Configuring general settings of Kaspersky Thin Client through the Web Console
In the Web Console, you can configure general settings for one device or for a group of devices running Kaspersky Thin Client.
How to configure general settings for one device
- In the main window of the Web Console, select Devices → Managed devices.
- Click the name of the device where Kaspersky Thin Client is running. You can view the device name in the control panel of the Kaspersky Thin Client interface. If the computer name is not on the list, add it to the Managed devices group. You can also manage devices that have not yet been added to the managed devices group by selecting Discovery & deployment → Unassigned devices.
If a managed device is added to an administration group and an enforced policy is configured for the settings of this group, the settings that were individually configured for this device will not be applied.
- In the window that opens, select the Applications tab.
- Click the name of the Kaspersky Security Management Suite web plug-in.
This opens a window containing information about Kaspersky Thin Client.
- Select the Application settings tab.
- Select the General section (see the figure below).

Window for configuring general settings through the Web Console for one device
- If you need to change the ID in the thin client name, click the Generate new ID button in the Device name block. The managed device for which you want to generate a new ID must be added to an administration group, and this group must have a configured and enforced policy for a group device naming rule.
The new ID in the thin client name will be created after the device is synchronized with Kaspersky Security Center.
- Click Save in the lower part of the window to save the changes.
How to configure general settings for a group of devices
- In the main window of the Web Console, select Devices → Policies & profiles.
- Click the policy name for the Kaspersky Security Management Suite web plug-in.
- In the window that opens, select the Application settings tab.
- Select the General section (see the figure below).
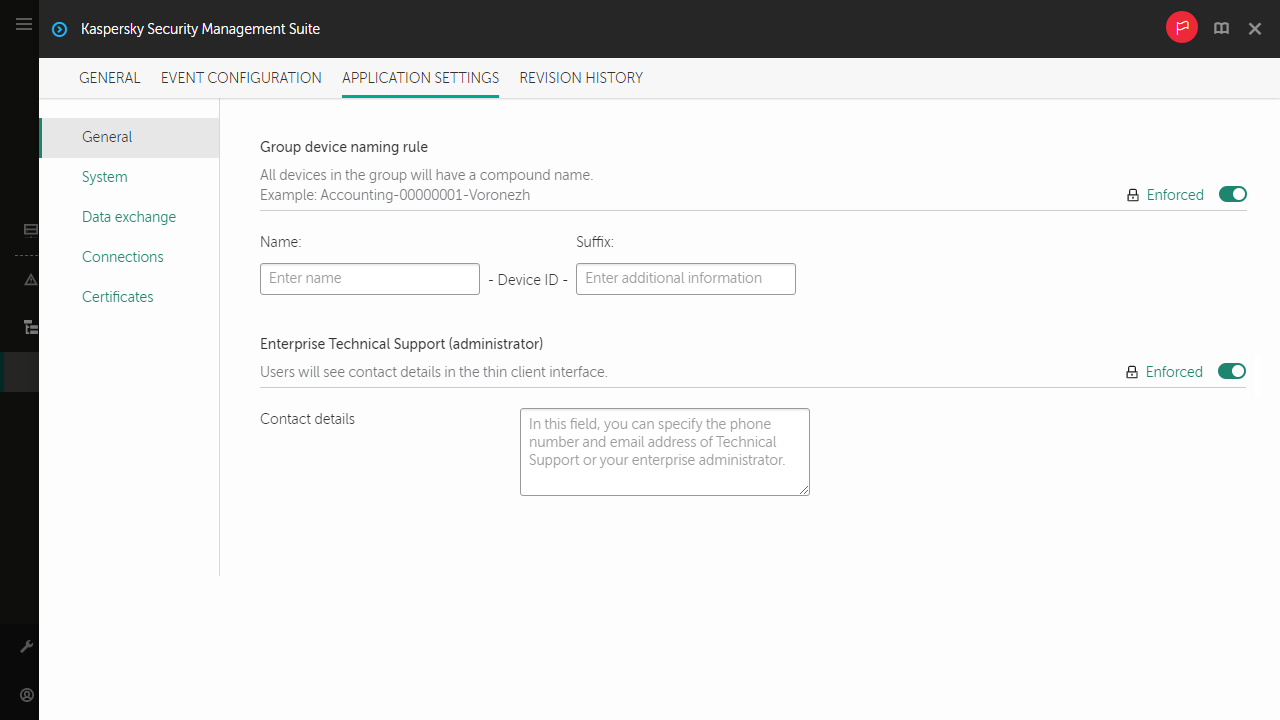
Window for configuring general settings through the Web Console for a group of devices
- If you need to specify a new name format for administration group devices, use the Group device naming rule block to indicate the new group name and additional information. You can use uppercase and lowercase letters of the Latin and Cyrillic alphabets, and special characters. A unique ID (eight characters) will be automatically generated for each device in the group. The number of characters in the device name must not exceed 30 characters.
- Move the toggle button located on the right in the Group device naming rule block to the Enforced position.
If the toggle button next to the name of a group of settings is in the Enforced position (
 ), the defined values of these settings are applied to devices on which the policy is applied, and these settings cannot be changed in the Kaspersky Thin Client interface. If the toggle button next to the name of a group of settings is in the Undefined position (
 ), the defined values of these settings are not applied to devices on which the policy is applied, and these settings can be changed for managed devices in the Kaspersky Thin Client interface under Devices → Managed devices.
 - If you need to add contact details for the Kaspersky Security Center administrator, enter the last name, first name, phone number and email address of the administrator in the Contact details field. The number of characters in this field must not exceed 80 characters.
The contact details of the Kaspersky Security Center administrator are visible to the user in the main window of Kaspersky Thin Client, in the windows for confirming a reset of Kaspersky Thin Client settings and data and confirming changes to Kaspersky Security Center connection settings, and when the certificate for connecting to Kaspersky Security Center is replaced.
- Move the toggle button located on the right in the Enterprise Technical Support (administrator) block to the Enforced position.
- Click Save in the lower part of the window to save the changes.