Contents
- Managing Kaspersky Thin Client through the Kaspersky Security Center Web Console
- About the Kaspersky Security Management Suite web plug-in
- Restricting access to functions of the Kaspersky Security Management Suite web plug-in
- Logging in and out of the Web Console
- Adding Kaspersky Thin Client to a group of managed devices
- Managing policies
- Configuring Kaspersky Thin Client settings through the Web Console
- Configuring general settings of Kaspersky Thin Client through the Web Console
- Configuring settings for connecting to a remote desktop via RDP through the Web Console
- Configuring settings for connecting to a remote desktop managed by Basis.WorkPlace through the Web Console
- Managing Kaspersky Thin Client power-saving mode through the Web Console
- Configuring the interface language and time zone of Kaspersky Thin Client through the Web Console
- Configuring synchronization between Kaspersky Thin Client and Kaspersky Security Center
- Configuring forwarding of Kaspersky Thin Client logs to a log server
- Confirming Kaspersky Thin Client user actions
- Managing Kaspersky Thin Client security certificates through the Web Console
- About the reserve certificate for connecting Kaspersky Thin Client to Kaspersky Security Center
- Creating a user certificate for connecting Kaspersky Thin Client to Kaspersky Security Center
- Uploading a reserve certificate and user certificate to the Web Console for connecting Kaspersky Thin Client to Kaspersky Security Center
- Adding new certificates in the Web Console
- Removing certificates from the Web Console
- Converting a certificate from PEM to DER format
- Monitoring Kaspersky Thin Client events through the Kaspersky Security Center Web Console
Managing Kaspersky Thin Client through the Kaspersky Security Center Web Console
The Kaspersky Security Center Web Console (hereinafter also referred to as simply "the Web Console") is a web application designed to let you centrally perform the main tasks for managing and maintaining the security system of an enterprise network. The Web Console is a Kaspersky Security Center component that provides a user interface. For detailed information about the Kaspersky Security Center Web Console, please refer to the Kaspersky Security Center Web Console Online Help Guide.
About the Kaspersky Security Management Suite web plug-in
The Kaspersky Security Management Suite web plug-in (hereinafter also referred to as "the web plug-in") is a specialized component that provides the capability to manage the operation of Kaspersky Thin Client through the Kaspersky Security Center Web Console. The web plug-in is included in the Kaspersky Thin Client distribution kit and facilitates interaction between Kaspersky Thin Client and Kaspersky Security Center.
The web plug-in lets you centrally perform the following operations:
- Manage Kaspersky Thin Client settings.
- Receive and view Kaspersky Thin Client events.
- Manage security certificates of Kaspersky Thin Client.
To enable interaction between Kaspersky Thin Client and Kaspersky Security Center, the following conditions must be met:
- When configuring Kaspersky Thin Client, you must specify the settings for connecting to Kaspersky Security Center.
- In the Kaspersky Security Center Web Console, you must install the Kaspersky Security Management Suite web plug-in.
Installing the Kaspersky Security Management Suite web plug-in
The Kaspersky Security Management Suite web plug-in is not installed in the Web Console by default. The web plug-in is included in the Kaspersky Thin Client distribution kit and must be installed on the computer that has the Kaspersky Security Center Web Console installed. You can view the list of installed web plug-ins in the Web Console interface (Console settings → Web plug-ins). Web plug-in functions are available to all administrators that have access to the Web Console in a browser, and you can restrict access to Kaspersky Security Management Suite functionality.
If you plan to use the default port to connect the thin client to Kaspersky Security Center, port 13292 must be available on the Kaspersky Security Center Administration Server. If you plan to use a port other than 13292, you must set the permissions accordingly. For details on port enabling on a Kaspersky Security Center Administration Server, see the Modifying the Mobile Device Management settings section of the Kaspersky Security Center Online Help Guide.
Kaspersky Security Center and the Kaspersky Security Center Web Console are not included in the Kaspersky Thin Client distribution kit. They must be installed separately.
To install the web plug-in in the Web Console:
- In the menu of the Web Console, select Console settings → Web plug-ins.
A list of available Web Console management plug-ins is displayed.
- Click the Add from file button.
- In the panel that opens on the right, add the following files:
- ZIP archive containing the web plug-in distribution package (plugin.zip) provided in the Kaspersky Thin Client distribution kit by clicking the Upload ZIP file button.
- Signature file (signature.txt) provided in the Kaspersky Thin Client distribution kit by clicking the Upload signature button.
- Click on the Add button.
- Please carefully read and accept the End User License Agreement.
- When installation of the web plug-in is complete, click OK.
The Kaspersky Security Management Suite web plug-in will be loaded in the default configuration and will appear in the list of Web Console management plug-ins.
Page topUpdating the Kaspersky Security Management Suite web plug-in
The Kaspersky Security Management Suite web plug-in can be updated only to a newer version.
You must first obtain the ZIP archive containing the distribution package for the new version of the web plug-in and the digital signature of the archive from Kaspersky experts.
To update the web plug-in in the Web Console:
- In the menu of the Web Console, select Console settings → Web plug-ins.
- In the displayed list of Web Console plug-ins, find Kaspersky Security Management Suite and click it.
- In the window that opens, click the Update from file button.
- In the panel that opens on the right, add the following files:
- ZIP archive containing the plug-in distribution package by clicking the Upload ZIP file button
- Digital signature file by clicking the Upload signature button
- Click Update.
- If a new End User License Agreement was created for the latest version of the plug-in, please carefully read and accept the new End User License Agreement.
- After the update is complete and you see a message confirming successful installation of the update, click OK.
The Kaspersky Security Management Suite web plug-in will be updated, and its version information and update time will be displayed in the table of plug-ins in the Web Console.
Removing the Kaspersky Security Management Suite web plug-in
The Kaspersky Security Management Suite web plug-in can be removed from the Web Console. After the web plug-in is removed, you will not be able to manage Kaspersky Thin Client through the Web Console interface.
To remove the Kaspersky Security Management Suite web plug-in from the Web Console:
- In the menu of the Web Console interface, select Console settings → Web plug-ins.
A list of available Web Console management plug-ins is displayed.
- In the list of management plug-ins, select the check box next to the Kaspersky Security Management Suite web plug-in.
- Click the Delete button.
- In the plug-in removal confirmation window that opens, do one of the following:
- If you need to save a backup copy of the plug-in, click OK.
A backup copy of the plug-in will be created. The Kaspersky Security Management Suite web plug-in will be removed from the Web Console.
- If you do not need to save a backup copy of the plug-in, click the Skip backup button.
The Kaspersky Security Management Suite web plug-in will be removed from the Web Console.
- If you need to save a backup copy of the plug-in, click OK.
- In the window containing information about plug-in removal that opens, click OK.
Restricting access to functions of the Kaspersky Security Management Suite web plug-in
If a Kaspersky Security Center user is not granted sufficient rights to access application functions, or the standard Kaspersky Security Center role is not assigned, the user cannot work in Kaspersky Security Center Web Console.
You can configure Kaspersky Security Center user rights to access application functions in the following ways:
- Configure rights of each user or user group separately.
- Create standard Kaspersky Security Center roles with preconfigured sets of rights and assign these roles to users depending on their duties.
A role is a preconfigured set of rights to access Kaspersky Security Management Suite functions, which you can assign to users. We recommend configuring role access rights according to typical tasks and duties of users. Once a user has been assigned a role, they gain access to the functions they require to fulfill their duties.
For details on configuring role-based access, see the Configuring access rights to application features. Role-based access control section of the Kaspersky Security Center Online Help Guide.
In addition to the standard Kaspersky Security Center roles, you can also assign users the following standard roles for managing Kaspersky Thin Client functions:
- Security Officer. This role has permissions to view all sections of Kaspersky Security Management Suite and to manage Kaspersky Thin Client certificates. You can assign this role to an employee in charge of the information security in your enterprise.
- Administrator. This role has permissions to view all sections of Kaspersky Security Management Suite and manage remote desktop connection settings, general settings, system settings, and Kaspersky Thin Client data. You can assign this role to an employee responsible for supporting and administering information systems in your organization.
- Advanced administrator. This role has permissions to view and manage all sections of Kaspersky Security Management Suite and manage certificates, remote desktop connection settings, general settings, system settings, and Kaspersky Thin Client data. You can assign this role to an employee who is responsible for supporting and administering information systems in your organization, and is in charge of the information security in your organization.
The table below describes the functions available to a user depending on their assigned role for managing Kaspersky Thin Client. For functions marked with the ![]() icon, the corresponding Kaspersky Thin Client settings can be changed through the Web Console. All roles can view the Kaspersky Thin Client settings pertaining to all functions through the Web Console.
icon, the corresponding Kaspersky Thin Client settings can be changed through the Web Console. All roles can view the Kaspersky Thin Client settings pertaining to all functions through the Web Console.
Kaspersky Thin Client management functions available in the Web Console depending on the user role
Function |
Security Officer |
Administrator |
Advanced administrator |
|---|---|---|---|
Managing certificates in a Kaspersky Security Management Suite policy |
|
– |
|
Configuring settings for connecting to remote desktops in a Kaspersky Security Management Suite policy |
– |
|
|
Configuring general settings in a Kaspersky Security Management Suite policy |
– |
|
|
Managing system settings in a Kaspersky Security Management Suite policy |
– |
|
|
Managing Kaspersky Thin Client data in a Kaspersky Security Management Suite policy |
– |
|
|
Logging in and out of the Web Console
To log in to the Web Console, you need to ask the administrator for the web address of the Kaspersky Security Center Administration Server and the port number that were specified during installation (port 8080 is used by default). You must also enable JavaScript in your browser.
To log in to the Web Console:
- In your browser, go to
https://<Administration Server address>:<Port number>. For the Kaspersky Security Center Web Console browser requirements, please refer to the Hardware and software requirements section of the Kaspersky Security Center Web Console Online Help Guide.The login page opens.
- Log in using the user name and password of a local administrator.
If the Administration Server does not respond or you entered incorrect account credentials, an error message will be displayed.
After logging in, the Dashboard appears displaying the last language and theme that were used. If you are logging in to the Web Console for the first time, the Quick Start Wizard starts. For additional information about how the Kaspersky Security Center Web Console works, please refer to the Kaspersky Security Center Web Console Online Help Guide.
To log out of the Web Console:
- In the lower-right corner of the screen, click the user name.
- In the menu that opens, select Sign out.
The Web Console closes, and the login page is displayed.
Page topAdding Kaspersky Thin Client to a group of managed devices
You must add Kaspersky Thin Client to a group of managed devices when connecting it to the Web Console for the first time.
To add Kaspersky Thin Client to a group of managed devices:
- In the main window of the Web Console, select Discovery & deployment → Unassigned devices.
The list of all detected unassigned devices will be displayed.
- Select the check box next to the name of the device that you want to add to the group of managed devices.
- Click the Move to group button.
The Move to group panel opens on the right. Select the check box next to the Managed devices administration group.
- Click the Move button.
Kaspersky Thin Client will be added to the group of managed devices of the Web Console.
Page topManaging policies
A policy is a collection of Kaspersky Thin Client operating settings defined for an
. You can configure multiple policies with different values for one device. For different administration groups, the settings of the application may be different. Each administration group can create its own policy for the application. For more detailed information on using Kaspersky Security Center policies to manage the application, please refer to the Policies and policy profiles section of the Kaspersky Security Center Online Help Guide.Policy settings are configured in the Kaspersky Security Center Web Console by using the web plug-in and are transmitted to Kaspersky Thin Client when the application synchronizes with Kaspersky Security Center. The synchronization period can be changed in the policy settings.
Active and inactive policy
A policy is intended for a group of managed devices and can be active or inactive. The settings of an active policy are saved on client devices during synchronization. You cannot simultaneously apply multiple policies to one device, therefore only one policy can be active in each group.
You can create an unlimited number of inactive policies. An inactive policy does not affect application settings on devices in the network. Inactive policies are intended as preparations for emergency situations, such as a virus attack. If there is an attack via flash drives, you can activate a policy that blocks access to flash drives. In this case, the active policy automatically becomes inactive.
Settings inheritance
Policies, like administration groups, have a hierarchy. By default, a child policy inherits the settings from the parent policy. A child policy is a policy for nested hierarchy levels. In other words, it is a policy for nested administration groups and secondary Administration Servers. You can turn off inheritance of settings from the parent policy.
Each policy setting has the ![]() attribute, which indicates if the settings can be modified in policies or in the local application settings. Depending on the status of this attribute, one of the following values is displayed next to a setting:
attribute, which indicates if the settings can be modified in policies or in the local application settings. Depending on the status of this attribute, one of the following values is displayed next to a setting:
 Undefined. If an open lock icon is displayed next to a setting and the toggle button is disabled, this setting is not defined in the policy. A user can change these settings in the local interface of the Kaspersky application. These settings are referred to as unlocked.
 Enforced. If a closed lock icon is displayed next to a setting and the toggle button is enabled, this setting is applied to devices on which the policy is applied. A user cannot change the values of these settings in the local interface of the Kaspersky application. These settings are referred to as locked.
The ![]() attribute applies for a child policy only if inheritance of the parent policy settings is enabled for the child policy.
attribute applies for a child policy only if inheritance of the parent policy settings is enabled for the child policy.
Policy creation
To manage a group of devices running Kaspersky Thin Client through the Web Console, you must create a policy.
To create a policy for a group of devices:
- In the main window of the Web Console, select Devices → Policies & profiles.
- Click on the Add button.
- From the list of applications in the window that opens, select Kaspersky Security Management Suite and click Next.
- In the new policy configuration window, on the General tab, specify the following settings:
- In the Name field, enter the policy name. By default, the field displays the Kaspersky Thin Client management web plug-in name as Kaspersky Security Management Suite.
- In the Policy status block, select one of the following statuses: Active, Inactive, Out-of-office. The default status is Active.
- If you need to configure inheritance of policy settings, configure the following settings in the Settings inheritance block:
- Enable or disable the Inherit settings from parent policy option.
- Enable or disable the Force inheritance of settings in child policies option.
- Click the Save button in the lower part of the page.
The policy will be created and will appear in the list of policies of the Web Console.
Page topEditing a policy
You can edit a previously created policy for a group of devices running Kaspersky Thin Client.
To change a policy:
- In the main window of the Web Console, select Devices → Policies & profiles.
- Select the policy that you need to edit.
- In the policy configuration window that opens, define the following settings on the General tab:
- If necessary, enter a new policy name in the Name field.
- If you need to change the policy status, use the Policy status block to select one of the following statuses: Active, Inactive, Out-of-office.
- If you need to configure inheritance of policy settings, configure the following settings in the Settings inheritance block:
- Enable or disable the Inherit settings from parent policy option.
- Enable or disable the Force inheritance of settings in child policies option.
- Click the Save button in the lower part of the page.
The changes made to the policy will be saved and displayed in the policy properties in the Revision history section.
Page topConfiguring Kaspersky Thin Client settings through the Web Console
This section contains information about configuring Kaspersky Thin Client settings through the Web Console.
Configuring general settings of Kaspersky Thin Client through the Web Console
In the Web Console, you can configure general settings for one device or for a group of devices running Kaspersky Thin Client.
How to configure general settings for one device
- In the main window of the Web Console, select Devices → Managed devices.
- Click the name of the device where Kaspersky Thin Client is running. You can view the device name in the control panel of the Kaspersky Thin Client interface. If the computer name is not on the list, add it to the Managed devices group. You can also manage devices that have not yet been added to the managed devices group by selecting Discovery & deployment → Unassigned devices.
If a managed device is added to an administration group and an enforced policy is configured for the settings of this group, the settings that were individually configured for this device will not be applied.
- In the window that opens, select the Applications tab.
- Click the name of the Kaspersky Security Management Suite web plug-in.
This opens a window containing information about Kaspersky Thin Client.
- Select the Application settings tab.
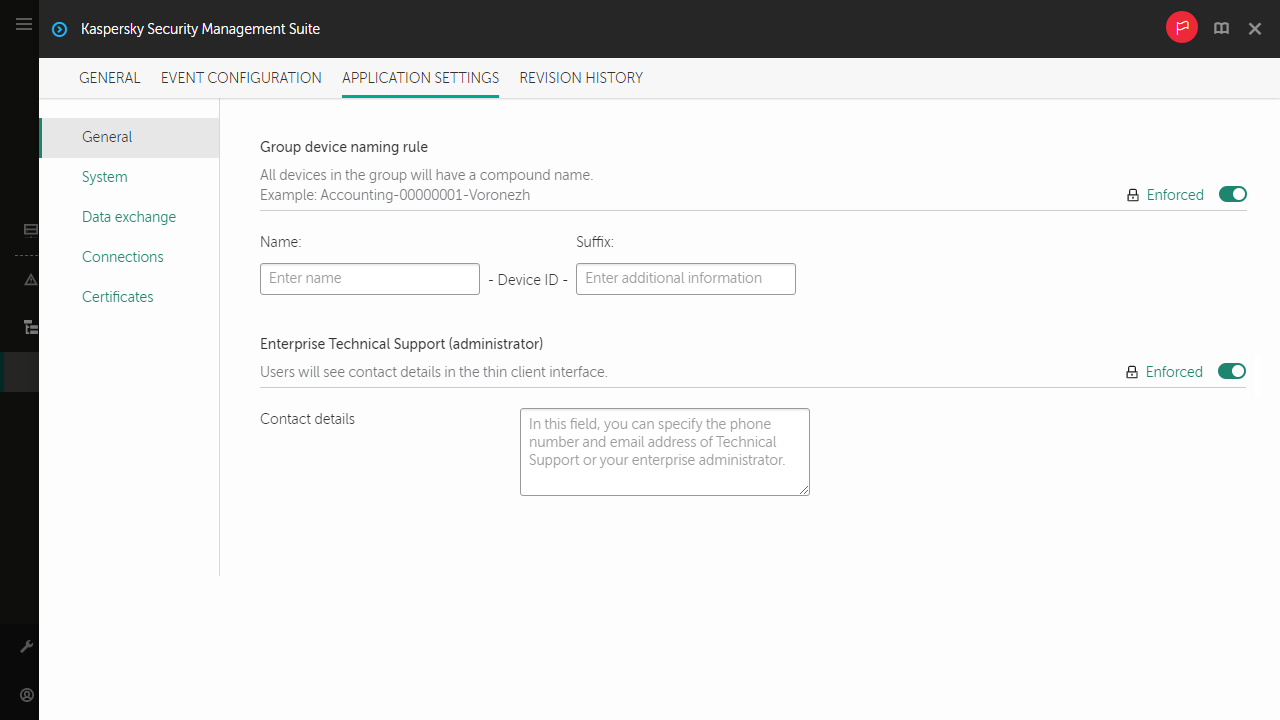
- Select the General section (see the figure below).

Window for configuring general settings through the Web Console for one device
- If you need to change the ID in the thin client name, click the Generate new ID button in the Device name block. The managed device for which you want to generate a new ID must be added to an administration group, and this group must have a configured and enforced policy for a group device naming rule.
The new ID in the thin client name will be created after the device is synchronized with Kaspersky Security Center.
- Click Save in the lower part of the window to save the changes.
How to configure general settings for a group of devices
- In the main window of the Web Console, select Devices → Policies & profiles.
- Click the policy name for the Kaspersky Security Management Suite web plug-in.
- In the window that opens, select the Application settings tab.
- Select the General section (see the figure below).
Window for configuring general settings through the Web Console for a group of devices
- If you need to specify a new name format for administration group devices, use the Group device naming rule block to indicate the new group name and additional information. You can use uppercase and lowercase letters of the Latin and Cyrillic alphabets, and special characters. A unique ID (eight characters) will be automatically generated for each device in the group. The number of characters in the device name must not exceed 30 characters.
- Move the toggle button located on the right in the Group device naming rule block to the Enforced position.
If the toggle button next to the name of a group of settings is in the Enforced position (
), the defined values of these settings are applied to devices on which the policy is applied, and these settings cannot be changed in the Kaspersky Thin Client interface. If the toggle button next to the name of a group of settings is in the Undefined position (), the defined values of these settings are not applied to devices on which the policy is applied, and these settings can be changed for managed devices in the Kaspersky Thin Client interface under Devices → Managed devices. - If you need to add contact details for the Kaspersky Security Center administrator, enter the last name, first name, phone number and email address of the administrator in the Contact details field. The number of characters in this field must not exceed 80 characters.
The contact details of the Kaspersky Security Center administrator are visible to the user in the main window of Kaspersky Thin Client, in the windows for confirming a reset of Kaspersky Thin Client settings and data and confirming changes to Kaspersky Security Center connection settings, and when the certificate for connecting to Kaspersky Security Center is replaced.
- Move the toggle button located on the right in the Enterprise Technical Support (administrator) block to the Enforced position.
- Click Save in the lower part of the window to save the changes.
Configuring settings for connecting to a remote desktop via RDP through the Web Console
You can use the Web Console to configure settings for connecting to remote desktops via RDP for one device or group of devices running Kaspersky Thin Client.
How to configure settings for connecting to remote desktops via RDP for one device
- In the main window of the Web Console, select Devices → Managed devices.
- Click the name of the device where Kaspersky Thin Client is running. You can view the device name in the control panel of the Kaspersky Thin Client interface. If the computer name is not on the list, add it to the Managed devices group. You can also manage devices that have not yet been added to the managed devices group by selecting Discovery & deployment → Unassigned devices.
If a managed device is added to an administration group and an enforced policy is configured for the settings of this group, the settings that were individually configured for this device will not be applied.
- In the window that opens, select the Applications tab.
- Click the name of the Kaspersky Security Management Suite web plug-in.
This opens a window containing information about Kaspersky Thin Client.
- Select the Application settings tab.
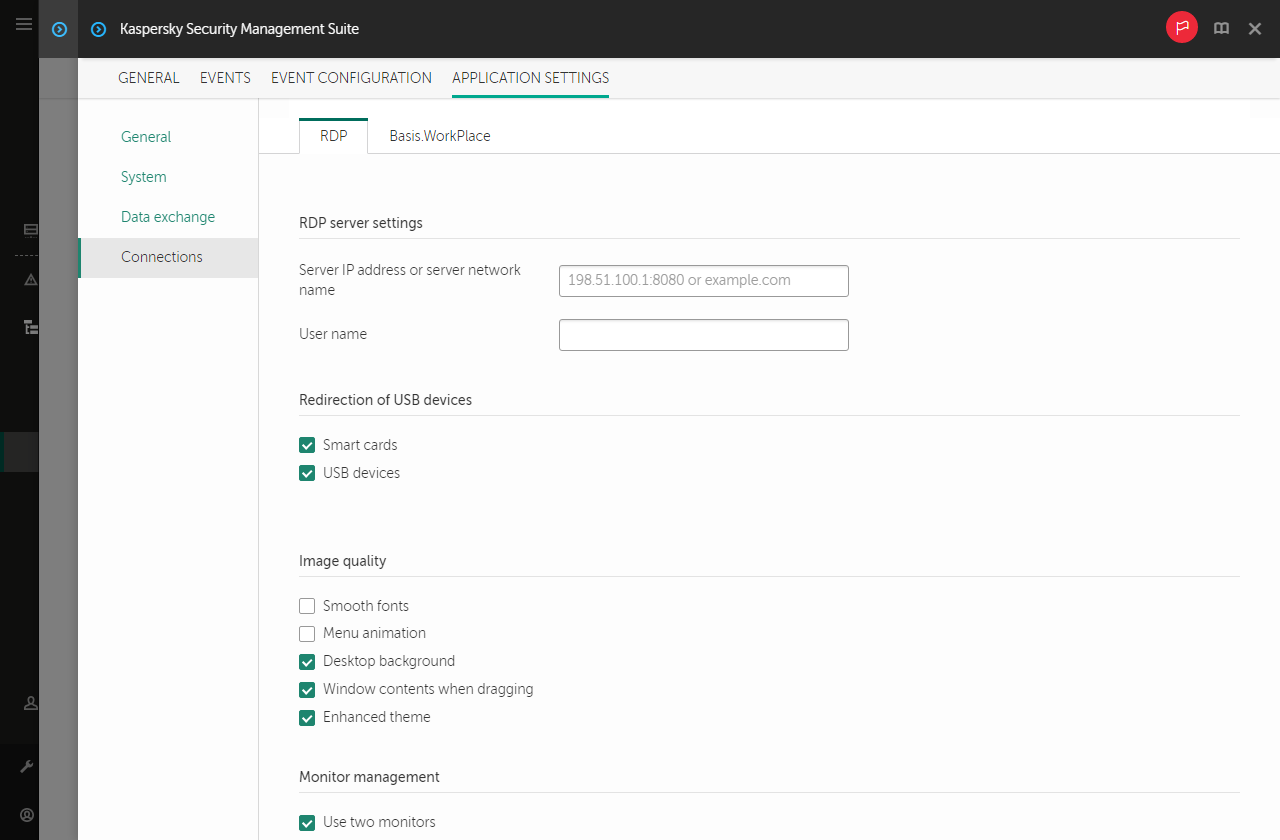
- Select Connections → RDP.
This opens a window in which you can configure settings for connecting to a remote desktop via RDP (see the figure below).
Window for configuring settings for connecting to a remote desktop via RDP through the Web Console for one device
- In the Server IP address or server network name field, enter the IP address or server name for connecting to a remote desktop via RDP.
- In the User name field, enter user account name that will be used to connect to the remote desktop via RDP.
- In the Redirection of USB devices settings block, select the check boxes next to the devices connected to Kaspersky Thin Client via USB that you need to pass through to the remote desktop:
- The Smart cards check box enables or disables redirection of smart cards and tokens.
- The USB devices check box enables or disables redirection of USB devices.
- In the Image quality block, select the check boxes next to the remote desktop graphics settings that you need to use:
- Smooth fonts
- Menu animation
- Desktop background
- Window contents when dragging
- Enhanced theme
Enabling remote desktop display settings may affect the speed of Kaspersky Thin Client operations.
- If two monitors are installed at your workstation and you want a remote desktop image to be displayed on both monitors, select the Use two monitors check box in the Monitor management block.
- Click Save in the lower part of the window to save the changes.
How to configure settings for connecting to remote desktops via RDP for a group of devices
- In the main window of the Web Console, select Devices → Policies & profiles.
- Click the policy name for the Kaspersky Security Management Suite web plug-in.
- In the window that opens, select the Application settings tab.
- Select Connections → RDP.
This opens a window in which you can configure settings for connecting to a remote desktop via RDP (see the figure below).

Window for configuring settings for connecting to a remote desktop via RDP through the Web Console for a group of devices
- In the Server IP address or server network name field, enter the IP address or server name for connecting to a remote desktop via RDP.
- In the Redirection of USB devices settings block, select the check boxes next to the devices connected to Kaspersky Thin Client via USB that you need to pass through to the remote desktop:
- The Smart cards check box enables or disables redirection of smart cards and tokens.
- The USB devices check box enables or disables redirection of USB devices.
- In the Image quality block, select the check boxes next to the remote desktop graphics settings that you need to use:
- Smooth fonts
- Menu animation
- Desktop background
- Window contents when dragging
- Enhanced theme
Enabling remote desktop display settings may affect the speed of Kaspersky Thin Client operations.
- Click Save in the lower part of the window to save the changes.
If the toggle button next to the name of a group of settings is in the Enforced position (![]() ), the defined values of these settings are applied to devices on which the policy is applied, and these settings cannot be changed in the Kaspersky Thin Client interface. If the toggle button next to the name of a group of settings is in the Undefined position (
), the defined values of these settings are applied to devices on which the policy is applied, and these settings cannot be changed in the Kaspersky Thin Client interface. If the toggle button next to the name of a group of settings is in the Undefined position (![]() ), the defined values of these settings are not applied to devices on which the policy is applied, and these settings can be changed for managed devices in the Kaspersky Thin Client interface under Devices → Managed devices.
), the defined values of these settings are not applied to devices on which the policy is applied, and these settings can be changed for managed devices in the Kaspersky Thin Client interface under Devices → Managed devices.
Configuring settings for connecting to a remote desktop managed by Basis.WorkPlace through the Web Console
You can use the Web Console to configure settings for connecting to a remote desktop managed by Basis.WorkPlace for one device or group of devices running Kaspersky Thin Client.
- In the main window of the Web Console, select Devices → Managed devices.
- Click the name of the device where Kaspersky Thin Client is running. You can view the device name in the control panel of the Kaspersky Thin Client interface. If the computer name is not on the list, add it to the Managed devices group. You can also manage devices that have not yet been added to the managed devices group by selecting Discovery & deployment → Unassigned devices.
If a managed device is added to an administration group and an enforced policy is configured for the settings of this group, the settings that were individually configured for this device will not be applied.
- In the window that opens, select the Applications tab.
- Click the name of the Kaspersky Security Management Suite web plug-in.
This opens a window containing information about Kaspersky Thin Client.
- Select the Application settings tab.
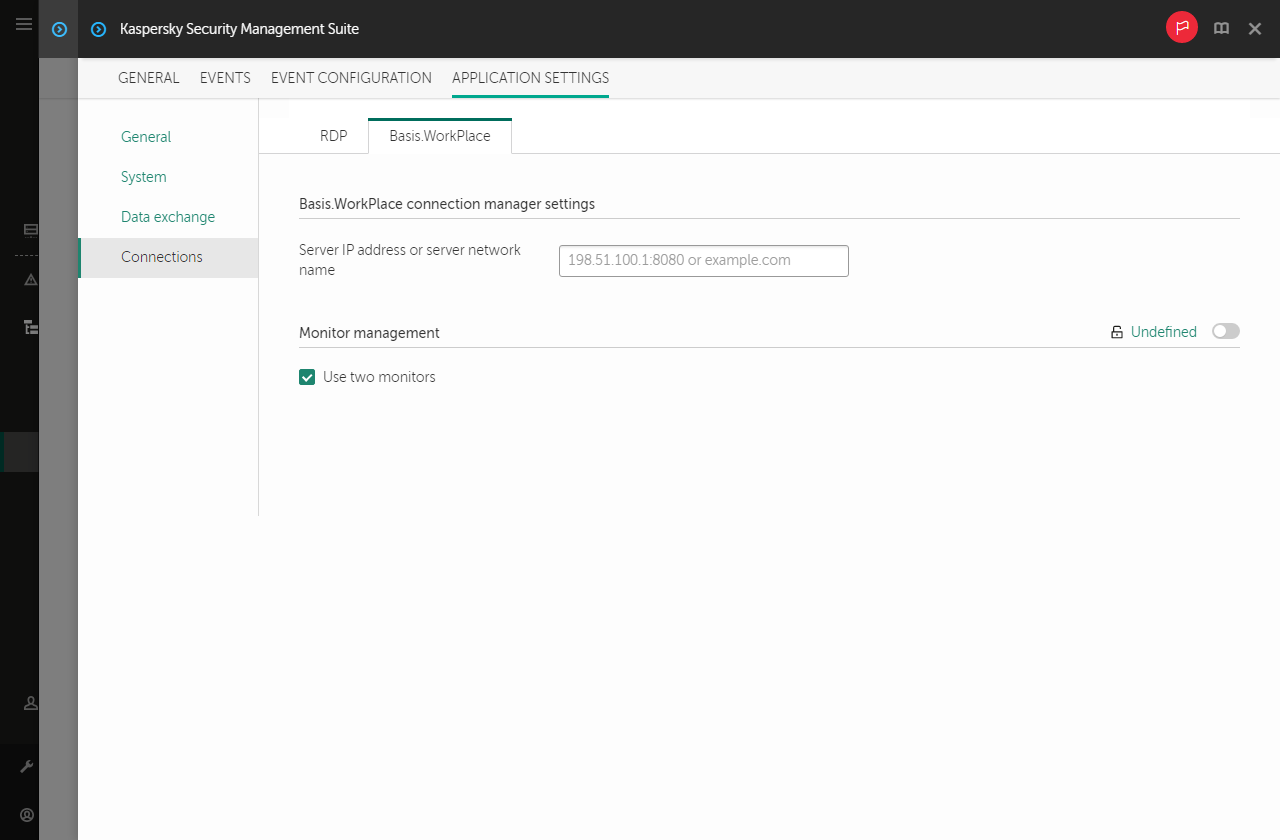
- Select Connections → Basis.WorkPlace.
This opens a window in which you can configure settings for connecting to a remote desktop managed by Basis.WorkPlace (see the figure below).
Window for configuring settings for connecting to a remote desktop managed by Basis.WorkPlace through the Web Console for one device
- In the Server IP address or server network name field, enter the IP address or server name for connecting to a remote desktop managed by Basis.WorkPlace.
- If two monitors are installed at your workstation and you want a remote desktop image to be displayed on both monitors, select the Use two monitors check box in the Monitor management block.
- Click Save in the lower part of the window to save the changes.
- In the main window of the Web Console, select Devices → Policies & profiles.
- Click the policy name for the Kaspersky Security Management Suite web plug-in.
- In the window that opens, select the Application settings tab.
- Select Connections → Basis.WorkPlace.
This opens a window in which you can configure settings for connecting to a remote desktop managed by Basis.WorkPlace (see the figure below).
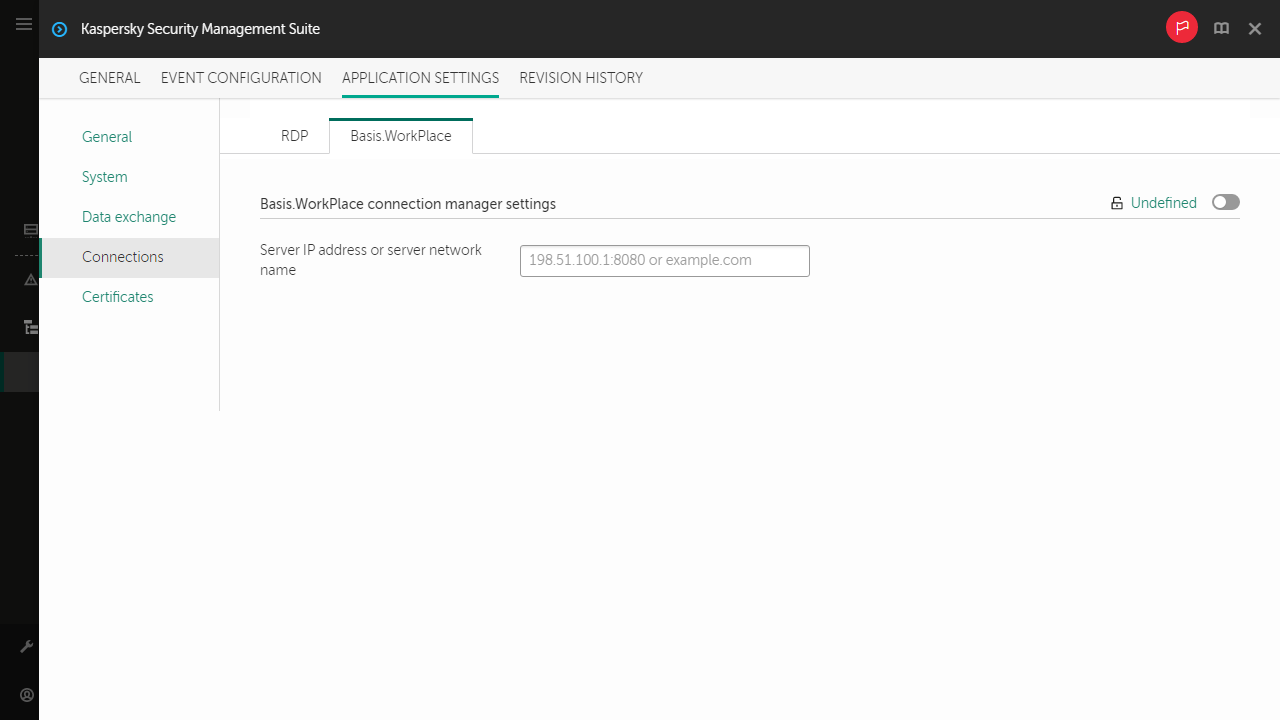
Window for configuring settings for connecting to a remote desktop managed by Basis.WorkPlace through the Web Console for a group of devices
- In the Server IP address or server network name field, enter the IP address or server name for connecting to a remote desktop managed by Basis.WorkPlace.
- Click Save in the lower part of the window to save the changes.
If the toggle button next to the name of a group of settings is in the Enforced position (![]() ), the defined values of these settings are applied to devices on which the policy is applied, and these settings cannot be changed in the Kaspersky Thin Client interface. If the toggle button next to the name of a group of settings is in the Undefined position (
), the defined values of these settings are applied to devices on which the policy is applied, and these settings cannot be changed in the Kaspersky Thin Client interface. If the toggle button next to the name of a group of settings is in the Undefined position (![]() ), the defined values of these settings are not applied to devices on which the policy is applied, and these settings can be changed for managed devices in the Kaspersky Thin Client interface under Devices → Managed devices.
), the defined values of these settings are not applied to devices on which the policy is applied, and these settings can be changed for managed devices in the Kaspersky Thin Client interface under Devices → Managed devices.
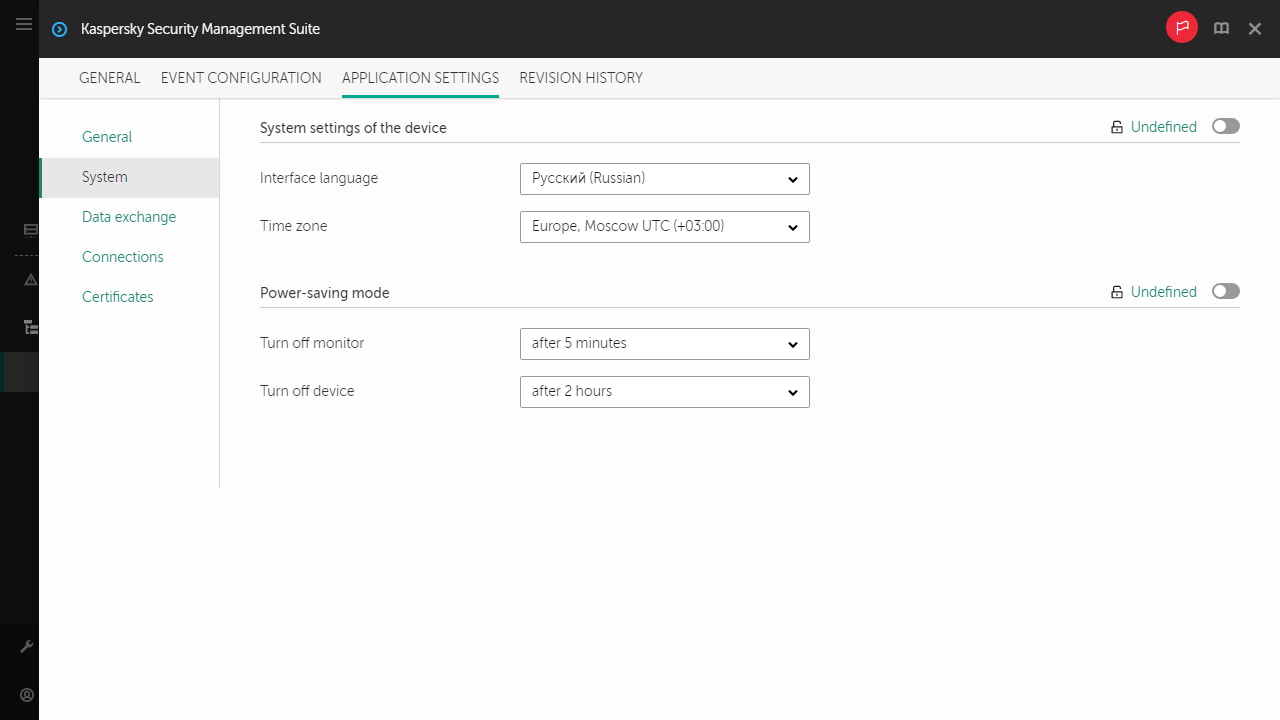
Managing Kaspersky Thin Client power-saving mode through the Web Console
In the Web Console, you can configure power-saving mode for one device or for a group of devices running Kaspersky Thin Client.
How to configure power-saving mode for one device
- In the main window of the Web Console, select Devices → Managed devices.
- Click the name of the device where Kaspersky Thin Client is running. You can view the device name in the control panel of the Kaspersky Thin Client interface. If the computer name is not on the list, add it to the Managed devices group. You can also manage devices that have not yet been added to the managed devices group by selecting Discovery & deployment → Unassigned devices.
If a managed device is added to an administration group and an enforced policy is configured for the settings of this group, the settings that were individually configured for this device will not be applied.
- In the window that opens, select the Applications tab.
- Click the name of the Kaspersky Security Management Suite web plug-in.
This opens a window containing information about Kaspersky Thin Client.
- Select the Application settings tab.
- Select the System section (see the figure below).
Window for configuring power-saving mode through the Web Console for one device
- In the Power-saving mode block, configure the following settings:
- In the Turn off monitor drop-down list, select the system inactivity period after which the monitor will be switched to power-saving mode.
- In the Turn off device drop-down list, select the system inactivity period after which the thin client will be turned off.
- Click Save in the lower part of the window to save the changes.
After Kaspersky Thin Client is synchronized with Kaspersky Security Center, the power-saving mode settings will be applied to Kaspersky Thin Client.
How to configure power-saving mode for a group of devices
- In the main window of the Web Console, select Devices → Policies & profiles.
- Click the policy name for the Kaspersky Security Management Suite web plug-in.
- In the window that opens, select the Application settings tab.
- Select the System section (see the figure below).
Window for configuring power-saving mode through the Web Console for a group of devices
- In the Power-saving mode block, configure the following settings:
- In the Turn off monitor drop-down list, select the system inactivity period after which the monitor will be switched to power-saving mode.
- In the Turn off device drop-down list, select the system inactivity period after which the thin client will be turned off.
- Click Save in the lower part of the window to save the changes.
After all devices of an administration group are synchronized with Kaspersky Security Center, the power-saving mode settings will be applied to all Kaspersky Thin Clients included in this group.
If the toggle button next to the name of a group of settings is in the Enforced position (![]() ), the defined values of these settings are applied to devices on which the policy is applied, and these settings cannot be changed in the Kaspersky Thin Client interface. If the toggle button next to the name of a group of settings is in the Undefined position (
), the defined values of these settings are applied to devices on which the policy is applied, and these settings cannot be changed in the Kaspersky Thin Client interface. If the toggle button next to the name of a group of settings is in the Undefined position (![]() ), the defined values of these settings are not applied to devices on which the policy is applied, and these settings can be changed for managed devices in the Kaspersky Thin Client interface under Devices → Managed devices.
), the defined values of these settings are not applied to devices on which the policy is applied, and these settings can be changed for managed devices in the Kaspersky Thin Client interface under Devices → Managed devices.
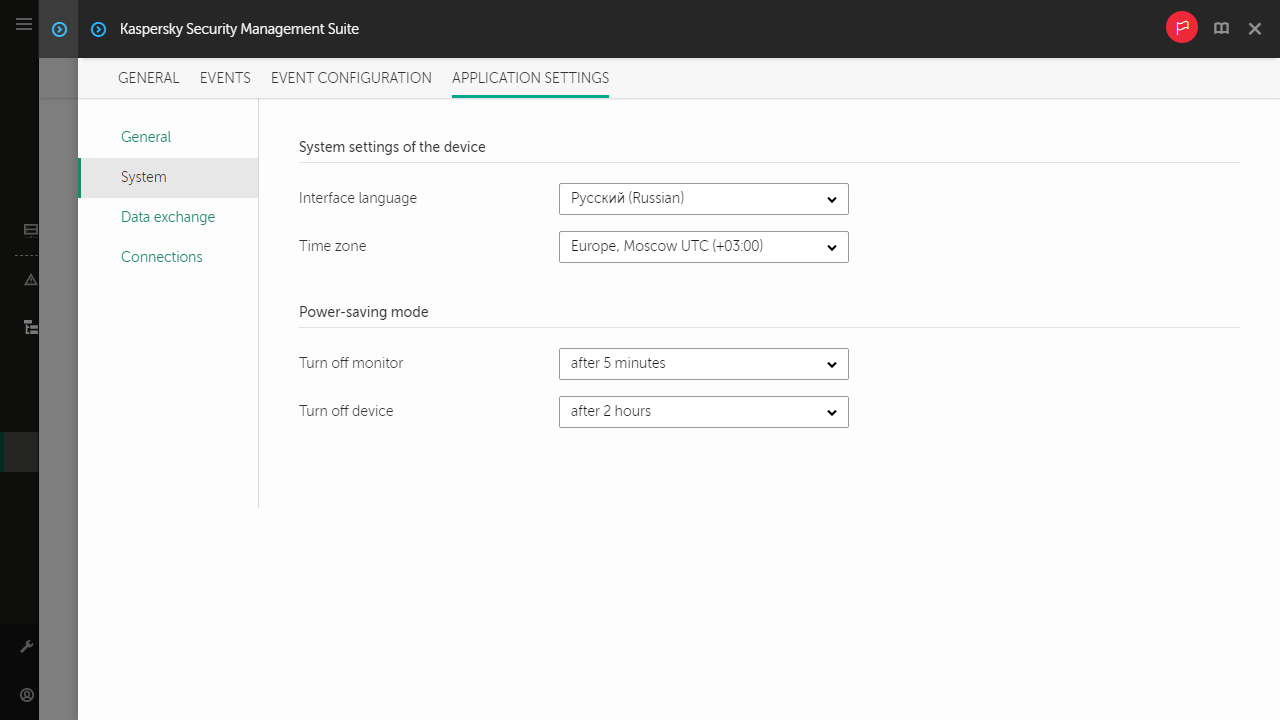
Configuring the interface language and time zone of Kaspersky Thin Client through the Web Console
In the Web Console, you can configure the interface language and time zone for one device or for a group of devices running Kaspersky Thin Client.
How to configure the interface language and time zone for one device
- In the main window of the Web Console, select Devices → Managed devices.
- Click the name of the device where Kaspersky Thin Client is running. You can view the device name in the control panel of the Kaspersky Thin Client interface. If the computer name is not on the list, add it to the Managed devices group. You can also manage devices that have not yet been added to the managed devices group by selecting Discovery & deployment → Unassigned devices.
If a managed device is added to an administration group and an enforced policy is configured for the settings of this group, the settings that were individually configured for this device will not be applied.
- In the window that opens, select the Applications tab.
- Click the name of the Kaspersky Security Management Suite web plug-in.
This opens a window containing information about Kaspersky Thin Client.
- Select the Application settings tab.
- Select the System section (see the figure below).
Window for configuring the interface language and time zone through the Web Console for one device
- In the System settings of the device block, select the relevant values from the Interface language and Time zone drop-down lists.
- Click Save in the lower part of the window to save the changes.
How to configure the interface language and time zone for a group of devices
- In the main window of the Web Console, select Devices → Policies & profiles.
- Click the policy name for the Kaspersky Security Management Suite web plug-in.
- In the window that opens, select the Application settings tab.
- Select the System section (see the figure below).
Window for configuring the interface language and time zone through the Web Console for a group of devices
- In the System settings of the device block, select the relevant values from the Interface language and Time zone drop-down lists.
- Click Save in the lower part of the window to save the changes.
If the toggle button next to the name of a group of settings is in the Enforced position (![]() ), the defined values of these settings are applied to devices on which the policy is applied, and these settings cannot be changed in the Kaspersky Thin Client interface. If the toggle button next to the name of a group of settings is in the Undefined position (
), the defined values of these settings are applied to devices on which the policy is applied, and these settings cannot be changed in the Kaspersky Thin Client interface. If the toggle button next to the name of a group of settings is in the Undefined position (![]() ), the defined values of these settings are not applied to devices on which the policy is applied, and these settings can be changed for managed devices in the Kaspersky Thin Client interface under Devices → Managed devices.
), the defined values of these settings are not applied to devices on which the policy is applied, and these settings can be changed for managed devices in the Kaspersky Thin Client interface under Devices → Managed devices.
Configuring synchronization between Kaspersky Thin Client and Kaspersky Security Center
In the Web Console, you can configure synchronization with Kaspersky Security Center only for a group of devices running Kaspersky Thin Client.
To configure synchronization between Kaspersky Thin Client and Kaspersky Security Center:
- In the main window of the Web Console, select Devices → Policies & profiles.
- Click the policy name for the Kaspersky Security Management Suite web plug-in.
- In the window that opens, select the Application settings tab.
- Select the Data exchange section (see the figure below).
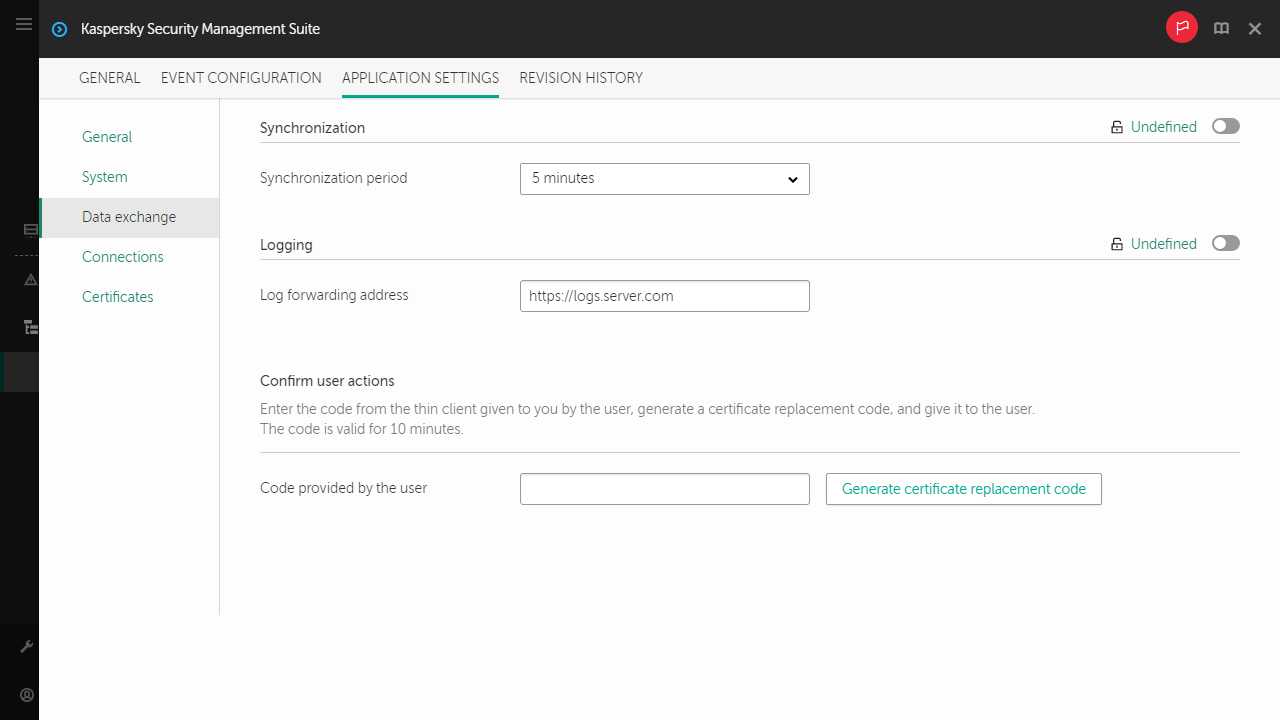
Window for configuring synchronization between Kaspersky Thin Client and Kaspersky Security Center
- In the Synchronization period field, specify the interval for synchronizing Kaspersky Thin Client with Kaspersky Security Center.
- Click Save in the lower part of the window to save the changes.
If the toggle button next to the name of a group of settings is in the Enforced position (![]() ), the defined values of these settings are applied to devices on which the policy is applied, and these settings cannot be changed in the Kaspersky Thin Client interface. If the toggle button next to the name of a group of settings is in the Undefined position (
), the defined values of these settings are applied to devices on which the policy is applied, and these settings cannot be changed in the Kaspersky Thin Client interface. If the toggle button next to the name of a group of settings is in the Undefined position (![]() ), the defined values of these settings are not applied to devices on which the policy is applied, and these settings can be changed for managed devices in the Kaspersky Thin Client interface under Devices → Managed devices.
), the defined values of these settings are not applied to devices on which the policy is applied, and these settings can be changed for managed devices in the Kaspersky Thin Client interface under Devices → Managed devices.
Configuring forwarding of Kaspersky Thin Client logs to a log server
In the Web Console, you can configure forwarding of Kaspersky Thin Client logs to a log server for one device or for a group of devices running Kaspersky Thin Client.
How to configure forwarding of logs for one device
- In the main window of the Web Console, select Devices → Managed devices.
- Click the name of the device where Kaspersky Thin Client is running. You can view the device name in the control panel of the Kaspersky Thin Client interface. If the computer name is not on the list, add it to the Managed devices group. You can also manage devices that have not yet been added to the managed devices group by selecting Discovery & deployment → Unassigned devices.
If a managed device is added to an administration group and an enforced policy is configured for the settings of this group, the settings that were individually configured for this device will not be applied.
- In the window that opens, select the Applications tab.
- Click the name of the Kaspersky Security Management Suite web plug-in.
This opens a window containing information about Kaspersky Thin Client.
- Select the Application settings tab.
- Select the Data exchange section (see the figure below).
Window for configuring forwarding of Kaspersky Thin Client logs through the Web Console for one device
- In the Log forwarding address field, enter the address of the destination log server in the format https://<server address>. Make sure that a log server compliant with the requirements is deployed in the enterprise infrastructure.
- Click Save in the lower part of the window to save the changes.
How to configure forwarding of logs for a group of devices
- In the main window of the Web Console, select Devices → Policies & profiles.
- Click the policy name for the Kaspersky Security Management Suite web plug-in.
- In the window that opens, select the Application settings tab.
- Select the Data exchange section (see the figure below).
Window for configuring forwarding of Kaspersky Thin Client logs through the Web Console for a group of devices
- In the Log forwarding address field, enter the address of the destination log server in the format https://<server address>. Make sure that a log server compliant with the requirements is deployed in the enterprise infrastructure.
- Click Save in the lower part of the window to save the changes.
Confirming Kaspersky Thin Client user actions
The following user actions require confirmation from the Kaspersky Security Center administrator:
- changing settings for connecting to Kaspersky Security Center
- changing certificates for connecting to Kaspersky Security Center
- resetting all settings and data of a thin client
To confirm the change of settings for connecting to Kaspersky Security Center or reset of all thin client settings:
- In the main window of the Web Console, select Devices → Managed devices.
- Click the name of the device where Kaspersky Thin Client is running. You can view the device name in the control panel of the Kaspersky Thin Client interface. If the computer name is not on the list, add it to the Managed devices group. You can also manage devices that have not yet been added to the managed devices group by selecting Discovery & deployment → Unassigned devices.
If a managed device is added to an administration group and an enforced policy is configured for the settings of this group, the settings that were individually configured for this device will not be applied.
- In the window that opens, select the Applications tab.
- Click the name of the Kaspersky Security Management Suite web plug-in.
This opens a window containing information about Kaspersky Thin Client.
- Select the Application settings tab.
- Select the Data exchange section (see the figure below).
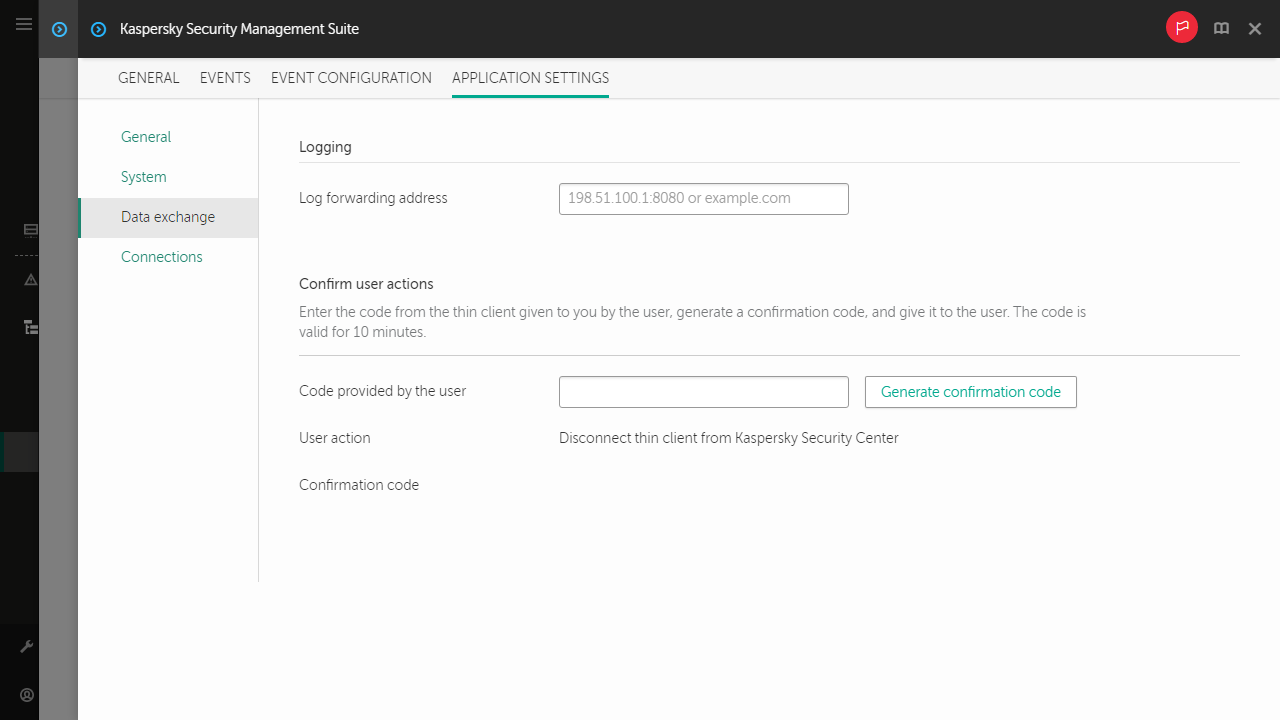
Window for confirming changes to Kaspersky Security Center connection settings
- In the Confirm user actions block, enter the code from the Kaspersky Thin Client interface which the user sent you and click Generate confirmation code.
A confirmation code will be created and displayed in the Confirm user actions block.
- Send the confirmation code to the Kaspersky Thin Client user.
To confirm the change of the certificate for connecting to Kaspersky Security Center:
- In the main window of the Web Console, select Devices → Policies & profiles.
- Click the policy name for the Kaspersky Security Management Suite web plug-in.
- In the window that opens, select the Application settings tab.
- Select the Data exchange section (see the figure below).
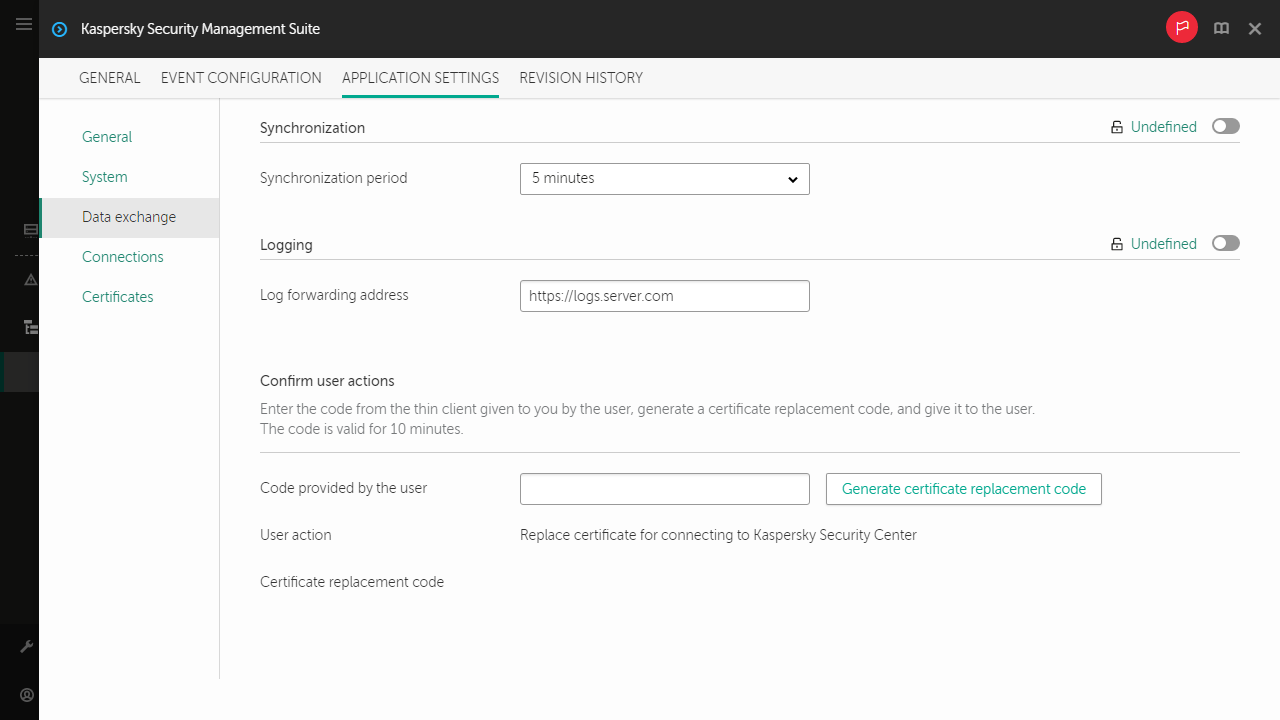
Window for confirming changes to the certificate for connecting to Kaspersky Security Center
- In the Confirm user actions block, enter the code from the Kaspersky Thin Client interface which the user sent you and click Generate certificate replacement code.
A certificate replacement code will be created and displayed in the Confirm user actions block.
- Send the certificate replacement code to the Kaspersky Thin Client user.
Managing Kaspersky Thin Client security certificates through the Web Console
You can use the Web Console to manage security certificates for a group of devices that have the Kaspersky Thin Client operating system installed. You can view valid certificates, add certificates, or delete them.
After security certificates for connecting to remote desktops or to a log server are added in the Kaspersky Security Center Web Console, thin clients in the administration group will switch to trusted mode. In this case, you will not be able to add certificates through the Kaspersky Thin Client interface.
In the Certificates section, the following information is displayed for each valid certificate:
- File name shows a certificate file name and its format.
- Issuer name shows information about the organization that issued the certificate.
- Subject name shows information about the application for which the certificate was issued.
- Valid from shows a start date of certificate validity.
- Valid to shows an end date of certificate validity.
- Certificate fingerprint shows certificate hash calculated from all certificate details and its signature.
You can sort the list of certificates based on their validity start and end dates, issuer and subject names.
Page topAbout the reserve certificate for connecting Kaspersky Thin Client to Kaspersky Security Center
To connect to Kaspersky Security Center, Kaspersky Thin Client uses a mobile certificate of the Kaspersky Security Center Administration Server. This mobile certificate is created by using the Administration Server quick start wizard after installing Kaspersky Security Center. The default validity period of an issued certificate is one year. When connecting to Kaspersky Security Center, Kaspersky Thin Client checks the validity of the certificate. If necessary, you can issue a new (reserve) mobile certificate or configure a rule for issuing certificates. For details on creating a new mobile certificate for the Kaspersky Security Center Administration Server, see the Working with certificates of mobile devices section and the Reissuing the Web Server certificate section of the Kaspersky Security Center Online Help Guide. For details on configuring rules for issuing certificates, see the Configuring certificate issuance rules section of the Kaspersky Security Center Online Help Guide.
Managed devices and devices included in an administration group will receive the new (reserve) certificate for connecting Kaspersky Thin Client to Kaspersky Security Center after Kaspersky Thin Client synchronizes with Kaspersky Security Center. The new (reserve) certificate will be saved in the Kaspersky Thin Client certificate store and will be used to connect thin clients to Kaspersky Security Center when the currently used certificate expires.
You can also issue a user certificate for connecting Kaspersky Thin Client to Kaspersky Security Center. In this case, the created user certificate must be uploaded to the Web Console as the mobile certificate. For detailed information about the requirements applied to Kaspersky Security Center user certificates, see the Requirements for custom certificates used in Kaspersky Security Center section of the Kaspersky Security Center Online Help Guide.
Page topCreating a user certificate for connecting Kaspersky Thin Client to Kaspersky Security Center
You can use a user certificate for connecting Kaspersky Thin Client to Kaspersky Security Center. For detailed information about the requirements applied to Kaspersky Security Center certificates, see the Requirements for custom certificates used in Kaspersky Security Center section of the Kaspersky Security Center Online Help Guide. We recommend using a user certificate when migrating a group of devices running Kaspersky Thin Client to a new Kaspersky Security Center Administration Server. After the user certificate is created, it must be uploaded to the Web Console as a mobile certificate. You can use the OpenSSL tool to create a user certificate.
To create a user certificate for connecting Kaspersky Thin Client to Kaspersky Security Center using the OpenSSL tool:
- Start the console and go to the folder in which you want to create the certificate.
- In the console, start the OpenSSL tool and run the following command:
openssl req -x509 -newkey rsa:2048 -keyout key.pem -out server.pem -days 729 -subj '/CN=mydomain.ru/C=RU/L=Moscow/O=My Organization Name/OU=My Organization Unit Name' -addext "keyUsage = digitalSignature, keyEncipherment, dataEncipherment, cRLSign, keyCertSign" -addext "extendedKeyUsage = serverAuth, clientAuth"where:
-keyout key.pemis a name of the file in which the private key of the created certificate will be saved.-out server.pemis a name of the file in which the created certificate will be saved.-daysis a setting that defines the validity term of the created certificate, in days. We recommend setting a certificate validity term of no more than 729 days.-subj'/CN=mydomain.ru/C=RU/L=Moscow/O=My Organization Name/OU=My Organization Unit Name'is data of your organization: domain name, location, name.
- Enter and confirm the password for the private certificate key. This password will need to be entered when uploading the user certificate to the Web Console as a mobile certificate. There are no special password requirements.
As a result, the following two files will be created in the folder where you ran the command:
- server.pem is a certificate file for connecting Kaspersky Thin Client to Kaspersky Security Center.
- key.pem is a private key of the certificate for connecting Kaspersky Thin Client to Kaspersky Security Center.
If necessary, you can convert a certificate file from PEM to DER format.
Page topUploading a reserve certificate and user certificate to the Web Console for connecting Kaspersky Thin Client to Kaspersky Security Center
If you created a user certificate or a reserve certificate for connecting Kaspersky Thin Client to Kaspersky Security Center, you must upload the created certificate to the Web Console as a mobile certificate.
It is recommended to first verify that the user certificate meets the requirements of Kaspersky Security Center. For detailed information about the requirements applied to Kaspersky Security Center certificates, see the Requirements for custom certificates used in Kaspersky Security Center section of the Kaspersky Security Center Online Help Guide.
To upload a certificate to the Web Console for connecting Kaspersky Thin Client to Kaspersky Security Center:
- In the menu of the Kaspersky Security Center Web Console, click the
 icon next to the name of the Kaspersky Security Center Administration Server.
The Administration Server properties window opens.
- In the list of subsections, select Certificates.
- In the window that opens, in the Administration Server authentication by mobile devices block, select Other certificate and click the Manage certificate button.
- In the panel that opens on the right, click Browse and do the following:
- In the Certificate type drop-down list, select X.509 certificate.
- If the user certificate is protected with a password, enter the password.
- Select the user certificate file by clicking the Browse button in the Certificate block.
- Select the private key for the user certificate by clicking the Browse button in the Private key block.
- Click Save to save the certificate adding.
- Click Save to save the changes you made in the Certificates subsection.
The certificate for connecting Kaspersky Thin Client to Kaspersky Security Center will be uploaded to the Web Console as a mobile certificate.
Page topAdding new certificates in the Web Console
For thin clients that are members of an administration group, you can add new certificates in the Web Console for securely connecting to remote desktops (via RDP or under Basis.WorkPlace management) or to a log server.
After certificates for securely connecting to remote desktops or to a log server are added to the Web Console, devices in the administration group will switch to trusted mode. In this case, you will not be able to add certificates through the Kaspersky Thin Client interface.
To add new certificates through the Web Console:
- In the main window of the Web Console, select Devices → Policies & profiles.
- Click the policy name for the Kaspersky Security Management Suite web plug-in.
- In the window that opens, select the Application settings tab.
- Select the Certificates section.
- In the Valid certificates table, click the Add button in the upper part of the table.
- In the panel that opens on the right, select all certificates that were previously uploaded and select the new certificates. The total size of the uploaded files must not exceed 1 MB. You can upload certificates only in DER format. Each certificate file must contain only one certificate. If necessary, you can convert certificates from PEM to DER format in advance.
- Click OK to confirm the upload of the selected certificates.
The selected certificates will be uploaded and information about them will be displayed in the Valid certificates table.
Page topRemoving certificates from the Web Console
For thin clients that are members of an administration group, you can remove the certificates for securely connecting to remote desktops (via RDP or under Basis.WorkPlace management) or to a log server from the Web Console.
When you remove a certificate, you will no longer be able to use the Kaspersky Thin Client interface to securely connect to servers where this certificate or its signed certificates are installed.
After certificates for securely connecting to remote desktops or to a log server are removed from the Web Console, Kaspersky Thin Client devices that are members an administration group will be switched out of the trusted mode. To connect to remote desktops or to a log server, you will have to add certificates in the Kaspersky Thin Client interface.
To remove certificates:
- In the main window of the Web Console, select Devices → Policies & profiles.
- Click the policy name for the Kaspersky Security Management Suite web plug-in.
- In the window that opens, select the Application settings tab.
- Select the Certificates section.
- In the Valid certificates table, select the check boxes next to the certificates that you need to remove.
- Click Delete and confirm deletion.
The selected certificates will be removed.
Page topConverting a certificate from PEM to DER format
Kaspersky Security Management Suite supports uploading of certificates only in DER format. You can convert a certificate file from PEM to DER format.
To carry out these instructions on the local computer, you must have the OpenSSL tool.
To convert a certificate file from PEM to DER format:
- Start the console on the local computer.
- Go to the folder containing the PEM certificate file and run the following file conversion command:
openssl x509 -outform der -in <certificate file name>.pem -out <certificate file name>.derwhere:
- <certificate file name>.pem is the original certificate file name in PEM format.
- <certificate file name>.der is the converted certificate file name in DER format.
The new certificate file in DER format will be generated in this same folder.
Page topMonitoring Kaspersky Thin Client events through the Kaspersky Security Center Web Console
This section contains instructions on monitoring events registered in Kaspersky Thin Client through the Kaspersky Security Center Web Console.
Configuring registration of Kaspersky Thin Client event notifications in the Kaspersky Security Center Web Console
Kaspersky Security Center lets you receive information about events that occur while Kaspersky Thin Client is running. In the Kaspersky Security Center Web Console interface, you can configure a notification regarding the registration of such events. Each event in Kaspersky Security Center has its own severity level. Depending on the conditions of its occurrence, an event can be assigned one of the following severity levels:
- A critical event is an event that indicates the occurrence of a critical problem that may lead to data loss, an operational malfunction, or a critical error.
- A functional failure is an event that indicates the occurrence of a serious problem, error or malfunction that occurred during operation of the application or while performing a procedure.
- A warning is an event that requires attention because it emphasizes important situations in the operation of Kaspersky Thin Client and may indicate a possible issue in the future. Most events are designated as warnings if the application can be restored without loss of data or functional capabilities after such events occur.
- An info is an event that informs about successful completion of an operation, proper functioning of the application, or completion of a procedure.
You can configure notifications about Kaspersky Thin Client events in the Kaspersky Security Center Web Console for one device or for a group of devices.
How to configure event notifications for one device
How to configure event notifications for a group of devices
For detailed information on configuring notifications for event registration in the Kaspersky Security Center Web Console, please refer to the Configuring notification delivery section of the Kaspersky Security Center Online Help Guide.
Viewing Kaspersky Thin Client events in the Web Console
You can view events registered by Kaspersky Thin Client in the Web Console.
To view events registered by Kaspersky Thin Client in the Web Console:
- In the main window of the Web Console, select Devices → Managed devices.
- Click the name of the thin client where Kaspersky Thin Client is running.
- In the window that opens, select the Events tab.
This opens a window displaying a table of registered events. The following information is displayed for each event:
- Time shows the date and time when the Web Console received the event registered on a device.
- Event shows a type of the event.
- Description shows a short description of the registered event.
- Application shows a name of the application for which the event was received in the Web Console.
- Version number shows a version of the application for which the event was received in the Web Console.
- Severity level shows severity of the event (Critical, Functional failure, Warning or Info).
- Task shows a name of the task to be run when the event is registered.
- Registered shows the date and time when the event was registered on the device.