Contents
- Managing client devices
- Settings of a managed device
- Creating administration groups
- Device moving rules
- Adding devices to an administration group manually
- Moving devices or clusters to an administration group manually
- About clusters and server arrays
- Properties of a cluster or server array
- Adjustment of distribution points and connection gateways
- Standard configuration of distribution points: Single office
- Standard configuration of distribution points: Multiple small remote offices
- Calculating the number and configuration of distribution points
- Assigning distribution points automatically
- Assigning distribution points manually
- Modifying the list of distribution points for an administration group
- Enabling a push server
- About device statuses
- Configuring the switching of device statuses
- Device selections
- Device tags
- Device tags
- Creating a device tag
- Renaming a device tag
- Deleting a device tag
- Viewing devices to which a tag is assigned
- Viewing tags assigned to a device
- Tagging a device manually
- Removing an assigned tag from a device
- Viewing rules for tagging devices automatically
- Editing a rule for tagging devices automatically
- Creating a rule for tagging devices automatically
- Running rules for auto-tagging devices
- Deleting a rule for tagging devices automatically
- Data encryption and protection
- Changing the Administration Server for client devices
- Viewing and configuring the actions when devices show inactivity
Managing client devices
Kaspersky Next XDR Expert allows you to manage client devices:
- View settings and statuses of managed devices, including clusters and server arrays.
- Configure distribution points.
- Manage tasks.
You can use administration groups to combine client devices in a set that can be managed as a single unit. A client device can be included in only one administration group. Devices can be allocated to a group automatically based on Rule conditions:
You can use device selections to filter devices based on a condition. You can also tag devices for creating selections, for finding devices, and for distributing devices among administration groups.
Settings of a managed device
To view the settings of a managed device:
- In the main menu, go to Assets (Devices) → Managed devices.
The list of managed devices is displayed.
- In the list of managed devices, click the link with the name of the required device.
The properties window of the selected device is displayed.
The following tabs are displayed in the upper part of the properties window representing the main groups of the settings:
If you use a PostgreSQL, MariaDB or MySQL DBMS, the Events tab may display an incomplete list of events for the selected client device. This occurs when the DBMS stores a very large amount of events. You can increase the number of displayed events by doing either of the following:
To see a full list of events logged on the Administration Server for the device, use Reports.
Page topCreating administration groups
Immediately after Open Single Management Platform installation, the hierarchy of administration groups contains only one administration group called Managed devices. When creating a hierarchy of administration groups, you can add devices and virtual machines to the Managed devices group, and add nested groups (see the figure below).
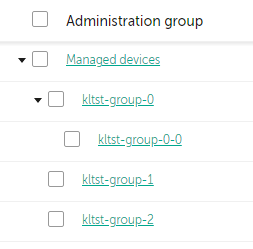
Viewing administration groups hierarchy
To create an administration group:
- In the main menu, go to Assets (Devices) → Hierarchy of groups.
- In the administration group structure, select the administration group that is to include the new administration group.
- Click the Add button.
- In the Name of the new administration group window that opens, enter a name for the group, and then click the Add button.
A new administration group with the specified name appears in the hierarchy of administration groups.
To create a structure of administration groups:
- In the main menu, go to Assets (Devices) → Hierarchy of groups.
- Click the Import button.
The New Administration Group Structure Wizard starts. Follow the instructions of the Wizard.
Page topDevice moving rules
We recommend that you automate the allocation of devices to administration groups through device moving rules. A device moving rule consists of three main parts: a name, an execution condition (logical expression with the device attributes), and a target administration group. A rule moves a device to the target administration group if the device attributes meet the rule execution condition.
All device moving rules have priorities. The Administration Server checks the device attributes as to whether they meet the execution condition of each rule, in ascending order of priority. If the device attributes meet the execution condition of a rule, the device is moved to the target group, so the rule processing is complete for this device. If the device attributes meet the conditions of multiple rules, the device is moved to the target group of the rule with the highest priority (that is, has the highest rank in the list of rules).
Device moving rules can be created implicitly. For example, in the properties of an installation package or a remote installation task, you can specify the administration group to which the device must be moved after Network Agent is installed on it. Also, device moving rules can be created explicitly by the administrator of Open Single Management Platform, in the Assets (Devices) → Moving rules section.
By default, a device moving rule is intended for one-time initial allocation of devices to administration groups. The rule moves devices from the unassigned devices group only once. If a device once was moved by this rule, the rule will never move it again, even if you return the device to the unassigned devices group manually. This is the recommended way of applying moving rules.
You can move devices that have already been allocated to some of the administration groups. To do this, in the properties of a rule, clear the Move only devices that do not belong to an administration group check box.
Applying moving rules to devices that have already been allocated to some of the administration groups, significantly increases the load on the Administration Server.
The Move only devices that do not belong to an administration group check box is locked in the properties of automatically created moving rules. Such rules are created when you add the Install application remotely task or create a stand-alone installation package.
You can create a moving rule that would affect a single device repeatedly.
We strongly recommend that you avoid moving a single device from one group to another repeatedly (for example, in order to apply a special policy to that device, run a special group task, or update the device through a specific distribution point).
Such scenarios are not supported, because they increase the load on Administration Server and network traffic to an extreme degree. These scenarios also conflict with the operating principles of Open Single Management Platform (particularly in the area of access rights, events, and reports). Another solution must be found, for example, through the use of policy profiles, tasks for device selections, assignment of Network Agents according to the standard scenario.
Page topCreating device moving rules
You can set up device moving rules, that is, rules that automatically allocate devices to administration groups.
To create a moving rule:
- In the main menu, go to Assets (Devices) → Moving rules.
- Click Add.
- In the window that opens, specify the following information on the General tab:
- On the Rule conditions tab, specify at least one criterion by which the devices are moved to an administration group.
- Click Save.
The moving rule is created. It is displayed in the list of moving rules.
The higher the position is on the list, the higher the priority of the rule. To increase or decrease the priority of a moving rule, move the rule up or down in the list, respectively, by using the mouse.
If the Apply rule continuously option is selected, the moving rule is applied regardless of the priority settings. Such rules are applied according to the schedule that the Administration Server sets up automatically.
If the device attributes meet the conditions of multiple rules, the device is moved to the target group of the rule with the highest priority (that is, has the highest rank in the list of rules).
Copying device moving rules
You can copy moving rules, for example, if you want to have several identical rules for different target administration groups.
To copy an existing a moving rule:
- Do one of the following:
- In the main menu, go to Assets (Devices) → Moving rules.
- In the main menu, go to Discovery & deployment → Deployment & assignment → Moving rules.
The list of moving rules is displayed.
- Select the check box next to the rule you want to copy.
- Click Copy.
- In the window that opens, change the following information on the General tab—or make no changes if you only want to copy the rule without changing its settings:
- On the Rule conditions tab, specify at least one criterion for the devices that you want to be moved automatically.
- Click Save.
The new moving rule is created. It is displayed in the list of moving rules.
Page topConditions for a device moving rule
When you create or copy a rule to move client devices to administration groups, on the Rule conditions tab you set conditions for moving the devices. To determine which devices to move, you can use the following criteria:
- Tags assigned to client devices.
- Network parameters. For example, you can move devices with IP addresses from a specified range.
- Managed applications installed on client devices, for instance, Network Agent or Administration Server.
- Virtual machines, which are the client devices.
Below, you can find the description on how to specify this information in a device moving rule.
If you specify several conditions in the rule, the AND logical operator works and all the conditions apply at the same time. If you do not select any options or keep some fields blank, such conditions do not apply.
Tags tab
On this tab, you can configure a device moving rule based on device tags that were previously added to the descriptions of client devices. To do this, select the required tags. Also, you can enable the following options:
Network tab
On this tab, you can specify the network data of devices that a device moving rule considers:
- DNS name of the device
- DNS domain
- IP range
- IP address for connection to Administration Server
- Connection profile changed
- Managed by a different Administration Server
Applications tab
On this tab, you can configure a device moving rule based on the managed applications and operating systems installed on client devices:
- Network Agent is installed
- Applications
- Operating system version
- Operating system bit size
You can cull client devices by the operating system bit sizes. In the Operating system bit size field, you can select one of the following values:
- Unknown
- x86
- AMD64
- IA64
To check the operating system bit size of the client devices:
- In the main menu, go to the Assets (Devices) → Managed devices section.
- Click the Columns settings button (
 ) on the right.
 - Select the Operating system bit size option, and then click the Save button.
After that, the operating system bit size is displayed for every managed device.
- Operating system service pack version
- User certificate
- Operating system build
- Operating system release number
Virtual machines tab
On this tab, you can configure a device moving rule according to whether client devices are virtual machines or part of a virtual desktop infrastructure (VDI):
- This is a virtual machine
- Virtual machine type
- Part of Virtual Desktop Infrastructure
Domain controller tab
On this tab, you can specify that it is necessary to move devices included in the domain organizational unit. You can also move devices from all child organizational units of the specified domain organizational unit:
- Device is included in the following organizational unit
- Include child organizational units
- Move devices from child units to corresponding subgroups
- Create subgroups corresponding to containers of newly detected devices
- Delete subgroups that are not present in the domain
- Device is included in the following domain security group
Adding devices to an administration group manually
You can move devices to administration groups automatically by creating device moving rules or manually by moving devices from one administration group to another or by adding devices to a selected administration group. This section describes how to manually add devices to an administration group.
To add manually one or more devices to a selected administration group:
- In the main menu, go to Assets (Devices) → Managed devices.
- Click the Current path:
<current path>link above the list. - In the window that opens, select the administration group to which you want to add the devices.
- Click the Add devices button.
The Move devices wizard starts.
- Make a list of the devices that you want to add to the administration group.
You can add only devices for which information has already been added to the Administration Server database either upon connection of the device or after device discovery.
Select how you want to add devices to the list:
- Click the Add devices button, and then specify the devices in one of the following ways:
- Select devices from the list of devices detected by the Administration Server.
- Specify a device IP address or an IP range.
- Specify a device DNS name.
The device name field must not contain space characters, backspace characters, or the following prohibited characters: , \ / * ' " ; : & ` ~ ! @ # $ ^ ( ) = + [ ] { } | < > %
- Click the Import devices from file button to import a list of devices from a .txt file. Each device address or name must be specified on a separate line.
The file must not contain space characters, backspace characters, or the following prohibited characters: , \ / * ' " ; : & ` ~ ! @ # $ ^ ( ) = + [ ] { } | < > %
- Click the Add devices button, and then specify the devices in one of the following ways:
- View the list of devices to be added to the administration group. You can edit the list by adding or removing devices.
- After making sure that the list is correct, click the Next button.
The wizard processes the device list and displays the result. The successfully processed devices are added to the administration group and are displayed in the list of devices under names generated by Administration Server.
Moving devices or clusters to an administration group manually
You can move devices from one administration group to another, or from the group of unassigned devices to an administration group.
You can also move clusters or server arrays from one administration group to another. When you move a cluster or server array to another group, all of its nodes move with it, because a cluster and any of its nodes always belong to the same administration group. When you select a single cluster node on the Assets (Devices) tab, the Move to group button becomes unavailable.
To move one or several devices or clusters to a selected administration group:
- Open the administration group from which you want to move the devices. To do this, perform one of the following:
- To open an administration group, in the main menu, go to Assets (Devices) → Managed devices, click the path link in the Current path field, and select an administration group in the left-side pane that opens.
- To open the Unassigned devices group, in the main menu, go to Discovery & deployment → Unassigned devices.
- If the administration group contains clusters or server arrays, the Managed devices section is divided into two tabs—the Assets (Devices) tab and the Clusters and server arrays tab. Open the tab for the object that you want to move.
- Select the check boxes next to the devices or clusters that you want to move to a different group.
- Click the Move to group button.
- In the hierarchy of administration groups, select the check box next to the administration group to which you want to move the selected devices or clusters.
- Click the Move button.
The selected devices or clusters are moved to the selected administration group.
Page topAbout clusters and server arrays
Open Single Management Platform supports cluster technology. If Network Agent sends information to Administration Server confirming that an application installed on a client device is part of a server array, this client device becomes a cluster node.
If an administration group contains clusters or server arrays, the Managed devices page displays two tabs—one for individual devices, and one for clusters and server arrays. After the managed devices are detected as cluster nodes, the cluster is added as an individual object to the Clusters and server arrays tab.
The cluster or server array nodes are listed on the Devices tab, along with other managed devices. You can view properties of the nodes as individual devices and perform other operations, but you cannot delete a cluster node or move it to another administration group separately from its cluster. You can only delete or move an entire cluster.
You can perform the following operations with clusters or server arrays:
- View properties
- Move the cluster or server array to another administration group
When you move a cluster or server array to another group, all of its nodes move with it, because a cluster and any of its nodes always belong to the same administration group.
- Delete
It is reasonable to delete a cluster or server array only when the cluster or server array does not exist in the organization network any longer. If a cluster is still visible on your network and Network Agent and the Kaspersky security application are still installed on the cluster nodes, Open Single Management Platform returns the deleted cluster and its nodes back to the list of managed devices automatically.
Properties of a cluster or server array
To view the settings of a cluster or server array:
- In the main menu, go to Assets (Devices) → Managed devices → Clusters and server arrays.
The list of clusters and server arrays is displayed.
- Click the name of the required cluster or server array.
The properties window of the selected cluster or server array is displayed.
General
The General section displays general information about the cluster or server array. Information is provided on the basis of data received during the last synchronization of the cluster nodes with the Administration Server:
- Name
- Description
- Windows domain
- NetBIOS name
- DNS name
Tasks
In the Tasks tab, you can manage the tasks assigned to the cluster or server array: view the list of existing tasks; create new ones; remove, start, and stop tasks; modify task settings; and view execution results. The listed tasks relate to the Kaspersky security application installed on the cluster nodes. Open Single Management Platform receives the task list and the task status details from the cluster nodes. If a connection is not established, the status is not displayed.
Nodes
This tab displays a list of nodes included into the cluster or server array. You can click a node name to view the device properties window.
Kaspersky application
The properties window may also contain additional tabs with the information and settings related to the Kaspersky security application installed on the cluster nodes.
Adjustment of distribution points and connection gateways
A structure of administration groups in Open Single Management Platform performs the following functions:
- Sets the scope of policies
There is an alternate way of applying relevant settings on devices, by using policy profiles.
- Sets the scope of group tasks
There is an approach to defining the scope of group tasks that is not based on a hierarchy of administration groups: use of tasks for device selections and tasks for specific devices.
- Sets access rights to devices, virtual Administration Servers, and secondary Administration Servers
- Assigns distribution points
When building the structure of administration groups, you must take into account the topology of the organization's network for the optimum assignment of distribution points. The optimum distribution of distribution points allows you to save traffic on the organization's network.
Depending on the organizational schema and network topology, the following standard configurations can be applied to the structure of administration groups:
- Single office
- Multiple small remote offices
Devices functioning as distribution points must be protected, including physical protection, against any unauthorized access.
Standard configuration of distribution points: Single office
In a standard "single-office" configuration, all devices are on the organization's network so they can "see" each other. The organization's network may consist of a few separate parts (networks or network segments) linked by narrow channels.
The following methods of building the structure of administration groups are possible:
- Building the structure of administration groups taking into account the network topology. The structure of administration groups may not reflect the network topology with absolute precision. A match between the separate parts of the network and certain administration groups would be enough. You can use automatic assignment of distribution points or assign them manually.
- Building the structure of administration groups, without taking the network topology into account. In this case, you must disable automatic assignment of distribution points, and then assign one or several devices to act as distribution points for a root administration group in each of the separate parts of the network, for example, for the Managed devices group. All distribution points will be at the same level and will feature the same scope spanning all devices on the organization's network. In this case, each Network Agent will connect to the distribution point that has the shortest route. The route to a distribution point can be traced with the tracert utility.
Standard configuration of distribution points: Multiple small remote offices
This standard configuration provides for a number of small remote offices, which may communicate with the head office over the internet. Each remote office is located behind the NAT, that is, connection from one remote office to another is not possible because offices are isolated from one another.
The configuration must be reflected in the structure of administration groups: a separate administration group must be created for each remote office (groups Office 1 and Office 2 in the figure below).
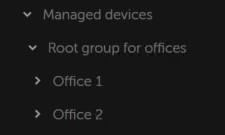
Remote offices are included in the administration group structure
One or multiple distribution points must be assigned to each administration group that correspond to an office. Distribution points must be devices at the remote office that have a sufficient amount of free disk space. Devices deployed in the Office 1 group, for example, will access distribution points assigned to the Office 1 administration group.
If some users move between offices physically, with their laptops, you must select two or more devices (in addition to the existing distribution points) in each remote office and assign them to act as distribution points for a top-level administration group (Root group for offices in the figure above).
Example: A laptop is deployed in the Office 1 administration group and then is moved physically to the office that corresponds to the Office 2 administration group. After the laptop is moved, Network Agent attempts to access the distribution points assigned to the Office 1 group, but those distribution points are unavailable. Then, Network Agent starts attempting to access the distribution points that have been assigned to the Root group for offices. Because remote offices are isolated from one another, attempts to access distribution points assigned to the Root group for offices administration group will only be successful when Network Agent attempts to access distribution points in the Office 2 group. That is, the laptop will remain in the administration group that corresponds to the initial office, but the laptop will use the distribution point of the office where it is physically located at the moment.
Calculating the number and configuration of distribution points
The more client devices a network contains, the more distribution points it requires. We recommend that you not disable automatic assignment of distribution points. When automatic assignment of distribution points is enabled, Administration Server assigns distribution points if the number of client devices is quite large and defines their configuration.
Using exclusively assigned distribution points
If you plan to use certain specific devices as distribution points (that is, exclusively assigned servers), you can opt out of using automatic assignment of distribution points. In this case, make sure that the devices that you intend to make distribution points have sufficient volume of free disk space, are not shut down regularly, and have Sleep mode disabled.
Number of exclusively assigned distribution points on a network that contains a single network segment, based on the number of networked devices
Number of client devices in the network segment |
Number of distribution points |
|---|---|
Less than 300 |
0 (Do not assign distribution points) |
More than 300 |
Acceptable: (N/10,000 + 1), recommended: (N/5000 + 2), where N is the number of networked devices |
Number of exclusively assigned distribution points on a network that contains multiple network segments, based on the number of networked devices
Number of client devices per network segment |
Number of distribution points |
|---|---|
Less than 10 |
0 (Do not assign distribution points) |
10–100 |
1 |
More than 100 |
Acceptable: (N/10,000 + 1), recommended: (N/5000 + 2), where N is the number of networked devices |
Using standard client devices (workstations) as distribution points
If you plan to use standard client devices (that is, workstations) as distribution points, we recommend that you assign distribution points as shown in the tables below in order to avoid excessive load on the communication channels and on Administration Server:
Number of workstations functioning as distribution points on a network that contains a single network segment, based on the number of networked devices
Number of client devices in the network segment |
Number of distribution points |
|---|---|
Less than 300 |
0 (Do not assign distribution points) |
More than 300 |
(N/300 + 1), where N is the number of networked devices; there must be at least 3 distribution points |
Number of workstations functioning as distribution points on a network that contains multiple network segments, based on the number of networked devices
Number of client devices per network segment |
Number of distribution points |
|---|---|
Less than 10 |
0 (Do not assign distribution points) |
10–30 |
1 |
31–300 |
2 |
More than 300 |
(N/300 + 1), where N is the number of networked devices; there must be at least 3 distribution points |
If a distribution point is shut down (or not available for some other reason), the managed devices in its scope can access the Administration Server for updates.
Assigning distribution points automatically
We recommend that you assign distribution points automatically. In this case, Open Single Management Platform will select on its own which devices must be assigned distribution points.
To assign distribution points automatically:
- In the main menu, click the settings icon (
 ) next to the name of the required Administration Server.
The Administration Server properties window opens.
- On the General tab, select the Distribution points section.
- Select the Automatically assign distribution points option.
If automatic assignment of devices as distribution points is enabled, you cannot configure distribution points manually or edit the list of distribution points.
- Click the Save button.
Administration Server assigns and configures distribution points automatically.
Assigning distribution points manually
Open Single Management Platform allows you to manually assign devices to act as distribution points.
We recommend that you assign distribution points automatically. In this case, Open Single Management Platform will select on its own which devices must be assigned distribution points. However, if you have to opt out of assigning distribution points automatically for any reason (for example, if you want to use exclusively assigned servers), you can assign distribution points manually after you calculate their number and configuration.
Devices functioning as distribution points must be protected, including physical protection, against any unauthorized access.
To manually assign a device to act as distribution point:
- In the main menu, click the settings icon () next to the name of the required Administration Server.
The Administration Server properties window opens.
- On the General tab, select the Distribution points section.
- Select the Manually assign distribution points option.
- Click the Assign button.
- Select the device that you want to make a distribution point.
When selecting a device, keep in mind the operation features of distribution points and the requirements set for the device that acts as distribution point.
- Select the administration group that you want to include in the scope of the selected distribution point.
- Click the OK button.
The distribution point that you have added will be displayed in the list of distribution points, in the Distribution points section.
- Click the newly added distribution point in the list to open its properties window.
- Configure the distribution point in the properties window:
- The General section contains the settings of interaction between the distribution point and client devices.
- In the Scope section, specify administration groups to which the distribution point will distribute updates.
- In the Source of updates section, you can select a source of updates for the distribution point:
- In the Internet connection settings subsection, you can specify the internet access settings:
- In the KSN Proxy section, you can configure the application to use the distribution point to forward KSN requests from the managed devices:
- In the Connection gateway section, you can configure the distribution point to act as a gateway for connection between Network Agent instances and Administration Server:
- Connection gateway
- Establish connection to gateway from Administration Server (if gateway is in DMZ)
- Open local port for Kaspersky Security Center Web Console
When connecting mobile devices to Administration Server via the distribution point that acts as a connection gateway, you can enable the following options:
- Open port for mobile devices (SSL authentication of the Administration Server only)
- Open port for mobile devices (two-way SSL authentication)
In both cases, the certificates are checked during the TLS session establishment on distribution point only. The certificates are not forwarded to be checked by the Administration Server. After a TLS session with the mobile device is established, the distribution point uses the Administration Server certificate to create a tunnel for synchronization between the mobile device and Administration Server. If you open the port for two-way SSL authentication, the only way to distribute the mobile device certificate is via an installation package.
- Configure domain controller polling by the distribution point.
- Configure the polling of IP ranges by the distribution point.
- In the Advanced section, specify the folder that the distribution point must use to store distributed data.
- Click the OK button.
The selected devices act as distribution points.
Page topModifying the list of distribution points for an administration group
You can view the list of distribution points assigned to a specific administration group and modify the list by adding or removing distribution points.
To view and modify the list of distribution points assigned to an administration group:
- In the main menu, go to Assets (Devices) → Managed devices.
- In the Current path field above the list of managed devices, click the path link.
- In the left-side pane that opens, select an administration group for which you want to view the assigned distribution points.
This enables the Distribution points menu item.
- In the main menu, go to Assets (Devices) → Distribution points.
- To add new distribution points for the administration group, click the Assign button.
- To remove the assigned distribution points, select devices from the list and click the Unassign button.
Depending on your modifications, the new distribution points are added to the list or existing distribution points are removed from the list.
Page topEnabling a push server
In Open Single Management Platform, a distribution point can work as a push server for the devices managed through the mobile protocol and for the devices managed by Network Agent. For example, a push server must be enabled if you want to be able to force synchronization of KasperskyOS devices with Administration Server. A push server has the same scope of managed devices as the distribution point on which the push server is enabled. If you have several distribution points assigned for the same administration group, you can enable push server on each of the distribution points. In this case, Administration Server balances the load between the distribution points.
You might want to use distribution points as push servers to make sure that there is continuous connectivity between a managed device and the Administration Server. Continuous connectivity is needed for some operations, such as running and stopping local tasks, receiving statistics for a managed application, or creating a tunnel. If you use a distribution point as a push server, you do not have to use the Do not disconnect from the Administration Server option on managed devices or send packets to the UDP port of the Network Agent.
A push server supports the load of up to 50,000 simultaneous connections.
To enable push server on a distribution point:
- In the main menu, click the settings icon () next to the name of the required Administration Server.
The Administration Server properties window opens.
- On the General tab, select the Distribution points section.
- Click the name of the distribution point on which you want to enable the push server.
The distribution point properties window opens.
- On the General section, enable the Run push server option.
- In the Push server port field, type the port number. You can specify number of any unoccupied port.
- In the Address for remote hosts field, specify the IP address or the name of the distribution point device.
- Click the OK button.
The push server is enabled on the selected distribution point.
About device statuses
Open Single Management Platform assigns a status to each managed device. The particular status depends on whether the conditions defined by the user are met. In some cases, when assigning a status to a device, Open Single Management Platform takes into consideration the device's visibility flag on the network (see the table below). If Open Single Management Platform does not find a device on the network within two hours, the visibility flag of the device is set to Not Visible.
The statuses are the following:
- Critical or Critical/Visible
- Warning or Warning/Visible
- OK or OK/Visible
The table below lists the default conditions that must be met to assign the Critical or Warning status to a device, with all possible values.
Conditions for assigning a status to a device
Condition |
Condition description |
Available values |
|---|---|---|
Security application is not installed |
Network Agent is installed on the device, but a security application is not installed. |
|
Too many viruses detected |
Some viruses have been found on the device by a task for virus detection, for example, the Malware scan task, and the number of viruses found exceeds the specified value. |
More than 0. |
Real-time protection level differs from the level set by the Administrator |
The device is visible on the network, but the real-time protection level differs from the level set (in the condition) by the administrator for the device status. |
|
Malware scan has not been performed in a long time |
The device is visible on the network and a security application is installed on the device, but neither the Malware scan task nor a local scan task has been run within the specified time interval. The condition is applicable only to devices that were added to the Administration Server database 7 days ago or earlier. |
More than 1 day. |
Databases are outdated |
The device is visible on the network and a security application is installed on the device, but the anti-virus databases have not been updated on this device within the specified time interval. The condition is applicable only to devices that were added to the Administration Server database 1 day ago or earlier. |
More than 1 day. |
Not connected in a long time |
Network Agent is installed on the device, but the device has not connected to an Administration Server within the specified time interval, because the device was turned off. |
More than 1 day. |
Active threats are detected |
The number of unprocessed objects in the Active threats folder exceeds the specified value. |
More than 0 items. |
Restart is required |
The device is visible on the network, but an application requires the device restart longer than the specified time interval and for one of the selected reasons. |
More than 0 minutes. |
Incompatible applications are installed |
The device is visible on the network, but software inventory performed through Network Agent has detected incompatible applications installed on the device. |
|
License expired |
The device is visible on the network, but the license has expired. |
|
License expires soon |
The device is visible on the network, but the license will expire on the device in less than the specified number of days. |
More than 0 days. |
Invalid encryption status |
Network Agent is installed on the device, but the device encryption result is equal to the specified value. |
|
Unprocessed security issues detected |
Some unprocessed security issues have been found on the device. Security issues can be created either automatically, through managed Kaspersky applications installed on the client device, or manually by the administrator. |
|
Device status defined by application |
The status of the device is defined by the managed application. |
|
Device is out of disk space |
Free disk space on the device is less than the specified value or the device could not be synchronized with the Administration Server. The Critical or Warning status is changed to the OK status when the device is successfully synchronized with the Administration Server and free space on the device is greater than or equal to the specified value. |
More than 0 MB. |
Device has become unmanaged |
During device discovery, the device was recognized as visible on the network, but more than three attempts to synchronize with the Administration Server failed. |
|
Protection is disabled |
The device is visible on the network, but the security application on the device has been disabled for longer than the specified time interval. In this case, the state of the security application is stopped or failure, and differs from the following: starting, running, or suspended. |
More than 0 minutes. |
Security application is not running |
The device is visible on the network and a security application is installed on the device but is not running. |
|
Open Single Management Platform allows you to set up automatic switching of the status of a device in an administration group when specified conditions are met. When the specified conditions are met, the client device is assigned one of the following statuses: Critical or Warning. When the specified conditions are not met, the client device is assigned the OK status.
Different statuses may correspond to different values of one condition. For example, by default, if the Databases are outdated condition has the More than 3 days value, the client device is assigned the Warning status; if the value is More than 7 days, the Critical status is assigned.
If you upgrade Open Single Management Platform from the previous version, the values of the Databases are outdated condition for assigning the status to Critical or Warning do not change.
When Open Single Management Platform assigns a status to a device, for some conditions (see the Condition description column) the visibility flag is taken into consideration. For example, if a managed device was assigned the Critical status because the Databases are outdated condition was met, and later the visibility flag was set for the device, then the device is assigned the OK status.
Configuring the switching of device statuses
You can change conditions to assign the Critical or Warning status to a device.
To enable changing the device status to Critical:
- Open the properties window in one of the following ways:
- In the Policies folder, in the context menu of an Administration Server policy, select Properties.
- Select Properties in the context menu of an administration group.
- In the Properties window that opens, in the Sections pane, select Device status.
- In the right pane, in the Set to Critical if these are specified section, select the check box next to a condition in the list.
You can change only settings that are not locked in the parent policy.
- Set the required value for the selected condition.
You can set values for some, but not all, conditions.
- Click OK.
When specified conditions are met, the managed device is assigned the Critical status.
To enable changing the device status to Warning:
- Open the properties window in one of the following ways:
- In the Policies folder, in the context menu of the Administration Server policy, select Properties.
- Select Properties in the context menu of the administration group.
- In the Properties window that opens, in the Sections pane select Device status.
- In the right pane, in the Set to Warning if these are specified section, select the check box next to a condition in the list.
You can change only settings that are not locked in the parent policy.
- Set the required value for the selected condition.
You can set values for some, but not all, conditions.
- Click OK.
When specified conditions are met, the managed device is assigned the Warning status.
Page topDevice selections
Device selections are a tool for filtering devices according to specific conditions. You can use device selections to manage several devices: for example, to view a report about only these devices or to move all of these devices to another group.
Open Single Management Platform provides a broad range of predefined selections (for example, Devices with Critical status, Protection is disabled, Active threats are detected). Predefined selections cannot be deleted. You can also create and configure additional user-defined selections.
In user-defined selections, you can set the search scope and select all devices, managed devices, or unassigned devices. Search parameters are specified in the conditions. In the device selection you can create several conditions with different search parameters. For example, you can create two conditions and specify different IP ranges in each of them. If several conditions are specified, a selection displays the devices that meet any of the conditions. By contrast, search parameters within a condition are superimposed. If both an IP range and the name of an installed application are specified in a condition, only those devices will be displayed where both the application is installed and the IP address belongs to the specified range.
Viewing the device list from a device selection
Open Single Management Platform allows you to view the list of devices from a device selection.
To view the device list from the device selection:
- In the main menu, go to the Assets (Devices) → Device selections or Discovery & deployment → Device selections section.
- In the selection list, click the name of the device selection.
The page displays a table with information about the devices included in the device selection.
- You can group and filter the data of the device table as follows:
- Click the settings icon (
 ), and then select the columns to be displayed in the table.
 - Click the filter icon (
 ), and then specify and apply the filter criterion in the invoked menu.
 The filtered table of devices is displayed.
- Click the settings icon (
You can select one or several devices in the device selection and click the New task button to create a task that will be applied to these devices.
To move the selected devices of the device selection to another administration group, click the Move to group button, and then select the target administration group.
Page topCreating a device selection
To create a device selection:
- In the main menu, go to Assets (Devices) → Device selections.
A page with a list of device selections is displayed.
- Click the Add button.
The Device selection settings window opens.
- Enter the name of the new selection.
- Specify the group that contains the devices to be included in the device selection:
- Find any devices—Searching for devices that meet the selection criteria and included in the Managed Devices or Unassigned devices group.
- Find managed devices—Searching for devices that meet the selection criteria and included in the Managed Devices group.
- Find unassigned devices—Searching for devices that meet the selection criteria and included in the Unassigned devices group.
You can enable the Include data from secondary Administration Servers check box to enable searching for devices that meet the selection criteria and managed by secondary Administration Servers.
- Click the Add button.
- In the window that opens, specify conditions that must be met for including devices in this selection, and then click the OK button.
- Click the Save button.
The device selection is created and added to the list of device selections.
Page topConfiguring a device selection
To configure a device selection:
- In the main menu, go to Assets (Devices) → Device selections.
A page with a list of device selections is displayed.
- Select the relevant user-defined device selection, and click the Properties button.
The Device selection settings window opens.
- On the General tab, click the New condition link.
- Specify conditions that must be met for including devices in this selection.
- Click the Save button.
The settings are applied and saved.
Below are descriptions of the conditions for assigning devices to a selection. Conditions are combined by using the OR logical operator: the selection will contain devices that comply with at least one of the listed conditions.
General
In the General section, you can change the name of the selection condition and specify whether that condition must be inverted:
Network infrastructure
In the Network subsection, you can specify the criteria that will be used to include devices in the selection according to their network data:
- Device name
- Domain
- Administration group
- Description
- IP range
- Managed by a different Administration Server
In the Domain controller subsection, you can configure criteria for including devices into a selection based on domain membership:
In the Network activity subsection, you can specify the criteria that will be used to include devices in the selection according to their network activity:
- Acts as a distribution point
- Do not disconnect from the Administration Server
- Connection profile switched
- Last connected to Administration Server
- New devices detected by network poll
- Device is visible
Device statuses
In the Managed device status subsection, you can configure criteria for including devices into a selection based on the description of the devices status from a managed application:
In the Status of components in managed applications subsection, you can configure criteria for including devices in a selection according to the statuses of components in managed applications:
- Data Leakage Prevention status
- Collaboration servers protection status
- Anti-virus protection status of mail servers
- Endpoint Sensor status
In the Status-affecting problems in managed applications subsection, you can specify the criteria that will be used to include devices in the selection according to the list of possible problems detected by a managed application. If at least one problem that you select exists on a device, the device will be included in the selection. When you select a problem listed for several applications, you have the option to select this problem in all of the lists automatically.
You can select check boxes for descriptions of statuses from the managed application; upon receipt of these statuses, the devices will be included in the selection. When you select a status listed for several applications, you have the option to select this status in all of the lists automatically.
System details
In the Operating system section, you can specify the criteria that will be used to include devices in the selection according to their operating system type.
- Platform type
- Operating system service pack version
- Operating system bit size
- Operating system build
- Operating system release number
In the Virtual machines section, you can set up the criteria to include devices in the selection according to whether these are virtual machines or part of virtual desktop infrastructure (VDI):
In the Hardware registry subsection, you can configure criteria for including devices into a selection based on their installed hardware:
Ensure that the lshw utility is installed on Linux devices from which you want to fetch hardware details. Hardware details fetched from virtual machines may be incomplete depending on the hypervisor used.
- Device
- Vendor
- Device name
- Description
- Device vendor
- Serial number
- Inventory number
- User
- Location
- CPU clock rate, in MHz, from
- CPU clock rate, in MHz, to
- Number of virtual CPU cores, from
- Number of virtual CPU cores, to
- Hard drive volume, in GB, from
- Hard drive volume, in GB, to
- RAM size, in MB, from
- RAM size, in MB, to
Third-party software details
In the Applications registry subsection, you can set up the criteria to search for devices according to applications installed on them:
- Application name
- Application version
- Vendor
- Application status
- Find by update
- Name of incompatible security application
- Application tag
- Apply to devices without the specified tags
In the Vulnerabilities and updates subsection, you can specify the criteria that will be used to include devices in the selection according to their Windows Update source:
WUA is switched to Administration Server
Details of Kaspersky applications
In the Kaspersky applications subsection, you can configure criteria for including devices in a selection based on the selected managed application:
- Application name
- Application version
- Critical update name
- Application status
- Select the period of the last update of modules
- Device is managed through Administration Server
- Security application is installed
In the Anti-virus protection subsection, you can set up the criteria for including devices in a selection based on their protection status:
In the Encryption subsection, you can configure the criterion for including devices in a selection based on the selected encryption algorithm:
The Application components subsection contains the list of components of those applications that have corresponding management plug-ins installed in OSMP Console.
In the Application components subsection, you can specify criteria for including devices in a selection according to the statuses and version numbers of the components that refer to the application that you select:
Tags
In the Tags section, you can configure criteria for including devices into a selection based on key words (tags) that were previously added to the descriptions of managed devices:
Apply if at least one specified tag matches
To add tags to the criterion, click the Add button, and select tags by clicking the Tag entry field. Specify whether to include or exclude the devices with the selected tags in the device selection.
Users
In the Users section, you can set up the criteria to include devices in the selection according to the accounts of users who have logged in to the operating system.
Page topExporting the device list from a device selection
Open Single Management Platform allows you to save information about devices from a device selection and export it as a CSV or a TXT file.
To export the device list from the device selection:
- Open the table with the devices from the device selection.
- Use one of the following ways to select the devices that you want to export:
- To select particular devices, select the check boxes next to them.
- To select all devices from the current table page, select the check box in the device table header, and then select the Select all on current page check box.
- To select all devices from the table, select the check box in the device table header, and then select the Select all check box.
- Click the Export to CSV or Export to TXT button. All information about the selected devices included in the table will be exported.
Note that if you applied a filter criterion to the device table, only the filtered data from the displayed columns will be exported.
Page topRemoving devices from administration groups in a selection
When working with a device selection, you can remove devices from administration groups right in this selection, without switching to the administration groups from which these devices must be removed.
To remove devices from administration groups:
- In the main menu, go to Assets (Devices) → Device selections or Discovery & deployment → Device selections.
- In the selection list, click the name of the device selection.
The page displays a table with information about the devices included in the device selection.
- Select the devices that you want to remove, and then click Delete.
The selected devices are removed from their respective administration groups.
Device tags
This section describes device tags, and provides instructions for creating and modifying them as well as for tagging devices manually or automatically.
Device tags
Open Single Management Platform allows you to tag devices. A tag is the string value that can be used for grouping, describing, or finding devices. Tags assigned to devices can be used for creating selections, for finding devices, and for distributing devices among administration groups.
You can tag devices manually or automatically. If you want to tag an individual device, you can use manual tagging. Auto-tagging is performed by Open Single Management Platform in one of the following ways:
- In accordance with the specified tagging rules.
- By an application.
We do not recommend that you use different ways of tagging to assign the same tag. For example, if the tag is assigned by the rule, it is not recommended to manually assign this tag to devices.
If the tags are assigned by rules, devices are tagged automatically when the specified rules are met. An individual rule corresponds to each tag. Rules are applied to the network properties of the device, operating system, applications installed on the device, and other device properties. For example, you can set up a rule that will assign the [CentOS] tag to all devices running CentOS operating system. Then, you can use this tag when creating a device selection; this will help you sort all CentOS devices and assign them a task.
A tag is automatically removed from a device in the following cases:
- When the device stops meeting conditions of the rule that assigns the tag.
- When the rule that assigns the tag is disabled or deleted.
The list of tags and the list of rules on each Administration Server are independent of all other Administration Servers, including a primary Administration Server or subordinate virtual Administration Servers. A rule is applied only to devices from the same Administration Server on which the rule is created.
Page topCreating a device tag
To create a device tag:
- In the main menu, go to Assets (Devices) → Tags → Device tags.
- Click Add.
A new tag window opens.
- In the Tag field, enter the tag name.
- Click Save to save the changes.
The new tag appears in the list of device tags.
Renaming a device tag
To rename a device tag:
- In the main menu, go to Assets (Devices) → Tags → Device tags.
- Click the name of the tag that you want to rename.
A tag properties window opens.
- In the Tag field, change the tag name.
- Click Save to save the changes.
The updated tag appears in the list of device tags.
Deleting a device tag
You can delete only manually assigned tags.
To delete a manually assigned device tag:
- In the main menu, go to Assets (Devices) → Tags → Device tags.
The list of tags is displayed.
- Select the device tag that you want to delete.
- Click the Delete button.
- In the window that opens, click Yes.
The device tag is deleted. The deleted tag is automatically removed from all of the devices to which it was assigned.
When you delete a tag assigned to the device by an auto-tagging rule, the rule is not deleted, and the tag will be assigned to a new device when the device first meets the rule conditions. If you delete an auto-tagging rule, the tag specified in the rule conditions will be removed from all devices to which it was assigned but will not be deleted from the list of tags. If necessary, you can manually delete the tag from the list.
The deleted tag is not removed automatically from the device if this tag is assigned to the device by an application or Network Agent. To remove the tag from your device, use the klscflag utility.
Viewing devices to which a tag is assigned
To view devices to which a tag is assigned:
- In the main menu, go to Assets (Devices) → Tags → Device tags.
- Click the View devices link next to the tag for which you want to view assigned devices.
The list of devices that appears shows only those devices to which the tag is assigned.
To return to the list of device tags, click the Back button of your browser.
Viewing tags assigned to a device
To view tags assigned to a device:
- In the main menu, go to Assets (Devices) → Managed devices.
- Click the name of the device whose tags you want to view.
- In the device properties window that opens, select the Tags tab.
The list of tags assigned to the selected device is displayed. In the Tag assigned column you can view how the tag was assigned.
You can assign another tag to the device or remove an already assigned tag. You can also view all device tags that exist on the Administration Server.
Tagging a device manually
To assign a tag to a device manually:
- View tags assigned to the device to which you want to assign another tag.
- Click Add.
- In the window that opens, do one of the following:
- To create and assign a new tag, select Create new tag, and then specify the name of the new tag.
- To select an existing tag, select Assign existing tag, and then select the necessary tag in the drop-down list.
- Click OK to apply the changes.
- Click Save to save the changes.
The selected tag is assigned to the device.
Removing an assigned tag from a device
To remove a tag from a device:
- In the main menu, go to Assets (Devices) → Managed devices.
- Click the name of the device whose tags you want to view.
- In the device properties window that opens, select the Tags tab.
- Select the check box next to the tag that you want to remove.
- At the top of the list, click the Unassign tag? button.
- In the window that opens, click Yes.
The tag is removed from the device.
The unassigned device tag is not deleted. If you want, you can delete it manually.
You cannot manually remove tags assigned to the device by applications or Network Agent. To remove these tags, use the klscflag utility.
Viewing rules for tagging devices automatically
To view rules for tagging devices automatically,
Do any of the following:
- In the main menu, go to Assets (Devices) → Tags → Auto-tagging rules.
- In the main menu, go to Assets (Devices) → Tags → Device tags, and then click the Set up auto-tagging rules link.
- View tags assigned to a device and then click the Settings button.
The list of rules for auto-tagging devices appears.
Editing a rule for tagging devices automatically
To edit a rule for tagging devices automatically:
- View rules for tagging devices automatically.
- Click the name of the rule that you want to edit.
A rule settings window opens.
- Edit the general properties of the rule:
- In the Rule name field, change the rule name.
The name cannot be more than 256 characters long.
- Do any of the following:
- Enable the rule by switching the toggle button to Rule enabled.
- Disable the rule by switching the toggle button to Rule disabled.
- In the Rule name field, change the rule name.
- Do any of the following:
- If you want to add a new condition, click the Add button, and specify the settings of the new condition in the window that opens.
- If you want to edit an existing condition, click the name of the condition that you want to edit, and then edit the condition settings.
- If you want to delete a condition, select the check box next to the name of the condition that you want to delete, and then click Delete.
- Click OK in the conditions settings window.
- Click Save to save the changes.
The edited rule is shown in the list.
Creating a rule for tagging devices automatically
To create a rule for tagging devices automatically:
- View rules for tagging devices automatically.
- Click Add.
A new rule settings window opens.
- Configure the general properties of the rule:
- In the Rule name field, enter the rule name.
The name cannot be more than 256 characters long.
- Do one of the following:
- Enable the rule by switching the toggle button to Rule enabled.
- Disable the rule by switching the toggle button to Rule disabled.
- In the Tag field, enter the new device tag name or select one of the existing device tags from the list.
The name cannot be more than 256 characters long.
- In the Rule name field, enter the rule name.
- In the conditions section, click the Add button to add a new condition.
A new condition settings window open.
- Enter the condition name.
The name cannot be more than 256 characters long. The name must be unique within a rule.
- Set up the triggering of the rule according to the following conditions. You can select multiple conditions.
- Network—Network properties of the device, such as DNS name of the device or device inclusion in an IP subnet.
If case sensitive collation is set for the database that you use for Open Single Management Platform, keep case when you specify a device DNS name. Otherwise, the auto-tagging rule will not work.
- Applications—Presence of Network Agent on the device, operating system type, version, and architecture.
- Virtual machines—Device belongs to a specific type of virtual machine.
- Applications registry—Presence of applications of different vendors on the device.
- Network—Network properties of the device, such as DNS name of the device or device inclusion in an IP subnet.
- Click OK to save the changes.
If necessary, you can set multiple conditions for a single rule. In this case, the tag will be assigned to a device if it meets at least one condition.
- Click Save to save the changes.
The newly created rule is enforced on devices managed by the selected Administration Server. If the settings of a device meet the rule conditions, the device is assigned the tag.
Later, the rule is applied in the following cases:
- Automatically and periodically, depending on the server workload
- After you edit the rule
- When you run the rule manually
- After Administration Server detects a change in the settings of a device that meets the rule conditions or the settings of a group that contains such a device
You can create multiple tagging rules. A single device can be assigned multiple tags if you have created multiple tagging rules and if the respective conditions of these rules are met simultaneously. You can view the list of all assigned tags in the device properties.
Page topRunning rules for auto-tagging devices
When a rule is run, the tag specified in properties of this rule is assigned to devices that meet conditions specified in properties of the same rule. You can run only active rules.
To run rules for auto-tagging devices:
- View rules for tagging devices automatically.
- Select check boxes next to active rules that you want to run.
- Click the Run rule button.
The selected rules are run.
Deleting a rule for tagging devices automatically
To delete a rule for tagging devices automatically:
- View rules for tagging devices automatically.
- Select the check box next to the rule that you want to delete.
- Click Delete.
- In the window that opens, click Delete again.
The selected rule is deleted. The tag that was specified in properties of this rule is unassigned from all of the devices that it was assigned to.
The unassigned device tag is not deleted. If you want, you can delete it manually.
Data encryption and protection
Data encryption reduces the risk of unintentional leakage of sensitive and corporate data if your laptop or hard drive is stolen or lost. Also, data encryption allows you to prevent access by unauthorized users and applications.
You can use the data encryption feature if your network includes Windows-based managed devices with Kaspersky Endpoint Security for Windows installed. In this case, on devices running a Windows operating system, you can manage the following types of encryption:
- BitLocker Drive Encryption
- Kaspersky Disk Encryption
By using these components of Kaspersky Endpoint Security for Windows, you can, for example, enable or disable encryption, view the list of encrypted drives, or generate and view reports about encryption.
To configure encryption, define the Kaspersky Endpoint Security for Windows policy in Open Single Management Platform. Kaspersky Endpoint Security for Windows performs encryption and decryption according to the active policy. For detailed instructions on how to configure rules and for a description of encryption features, see the Kaspersky Endpoint Security for Windows Help.
Encryption management for a hierarchy of Administration Servers is currently not available in the Web Console. Use the primary Administration Server to manage encrypted devices.
You can show or hide some of the interface elements related to the encryption management feature by using the user interface settings.
Viewing the list of encrypted drives
In Open Single Management Platform, you can view details about encrypted drives and devices that are encrypted at the drive level. After the information on a drive is decrypted, the drive is automatically removed from the list.
To view the list of encrypted drives,
In the main menu, go to Operations → Data encryption and protection → Encrypted drives.
If the section is not on the menu, this means that it is hidden. In the user interface settings, enable the Show data encryption and protection option to display the section.
You can export the list of encrypted drives to a CSV or TXT file. To do this, click the Export to CSV or Export to TXT button.
Viewing the list of encryption events
When running data encryption or decryption tasks on devices, Kaspersky Endpoint Security for Windows sends Open Single Management Platform information about events of the following types:
- Cannot encrypt or decrypt a file, or create an encrypted archive, due to a lack of free disk space.
- Cannot encrypt or decrypt a file, or create an encrypted archive, due to license issues.
- Cannot encrypt or decrypt a file, or create an encrypted archive, due to missing access rights.
- The application has been prohibited from accessing an encrypted file.
- Unknown errors.
To view a list of events that occurred during data encryption on devices,
In the main menu, go to Operations → Data encryption and protection → Encryption events.
If the section is not on the menu, this means that it is hidden. In the user interface settings, enable the Show data encryption and protection option to display the section.
You can export the list of encrypted drives to a CSV or TXT file. To do this, click the Export to CSV or Export to TXT button.
Alternatively, you can examine the list of encryption events for every managed device.
To view the encryption events for a managed device:
- In the main menu, go to Assets (Devices) → Managed devices.
- Click on the name of a managed device.
- On the General tab, go to the Protection section.
- Click the View data encryption errors link.
Creating and viewing encryption reports
You can generate the following reports:
- Report on encryption status of managed devices. This report provides details about the data encryption of various managed devices. For example, the report shows the number of devices to which the policy with configured encryption rules applies. Also, you can find out, for instance, how many devices need to be rebooted. The report also contains information about the encryption technology and algorithm for every device.
- Report on encryption status of mass storage devices. This report contains similar information as the report on the encryption status of managed devices, but it provides data only for mass storage devices and removable drives.
- Report on rights to access encrypted drives. This report shows which user accounts have access to encrypted drives.
- Report on file encryption errors. This report contains information about errors that occurred when the data encryption or decryption tasks were run on devices.
- Report on blockage of access to encrypted files. This report contains information about blocking application access to encrypted files. This report is helpful if an unauthorized user or application tries to access encrypted files or drives.
You can generate any report in the Monitoring & reporting → Reports section. Alternatively, in the Operations → Data encryption and protection section, you can generate the following encryption reports:
- Report on encryption status of mass storage devices
- Report on rights to access encrypted drives
- Report on file encryption errors
To generate an encryption report in the Data encryption and protection section:
- Make sure that you enabled the Show data encryption and protection option in the Interface options.
- In the main menu, go to Operations → Data encryption and protection.
- Open one of the following sections:
- Encrypted drives generates the report on encryption status of mass storage devices or the report on rights to access encrypted drives.
- Encryption events generates the report on file encryption errors.
- Click the name of the report that you want to generate.
The report generation starts.
Granting access to an encrypted drive in offline mode
A user can request access to an encrypted device, for example, when Kaspersky Endpoint Security for Windows is not installed on the managed device. After you receive the request, you can create an access key file and send it to the user. All of the use cases and detailed instructions are provided in the Kaspersky Endpoint Security for Windows Help.
To grant access to an encrypted drive in offline mode:
- Get a request access file from a user (a file with the FDERTC extension). Follow the instructions in the Kaspersky Endpoint Security for Windows Help to generate the file in Kaspersky Endpoint Security for Windows.
- In the main menu, go to Operations → Data encryption and protection → Encrypted drives.
A list of encrypted drives appears.
- Select the drive to which the user requested access.
- Click the Grant access to the device in offline mode button.
- In the window that opens, select the Kaspersky Endpoint Security for Windows plug-in.
- Follow the instructions provided in the Kaspersky Endpoint Security for Windows Help (see the instructions for OSMP Console at the end of the section).
After that, the user applies the received file to access the encrypted drive and read data stored on the drive.
Changing the Administration Server for client devices
You can change the Administration Server to a different one for specific client devices. For this purpose, use the Change Administration Server task.
To change the Administration Server that manages client devices to a different Server:
- Connect to the Administration Server that manages the devices.
- Create the Administration Server change task.
The New task wizard starts. Follow the instructions of the wizard. In the New task window of the New task wizard, select the Kaspersky Security Center 15 application and the Change Administration Server task type. After that, specify the devices for which you want to change the Administration Server:
- Run the created task.
After the task is complete, the client devices for which it was created are put under the management of the Administration Server specified in the task settings.
If the Administration Server supports encryption and data protection and you are creating a Change Administration Server task, a warning is displayed. The warning states that if any encrypted data is stored on devices, after the new Server begins managing the devices, users will be able to access only the encrypted data with which they previously worked. In other cases, no access to encrypted data is provided. For detailed descriptions of scenarios in which access to encrypted data is not provided, refer to the Kaspersky Endpoint Security for Windows Help.
Page topViewing and configuring the actions when devices show inactivity
If client devices within a group are inactive, you can get notifications about it. You can also automatically delete such devices.
To view or configure the actions when the devices in the group show inactivity:
- In the main menu, go to Assets (Devices) → Hierarchy of groups.
- Click the name of the required administration group.
The administration group properties window opens.
- In the properties window, go to the Settings tab.
- In the Inheritance section, enable or disable the following options:
- In the Device activity section, enable or disable the following options:
- Click Save.
Your changes are saved and applied.
Page top