Contents
Setting up ticketing
This section explains how to set up ticketing for your Autotask accounts.
About setting up ticketing
Tickets allow timely responses to different types of events or changes in computer status that occur on the network. Automated ticketing allows you to reduce significantly the time spent monitoring and managing your Autotask accounts.
You must establish ticketing rules to enable automatic creation and assignment of tickets in Autotask. You can set up creation and assignment of tickets depending on the event severity or when a computer status changes to Critical or Warning in Kaspersky Lab security applications.
Tickets created on the basis of computer status changes are automatically closed when the corresponding issue is resolved and the status description that triggered the ticket creation is no longer relevant. For example, when a computer's status becomes Warning because a "Databases are out of date" status description is assigned, a corresponding ticket is created. When the databases are updated, the status description "Databases are out of date" is no longer relevant, and the ticket is automatically closed. However, the computer status might remain Warning because of other status descriptions, for example, "Many viruses detected".
Tickets created on the basis of events Mailboxes protection is not provided and License-related issue occurred that occur in Kaspersky Security for Microsoft Office 365 are also closed when the corresponding issue is resolved.
Tickets created on the basis of all other events that occur in Kaspersky Security for Microsoft Office 365 and tickets created on the basis of events that occur in Kaspersky Security Center or Kaspersky Endpoint Security Cloud are not closed automatically, so you must close these tickets manually.
You can create and modify ticketing rules for your Autotask accounts. Ticketing rules are applicable to all accounts that are mapped to Kaspersky Security Center virtual servers or Kaspersky Business Hub companies. Ticketing rules are configured individually for events and for computer statuses. When configuring integration between Autotask and Kaspersky Business Hub, you must set up ticketing separately for Kaspersky Endpoint Security Cloud and Kaspersky Security for Microsoft Office 365.
Page topGeneral ticketing settings
In the General section of the Ticketing tab, you can configure general ticketing settings. General settings are applicable to all tickets that have been automatically created in Autotask as a result of events or computer status changes that occur in Kaspersky Lab security applications. General settings provide the required initial values to the ticket attributes so that tickets are created correctly in Autotask.
Configuring general ticketing settings
To configure general ticketing settings:
- In the Kaspersky Security Integration Tool for MSP window, click the Ticketing tab.
- In the left pane, select the General section.
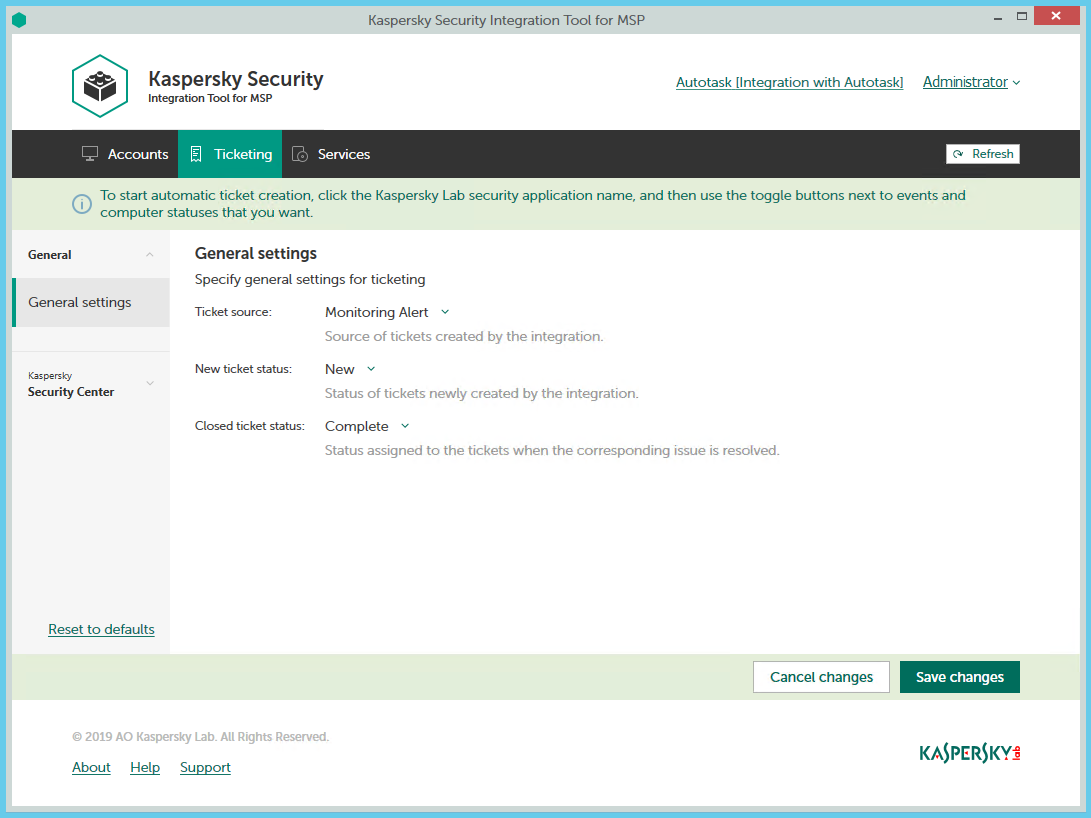
The General Settings right pane allows you to configure general settings for ticketing.
- Edit the following settings:
- In the Ticket source drop-down list, select the source to be assigned to new tickets that are automatically created in Autotask when an event is triggered or a change in computer status occurs. This value is optional; it is displayed in the ticket properties in Autotask.
- In the New ticket status drop-down list, select the status to be assigned to new tickets that are automatically created in Autotask when an event is triggered or a change in computer status occurs. By default, these tickets are assigned the New status. This value is required.
- In the Closed ticket status drop-down list, select the status to be assigned to tickets when they are automatically closed by Kaspersky Security Integration Service for MSP after the corresponding issue in the Kaspersky Lab security application has been resolved. By default, these tickets are assigned the Complete status. This value is required.
- When you finish configuring general ticketing settings, click the Save changes button to save the ticketing settings.
General ticketing settings are configured and Autotask tickets are created in accordance with the specified rules.
You can cancel changes and reset general ticketing settings to their last saved values.
To cancel changes to general ticketing settings and restore last saved values:
- Open the Ticketing tab and in the left pane select the General section.
- Click the Cancel changes button.
You can also reset general ticketing settings to their default values.
To reset general ticketing settings to their default values:
- Open the Ticketing tab and in the left pane select the General section.
- Click the Reset to defaults link.
Ticketing for events
The ticketing settings depend on the Kaspersky Lab solution that you use: Kaspersky Security Center or Kaspersky Business Hub.
Ticketing for events that occur in Kaspersky Security Center
On the Ticketing tab, you can configure ticketing rules for events that occur in Kaspersky Security Center. You can edit ticketing settings either for an individual event or for several events at the same time.
Configuring ticketing for events
To set up ticketing for events:
- In the Kaspersky Security Integration Tool for MSP window, click the Ticketing tab.
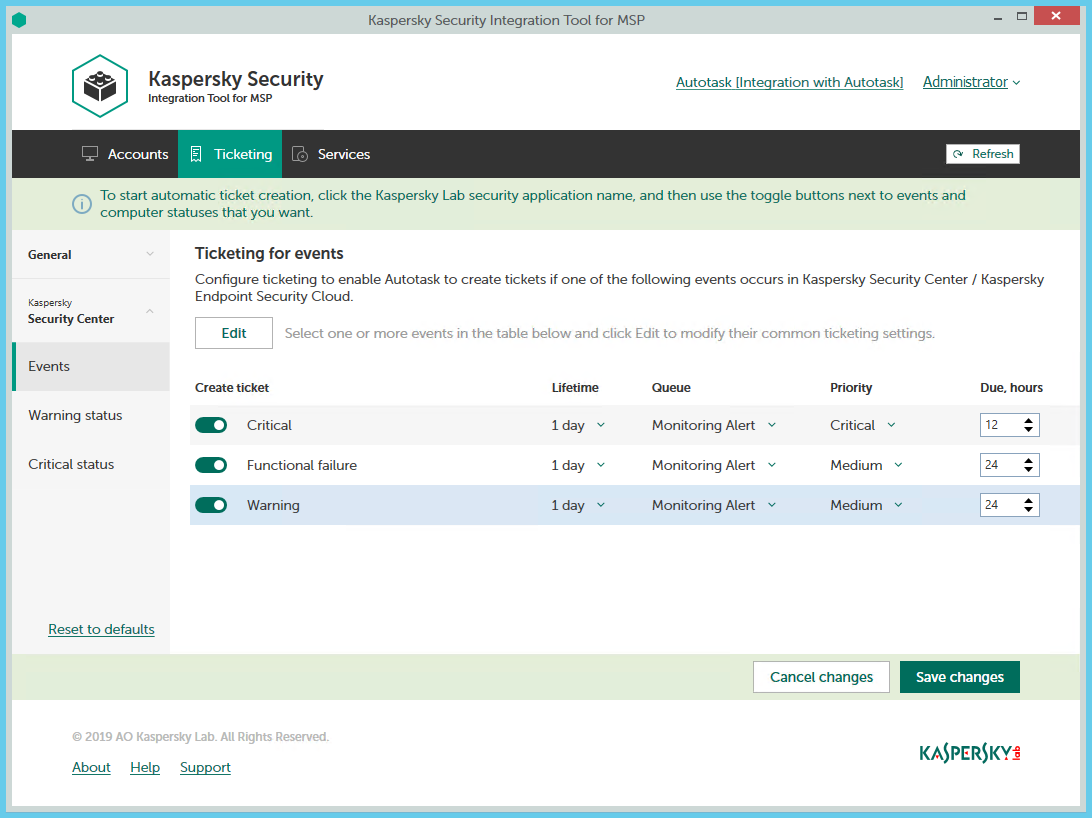
- In the left pane, select the Events section to configure ticketing for events.
- Do one of the following:
- To configure ticketing for one event severity, use the toggle button in the Create ticket column to enable ticket creation for the corresponding event severity. In the Lifetime, Queue, Priority, and Due, hours columns, edit the settings as required.
By default, ticketing is disabled for all event severities.
- To configure ticketing for one or several event severities simultaneously, select the lines that contain required event severities, and then click the Edit button above the table. The Ticketing settings for events window opens.
Editing ticketing settings for multiple event severities is useful if you want to assign the same settings to these event severities. If you want the ticketing settings to be different, edit them individually for each event severity.
You can edit the following ticketing settings:
- On / Off (or, in the main window, the toggle button)—Enable or disable ticket creation for the selected event severities.
- Lifetime—Select the period, in days, during which the events are still relevant. The default value is 1 day.
This value is used to determine whether to create a ticket for an event in Autotask. If the connection between Autotask and Kaspersky Security Center has been broken and events have not been sent for some time, only events more recent than the specified period are sent to Autotask as tickets. A different relevance period can be set for different event severities.
- Queue—Select the queue in which to put the created ticket. The drop-down list contains the names of the Autotask queues. By default, tickets are put in the Monitoring Alert queue. This setting is required.
- Priority—Select the priority level for the tickets created in Autotask. Assigning priority levels is used to prioritize corresponding Autotask tickets. The ticket priority allows you to respond to the issues in order of their importance, so that more urgent problems can be resolved sooner. The default priority for Critical events is Critical, and for Warning and Functional Failure events it is Medium. If one of these basic priority values is deleted in Autotask, the default value is blank. This setting is required.
- Due—Specify the time interval during which the ticket issue must be resolved and the ticket must be closed. The default value is 12 hours.
- Work type—Select the work type to be assigned to the ticket. This setting is present only in the Ticketing settings for events window.
- Issue type—Select the Autotask issue type to be assigned to the ticket. This setting is present only in the Ticketing settings for events window.
- Issue subtype—Select the Autotask issue subtype to be assigned to the ticket. This setting is present only in the Ticketing settings for events window.
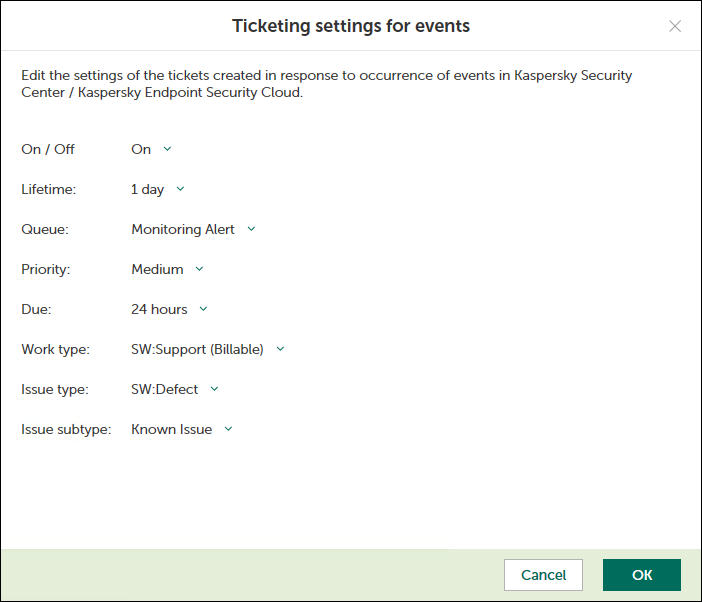
Ticketing settings for events window
- To configure ticketing for one event severity, use the toggle button in the Create ticket column to enable ticket creation for the corresponding event severity. In the Lifetime, Queue, Priority, and Due, hours columns, edit the settings as required.
- When you finish configuring ticketing for events, click the Save changes button to save the ticketing settings.
Ticketing for event severities is configured and Autotask tickets will be created in accordance with the specified rules.
Kaspersky Security Integration Service for MSP can create tickets only for active Autotask accounts. Therefore, make sure that the Active check box is selected in the account properties.
You can cancel changes and reset ticketing settings to their last saved values.
To cancel changes of ticketing settings and restore last saved values:
- Open the Ticketing tab.
- In the left pane, select the Events section.
- Click the Cancel changes button.
You can also reset ticketing settings to their default values.
To reset ticketing settings to their default values:
- Open the Ticketing tab.
- In the left pane, select the Events section.
- Click the Reset to defaults link.
Ticketing for events that occur in Kaspersky Endpoint Security Cloud and Kaspersky Security for Microsoft Office 365
On the Ticketing tab, you can configure ticketing rules for events that occur in Kaspersky Endpoint Security Cloud and Kaspersky Security for Microsoft Office 365. You can edit ticketing settings either for an individual event or for several events at the same time.
Configuring ticketing for events
To set up ticketing for events:
- In the Kaspersky Security Integration Tool for MSP window, click the Ticketing tab.
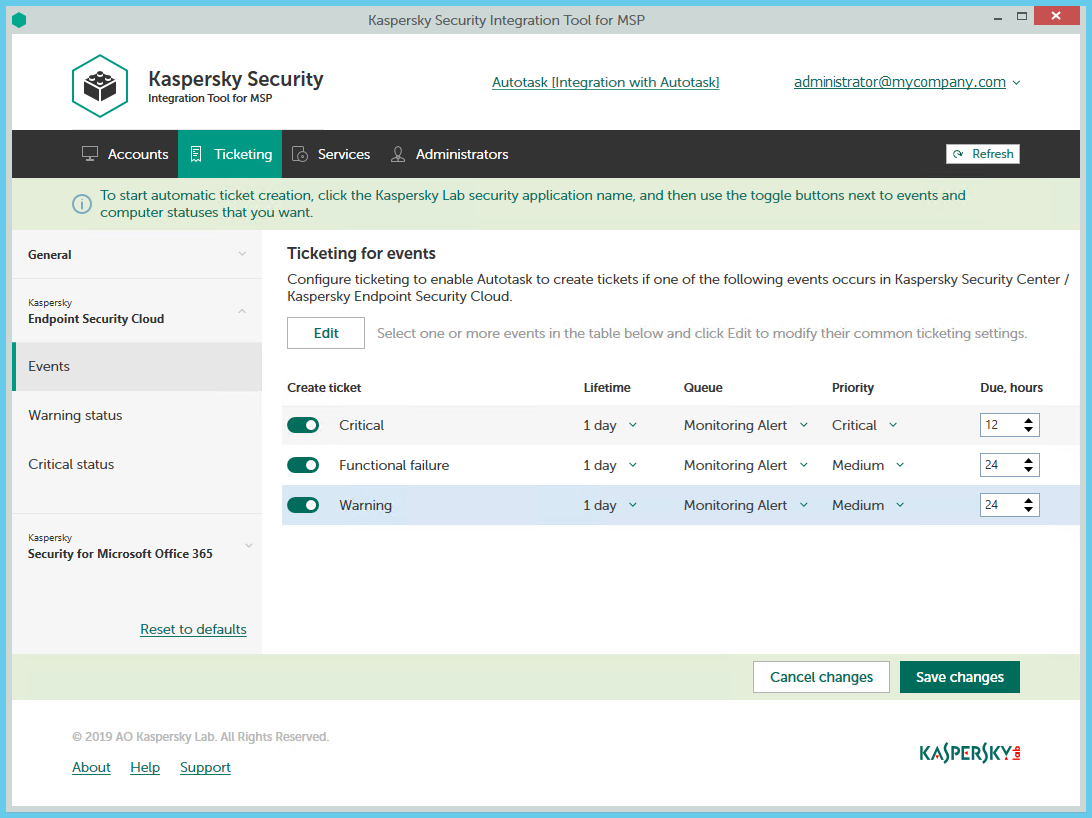
- In the left pane, click the Kaspersky Lab security application name, and then select the Events section to configure ticketing for events. You can configure ticketing separately for events that occur in Kaspersky Endpoint Security Cloud and Kaspersky Security for Microsoft Office 365.
- Do one of the following:
- To configure ticketing for one event severity (in Kaspersky Endpoint Security Cloud) or for one event type (in Kaspersky Security for Microsoft Office 365), use the toggle button in the Create ticket column to enable ticket creation for the corresponding event severity or event type. In the Lifetime, Queue, Priority, and Due, hours columns, edit the settings as required.
By default, ticketing is disabled for all event severities and event types.
- To configure ticketing for one or several event severities or event types simultaneously, select the lines that contain required event severities or event types, and then click the Edit button above the table. The Ticketing settings for events window opens.
Editing ticketing settings for multiple event severities or event types is useful if you want to assign the same settings to these event severities or event types. If you want the ticketing settings to be different, edit them individually for each event severity or event type.
You can edit the following ticketing settings:
- On / Off (or, in the main window, the toggle button)—Enable or disable ticket creation for the selected event severities or event types.
- Lifetime—Select the period, in days, during which the events are still relevant. The default value is 1 day. This setting is not present for events that occur in Kaspersky Security for Microsoft Office 365.
This value is used to determine whether to create a ticket for an event in Autotask. If the connection between Autotask and Kaspersky Endpoint Security Cloud has been broken and events have not been sent for some time, only events more recent than the specified period are sent to Autotask as tickets. A different relevance period can be set for different event severities.
- Queue—Select the queue in which to put the created ticket. The drop-down list contains the names of the Autotask queues. By default, tickets are put in the Monitoring Alert queue. This setting is required.
- Priority—Select the priority level for the tickets created in Autotask. Assigning priority levels is used to prioritize corresponding Autotask tickets. The ticket priority allows you to respond to the issues in order of their importance, so that more urgent problems can be resolved sooner. The default priority for Critical events that occur in Kaspersky Endpoint Security Cloud is Critical, and for Warning and Functional Failure events it is Medium. The default priority for all events that occur in Kaspersky Security for Microsoft Office 365 is Critical. If one of these basic priority values is deleted in Autotask, the default value is blank. This setting is required.
- Due—Specify the time interval during which the ticket issue must be resolved and the ticket must be closed. The default value is 12 hours.
- Work type—Select the work type to be assigned to the ticket. This setting is present only in the Ticketing settings for events window.
- Issue type—Select the Autotask issue type to be assigned to the ticket. This setting is present only in the Ticketing settings for events window.
- Issue subtype—Select the Autotask issue subtype to be assigned to the ticket. This setting is present only in the Ticketing settings for events window.
Ticketing settings for events window
- To configure ticketing for one event severity (in Kaspersky Endpoint Security Cloud) or for one event type (in Kaspersky Security for Microsoft Office 365), use the toggle button in the Create ticket column to enable ticket creation for the corresponding event severity or event type. In the Lifetime, Queue, Priority, and Due, hours columns, edit the settings as required.
- When you finish configuring ticketing for events, click the Save changes button to save the ticketing settings.
Ticketing for event severities or event types is configured and Autotask tickets will be created in accordance with the specified rules.
Kaspersky Security Integration Service for MSP can create tickets only for active Autotask accounts. Therefore, make sure that the Active check box is selected in the account properties.
You can cancel changes and reset ticketing settings to their last saved values.
To cancel changes of ticketing settings and restore last saved values:
- Open the Ticketing tab.
- In the left pane, click the Kaspersky Lab security application name, and then select the Events section.
- Click the Cancel changes button.
You can also reset ticketing settings to their default values.
To reset ticketing settings to their default values:
- Open the Ticketing tab.
- In the left pane, click the Kaspersky Lab security application name, and then select the Events section.
- Click the Reset to defaults link.
Ticketing for computer statuses
On the Ticketing tab, you can configure ticketing rules for the computer statuses. This allows tickets to be created in Autotask when the computer status in Kaspersky Security Center or Kaspersky Endpoint Security Cloud changes to Warning or Critical. You can edit ticketing settings either for an individual computer status or for several statuses at the same time.
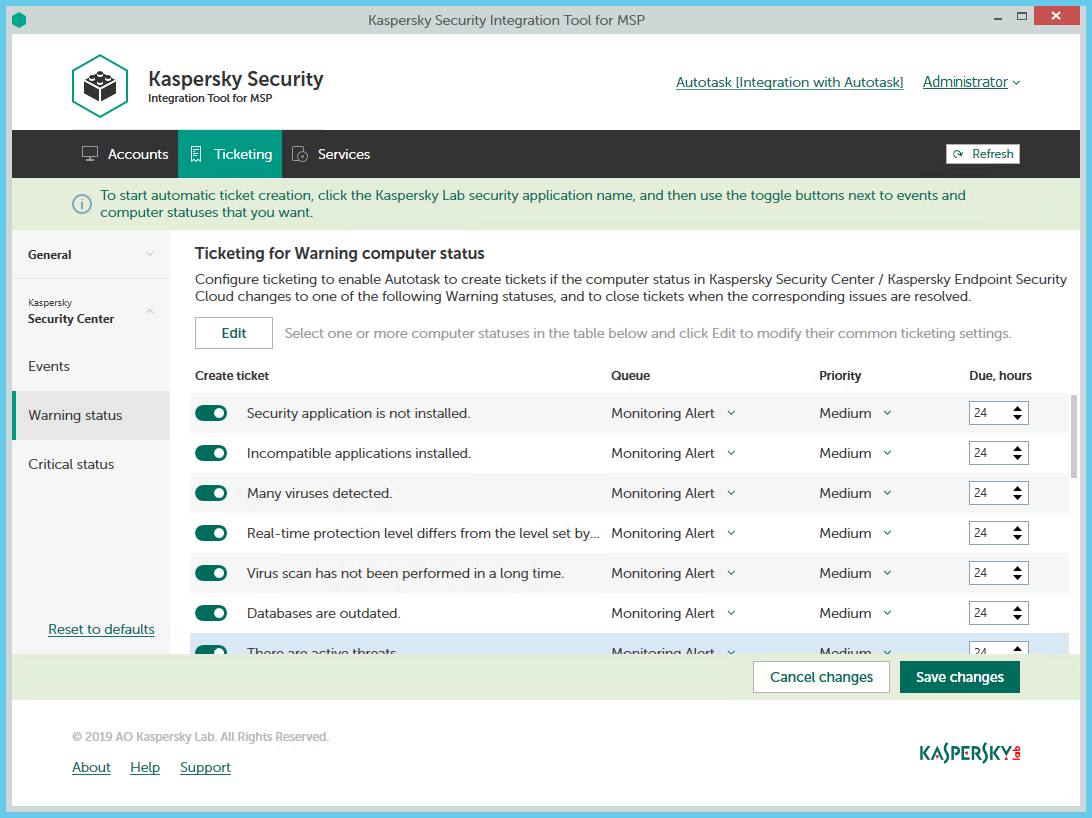
Configuring ticketing for computer statuses
To set up ticketing for computer status:
- In the Kaspersky Security Integration Tool for MSP window, click the Ticketing tab.
- In the left pane, select the Warning status or Critical status section to configure ticketing for computer statuses.
- Do one of the following:
- To configure ticket creation for one status, use the toggle button in the Create ticket column to enable ticket creation for the corresponding status change. In the Queue, Priority, and Due, hours columns, edit the settings as required.
By default, ticket creation is disabled for all computer status descriptions.
- To configure ticket creation for one or several statuses simultaneously, select the lines that contain the required status description, and then click the Edit button above the table. The Ticketing settings for computer status change window opens.
Editing ticketing settings for multiple computer statuses is useful if you want to assign the same ticketing settings to these computer statuses. If you want the ticketing settings to be different, edit them individually for each computer status.
You can edit the following ticketing settings:
- On / Off (or, in the main window, the toggle button)—Enable or disable ticket creation for the selected status changes.
- Queue—Select the queue in which to put the created ticket. The drop-down list contains the names of the Autotask queues. By default, the tickets are put in the Monitoring Alert queue. This setting is required.
- Priority—Select the priority level for the tickets created in Autotask. Assigning priority levels to the tickets created for computer status change is used to prioritize corresponding Autotask tickets. The ticket priority allows you to respond to the issues in order of their importance, so that more urgent problems can be resolved sooner. The default priority for Critical computer statuses is Critical, and for Warning computer statuses it is Medium. If one of these basic priority values is deleted in Autotask, the default value is blank. This setting is required.
- Due—Specify the time interval during which the ticket issue must be resolved and the ticket must be closed. The default value for Critical computer statuses is 12 hours, and for Warning computer statuses it is 24 hours.
- Work type—Select the work type to be assigned to the ticket. This setting is present only in the Ticketing settings for computer status change window.
- Issue type—Select the Autotask issue type to be assigned to the ticket. This setting is present only in the Ticketing settings for computer status change window.
- Issue subtype—Select the Autotask issue subtype to be assigned to the ticket. This setting is present only in the Ticketing settings for computer status change window.

Ticketing settings for computer status change window
- To configure ticket creation for one status, use the toggle button in the Create ticket column to enable ticket creation for the corresponding status change. In the Queue, Priority, and Due, hours columns, edit the settings as required.
- When you finish configuring ticketing for computer statuses, click the Save changes button to save the ticketing settings.
Ticketing for computer statuses is configured and Autotask tickets will be created in accordance with the specified rules.
Kaspersky Security Integration Service for MSP can create Tickets only for active Autotask accounts. Therefore, make sure that the Active check box is selected in the account properties.
You can cancel changes and reset ticketing settings to their last saved values.
To cancel changes of ticketing settings and restore last saved values:
- Open the Ticketing tab.
- In the left pane, click the Kaspersky Lab solution name, and then select the Warning status or Critical status section.
- Click the Cancel changes button.
You can also reset ticketing settings to their default values.
To reset ticketing settings to their default values:
- Open the Ticketing tab.
- In the left pane, click the Kaspersky Lab solution name, and then select the Warning status or Critical status section.
- Click the Reset to defaults link.