Contents
Managing integrations
This section describes how to edit or delete an existing integration and how to create a new integration. For example, you may have to edit, delete, or create an integration when you change the vendor of your Professional Services Automation system.
Creating a new integration
You can create a new integration in the Kaspersky Security Integration Tool for MSP window.
Creating a new integration
To create a new integration with Tigerpaw:
- At the top of the Kaspersky Security Integration Tool for MSP window, click the name of the current integration.
- In the Integration Settings window that opens, click the New integration button.
A new Integration Settings window opens. The fields for the connection settings are blank.
- Specify the values for the following settings of the integration:
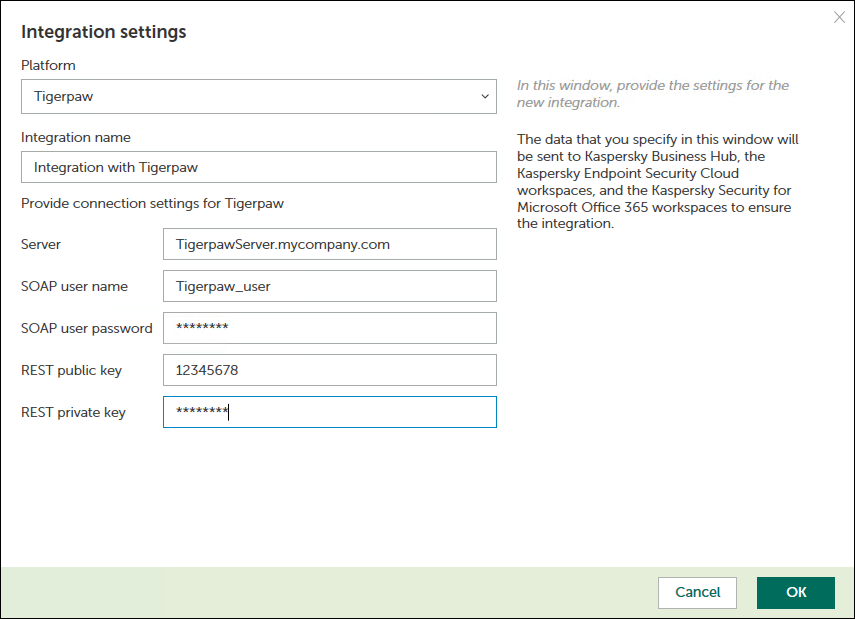
- Platform—Select the integration platform from the drop-down list. The list contains the names of all platforms that Kaspersky Security Center or Kaspersky Business Hub can be integrated with. For integration with Tigerpaw, select Tigerpaw.
- Integration name—Name of the new integration. This field cannot be blank. By default, the integration name is Integration with Tigerpaw. The integration name is displayed in the Kaspersky Security Integration Tool for MSP window as a link that allows you to view and access the integration properties.
For an integration with Kaspersky Business Hub, click the View integration ID link under the integration name to view the identifier of the integration. You may have to provide this ID to Kaspersky Lab Technical Support for diagnostics and troubleshooting.
- SOAP user name—ASMX API user name that you created for your integration. This field cannot be blank.
- SOAP password—Password for the ASMX API user that you created for your integration. This field cannot be blank.
For details about how to obtain the ASMX API user name and password, see Configuring ASMX API connection parameters.
- REST public key—Public key generated by Tigerpaw for the rep account that you use for your integration. This field cannot be blank.
- REST private key—Private key generated by Tigerpaw for the rep account that you use for your integration. This field cannot be blank.
Tigerpaw generates both public and private keys. For details about how to generate the keys, see Configuring REST API connection parameters.
- Click OK when you have finished specifying the integration settings.
The settings are saved and then used by Kaspersky Security Integration with Tigerpaw to gain access to Tigerpaw.
A new integration with Tigerpaw is created.
Page topEditing and viewing an existing integration
You can view and edit settings of an existing integration in the Kaspersky Security Integration Tool for MSP window.

Editing an integration
To view and edit integration with Tigerpaw:
- At the top of the window, click the name of the integration whose settings you want to view or modify.
- In the Integration Settings window that opens, in the Select integration drop-down list select the required integration.
- Modify the following settings of the selected integration:
- Integration name—Name of the selected integration. By default, the integration name is Integration with Tigerpaw. You can edit this field, however, it cannot be blank.
For an integration with Kaspersky Business Hub, click the View integration ID link under the integration name to view the identifier of the integration. You may have to provide this ID to Kaspersky Lab Technical Support for diagnostics and troubleshooting.
- SOAP user name—ASMX API user name that you created for your integration. This field cannot be blank.
- SOAP password—Password for the ASMX API user that you created for your integration. This field cannot be blank.
For details about how to obtain the ASMX API user name and password, see Configuring ASMX API connection parameters.
- REST public key—Public key generated by Tigerpaw for the rep account that you use for your integration. This field cannot be blank.
- REST private key—Private key generated by Tigerpaw for the rep account that you use for your integration. This field cannot be blank.
Tigerpaw generates both public and private keys. For details about how to generate the keys, see Configuring REST API connection parameters.
- Integration name—Name of the selected integration. By default, the integration name is Integration with Tigerpaw. You can edit this field, however, it cannot be blank.
- Click OK when you have finished editing the integration settings.
The settings are saved and then used by Kaspersky Security Integration with Tigerpaw to gain access to Tigerpaw.
The integration with Tigerpaw is modified and saved.
Page topDeleting an existing integration
You can delete an existing integration in the Kaspersky Security Integration Tool for MSP window.
When you delete an integration, all virtual servers or companies that were linked to the integration are unbound from the integration but continue to exist in Kaspersky Security Center or Kaspersky Business Hub. All administrators of the deleted integration receive notifications that the integration was deleted, but they can continue to administer Kaspersky Business Hub companies that were linked to this integration.
All Kaspersky Security Center virtual servers or Kaspersky Business Hub companies that are unbound from the deleted integration can be added to other integrations.
To delete integration with Tigerpaw:
- At the top of the Kaspersky Security Integration Tool for MSP window, click the name of the integration that you want to delete.
- In the integration window that opens, click Delete to delete the integration.
- Click Yes to confirm deletion.
The integration settings are cleared, indicating that the integration is deleted.