Contents
Getting started
After you install Kaspersky Security Integration with ConnectWise Manage, you establish a connection between it and ConnectWise Manage. The connection enables you to configure integration using Kaspersky Security Integration Tool for MSP and enables Kaspersky Security Integration Service for MSP to send Service Tickets and license usage information to ConnectWise Manage. To establish connection, create a new integration using Kaspersky Security Integration Tool for MSP.
The integration process varies depending on which Kaspersky Lab solution you use. This section describes how to configure integration with Kaspersky Security Center and with Kaspersky Business Hub.
Prerequisites
When configuring integration, you must specify the parameters of the Kaspersky Lab solution you integrate with (Kaspersky Security Center or Kaspersky Business Hub) and ConnectWise Manage connection parameters. It is recommended that you check these parameters in advance in order to prepare for setting up integration.
Kaspersky Security Center parameters
Check the following parameters:
- Address of the computer on which Kaspersky Security Center Administration Server is installed.
- Credentials: user name and password for the computer on which Administration Server is installed.
- If you establish connection to the Administration Server through a proxy server, check the proxy server parameters: network address or domain name and credentials for the proxy server.
Kaspersky Business Hub parameters
Check the credentials of your Kaspersky Business Hub account: email address and password.
ConnectWise Manage parameters
Check the following parameters:
- Web address of the site that hosts the ConnectWise Manage Server.
- Name of your company in ConnectWise Manage, that is, the company name you use to log in to ConnectWise Manage.
- Public and private keys generated by ConnectWise Manage. Note that the private key is available only at the time the key is created.
For details on how to generate the keys, see Setting up public and private keys in ConnectWise Manage.
Additional prerequisites
During the integration process, it is required to add virtual servers or companies to your integration. These virtual servers or companies are then mapped to ConnectWise Manage companies.
For each client company in ConnectWise Manage, create and assign a separate Kaspersky Security Center virtual server / Kaspersky Business Hub company prior to integration.
One-to-one mapping is supported, and therefore the number of virtual servers or companies must not exceed the number of your managed companies.
Page topSetting up public and private keys in ConnectWise Manage
To create integration between ConnectWise Manage and Kaspersky Security Integration with ConnectWise Manage, you have to provide API keys. API keys are public and private keys that are generated by ConnectWise Manage for an integration account.
To create API keys in ConnectWise Manage:
- In ConnectWise Manage, click System → Members and either select an existing member or create a new one.
Make sure that the member you selected has all the rights necessary to set up the integration.
- On the Member Maintenance screen, click the API Keys tab and then click the New Item button.
- In the Description field, type the description for the newly created keys (for example, Kaspersky Integration).
- Click the Save button to save the new item.
The two API keys are generated and displayed in the Public Key and Private Key fields.
The private key is displayed only at the time it is created.
Make a note of both keys or copy them to the Clipboard because there is no way to recover the private key after the API Keys tab is closed.
You will have to specify these keys when you configure integration with ConnectWise Manage.
Page topIntegrating with Kaspersky Security Center
This section describes how to create and configure integration between ConnectWise Manage and Kaspersky Security Center by using Kaspersky Security Integration Tool for MSP.
To successfully create integration, connect to Kaspersky Security Center Administration Server and perform the steps described in the following sections.
Connecting to Kaspersky Security Center Administration Server
When you start Kaspersky Security Integration Tool for MSP, the connection settings window opens. In this window, specify the settings to connect to Kaspersky Security Center Administration Server.
Connecting to Kaspersky Security Center Administration Server
To connect to Kaspersky Security Center Administration Server:
- In the Start menu, select Kaspersky Security Integration Tool for MSP.
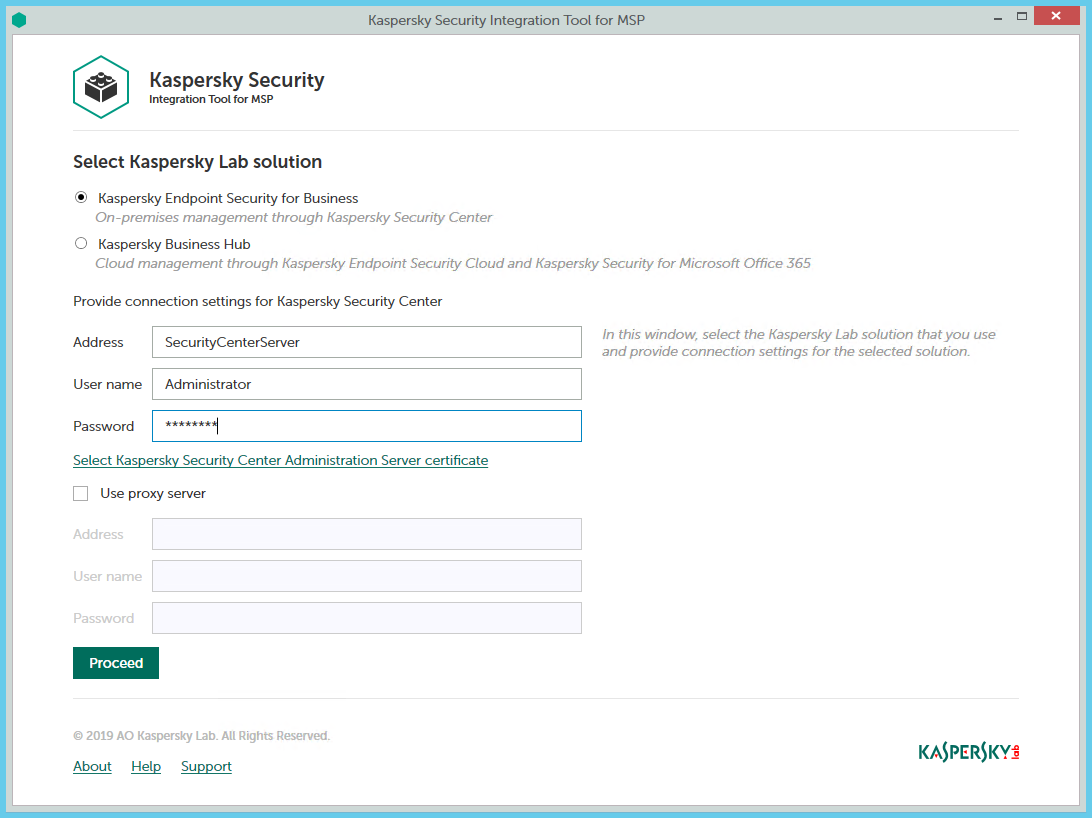
- In the window that opens, select the Kaspersky Endpoint Security for Business solution to connect to Kaspersky Security Center Administration Server.
- You can connect to Kaspersky Security Center Administration Server in one of the following ways:
- By providing the connection parameters for the computer on which the Administration Server is installed.
If you selected this method of connection, specify the following connection settings. None of the fields can be blank.
- Address—Address of the computer on which the Administration Server is installed. You can specify this value as an IP address or as a domain name of the computer.
- User name—User name to connect to the computer on which the Administration Server is installed, that is, to the computer whose address you specified in the Address field.
- Password—Password to connect to the computer, on which the Administration Server is installed, that is, to the computer whose address you specified in the Address field.
- By selecting the Administration Server certificate.
In this case, you do not have to provide the connection parameters for the computer on which the Administration Server is installed. Kaspersky Security Integration Tool for MSP uses the certificate of Kaspersky Security Center Administration Server to connect to this Administration Server. Usage of the certificate guarantees that Kaspersky Security Integration Tool for MSP connects to the Administration Server from which the certificate was downloaded.
The Administration Server certificate is created automatically during installation of the Administration Server and is stored in the %ProgramData%\Application Data\KasperskyLab\adminkit\1093\cert folder on the computer that has Administration Server installed. Before starting to use the Administration Server certificate for authentication, copy the certificate file, klserver.cer, to the computer on which Kaspersky Security Integration Tool for MSP is installed.
- By providing the connection parameters for the computer on which the Administration Server is installed.
To use Administration Server certificate:
- Click the Select Kaspersky Security Center Administration Server certificate link.
- In the window that opens, select the Use a certificate check box, click Browse, and then navigate to the certificate file.
- Click OK to start using the selected certificate for connection.
- If you want to establish the connection to the Administration Server through a proxy server, select the Use proxy server check box. By default, this check box is cleared.
If you selected the Use proxy server check box, provide the following proxy-server settings:
- Address—Network address of the proxy server. Provide the address as a full domain name of the proxy server.
- User name—User name to connect to the proxy server.
- Password—Password to connect to the proxy server.
- Click the Proceed button to connect to the Administration Server using the specified settings.
The system validates the provided settings and connects to the Administration Server.
Creating a Kaspersky Security Center integration with ConnectWise Manage
After you connect to the Administration Server, the integration settings window opens, where you can create an integration between ConnectWise Manage and Kaspersky Security Center by means of Kaspersky Security Integration Tool for MSP.
Creation of an integration between ConnectWise Manage and Kaspersky Security Center is required only when you launch Kaspersky Security Integration Tool for MSP for the first time.
Specifying ConnectWise Manage integration settings
To create integration with ConnectWise Manage:
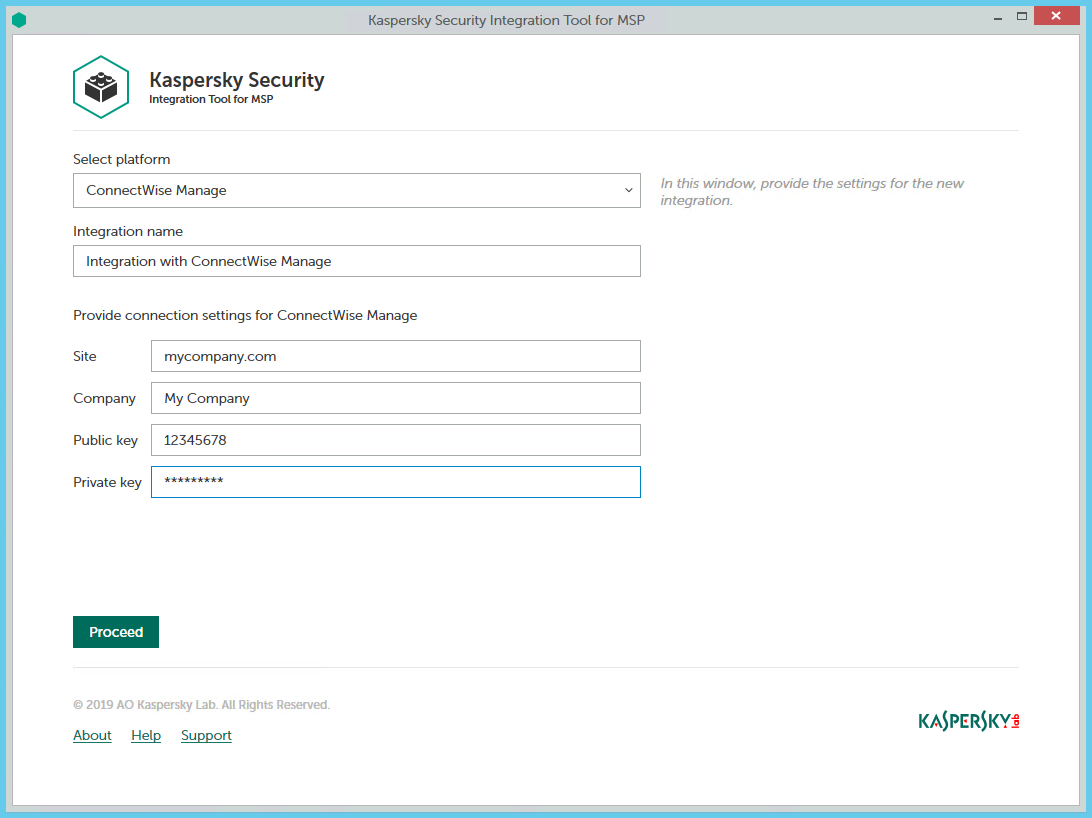
- In the integration settings window that opens after you connect to the Administration Server, specify the following settings for the newly created integration:
- Select platform—Select the integration platform from the drop-down list. The list contains the names of all the platforms that Kaspersky Security Center can be integrated with. For integration with ConnectWise Manage, select ConnectWise Manage.
- Integration name—Name of the new integration. This field cannot be blank. By default, the integration name is Integration with ConnectWise Manage. The integration name is displayed in the Kaspersky Security Integration Tool for MSP window as a link that allows you to view and access the integration properties.
For an integration with Kaspersky Business Hub, click the View integration ID link under the integration name to view the identifier of the integration. You may have to provide this ID to Kaspersky Lab Technical Support for diagnostics and troubleshooting.
- Site—Web address of the site that hosts the ConnectWise Manage Server. This field cannot be blank.
When you set up integration with ConnectWise Manage Cloud, specify the web address of the site that hosts the ConnectWise Manage Server with the ‘api-' prefix. Use one of the following sites based on your location:
- North American Cloud:
api-na.myconnectwise.net - European Cloud:
api-eu.myconnectwise.net - South African Cloud:
api-za.myconnectwise.net - Australian Cloud:
api-au.myconnectwise.net
- North American Cloud:
- Company—Name of your company in ConnectWise Manage. It is the company name you use to log in to ConnectWise Manage. This field cannot be blank.
- Public key—Public key generated by ConnectWise Manage. This field cannot be blank.
- Private key—Private key generated by ConnectWise Manage. This field cannot be blank. The private key is available only at the time the key is created.
ConnectWise Manage generates both public and private keys. For details on how to generate the keys, see section Setting up public and private keys in ConnectWise Manage.
- Click the Proceed button when you have finished specifying the integration settings.
The system validates the ConnectWise Manage integration settings. If the settings you provide are correct, they are saved and then used by Kaspersky Security Integration with ConnectWise Manage to gain access to ConnectWise Manage.
Kaspersky Security Center is now integrated with ConnectWise Manage.
Adding virtual servers to the integration
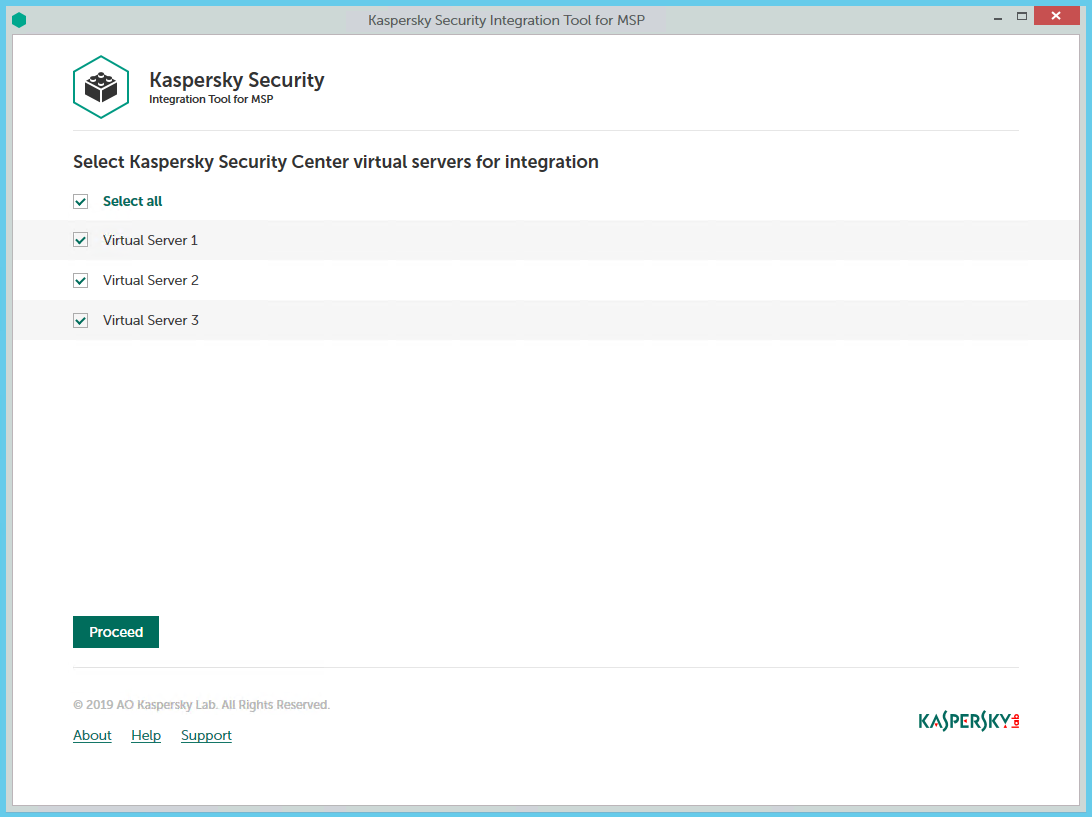
After an integration with ConnectWise Manage is created, a window opens where you can add Kaspersky Security Center virtual servers to the integration. Kaspersky Security Center virtual servers are then mapped to the ConnectWise Manage companies.
Adding virtual servers to the integration
To add Kaspersky Security Center virtual servers to the integration:
- In the window, which lists Kaspersky Security Center virtual servers, select the check boxes next to the existing virtual servers to add them to the integration.
If you want to add all virtual servers to the integration, select the Select all check box.
- Click Proceed.
You will now be able to map these virtual servers to ConnectWise Manage companies.
Each virtual server can be added to one integration only. That is, if a virtual server is added to an integration, it is not displayed in a list of virtual servers available for another integration.
Integrating with Kaspersky Business Hub
This section describes how to create and configure integration between ConnectWise Manage and Kaspersky Business Hub by means of Kaspersky Security Integration Tool for MSP.
To successfully create integration, connect to Kaspersky Business Hub and perform the steps described in the following sections.
Connecting to Kaspersky Business Hub
When you start Kaspersky Security Integration Tool for MSP, the connection settings window opens. In this window, specify the settings to connect to Kaspersky Business Hub.
Connecting to Kaspersky Business Hub
To connect to Kaspersky Business Hub:
- In the Start menu, select Kaspersky Security Integration Tool for MSP.
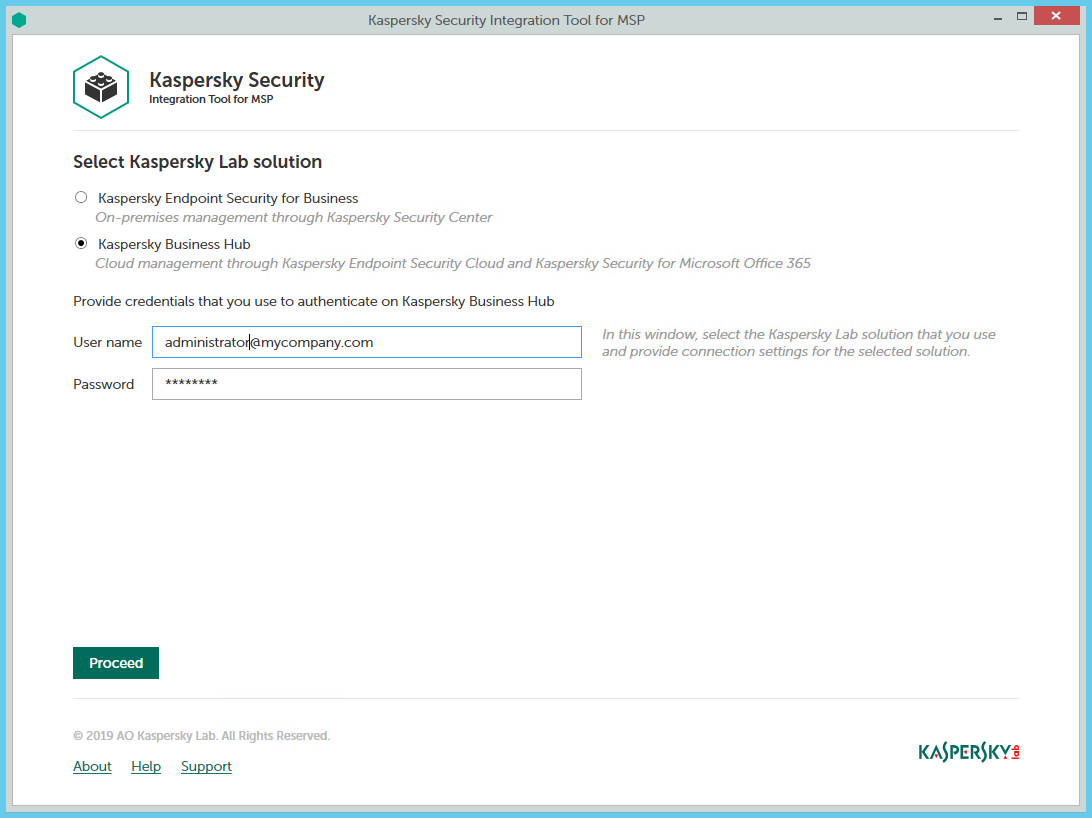
- In the window that opens, select the Kaspersky Business Hub solution.
- Specify the following connection settings:
- User name—Email address that you use to connect to Kaspersky Business Hub. This field cannot be blank.
- Password—Password that you use to connect to Kaspersky Business Hub. This field cannot be blank.
- Click the Proceed button to connect to Kaspersky Business Hub by using the specified settings.
The system validates the provided settings and establishes connection to Kaspersky Business Hub.
Creating a Kaspersky Business Hub integration with ConnectWise Manage
After you connect to the Kaspersky Business Hub, the integration settings window opens, where you can create an integration between ConnectWise Manage and Kaspersky Business Hub by means of Kaspersky Security Integration Tool for MSP.
Creation of an integration between ConnectWise Manage and Kaspersky Business Hub is required only when you launch Kaspersky Security Integration Tool for MSP for the first time.
Specifying ConnectWise Manage integration settings
To create integration with ConnectWise Manage:
- In the integration settings window that opens after you connect to Kaspersky Business Hub, specify the following settings for the newly created integration:
- Select platform—Select the integration platform from the drop-down list. The list contains the names of all platforms that Kaspersky Business Hub can be integrated with. For integration with ConnectWise Manage, select ConnectWise Manage.
- Integration name—Name of the new integration. This field cannot be blank. By default, the integration name is Integration with ConnectWise Manage. The integration name is displayed in the Kaspersky Security Integration Tool for MSP window as a link that allows you to view and access the integration properties.
For an integration with Kaspersky Business Hub, click the View integration ID link under the integration name to view the identifier of the integration. You may have to provide this ID to Kaspersky Lab Technical Support for diagnostics and troubleshooting.
- Site—Web address of the site that hosts the ConnectWise Manage Server. This field cannot be blank.
When you set up integration with ConnectWise Manage Cloud, specify the web address of the site that hosts the ConnectWise Manage Server with the ‘api-' prefix. Use one of the following sites based on your location:
- North American Cloud:
api-na.myconnectwise.net - European Cloud:
api-eu.myconnectwise.net - South African Cloud:
api-za.myconnectwise.net - Australian Cloud:
api-au.myconnectwise.net
- North American Cloud:
- Company—Name of your company in ConnectWise Manage. It is the company name you use to log in to ConnectWise Manage. This field cannot be blank.
- Public key—Public key generated by ConnectWise Manage. This field cannot be blank.
- Private key—Private key generated by ConnectWise Manage. This field cannot be blank. The private key is available only at the time the key is created.
ConnectWise Manage generates both public and private keys. For details on how to generate the keys, see section Setting up public and private keys in ConnectWise Manage.
- Click the Proceed button when you have finished specifying the integration settings.
The system validates the ConnectWise Manage integration settings. If the settings you provide are correct, they are saved and then used by Kaspersky Security Integration with ConnectWise Manage to gain access to ConnectWise Manage.
Kaspersky Business Hub is now integrated with ConnectWise Manage.
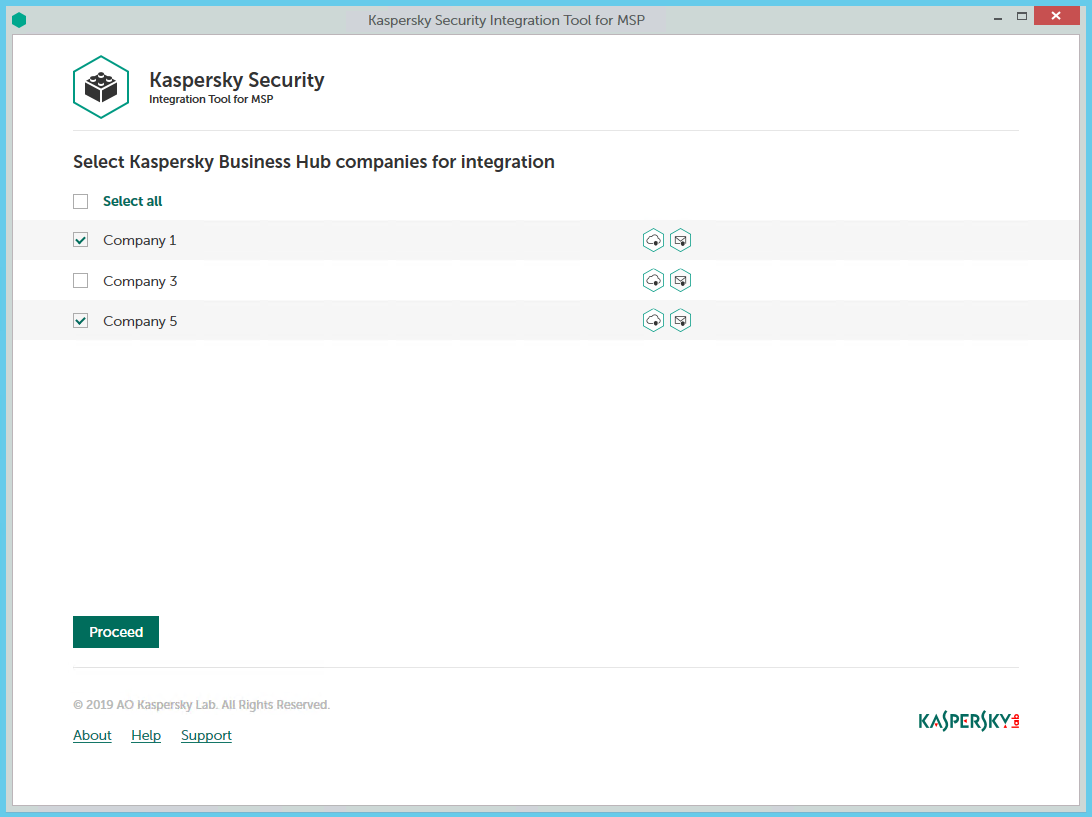
Adding Kaspersky Business Hub companies to the integration
After an integration with ConnectWise Manage is created, a window opens where you can add Kaspersky Business Hub companies to the integration. Kaspersky Business Hub companies are then mapped to the ConnectWise Manage companies.
You cannot add separate Kaspersky Endpoint Security Cloud workspaces or Kaspersky Security for Microsoft Office 365 workspaces to the integration. You can add only entire Kaspersky Business Hub companies. All workspaces created for a company in Kaspersky Business Hub are added to the integration.
Adding companies to the integration
To add Kaspersky Business Hub companies to the integration:
- In the window, which lists Kaspersky Business Hub companies, select the check boxes next to the existing companies to add them to the integration. Icons next to the name of each company show which workspaces are created for this company in Kaspersky Business Hub.
If you want to add all companies to the integration, select the Select all check box.
- Click Proceed.
You will now be able to map these companies to ConnectWise Manage companies.
Each Kaspersky Business Hub company can be added to one integration only. That is, if a company is added to an integration, it is not displayed in a list of companies available for another integration.
Supplementary parameter
The parameter that indicates the type of Kaspersky Business Hub server to which Kaspersky Security Integration Tool for MSP connects may be included in the .config file (IntegrationUI.exe.config) of Kaspersky Security Integration Tool for MSP.
The parameter name is KESCloudServer; and its possible values are:
- production—Kaspersky Security Integration Tool for MSP works with the Production server.
- beta—Kaspersky Security Integration Tool for MSP works with the Beta server.
- test—Kaspersky Security Integration Tool for MSP works with the Test server.
You are strongly urged not to modify the KESCloudServer parameter unless you receive clear instructions from Kaspersky Lab.
The IntegrationUI.exe.config file is stored in the installation folder of Kaspersky Security Integration Tool for MSP. The default path is C:\Program Files (x86)\Kaspersky Lab\Kaspersky Security Integration Tool for MSP\IntegrationUI.exe.config.
By default, the KESCloudServer parameter is not displayed in the .config file of Kaspersky Security Integration Tool for MSP.
The KESCloudServer parameter can be specified as follows:
<appSettings>
<add key="KESCloudServer" value="production" />
</appSettings>