Contents
Getting started with Kaspersky Security Plug-in for ConnectWise Automate
After you install Kaspersky Security Plug-in for ConnectWise Automate, you must perform additional configuration in ConnectWise Automate Control Center to be able to use the Plug-in with your Kaspersky Lab solution.
This section describes the actions that you must perform when getting started with Kaspersky Security Plug-in for ConnectWise Automate. The actions depend on the Kaspersky Lab solution you use. Refer to one of the following sections to get started with Kaspersky Security Plug-in for ConnectWise Automate.
Prerequisites
When configuring integration, you must specify the parameters of the Kaspersky Lab solution you integrate with (Kaspersky Security Center / Kaspersky Endpoint Security Cloud). It is recommended that you check these parameters in advance in order to prepare for setting up integration.
Kaspersky Security Center parameters
Check the following parameters:
- Address of the computer on which Kaspersky Security Center Administration Server is installed.
- Credentials: user name and password for the computer on which Administration Server is installed.
- If you establish connection to the Administration Server through a proxy server, check the proxy server parameters: network address or domain name and credentials for the proxy server.
Kaspersky Endpoint Security Cloud parameters
Check the credentials of your Kaspersky Business Hub account: email address and password.
Additional prerequisites
During the integration process, it is required to add Kaspersky Endpoint Security Cloud workspaces to your integration. Prior to integration, you must create workspaces and distribute computers of client companies between these workspaces.
If you use Kaspersky Security Center, creation of virtual servers is optional.
Page topGetting started if Kaspersky Security Center Administration Server is used
After you install Kaspersky Security Plug-in for ConnectWise Automate, deploy it on the computers where Kaspersky Security Center Administration Server is installed.
Kaspersky Security Plug-in for ConnectWise Automate adds new role detection rules to the ConnectWise Automate database. The new roles are Kaspersky Security Administration Server and Kaspersky Security Network Agent. These roles are used by the Plug-in to automatically detect the Administration Server computers, and the client computers, managed by the Administration Server. The Plug-in is then deployed on computers that have Administration Server installed. However, role detection and Plug-in deployment occur not immediately but instead during the scheduled synchronization procedure. You can force the process of role detection and Plug-in deployment manually using the tools provided by ConnectWise Automate.
You can perform the Plug-in deployment procedure at any level: for a client, a location, or an individual computer. When you deploy the Plug-in for a higher level, it is deployed for all sublevels as well. For example, when you deploy the Plug-in for a location, it is deployed for all the computers at this location that have Kaspersky Security Center installed.
To get started using the Plug-in:
- In the ConnectWise Automate navigation tree, use the context menu to execute the Commands → Inventory → Update Config command for all Kaspersky Security Center Administration Servers and computers, managed by the Administration Servers, or for the computers' parent client or location.
When you execute the command for a client or location, the command is applied to all the computers under this client or location. As a result, the configuration of the selected computers is updated and includes new Plug-in role definitions.
- Also in the ConnectWise Automate navigation tree, use the context menu to execute the Commands → Inventory → Resend System Info command for all Administration Servers and computers, managed by the Administration Servers, or for the computers' parent client or location.
As a result, the Automate Agents on the selected computers send the updated system information, including information on the detected roles, to the ConnectWise Automate server.
Getting started if Kaspersky Endpoint Security Cloud is used
After you install Kaspersky Security Plug-in for ConnectWise Automate, it must be integrated with Kaspersky Endpoint Security Cloud.
The integration process consists of the following phases:
- Creating a new integration or editing an existing one. At this phase, you create an integration and add workspaces and administrators to this integration, or edit the list of workspaces and administrators of an existing integration. Adding workspaces to an integration is required to get information on computers and events from these workspaces. Adding administrators is required to allow these administrators to manage the workspaces and integration itself.
- Assigning the "bridge" role to the computer. This role indicates that this computer interacts with Kaspersky Endpoint Security Cloud and connects ConnectWise Automate and Kaspersky Endpoint Security Cloud like a bridge.
- Providing the connection settings for the bridge. At this step, you specify the credentials to be used by the bridge to connect to Kaspersky Endpoint Security Cloud.
Managing integrations
This section describes how to edit or delete an existing integration and how to create a new integration.
Creating a new integration
When you use Kaspersky Security Plug-in for ConnectWise Automate for the first time, you must create an integration between Kaspersky Endpoint Security Cloud and ConnectWise Automate.
Later, you can edit an existing integration, as described in Editing an integration, or create another integration. You may have to create several integrations for load balancing purposes by selecting different workspaces in different integrations, and then assigning the "bridge" role to several computers and connecting each of these computers to different integrations. As a result, the load of interacting with Kaspersky Endpoint Security Cloud is distributed between several computers.
To create an integration:
- Open ConnectWise Automate Control Center.
- Select Dashboard on the toolbar (if you use ConnectWise Automate 10.5 or 11) or select System → Configuration → Dashboard (if you use ConnectWise Automate 12).
- In the System Dashboard window that opens, click the following sequence of tabs: Config → Integration → Kaspersky.
- On the Kaspersky tab, specify the user name and password that you use to connect to Kaspersky Endpoint Security Cloud:
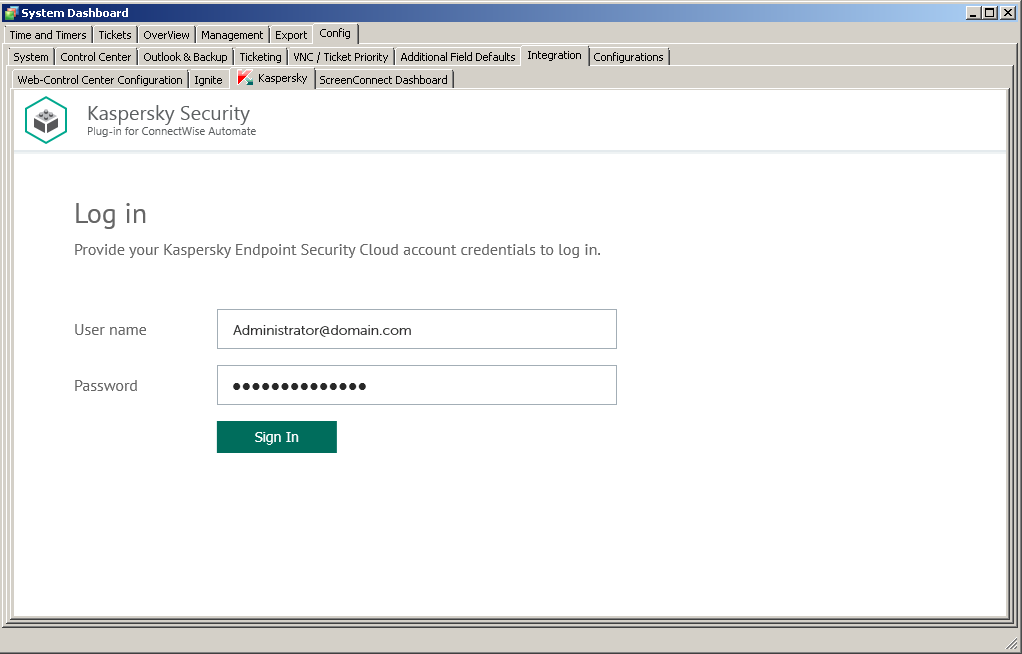
Connecting to Kaspersky Endpoint Security Cloud
- User name—Email address used for your Kaspersky Endpoint Security Cloud account. This field cannot be blank.
- Password—Password to connect to Kaspersky Endpoint Security Cloud. This field cannot be blank.
- Click the Sign in button.
After you connect to Kaspersky Endpoint Security Cloud, the Integration settings section appears.
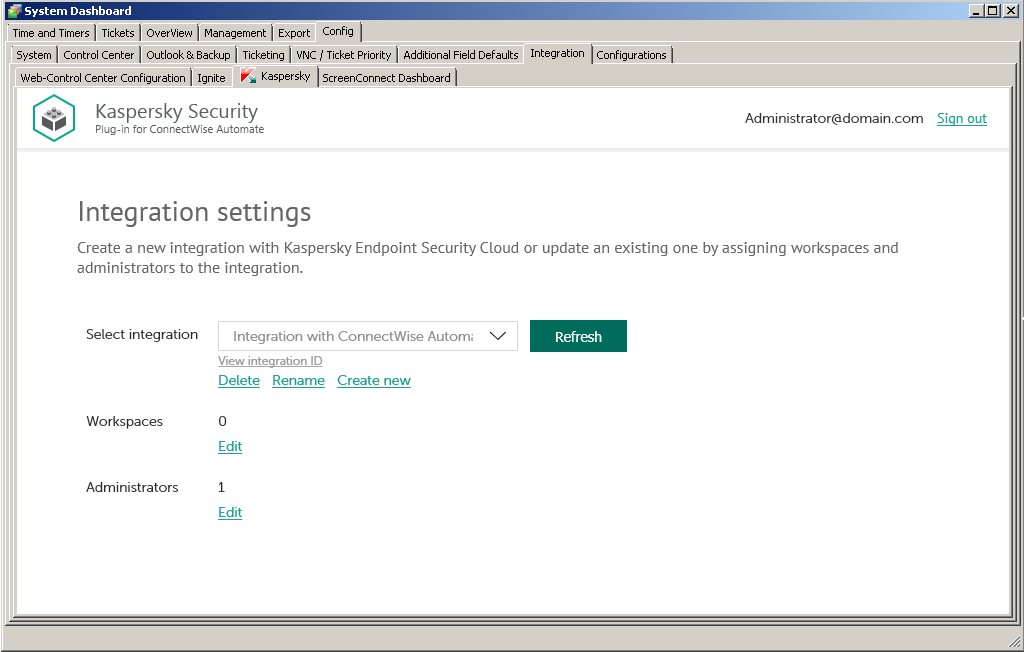
Specifying integration settings
- Click the Create new link.
- Provide the integration name in the dialog box that opens. The Integration name field cannot be blank. By default, the integration name is Integration with ConnectWise Automate.
For an integration with Kaspersky Endpoint Security Cloud, click the View integration ID link under the integration name to view the identifier of the integration. You may have to provide this ID to Kaspersky Lab Technical Support for diagnostics and troubleshooting.
- Specify the following integration settings:
- Workspaces. Select workspaces for your integration. For details, refer to Editing the list of integration workspaces.
- Administrators. Select administrators for your integration. For details, refer to Editing the list of integration administrators.
- To save changes, close the System Dashboard window when you have finished specifying the integration settings.
Kaspersky Endpoint Security Cloud is now integrated with ConnectWise Automate.
Editing an integration
Editing an integration means renaming it or editing the list of workspaces and administrators that are related to the integration, that is, adding or removing workspaces and administrators to / from the integration.
To edit an integration:
- On the Kaspersky tab of ConnectWise Automate Control Center, go to the Integration settings section. For details, refer to Creating a new integration, steps 1–5.
- In the Select integration drop-down list, select the integration that you want to edit.
- If you want to rename the integration, click the Rename link and provide the new integration name in the dialog box that opens. The Integration name field cannot be blank.
For an integration with Kaspersky Endpoint Security Cloud, click the View integration ID link under the integration name to view the identifier of the integration. You may have to provide this ID to Kaspersky Lab Technical Support for diagnostics and troubleshooting.
- If you want to edit the list of workspaces for your integration, refer to Editing the list of integration workspaces.
- If you want to edit the list of administrators for your integration, refer to Editing the list of integration administrators.
- To save changes, close the System Dashboard window when you have finished editing the integration settings.
Kaspersky Endpoint Security Cloud integration with ConnectWise Automate is now updated.
Page topEditing the list of integration workspaces
When you create or edit an integration with ConnectWise Automate, edit the list of Kaspersky Endpoint Security Cloud workspaces associated with your integration.
When you add workspaces to the integration, information from these workspaces is synchronized between Kaspersky Endpoint Security Cloud and ConnectWise Automate, and ConnectWise Automate gains access to these workspaces. You may also have to remove a client’s workspace from the integration, for example, if your company no longer provides services to this client. After you remove a workspace, information from this workspace is no longer synchronized with ConnectWise Automate, but all integration administrators are able to continue administering this workspace in Kaspersky Endpoint Security Cloud.
Adding workspaces to the integration is required when you create a new integration.
To edit the list of integration workspaces:
- In the Integration settings window that opens after you connect to Kaspersky Endpoint Security Cloud, click the Edit link next to Workspaces.
- In the Select workspaces dialog box, the list of workspaces is displayed. Do one of the following:
- Select the check boxes next to the workspaces that you want to add to the integration.
- Clear the check boxes next to the workspaces that you want to remove from the integration.
- Click OK when you have selected the required workspaces.
The list of workspaces associated with the selected integration is now saved.
Editing the list of integration administrators
When you create or edit an integration with ConnectWise Automate, edit the list of administrators of your integration. You can add integration administrators as well.
When you add administrators to the integration, they have the same rights as existing administrators: they can administer all Kaspersky Endpoint Security Cloud workspaces bound to this integration and manage the integration settings.
When you remove administrators from the integration, they can no longer manage this integration and cannot administer its workspaces. You may have to remove administrators, for example, if they stop working for your company or move to new positions within the company and are no longer allowed to manage integrations.
Adding administrators to the integration is required when you create a new integration.
To add integration administrators:
- In the Integration settings window that opens after you connect to Kaspersky Endpoint Security Cloud, click the Add new link next to Administrators.
- In the Add administrators dialog box that opens, specify the email addresses and aliases associated with the Kaspersky Lab accounts of the users that you want to add as new administrators. You can add several administrators at a time.
- Use a semicolon to separate the email address and alias of an administrator.
- Type the data for each administrator in a new line.
Only users registered in Kaspersky Endpoint Security Cloud can be added to the integration.
- Click Next and check the data that you provided. If everything is correct, click Finish to add the administrators to the integration. If you want to change the information you provided, click Back.
- After you perform all the actions with administrators' accounts, click OK.
- The new administrators are added to the list of administrators of the selected integration.
To remove integration administrators:
- In the Integration settings window that opens after you connect to Kaspersky Endpoint Security Cloud, click the Edit link next to Administrators.
The Select administrators dialog box opens, and names of all the administrators of the selected integration are displayed. The check boxes are selected next to all administrators of the integration.
- To remove one or more administrators from the integration, clear the check boxes next to these administrator names.
- Click OK.
The list of administrators associated with the selected integration is now saved. The removed administrators can no longer administer the workspaces of this integration.
Deleting an existing integration
You can delete an existing integration in the Integration settings section.
When you delete an integration, all workspaces linked to the integration are unbound from the integration and continue to exist in Kaspersky Endpoint Security Cloud. All administrators of the deleted integration receive notifications that the integration was deleted, but they can continue to administer workspaces that were linked to this integration. All workspaces that are unbound from the deleted integration can be added to other integrations.
To delete an integration:
- On the Kaspersky tab of ConnectWise Automate Control Center, go to the Integration settings section. For details, refer to Creating a new integration, steps 1–5.
- In the Select integration drop-down list, select the integration that you want to delete.
- Click Delete.
- Confirm integration deletion in the dialog box.
The integration is deleted.
Page topSupplementary parameter
The parameter that indicates the type of Kaspersky Endpoint Security Cloud server to which Kaspersky Security Plug-in for ConnectWise Automate connects may be included in the .config file of ConnectWise Automate.
The parameter name is KESCloudServer; its possible values are:
- production—Kaspersky Security Plug-in for ConnectWise Automate works with the Production server.
- beta—Kaspersky Security Plug-in for ConnectWise Automate works with the Beta server.
- test—Kaspersky Security Plug-in for ConnectWise Automate works with the Test server.
You are strongly urged not to modify the KESCloudServer parameter unless you receive clear instructions from Kaspersky Lab.
By default, the KESCloudServer parameter is not displayed in the .config file of ConnectWise Automate.
The KESCloudServer parameter can be specified as follows:
<appSettings>
<add key="KESCloudServer" value="production" />
</appSettings>
Managing the "bridge" role of a computer
When you install Kaspersky Security Plug-in for ConnectWise Automate, a new role definition is added to the ConnectWise Automate configuration. This role definition is Kaspersky Endpoint Security Cloud Bridge. This role shows that a computer with such a role interacts with Kaspersky Endpoint Security Cloud, connecting it to ConnectWise Automate like a bridge.
The computer to be assigned the "bridge" role must meet the following requirements:
- Stable access to the Internet.
- ConnectWise Automate Agent installed.
- Kaspersky Security Center Administration Console installed.
The "bridge" role is assigned to a computer manually. When you assign the "bridge" role to a computer, the computer is authorized to perform requests to Kaspersky Endpoint Security Cloud and return the results to ConnectWise Automate.
You can also remove the "bridge" role from a computer, for example, if you want to assign this role to another computer.
The exact steps required to assign and remove the "bridge" role depend on the ConnectWise Automate version that you use.
If you use ConnectWise Automate 10.5 or 11
To assign the "bridge" role to a computer:
- In the ConnectWise Automate navigation tree, select the computer to which you want to assign the "bridge" role.
- Right-click the selected computer, point to Commands → LabTech, and then click Kaspersky - Assign Kaspersky Endpoint Security Cloud Bridge Role.
Configuration of the selected computer is updated and the "bridge" role is assigned to the computer.
- Double-click the selected computer. The computer management screen opens.
- Click the Detected Roles tab (if you use ConnectWise Automate 10.5), or on the Automation (
 ) tab click the Detected Roles tile (if you use ConnectWise Automate 11), and check that the "bridge" role is present in the list of roles for the selected computer.
To remove the "bridge" role from a computer:
- In the ConnectWise Automate navigation tree, select the computer from which you want to remove the "bridge" role.
- Right-click the selected computer, point to Commands → LabTech, and then click Kaspersky - Remove Kaspersky Endpoint Security Cloud Bridge Role.
Configuration of the selected computer is updated and the "bridge" role is removed from the computer.
- Double-click the selected computer. The computer management screen opens.
- Click the Detected Roles tab (if you use ConnectWise Automate 10.5), or on the Automation () tab click the Detected Roles tile (if you use ConnectWise Automate 11), and check that the "bridge" role is absent in the list of roles for the selected computer.
If you use ConnectWise Automate 12
To assign the "bridge" role to a computer:
- In the ConnectWise Automate 12 browser, select the computer to which you want to assign the "bridge" role.
- Double-click the selected computer. The computer management screen opens.
- On the Automation () tab, click the Detected Roles tile. Click the Add button.
- In the Role Template list, select Kaspersky Endpoint Security Cloud Bridge. Click OK to save the changes.
- In the ConnectWise Automate navigation tree, right-click the computer, point to Commands → Remote Agent, and then click Update Plug-ins.
- On the Automation () tab of the computer management screen, click the Detected Roles tile and check that the "bridge" role is present in the list of roles for the selected computer.
To remove the "bridge" role from a computer:
- In the ConnectWise Automate 12 browser, select the computer from which you want to remove the "bridge" role.
- Double-click the selected computer. The computer management screen opens.
- On the Automation () tab, click the Detected Roles tile.
- Right-click the Kaspersky Endpoint Security Cloud Bridge role, and then click Delete Role. Confirm the action.
- In the ConnectWise Automate navigation tree, right-click the computer, point to Commands → Remote Agent, and then click Update Plug-ins.
- On the Automation () tab of the computer management screen, click the Detected Roles tile and check that the "bridge" role is absent in the list of roles for the selected computer.