Contents
Starting the Collector Installation Wizard
A collector consists of two parts: one part is created inside the KUMA web interface, and the other part is installed on the network infrastructure server intended for receiving events. The Installation Wizard creates the first part of the collector.
To start the Collector Installation Wizard:
- In the KUMA web interface, in the Resources section, click Add event source.
- In the KUMA web interface in the Resources → Collectors section click Add collector.
Follow the instructions of the Wizard.
Event Source Connection Wizard
Aside from the first and last steps of the Wizard, the steps of the Wizard can be performed in any order. You can switch between steps by using the Next and Previous buttons, as well as by clicking the names of the steps in the left side of the window.
After the Wizard completes, a resource set for a collector is created in the KUMA web interface under Resources → Collectors, and a collector service is added under Resources → Active services.
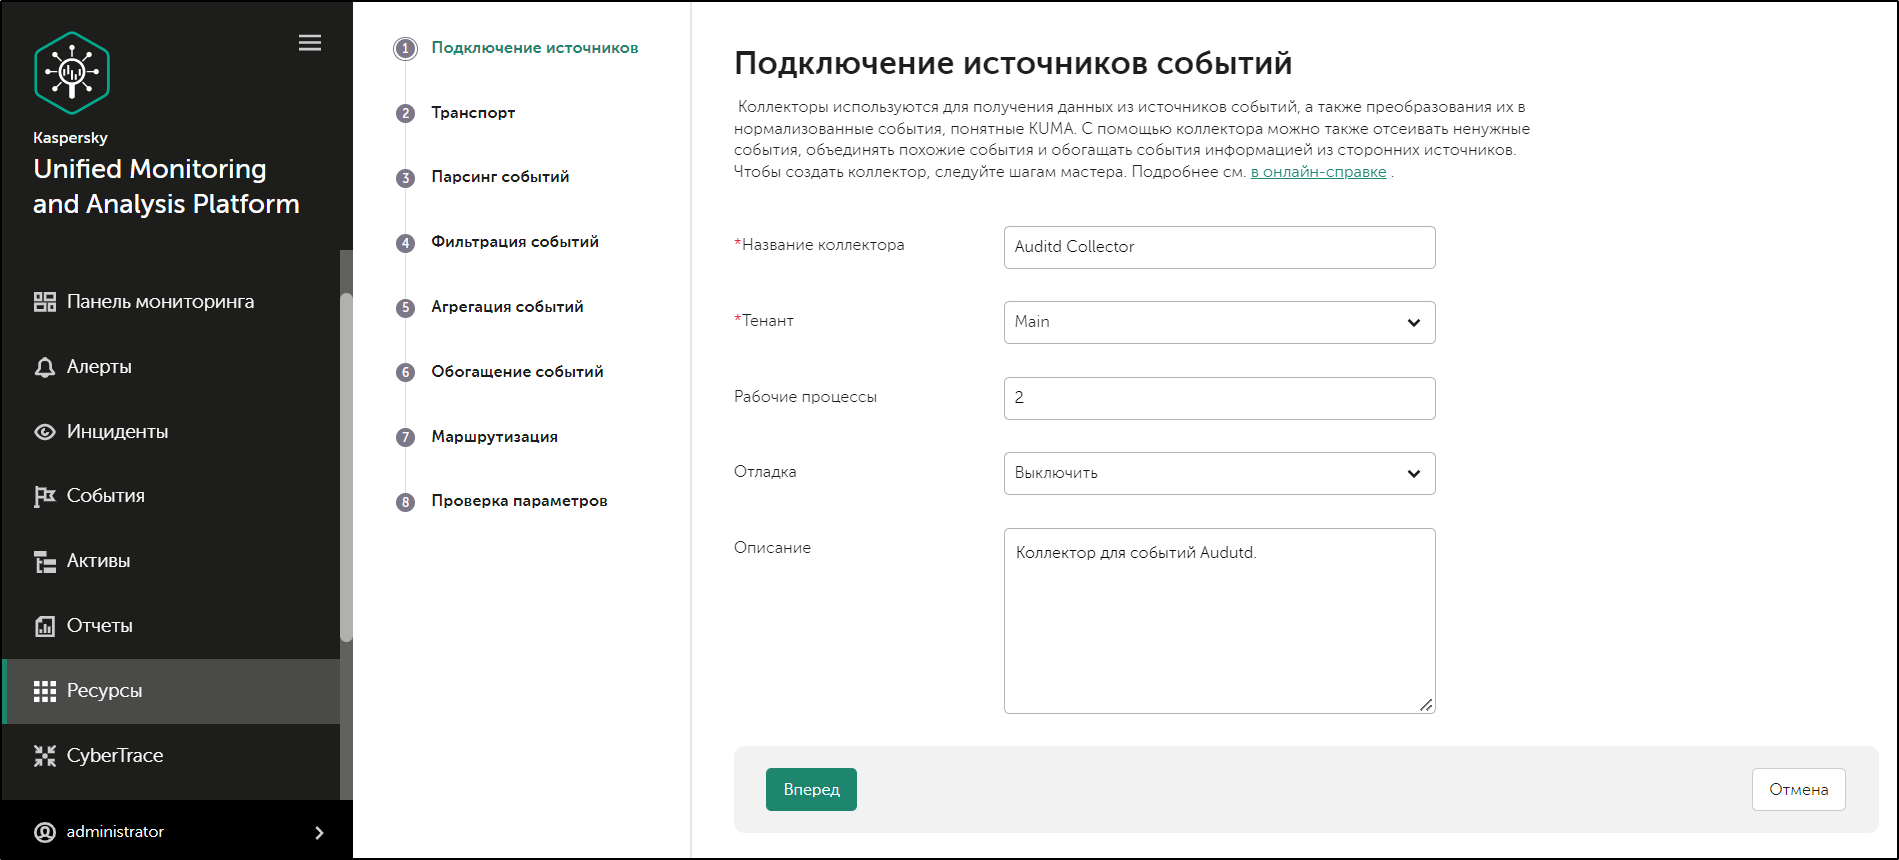
Step 1. Connect event sources
This is a required step of the Installation Wizard. At this step, you specify the main settings of the collector: its name and the tenant that will own it.
To specify the basic settings of the collector:
- In the Collector name field, enter a unique name for the service you are creating. The name must contain 1 to 128 Unicode characters.
When certain types of collectors are created, agents named "agent: <Collector name>, auto created" are also automatically created together with the collectors. If this type of agent was previously created and has not been deleted, it will be impossible to create a collector named <Collector name>. If this is the case, you will have to either specify a different name for the collector or delete the previously created agent.
- In the Tenant drop-down list, select the tenant that will own the collector. The tenant selection determines what resources will be available when the collector is created.
If you return to this window from another subsequent step of the Installation Wizard and select another tenant, you will have to manually edit all the resources that you have added to the service. Only resources from the selected tenant and shared tenant can be added to the service.
- If required, specify the number of processes that the service can run concurrently in the Workers field. By default, the number of worker processes is the same as the number of vCPUs on the server where the service is installed.
- If necessary, use the Debug drop-down list to enable logging of service operations.
Error messages of the collector service are logged even when debug mode is disabled. The log can be viewed on the machine where the collector is installed, in the /opt/kaspersky/kuma/collector/<collector ID>/log/collector directory.
- You can optionally add up to 256 Unicode characters describing the service in the Description field.
The main settings of the collector are specified. Proceed to the next step of the Installation Wizard.
Page topStep 2. Transportation
This is a required step of the Installation Wizard. On the Transport tab of the Installation Wizard, select or create a connector with settings indicating from where the collector service must receive events.
To add an existing connector to a resource set,
select the name of the required connector from the Connector drop-down list.
The Transport tab of the Installation Wizard will display the settings of the selected connector. You can open the selected connector for editing in a new browser tab using the  button.
To create a new connector:
- Select Create new from the Connector drop-down list.
- In the Type drop-down list, select the connector type and define its settings on the Basic settings and Advanced settings tabs. The available settings depend on the selected type of connector:
When using the tcp or udp connector type at the normalization stage, IP addresses of the assets from which the events were received will be written in the DeviceAddress event field if it is empty.
When using a wmi or wec connector, agents will be automatically created for receiving Windows events.
It is recommended to use the default encoding (UTF-8), and to apply other settings only if bit characters are received in the fields of events.
Making KUMA collectors to listen on ports up to 1,000 requires running the service of the relevant collector with root privileges. To do this, after installing the collector, add the line
AmbientCapabilities = CAP_NET_BIND_SERVICEto its systemd configuration file in the [Service] section.
The systemd file is located in the /usr/lib/systemd/system/kuma-collector-<collector ID>.service directory.
The connector is added to the resource set of the collector. The created connector is only available in this resource set and is not displayed in the web interface Resources → Connectors section.
Proceed to the next step of the Installation Wizard.
Page topStep 3. Event parsing
This is a required step of the Installation Wizard. On the Event parsing tab of the Installation Wizard, select or create a normalizer whose settings will define the rules for converting raw events into normalized events. You can add multiple event parsing rules to the normalizer to implement complex event processing logic.
When creating a new normalizer in the Installation Wizard, by default it is saved in the set of resources for the collector and cannot be used in other collectors. You can use the Save normalizer check box to create a normalizer as a separate resource.
If, when changing the settings of a collector resource set, you change or delete conversions in a normalizer connected to it, the edits will not be saved, and the normalizer itself may be corrupted. If you need to modify conversions in a normalizer that is already part of a service, the changes must be made directly to the normalizer under Resources → Normalizers in the web interface.
Adding a normalizer
To add an existing normalizer to a resource set:
- Click the Add event parsing button.
The Event parsing window will open with the normalizer settings and an active Normalization scheme tab.
- In the Normalizer drop-down list, select the required normalizer.
The Event parsing window will display the parameters of the selected normalizer. You can open the selected normalizer for editing in a new browser tab using the
button. - Click OK.
The normalizer is displayed as a dark circle on the Event parsing tab of the Installation Wizard. Clicking on the circle will open the normalizer options for editing. When you hover over the circle, a plus sign is displayed: click on it to add more normalizers (see below).
To create a new normalizer:
- Select Create new from the Normalizer drop-down list.
The Event parsing window will open with the normalizer settings and an active Normalization scheme tab.
- If you want to keep the normalizer as a separate resource, select the Save normalizer check box. This check box is cleared by default.
- In the Name field, enter a unique name for the normalizer. The name must contain 1 to 128 Unicode characters.
- In the Parsing method drop-down list, select the type of events to receive. Depending on your choice, you can use the preconfigured rules for matching event fields or set your own rules. When you select some parsing methods, additional parameter fields required for filling in may become available.
Available parsing methods:
- json
- cef
- regexp
This parsing method is used to create custom rules for processing data in a format using regular expressions.
In the Normalization parameter block field, add a regular expression (RE2 syntax) with named capture groups. The name of a group and its value will be interpreted as the field and the value of the raw event, which can be converted into an event field in KUMA format.
To add event handling rules:
- Copy an example of the data you want to process to the Event examples field. This is an optional but recommended step.
- In the Normalization parameter block field add a regular expression with named capture groups in RE2 syntax, for example "(?P<name>regexp)". The regular expression added to the Normalization parameter must exactly match the event. Also, when developing the regular expression, it is recommended to use special characters that match the starting and ending positions of the text: ^, $.
You can add multiple regular expressions by using the Add regular expression button. If you need to remove the regular expression, use the
 button.
 - Click the Copy field names to the mapping table button.
Capture group names are displayed in the KUMA field column of the Mapping table. Now you can select the corresponding KUMA field in the column next to each capture group. Otherwise, if you named the capture groups in accordance with the CEF format, you can use the automatic CEF mapping by selecting the Use CEF syntax for normalization check box.
Event handling rules were added.
- syslog
- csv
- kv
- xml
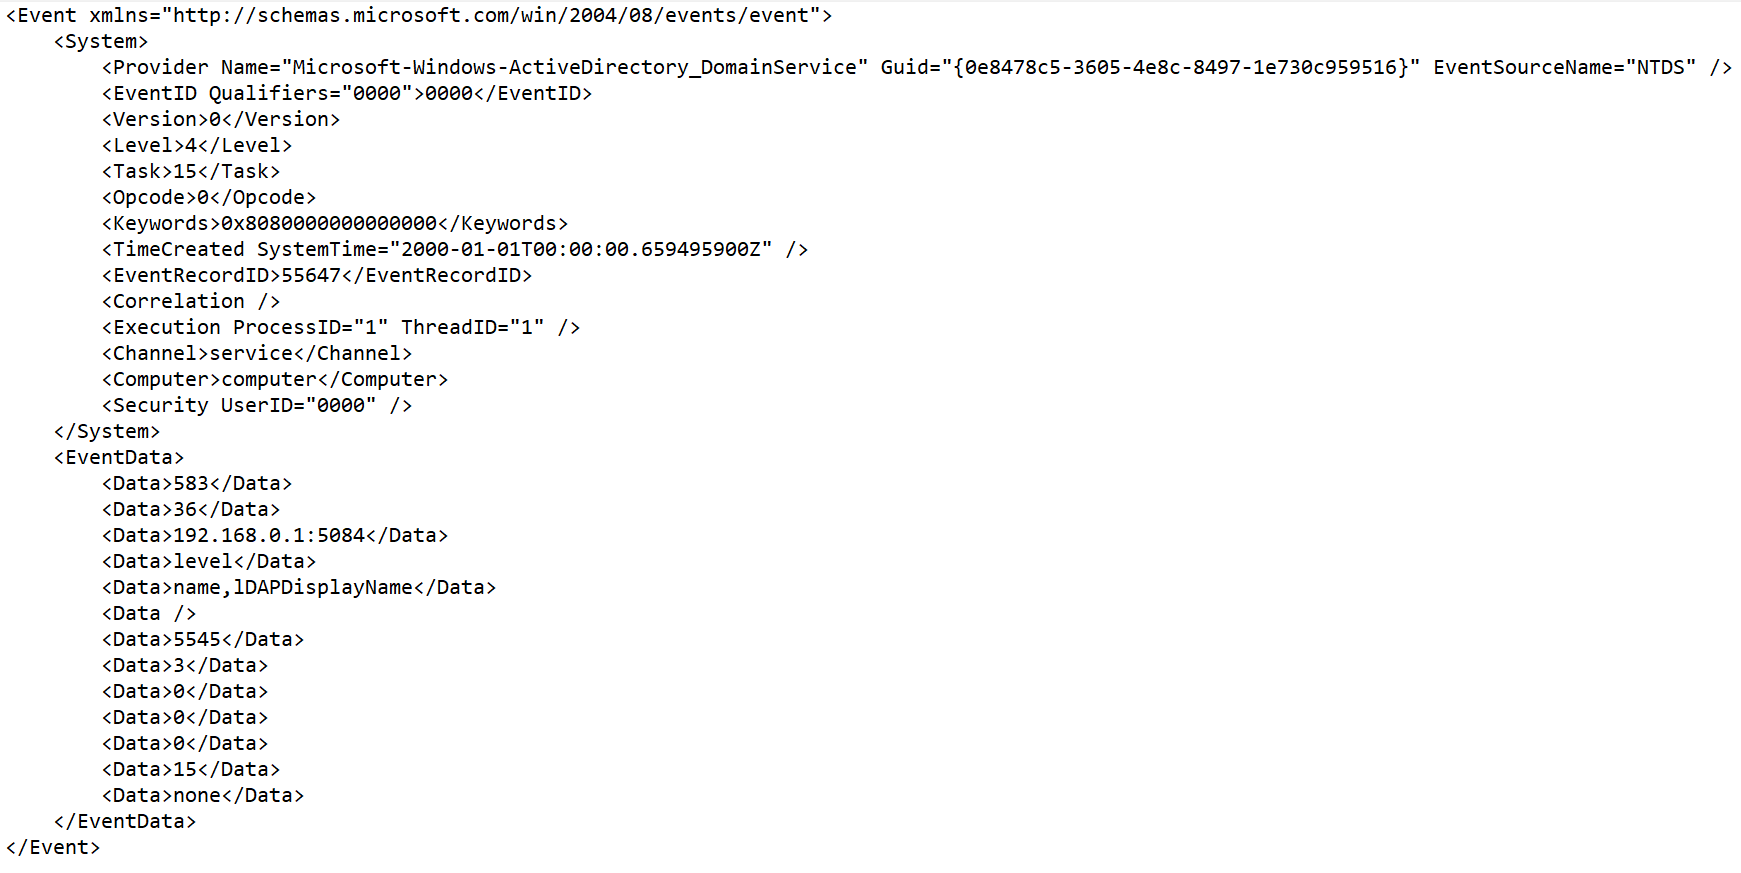
This parsing method is used to process XML data in which each object, including its nested objects, occupies a single line in a file. Files are processed line by line.
When this method is selected in the parameter block XML attributes you can specify the key attributes to be extracted from tags. If an XML structure has several attributes with different values in the same tag, you can indicate the necessary value by specifying its key in the Source column of the Mapping table.
To add key XML attributes,
Click the Add field button, and in the window that appears, specify the path to the required attribute.
You can add more than one attribute. Attributes can be removed one at a time using the cross icon or all at once using the Reset button.
If XML key attributes are not specified, then in the course of field mapping the unique path to the XML value will be represented by a sequence of tags.
Tag numbering
Tag numbering is available as of KUMA 2.1.3. This functionality allows automatically numbering tags in XML events, which lets you parse an event with identical tags or unnamed tags, such as <Data>.
As an example, we will use the Tag numbering functionality to number the tags of the EventData attribute of Microsoft Windows PowerShell event ID 800.
To parse such events, you must:
- Configure tag numbering.
- Configure data mapping for numbered tags with KUMA event fields.
Simultaneous use of XML attributes and Tag numbering leads to incorrect operation of the normalizer. If an attribute contains unnamed tags or the identical tags, we recommend using the Tag numbering functionality. If the attribute contains only named tags, use XML attributes.
To configure parsing of events with identically named or unnamed tags:
- Create a new normalizer or open an existing normalizer for editing.
- In the Basic event parsing window of the normalizer, in the Parsing method drop-down list, select 'xml' and in the Tag numbering field, click Add field.
In the displayed field, enter the full path to the tag to whose elements you want to assign a number. For example, Event.EventData.Data. The first number to be assigned to a tag is 0. If the tag is empty, for example, <Data />, it is also assigned a number.
- To configure data mapping, under Mapping, click Add row and do the following:
- In the new row, in the Source field, enter the full path to the tag and its index. For the Microsoft Windows event from the example above, the full path with indices look like this:
- Event.EventData.Data.0
- Event.EventData.Data.1
- Event.EventData.Data.2 and so on
- In the KUMA field drop-down list, select the field in the KUMA event that will receive the value from the numbered tag after parsing.
- In the new row, in the Source field, enter the full path to the tag and its index. For the Microsoft Windows event from the example above, the full path with indices look like this:
- To save changes:
- If you created a new normalizer, click Save.
- If you edited an existing normalizer, click Update configuration in the collector to which the normalizer is linked.
Parsing is configured.
- netflow5
- netflow9
- sflow5
- ipfix
- sql—this method becomes available only when using a sql type connector.
- In the Keep raw event drop-down list, specify whether to store the original raw event in the newly created normalized event. Available values:
- Don't save—do not save the raw event. This is the default setting.
- Only errors—save the raw event in the
Rawfield of the normalized event if errors occurred when parsing it. This value is convenient to use when debugging a service. In this case, every time an event has a non-emptyRawfield, you know there was a problem. - Always—always save the raw event in the
Rawfield of the normalized event.
- In the Keep extra fields drop-down list, choose whether you want to store the raw event fields in the normalized event if no mapping rules have been configured for them (see below). The data is stored in the Extra event field. By default, fields are not saved.
- Copy an example of the data you want to process to the Event examples field. This is an optional but recommended step.
- Configure the mapping of the raw event fields to event fields in KUMA format In the Mapping table:
- In the Source column, provide the name of the raw event field that you want to convert into the KUMA event field.
Clicking the
 button next to the field names in the Source column opens the Conversion window, in which you can use the Add conversion button to create rules for modifying the original data before they are written to the KUMA event fields.
In the Conversion window, you can swap the added rules by dragging them by the
 icon; you can also delete them using the
  icon.
icon. - In the KUMA field column, select the required KUMA event field from the drop-down list. You can search for fields by entering their names in the field.
- If the name of the KUMA event field selected at the previous step begins with
DeviceCustom*orFlex*, you can add a unique custom label in the Label field.
New table rows can be added by using the Add row button. Rows can be deleted individually using the
button or all at once using the Clear all button.If you have loaded data into the Event examples field, the table will have an Examples column containing examples of values carried over from the raw event field to the KUMA event field.
- In the Source column, provide the name of the raw event field that you want to convert into the KUMA event field.
- Click OK.
The normalizer is displayed as a dark circle on the Event parsing tab of the Installation Wizard. Clicking the circle opens its settings for editing. When you hover the mouse over the circle, a plus sign is displayed. Click it to add event parsing rules (see below).
Enriching normalized events with additional data
You can add additional data to newly created normalized events by creating enrichment rules in the normalizer. These enrichment rules are stored in the normalizer where they were created. There can be more than one enrichment rule.
To add enrichment rules to the normalizer:
- Select the main or additional normalization rule, and in the window that opens click the Enrichment tab.
- Click the Add enrichment button.
The enrichment rule parameter block appears. You can delete the group of settings using the
button. - Select the enrichment type from the Source kind drop-down list. Depending on the selected type, you may see advanced settings that will also need to be completed.
Available Enrichment rule source types:
- constant
- dictionary
- table
This type of enrichment is used if you need to add a value from the dictionary of the Table type.
When this enrichment type is selected in the Dictionary name drop-down list, select the dictionary for providing the values. In the Key fields group of settings, use the Add field button to select the event fields whose values are used for dictionary entry selection.
In the Mapping table, configure the dictionary fields to provide data and the event fields to receive data:
- In the Dictionary field column, select the dictionary field. The available fields depend on the selected dictionary resource.
- In the KUMA field column, select the event field to which the value is written. For some of the selected fields (
*custom*and*flex*), in the Label column, you can specify a name for the data written to them.
New table rows can be added by using the Add new element button. Columns can be deleted using the
button. - event
This type of enrichment is used when you need to write a value from another event field to the current event field. Settings of this type of enrichment:
- In the Target field drop-down list, select the KUMA event field to which you want to write the data.
- In the Source field drop-down list, select the event field whose value will be written to the target field.
- Clicking the button opens the Conversion window in which you can, using the Add conversion button, create rules for modifying the original data before writing them to the KUMA event fields.
- template
- In the Target field drop-down list, select the KUMA event field to which you want to write the data.
This setting is not available for the enrichment source of the Table type.
- Click OK.
Event enrichment rules with the additional data are added to the normalizer, to the selected parsing rule.
Creating a structure of event normalization rules
To implement a complex event processing logic, you can add multiple event parsing rules to the normalizer. Events are transmitted between the parsing rules depending on the specified conditions. The sequence of creating parsing rules is important. The event is processed sequentially, and its path is shown using arrows.
To create an additional parsing rule:
- Create a normalizer (see above).
The created normalizer will be displayed in the window as a dark circle.
- Hover the mouse over the circle and click the plus sign button that appears.
- In the Additional event parsing window that opens, specify the parameters of the additional event parsing rule:
- Extra normalization conditions tab:
To send only the events with a specific field to the additional normalizer, specify this field in the Field to pass into normalizer field.
On this tab, you can also define other conditions. When these conditions are met, the event is sent for additional parsing.
- Normalization scheme tab:
On this tab, you can configure event processing rules, similar to the main normalizer settings (see above). The Keep raw event setting is not available. The Event examples field displays the values specified when the initial normalizer was created.
- Enrichment tab:
On this tab, you can configure event enrichment rules (see above).
- Extra normalization conditions tab:
- Click OK.
The additional parsing rule is added to the normalizer. It is displayed as a dark block with the conditions under which this rule is triggered. You can change the settings of the additional parsing rule by clicking it. If you hover the mouse over the additional parsing rule, a plus button appears. You can use this button to create a new additional parsing rule. To delete a normalizer, use the button with the trash icon.
The upper right corner of the window contains a search window where you can search parsing rules by name.
Proceed to the next step of the Installation Wizard.
Page topStep 4. Filtering events
This is an optional step of the Installation Wizard. The Event filtering tab of the Installation Wizard allows you to select or create a filter whose settings specify the conditions for selecting events. You can add multiple filters to the collector. You can swap the filters by dragging them by the icon as well as delete them. Filters are combined by the AND operator.
To add an existing filter to a collector resource set,
Click the Add filter button and select the required filter from the Filter drop-down menu.
To add a new filter to the collector resource set:
- Click the Add filter button and select Create new from the Filter drop-down menu.
- If you want to keep the filter as a separate resource, select the Save filter check box. This can be useful if you decide to reuse the same filter across different services. This check box is cleared by default.
- If you selected the Save filter check box, enter a name for the created filter in the Name field. The name must contain 1 to 128 Unicode characters.
- In the Conditions section, specify the conditions that must be met by the filtered events:
- The Add condition button is used to add filtering conditions. You can select two values (two operands, left and right) and assign the operation you want to perform with the selected values. The result of the operation is either True or False.
- In the operator drop-down list, select the function to be performed by the filter.
In this drop-down list, you can select the do not match case check box if the operator should ignore the case of values. This check box is ignored if the InSubnet, InActiveList, InCategory, and InActiveDirectoryGroup operators are selected. This check box is cleared by default.
- In the Left operand and Right operand drop-down lists, select where the data to be filtered will come from. As a result of the selection, Advanced settings will appear. Use them to determine the exact value that will be passed to the filter. For example, when choosing active list you will need to specify the name of the active list, the entry key, and the entry key field.
- You can use the If drop-down list to choose whether you need to create a negative filter condition.
Conditions can be deleted using the
button. - In the operator drop-down list, select the function to be performed by the filter.
- The Add group button is used to add groups of conditions. Operator AND can be switched between AND, OR, and NOT values.
A condition group can be deleted using the
button. - By clicking Add filter, you can add existing filters selected in the Select filter drop-down list to the conditions. You can click to navigate to a nested filter.
A nested filter can be deleted using the
button.
- The Add condition button is used to add filtering conditions. You can select two values (two operands, left and right) and assign the operation you want to perform with the selected values. The result of the operation is either True or False.
The filter has been added.
Proceed to the next step of the Installation Wizard.
Page topStep 5. Event aggregation
This is an optional step of the Installation Wizard. The Event aggregation tab of the Installation Wizard allows you to select or create an aggregation rule whose settings specify the conditions for aggregating events of the same type. You can add multiple aggregation rules to the collector.
To add an existing aggregation rule to a set of collector resources,
click Add aggregation rule and select Aggregation rule in the drop-down list.
To add a new aggregation rule to a set of collector resources:
- Click the Add aggregation rule button and select Create new from the Aggregation rule drop-down menu.
- Enter the name of the newly created aggregation rule in the Name field. The name must contain 1 to 128 Unicode characters.
- In the Threshold field, specify how many events must be accumulated before the aggregation rule triggers and the events are aggregated. The default value is
100. - In the Triggered rule lifetime field, specify how long (in seconds) the collector must accumulate events to be aggregated. When this time expires, the aggregation rule is triggered and a new aggregation event is created. The default value is
60. - In the Identical fields section, use the Add field button to select the fields that will be used to identify the same types of events. Selected events can be deleted using the buttons with a cross icon.
- In the Unique fields section, you can click Add field to select the fields that will disqualify events from aggregation even if the events contain fields listed in the Identical fields section. Selected events can be deleted using the buttons with a cross icon.
- In the Sum fields section, you can use the Add field button to select the fields whose values will be summed during the aggregation process. Selected events can be deleted using the buttons with a cross icon.
- In the Filter section, you can specify the conditions to define events that will be processed by this resource. You can select an existing filter from the drop-down list or create a new filter.
Creating a filter in resources
- In the Filter drop-down list, select Create new.
- If you want to keep the filter as a separate resource, select the Save filter check box.
In this case, you will be able to use the created filter in various services.
This check box is cleared by default.
- If you selected the Save filter check box, enter a name for the created filter resource in the Name field. The name must contain 1 to 128 Unicode characters.
- In the Conditions settings block, specify the conditions that the events must meet:
- Click the Add condition button.
- In the Left operand and Right operand drop-down lists, specify the search parameters.
Depending on the data source selected in the Right operand field, you may see fields of additional parameters that you need to use to define the value that will be passed to the filter. For example, when choosing active list you will need to specify the name of the active list, the entry key, and the entry key field.
- In the operator drop-down list, select the relevant operator.
- If necessary, select the do not match case check box. When this check box is selected, the operator ignores the case of the values.
The selection of this check box does not apply to the InSubnet, InActiveList, InCategory or InActiveDirectoryGroup operators.
This check box is cleared by default.
- If you want to add a negative condition, select If not from the If drop-down list.
- You can add multiple conditions or a group of conditions.
- If you have added multiple conditions or groups of conditions, choose a search condition (and, or, not) by clicking the AND button.
- If you want to add existing filters that are selected from the Select filter drop-down list, click the Add filter button.
You can view the nested filter settings by clicking the
button.
Aggregation rule added. You can delete it using the button.
Proceed to the next step of the Installation Wizard.
Page topStep 6. Event enrichment
This is an optional step of the Installation Wizard. On the Event enrichment tab of the Installation Wizard, you can specify which data from which sources should be added to events processed by the collector. Events can be enriched with data obtained using enrichment rules or LDAP.
Rule-based enrichment
There can be more than one enrichment rule. You can add them by clicking the Add enrichment button and can remove them by clicking the button. You can use existing enrichment rules or create rules directly in the Installation Wizard.
To add an existing enrichment rule to a set of resources:
- Click Add enrichment.
This opens the enrichment rules settings block.
- In the Enrichment rule drop-down list, select the relevant resource.
The enrichment rule is added to the set of resources for the collector.
To create a new enrichment rule in a set of resources:
- Click Add enrichment.
This opens the enrichment rules settings block.
- In the Enrichment rule drop-down list, select Create new.
- In the Source kind drop-down list, select the source of data for enrichment and define its corresponding settings:
- constant
- dictionary
- event
- template
- dns
- cybertrace
This type of enrichment is used to add information from CyberTrace data streams to event fields.
Available settings:
- URL (required)—in this field, you can specify the URL of a CyberTrace server to which you want to send requests.
- Number of connections—maximum number of connections to the CyberTrace server that can be simultaneously established by KUMA. By default, this value is equal to the number of vCPUs of the KUMA Core server.
- RPS—maximum number of requests sent to the server per second. The default value is
1,000. - Timeout—amount of time to wait for a response from the CyberTrace server, in seconds. The default value is
30. - Mapping (required)—this settings block contains the mapping table for mapping KUMA event fields to CyberTrace indicator types. The KUMA field column shows the names of KUMA event fields, and the CyberTrace indicator column shows the types of CyberTrace indicators.
Available types of CyberTrace indicators:
- ip
- url
- hash
In the mapping table, you must provide at least one string. You can use the Add row button to add a string, and can use the
button to remove a string.
- timezone
- geographic data
This type of enrichment is used to add IP address geographic data to event fields. Learn more about linking IP addresses to geographic data.
When this type is selected, in the Mapping geographic data to event fields settings block, you must specify from which event field the IP address will be read, select the required attributes of geographic data, and define the event fields in which geographic data will be written:
- In the Event field with IP address drop-down list, select the event field from which the IP address is read. Geographic data uploaded to KUMA is matched against this IP address.
You can use the Add event field with IP address button to specify multiple event fields with IP addresses that require geographic data enrichment. You can delete event fields added in this way by clicking the Delete event field with IP address button.
When the
SourceAddress,DestinationAddress, andDeviceAddressevent fields are selected, the Apply default mapping button becomes available. You can use this button to add preconfigured mapping pairs of geographic data attributes and event fields. - For each event field you need to read the IP address from, select the type of geographic data and the event field to which the geographic data should be written.
You can use the Add geodata attribute button to add field pairs for Geodata attribute – Event field to write to. You can also configure different types of geographic data for one IP address to be written to different event fields. To delete a field pair, click
 .
.- In the Geodata attribute field, select which geographic data corresponding to the read IP address should be written to the event. Available geographic data attributes: Country, Region, City, Longitude, Latitude.
- In the Event field to write to, select the event field which the selected geographic data attribute must be written to.
You can write identical geographic data attributes to different event fields. If you configure multiple geographic data attributes to be written to the same event field, the event will be enriched with the last mapping in the sequence.
- In the Event field with IP address drop-down list, select the event field from which the IP address is read. Geographic data uploaded to KUMA is matched against this IP address.
- Use the Debug drop-down list to indicate whether or not to enable logging of service operations. Logging is disabled by default.
- In the Filter section, you can specify conditions to identify events that will be processed by the enrichment rule resource. You can select an existing filter from the drop-down list or create a new filter.
Creating a filter in resources
- In the Filter drop-down list, select Create new.
- If you want to keep the filter as a separate resource, select the Save filter check box.
In this case, you will be able to use the created filter in various services.
This check box is cleared by default.
- If you selected the Save filter check box, enter a name for the created filter resource in the Name field. The name must contain 1 to 128 Unicode characters.
- In the Conditions settings block, specify the conditions that the events must meet:
- Click the Add condition button.
- In the Left operand and Right operand drop-down lists, specify the search parameters.
Depending on the data source selected in the Right operand field, you may see fields of additional parameters that you need to use to define the value that will be passed to the filter. For example, when choosing active list you will need to specify the name of the active list, the entry key, and the entry key field.
- In the operator drop-down list, select the relevant operator.
- If necessary, select the do not match case check box. When this check box is selected, the operator ignores the case of the values.
The selection of this check box does not apply to the InSubnet, InActiveList, InCategory or InActiveDirectoryGroup operators.
This check box is cleared by default.
- If you want to add a negative condition, select If not from the If drop-down list.
- You can add multiple conditions or a group of conditions.
- If you have added multiple conditions or groups of conditions, choose a search condition (and, or, not) by clicking the AND button.
- If you want to add existing filters that are selected from the Select filter drop-down list, click the Add filter button.
You can view the nested filter settings by clicking the
button.
The new enrichment rule was added to the set of resources for the collector.
LDAP enrichment
To enable enrichment using LDAP:
- Click Add enrichment with LDAP data.
This opens the settings block for LDAP enrichment.
- In the LDAP accounts mapping settings block, use the New domain button to specify the domain of the user accounts. You can specify multiple domains.
- In the LDAP mapping table, define the rules for mapping KUMA fields to LDAP attributes:
- In the KUMA field column, indicate the KUMA event field which data should be compared to LDAP attribute.
- In the LDAP attribute column, specify the attribute that must be compared with the KUMA event field. The drop-down list contains standard attributes and can be augmented with custom attributes.
- In the KUMA event field to write to column, specify in which field of the KUMA event the ID of the user account imported from LDAP should be placed if the mapping was successful.
You can use the Add row button to add a string to the table, and can use the
button to remove a string. You can use the Apply default mapping button to fill the mapping table with standard values.
Event enrichment rules for data received from LDAP were added to the group of resources for the collector.
If you add an enrichment to an existing collector using LDAP or change the enrichment settings, you must stop and restart the service.
Proceed to the next step of the Installation Wizard.
Page topStep 7. Routing
This is an optional step of the Installation Wizard. On the Routing tab of the Installation Wizard, you can select or create destinations with settings indicating the forwarding destination of events processed by the collector. Typically, events from the collector are routed to two points: to the correlator to analyze and search for threats; and to the storage, both for storage and so that processed events can be viewed later. Events can be sent to other locations as needed. There can be more than one destination point.
To add an existing destination to a collector resource set:
- In the Add destination drop-down list, select the type of destination resource you want to add:
- Select Storage if you want to configure forwarding of processed events to the storage.
- Select Correlator if you want to configure forwarding of processed events to a correlator.
- Select Other if you want to send events to other locations.
This type of resource includes correlator and storage services that were created in previous versions of the program.
The Add destination window opens where you can specify parameters for events forwarding.
- In the Destination drop-down list, select the necessary destination.
The window name changes to Edit destination, and it displays the settings of the selected resource. To open the settings of a destination for editing in a new browser tab, click
. - Click Save.
The selected destination is displayed on the Installation Wizard tab. A destination resource can be removed from the resource set by selecting it and clicking Delete in the opened window.
To add a new destination resource to a collector resource set:
- In the Add destination drop-down list, select the type of destination resource you want to add:
- Select Storage if you want to configure forwarding of processed events to the storage.
- Select Correlator if you want to configure forwarding of processed events to a correlator.
- Select Other if you want to send events to other locations.
This type of resource includes correlator and storage services that were created in previous versions of the program.
The Add destination window opens where you can specify parameters for events forwarding.
- Specify the settings on the Basic settings tab:
- In the Destination drop-down list, select Create new.
- In the Name field, enter a unique name for the destination resource. The name must contain 1 to 128 Unicode characters.
- Use the Disabled toggle button to specify whether events will be sent to this destination. By default, sending events is enabled.
- Select the Type for the destination resource:
- Select storage if you want to configure forwarding of processed events to the storage.
- Select correlator if you want to configure forwarding of processed events to a correlator.
- Select nats-jetstream, tcp, http, kafka, or file if you want to configure sending events to other locations.
- Specify the URL to which events should be sent in the hostname:<API port> format.
You can specify multiple destination addresses using the URL button for all types except nats-jetstream, file, and diode.
- For the nats-jetstream and kafka types, use the Topic field to specify which topic the data should be written to. The topic must contain Unicode characters. The Kafka topic is limited to 255 characters.
- If required, define the settings on the Advanced settings tab. The available settings vary based on the selected destination resource type:
- Compression is a drop-down list where you can enable Snappy compression. By default, compression is disabled.
- Proxy is a drop-down list for proxy server selection.
- The Buffer size field is used to set buffer size (in bytes) for the destination. The default value is 1 MB, and the maximum value is 64 MB.
- Timeout field is used to set the timeout (in seconds) for another service or component response. The default value is
30. - Disk buffer size limit field is used to specify the size of the disk buffer in bytes. The default size is 10 GB.
- Cluster ID is the ID of the NATS cluster.
- TLS mode is a drop-down list where you can specify the conditions for using TLS encryption:
- Disabled (default)—do not use TLS encryption.
- Enabled—encryption is enabled, but without verification.
- With verification—use encryption with verification that the certificate was signed with the KUMA root certificate. The root certificate and key of KUMA are created automatically during program installation and are stored on the KUMA Core server in the folder /opt/kaspersky/kuma/core/certificates/.
When using TLS, it is impossible to specify an IP address as a URL.
- URL selection policy is a drop-down list in which you can select a method for determining which URL to send events to if several URLs have been specified:
- Any. Events are sent to one of the available URLs as long as this URL receives events. If the connection is broken (for example, the receiving node is disconnected) a different URL will be selected as the events destination.
- Prefer first. Events are sent to the first URL in the list of added addresses. If it becomes unavailable, events are sent to the next available node in sequence. When the first URL becomes available again, events start to be sent to it again.
- Round robin. Packets with events will be evenly distributed among available URLs from the list. Because packets are sent either on a destination buffer overflow or on the flush timer, this URL selection policy does not guarantee an equal distribution of events to destinations.
- Delimiter is used to specify the character delimiting the events. By default,
\nis used. - Path—the file path if the file destination type is selected.
- Buffer flush interval—this field is used to set the time interval (in seconds) at which the data is sent to the destination. The default value is
100. - Workers—this field is used to set the number of services processing the queue. By default, this value is equal to the number of vCPUs of the KUMA Core server.
- You can set health checks using the Health check path and Health check timeout fields. You can also disable health checks by selecting the Health Check Disabled check box.
- Debug—a drop-down list where you can specify whether resource logging should be enabled. By default it is Disabled.
- The Disk buffer disabled drop-down list is used to enable or disable the use of a disk buffer. By default, the disk buffer is disabled.
The disk buffer is used if the collector cannot send normalized events to the destination. The amount of allocated disk space is limited by the value of the Disk buffer size limit setting.
If the disk space allocated for the disk buffer is exhausted, events are rotated as follows: new events replace the oldest events written to the buffer.
- In the Filter section, you can specify the conditions to define events that will be processed by this resource. You can select an existing filter from the drop-down list or create a new filter.
Creating a filter in resources
- In the Filter drop-down list, select Create new.
- If you want to keep the filter as a separate resource, select the Save filter check box.
In this case, you will be able to use the created filter in various services.
This check box is cleared by default.
- If you selected the Save filter check box, enter a name for the created filter resource in the Name field. The name must contain 1 to 128 Unicode characters.
- In the Conditions settings block, specify the conditions that the events must meet:
- Click the Add condition button.
- In the Left operand and Right operand drop-down lists, specify the search parameters.
Depending on the data source selected in the Right operand field, you may see fields of additional parameters that you need to use to define the value that will be passed to the filter. For example, when choosing active list you will need to specify the name of the active list, the entry key, and the entry key field.
- In the operator drop-down list, select the relevant operator.
- If necessary, select the do not match case check box. When this check box is selected, the operator ignores the case of the values.
The selection of this check box does not apply to the InSubnet, InActiveList, InCategory or InActiveDirectoryGroup operators.
This check box is cleared by default.
- If you want to add a negative condition, select If not from the If drop-down list.
- You can add multiple conditions or a group of conditions.
- If you have added multiple conditions or groups of conditions, choose a search condition (and, or, not) by clicking the AND button.
- If you want to add existing filters that are selected from the Select filter drop-down list, click the Add filter button.
You can view the nested filter settings by clicking the
button.
- Click Save.
The created destination resource is displayed on the Installation Wizard tab. A destination resource can be removed from the resource set by selecting it and clicking Delete in the opened window.
Proceed to the next step of the Installation Wizard.
Page topStep 8. Setup validation
This is the required, final step of the Installation Wizard. At this step, KUMA creates a service resource set, and the Services are created automatically based on this set:
- The set of resources for the collector is displayed under Resources → Collectors. It can be used to create new collector services. When this set of resources changes, all services that operate based on this set of resources will start using the new parameters after the services restart. To do so, you can use the Save and restart services and Save and update service configurations buttons.
A set of resources can be modified, copied, moved from one folder to another, deleted, imported, and exported, like other resources.
- Services are displayed in Resources → Active services. The services created using the Installation Wizard perform functions inside the KUMA program. To communicate with external parts of the network infrastructure, you need to install similar external services on the servers and assets intended for them. For example, an external collector service should be installed on a server intended as an events recipient, external storage services should be installed on servers that have a deployed ClickHouse service, and external agent services should be installed on the Windows assets that must both receive and forward Windows events.
To finish the Installation Wizard:
- Click Create and save service.
The Setup validation tab of the Installation Wizard displays a table of services created based on the set of resources selected in the Installation Wizard. The lower part of the window shows examples of commands that you must use to install external equivalents of these services on their intended servers and assets.
For example:
/opt/kaspersky/kuma/kuma collector --core https://kuma-example:<port used for communication with the KUMA Core> --id <service ID> --api.port <port used for communication with the service> --install
The "kuma" file can be found inside the installer in the /kuma-ansible-installer/roles/kuma/files/ directory.
The port for communication with the KUMA Core, the service ID, and the port for communication with the service are added to the command automatically. You should also ensure the network connectivity of the KUMA system and open the ports used by its components if necessary.
- Close the Wizard by clicking Save collector.
The collector service is created in KUMA. Now you will install a similar service on the server intended for receiving events.
If a wmi or wec connector was selected for collectors, you must also install the automatically created KUMA agents.
Page top