Contents
Distributed installation
Distributed installation of KUMA involves multiple steps:
- Verifying that the hardware, software, and installation requirements for KUMA are satisfied.
- Preparing the test machine.
The test machine is used during the program installation process: the installer files are unpacked and run on it.
- Preparing the target machines.
The program components are installed on the target machines.
- Preparing the distributed.inventory.yml inventory file.
Create an inventory file with a description of the network structure of program components. The installer uses this inventory file to deploy KUMA.
- Installing the program.
Install the program and log in to the web interface.
- Creating services.
Create the client part of the services in the KUMA web interface and install the server part of the services on the target machines.
Make sure the KUMA installation is complete before you install KUMA services. We recommend installing services in the following order: storage, collectors, correlators, and agents.
When deploying several KUMA services on the same host, you must specify unique ports for each service using the
--api.port <port>parameters during installation.
If necessary, you can change the KUMA web console certificate to your company's certificate.
Preparing the test machine
To prepare the test machine for the KUMA installation:
- Ensure that hardware, software, and installation requirements of the program are met.
- Generate an SSH key for authentication on the SSH servers of the target machines by executing the following command:
sudo ssh-keygen -f /root/.ssh/id_rsa -N "" -C kuma-ansible-installerIf SSH root access is blocked on the test machine, generate an SSH key for authentication on the SSH servers of the target machines using a user from the sudo group:
sudo ssh-keygen -f /home/<name of the user from sudo group>/.ssh/id_rsa -N "" -C kuma-ansible-installerAs a result, the key is generated and saved in the user's home directory. You should specify the full path to the key in the inventory file in the value of the ansible_ssh_private_key_file parameter so that the key is available during installation.
- Make sure that the test machine has network access to all the target machines by host name and copy the SSH key to each target machine by carrying out the following command:
sudo ssh-copy-id -i /root/.ssh/id_rsa root@<host name of the test machine>If SSH root access is blocked on the test machine and you want to use the SSH key from the home directory of the sudo group user, make sure that the test machine has network access to all target machines by host name and copy the SSH key to each target machine using the following command:
sudo ssh-copy-id -i /home/<name of a user in the sudo group>/.ssh/id_rsa root@<host name of the test machine> - Copy the archive with the
kuma-ansible-installer-<version>.tar.gzinstaller to the test machine and unpack it using the following command (about 2 GB of disk space is required):sudo tar -xpf kuma-ansible-installer-<version name>.tar.gz
The test machine is ready for the KUMA installation.
Page topPreparing the target machine
To prepare the target machine for the installation of KUMA components:
- Ensure that hardware, software, and installation requirements are met.
- Specify the host name. We recommend specifying the FQDN. For example, kuma1.example.com.
You should not change the KUMA host name after installation: this will make it impossible to verify the authenticity of certificates and will disrupt the network communication between the program components.
- Register the target machine in your organization's DNS zone to allow host names to be translated to IP addresses.
If your organization does not use a DNS server, you can use the /etc/hosts file for name resolution. The content of the files can be automatically generated for each target machine when installing KUMA.
- To get the hostname that you must specify when installing KUMA, run the following command and record the result:
hostname -fThe test machine must be able to access the target machine using this name.
The target machine is ready for the installation of KUMA components.
Page topPreparing the distributed.inventory.yml inventory file
To create the distributed.inventory.yml inventory file:
- Go to the KUMA installer folder by executing the following command:
cd kuma-ansible-installer - Copy the distributed.inventory.yml.template template and create an inventory file named distributed.inventory.yml:
cp distributed.inventory.yml.template distributed.inventory.yml - Edit the settings in the distributed.inventory.yml inventory file.
We recommend backing up the inventory file that you used to install the program. You can use it to add components to the system or remove KUMA.
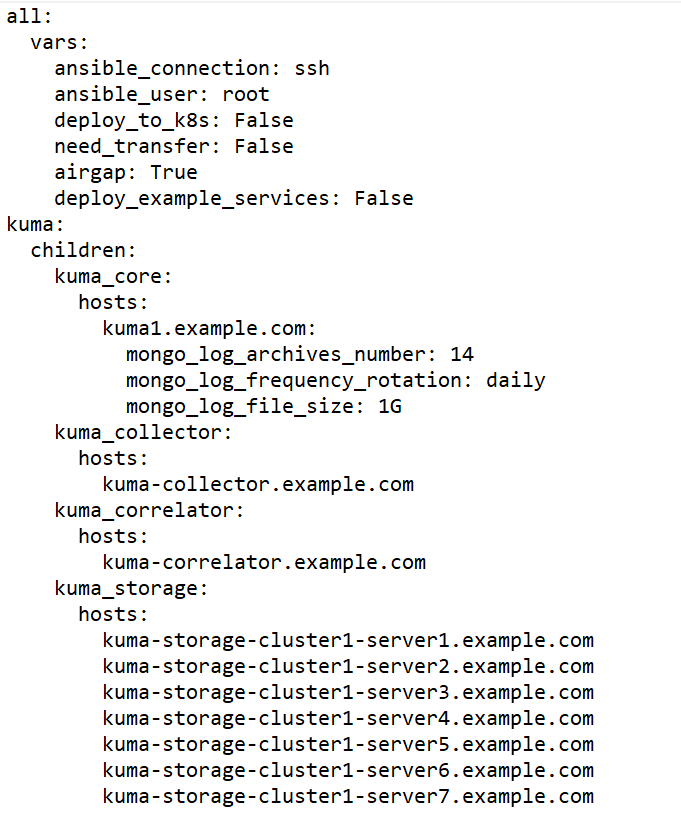
Sample inventory file for distributed installation
Installing the program in a distributed configuration
KUMA is installed using the Ansible tool and the YML inventory file. The installation is performed using the test machine, where all of the KUMA components are installed on the target machines.
To install KUMA:
- On the test machine, open the folder containing the unpacked installer.
cd kuma-ansible-installer - Place the license key file in the <installer directory>/roles/kuma/files/ directory.
The key file must be named license.key.
- Run the installer from the folder with the unpacked installer:
sudo ./install.sh distributed.inventory.yml - Accept the terms of the End User License Agreement.
If you do not accept the terms of the End User License Agreement, the program will not be installed.
KUMA components are installed. The screen will display the URL of the KUMA web interface and the user name and password that must be used to access the web interface.
By default, the KUMA web interface address is https://<FQDN or IP address of the core component>:7220.
Default login credentials (after the first login, you must change the password of the admin account):
- user name — admin
- password— mustB3Ch@ng3d!
We recommend backing up the inventory file that you used to install the program. You can use it to add components to the system or remove KUMA.
Page topModifying the self-signed web console certificate
Before changing KUMA certificate, make sure to back up the previous certificate and key with the names external.cert.old and external.key.old respectively.
After installing the KUMA Core, the installer creates the following certificates in the /opt/kaspersky/kuma/core/certificates folder:
- Self-signed root certificate ca.cert with the ca.key.
Signs all other certificates that are used for internal communication between KUMA components.
- The internal.cert certificate signed with the root certificate, and the Core server internal.key.
Used for internal communication between KUMA components.
- KUMA web console external.cert certificate and external.key.
Used in the KUMA web console and for REST API requests.
You can use your company certificate and key instead of self-signed web console certificate. For example, if you want to replace self-signed CA Core certificate with a certificate issued by an enterprise CA, you must provide an external.cert and an unencrypted external.key in PEM format.
The following example shows how to replace a self-signed CA Core certificate with an enterprise certificate in PFX format. You can use the instructions as an example and adapt the steps according to your needs.
To replace the KUMA web console certificate with an external certificate:
- Switch to root user operation:
sudo -i - Go to the certificates directory:
cd /opt/kaspersky/kuma/core/certificates - Make a backup copy of the current certificate and key:
mv external.cert external.cert.old && mv external.key external.key.old - In OpenSSL, convert the PFX file to a certificate and an encrypted key in PEM format:
openssl pkcs12 -in kumaWebIssuedByCorporateCA.pfx -nokeys -out external.certopenssl pkcs12 -in kumaWebIssuedByCorporateCA.pfx -nocerts -nodes -out external.keyWhen carrying out the command, you are required to specify the PFX key password (Enter Import Password).
As a result, the external.cert certificate and the external.key in PEM format are returned.
- Place the returned external.cert certificate and external.key files in the /opt/kaspersky/kuma/core/certificates directory.
- Change the owner of the key files:
chown kuma:kuma external.cert external.key - Restart KUMA:
systemctl restart kuma-core - Refresh the web page or restart the browser hosting the KUMA web interface.
Your company certificate and key have been replaced.
Page top