Contents
Installation on a single server
To install KUMA components on a single server, complete the following steps:
- Ensure that hardware, software, and installation requirements for KUMA are met.
- Prepare the single.inventory.yml inventory file.
Use the single.yml.template inventory file template from the distribution kit to create a single.inventory.yml inventory file and describe the network structure of program components in that file. The installer uses the single.inventory.yml file to deploy KUMA.
- Install the program.
Install the program and log in to the web interface using the default credentials.
If necessary, you can move application components to different servers to continue with a distributed configuration.
Preparing the single.inventory.yml inventory file
KUMA components can be installed, updated, and removed in the directory containing the unpacked installer by using the Ansible tool and the user-created YML inventory file containing a list of the hosts of KUMA components and other settings. If you want to install all KUMA components on the same server, you must specify the same host for all components in the inventory file.
To create an inventory file for installation on a single server:
- Copy the archive with the
kuma-ansible-installer-<version name>.tar.gzinstaller to the server and unpack it using the following command (about 2 GB of disk space is required):sudo tar -xpf kuma-ansible-installer-<version name>.tar.gz - Go to the KUMA installer folder by executing the following command:
cd kuma-ansible-installer - Copy the single.inventory.yml.template template and create an inventory file named single.inventory.yml:
cp single.inventory.yml.template single.inventory.yml - Edit the settings in the single.inventory.yml inventory file.
If you want predefined services to be created during the installation, set deploy_example_services to true.
deploy_example_services: trueThe predefined services will appear only as a result of the initial installation of KUMA. If you are upgrading the system using the same inventory file, the predefined services are not re-created.
- Replace all
kuma.example.comstrings in the inventory file with the name of the host on which you want to install KUMA components.
The inventory file is created. Now you can use it to install KUMA on a single server.
We recommend backing up the inventory file that you used to install the program. You can use it to add components to the system or remove KUMA.
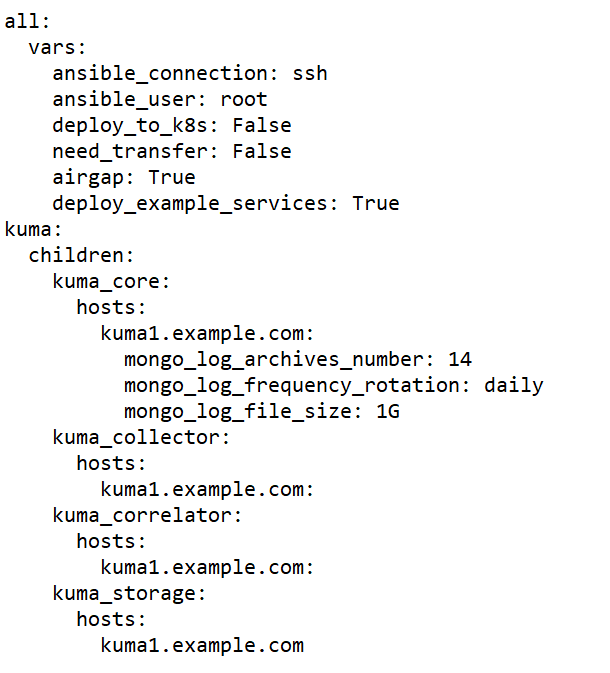
Sample inventory file for installation on a single server
Installing the program on a single server
You can install all KUMA components on a single server using the Ansible tool and the single.inventory.yml inventory file.
To install Kuma on a single server:
- Download the kuma-ansible-installer-<
build number>.tar.gz KUMA distribution kit to the server and extract it. The archive is unpacked into the kuma-ansibleinstaller directory. - Go to the directory with the unpacked installer.
- Place the license key file in the <installer directory>/roles/kuma/files/ directory.
The key file must be named license.key.
sudo cp <key file>.key <installer directory>/roles/kuma/files/license.key - Run the following command to start the component installation with your prepared single.inventory.yml inventory file:
sudo ./install.sh single.inventory.yml - Accept the terms of the End User License Agreement.
If you do not accept the terms of the End User License Agreement, the program will not be installed.
As a result, all KUMA components are installed. After the installation is complete, log in to the KUMA web interface and enter the address of the KUMA web interface in the address bar of your browser, then enter your credentials on the login page.
The address of the KUMA web interface is https://<FQDN of the host where KUMA is installed>:7220.
Default login credentials:
- login – admin
- password – mustB3Ch@ng3d!
After the first login, change the password of the admin account
We recommend backing up the inventory file that you used to install the program. You can use this inventory file to add components to the system or remove KUMA.
You can expand the installation to a distributed installation.
Page top