Contents
- Installing and removing KUMA
- Program installation requirements
- Ports used by KUMA during installation
- Synchronizing time on servers
- About the inventory file
- Installation on a single server
- Distributed installation
- Distributed installation in a fault-tolerant configuration
- KUMA backup
- Modifying the configuration of KUMA
- Updating previous versions of KUMA
- Troubleshooting update errors
- Delete KUMA
Installing and removing KUMA
To complete the installation, you need a distribution kit:
- kuma-ansible-installer-<build number>.tar.gz contains all necessary files for installing KUMA without the support for fault-tolerant configurations.
- kuma-ansible-installer-ha-<build number>.tar.gz contains all necessary files for installing KUMA in a fault-tolerant configuration.
To complete the installation, you need the install.sh installer file and an inventory file that describes the infrastructure. You can create an inventory file based on a template. Each distribution contains an install.sh installer file and the following inventory file templates:
- single.inventory.yml.template
- distributed.inventory.yml.template
- expand.inventory.yml.template
- k0s.inventory.yml.template
KUMA places its files in the /opt directory, so we recommend making /opt a separate partition and allocating 16 GB for the operating system and the remainder of the disk space for the /opt partition.
KUMA is installed in the same way on all hosts using the installer and your prepared inventory file in which you describe your configuration. We recommend taking time to think through the setup before you proceed.
The following installation options are available:
- Installation on a single server
Single-server installation diagram

Installation on a single server
You can install all KUMA components on the same server: specify the same server in the single.inventory.yml inventory file for all components. An "all-in-one" installation can handle a small stream of events, up to 10,000 EPS. If you plan to use multiple dashboard layouts and handle a high volume of search queries, a single server might not be sufficient. In that case, we recommend choosing the distributed installation instead.
- Distributed installation
Distributed Installation diagram
Distributed Installation diagram
You can install KUMA services on different servers; you can describe the configuration for a distributed installation in the distributed.inventory.yml inventory file.
- Distributed installation in a fault-tolerant configuration
You can install the KUMA Core on a Kubernetes cluster for fault tolerance. Use the k0s.inventory.yml inventory file for the description.
Program installation requirements
General application installation requirements
Before deploying the application, make sure the following conditions are met:
- Servers on which you want to install the components satisfy the hardware and software requirements.
- Ports used by the installed instance of KUMA are available.
- KUMA components are addressed using the fully qualified domain name (FQDN) of the host. Before you install the application, make sure that the correct host FQDN is returned in the
Static hostnamefield. For this purpose, execute the following command:hostnamectl status - The server where the installer is run does not have the name
localhostorlocalhost.<domain>. - Time synchronization over Network Time Protocol (NTP) is configured on all servers with KUMA services.
Installation requirements for Oracle Linux and Astra Linux operating systems
|
Oracle Linux |
Astra Linux |
|---|---|---|
Python version |
3.6 or later |
3.6 or later |
SELinux module |
Disabled |
Disabled |
Package manager |
pip3 |
pip3 |
Basic packages |
The packages can be installed using the following commands:
|
The packages can be installed using the following command:
|
Dependent packages |
– |
The packages can be installed using the following command:
If you are planning to query Oracle DB databases from KUMA, you must install the libaio1 Astra Linux package. |
Packages that must be installed on a device with the KUMA Core for correct generation and downloading of reports |
|
|
User permissions level required to install the application |
– |
To assign the required permissions to the user account used for installing the application, run the following command:
|
Ports used by KUMA during installation
For the program to run correctly, you need to ensure that the KUMA components are able to interact with other components and programs over the network via the protocols and ports specified during the installation of the KUMA components.
Before installing the Core on the device, make sure that the following ports are free:
- 9090: used by Victoria Metrics.
- 8880: used by VMalert.
- 27017: used by MongoDB.
The table below shows the default network ports values. The installer automatically opens the ports during KUMA installation
Network ports used for the interaction of KUMA components
Protocol |
Port |
Direction |
Destination of the connection |
HTTPS |
7222 |
From the KUMA client to the server with the KUMA Core component. |
Reverse proxy in the CyberTrace system. |
HTTPS |
8123 |
From the storage service to the ClickHouse cluster node. |
Writing and receiving normalized events in the ClickHouse cluster. |
HTTPS |
9009 |
Between ClickHouse cluster replicas. |
Internal communication between ClickHouse cluster replicas for transferring data of the cluster. |
TCP |
2181 |
From ClickHouse cluster nodes to the ClickHouse keeper replication coordination service. |
Receiving and writing of replication metadata by replicas of ClickHouse servers. |
TCP |
2182 |
From one ClickHouse keeper replication coordination service to another. |
Internal communication between replication coordination services to reach a quorum. |
TCP |
7209 |
From the parent server with the KUMA Core component to the child server with the KUMA Core component. |
Internal communication of the parent node with the child node in hierarchy mode. |
TCP |
7210 |
From all KUMA components to the KUMA Core server. |
Receipt of the configuration by KUMA from the KUMA Core server. |
TCP |
7220 |
|
|
TCP |
7221 and other ports used for service installation as the --api.port <port> parameter value |
From KUMA Core to KUMA services. |
Administration of services from the KUMA web interface. |
TCP |
7223 |
To the KUMA Core server. |
Default port used for API requests. |
TCP |
8001 |
From Victoria Metrics to the ClickHouse server. |
Receiving ClickHouse server operation metrics. |
TCP |
9000 |
From the ClickHouse client to the ClickHouse cluster node. |
Writing and receiving data in the ClickHouse cluster. |
Ports used by the OOTB predefined resources
The installer automatically opens the ports during KUMA installation.
Ports used by the OOTB predefined resources:
- 7230/tcp
- 7231/tcp
- 7232/tcp
- 7233/tcp
- 7234/tcp
- 7235/tcp
- 5140/tcp
- 5140/udp
- 5141/tcp
- 5144/udp
KUMA Core traffic in a fault-tolerant configuration
The "KUMA Core traffic in a fault-tolerant configuration" table shows the initiator of the connection (the source) and the destination. The port number on the initiator can be dynamic. Return traffic within the established connection must not be blocked.
KUMA Core traffic in a fault-tolerant configuration
Source |
Destination |
Destination port |
Type |
|---|---|---|---|
External KUMA services |
Load balancer |
7209 |
TCP |
External KUMA services |
Load balancer |
7210 |
TCP |
External KUMA services |
Load balancer |
7220 |
TCP |
External KUMA services |
Load balancer |
7222 |
TCP |
External KUMA services |
Load balancer |
7223 |
TCP |
Worker node |
Load balancer |
6443 |
TCP |
Worker node |
Load balancer |
8132 |
TCP |
Control node |
Load balancer |
6443 |
TCP |
Control node |
Load balancer |
8132 |
TCP |
Control node |
Load balancer |
9443 |
TCP |
Worker node |
External KUMA services |
Depending on the settings specified when creating the service. |
TCP |
Load balancer |
Worker node |
7209 |
TCP |
Load balancer |
Worker node |
7210 |
TCP |
Load balancer |
Worker node |
7220 |
TCP |
Load balancer |
Worker node |
7222 |
TCP |
Load balancer |
Worker node |
7223 |
TCP |
External KUMA services |
Worker node |
7209 |
TCP |
External KUMA services |
Worker node |
7210 |
TCP |
External KUMA services |
Worker node |
7220 |
TCP |
External KUMA services |
Worker node |
7222 |
TCP |
External KUMA services |
Worker node |
7223 |
TCP |
Worker node |
Worker node |
179 |
TCP |
Worker node |
Worker node |
9500 |
TCP |
Worker node |
Worker node |
10250 |
TCP |
Worker node |
Worker node |
51820 |
UDP |
Worker node |
Worker node |
51821 |
UDP |
Control node |
Worker node |
10250 |
TCP |
Load balancer |
Control node |
6443 |
TCP |
Load balancer |
Control node |
8132 |
TCP |
Load balancer |
Control node |
9443 |
TCP |
Worker node |
Control node |
6443 |
TCP |
Worker node |
Control node |
8132 |
TCP |
Worker node |
Control node |
10250 |
TCP |
Control node |
Control node |
2380 |
TCP |
Control node |
Control node |
6443 |
TCP |
Control node |
Control node |
9443 |
TCP |
Control node |
Control node |
10250 |
TCP |
Cluster management console (CLI) |
Load balancer |
6443 |
TCP |
Cluster management console (CLI) |
Control node |
6443 |
TCP |
Synchronizing time on servers
To configure time synchronization on servers:
- Install chrony:
sudo apt install chrony - Configure the system time to synchronize with the NTP server:
- Make sure the virtual machine has Internet access.
If access is available, go to step b.
If internet access is not available, edit the
/etc/chrony.conffile to replace2.pool.ntp.orgwith the name or IP address of your organization's internal NTP server. - Start the system time synchronization service by executing the following command:
sudo systemctl enable --now chronyd - Wait a few seconds and run the following command:
sudo timedatectl | grep 'System clock synchronized'If the system time is synchronized correctly, the output will contain the line "System clock synchronized: yes".
- Make sure the virtual machine has Internet access.
Synchronization is configured.
Page topAbout the inventory file
KUMA components can be installed, updated, and removed from the directory with the unpacked kuma-ansible-installer using the Ansible tool and the inventory file you created. You can specify values for KUMA configuration settings in the inventory file; the installer uses these values when deploying, updating, and removing the program. The inventory file uses the YAML format.
You can create an inventory file based on the templates included in the distribution kit. The following templates are available:
- single.inventory.yml.template—Used to install KUMA on a single server. It contains the minimum set of settings optimized for installation on a single device without the use of a Kubernetes cluster.
- distributed.inventory.yml.template—Used for the initial distributed installation of KUMA without using a Kubernetes cluster, for expanding the all-in-one installation to a distributed installation, and for updating KUMA.
- expand.inventory.yml.template—Used in some reconfiguration scenarios: for adding collector and correlator servers, for expanding an existing storage cluster, and for adding a new storage cluster. If you use this inventory file to edit the configuration, the installer does not stop services in the entire infrastructure. If you reuse the inventory file, the installer can stop only services on hosts that are listed in the expand.inventory.yml inventory file.
- k0s.inventory.yml.template—Used to install or migrate KUMA to a Kubernetes cluster.
We recommend backing up the inventory file that you used to install the program. You can use it to add components to the system or remove KUMA.
Page topKUMA settings in the inventory file
The inventory file may include the following blocks:
allkumakuma_k0s
For each host, you must specify the FQDN in the <host name>.<domain> format or an ipv4 or ipv6 IP address.
Example: hosts: hostname.example.com: ip: 0.0.0.0 or ip: ::%eth0 |
all block
In this block the variables that are applied to all hosts indicated in the inventory are specified, including the implicit localhost where the installation is started. Variables can be redefined at the level of host groups or even for individual hosts.
Example of redefining variables in the inventory file
The following table lists possible variables in the 'vars' section and their descriptions.
List of possible variables in the vars section
Variable |
Description |
Possible values |
|---|---|---|
|
Method used to connect to target machines. |
|
|
User name used to connect to target machines and install components. |
If the root user is blocked on the target machines, use a user name that has the right to establish SSH connections and elevate privileges using su or sudo. |
|
Indicates the need to increase the privileges of the user account that is used to install KUMA components. |
|
|
A method for increasing the privileges of the user account that is used to install KUMA components. |
|
|
Path to the private key in the format /<path>/.ssh/id_rsa. This variable must be defined if you need to specify a key file that is different from the default key file: ~/.ssh/id_rsa. |
|
|
Indicates that KUMA components are deployed in a Kubernetes cluster. |
|
|
Indicates that KUMA components are moved in a Kubernetes cluster. |
|
|
Indicates that there is no internet connection. |
– is the default value for the k0s.inventory.yml template. |
|
Indicates that the machines are registered in the DNS zone of your organization. In this case, the installer will automatically add the IP addresses of the machines from the inventory file to the /etc/hosts files on the machines where KUMA components are installed. The specified IP addresses must be unique. |
|
|
Indicates the creation of predefined services during installation. |
|
|
Indicates that KUMA is installed in environments with limited computing resources. In this case, the Core can be installed on a host that has 4 GB of free disk space. By default, there is no variable. |
|
kuma block
This block lists the settings of KUMA components deployed outside of the Kubernetes cluster.
The following sections are available in the block:
- In the
varssection, you can specify the variables that are applied to all hosts indicated in thekumablock. - In the
childrensection you can list groups of component settings:kuma_core—KUMA Core settings. This may contain only one host.kuma_collector—settings of KUMA collectors. Can contain multiple hosts.kuma_correlator—settings of KUMA correlators. Can contain multiple hosts.kuma_storage—settings of KUMA storage nodes. Can contain multiple hosts.
kuma_k0s block
This block defines the settings of the Kubernetes cluster that ensures fault tolerance of KUMA. This block is only available in an inventory file that is based on k0s.inventory.yml.template.
The minimum configuration allowed for installation is one controller combined with a worker node. This configuration does not provide fault tolerance for the Core and is only intended for demonstration of its capabilities or for testing the software environment.
To implement fault tolerance, 2 dedicated cluster controllers and a load balancer are required. For industrial operation, it is recommended to use dedicated worker nodes and controllers. If a cluster controller is under workload and the pod with the KUMA Core is hosted on the controller, disabling the controller will result in a complete loss of access to the Core.
The following sections are available in the block:
- In the
varssection, you can specify the variables that are applied to all hosts indicated in thekumablock. - The
childrensection defines the settings of the Kubernetes cluster that ensures fault tolerance of KUMA.
The table below shows a list of possible variables in the vars section and their descriptions.
List of possible variables in the vars section
Variable group |
Description |
|
|---|---|---|
|
FQDN of the load balancer. The user installs the balancer on their own. If the |
|
|
A host that acts as a dedicated primary controller for the cluster. |
Groups for specifying the primary controller. A host must be assigned to only one of them. |
|
A host that combines the role of the primary controller and worker node of the cluster. |
|
|
Hosts that act as a dedicated cluster controller. |
Groups for specifying secondary controllers. |
|
Hosts that combine the role of controller and worker node of the cluster. |
|
|
Worker nodes of the cluster. |
|
Each host in this block must have its unique FQDN or IP address indicated in the ansible_host parameter, except for the host in the kuma_lb section which must have its FQDN indicated. Hosts must not be duplicated in groups.
The parameter extra_args: "--labels=kaspersky.com/kuma-core=true,kaspersky.com/kuma-ingress=true,node.longhorn.io/create-default-disk=true" must be indicated for each cluster node and for a cluster controller that is combined with a worker node.
Installation on a single server
To install KUMA components on a single server, complete the following steps:
- Ensure that hardware, software, and installation requirements for KUMA are met.
- Prepare the single.inventory.yml inventory file.
Use the single.yml.template inventory file template from the distribution kit to create a single.inventory.yml inventory file and describe the network structure of program components in that file. The installer uses the single.inventory.yml file to deploy KUMA.
- Install the program.
Install the program and log in to the web interface using the default credentials.
If necessary, you can move application components to different servers to continue with a distributed configuration.
Preparing the single.inventory.yml inventory file
KUMA components can be installed, updated, and removed in the directory containing the unpacked installer by using the Ansible tool and the user-created YML inventory file containing a list of the hosts of KUMA components and other settings. If you want to install all KUMA components on the same server, you must specify the same host for all components in the inventory file.
To create an inventory file for installation on a single server:
- Copy the archive with the
kuma-ansible-installer-<version name>.tar.gzinstaller to the server and unpack it using the following command (about 2 GB of disk space is required):sudo tar -xpf kuma-ansible-installer-<version name>.tar.gz - Go to the KUMA installer folder by executing the following command:
cd kuma-ansible-installer - Copy the single.inventory.yml.template template and create an inventory file named single.inventory.yml:
cp single.inventory.yml.template single.inventory.yml - Edit the settings in the single.inventory.yml inventory file.
If you want predefined services to be created during the installation, set deploy_example_services to true.
deploy_example_services: trueThe predefined services will appear only as a result of the initial installation of KUMA. If you are upgrading the system using the same inventory file, the predefined services are not re-created.
- Replace all
kuma.example.comstrings in the inventory file with the name of the host on which you want to install KUMA components.
The inventory file is created. Now you can use it to install KUMA on a single server.
We recommend backing up the inventory file that you used to install the program. You can use it to add components to the system or remove KUMA.
Sample inventory file for installation on a single server
Installing the program on a single server
You can install all KUMA components on a single server using the Ansible tool and the single.inventory.yml inventory file.
To install Kuma on a single server:
- Download the kuma-ansible-installer-<
build number>.tar.gz KUMA distribution kit to the server and extract it. The archive is unpacked into the kuma-ansibleinstaller directory. - Go to the directory with the unpacked installer.
- Place the license key file in the <installer directory>/roles/kuma/files/ directory.
The key file must be named license.key.
sudo cp <key file>.key <installer directory>/roles/kuma/files/license.key - Run the following command to start the component installation with your prepared single.inventory.yml inventory file:
sudo ./install.sh single.inventory.yml - Accept the terms of the End User License Agreement.
If you do not accept the terms of the End User License Agreement, the program will not be installed.
As a result, all KUMA components are installed. After the installation is complete, log in to the KUMA web interface and enter the address of the KUMA web interface in the address bar of your browser, then enter your credentials on the login page.
The address of the KUMA web interface is https://<FQDN of the host where KUMA is installed>:7220.
Default login credentials:
- login – admin
- password – mustB3Ch@ng3d!
After the first login, change the password of the admin account
We recommend backing up the inventory file that you used to install the program. You can use this inventory file to add components to the system or remove KUMA.
You can expand the installation to a distributed installation.
Page topDistributed installation
Distributed installation of KUMA involves multiple steps:
- Verifying that the hardware, software, and installation requirements for KUMA are satisfied.
- Preparing the test machine.
The test machine is used during the program installation process: the installer files are unpacked and run on it.
- Preparing the target machines.
The program components are installed on the target machines.
- Preparing the distributed.inventory.yml inventory file.
Create an inventory file with a description of the network structure of program components. The installer uses this inventory file to deploy KUMA.
- Installing the program.
Install the program and log in to the web interface.
- Creating services.
Create the client part of the services in the KUMA web interface and install the server part of the services on the target machines.
Make sure the KUMA installation is complete before you install KUMA services. We recommend installing services in the following order: storage, collectors, correlators, and agents.
When deploying several KUMA services on the same host, you must specify unique ports for each service using the
--api.port <port>parameters during installation.
If necessary, you can change the KUMA web console certificate to your company's certificate.
Preparing the test machine
To prepare the test machine for the KUMA installation:
- Ensure that hardware, software, and installation requirements of the program are met.
- Generate an SSH key for authentication on the SSH servers of the target machines by executing the following command:
sudo ssh-keygen -f /root/.ssh/id_rsa -N "" -C kuma-ansible-installerIf SSH root access is blocked on the test machine, generate an SSH key for authentication on the SSH servers of the target machines using a user from the sudo group:
sudo ssh-keygen -f /home/<name of the user from sudo group>/.ssh/id_rsa -N "" -C kuma-ansible-installerAs a result, the key is generated and saved in the user's home directory. You should specify the full path to the key in the inventory file in the value of the ansible_ssh_private_key_file parameter so that the key is available during installation.
- Make sure that the test machine has network access to all the target machines by host name and copy the SSH key to each target machine by carrying out the following command:
sudo ssh-copy-id -i /root/.ssh/id_rsa root@<host name of the test machine>If SSH root access is blocked on the test machine and you want to use the SSH key from the home directory of the sudo group user, make sure that the test machine has network access to all target machines by host name and copy the SSH key to each target machine using the following command:
sudo ssh-copy-id -i /home/<name of a user in the sudo group>/.ssh/id_rsa root@<host name of the test machine> - Copy the archive with the
kuma-ansible-installer-<version>.tar.gzinstaller to the test machine and unpack it using the following command (about 2 GB of disk space is required):sudo tar -xpf kuma-ansible-installer-<version name>.tar.gz
The test machine is ready for the KUMA installation.
Page topPreparing the target machine
To prepare the target machine for the installation of KUMA components:
- Ensure that hardware, software, and installation requirements are met.
- Specify the host name. We recommend specifying the FQDN. For example, kuma1.example.com.
You should not change the KUMA host name after installation: this will make it impossible to verify the authenticity of certificates and will disrupt the network communication between the program components.
- Register the target machine in your organization's DNS zone to allow host names to be translated to IP addresses.
If your organization does not use a DNS server, you can use the /etc/hosts file for name resolution. The content of the files can be automatically generated for each target machine when installing KUMA.
- To get the hostname that you must specify when installing KUMA, run the following command and record the result:
hostname -fThe test machine must be able to access the target machine using this name.
The target machine is ready for the installation of KUMA components.
Page topPreparing the distributed.inventory.yml inventory file
To create the distributed.inventory.yml inventory file:
- Go to the KUMA installer folder by executing the following command:
cd kuma-ansible-installer - Copy the distributed.inventory.yml.template template and create an inventory file named distributed.inventory.yml:
cp distributed.inventory.yml.template distributed.inventory.yml - Edit the settings in the distributed.inventory.yml inventory file.
We recommend backing up the inventory file that you used to install the program. You can use it to add components to the system or remove KUMA.
Sample inventory file for distributed installation
Installing the program in a distributed configuration
KUMA is installed using the Ansible tool and the YML inventory file. The installation is performed using the test machine, where all of the KUMA components are installed on the target machines.
To install KUMA:
- On the test machine, open the folder containing the unpacked installer.
cd kuma-ansible-installer - Place the license key file in the <installer directory>/roles/kuma/files/ directory.
The key file must be named license.key.
- Run the installer from the folder with the unpacked installer:
sudo ./install.sh distributed.inventory.yml - Accept the terms of the End User License Agreement.
If you do not accept the terms of the End User License Agreement, the program will not be installed.
KUMA components are installed. The screen will display the URL of the KUMA web interface and the user name and password that must be used to access the web interface.
By default, the KUMA web interface address is https://<FQDN or IP address of the core component>:7220.
Default login credentials (after the first login, you must change the password of the admin account):
- user name — admin
- password— mustB3Ch@ng3d!
We recommend backing up the inventory file that you used to install the program. You can use it to add components to the system or remove KUMA.
Page topModifying the self-signed web console certificate
Before changing KUMA certificate, make sure to back up the previous certificate and key with the names external.cert.old and external.key.old respectively.
After installing the KUMA Core, the installer creates the following certificates in the /opt/kaspersky/kuma/core/certificates folder:
- Self-signed root certificate ca.cert with the ca.key.
Signs all other certificates that are used for internal communication between KUMA components.
- The internal.cert certificate signed with the root certificate, and the Core server internal.key.
Used for internal communication between KUMA components.
- KUMA web console external.cert certificate and external.key.
Used in the KUMA web console and for REST API requests.
You can use your company certificate and key instead of self-signed web console certificate. For example, if you want to replace self-signed CA Core certificate with a certificate issued by an enterprise CA, you must provide an external.cert and an unencrypted external.key in PEM format.
The following example shows how to replace a self-signed CA Core certificate with an enterprise certificate in PFX format. You can use the instructions as an example and adapt the steps according to your needs.
To replace the KUMA web console certificate with an external certificate:
- Switch to root user operation:
sudo -i - Go to the certificates directory:
cd /opt/kaspersky/kuma/core/certificates - Make a backup copy of the current certificate and key:
mv external.cert external.cert.old && mv external.key external.key.old - In OpenSSL, convert the PFX file to a certificate and an encrypted key in PEM format:
openssl pkcs12 -in kumaWebIssuedByCorporateCA.pfx -nokeys -out external.certopenssl pkcs12 -in kumaWebIssuedByCorporateCA.pfx -nocerts -nodes -out external.keyWhen carrying out the command, you are required to specify the PFX key password (Enter Import Password).
As a result, the external.cert certificate and the external.key in PEM format are returned.
- Place the returned external.cert certificate and external.key files in the /opt/kaspersky/kuma/core/certificates directory.
- Change the owner of the key files:
chown kuma:kuma external.cert external.key - Restart KUMA:
systemctl restart kuma-core - Refresh the web page or restart the browser hosting the KUMA web interface.
Your company certificate and key have been replaced.
Page topDistributed installation in a fault-tolerant configuration
KUMA fault-tolerant configuration is provided by injecting KUMA Core into a Kubernetes cluster deployed by the KUMA installer.
The Kubernetes cluster configuration is defined in the inventory file. It must include one controller (dedicated or combined with a worker node), at least one worker node (dedicated or combined with a controller), and 0 or more dedicated worker nodes.
To install a fault-tolerant configuration of KUMA, you must use the kuma-ansible-installer-ha-<build number>.tar.gz installer.
When installing the fault-tolerant application configuration, the KUMA Core is placed into a Kubernetes cluster using the installer and the inventory file. The KUMA Core can be placed in a Kubernetes cluster in the following ways:
- Install KUMA in a Kubernetes cluster.
- Migrate the Core of the existing KUMA installation to the Kubernetes cluster.
About KUMA fault tolerance
KUMA fault tolerance is ensured by implementing the KUMA Core into the Kubernetes cluster deployed by the KUMA installer, and by using an external TCP traffic balancer.
There are 2 possible roles for nodes in Kubernetes:
- Controllers (control-plane)—nodes with this role manage the cluster, store metadata, and distribute the workload.
- Workers—nodes with this role bear the workload by hosting KUMA processes.
Learn more about the requirements for cluster nodes.
For product installations of the KUMA Core in Kubernetes, it is critically important to allocate 3 separate nodes with a single controller role. This will provide fault tolerance for the Kubernetes cluster and will ensure that the workload (KUMA processes and others) cannot affect the tasks associated with managing the Kubernetes cluster. If you are using virtualization tools, you should make sure that these nodes reside on different physical servers and ensure that there are no worker nodes on the same physical servers.
In cases where KUMA is installed for demo purposes, nodes that combine the roles of a controller and worker node are allowed. However, if you are expanding an installation to a distributed installation, you must reinstall the entire Kubernetes cluster while allocating 3 separate nodes with the controller role and at least 2 nodes with the worker node role. KUMA cannot be upgraded to later versions if there are nodes that combine the roles of a controller and worker node.
You can combine different roles on the same cluster node only for demo deployment of the application.
KUMA Core availability under various scenarios:
- Malfunction or network disconnection of the worker node where the KUMA Core service is deployed.
Access to the KUMA web interface is lost. After 6 minutes, Kubernetes initiates migration of the Core bucket to an operational node of the cluster. After deployment is complete, which takes less than one minute, the KUMA web interface becomes available again via URLs that use the FQDN of the load balancer. To determine on which of the hosts the Core is running, run the following command in the terminal of one of the controllers:
k0s kubectl get pod -n kuma -o wideWhen the malfunctioning worker node or access to it is restored, the Core bucket is not migrated from its current worker node. A restored node can participate in replication of a disk volume of the Core service.
- Malfunction or network disconnection of a worker node containing a replica of the KUMA Core drive on which the Core service is not currently deployed.
Access to the KUMA web interface is not lost via URLs that use the FQDN of the load balancer. The network storage creates a replica of the running Core disk volume on other running nodes. When accessing KUMA via a URL with the FQDN of running nodes, there is no disruption.
- Loss of availability of one or more cluster controllers when quorum is maintained.
Worker nodes operate in normal mode. Access to KUMA is not disrupted. A failure of cluster controllers extensive enough to break quorum leads to the loss of control over the cluster.
Correspondence of the number of machines in use to ensure fault tolerance
Number of controllers when installing a cluster
Minimum number of controllers required for the operation of the cluster (quorum)
Admissible number of failed controllers
1
1
0
2
2
0
3
2
1
4
3
1
5
3
2
6
4
2
7
4
3
8
5
3
9
5
4
- Simultaneous failure of all Kubernetes cluster controllers.
The cluster cannot be managed and therefore will have impaired performance.
- Simultaneous loss of availability of all worker nodes of a cluster with replicas of the Core volume and the Core pod.
Access to the KUMA web interface is lost. If all replicas are lost, information will be lost.
Additional application installation requirements
To protect the KUMA network infrastructure using Kaspersky Endpoint Security for Linux, first install KUMA in a Kubernetes cluster and then deploy Kaspersky Endpoint Security for Linux.
When you install a fault-tolerant configuration of KUMA, the following requirements must be met:
- General application installation requirements.
- The hosts that are planned to be used for Kubernetes cluster nodes do not use IP addresses from the following Kubernetes blocks:
- serviceCIDR: 10.96.0.0/12
- podCIDR: 10.244.0.0/16
The traffic to the proxy servers is also excluded for the addresses of these blocks.
- The nginx load balancer is installed and configured (more details about configuring nginx). For example, you can use the following command for installation:
sudo yum install nginxIf you want nginx to be configured automatically during the KUMA installation, install nginx and provide access to it via SSH in the same way as for the Kubernetes cluster hosts.
- An access key from the device on which KUMA is installed is added to the load balancer server.
- The SELinux module is NOT enabled on the balancer server in the operating system.
- The tar, systemctl, setfacl packages are installed on the hosts.
During KUMA installation, the hosts are automatically checked to meet the following hardware requirements. If these conditions are not met, the installation is terminated.
For demonstration purposes, you can disable the check of these conditions during installation by specifying the low_resources: true variable in the inventory file.
- Number of CPU cores (threads) – 12 or more.
- RAM – 22,528 MB or more.
- Available disk space in the /opt/ section – 1,000 GB or more.
- For initial installation, the /var/lib/ section must have at least 32 GB of available space. If the cluster is already installed on this node, the size of the required available space is reduced by the size of the /var/lib/k0s directory.
Additional requirements for the application installation in the Astra Linux Special Edition operating system
- Installing a fault-tolerant configuration of KUMA is supported for the Astra Linux Special Edition RUSB.10015-01 operating system (2022-1011SE17MD, update 1.7.2.UU.1). Core version 5.15.0.33 or higher is required.
- The following packages are installed on the machines intended for deploying a Kubernetes cluster:
- open-iscsi
- wireguard
- wireguard-tools
The packages can be installed using the following command:
sudo apt install open-iscsi wireguard wireguard-tools
Additional requirements for the application installation in the Oracle Linux operating system
The following packages are installed on the machines intended for deploying a Kubernetes cluster:
- iscsi-initiator-utils
- wireguard-tools
Before installing the packages, add the EPEL repository as a source: sudo yum install oracle-epel-release-el8.
The packages can be installed using the following command:
sudo yum install iscsi-initiator-utils wireguard-tools
Managing Kubernetes and accessing KUMA
When installing KUMA in a fault-tolerant configuration, the file named artifacts/k0s-kubeconfig.yml is created in the installer directory. This file contains the details required for connecting to the created Kubernetes cluster. The same file is created on the main controller in the home directory of the user set as ansible_user in the inventory file.
To ensure that the Kubernetes cluster can be monitored and managed, the k0s-kubeconfig.yml file must be saved in a location available for the cluster administrators. Access to the file must be restricted.
Managing a Kubernetes cluster
To monitor and manage a cluster, you can use the k0s application that is installed on all cluster nodes during KUMA deployment. For example, you can use the following command to view the load on worker nodes:
k0s kubectl top nodes
Access to the KUMA Core
The KUMA Core can be accessed at the URL https://<worker node FQDN>:<worker node port>. Available ports: 7209, 7210, 7220, 7222, 7223. Port 7220 is used by default to connect to the KUMA Core web interface. Access can be obtained through any worker node whose extra_args parameter contains the value kaspersky.com/kuma-ingress=true.
It is not possible to log in to the KUMA web interface on multiple worker nodes simultaneously using the same account credentials. Only the most recently established connection remains active.
If you are using an external load balancer in a fault-tolerant Kubernetes cluster configuration, the ports of the KUMA Core are accessed via the FQDN of the load balancer.
Page topTime zone in a Kubernetes cluster
The time zone within a Kubernetes cluster is always UTC+0, so this time difference should be taken into account when handling data created by the KUMA Core deployed in a fault-tolerant configuration:
- In audit events, the time zone is UTC+0 in the
DeviceTimeZonefield. - In generated reports, the user will see the difference between the time the report was generated and the time in the browser.
- In the dashboard, the user will see the difference between the time in the widget (the time of the user's browser is displayed) and the time in the exported widget data in the CSV file (the time within the Kubernetes cluster is displayed).
KUMA backup
KUMA allows you to back up the KUMA Core database and certificates. The backup function is intended for restoring KUMA. To move or copy the resources, use the resource export and import functions.
Backup can be done in the following ways:
- Using the REST API
- Using the /opt/kaspersky/kuma/kuma executable file
The KUMA backup using the kuma executable file is not available in KUMA higher than 2.1.
Special considerations for KUMA backup
- Data may only be restored from a backup if it is restored to the KUMA of the same version as the backup one.
- Backup of collectors is not required unless the collectors have an SQL connection. When restoring such collectors, you should revert to the original initial value of the ID.
- If KUMA cannot start after the restore, it is recommended to reset the kuma database in MongoDB.
KUMA backup using the kuma file
To perform a backup:
- Log in to the OS of the server where the KUMA Core is installed.
- Execute the following command of the kuma executable file:
sudo /opt/kaspersky/kuma/kuma tools backup --dst <path to folder for backup copy> --certificates
The backup copy has been created.
To restore data from a backup:
- Log in to the OS of the server where the KUMA Core is installed.
- On the KUMA Core server, run the following command:
sudo systemctl stop kuma-core - Execute the following command:
sudo /opt/kaspersky/kuma/kuma tools restore --src <path to folder containing backup copy> --certificates - Start KUMA by running the following command:
sudo systemctl start kuma-core - In the KUMA web interface, in the Resources → Active services section, select all services and click the Reset certificate button.
- Reinstall the services with the same ports and IDs.
Data is restored from the backup.
Page topModifying the configuration of KUMA
The following KUMA configuration changes can be performed.
- Extending an all-in-one installation to a distributed installation.
To expand an all-in-one installation to a distributed installation:
- Create a backup copy of KUMA.
- Remove the pre-installed correlator, collector, and storage services from the server.
- In the KUMA web interface, under Resources → Active services, select a service and click Copy ID. On the server where the services were installed, run the service removal command:
sudo /opt/kaspersky/kuma/kuma <collector/correlator/storage> --id <service ID copied from the KUMA web interface> --uninstallRepeat the removal command for each service.
- Then remove the services in the KUMA web interface:
As a result, only the KUMA Core remains on the initial installation server.
- In the KUMA web interface, under Resources → Active services, select a service and click Copy ID. On the server where the services were installed, run the service removal command:
- Prepare the distributed.inventory.yml inventory file and in that file, specify the initial all-in-one initial installation server in the
kuma_coregroup.In this way, the KUMA Core remains on the original server, and you can deploy the other components on other servers. Specify the servers on which you want to install the KUMA components in the inventory file.
Sample inventory file for expanding an all-in-one installation to a distributed installation
- Create and install the storage, collector, correlator, and agent services on other machines.
- After you specify the settings for all sections in the distributed.inventory.yml inventory file, run the installer on the test machine.
sudo ./install.sh distributed.inventory.ymlRunning the command causes the files necessary to install the KUMA components (storages, collectors, correlators) to appear on each target machine specified in the distributed.inventory.yml inventory file.
- Create storage, collector, and correlator services.
- After you specify the settings for all sections in the distributed.inventory.yml inventory file, run the installer on the test machine.
The expansion of the installation is completed.
- Adding servers for collectors to a distributed installation.
The following instructions show how to add one or more servers to an existing infrastructure and then install collectors on these servers to balance the load. You can use these instructions as an example and adapt them to your requirements.
To add servers to a distributed installation:
- Ensure that the target machines meet hardware, software, and installation requirements.
- On the test machine, go to the directory with the unpacked KUMA installer by running the following command:
cd kuma-ansible-installer - Copy the expand.inventory.yml.template template to create an inventory file called expand.inventory.yml:
cp expand.inventory.yml.template expand.inventory.yml - Edit the settings in the expand.inventory.yml inventory file and specify the servers that you want to add in the kuma_collector section.
Sample expand.inventory.yml inventory file for adding collector servers
- On the test machine start expand.inventory.playbook by running the following command as root in the directory with the unpacked installer:
PYTHONPATH="$(pwd)/ansible/site-packages:${PYTHONPATH}" python3 ./ansible/bin/ansible-playbook -i expand.inventory.yml expand.inventory.playbook.ymlRunning this command on each target machine specified in the expand.inventory.yml inventory file creates files for creating and installing the collector.
- Create and install the collectors. A KUMA collector consists of a client part and a server part, therefore creating a collector involves two steps.
- Creating the client part of the collector, which includes a set of resources and the collector service.
To create a set of resources for a collector, in the KUMA web interface, under Resources → Collectors, click Add collector and edit the settings. For more details, see Creating a collector.
At the last step of the configuration wizard, after you click Create and save, a resource set for the collector is created and the collector service is automatically created. The command for installing the service on the server is also automatically generated and displayed on the screen. Copy the installation command and proceed to the next step.
- Creating the server part of the collector.
- On the target machine, run the command you copied at the previous step. The command looks as follows, but all parameters are filled in automatically.
sudo /opt/kaspersky/kuma/kuma <storage> --core https://<KUMA Core server FQDN>:<port used by KUMA Core for internal communication (port 7210 by default)> --id <service ID copied from the KUMA web interface> --installThe collector service is installed on the target machine. You can check the status of the service in the web interface under Resources → Active services.
- Run the same command on each target machine specified in the expand.inventory.yml inventory file.
- Creating the client part of the collector, which includes a set of resources and the collector service.
- Specify the added servers in the distributed.inventory.yml inventory file so that it has up-to-date information in case of a KUMA update.
Servers are successfully added.
- Adding servers for correlators to a distributed installation.
The following instructions show how to add one or more servers to an existing infrastructure and then install correlators on these servers to balance the load. You can use these instructions as an example and adapt them to your requirements.
To add servers to a distributed installation:
- Ensure that the target machines meet hardware, software, and installation requirements.
- On the test machine, go to the directory with the unpacked KUMA installer by running the following command:
cd kuma-ansible-installer - Copy the expand.inventory.yml.template template to create an inventory file called expand.inventory.yml:
cp expand.inventory.yml.template expand.inventory.yml - Edit the settings in the expand.inventory.yml inventory file and specify the servers that you want to add in the kuma_correlator section.
Sample expand.inventory.yml inventory file for adding correlator servers
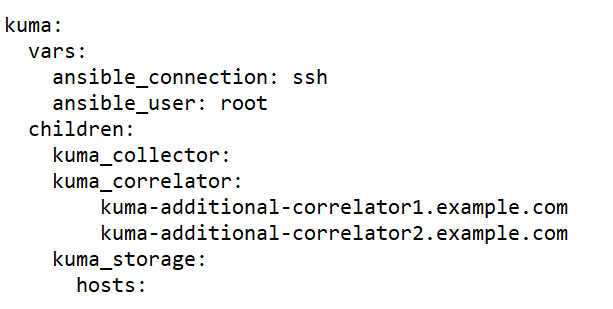
- On the test machine, start expand.inventory.playbook by running the following command as root in the directory with the unpacked installer:
PYTHONPATH="$(pwd)/ansible/site-packages:${PYTHONPATH}" python3 ./ansible/bin/ansible-playbook -i expand.inventory.yml expand.inventory.playbook.ymlRunning this command on each target machine specified in the expand.inventory.yml inventory file creates files for creating and installing the correlator.
- Create and install the correlators. A KUMA correlator consists of a client part and a server part, therefore creating a correlator involves two steps.
- Creating the client part of the correlator, which includes a set of resources and the correlator service.
To create a resource set for a correlator, in the KUMA web interface, under Resources → Correlators, click Add correlator and edit the settings. For more details, see Creating a correlator.
At the last step of the configuration wizard, after you click Create and save, a resource set for the correlator is created and the correlator service is automatically created. The command for installing the service on the server is also automatically generated and displayed on the screen. Copy the installation command and proceed to the next step.
- Creating the server part of the correlator.
- On the target machine, run the command you copied at the previous step. The command looks as follows, but all parameter values are assigned automatically.
sudo /opt/kaspersky/kuma/kuma <storage> --core https://<KUMA Core server FQDN>:<port used by KUMA Core for internal communication (port 7210 by default)> --id <service ID copied from the KUMA web interface> --installThe correlator service is installed on the target machine. You can check the status of the service in the web interface under Resources → Active services.
- Run the same command on each target machine specified in the expand.inventory.yml inventory file.
- Creating the client part of the correlator, which includes a set of resources and the correlator service.
- Specify the added servers in the distributed.inventory.yml inventory file so that it has up-to-date information in case of a KUMA update.
Servers are successfully added.
- Adding servers to an existing storage cluster.
The following instructions show how to add multiple servers to an existing storage cluster. You can use these instructions as an example and adapt them to your requirements.
To add servers to an existing storage cluster:
- Ensure that the target machines meet hardware, software, and installation requirements.
- On the test machine, go to the directory with the unpacked KUMA installer by running the following command:
cd kuma-ansible-installer - Copy the expand.inventory.yml.template template to create an inventory file called expand.inventory.yml:
cp expand.inventory.yml.template expand.inventory.yml - Edit the settings in the expand.inventory.yml inventory file and specify the servers that you want to add in the 'storage' section. In the following example, the 'storage' section specifies servers for installing two shards, each of which contains two replicas. In the expand.inventory.yml inventory file, you must only specify the FQDN, the roles of shards and replicas are assigned later in the KUMA web interface by following the steps of the instructions. You can adapt this example to suit your needs.
Sample expand.inventory.yml inventory file for adding servers to an existing storage cluster
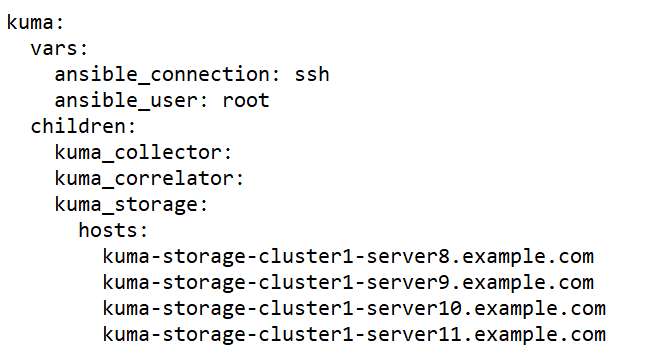
- On the test machine, start expand.inventory.playbook by running the following command as root in the directory with the unpacked installer:
PYTHONPATH="$(pwd)/ansible/site-packages:${PYTHONPATH}" python3 ./ansible/bin/ansible-playbook -i expand.inventory.yml expand.inventory.playbook.ymlRunning this command on each target machine specified in the expand.inventory.yml inventory file creates files for creating and installing the storage. - You do not need to create a separate storage because you are adding servers to an existing storage cluster. You must edit the storage settings of the existing cluster:
- In the Resources → Storages section, select an existing storage and open the storage for editing.
- In the ClickHouse cluster nodes section, click Add nodes and specify roles in the fields for the new node. The following example shows how to specify identifiers to add two shards, containing two replicas each, to an existing cluster. You can adapt the example to suit your needs.
Example:
ClickHouse cluster nodes
<existing nodes>
FQDN: kuma-storage-cluster1server8.example.com
Shard ID: 1
Replica ID: 1
Keeper ID: 0
FQDN: kuma-storage-cluster1server9.example.com
Shard ID: 1
Replica ID: 2
Keeper ID: 0
FQDN: kuma-storage-cluster1server9.example.com
Shard ID: 2
Replica ID: 1
Keeper ID: 0
FQDN: kuma-storage-cluster1server10.example.com
Shard ID: 2
Replica ID: 2
Keeper ID: 0
- Save the storage settings.
Now you can create storage services for each ClickHouse cluster node.
- To create a storage service, in the KUMA web interface, in the Resources → Active services section, click Add service.
This opens the Choose a service window; in that window, select the storage you edited at the previous step and click Create service. Do the same for each ClickHouse storage node you are adding.
As a result, the number of created services must be the same as the number of nodes added to the ClickHouse cluster, that is, four services for four nodes. The created storage services are displayed in the KUMA web interface in the Resources → Active services section. Now storage services must be installed on each server by using the service ID.
- Now storage services must be installed on each server by using the service ID.
- In the KUMA web interface, in the Resources → Active services section, select the storage service that you need and click Copy ID.
The service ID is copied to the clipboard; you need it for running the service installation command.
- Compose and run the following command on the target machine:
sudo /opt/kaspersky/kuma/kuma <storage> --core https://<KUMA Core server FQDN>:<port used by KUMA Core for internal communication (port 7210 by default)> --id <service ID copied from the KUMA web interface> --installThe storage service is installed on the target machine. You can check the status of the service in the web interface under Resources → Active services.
- Run the storage service installation command on each target machine listed in the 'storage' section of the expand.inventory.yml inventory file, one machine at a time. On each machine, the unique service ID within the cluster must be specified in the installation command.
- In the KUMA web interface, in the Resources → Active services section, select the storage service that you need and click Copy ID.
- To apply changes to a running cluster, in the KUMA web interface, under Resources → Active services, select the check box next to all storage services in the cluster that you are expanding and click Update configuration. Changes are applied without stopping services.
- Specify the added servers in the distributed.inventory.yml inventory file so that it has up-to-date information in case of a KUMA update.
Servers are successfully added to a storage cluster.
- Adding an additional storage cluster.
The following instructions show how to add an additional storage cluster to existing infrastructure. You can use these instructions as an example and adapt them to your requirements.
To add an additional storage cluster:
- Ensure that the target machines meet hardware, software, and installation requirements.
- On the test machine, go to the directory with the unpacked KUMA installer by running the following command:
cd kuma-ansible-installer - Copy the expand.inventory.yml.template template to create an inventory file called expand.inventory.yml:
cp expand.inventory.yml.template expand.inventory.yml - Edit the settings in the expand.inventory.yml inventory file and specify the servers that you want to add in the 'storage' section. In the following example, the 'storage' section specifies servers for installing three dedicated keepers and two shards, each of which contains two replicas. In the expand.inventory.yml inventory file, you must only specify the FQDN, the roles of keepers, shards, and replicas are assigned later in the KUMA web interface by following the steps of the instructions. You can adapt this example to suit your needs.
Sample expand.inventory.yml inventory file for adding an additional storage cluster
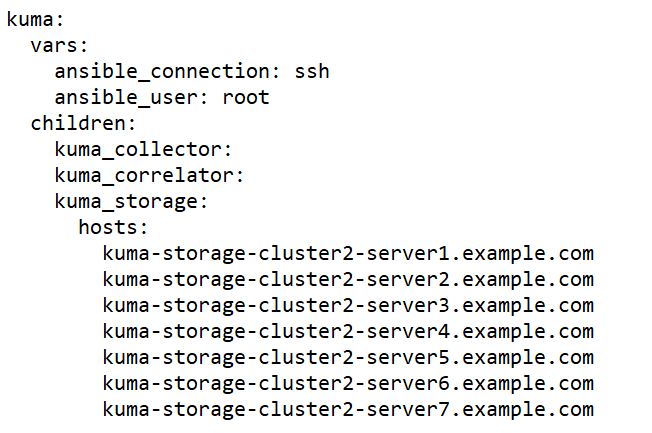
- On the test machine, start expand.inventory.playbook by running the following command as root in the directory with the unpacked installer:
PYTHONPATH="$(pwd)/ansible/site-packages:${PYTHONPATH}" python3 ./ansible/bin/ansible-playbook -i expand.inventory.yml expand.inventory.playbook.ymlRunning this command on each target machine specified in the expand.inventory.yml inventory file creates files for creating and installing the storage. - Create and install a storage. For each storage cluster, you must create a separate storage, that is, three storages for three storage clusters. A storage consists of a client part and a server part, therefore creating a storage involves two steps.
- Creating the client part of the storage, which includes a set of resources and the storage service.
- To create a resource set for a storage, in the KUMA web interface, under Resources → Storages, click Add storage and edit the settings. In the ClickHouse cluster nodes section, specify roles for each server that you are adding: keeper, shard, replica. For more details, see Creating a set of resources for a storage.
The created set of resources for the storage is displayed in the Resources → Storages section. Now you can create storage services for each ClickHouse cluster node.
- To create a storage service, in the KUMA web interface, in the Resources → Active services section, click Add service.
This opens the Choose a service window; in that window, select the set of resources that you created for the storage at the previous step and click Create service. Do the same for each ClickHouse storage.
As a result, the number of created services must be the same as the number of nodes in the ClickHouse cluster, that is, fifty services for fifty nodes. The created storage services are displayed in the KUMA web interface in the Resources → Active services section. Now storage services must be installed to each node of the ClickHouse cluster by using the service ID.
- To create a resource set for a storage, in the KUMA web interface, under Resources → Storages, click Add storage and edit the settings. In the ClickHouse cluster nodes section, specify roles for each server that you are adding: keeper, shard, replica. For more details, see Creating a set of resources for a storage.
- Creating the server part of the storage.
- On the target machine, create the server part of the storage: in the KUMA web interface, in the Resources → Active services section, select the relevant storage service and click Copy ID.
The service ID is copied to the clipboard; you need it for running the service installation command.
- Compose and run the following command on the target machine:
sudo /opt/kaspersky/kuma/kuma <storage> --core https://<KUMA Core server FQDN>:<port used by KUMA Core for internal communication (port 7210 by default)> --id <service ID copied from the KUMA web interface> --installThe storage service is installed on the target machine. You can check the status of the service in the web interface under Resources → Active services.
- Run the storage service installation command on each target machine listed in the 'storage' section of the expand.inventory.yml inventory file, one machine at a time. On each machine, the unique service ID within the cluster must be specified in the installation command.
- Dedicated keepers are automatically started immediately after installation and are displayed in the Resources → Active services section with a green status. Services on other storage nodes may not start until services are installed for all nodes in that cluster. Up to that point, services can be displayed with a red status. This is normal behavior for creating a new storage cluster or adding nodes to an existing storage cluster. As soon as the command to install services on all nodes of the cluster is executed, all services acquire the green status.
- Creating the client part of the storage, which includes a set of resources and the storage service.
- Specify the added servers in the distributed.inventory.yml inventory file so that it has up-to-date information in case of a KUMA update.
An additional storage cluster is successfully added.
- Removing servers from a distributed installation.
- Removing a storage cluster from a distributed installation.
- Migrating the KUMA Core to a new Kubernetes cluster.
Updating previous versions of KUMA
The update is performed the same way on all hosts using the installer and inventory file. If you are using version 1.5 or 1.6 and want to update to KUMA 2.1.x, please update to 2.0.x first, and then from 2.0.x to 2.1.x.
Upgrading from version 2.0.x to 2.1.x
Upgrading from version 2.1.x to 2.1.3
Page topTroubleshooting update errors
When updating KUMA, you may encounter the following errors:
Fix the errors to successfully complete the update.
Page topDelete KUMA
To remove KUMA, use the Ansible tool and the user-generated inventory file.
To remove KUMA:
- On the test machine, go to the installer folder:
cd kuma-ansible-installer - Execute the following command:
sudo ./uninstall.sh <inventory file>
KUMA and all of the program data will be removed from the server.
The databases that were used by KUMA (for example, the ClickHouse storage database) and the information they contain must be deleted separately.
Special considerations for removing a fault-tolerant configuration of KUMA
The composition of the removed components depends on the value of the deploy_to_k8s parameter in the inventory file used to remove KUMA:
true– the Kubernetes cluster created during the KUMA installation is deleted.false– all KUMA components except for the Core are deleted from the Kubernetes cluster. The cluster is not deleted.
In addition to the KUMA components installed outside the cluster, the following directories and files are deleted on the cluster nodes:
- /usr/bin/k0s
- /etc/k0s/
- /var/lib/k0s/
- /usr/libexec/k0s/
- ~/k0s/ (for the ansible_user)
- /opt/longhorn/
- /opt/cni/
- /opt/containerd
When a cluster is being deleted, error messages may appear, however, it does not interrupt the installer.
- You can ignore such messages for the Delete KUMA transfer job and Delete KUMA pod tasks.
- For the Reset k0s task (if an error message contains the following text: "To ensure a full reset, a node reboot is recommended.") and the Delete k0s Directories and files task (if an error message contains the following text: "I/O error: '/var/lib/k0s/kubelet/plugins/kubernetes.io/csi/driver.longhorn.io/"), it is recommended to restart the host the error is related to and try to uninstall KUMA again with the same inventory file.
After removing KUMA, restart the hosts on which the KUMA or Kubernetes components were installed.
Page top