Contents
Creating an event router
An event router is a service that allows you to receive streams of events from collectors and correlators and then distribute the events to specified destinations in accordance with the configured filters.
To have events from the collector sent to the event router, you must create an eventRouter destination resource with the address of the event router and link the resource to the collectors that you want to send events to the event router.
The event router receives events on the API port, just like storage and correlator destinations.
You can create a router in the Resources section.
Using an event router lets you reduce the utilization of links, which is important for low-bandwidth and busy links.
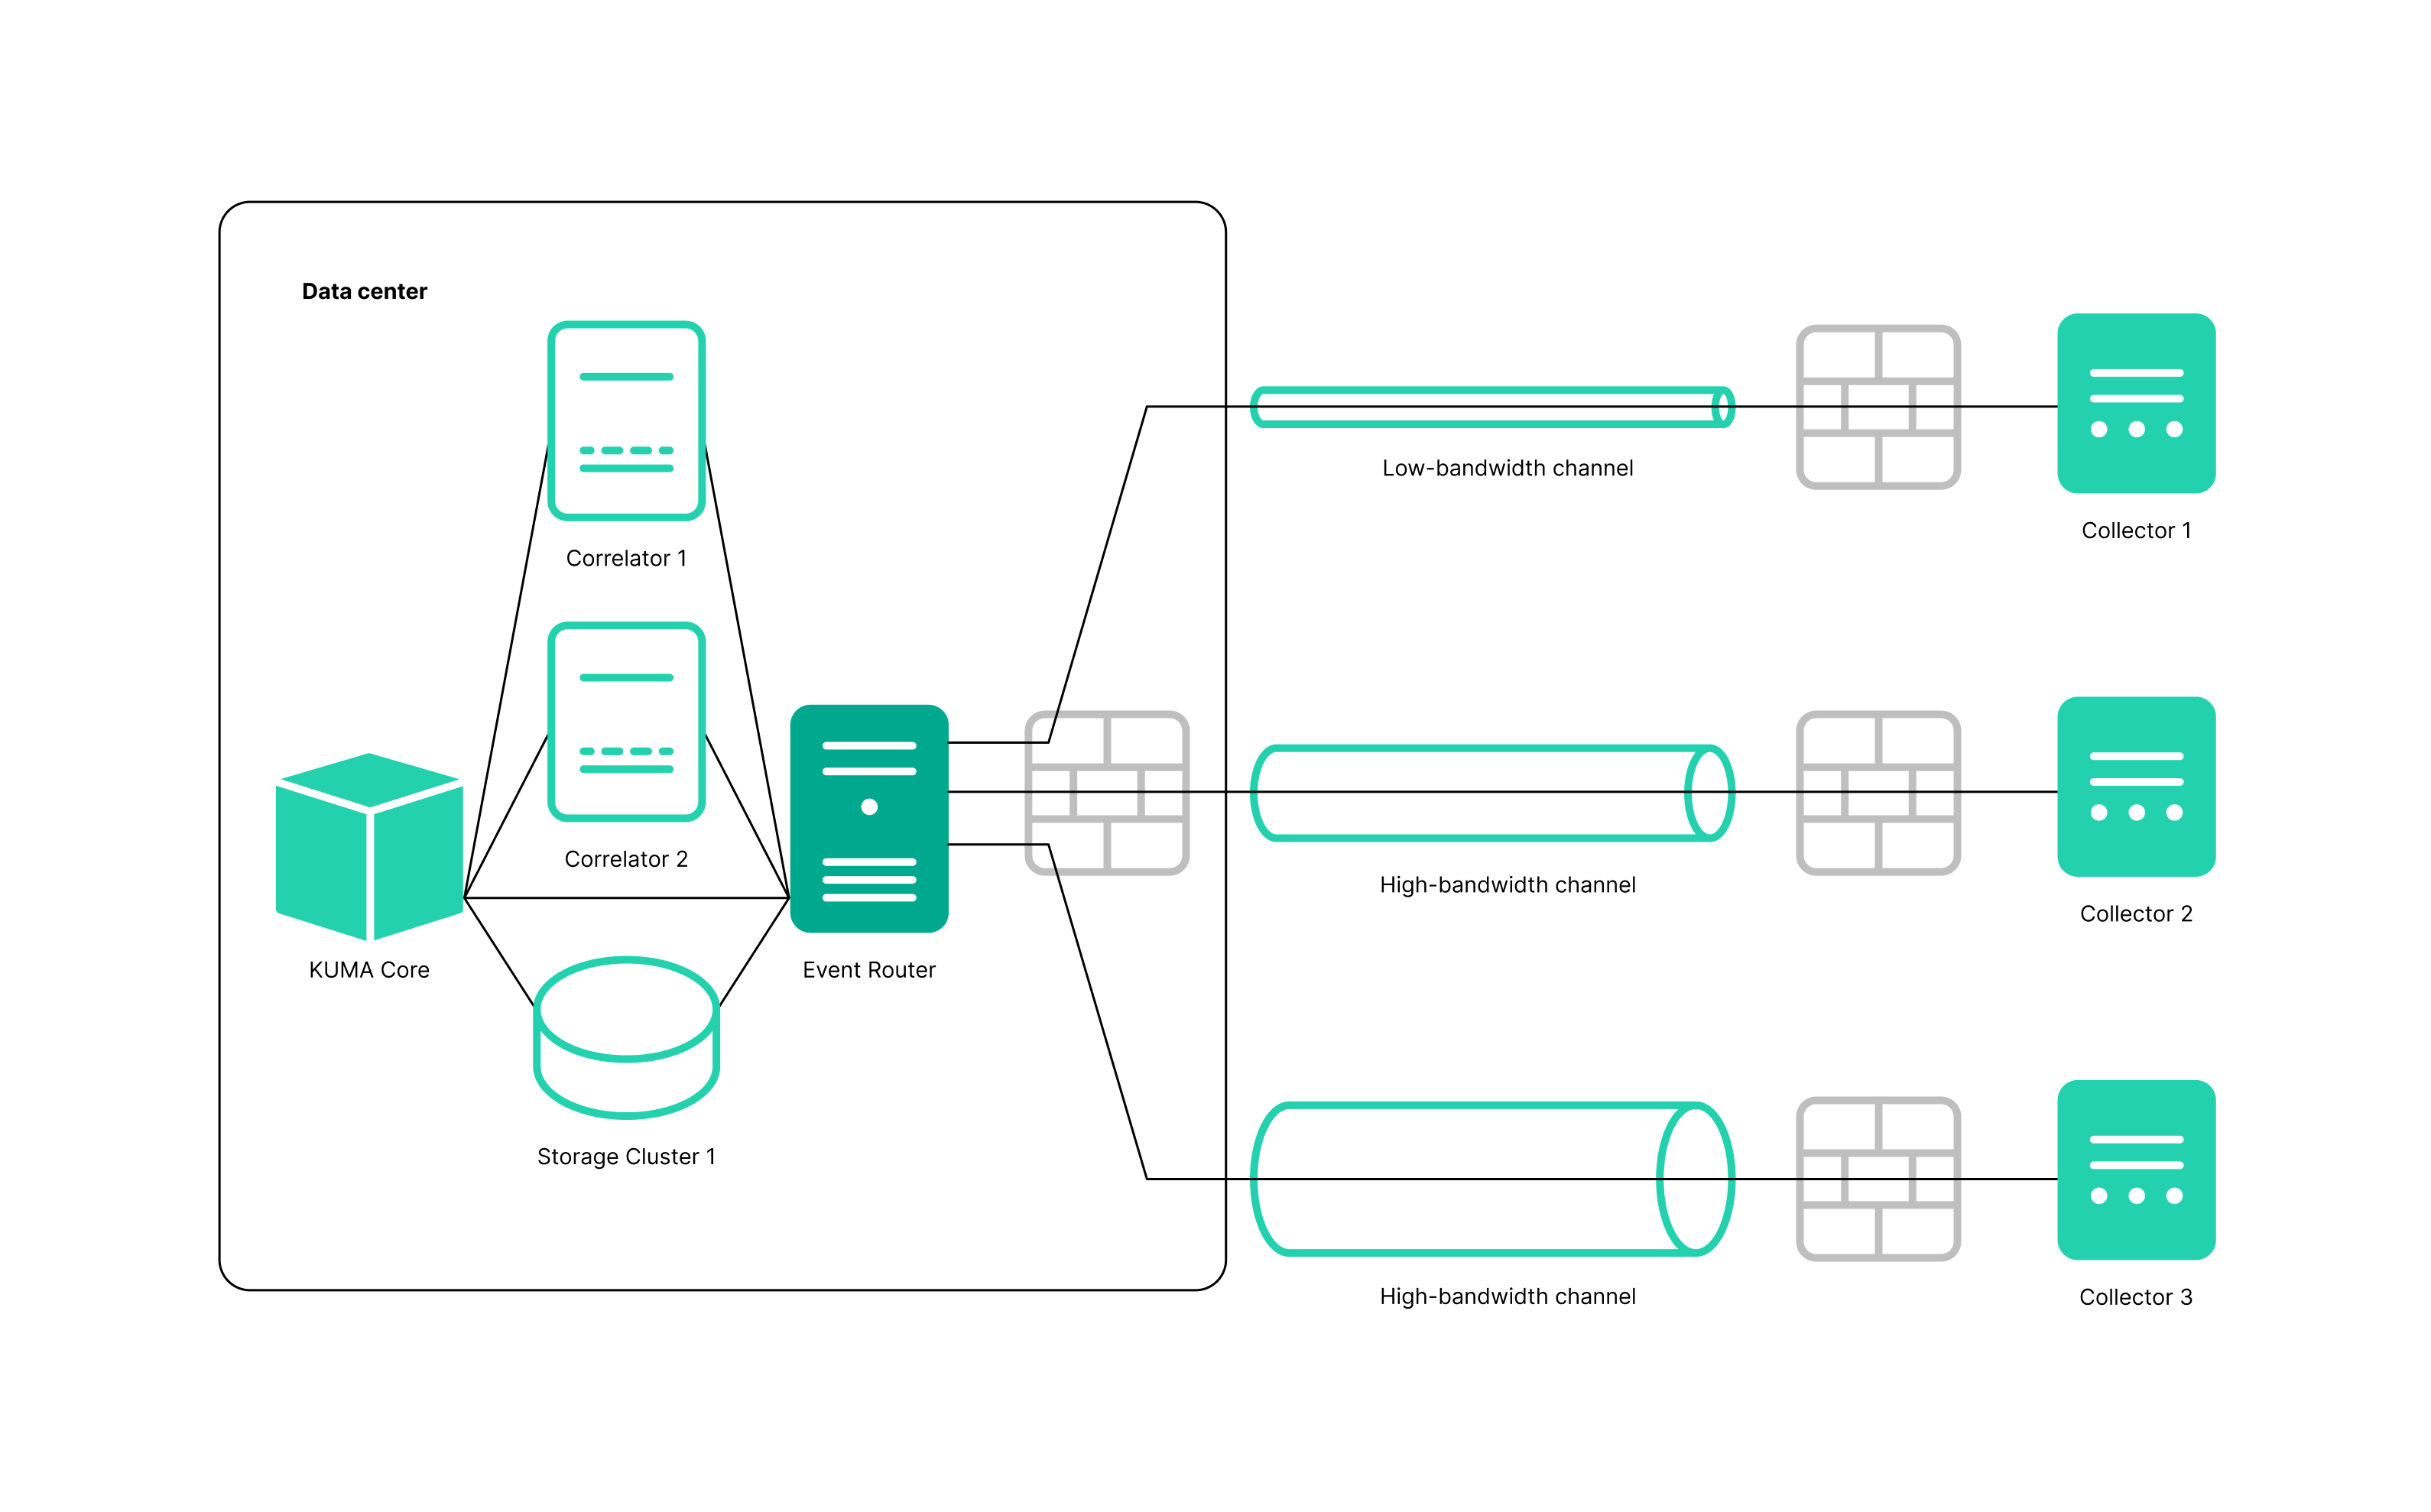
Possible use cases:
Collector—Event router in the data center

The event router must be installed on a Linux device. Only a user with the Main administrator role can create the service. You can create a service in any tenant; the tenant relation does not impose any restrictions.
You can use the following metrics to get information about the service performance:
- IO
- Process
- OS
As with other resources, the following audit events are generated for the event router in KUMA:
- Resource was successfully added
- Resource was successfully updated
- Resource was successfully deleted
Installing an event router involves two steps:
- Create the event router service in the KUMA Console using the Installation Wizard.
- Install the event router service on the server.
Starting the event router installation wizard
To start the event router installation wizard:
- In the KUMA Console, in the Resources section, click Event routers.
- In the Event routers window that opens, click Add.
Follow the instructions of the wizard.
Step 1. General settings of the event router
This is a required step of the Installation Wizard. At this step, you specify the main settings of the event router: its name and the tenant that will own it.
To specify the basic settings of the event router:
- In the Name field, enter a unique name for the service you are creating. The name must contain 1 to 128 Unicode characters.
- In the Tenant drop-down list, select the tenant that will own the event router. An event router belonging to a tenant is organizational in nature and does not impose any restrictions.
- If necessary, specify the number of processes that the service can run concurrently in the Handlers field. By default, the number of handlers is the same as the number of vCPUs on the server where the service is installed.
- If necessary, use the Debug toggle switch to enable logging of service operations.
- You can optionally add up to 4000 Unicode characters describing the service in the Description field.
The basic settings of the event router are configured. Proceed to the next step of the Installation Wizard.
Page topStep 2. Routing
This is a required step of the Installation Wizard. We recommend sending events to at least two destinations: to the correlator for analysis and to the storage for storage. You can also select another event router as the destination.
To specify the settings of the destination to which you want the event router to send events received from collectors:
- In the Routing step of the installation wizard, click Add.
- This opens the Create destination window; in that window, specify the following settings:
- On the Basic settings tab, in the Name field, enter a unique name for the destination. The name must contain 1 to 128 Unicode characters.
- You can use the State toggle switch to enable or disable the service as needed.
- In the Type drop-down list, select the type of the destination. The following values are available:
- On the Advanced settings tab, specify the values of parameters. The set of parameters that can be configured depends on the type of the destination selected on the Basic settings tab. For detailed information about parameters and their values, click the link for each type of destination in paragraph "c." of this instruction.
The created destination is displayed on the Installation Wizard tab. A destination resource can be removed from the resource set by selecting it and clicking Delete in the opened window.
Routing is configured. You can proceed to the next step of the installation wizard.
Page topStep 3. Setup validation
This is the required, final step of the Installation Wizard.
To create an event router in the installation wizard:
- Click Create and save service.
The lower part of the window displays the command that you must use to install the event router on the server.
Example command:
/opt/kaspersky/kuma/kuma eventrouter --core https://kuma-example:<port used for communication with the KUMA Core> --id <event router service ID> --api.port <port used for communication with the service> --installThe port for communication with the KUMA Core, the service ID, and the port for communication with the service are added to the command automatically. You must also ensure the network connectivity of KUMA and open the ports used by its components, if necessary.
- Close the Wizard by clicking Save.
The service is installed in the KUMA Console. You can now proceed with installing the service in the KUMA network infrastructure.
Page topInstalling the event router on the server
To install the event router on the server:
- Log in to the server where you want to install the event router service.
- Create the /opt/kaspersky/kuma/ folder.
- Copy the "kuma" file to the "/opt/kaspersky/kuma/" directory. The file is located inside the installer in the "/kuma-ansible-installer/roles/kuma/files/" directory.
- Make sure the kuma file has sufficient rights to run. If the file is not executable, make it executable:
sudo chmod +x /opt/kaspersky/kuma/kuma - Place the LICENSE file from the /kuma-ansible-installer/roles/kuma/files/ directory in the /opt/kaspersky/kuma/ directory and accept the license by running the following command:
sudo /opt/kaspersky/kuma/kuma license - Create the 'kuma' user:
sudo useradd --system kuma && usermod -s /usr/bin/false kuma - Make the 'kuma' user the owner of the /opt/kaspersky/kuma directory and all files inside the directory:
sudo chown -R kuma:kuma /opt/kaspersky/kuma/ - Add the KUMA event router port to firewall exclusions.
For the program to run correctly, ensure that the KUMA components are able to interact with other components and programs over the network via the protocols and ports specified during the installation of the KUMA components.
- Execute the following command:
sudo /opt/kaspersky/kuma/kuma eventrouter --core https://<FQDN of the KUMA Core server>:<port used by KUMA Core server for internal communication (port 7210 by default)> --id <service ID copied from the KUMA Console> --api.port <port used for communication with the installed component> --installExample:
sudo /opt/kaspersky/kuma/kuma eventrouter --core https://kuma.example.com:7210 --id XXXX --api.port YYYY --install
The event router is installed on the server. You can use it to receive events from collectors and relay the events to specified destinations.
Page top