Contents
Creating a storage
A storage consists of two parts: one part is created inside the KUMA Console, and the other part is installed on network infrastructure servers intended for storing events. The server part of a KUMA storage consists of ClickHouse nodes collected into a cluster. ClickHouse clusters can be supplemented with cold storage disks.
For each ClickHouse cluster, a separate storage must be installed.
Prior to storage creation, carefully plan the cluster structure and deploy the necessary network infrastructure. When choosing a ClickHouse cluster configuration, consider the specific event storage requirements of your organization.
It is recommended to use ext4 as the file system.
A storage is created in several steps:
- Creating a set of resources for a storage in the KUMA Console
- Creating a storage service in the KUMA Console
- Installing storage nodes in the network infrastructure
When creating storage cluster nodes, verify the network connectivity of the system and open the ports used by the components.
If the storage settings are changed, the service must be restarted.
ClickHouse cluster structure
A ClickHouse cluster is a logical group of devices that possess all accumulated normalized KUMA events. It consists of one or more logical shards.
A shard is a logical group of devices that possess a specific portion of all normalized events accumulated in the cluster. It consists of one or more replicas. Increasing the number of shards lets you do the following:
- Accumulate more events by increasing the total number of servers and disk space.
- Absorb a larger stream of events by distributing the load associated with an influx of new events.
- Reduce the time taken to search for events by distributing search zones among multiple devices.
A replica is a device that is a member of a logical shard and possesses a single copy of that shard's data. If multiple replicas exist, it means multiple copies exist (the data is replicated). Increasing the number of replicas lets you do the following:
- Improve high availability.
- Distribute the total load related to data searches among multiple machines (although it's best to increase the number of shards for this purpose).
A keeper is a device that participates in coordination of data replication at the whole cluster level. At least one device per cluster must have this role. The recommended number of the devices with this role is 3. The number of devices involved in coordinating replication must be an odd number. The keeper and replica roles can be combined in one machine.
Page topClickHouse cluster node settings
Prior to storage creation, carefully plan the cluster structure and deploy the necessary network infrastructure. When choosing a ClickHouse cluster configuration, consider the specific event storage requirements of your organization.
When creating ClickHouse cluster nodes, verify the network connectivity of the system and open the ports used by the components.
For each node of the ClickHouse cluster, you need to specify the following settings:
- Fully qualified domain name (FQDN)—a unique address to access the node. Specify the entire FQDN, for example,
kuma-storage.example.com. - Shard, replica, and keeper IDs—the combination of these settings determines the position of the node in the ClickHouse cluster structure and the node role.
Node roles
The roles of the nodes depend on the specified settings:
- shard, replica, keeper—the node participates in the accumulation and search of normalized KUMA events and helps coordinate data replication at the cluster-wide level.
- shard, replica—the node participates in the accumulation and search of normalized KUMA events.
- keeper—the node does not accumulate normalized events, but helps coordinate data replication at the cluster-wide level. Dedicated keepers must be specified at the beginning of the list in the Resources → Storages → <Storage> → Basic settings → ClickHouse cluster nodes section.
ID requirements:
- If multiple shards are created in the same cluster, the shard IDs must be unique within this cluster.
- If multiple replicas are created in the same shard, the replica IDs must be unique within this shard.
- The keeper IDs must be unique within the cluster.
Example of ClickHouse cluster node IDs:
- shard 1, replica 1, keeper 1;
- shard 1, replica 2;
- shard 2, replica 1;
- shard 2, replica 2, keeper 3;
- shard 2, replica 3;
- keeper 2.
Cold storage of events
In KUMA, you can configure the migration of legacy data from a ClickHouse cluster to the cold storage. Cold storage can be implemented using the local disks mounted in the operating system or the Hadoop Distributed File System (HDFS). Cold storage is enabled when at least one cold storage disk is specified. If a cold storage disk is not configured and the server runs out of disk space, the storage service is stopped. If both hot storage and cold storage are configured, and space runs out on the cold storage disk, the KUMA storage service is stopped. We recommend avoiding such situations.
Cold storage disks can be added or removed.
After changing the cold storage settings, the storage service must be restarted. If the service does not start, the reason is specified in the storage log.
If the cold storage disk specified in the storage settings has become unavailable (for example, out of order), this may lead to errors in the operation of the storage service. In this case, recreate a disk with the same path (for local disks) or the same address (for HDFS disks) and then delete it from the storage settings.
Rules for moving the data to the cold storage disks
When cold storage is enabled, KUMA checks the storage terms of the spaces once an hour:
- If the storage term for a space on a ClickHouse cluster expires, the data is moved to the cold storage disks. If a cold storage disk is misconfigured, the data is deleted.
- If the storage term for a space on a cold storage disk expires, the data is deleted.
- If the ClickHouse cluster disks are 95% full, the biggest partitions are automatically moved to the cold storage disks. This can happen more often than once per hour.
- Audit events are generated when data transfer starts and ends.
During data transfer, the storage service remains operational, and its status stays green in the Resources → Active services section of the KUMA Console. When you hover the mouse pointer over the status icon, a message indicating the data transfer appears. When a cold storage disk is removed, the storage service has the yellow status.
Special considerations for storing and accessing events
- When using HDFS disks for cold storage, protect your data in one of the following ways:
- Configure a separate physical interface in the VLAN, where only HDFS disks and the ClickHouse cluster are located.
- Configure network segmentation and traffic filtering rules that exclude direct access to the HDFS disk or interception of traffic to the disk from ClickHouse.
- Events located in the ClickHouse cluster and on the cold storage disks are equally available in the KUMA Console. For example, when you search for events or view events related to alerts.
- Storing events or audit events on cold storage disks is not mandatory; to disable this functionality, specify
0(days) in the Cold retention period or Audit cold retention period field in the storage settings.
Special considerations for using HDFS disks
- Before connecting HDFS disks, create directories for each node of the ClickHouse cluster on them in the following format:
<HDFS disk host>/<shard ID>/<replica ID>. For example, if a cluster consists of two nodes containing two replicas of the same shard, the following directories must be created:- hdfs://hdfs-example-1:9000/clickhouse/1/1/
- hdfs://hdfs-example-1:9000/clickhouse/1/2/
Events from the ClickHouse cluster nodes are migrated to the directories with names containing the IDs of their shard and replica. If you change these node settings without creating a corresponding directory on the HDFS disk, events may be lost during migration.
- HDFS disks added to storage operate in the JBOD mode. This means that if one of the disks fails, access to the storage will be lost. When using HDFS, take high availability into account and configure RAID, as well as storage of data from different replicas on different devices.
- The speed of event recording to HDFS is usually lower than the speed of event recording to local disks. The speed of accessing events in HDFS, as a rule, is significantly lower than the speed of accessing events on local disks. When using local disks and HDFS disks at the same time, the data is written to them in turn.
Removing cold storage disks
Before physically disconnecting cold storage disks, remove these disks from the storage settings.
To remove a disk from the storage settings:
- In the KUMA Console, under Resources → Storages, select the relevant storage.
This opens the storage.
- In the window, in the Disks for cold storage section, in the required disk's group of settings, click Delete disk.
Data from removed disk is automatically migrated to other cold storage disks or, if there are no such disks, to the ClickHouse cluster. During data migration, the storage status icon is highlighted in yellow. Audit events are generated when data transfer starts and ends.
- After event migration is complete, the disk is automatically removed from the storage settings. It can now be safely disconnected.
Removed disks can still contain events. If you want to delete them, you can manually delete the data partitions using the DROP PARTITION command.
If the cold storage disk specified in the storage settings has become unavailable (for example, out of order), this may lead to errors in the operation of the storage service. In this case, create a disk with the same path (for local disks) or the same address (for HDFS disks) and then delete it from the storage settings.
Page topDetaching, archiving, and attaching partitions
If you want to optimize disk space and speed up queries in KUMA, you can detach data partitions in ClickHouse, archive partitions, or move partitions to a drive. If necessary, you can later reattach the partitions you need and perform data processing.
Detaching partitions
To detach partitions:
- Determine the shard on all replicas of which you want to detach the partition.
- Get the partition ID using the following command:
sudo /opt/kaspersky/kuma/clickhouse/bin/client.sh -d kuma --multiline --query "SELECT partition, name FROM system.parts;" |grep 20231130In this example, the command returns the partition ID for November 30, 2023.
- One each replica of the shard, detach the partition using the following command and specifying the partition ID:
sudo /opt/kaspersky/kuma/clickhouse/bin/client.sh -d kuma --multiline --query "ALTER TABLE events_local_v2 DETACH PARTITION ID '<partition ID>'"
As a result, the partition is detached on all replicas of the shard. Now you can move the data directory to a drive or archive the partition.
Archiving partitions
To archive detached partitions:
- Find the detached partition in disk subsystem of the server:
sudo find /opt/kaspersky/kuma/clickhouse/data/ -name <ID of the detached partition>\* Change to the 'detached' directory that contains the detached partition, and while in the 'detached' directory, perform the archival:sudo cd <path to the 'detached' directory containing the detached partition>sudo zip -9 -r detached.zip *For example:
sudo cd /opt/kaspersky/kuma/clickhouse/data/store/d5b/d5bdd8d8-e1eb-4968-95bd-d8d8e1eb3968/detached/sudo zip -9 -r detached.zip *
The partition is archived.
Attaching partitions
To attach archived partitions to KUMA:
- Increase the Retention period value.
KUMA deletes data based on the date specified in the Timestamp field, which records the time when the event is received, and based on the Retention period value that you set for the storage.
Before restoring archived data, make sure that the Retention period value overlaps the date in the Timestamp field. If this is not the case, the archived data will be deleted within 1 hour.
- Place the archive partition in the 'detached' section of your storage and unpack the archive:
sudounzip detached.zip -d<path to the 'detached' directory>For example:
sudounzip detached.zip -d/opt/kaspersky/kuma/clickhouse/data/store/d5b/d5bdd8d8-e1eb-4968-95bd-d8d8e1eb3968/detached/ - Run the command to attach the partition:
sudo /opt/kaspersky/kuma/clickhouse/bin/client.sh -d kuma --multiline --query "ALTER TABLE events_local_v2 ATTACH PARTITION ID '<partition ID>'"Repeat the steps of unpacking the archive and attaching the partition on each replica of the shard.
As a result, the archived partition is attached and its events are again available for search.
Page topCreating a set of resources for a storage
In the KUMA Console, a storage service is created based on the set of resources for the storage.
To create a set of resources for a storage in the KUMA Console:
- In the KUMA Console, under Resources → Storages, click Add storage.
This opens the Create storage window.
- On the Basic settings tab, in the Storage name field, enter a unique name for the service you are creating. The name must contain 1 to 128 Unicode characters.
- In the Tenant drop-down list, select the tenant that will own the storage.
- You can optionally add up to 256 Unicode characters describing the service in the Description field.
- In the Retention period field, specify the period, in days from the moment of arrival, during which you want to store events in the ClickHouse cluster. When the specified period expires, events are automatically deleted from the ClickHouse cluster. If cold storage of events is configured, when the event storage period in the ClickHouse cluster expires, the data is moved to cold storage disks. If a cold storage disk is misconfigured, the data is deleted.
- In the Audit retention period field, specify the period, in days, to store audit events. The minimum value and default value is
365. - If cold storage is required, specify the event storage term:
- Cold retention period—the number of days to store events. The minimum value is
1. - Audit cold retention period—the number of days to store audit events. The minimum value is 0.
- Cold retention period—the number of days to store events. The minimum value is
- In the Debug drop-down list, specify whether resource logging must be enabled. The default value (Disabled) means that only errors are logged for all KUMA components. If you want to obtain detailed data in the logs, select Enabled.
- If you want to change ClickHouse settings, in the ClickHouse configuration override field, paste the lines with settings from the ClickHouse configuration XML file /opt/kaspersky/kuma/clickhouse/cfg/config.xml. Specifying the root elements <yandex>, </yandex> is not required. Settings passed in this field are used instead of the default settings.
Example:
<merge_tree>
<parts_to_delay_insert>600</parts_to_delay_insert>
<parts_to_throw_insert>1100</parts_to_throw_insert>
</merge_tree>
- If necessary, in the Spaces section, add spaces to the storage to distribute the stored events.
There can be multiple spaces. You can add spaces by clicking the Add space button and remove them by clicking the Delete space button.
Available settings:
- In the Name field, specify a name for the space containing 1 to 128 Unicode characters.
- In the Retention period field, specify the number of days to store events in the ClickHouse cluster.
- If necessary, in the Cold retention period field, specify the number of days to store the events in the cold storage. The minimum value is
1. - In the Filter section, you can specify conditions to identify events that will be put into this space. You can select an existing filter from the drop-down list or create a new filter.
Creating a filter in resources
- In the Filter drop-down list, select Create new.
- If you want to keep the filter as a separate resource, select the Save filter check box.
In this case, you will be able to use the created filter in various services.
This check box is cleared by default.
- If you selected the Save filter check box, enter a name for the created filter resource in the Name field. The name must contain 1 to 128 Unicode characters.
- In the Conditions settings block, specify the conditions that the events must meet:
- Click the Add condition button.
- In the Left operand and Right operand drop-down lists, specify the search parameters.
Depending on the data source selected in the Right operand field, you may see fields of additional parameters that you need to use to define the value that will be passed to the filter. For example, when choosing active list you will need to specify the name of the active list, the entry key, and the entry key field.
- In the operator drop-down list, select the relevant operator.
- If necessary, select the do not match case check box. When this check box is selected, the operator ignores the case of the values.
The selection of this check box does not apply to the InSubnet, InActiveList, InCategory or InActiveDirectoryGroup operators.
This check box is cleared by default.
- If you want to add a negative condition, select If not from the If drop-down list.
- You can add multiple conditions or a group of conditions.
- If you have added multiple conditions or groups of conditions, choose a search condition (and, or, not) by clicking the AND button.
- If you want to add existing filters that are selected from the Select filter drop-down list, click the Add filter button.
You can view the nested filter settings by clicking the
 button.
After the service is created, you can view and delete spaces in the storage resource settings.
There is no need to create a separate space for audit events. Events of this type (Type=4) are automatically placed in a separate Audit space with a storage term of at least 365 days. This space cannot be edited or deleted from the KUMA Console.
- If necessary, in the Disks for cold storage section, add to the storage the disks where you want to transfer events from the ClickHouse cluster for long-term storage.
There can be multiple disks. You can add disks by clicking the Add disk button and remove them by clicking the Delete disk button.
Available settings:
- In the Type drop-down list, select the type of the disk being connected:
- Local—for the disks mounted in the operating system as directories.
- HDFS—for the disks of the Hadoop Distributed File System.
- In the Name field, specify the disk name. The name must contain 1 to 128 Unicode characters.
- If you select Local disk type, specify the absolute directory path of the mounted local disk in the Path field. The path must begin and end with a "/" character.
- If you select HDFS disk type, specify the path to HDFS in the Host field. For example,
hdfs://hdfs1:9000/clickhouse/.
- In the Type drop-down list, select the type of the disk being connected:
- If necessary, in the ClickHouse cluster nodes section, add ClickHouse cluster nodes to the storage.
There can be multiple nodes. You can add nodes by clicking the Add node button and remove them by clicking the Remove node button.
Available settings:
- In the FQDN field, specify the fully qualified domain name of the node being added. For example,
kuma-storage-cluster1-server1.example.com. - In the shard, replica, and keeper ID fields, specify the role of the node in the ClickHouse cluster. The shard and keeper IDs must be unique within the cluster, the replica ID must be unique within the shard. The following example shows how to populate the ClickHouse cluster nodes section for a storage with dedicated keepers in a distributed installation. You can adapt the example to suit your needs.
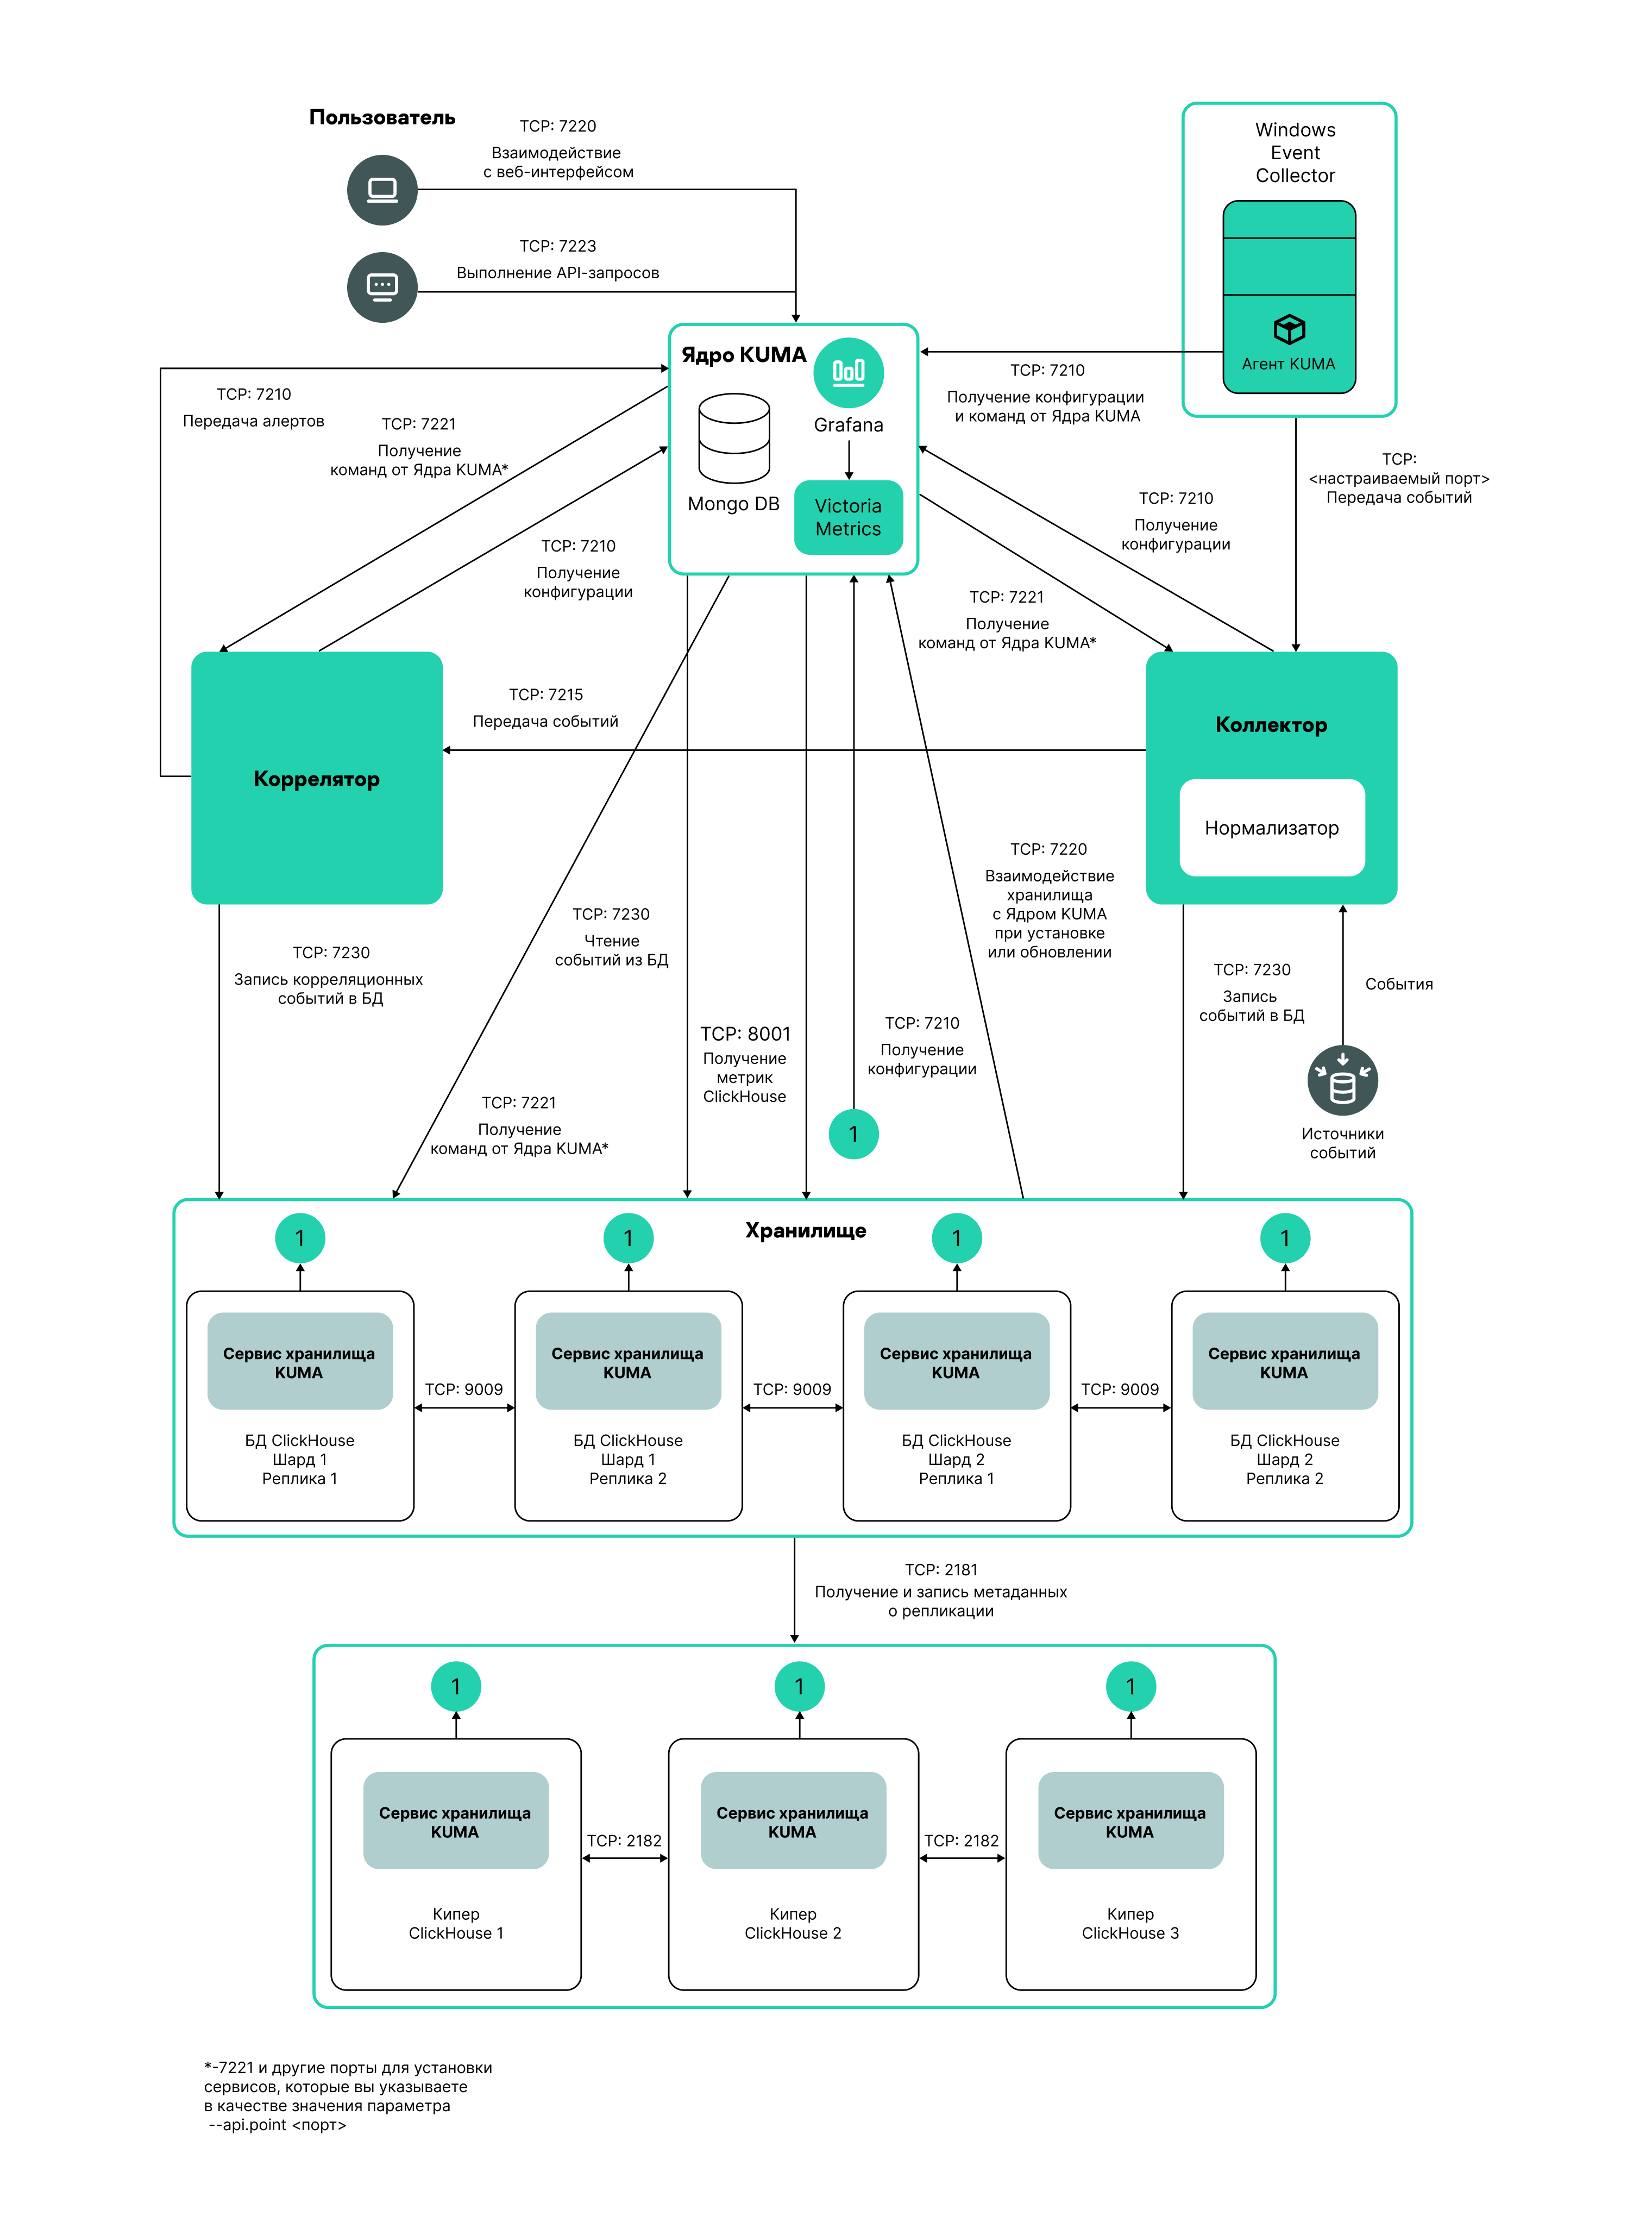
Distributed Installation diagram
Example:
ClickHouse cluster nodes
FQDN: kuma-storage-cluster1-server1.example.com
Shard ID: 0
Replica ID: 0
Keeper ID: 1
FQDN: kuma-storage-cluster1server2.example.com
Shard ID: 0
Replica ID: 0
Keeper ID: 2
FQDN: kuma-storage-cluster1server3.example.com
Shard ID: 0
Replica ID: 0
Keeper ID: 3
FQDN: kuma-storage-cluster1server4.example.com
Shard ID: 1
Replica ID: 1
Keeper ID: 0
FQDN: kuma-storage-cluster1server5.example.com
Shard ID: 1
Replica ID: 2
Keeper ID: 0
FQDN: kuma-storage-cluster1server6.example.com
Shard ID: 2
Replica ID: 1
Keeper ID: 0
FQDN: kuma-storage-cluster1server7.example.com
Shard ID: 2
Replica ID: 2
Keeper ID: 0
- In the FQDN field, specify the fully qualified domain name of the node being added. For example,
- On the Advanced settings tab, in the Buffer size field, enter the buffer size in bytes, that causes events to be sent to the database when reached. The default value is 64 MB. No maximum value is configured. If the virtual machine has less free RAM than the specified Buffer size, KUMA sets the limit to 128 MB.
- On the Advanced Settings tab, In the Buffer flush interval field, enter the time in seconds for which KUMA waits for the buffer to fill up. If the buffer is not full, but the specified time has passed, KUMA sends events to the database. The default value is 1 second.
- On the Advanced settings tab, in the Disk buffer size limit field, enter the value in bytes. The disk buffer is used to temporarily store events that could not be sent for further processing or storage. If the disk space allocated for the disk buffer is exhausted, events are rotated as follows: new events replace the oldest events written to the buffer. The default value is 10 GB.
- On the Advanced Settings tab, from the Disk buffer disabled drop-down list, select a value to Enable or Disable the use of the disk buffer. By default, the disk buffer is enabled.
- On the Advanced Settings tab, In the Write to local database table drop-down list, select Enable or Disable. Writing is disabled by default.
In Enable mode, data is written only on the host where the storage is located. We recommend using this functionality only if you have configured balancing on the collector and/or correlator — at step 6. Routing, in the Advanced settings section, the URL selection policy field is set to Round robin.
In Disable mode, data is distributed among the shards of the cluster.
The set of resources for the storage is created and is displayed under Resources → Storages. Now you can create a storage service.
Page topCreating a storage service in the KUMA Console
When a set of resources is created for a storage, you can proceed to create a storage service in KUMA.
To create a storage service in the KUMA Console:
- In the KUMA Console, under Resources → Active services, click Add service.
- In the opened Choose a service window, select the set of resources that you just created for the storage and click Create service.
The storage service is created in the KUMA Console and is displayed under Resources → Active services. Now storage services must be installed to each node of the ClickHouse cluster by using the service ID.
Page topInstalling a storage in the KUMA network infrastructure
To create a storage:
- Log in to the server where you want to install the service.
- Create the /opt/kaspersky/kuma/ folder.
- Copy the "kuma" file to the /opt/kaspersky/kuma/ folder. The file is located in the installer in the /kuma-ansible-installer/roles/kuma/files/ folder.
Make sure the kuma file has sufficient rights to run.
- Execute the following command:
sudo /opt/kaspersky/kuma/kuma storage --core https://<KUMA Core server FQDN>:<port used by KUMA Core for internal communication (port 7210 by default)> --id <service ID copied from the KUMA console> --installExample:
sudo /opt/kaspersky/kuma/kuma storage --core https://kuma.example.com:7210 --id XXXXX --installWhen deploying several KUMA services on the same host, during the installation process you must specify unique ports for each component using the
--api.port <port>parameter. The following setting values are used by default:--api.port 7221. - Repeat steps 1–2 for each storage node.
The storage is installed.
Page top