Contents
- Deployment of Kaspersky Next XDR Expert
- Hardening Guide
- Deployment scheme: Distributed deployment
- Deployment scheme: Single node deployment
- Ports used by Kaspersky Next XDR Expert
- Preparation work and deployment
- Distributed deployment: Preparing the administrator and target hosts
- Single node deployment: Preparing the administrator and target hosts
- Preparing the hosts for installation of the KUMA services
- Installing a database management system
- Configuring the PostgreSQL or Postgres Pro server for working with Open Single Management Platform
- Preparing the KUMA inventory file
- Distributed deployment: Specifying the installation parameters
- Single node deployment: Specifying the installation parameters
- Specifying the installation parameters by using the Configuration wizard
- Installing Kaspersky Next XDR Expert
- Configuring internet access for the target hosts
- Synchronizing time on machines
- Installing KUMA services
- Deployment of multiple Kubernetes clusters and Kaspersky Next XDR Expert instances
- Signing in to Kaspersky Next XDR Expert
- Kaspersky Next XDR Expert maintenance
- Updating Kaspersky Next XDR Expert components
- Versioning the configuration file
- Removing Kaspersky Next XDR Expert components and management web plug-ins
- Reinstalling Kaspersky Next XDR Expert after a failed installation
- Stopping the Kubernetes cluster nodes
- Using certificates for public Kaspersky Next XDR Expert services
- Modifying the self-signed KUMA Console certificate
- Calculation and changing of disk space for storing Administration Server data
- Rotation of secrets
- Adding hosts for installing the additional KUMA services
- Replacing a host that uses KUMA storage
Deployment of Kaspersky Next XDR Expert
Following this scenario, you can prepare your infrastructure for the deployment of Open Single Management Platform and all the required components for Kaspersky Next XDR Expert, prepare the configuration file containing the installation parameters, and deploy the solution by using the Kaspersky Deployment Toolkit utility (hereinafter referred to as KDT).
Before you deploy Open Single Management Platform and Kaspersky Next XDR Expert components, we recommend reading the Hardening Guide.
The deployment scenario proceeds in stages:
- Selecting the option for deploying Kaspersky Next XDR Expert
Select the configuration of Kaspersky Next XDR Expert that best suits your organization. You can use the sizing guide that describes the hardware requirements and the recommended deployment option in relation to the number of devices in the organization.
Depending on the deployment option you choose, you may need the following hosts for the function of Kaspersky Next XDR Expert:
- Administrator host
- Target hosts
- DBMS host (only for the distributed deployment)
- KATA/KEDR host (optional)
The distributed and single node deployment schemes are available:
- Distributed deployment
The recommended option for deploying Kaspersky Next XDR Expert. In the distributed deployment, the Kaspersky Next XDR Expert components are installed on several worker nodes of the Kubernetes cluster and if one node fails, the cluster can restore the operation of components on another node.
In this configuration, you need at least seven hosts:
- 1 administrator host
- 4 target hosts for installing the Kubernetes cluster and the Kaspersky Next XDR Expert components
- 1 host for installing the DBMS
- 1 KUMA target host for installing the KUMA services
In this configuration, the DBMS can be installed on a host that is located outside or inside the Kubernetes cluster.
- Single node deployment
In the single node deployment, all Kaspersky Next XDR Expert components are installed on a single node of the Kubernetes cluster. You can perform the single node deployment of Kaspersky Next XDR Expert if you need a solution that requires fewer computing resources (for example, for demonstration purposes).
In this configuration, you need at least three hosts:
- 1 administrator host
- 1 target host for installing the Kubernetes cluster, the Kaspersky Next XDR Expert components, and the DBMS
- 1 KUMA target host for installing the KUMA services
In this configuration, the DBMS does not require a separate node but should be installed manually on the primary node before the Kaspersky Next XDR Expert deployment. The DBMS host can be included in the cluster only for evaluation and demonstration purposes.
- Downloading the distribution package with the Kaspersky Next XDR Expert components
The distribution package contains the following components:
- Transport archive with the Kaspersky Next XDR Expert components and End User License Agreements for Kaspersky Next XDR Expert and KDT
- Archive with the KDT utility, and templates of the configuration file and KUMA inventory file
- Installing a database management system (DBMS)
Manually install the DBMS on the separated server outside the Kubernetes cluster, if needed.
Skip this step if you want to install the DBMS inside the cluster. KDT will install the DBMS during the Kaspersky Next XDR Expert deployment. In this case, the Kaspersky Next XDR Expert components and the DBMS will use one target host.
- Preparing the administrator and target hosts
Based on the selected deployment scheme, define the number of target hosts on which you will deploy the Kubernetes cluster and the Kaspersky Next XDR Expert components included in this cluster. Prepare the selected administrator and target hosts for deployment of Kaspersky Next XDR Expert.
How-to instructions:
- Preparing the KUMA hosts
Prepare the KUMA target hosts for the installation of the KUMA services (collectors, correlators, and storages).
How-to instruction: Preparing the hosts for installation of the KUMA services
- Preparing the KUMA inventory file for installation of the KUMA services
Prepare the KUMA inventory file in the YAML format. The KUMA inventory file contains parameters for installation of the KUMA services.
How-to instruction: Preparing the KUMA inventory file
- Preparing the configuration file
Prepare the configuration file in the YAML format. The configuration file contains the list of target hosts for deployment and a set of installation parameters of the Kaspersky Next XDR Expert components.
If you deploy Kaspersky Next XDR Expert on a single node, use the configuration file that contains the installation parameters specific for the single node deployment.
How-to instructions:
- Distributed deployment: Specifying the installation parameters
- Single node deployment: Specifying the installation parameters
You can fill out the configuration file template manually; or use the Configuration wizard to specify the installation parameters that are required for the Kaspersky Next XDR Expert deployment, and then generate the configuration file.
How-to instruction: Specifying the installation parameters by using the Configuration wizard
- Deployment of Kaspersky Next XDR Expert
Deploy Kaspersky Next XDR Expert by using KDT. KDT automatically deploys the Kubernetes cluster within which the Kaspersky Next XDR Expert components and other infrastructure components are installed.
How-to instruction: Installing Kaspersky Next XDR Expert
- Installing the KUMA services
Install the KUMA services (collectors, correlators, and storages) on the prepared KUMA target hosts that are located outside the Kubernetes cluster.
How-to instruction: Installing KUMA services
- Configuring integration with Kaspersky Anti Targeted Attack Platform
Install Central Node to receive telemetry from Kaspersky Anti Targeted Attack Platform, and then configure integration between Kaspersky Next XDR Expert and KATA/KEDR to manage threat response actions on assets connected to Kaspersky Endpoint Detection and Response servers.
If necessary, you can install multiple Central Node components to use them independently of each other or to combine them for centralized management in the distributed solution mode. To combine multiple Central Node components, you have to organize the servers with the components into a hierarchy.
When configuring the Central Node servers, you have to specify the minimum possible value in the Storage field, to avoid duplication of data between the Kaspersky Next XDR Expert and KEDR databases.
Hardening Guide
The Hardening Guide is intended for professionals who deploy and administer Kaspersky Next XDR Expert, as well as for those who provide technical support to organizations that use Kaspersky Next XDR Expert.
The Hardening Guide describes recommendations and features of configuring Kaspersky Next XDR Expert and its components, aimed to reduce the risks of its compromise.
The Hardening Guide contains the following information:
- Preparing the infrastructure for the Kaspersky Next XDR Expert deployment
- Configuring a secure connection to Kaspersky Next XDR Expert
- Configuring accounts to access Kaspersky Next XDR Expert
- Managing protection of Kaspersky Next XDR Expert
- Managing protection of client devices
- Configuring protection for managed applications
- Transferring information to third-party applications
Before you start to deploy Kaspersky Next XDR Expert, we recommend reading the Hardening Guide.
Managing infrastructure of Kaspersky Next XDR Expert
This section describes the general principle of using the minimum required number of applications for the function of the operating system and Kaspersky Next XDR Expert. This section also describes the principle of least privilege, which boils down to the concept of Zero Trust.
Managing operating system accounts
To work with a Kubernetes cluster by using KDT, we recommend creating a separate user with minimal privileges. The optimal way is to implement management of user accounts of the operating system by using LDAP, with the ability to revoke user rights through LDAP. For the specific implementation of user revocation and blocking, see the user/administrator guide in your LDAP solution. We recommend using a password of at least 18 characters or a physical means of authentication (for example, token) to authenticate the operating system user.
We also recommend protecting the user home directory and all nested directories in such a way that only the user has access to them. Other users and the user group must not have rights to the home directory.
We recommend not granting the execute permission for the .ssh, .kube, .config, and .kdt directories, and all the contained files in these directories in the user's home directory.
Package management of the operating system
We recommend using the minimum set of applications required for the function of KDT and Kaspersky Next XDR Expert. For example, you do not need to use a graphical user interface for working in the Kubernetes cluster, so we recommend not installing graphical packages. If packages are installed, we recommend removing these packages, including graphical servers such as Xorg or Wayland.
We recommend regularly installing security updates for the system software and the Linux kernel. We also recommend enabling automatic updates as follows:
- For operating systems with the atp package manager:
/etc/apt/apt.conf.d/50unattended-upgrades
Unattended-Upgrade::Allowed-Origins { "${distro_id}:${distro_codename}-security"; "${distro_id}ESMApps:${distro_codename}-apps-security"; "${distro_id}ESM:${distro_codename}-infra-security"; }; - For operating systems with the rp, dnf, and yum package managers:
/etc/dnf/automatic.conf
[commands] # What kind of upgrade to perform: # default = all available upgrades # security = only the security upgrades upgrade_type = default # Whether updates should be downloaded when they are available, by # dnf-automatic.timer. notifyonly.timer, download.timer and # install.timer override this setting. download_updates = yes # Whether updates should be applied when they are available, by # dnf-automatic.timer. notifyonly.timer, download.timer and # install.timer override this setting. apply_updates = no
Operating system security settings
The Linux kernel security settings can be enabled in the /etc/sysctl.conf file or by using the sysctl command. The recommended Linux kernel security settings are listed in the /etc/sysctl.conf file snippet:
/etc/sysctl.conf
We recommend restricting access to the PID. This will reduce the possibility of one user tracking the processes of another user. You can restrict access to the PID while mounting the /proc file system, for example, by adding the following line to the /etc/fstab file:
If the operating system processes are managed by using the systemd system, the systemd-logind service can still monitor the processes of other users. In order for user sessions to work correctly in the systemd system, you need to create the /etc/systemd/system/systemd-logind.service.d/hidepid.conf file, and then add the following lines to it:
Since some systems may not have the proc group, we recommend adding the proc group in advance.
We recommend turning off the ctrl+alt+del key combination, to prevent an unexpected reboot of the operating system by using the systemctl mask ctrl-alt-del.target command.
We recommend prohibiting authentication of privileged users (root users) to establish a remote user connection.
We recommend using a firewall to limit network activity. For more information about the ports and protocols used, refer to Ports used by Kaspersky Next XDR Expert.
We recommend enabling auditd, to simplify the investigation of security incidents. For more information about enabling telemetry redirection, refer to Setting up receiving Auditd events.
We recommend regularly backing up the following configurations and data directories:
- Administration host:
~/kdt - Target hosts:
/etc/k0s/,/var/lib/k0s
Also we recommend encrypting these backups.
Hardening guides for various operating systems and for DBMS
If you need to configure the security settings of your operating system and software, you can use the recommendations provided by Center for Internet Security (CIS).
If you use the Astra Linux operating system, refer to the security recommendations that can be applied to your Astra Linux version.
If you need to configure security settings of PostgreSQL, use the server administration recommendations from the official PostgreSQL documentation.
Page topConnection safety
Strict TLS settings
We recommend using TLS protocol version 1.2 and later, and restricting or prohibiting insecure encryption algorithms.
You can configure encryption protocols (TLS) used by Administration Server. Please note that at the time of the release of a version of Kaspersky Next XDR Expert, the encryption protocol settings are configured by default to ensure secure data transfer.
Restricting access to the Kaspersky Next XDR Expert database
We recommend restricting access to the Kaspersky Next XDR Expert database. For example, grant access only from devices with Kaspersky Next XDR Expert deployed. This reduces the likelihood of the Kaspersky Next XDR Expert database being compromised due to known vulnerabilities.
You can configure the parameters according to the operating instructions of the used database, as well as provide closed ports on firewalls.
Page topAccounts and authentication
Using two-step verification with Kaspersky Next XDR Expert
Kaspersky Next XDR Expert provides two-step verification for users, based on the RFC 6238 standard (TOTP: Time-Based One-Time Password algorithm).
When two-step verification is enabled for your own account, every time you log in to Kaspersky Next XDR Expert through a browser, you enter your user name, password, and an additional single-use security code. To receive a single-use security code, you must install an authenticator app on your computer or your mobile device.
There are both software and hardware authenticators (tokens) that support the RFC 6238 standard. For example, software authenticators include Google Authenticator, Microsoft Authenticator, FreeOTP.
We strongly do not recommend installing the authenticator app on the same device from which the connection to Kaspersky Next XDR Expert is established. You can install an authenticator app on your mobile device.
Using two-factor authentication for an operating system
We recommend using multi-factor authentication (MFA) on devices with Kaspersky Next XDR Expert deployed, by using a token, a smart card, or other method (if possible).
Prohibition on saving the administrator password
If you use Kaspersky Next XDR Expert through a browser, we do not recommend saving the administrator password in the browser installed on the user device.
Authentication of an internal user account
By default, the password of an internal user account of Kaspersky Next XDR Expert must comply with the following rules:
The password must be 8 to 16 characters long.
The password must contain characters from at least three of the groups listed below:
Uppercase letters (A-Z)
Lowercase letters (a-z)
Numbers (0-9)
Special characters (@ # $ % ^ & * - _ ! + = [ ] { } | : ' , . ? / \ ` ~ " ( ) ;)
The password must not contain any whitespaces, Unicode characters, or the combination of "." and "@", when "." is placed before "@".
By default, the maximum number of allowed attempts to enter a password is 10. You can change the number of allowed password entry attempts.
The user can enter an invalid password a limited number of times. After the limit is reached, the user account is blocked for one hour.
Restricting the assignment of the Main Administrator role
The user is assigned the Main Administrator role in the access control list (ACL) of Kaspersky Next XDR Expert. We do not recommend assigning the Main Administrator role to a large number of users.
Configuring access rights to application features
We recommend using flexible configuration of access rights to the features of Kaspersky Next XDR Expert for each user or group of users.
Role-based access control allows the creation of standard user roles with a predefined set of rights and the assignment of those roles to users depending on their scope of duties.
The main advantages of the role-based access control model:
- Ease of administration
- Role hierarchy
- Least privilege approach
- Segregation of duties
You can assign built-in roles to certain employees based on their positions, or create completely new roles.
While configuring roles, pay attention to the privileges associated with changing the protection state of the device with Kaspersky Next XDR Expert and remote installation of third-party software:
- Managing administration groups.
- Operations with Administration Server.
- Remote installation.
- Changing the parameters for storing events and sending notifications.
This privilege allows you to set notifications that run a script or an executable module on the device with OSMP when an event occurs.
Separate account for remote installation of applications
In addition to the basic differentiation of access rights, we recommend restricting the remote installation of applications for all accounts (except for the Main Administrator or another specialized account).
We recommend using a separate account for remote installation of applications. You can assign a role or permissions to the separate account.
Regular audit of all users
We recommend conducting a regular audit of all users on devices with Kaspersky Next XDR Expert deployed. This allows you to respond to certain types of security threats associated with the possible compromise of a device.
Page topManaging protection of Kaspersky Next XDR Expert
Selecting protection software of Kaspersky Next XDR Expert
Depending on the type of the Kaspersky Next XDR Expert deployment and the general protection strategy, select the application to protect devices with Kaspersky Next XDR Expert deployed and the administrator host.
If you deploy Kaspersky Next XDR Expert on dedicated devices, we recommend selecting the Kaspersky Endpoint Security application to protect devices with Kaspersky Next XDR Expert deployed and the administrator host. This allows applying all available technologies to protect these devices, including behavioral analysis modules.
If Kaspersky Next XDR Expert is deployed on devices that exists in the infrastructure and has previously been used for other tasks, we recommend considering the following protection software:
- Kaspersky Industrial CyberSecurity for Nodes. We recommend installing this application on devices that are included in an industrial network. Kaspersky Industrial CyberSecurity for Nodes is an application that has certificates of compatibility with various manufacturers of industrial software.
- Recommended security applications. If Kaspersky Next XDR Expert is deployed on devices with other software, we recommend taking into account the recommendations from that software vendor on the compatibility of security applications (there may already be recommendations for selecting a security solution, and you may need to configure the trusted zone).
Protection modules
If there are no special recommendations from the vendor of the third-party software installed on the same devices as Kaspersky Next XDR Expert, we recommend activating and configuring all available protection modules (after checking the operation of these protection modules for a certain time).
Configuring the firewall of devices with Kaspersky Next XDR Expert
On devices with Kaspersky Next XDR Expert deployed, we recommend configuring the firewall to restrict the number of devices from which administrators can connect to Kaspersky Next XDR Expert through a browser.
By default,
Kaspersky Next XDR Expert uses port 443 to log in through a browser. We recommend restricting the number of devices from which Kaspersky Next XDR Expert can be managed by using this port.
Page topManaging protection of client devices
Restricting of adding license keys to installation packages
Installation packages can be published through Web Server, which is included in Kaspersky Next XDR Expert. If you add a license key to the installation package that is published on Web Server, the license key will be available for all users to read.
To avoid compromising the license key, we do not recommend adding license keys to installation packages.
We recommend using automatic distribution of license keys to managed devices, deployment through the Add license key task for a managed application, and adding an activation code or a key file manually to the devices.
Automatic rules for moving devices between administration groups
We recommend restricting the use of automatic rules for moving devices between administration groups.
If you use automatic rules for moving devices, this may lead to propagation of policies that provide more privileges to the moved device than the device has before relocation.
Also, moving a client device to another administration group may lead to propagation of policy settings. These policy settings may be undesirable for distribution to guest and untrusted devices.
This recommendation does not apply for one-time initial allocation of devices to administration groups.
Security requirements for distribution points and connection gateways
Devices with Network Agent installed can act as a distribution point and perform the following functions:
- Distribute updates and installation packages received from Kaspersky Next XDR Expert to client devices within the group.
- Perform remote installation of third-party software and Kaspersky applications on client devices.
- Poll the network to detect new devices and update information about existing ones. The distribution point can use the same methods of device detection as Kaspersky Next XDR Expert.
Placing distribution points on the organization's network used for:
- Reducing the load on Kaspersky Next XDR Expert
- Traffic optimization
- Providing Kaspersky Next XDR Expert with access to devices in hard-to-reach parts of the network
Taking into account the available capabilities, we recommend protecting devices that act as distribution points from any type of unauthorized access (including physically).
Restricting automatic assignment of distribution points
To simplify administration and keep the network operability, we recommend using automatic assignment of distribution points. However, for industrial networks and small networks, we recommend that you avoid assigning distribution points automatically, since, for example, the private information of the accounts used for pushing remote installation tasks, can be transferred to distribution points by means of the operating system.
For industrial networks and small networks, you can manually assign devices to act as distribution points.
You can also view the Report on activity of distribution points.
Page topConfiguring protection for managed applications
Managed application policies
We recommend creating a policy for each type of the used applications and for all components of Kaspersky Next XDR Expert (Network Agent, Kaspersky Endpoint Security for Windows, Kaspersky Endpoint Agent, and others). This policy must be applied to all managed devices (the root administration group) or to a separate group to which new managed devices are automatically moved according to the configured movement rules.
Specifying the password for disabling protection and uninstalling the application
We strongly recommend enabling password protection to prevent intruders from disabling or uninstalling Kaspersky security applications. On platforms where password protection is supported, you can set the password, for example, for Kaspersky Endpoint Security, Network Agent, and other Kaspersky applications. After you enable password protection, we recommend locking the corresponding settings by closing the "lock."
Using Kaspersky Security Network
In all policies of managed applications and in the Kaspersky Next XDR Expert properties, we recommend enabling the use of Kaspersky Security Network (KSN) and accepting the KSN Statement. When you update Kaspersky Next XDR Expert, you can accept the updated KSN Statement. In some cases, when the use of cloud services is prohibited by law or other regulations, you can disable KSN.
Regular scan of managed devices
For all device groups, we recommend creating a task that periodically runs a full scan of devices.
Discovering new devices
We recommend properly configuring device discovery settings: set up integration with domain controllers and specify IP address ranges for discovering new devices.
For security purposes, you can use the default administration group that includes all new devices and the default policies affecting this group.
Page topEvent transfer to third-party systems
This section describes the specifics of transferring security issues found on client devices to third-party systems.
Monitoring and reporting
For timely response to security issues, we recommend configuring the monitoring and reporting features.
Export of events to SIEM systems
For fast detection of security issues before significant damage occurs, we recommend using event export in a SIEM system.
Email notifications of audit events
For timely response to emergencies, we recommend configuring Administration Server to send notifications about the audit events, critical events, failure events, and warnings that it publishes.
Since these events are intra-system events, a small number of them can be expected, which is quite applicable for mailing.
Page topDeployment scheme: Distributed deployment
You have several options for deploying Kaspersky Next XDR Expert. Before you start, ensure that you are familiar with the different deployment schemes, and then choose the one that best meets your organization's requirements.
This section provides a description of the distributed deployment scheme.
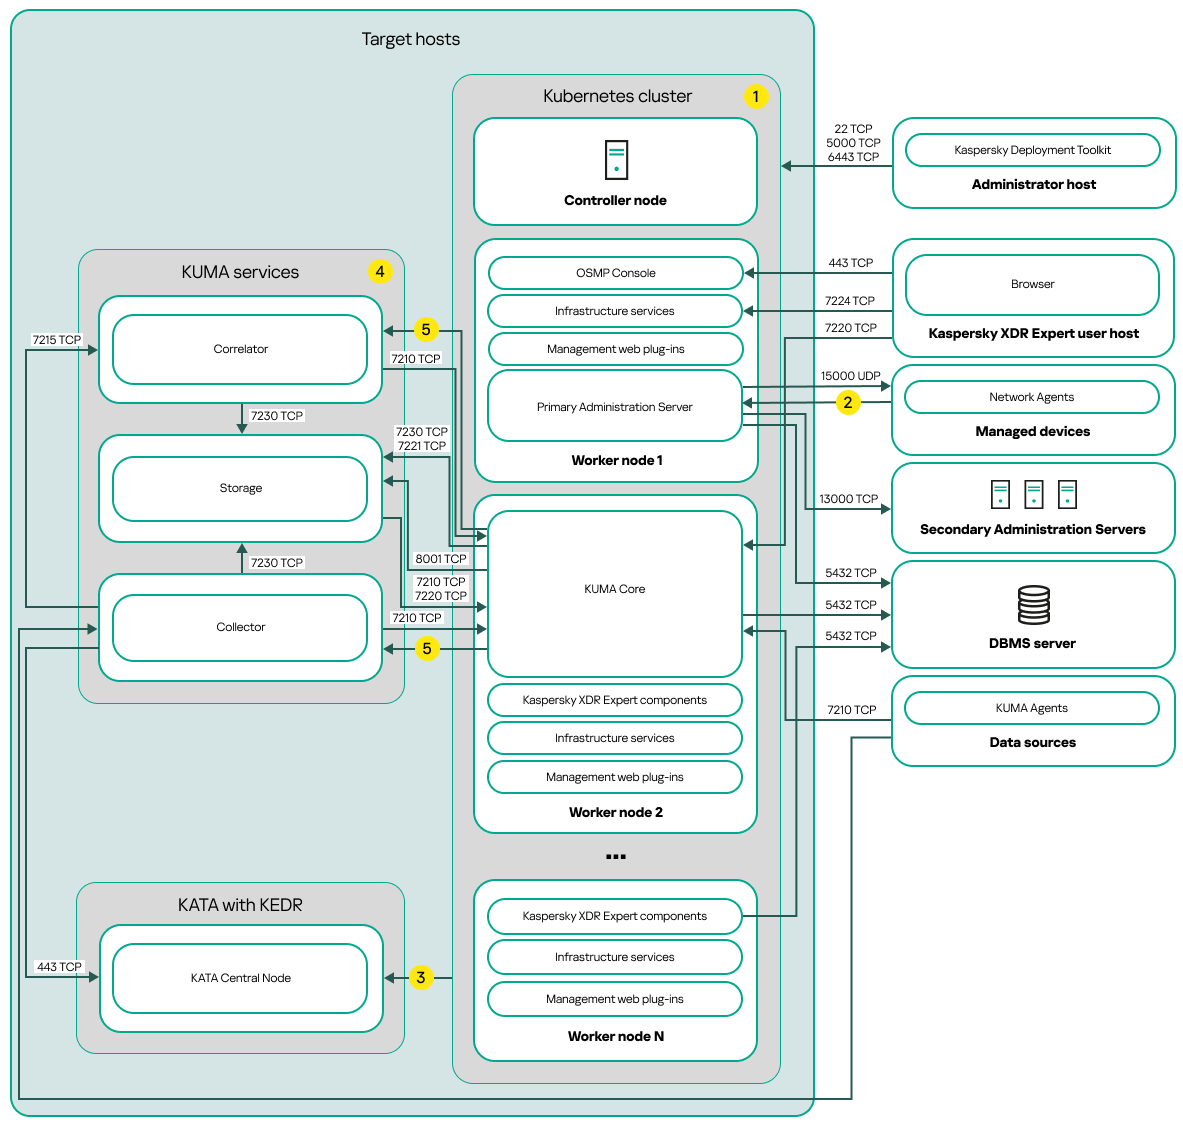
Distributed deployment scheme of Kaspersky Next XDR Expert
The distributed deployment scheme of Kaspersky Next XDR Expert contains the following main components:
- Administrator host. On this host, an administrator uses Kaspersky Deployment Toolkit to deploy and manage the Kubernetes cluster and Kaspersky Next XDR Expert. The administrator host is not included in the Kubernetes cluster.
- Kubernetes cluster. A Kubernetes cluster includes the controller node (also referred to as primary node during the deployment procedure) and, at a minimum, three worker nodes. The number of worker nodes may vary. On the scheme, the distribution of Kaspersky Next XDR Expert components among the worker nodes is shown as an example. Actual component distribution may vary.
- DBMS server. A server with an installed database management system is required for the proper function of Kaspersky Next XDR Expert components. An administrator uses Kaspersky Deployment Toolkit to install the DBMS.
- Hosts with KUMA services. The KUMA services (collectors, correlators, and storages) are installed on the hosts that are located outside the Kubernetes cluster. The number of target hosts for KUMA services may vary.
- KATA with KEDR. Kaspersky Anti Targeted Attack Platform with the Kaspersky Endpoint Detection and Response functional block. For details about KATA deployment scenarios, refer to the KATA documentation.
- Kaspersky Next XDR Expert user host. A user device that is used to sign in to OSMP Console or KUMA Console.
- Secondary Administration Servers (optional). Secondary Administration Servers are used to create a Server hierarchy.
- Managed devices. Client devices protected by Kaspersky Next XDR Expert. Each managed device has Network Agent installed.
Ports
The scheme does not provide all of the ports required for successful deployment. For the full list of ports, refer to the Ports used by Kaspersky Next XDR Expert section.
Scheme legend:
![]() On the scheme, the communication within the Kubernetes cluster between hosts and between Kaspersky Next XDR Expert components is not shown. For details, refer to the Ports used by Kaspersky Next XDR Expert section.
On the scheme, the communication within the Kubernetes cluster between hosts and between Kaspersky Next XDR Expert components is not shown. For details, refer to the Ports used by Kaspersky Next XDR Expert section.
![]() For the list of ports that must be opened on the managed devices, refer to the Ports used by Kaspersky Next XDR Expert section.
For the list of ports that must be opened on the managed devices, refer to the Ports used by Kaspersky Next XDR Expert section.
![]() For details about integration with KATA, including KEDR functional block, refer to the Integration with KATA/KEDR section.
For details about integration with KATA, including KEDR functional block, refer to the Integration with KATA/KEDR section.
![]() On the scheme, the KUMA services are deployed according to the distributed deployment scheme. The number of target hosts for KUMA services may vary. The list of ports to be opened depends on the selected deployment scheme. For the full list of ports, refer to the Ports used by Kaspersky Next XDR Expert section.
On the scheme, the KUMA services are deployed according to the distributed deployment scheme. The number of target hosts for KUMA services may vary. The list of ports to be opened depends on the selected deployment scheme. For the full list of ports, refer to the Ports used by Kaspersky Next XDR Expert section.
![]() Port TCP 7221 and other ports to install services. You specify these ports as a value for --api.point <port>.
Port TCP 7221 and other ports to install services. You specify these ports as a value for --api.point <port>.
Deployment scheme: Single node deployment
You have several options for deploying Kaspersky Next XDR Expert. Before you start, ensure that you are familiar with the different deployment schemes, and then choose the one that best meets your organization's requirements.
This section provides a description of the single node deployment scheme.
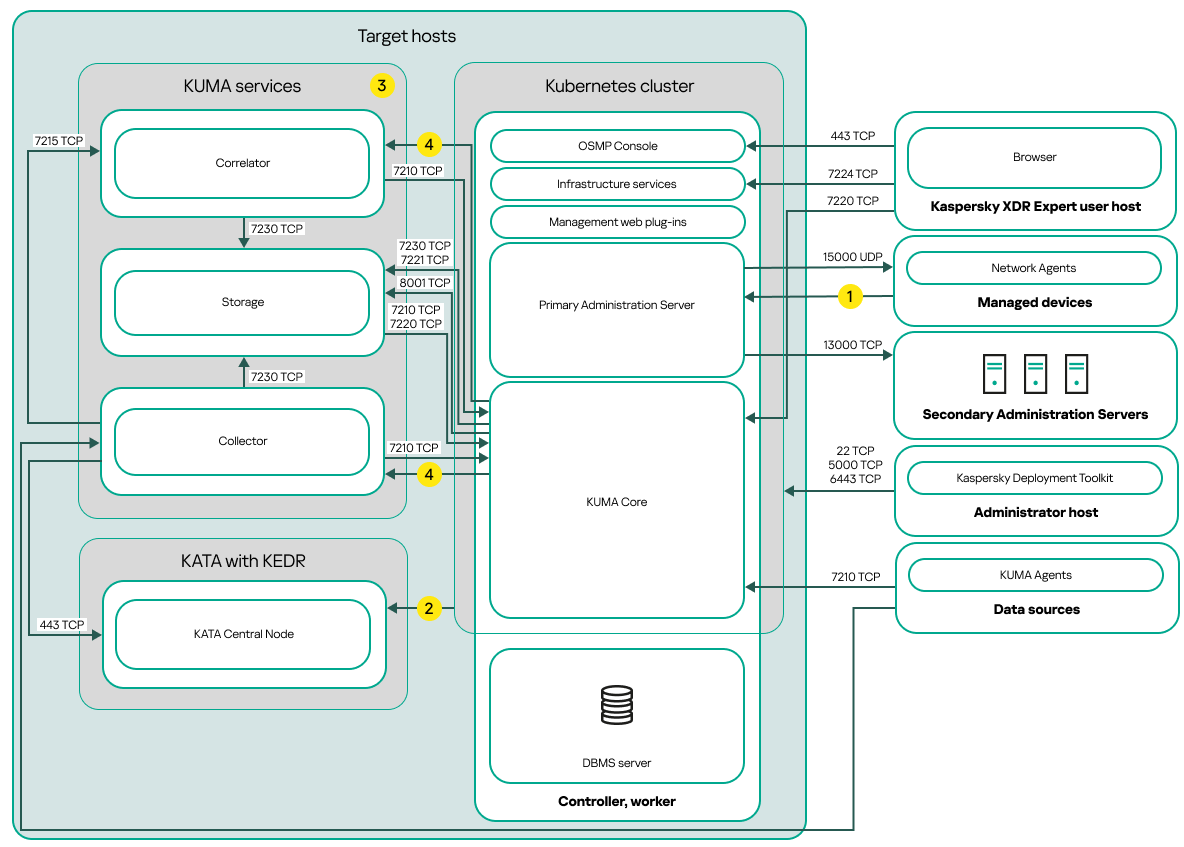
Single node deployment scheme of Kaspersky Next XDR Expert
The single node deployment scheme of Kaspersky Next XDR Expert contains the following main components:
- Administrator host. On this host, an administrator uses Kaspersky Deployment Toolkit to deploy and manage the Kubernetes cluster and Kaspersky Next XDR Expert. The administrator host is not included in the Kubernetes cluster.
- Kubernetes cluster. A Kubernetes cluster includes the host that acts both as a controller node (also referred to as primary node during the deployment procedure) and a worker node.
- DBMS server. A server with an installed database management system is required for the proper function of Kaspersky Next XDR Expert components. The DBMS server is not included in the Kubernetes cluster. An administrator installs the DBMS manually on the host that will act as a primary node before the Kaspersky Next XDR Expert deployment.
- Hosts with KUMA services. The KUMA services (collectors, correlators, and storages) are installed on the hosts that are located outside the Kubernetes cluster. The number of target hosts for KUMA services may vary.
- KATA with KEDR. Kaspersky Anti Targeted Attack Platform with the Kaspersky Endpoint Detection and Response functional block. For details about KATA deployment scenarios, refer to the KATA documentation.
- Kaspersky Next XDR Expert user host. A user device that is used to sign in to OSMP Console or KUMA Console.
- Secondary Administration Servers (optional). Secondary Administration Servers are used to create a Server hierarchy.
- Managed devices. Client devices protected by Kaspersky Next XDR Expert. Each managed device has Network Agent installed.
Ports
The scheme does not provide all of the ports required for successful deployment. For the full list of ports, refer to the Ports used by Kaspersky Next XDR Expert section.
Scheme legend:
![]() For the list of ports that must be opened on the managed devices, refer to the Ports used by Kaspersky Next XDR Expert section.
For the list of ports that must be opened on the managed devices, refer to the Ports used by Kaspersky Next XDR Expert section.
![]() For details about integration with KATA, including KEDR functional block, refer to the Integration with KATA/KEDR section.
For details about integration with KATA, including KEDR functional block, refer to the Integration with KATA/KEDR section.
![]() On the scheme, the KUMA services are deployed according to the distributed deployment scheme. The number of target hosts for KUMA services may vary. The list of ports to be opened depends on the selected deployment scheme. For the full list of ports, refer to the Ports used by Kaspersky Next XDR Expert section.
On the scheme, the KUMA services are deployed according to the distributed deployment scheme. The number of target hosts for KUMA services may vary. The list of ports to be opened depends on the selected deployment scheme. For the full list of ports, refer to the Ports used by Kaspersky Next XDR Expert section.
![]() Port TCP 7221 and other ports to install services. You specify these ports as a value for --api.point <port>.
Port TCP 7221 and other ports to install services. You specify these ports as a value for --api.point <port>.
Ports used by Kaspersky Next XDR Expert
For correct interaction between the administrator host and target hosts, you must provide connection access from the administrator host to the target hosts by the ports listed in the table below. These ports cannot be changed.
For interaction between the administrator host and hosts that are used for the installation of the KUMA services and are located outside the Kubernetes cluster, you must provide access only by TCP 22 port.
Ports used for interaction between the administrator host and target hosts
Port |
Protocol |
Port purpose |
|---|---|---|
22 |
TCP |
Providing the SSH connection from the administrator host to the target hosts. Providing the SSH connection from the administrator host to the hosts that are used for the installation of the external KUMA services. |
5000 |
TCP |
Connection to the Docker registry. |
6443 |
TCP |
Connection to the Kubernetes API. |
For properly work of the Kaspersky Next XDR Expert components, the target hosts must be located in the same broadcast domain.
The table below contains the ports that must be opened on the firewalls of all target hosts of the cluster. These ports cannot be changed.
If you use the firewalld or UFW firewall on your target hosts, KDT opens the required ports on the firewalls automatically. Otherwise, you can open the listed ports manually before you deploy Kaspersky Next XDR Expert.
Required ports used by the Kaspersky Next XDR Expert components
Port |
Protocol |
Port purpose |
|---|---|---|
80 |
TCP (HTTP) |
Receiving connections from browser. Redirecting to the 443 TCP (HTTPS) port. |
443 |
TCP (HTTPS) |
Receiving connections from browser. Receiving connections to the Administration Server over OpenAPI. Used to automate scenarios for working with the Administration Server. |
13000 |
TCP |
Receiving connections from Network Agents and secondary Administration Servers. |
13000 |
UDP |
Receiving information about devices that were turned off from Network Agents. |
14000 |
TCP |
Receiving connections from Network Agents. |
17000 |
TCP |
Receiving connections for application activation from managed devices (except for mobile devices). |
7210 |
TCP |
Receiving of the KUMA configuration from the KUMA Core server. |
7220 |
TCP |
Receiving connections from browser. |
7222 |
TCP |
Reversing proxy in the CyberTrace system. |
7224 |
TCP |
Callbacks for Identity and Access Manager (IAM). |
The table below contains the ports that are not opened by default on the firewalls during the Kaspersky Next XDR Expert deployment. These ports cannot be changed.
If you need to perform actions listed in the Port purpose column of the table below, you can open the corresponding ports on the firewalls of all target hosts manually.
Optional ports on the firewall used by the Kaspersky Next XDR Expert components
Port |
Protocol |
Port purpose |
|---|---|---|
8060 |
TCP |
Transmitting published installation packages to client devices. |
8061 |
TCP |
Transmitting published installation packages to client devices. |
13111 |
TCP |
Receiving requests from managed devices to KSN proxy server. |
15111 |
UDP |
Receiving requests from managed devices to KSN proxy server. |
17111 |
TCP |
Receiving requests from managed devices to KSN proxy server. |
5432 |
TCP |
Interaction with the DBMS (PostgreSQL). This port is used only if the DBMS is installed on the target host inside the Kubernetes cluster. |
The table below contains the ports that must be opened for functioning of the Kubernetes cluster and infrastructure components. These ports cannot be changed.
If you use the firewalld or UFW firewall on your target hosts, the KDT opens the required ports on the firewalls automatically. Otherwise, you can open the listed ports manually before you deploy Kaspersky Next XDR Expert.
Ports used by the Kubernetes cluster and infrastructure components
Port |
Protocol |
Node |
|---|---|---|
80 |
TCP |
Primary node |
443 |
TCP |
Primary node |
10250 |
TCP |
Primary node |
9443 |
TCP |
Primary node |
6443 |
TCP |
Primary node |
8132 |
TCP |
Primary node |
5000 |
TCP |
Primary node |
80 |
TCP |
Worker node |
443 |
TCP |
Worker node |
179 |
TCP |
Worker node |
10250 |
TCP |
Worker node |
10255 |
TCP |
Worker node |
9443 |
TCP |
Worker node |
6443 |
TCP |
Worker node |
9500 |
TCP |
Worker node |
9501 |
TCP |
Worker node |
9502 |
TCP |
Worker node |
9503 |
TCP |
Worker node |
8500 |
TCP |
Worker node |
8501 |
TCP |
Worker node |
3260 |
TCP |
Worker node |
8000 |
TCP |
Worker node |
8002 |
TCP |
Worker node |
2049 |
TCP |
Worker node |
3370 |
TCP |
Worker node |
179 |
UDP |
Worker node |
51820 |
UDP |
Worker node |
51821 |
UDP |
Worker node |
For correct work of the KUMA services that are not included in a Kubernetes cluster, you must open the ports listed in the table below. The table below shows the default network ports values. These ports automatically open during the KUMA installation.
Ports used for the interaction with the external KUMA services
Port |
Protocol |
Direction |
Destination of the connection |
|---|---|---|---|
8123 |
HTTPS |
From the storage service to the ClickHouse cluster node. |
Writing and receiving normalized events in the ClickHouse cluster. |
9009 |
HTTPS |
Between ClickHouse cluster replicas. |
Internal communication between ClickHouse cluster replicas for transferring data of the cluster. |
2181 |
TCP |
From ClickHouse cluster nodes to the ClickHouse keeper replication coordination service. |
Receiving and writing of replication metadata by replicas of ClickHouse servers. |
2182 |
TCP |
From one ClickHouse keeper replication coordination service to another. |
Internal communication between replication coordination services to reach a quorum. |
8001 |
TCP |
From Victoria Metrics to the ClickHouse server. |
Receiving ClickHouse server operation metrics. |
9000 |
TCP |
From the ClickHouse client to the ClickHouse cluster node. |
Writing and receiving data in the ClickHouse cluster. |
If you create an additional KUMA service (collector, correlator or storage) on a server, you need to manually open a port that corresponds to the created service on the server. You can use port TCP 7221 or other port used for service installation.
If the out of the box example services are used, the following ports automatically open during the Kaspersky Next XDR Expert deployment:
- 7230 TCP
- 7231 TCP
- 7232 TCP
- 7233 TCP
- 7234 TCP
- 7235 TCP
- 5140 TCP
- 5140 UDP
- 5141 TCP
- 5144 UDP
Preparation work and deployment
This section describes how to prepare the infrastructure for the Kaspersky Next XDR Expert deployment, set the installation parameters that are specific for the distributed or single node deployment, as well as how to use the Configuration wizard to generate the configuration file.
You will find out how to install Kaspersky Next XDR Expert according to the distributed and single node deployment schemes. Also, this section contains information on how to deploy multiple Kubernetes clusters with Kaspersky Next XDR Expert instances and switch between them by using KDT.
Distributed deployment: Preparing the administrator and target hosts
The administrator host is used to deploy and manage the Kubernetes cluster and Kaspersky Next XDR Expert. The target hosts are included in the Kubernetes cluster and perform the workload of the Kaspersky Next XDR Expert components. Kaspersky Next XDR Expert is deployed on the target hosts by using KDT. KDT runs on the administrator host and connects to target hosts via SSH.
Preparing the administrator host
To prepare the administrator host:
- Prepare a device that will act as the administrator host from which KDT will launch.
The administrator host will not be included in the Kubernetes cluster that is created by KDT during the deployment.
Make sure that the hardware and software on the administrator host meet the requirements for KDT.
On the administrator host, allocate at least 10 GB of free space in the temporary files directory (/
tmp) for KDT. If you do not have enough free space in this directory, run the following command to specify the path to another directory:export TMPDIR=<new_directory>/tmp - Install the package for Docker version 23 or later, and then perform post-installation steps to configure the administration host for proper functioning with Docker.
Do not install unofficial distributions of Docker packages from the operating system maintainer repositories.
Preparing the target hosts
To prepare the target hosts:
- Prepare the physical or virtual machines on which Kaspersky Next XDR Expert will be deployed.
A minimum cluster configuration for the distributed deployment includes four nodes:
- One primary node
The primary node is intended for managing the cluster, storing metadata, and distributing the workload.
- Three worker nodes
The worker nodes are intended for performing the workload of the Kaspersky Next XDR Expert components.
For optimal allocation of computing resources, it is recommended to use nodes with the same resources.
You can install the DBMS inside the Kubernetes cluster when you perform the demonstration deployment of Kaspersky Next XDR Expert. In this case, allocate the additional worker node for the DBMS installation. KDT will install the DBMS during the Kaspersky Next XDR Expert deployment.
For the distributed deployment, we recommend installing a DBMS on a separate server outside the cluster.
After you deploy Kaspersky Next XDR Expert, changing the DBMS installed inside the cluster to a DBMS installed on a separate server is not available. You have to remove all Kaspersky Next XDR Expert components, and then install Kaspersky Next XDR Expert again. In this case, the data will be lost.
Make sure that the hardware and software on the target hosts meet the requirements for the distributed deployment, and the target hosts are located in the same broadcast domain.
For proper functioning of Kaspersky Next XDR Expert, the Linux kernel version must be 5.15.0.107 or later on the target hosts with the Ubuntu family operating systems.
Docker must not be installed on the target hosts. KDT will install all necessary software and dependencies during the deployment.
- One primary node
- On each target host, install the sudo package, if this package is not already installed. For Debian family operating systems, install the UFW package on the target hosts.
- On each target host, configure the /etc/environment file. If your organization's infrastructure uses the proxy server to access the internet, connect the target hosts to the internet.
- On the primary node with the UFW configuration, allow IP forwarding. In the
/etc/default/ufwfile, setDEFAULT_FORWARD_POLICYtoACCEPT. - Provide access to the package repository. In this repository the following packages required for Kaspersky Next XDR Expert are located:
- nfs-common
- tar
- iscsi-package
- wireguard
- wireguard-tools
KDT will try to install these packages during the deployment from the package repository. You can also install these packages manually.
- For the primary node, ensure that the curl package is installed.
- For the worker nodes, ensure that the libnfs package version 12 or later is installed.
The curl and libnfs packages are not installed during the deployment from the package repository by using KDT. You must install these packages manually if they are not already installed.
- Reserve static IP addresses for the target hosts, for the Kubernetes cluster gateway and for the DBMS host (if the DBMS is installed inside the cluster).
The Kubernetes cluster gateway is intended for connecting to the Kaspersky Next XDR Expert components installed inside the Kubernetes cluster.
If you install the DBMS inside the cluster, the gateway IP address is an IP range (for example, 192.168.0.1—192.168.0.2). If you install the DBMS on a separate server, the gateway IP address is an IP address in CIDR notation that contains the subnet mask /32 (for example, 192.168.0.0/32). The gateway IP address is specified in the configuration file.
Make sure that the target hosts, the Kubernetes cluster gateway, and the DBMS host are located in the same broadcast domain.
- On your DNS server, register the service FQDNs to connect to the Kaspersky Next XDR Expert services.
By default, the Kaspersky Next XDR Expert services are available at the following addresses:
- console.<smp_domain>—Access to the OSMP Console interface.
- admsrv.<smp_domain>—Interaction with Administration Server.
- kuma.<smp_domain>—Access to the KUMA Console interface.
- api.<smp_domain>—Access to the Kaspersky Next XDR Expert API.
- psql.<smp_domain>—Interaction with the DBMS (PostgreSQL).
Where <smp_domain> is a common part of the service FQDNs that you can specify in the configuration file.
Register the psql.<smp_domain> service FQDN if you installed the DBMS inside the Kubernetes cluster on the DBMS node and you need to connect to the DBMS.
Depending on where you want to install the DBMS, the listed service FQDNs must be resolved to the IP address of the Kubernetes cluster as follows:
- DBMS inside the Kubernetes cluster
In this case, the gateway IP address is an IP range. The first IP address of the range is the address of the Kaspersky Next XDR Expert services (excluding the DBMS IP address), and the second IP address of the range is the IP address of the DBMS. For example, if the gateway IP range is 192.168.0.1—192.168.0.2, the service FQDNs must be resolved as follows:
- console.<smp_domain>—192.168.0.1
- admsrv.<smp_domain>—192.168.0.1
- kuma.<smp_domain>—192.168.0.1
- api.<smp_domain>—192.168.0.1
- psql.<smp_domain>—192.168.0.2
- DBMS on a separate server
In this case, you do not need to specify the DBMS service IP address. The gateway IP address is the address of the Kaspersky Next XDR Expert services (excluding the DBMS IP address). For example, if the gateway IP address is 192.168.0.0/32, the service FQDNs must be resolved as follows:
- console.<smp_domain>—192.168.0.0/32
- admsrv.<smp_domain>—192.168.0.0/32
- kuma.<smp_domain>—192.168.0.0/32
- api.<smp_domain>—192.168.0.0/32
- On the target hosts, create the accounts that will be used for the Kaspersky Next XDR Expert deployment.
These accounts are used for the SSH connection and must be able to elevate privileges (sudo) without entering a password. To do this, add the created user accounts to the
/etc/sudoersfile. - Configure the SSH connection between the administrator and target hosts:
- On the administrator host, generate SSH keys by using the ssh-keygen utility without a passphrase.
- Copy the public key to every target host (for example, to the
/home/<user_name>/.sshdirectory) by using the ssh-copy-id utility.
- For proper function of the Kaspersky Next XDR Expert components, provide network access between the target hosts and open the required ports on the firewall of the administrator and target hosts, if necessary.
- Configure time synchronization over Network Time Protocol (NTP) on the administrator and target hosts.
- If necessary, prepare custom certificates for working with Kaspersky Next XDR Expert public services.
You can use one intermediate certificate that is issued off the organization's root certificate or leaf certificates for each of the services. The prepared custom certificates will be used instead of self-signed certificates.
Single node deployment: Preparing the administrator and target hosts
The administrator host is used to deploy and manage the Kubernetes cluster and Kaspersky Next XDR Expert. Kaspersky Next XDR Expert is deployed on the target host by using KDT. KDT runs on the administrator host and connects to the target host via SSH.
In the single node configuration, one target host manages the Kubernetes cluster, stores metadata, and performs the workload of the Kaspersky Next XDR Expert components. The Kubernetes cluster and Kaspersky Next XDR Expert components are installed on this target host. Only the target host is included in the Kubernetes cluster.
Preparing the administrator host
To prepare the administrator host:
- Prepare a device that will act as the administrator host from which KDT will launch.
The administrator host will not be included in the Kubernetes cluster that is created by KDT during the deployment.
Make sure that the hardware and software on the administrator host meet the requirements for KDT.
On the administrator host, allocate at least 10 GB of free space in the temporary files directory (/
tmp) for KDT. If you do not have enough free space in this directory, run the following command to specify the path to another directory:export TMPDIR=<new_directory>/tmp - Install the package for Docker version 23 or later, and then perform post-installation steps to configure the administration host for proper functioning with Docker.
Do not install unofficial distributions of Docker packages from the operating system maintainer repositories.
Preparing the target host
To prepare the target host:
- Prepare a physical or virtual machine on which Kaspersky Next XDR Expert will be deployed.
A minimum cluster configuration for the single node deployment includes one target host, which acts as the primary and worker nodes. On this primary-worker node, the Kubernetes cluster, Kaspersky Next XDR Expert components, and the DBMS are installed.
Make sure that the hardware and software on the target host meet the requirements for the single node deployment.
For proper functioning of Kaspersky Next XDR Expert, the Linux kernel version must be 5.15.0.107 or later on the target host with the Ubuntu family operating systems
Do not install Docker on the target host. KDT will install all necessary software and dependencies during the deployment.
- Install the sudo package, if this package is not already installed. For Debian family operating systems, install the UFW package.
- Configure the /etc/environment file. If your organization's infrastructure uses the proxy server to access the internet, you also need to connect the target host to the internet.
- If the primary-worker node has the UFW configuration, allow IP forwarding. In the
/etc/default/ufwfile, setDEFAULT_FORWARD_POLICYtoACCEPT. - Provide access to the package repository. In this repository the following packages required for Kaspersky Next XDR Expert are located:
- nfs-common
- tar
- iscsi-package
- wireguard
- wireguard-tools
KDT will try to install these packages during the deployment from the package repository. You can also install these packages manually.
- Ensure that the curl and libnfs packages are installed on the primary-worker node.
The curl and libnfs packages are not installed during the deployment from the package repository by using KDT. You must install these packages manually if they are not already installed. The libnfs package version 12 and later is used.
- Reserve static IP addresses for the target host and for the Kubernetes cluster gateway.
The Kubernetes cluster gateway is intended for connecting to the Kaspersky Next XDR Expert components installed inside the Kubernetes cluster.
Since the DBMS is installed inside the cluster on the primary-worker node, the gateway IP address is an IP range (for example, 192.168.0.1—192.168.0.2). The gateway IP address is specified in the configuration file.
Make sure that the target host and the Kubernetes cluster gateway are located in the same broadcast domain.
- On your DNS server, register the service FQDNs to connect to the Kaspersky Next XDR Expert services.
By default, the Kaspersky Next XDR Expert services are available at the following addresses:
- console.<smp_domain>—Access to the OSMP Console interface.
- admsrv.<smp_domain>—Interaction with Administration Server.
- kuma.<smp_domain>—Access to the KUMA Console interface.
- api.<smp_domain>—Access to the Kaspersky Next XDR Expert API.
- psql.<smp_domain>—Interaction with the DBMS (PostgreSQL).
Where <smp_domain> is a common part of the service FQDNs that you can specify in the configuration file.
The listed service FQDNs must be resolved to the IP address of the Kubernetes cluster gateway. The first IP address of the gateway IP range is the address of the Kaspersky Next XDR Expert services (excluding the DBMS IP address), and the second IP address of the gateway IP range is the IP address of the DBMS. For example, if the gateway IP range is 192.168.0.1—192.168.0.2, the service FQDNs must be resolved as follows:
- console.<smp_domain>—192.168.0.1
- admsrv.<smp_domain>—192.168.0.1
- kuma.<smp_domain>—192.168.0.1
- api.<smp_domain>—192.168.0.1
- psql.<smp_domain>—192.168.0.2
- Create the user accounts that will be used for the Kaspersky Next XDR Expert deployment.
These accounts are used for the SSH connection and must be able to elevate privileges (sudo) without entering a password. To do this, add the created user accounts to the
/etc/sudoersfile. - Configure the SSH connection between the administrator and target hosts:
- On the administrator host, generate SSH keys by using the ssh-keygen utility without a passphrase.
- Copy the public key to the target host (for example, to the
/home/<user_name>/.sshdirectory) by using the ssh-copy-id utility.
- For proper function of the Kaspersky Next XDR Expert components, open the required ports on the firewall of the administrator and target hosts, if necessary.
- Configure time synchronization over Network Time Protocol (NTP) on the administrator and target hosts.
- If necessary, prepare custom certificates for working with Kaspersky Next XDR Expert public services.
You can use one intermediate certificate that is issued off the organization's root certificate or leaf certificates for each of the services. The prepared custom certificates will be used instead of self-signed certificates.
Preparing the hosts for installation of the KUMA services
The KUMA services (collectors, correlators, and storages) are installed on the KUMA target hosts that are located outside the Kubernetes cluster.
Access to KUMA services is performed by using the KUMA target host FQDNs. The administrator host must be able to access the KUMA target hosts by its FQDNs.
To prepare the KUMA target hosts for installation of the KUMA services:
- Ensure that the hardware, software, and installation requirements are met.
- Specify the host names.
We recommend specifying the FQDN, for example: kuma1.example.com.
We do not recommend changing the KUMA host name after installation. This will make it impossible to verify the authenticity of certificates and will disrupt the network communication between the application components.
- Run the following commands:
hostname -fhostnamectl statusCompare the output of the
hostname -fcommand and the value of theStatic hostnamefield in thehostnamectl statuscommand output. These values must coincide and match the FQDN of the device. - Configure the SSH connection between the administrator host and hosts on which the KUMA services will be installed.
You can use the SSH keys created for the target hosts. Alternatively, you can generate new SSH keys by using the ssh-keygen utility:
- Generate a pair of SSH keys on the administrator host.
- Copy the public key to KUMA target hosts by using the ssh-copy-id utility.
- Register the KUMA target hosts in your organization's DNS zone to allow host names to be translated to IP addresses.
- Ensure time synchronization over Network Time Protocol (NTP) is configured on all KUMA target hosts.
The hosts are ready for installation of the KUMA services.
Page topInstalling a database management system
Kaspersky Next XDR Expert supports PostgreSQL or Postgres Pro database management systems (DBMS). For the full list of supported DBMSs, refer to the Hardware and software requirements.
Each of the following Kaspersky Next XDR Expert components requires a database:
- Administration Server
- Automation Platform
- Incident Response Platform (IRP)
- Identity and Access Manager (IAM)
Each of the components must have a separate database within the same instance of DBMS. We recommend that you install the DBMS instance outside the Kubernetes cluster.
For the DBMS installation, KDT requires a privileged DBMS account that has permissions to create databases and other DBMS accounts. KDT uses this privileged DBMS account to create the databases and other DBMS accounts required for the Kaspersky Next XDR Expert components.
For information about how to install the selected DBMS, refer to its documentation.
After you install the DBMS, you need to configure the DBMS server parameters to optimize the DBMS work with Open Single Management Platform.
Page topConfiguring the PostgreSQL or Postgres Pro server for working with Open Single Management Platform
Kaspersky Next XDR Expert supports PostgreSQL or Postgres Pro database management systems (DBMS). For the full list of supported DBMSs, refer to the Hardware and software requirements. Consider configuring the DBMS server parameters to optimize the DBMS work with Administration Server.
The default path to the configuration file is: /etc/postgresql/<VERSION>/main/postgresql.conf
Recommended parameters for PostgreSQL and Postgres Pro DBMS for work with Administration Server:
shared_buffers =25% of the RAM value of the device where the DBMS is installedIf RAM is less than 1 GB, then leave the default value.
max_stack_depth =If the DBMS is installed on a Linux device: maximum stack size (execute the 'ulimit -s' command to obtain this value in KB) minus the 1 MB safety marginIf the DBMS is installed on a Windows device, then leave the default value 2 MB.
temp_buffers =24MBwork_mem =16MBmax_connections =151max_parallel_workers_per_gather =0maintenance_work_mem =128MB
Reload configuration or restart the server after updating the postgresql.conf file. Refer to the PostgreSQL documentation for details.
If you use Postgres Pro 15.7 or Postgres Pro 15.7.1, disable the enable_compound_index_stats parameter:
enable_compound_index_stats = off
For detailed information about PostgreSQL and Postgres Pro server parameters and on how to specify the parameters, refer to the corresponding DBMS documentation.
Preparing the KUMA inventory file
The KUMA inventory file is a file in the YAML format that contains installation parameters for deployment of the KUMA services that are not included in the Kubernetes cluster. The path to the KUMA inventory file is included in the configuration file that is used by Kaspersky Deployment Toolkit for the Kaspersky Next XDR Expert deployment.
The templates of the KUMA inventory file are located in the distribution package. If you want to install the KUMA services (storage, collector, and correlator) on one host, use the single.inventory.yaml file. To install the services on several hosts in the network infrastructure, use the distributed.inventory.yaml file.
We recommend backing up the KUMA inventory file that you used to install the KUMA services. You can use it to remove KUMA.
To prepare the KUMA inventory file,
Open the KUMA inventory file template located in the distribution package, and then edit the variables in the inventory file.
The KUMA inventory file contains the following blocks:
allblockThe
allblock contains the variables that are applied to all hosts specified in the inventory file. The variables are located in thevarssection.kumablockThe
kumablock contains the variables that are applied to hosts on which the KUMA services will be installed. These hosts are listed in thekumablock in thechildrensection. The variables are located in thevarssection.
The following table lists possible variables, their descriptions, possible values, and blocks of the KUMA inventory file where these variables can be located.
List of possible variables in the vars section
Variable |
Description |
Possible values |
Block |
Variables located in the |
|||
|
Method used to connect to the KUMA service hosts. |
To provide the correct installation of the KUMA services, in the In the |
|
|
User name used to connect to KUMA service hosts to install external KUMA services. |
If the root user is blocked on the target hosts, specify a user name that has the right to establish SSH connections and elevate privileges by using su or sudo. To provide the correct installation of the KUMA services, in the In the |
|
|
Variable used to indicate the creation of predefined services during installation. |
|
|
|
Variable used to indicate the need to increase the privileges of the user account that is used to install KUMA components. |
|
|
|
Method used for increasing the privileges of the user account that is used to install KUMA components. |
|
|
Variables located in the |
|||
|
Group of hosts used for storing the service files and utilities of KUMA. A host can be included in the During the Kaspersky Next XDR Expert deployment, on the hosts that are included in
|
The group of hosts contains the |
|
|
Group of KUMA collector hosts. This group can contain multiple hosts. |
The group of KUMA collector hosts contains the |
|
|
Group of KUMA correlator hosts. This group can contain multiple hosts. |
The group of KUMA correlator hosts contains the |
|
|
Group of KUMA storage hosts. This group can contain multiple hosts. |
The group of KUMA storage hosts contains the In this group, you can also specify the storage structure if you install the example services during the demonstration deployment ( |
|
Distributed deployment: Specifying the installation parameters
The configuration file is a file in the YAML format and contains a set of installation parameters for the Kaspersky Next XDR Expert components.
The installation parameters listed in the tables below are required for the distributed deployment of Kaspersky Next XDR Expert. To deploy Kaspersky Next XDR Expert on a single node, use the configuration file that contains the installation parameters specific for the single node deployment.
The template of the configuration file (smp_param.yaml.template) is located in the distribution package in the archive with the KDT utility. You can fill out the configuration file template manually; or use the Configuration wizard to specify the installation parameters that are required for the Kaspersky Next XDR Expert deployment, and then generate the configuration file.
For correct function of KDT with the configuration file, add an empty line at the end of the file.
The nodes section of the configuration file contains installation parameters for each target host of the Kubernetes cluster. These parameters are listed in the table below.
Nodes section
Parameter name |
Required |
Description |
|---|---|---|
|
Yes |
The name of the node. |
|
Yes |
Possible parameter values:
|
|
Yes |
The IP address of the node. All nodes must be included in the same subnet. |
|
No |
The node type that specifies the Kaspersky Next XDR Expert component that will be installed on this node. Possible parameter values:
For Kaspersky Next XDR Expert to work correctly, we recommend that you select the node on which Administration Server will work. Also, you can select the node on which you want to install the DBMS. Specify the appropriate values of the |
|
Yes |
The username of the user account created on the target host and used for connection to the node by KDT. |
|
Yes |
The path to the private part of the SSH key located on the administrator host and used for connection to the node by KDT. |
Other installation parameters are listed in the parameters section of the configuration file and are described in the table below.
Parameters section
Parameter name |
Required |
Description |
|---|---|---|
|
Yes |
The connection string for accessing the DBMS that is installed and configured on a separate server. Specify this parameter as follows:
If the We recommend installing a DBMS on a separate server outside the cluster. |
|
Yes |
The language of the OSMP Console interface specified by default. After installation, you can change the OSMP Console language. Possible parameter values:
|
|
Yes |
The reserved static IP address of the Kubernetes cluster gateway. The gateway must be included in the same subnet as all cluster nodes. If you install the DBMS on a separate server, specify the gateway IP address as an IP address in CIDR notation that contains the subnet mask /32. If you install the DBMS inside the cluster, set the gateway IP address to an IP range in the format |
|
Yes |
The path to the private part of the SSH key located on the administrator host and used for connection to the node by KDT. |
|
Yes |
The path to the private part of the SSH key located on the administrator host and used for connection to the nodes with the KUMA services (collectors, correlators, and storages). |
|
Yes |
The The Main administrator role is assigned to this user account. The The The password must comply with the following rules:
|
|
No |
The parameter that indicates that Kaspersky Next XDR Expert is installed on the target host with limited computing resources. Set the Possible parameter values:
|
|
Yes |
The parameter that specifies the amount of disk space for the operation of KUMA Core. This parameter is used only if the |
|
Yes |
The path to the KUMA inventory file located on the administrator host. The inventory file contains the installation parameters for deployment of the KUMA services that are not included in the Kubernetes cluster. |
|
No |
The path to the additional KUMA inventory file located on the administrator host. This file contains the installation parameters used to partially add or remove hosts with the KUMA services. If you perform an initial deployment of Kaspersky Next XDR Expert or run a custom action that requires configuration file, leave the default parameter value ( |
|
Yes |
The path to the license key of KUMA Core. |
|
Yes |
The domain name that is used in the FQDNs of the public Kaspersky Next XDR Expert services. For example, if the value of the |
|
Yes |
The domain name for which a self-signed or custom certificate is to be generated. The |
|
Yes |
The FQDNs of the Kaspersky Next XDR Expert services. These FQDNs contain the domain name, which must match the |
|
Yes |
The list of FQDNs of the public Kaspersky Next XDR Expert services for which a self-signed or custom certificate is to be generated. These FQDNs contain the domain name, which must match the |
|
No |
The parameter that indicates whether to use the custom intermediate certificate instead of the self-signed certificates for the public Kaspersky Next XDR Expert services. The default value is Possible parameter values:
|
|
No |
The path to the custom intermediate certificate used to work with public Kaspersky Next XDR Expert services. Specify this parameter if the |
|
No |
The paths to the custom leaf certificates used to work with the corresponding public Kaspersky Next XDR Expert services: admsrv.<smp_domain>, api.<smp_domain>, console.<smp_domain>, psql.<smp_domain>. Specify the If you want to specify the leaf custom certificates, set the |
|
Yes |
The address of KUMA Console. This address contains the domain name, which must match the |
|
Yes |
The address of OSMP Console. This address contains the domain name, which must match the |
|
Yes |
The names of the secret files that are stored in the Kubernetes cluster. These names contain the domain name, which must match the |
|
Yes |
The amount of free disk space allocated to store the Administration Server data (updates, installation packages, and other internal service data). Measured in gigabytes, specified as "<amount>Gi". The required amount of free disk space depends on the number of managed devices and other parameters, and can be calculated. The minimum recommended value is 10 GB. |
|
No |
The amount of free disk space allocated to store the internal service KDT data. Measured in gigabytes, specified as "<amount>Gi". The minimum recommended value is 1 GB. |
|
Yes |
The amount of free disk space allocated to store the backups of the Administration Server data. Measured in gigabytes, specified as "<amount>Gi".The minimum recommended value is 10 GB. |
|
Yes |
The amount of free disk space allocated to store metrics. Measured in gigabytes, specified as "<amount>GB". The minimum recommended value is 5 GB. |
|
Yes |
The amount of free disk space allocated to store OSMP logs. Measured in gigabytes, specified as "<amount>Gi". The minimum recommended value is 20 GB. |
|
Yes |
The storage period of OSMP logs after which logs are automatically removed. The default value is 72 hours (set the parameter value in the configuration file as "<time in hours>h". For example, "72h"). |
|
Yes |
The The The default parameter value is |
|
No |
The parameter that indicates whether to encrypt the traffic between the Kaspersky Next XDR Expert components and the DBMS by using the TLS protocol. The default value is Possible parameter values:
|
|
No |
The path to the PEM file that can contain the TLS certificate of the DBMS server or a root certificate from which the TLS server certificate can be issued. Specify the |
|
No |
The path to the PEM file that contains a certificate and a private key of the Kaspersky Next XDR Expert component. This certificate is used to establish the TLS connection between the Kaspersky Next XDR Expert components and the DBMS. Specify the |
|
No |
The parameter that indicates whether to use the proxy server to connect the Kaspersky Next XDR Expert components to the internet. If the host on which Kaspersky Next XDR Expert is installed has internet access, you can also provide internet access for the operation of Kaspersky Next XDR Expert components (for example, Administration Server) and for specific integrations, both Kaspersky and third-party. To establish the proxy connection, you must also specify the proxy server parameters in the Administration Server properties. The default value is Possible parameter values:
|
|
No |
The IP address of the proxy server. If the proxy server uses multiple IP addresses, specify these addresses separated by a space (for example, " |
|
No |
The number of the port through which the proxy connection will be established. Specify this parameter if the |
|
Yes |
Parameters for internal use. Do not change the parameter value. |
Sample of the configuration file for the distributed deployment of Kaspersky Next XDR Expert
Page topSingle node deployment: Specifying the installation parameters
Configuration file used to deploy Kaspersky Next XDR Expert on a single node contains installation parameters that are required both for the distributed and single node deployment. Also this configuration file contains parameters specific only for the single node deployment (vault_replicas, vault_ha_mode, vault_standalone, and defaultClassReplicaCount).
The template of the configuration file (smp_param.yaml.template) is located in the distribution package in the archive with the KDT utility. You can fill out the configuration file template manually; or use the Configuration wizard to specify the installation parameters that are required for the Kaspersky Next XDR Expert deployment, and then generate the configuration file.
For correct function of KDT with the configuration file, add an empty line at the end of the file.
The nodes section of the configuration file contains the target host parameters that are listed in the table below.
Nodes section
Parameter name |
Required |
Description |
|---|---|---|
|
Yes |
The name of the node. |
|
Yes |
Possible parameter values:
For the target host, set the |
|
Yes |
The IP address of the node. All nodes must be included in the same subnet. |
|
No |
The node type that specifies the Kaspersky Next XDR Expert component that will be installed on this node. If the Possible parameter values:
Do not specify the |
|
Yes |
The username of the user account created on the target host and used for connection to the node by KDT. |
|
Yes |
The path to the private part of the SSH key located on the administrator host and used for connection to the node by KDT. |
Other installation parameters are listed in the parameters section of the configuration file and are described in the table below.
Parameters section
Parameter name |
Required |
Description |
|---|---|---|
|
Yes |
The connection string for accessing the DBMS that is installed and configured on a separate server. Specify this parameter as follows:
If the |
|
Yes |
The language of the OSMP Console interface specified by default. After installation, you can change the OSMP Console language. Possible parameter values:
|
|
Yes |
The reserved static IP address of the Kubernetes cluster gateway. The gateway must be included in the same subnet as all cluster nodes. If you install the DBMS on a separate server, the gateway IP address must contain the subnet mask /32. If you install the DBMS inside the cluster, set the gateway IP address to an IP range in the format |
|
Yes |
The path to the private part of the SSH key located on the administrator host and used for connection to the node by KDT. |
|
Yes |
The path to the private part of the SSH key located on the administrator host and used for connection to the nodes with the KUMA services (collectors, correlators and storages). |
|
Yes |
The The Main administrator role is assigned to this user account. The The The password must comply with the following rules:
|
|
Yes |
The parameter that indicates that Kaspersky Next XDR Expert is installed on the target host with limited computing resources. Possible parameter values:
For the single node deployment, set the |
|
Yes |
The number of replicas of the secret storage in the Kubernetes cluster. For the single node deployment, set the |
|
Yes |
The parameter that indicates whether to run the secret storage in the High Availability (HA) mode. Possible parameter values:
For the single node deployment, set the |
|
Yes |
The parameter that indicates whether to run the secret storage in the standalone mode. Possible parameter values:
For the single node deployment, set the |
|
Yes |
The parameter that specifies the amount of disk space for the operation of KUMA Core. This parameter is used only if the |
|
Yes |
The path to the KUMA inventory file located on the administrator host. The inventory file contains installation parameters for deployment of the KUMA services that are not included in the Kubernetes cluster. |
|
No |
The path to the additional KUMA inventory file located on the administrator host. This file contains the installation parameters used to partially add or remove hosts with the KUMA services. If you perform an initial deployment of Kaspersky Next XDR Expert or run a custom action that requires configuration file, leave the default parameter value ( |
|
Yes |
The path to the license key of KUMA Core. |
|
Yes |
The domain name that is used in the FQDNs of the public Kaspersky Next XDR Expert services. |
|
Yes |
The domain name for which a self-signed or custom certificate is to be generated. The |
|
Yes |
The FQDNs of the Kaspersky Next XDR Expert services. These addresses contain the domain name, which must match the |
|
Yes |
The list of FQDNs of the public Kaspersky Next XDR Expert services for which a self-signed or custom certificate is to be generated. These FQDNs contain the domain name, which must match the |
|
No |
The parameter that indicates whether to use the custom intermediate certificate instead of the self-signed certificates for the public Kaspersky Next XDR Expert services. The default value is Possible parameter values:
|
|
No |
The path to the custom intermediate certificate used to work with public Kaspersky Next XDR Expert services. Specify this parameter if the |
|
No |
The paths to the custom leaf certificates used to work with the corresponding public Kaspersky Next XDR Expert services: admsrv.<smp_domain>, api.<smp_domain>, console.<smp_domain>, psql.<smp_domain>. Specify the If you want to specify the leaf custom certificates, set the |
|
Yes |
The address of KUMA Console. This address contains the domain name, which must match the |
|
Yes |
The address of OSMP Console. This address contains the domain name, which must match the |
|
Yes |
The names of the secret files that are stored in the Kubernetes cluster. These names contain the domain name, which must match the |
|
Yes |
The amount of free disk space allocated to store the Administration Server data (updates, installation packages, and other internal service data). |
|
Yes |
The number of disk volumes that are used to store the service data of Kaspersky Next XDR Expert components and KDT. The default value is For the single node deployment, set the |
|
No |
The amount of free disk space allocated to store the internal service KDT data. The default value is |
|
Yes |
The amount of free disk space allocated to store metrics. The minimum recommend value is 5 GB. |
|
Yes |
The amount of free disk space allocated to store OSMP logs. The minimum recommend value is 20 GB. |
|
Yes |
The storage period of OSMP logs after which logs are automatically removed. The default value is 72 hours (set the parameter value in the configuration file as "<time in hours>h". For example, "72h"). |
|
Yes |
The The The default parameter value is |
|
No |
The parameter that indicates whether to encrypt the traffic between the Kaspersky Next XDR Expert components and the DBMS by using the TLS protocol. Possible parameter values:
|
|
No |
The path to the PEM file that can contain the TLS certificate of the DBMS server or a root certificate from which the TLS server certificate can be issued. Specify the |
|
No |
The path to the PEM file that contains a certificate and a private key of the Kaspersky Next XDR Expert component. This certificate is used to establish the TLS connection between the Kaspersky Next XDR Expert components and the DBMS. Specify the |
|
No |
The parameter that indicates whether to use the proxy server to connect the Kaspersky Next XDR Expert components to the internet. If the host on which Kaspersky Next XDR Expert is installed has internet access, you can also provide internet access for operation of Kaspersky Next XDR Expert components (for example, Administration Server) and for specific integrations, both Kaspersky and third-party. To establish the proxy connection, you must also specify the proxy server parameters in the Administration Server properties. The default value is Possible parameter values:
|
|
No |
The IP address of the proxy server. If the proxy server uses multiple IP addresses, specify these addresses separated by a space (for example, " |
|
No |
The number of the port through which the proxy connection will be established. Specify this parameter if the |
|
No |
The trace level. The default value is Possible parameter values: 0–5. |
|
Yes |
The parameters for internal use. Do not change the parameter value. |
Sample of the configuration file for the single node deployment of Kaspersky Next XDR Expert
Page topSpecifying the installation parameters by using the Configuration wizard
For the distributed and single node Kaspersky Next XDR Expert deployment, you have to prepare a configuration file that contains the installation parameters of the Kaspersky Next XDR Expert components. The Configuration wizard allows you to specify the installation parameters that are required to deploy Kaspersky Next XDR Expert, and then generate the resulting configuration file.
Prerequisites
Before specifying the installation parameters by using the Configuration wizard, you must install a database management system on a separate server that is located outside the Kubernetes cluster, perform all preparatory steps necessary for the administrator, target hosts (depending on the distributed or single node deployment option), and KUMA hosts.
Process
To specify the installation parameters by using the Configuration wizard:
- On the administrator host where the KDT utility is located, run the Configuration wizard by using the following command:
./kdt wizard -k <path_to_transport_archive> -o <path_to_configuration_file>where:
<path_to_transport_archive>is the path to the transport archive.<path_to_configuration_file>is the path where you want to save the configuration file and the configuration file name.
The Configuration wizard prompts you to specify the installation parameters. The list of the installation parameters that are specific for the distributed and single node deployment differs.
If you do not have the Write permissions on the specified directory or a file with the same name is located in this directory, an error occurs and the wizard terminates.
- Enter the IPv4 address of a primary node (or a primary-worker node, if you will perform the single node deployment). This value corresponds to the
hostparameter of the configuration file. - Enter the username of the user account used for connection to the primary node by KDT (the
userparameter of the configuration file). - Enter the path to the private part of the SSH key located on the administrator host and that is used for connection to the primary node by KDT (the
keyparameter of the configuration file). - Enter the number of worker nodes.
Possible values:
- 0—Single node deployment.
- 3 or more—Distributed deployment.
This step defines the option of deploying Kaspersky Next XDR Expert. If you want to perform single node deployment, the following parameters specific for this deployment option will take the default values:
type—primary-workerlowResources—truevault_replicas—1vault_ha_mode—falsevault_standalone—truedefaultClassReplicaCount—1
- For each worker node, enter the IPv4 address (the
hostparameter of the configuration file).Note that the primary and worker nodes must be included in the same subnet.
For distributed deployment, the
kindparameter of the first worker node is set toadmsrvby default. That means that Administration Server will be installed on the first worker node. For single node deployment, thekindparameter is not specified for the primary worker node. - For each worker node, enter the username used for connection to the worker node by KDT (the
userparameter of the configuration file). - For each worker node, enter the path to the private part of the SSH key used for connection to the worker node by KDT (the
keyparameter of the configuration file). - Enter the connection string for accessing the DBMS that is installed and configured on a separate server (the
psql_dsnparameter of the configuration file).Specify this parameter as follows:
postgres://<dbms_username>:<password>@<fqdn>:<port>.The Configuration wizard specifies the installation parameters only for the deployment option with the DBMS installed on a separate server that is located outside the Kubernetes cluster.
- Enter the IP address of the Kubernetes cluster gateway (the
ipaddressparameter of the configuration file).The gateway must be included in the same subnet as all cluster nodes. The gateway IP address must contain the subnet mask /32.
- Enter the username of the Kaspersky Next XDR Expert user account that will be created by KDT during the installation (the
adminLoginparameter of the configuration file).The default username of this account is "admin." The Main administrator role is assigned to this user account.
- Enter the password of the Kaspersky Next XDR Expert user account that will be created by KDT during the installation (the
kscpasswordandadminPasswordparameters of the configuration file). - Enter the path to the KUMA inventory file located on the administrator host (the
inventoryparameter of the configuration file).The KUMA inventory file contains the installation parameters for deployment of the KUMA services that are not included in the Kubernetes cluster.
- Enter the path to the private part of the SSH key located on the administrator host and used for connection to the nodes with the KUMA services (the
sshkeyparameter of the configuration file). - Enter the path to the LICENSE file of KUMA (the
licenseparameter of the configuration file). - Enter the domain name that is used in the FQDNs of the public Kaspersky Next XDR Expert services (the
smp_domainparameter of the configuration file). - Enter the path to the custom certificates used to work with the public Kaspersky Next XDR Expert services (the
intermediate_bundleparameter of the configuration file).If you want to use self-signed certificates, press Enter to skip this step.
- Check the specified parameters that are displayed in the numbered list.
To edit the parameter, enter the parameter number, and then specify a new parameter value. Otherwise, press Enter to continue.
- Press Y to save a new configuration file with the specified parameters or N to stop the Configuration wizard without saving.
The configuration file with the specified parameters is saved in the YAML format.
Other installation parameters are included in the configuration file, with default values. You can edit the configuration file manually before the deployment of Kaspersky Next XDR Expert.
Page topInstalling Kaspersky Next XDR Expert
Kaspersky Next XDR Expert is deployed by using KDT. KDT automatically deploys the Kubernetes cluster within which the Kaspersky Next XDR Expert components and other infrastructure components are installed. The steps of the Kaspersky Next XDR Expert installation process do not depend on the selected deployment option.
If you need to install multiple Kubernetes clusters with Kaspersky Next XDR Expert instances, you can use the required number of contexts.
To install Kaspersky Next XDR Expert:
- Unpack the downloaded distribution package with KDT on the administrator host.
- Read the End User License Agreement (EULA) of KDT located in the distribution package with the Kaspersky Next XDR Expert components.
When you start using KDT, you accept the terms of the EULA of KDT.
You can read the EULA of KDT after the deployment of Kaspersky Next XDR Expert. The file is located in the
/home/kdt/directory of the user who runs the deployment of Kaspersky Next XDR Expert. - During installation, KDT downloads missing packages from the OS repositories. Before you start installing Kaspersky Next XDR Expert, run the following command on the target hosts to make sure that the apt/yum cache is up-to-date.
apt update - On the administrator host, run the following commands to start deployment of Kaspersky Next XDR Expert by using KDT. Specify the path to the transport archive with the Kaspersky Next XDR Expert components and the path to the configuration file that you filled out earlier (installation parameter sets for the distributed and single node deployment differ).
chmod +x kdt./kdt apply -k <path_to_transport_archive> -i <path_to_configuration_file>You can install Kaspersky Next XDR Expert without prompting to read the terms of the EULA and the Privacy Policy of OSMP, if you use the
--accept-eulaflag. In this case you must read the EULA and the Privacy Policy of OSMP before the deployment of Kaspersky Next XDR Expert. The files are located in the distribution package with the Kaspersky Next XDR Expert components.If you want to read and accept the terms of the EULA and the Privacy Policy during the deployment, do not use the
--accept-eulaflag. - If you do not use the
--accept-eulaflag in the previous step, read the EULA and the Privacy Policy of OSMP. The text is displayed in the command line window. Press the space bar to view the next text segment. Then, when prompted, enter the following values:- Enter
yif you understand and accept the terms of the EULA.Enter
nif you do not accept the terms of the EULA. - Enter
yif you understand and accept the terms of the Privacy Policy, and if you agree that your data will be handled and transmitted (including to third countries) as described in the Privacy Policy.Enter
nif you do not accept the terms of the Privacy Policy.To use Kaspersky Next XDR Expert, you must accept the terms of the EULA and the Privacy Policy.
After you accept the EULA and the Privacy Policy, KDT deploys the Kaspersky Next XDR Expert components within the Kubernetes cluster on the target hosts.
During the Kaspersky Next XDR Expert deployment, a new user is created on the primary Administration Server. To start configuring OSMP Console, this user is assigned the following roles: the XDR role of the Main administrator in the Root tenant and the Kaspersky Security Center role of the Main administrator.
- Enter
- View the installation logs of the Bootstrap component in the directory with the KDT utility and obtain diagnostic information about Kaspersky Next XDR Expert components, if needed.
- Sign in to the OSMP Console and to the KUMA Console.
The OSMP Console address is
https://console.<smp_domain>:443.The KUMA Console address is
https://kuma.<smp_domain>:7220.Addresses contain the
smp_domainparameter value specified in the configuration file.
Kaspersky Next XDR Expert is deployed on the target hosts. Install the KUMA services to get started with the solution.
Page topConfiguring internet access for the target hosts
If your organization's infrastructure uses the proxy server to access the internet, as well as you need to connect the target hosts to the internet, you must add the IP address of each target host to the no_proxy variable in the /etc/environment file before the Kaspersky Next XDR Expert deployment. This allows you to establish a direct connection of the target hosts to the internet and correctly deploy Kaspersky Next XDR Expert.
To configure internet access for the target hosts:
- On the target host, open the /etc/environment file by using a text editor. For example, the following command opens the file by using the GNU nano text editor:
sudo nano /etc/environment - In the /etc/environment file, add the IP address of the target host to the
no_proxyvariable separated by a comma without a space.For example, the
no_proxyvariable can be initially specified as follows:no_proxy=localhost,127.0.0.1You can add the IP address of the target host (192.168.0.1) to the
no_proxyvariable:no_proxy=localhost,127.0.0.1,192.168.0.1Alternatively, you can specify the subnet that includes the target hosts (in CIDR notation):
no_proxy=localhost,127.0.0.1,192.168.0.0/24 - Save the /etc/environment file.
After you add the IP addresses in the /etc/environment file to each target host, you can continue preparing of the target hosts and further Kaspersky Next XDR Expert deployment.
Page topSynchronizing time on machines
To configure time synchronization on machines:
- Run the following command to install chrony:
sudo apt install chrony - Configure the system time to synchronize with the NTP server:
- Make sure the virtual machine has internet access.
If access is available, go to step b.
If internet access is not available, edit the
/etc/chrony.conffile. Replace2.pool.ntp.orgwith the name or IP address of your organization's internal NTP server. - Start the system time synchronization service by executing the following command:
sudo systemctl enable --now chronyd - Wait a few seconds, and then run the following command:
sudo timedatectl | grep 'System clock synchronized'If the system time is synchronized correctly, the output will contains the line
System clock synchronized: yes.
- Make sure the virtual machine has internet access.
Synchronization is configured.
Page topInstalling KUMA services
Services are the main components of KUMA that help the system to manage events. Services allow you to receive events from event sources and subsequently bring them to a common form that is convenient for finding correlation, as well as for storage and manual analysis.
Service types:
- Storages are used to save events.
- Collectors are used to receive events and convert them to the KUMA format.
- Correlators are used to analyze events and search for defined patterns.
- Agents are used to receive events on remote devices and forward them to the KUMA collectors.
You must install the KUMA services only after you deploy Kaspersky Next XDR Expert. During the Kaspersky Next XDR Expert deployment, the required infrastructure is prepared: the service directories are created on the prepared hosts, and the files that are required for the service installation are added to these directories. We recommend installing services in the following order: storage, collectors, correlators, and agents.
To install and configure the KUMA services:
- Sign in to the KUMA Console.
You can use one of the following methods:
- In the main menu of OSMP Console, go to Settings → KUMA.
- In your browser, go to
https://kuma.<smp_domain>:7220.
- In the KUMA Console, create a resource set for each KUMA service (storages, collectors, and correlators) that you want to install on the prepared hosts in the network infrastructure.
- Create services for storages, collectors, and correlators in KUMA Console.
- Obtain the service identifiers to bind the created resource sets and the KUMA services:
- In the KUMA Console main menu, go to Resources → Active services.
- Select the required KUMA service, and then click the Copy ID button.
- On the prepared hosts in the network infrastructure, run the corresponding commands to install the KUMA services. Use the service identifiers that were obtained earlier:
- Installation command for the storage:
sudo /opt/kaspersky/kuma/kuma storage --core https://<KUMA Core server FQDN>:7210 --id <service ID copied from the KUMA Console> --install - Installation command for the collector:
sudo /opt/kaspersky/kuma/kuma collector --core https://<KUMA Core server FQDN>:7210 --id <service ID copied from the KUMA Console> --api.port <port used for communication with the collector> - Installation command for the correlator:
sudo /opt/kaspersky/kuma/kuma correlator --core https://<KUMA Core server FQDN>:7210 --id <service ID copied from the KUMA Console> --api.port <port used for communication with the correlator> --install
By default, the FQDN of the KUMA Core is
kuma.<smp_domain>.The port that is used for connection to KUMA Core cannot be changed. By default, port 7210 is used.
Open ports that correspond to the installed collector and correlator on the server (TCP 7221 and other ports used for service installation as the
--api.port <port>parameter values). - Installation command for the storage:
- During the installation of the KUMA services, read the End User License Agreement (EULA) of KUMA. The text is displayed in the command line window. Press the space bar to view the next text segment. Then, when prompted, enter the following values:
- Enter
yif you understand and accept the terms of the EULA. - Enter
nif you do not accept the terms of the EULA. To use the KUMA services, you must accept the terms of the EULA.
You can read the EULA of KUMA after the installation of the KUMA services in one of the following ways:
- On hosts, it is included in the
kuma_utilsgroup in the KUMA inventory file: open the LICENSE file located in the/opt/kaspersky/kuma/utilsdirectory. - On hosts, it is included in other groups (
kuma_storage, kuma_collector, orkuma_correlator) in the KUMA inventory file: open the LICENSE file located in the/opt/kaspersky/kumadirectory. - Run the following command:
/opt/kaspersky/kuma/kuma license --show
After you accept the EULA, the KUMA services are installed on the prepared machines in the network infrastructure.
- Enter
- If necessary, verify that the collector and correlator are ready to receive events.
- If necessary, install agents in the KUMA network infrastructure.
The files required for the agent installation are located in the
/opt/kaspersky/kuma/utilsdirectory.
The KUMA services required for the function of Kaspersky Next XDR Expert are installed.
Page topDeployment of multiple Kubernetes clusters and Kaspersky Next XDR Expert instances
KDT allows you to deploy multiple Kubernetes clusters with Kaspersky Next XDR Expert instances and switch between them by using contexts. Context is a set of access parameters that define the Kubernetes cluster that the user can select to interact with. The context also includes data for connecting to the cluster by using KDT.
Prerequisites
Before creating contexts and installing Kubernetes clusters with Kaspersky Next XDR Expert instances, you must do the following:
- Prepare the administrator and target hosts.
For the installation of multiple clusters and Kaspersky Next XDR Expert instances, you need to prepare one administration host for all clusters and separate sets of target hosts for each of the clusters. Kubernetes components should not be installed on the target hosts.
- Prepare the hosts for installation of the KUMA services.
For installation of the KUMA services, you need to prepare separate sets of hosts for each Kaspersky Next XDR Expert instance.
- Prepare the KUMA inventory file.
For installation of the KUMA services, you need to prepare separate inventory files for each Kaspersky Next XDR Expert instance.
- Prepare the configuration file.
For installation of multiple clusters and Kaspersky Next XDR Expert instances, you need to prepare configuration files for each Kaspersky Next XDR Expert instance. In these configuration files, specify the corresponding administration and target hosts, and other parameters specific to a particular cluster and Kaspersky Next XDR Expert instance.
Process
To create a context with the Kubernetes cluster and Kaspersky Next XDR Expert instance:
- On the administrator host where the KDT utility is located, run the following command and specify the context name:
./kdt ctx <context_name> --createThe context with the specified name is created.
- Install the Kubernetes cluster and Kaspersky Next XDR Expert.
The cluster with the Kaspersky Next XDR Expert instance is deployed in the context. The creation of the context is finished.
You can repeat this procedure to create the required number of contexts with installed clusters and Kaspersky Next XDR Expert instances.
You must deploy the Kubernetes cluster and the Kaspersky Next XDR Expert instance after you create the context to finish the context creation. If you do not perform the deployment in the context, and then create another context, the first context will be removed.
You can view the list of created contexts by using the following command:
./kdt ctx
If you want to switch to the required context, run the following command and specify the context name:
./kdt ctx <context_name>
After you select the context, KDT connects to the corresponding Kubernetes cluster. Now, you can work with this cluster and the Kaspersky Next XDR Expert instance. KDT commands are applied to the selected cluster.
When you remove the Kaspersky Next XDR Expert components installed in the Kubernetes cluster and the cluster itself by using KDT, the corresponding contexts are also removed. Other contexts and their clusters with Kaspersky Next XDR Expert instances are not removed.
Page topSigning in to Kaspersky Next XDR Expert
To sign in to Kaspersky Next XDR Expert, you must know the web address of Open Single Management Platform Console. In your browser, JavaScript must be enabled.
To sign in to Open Single Management Platform Console:
- In your browser, go to
https://console.<smp_domain>:443.The sign-in page is displayed.
- Do one of the following:
- To sign in to Open Single Management Platform Console with a domain user account, enter the user name and password of the domain user.
You can enter the user name of the domain user in one of the following formats:
Username@dns.domain- NTDOMAIN\
Username
Before you sign in with a domain user account, poll the domain controller to obtain the list of domain users.
- Enter the user name and password of the internal user.
- If one or more virtual Servers are created on the Server and you want to sign in to a virtual Server:
- Click Show virtual Server options.
- Type the virtual Server name that you specified while creating the virtual Server.
- Enter the user name and password of the internal or domain user who has rights on the virtual Server.
- To sign in to Open Single Management Platform Console with a domain user account, enter the user name and password of the domain user.
- Click the Sign in button.
After sign-in, the dashboard is displayed, and it contains the language and theme that you used the last time you signed in.
Kaspersky Next XDR Expert allows you to work with Open Single Management Platform Console and KUMA Console interfaces.
If you sign in to one of the consoles, and then open the other console on a different tab of the same browser window, you are signed in to the other console without having to re-enter the credentials. In this case, when you sign out of one console, the session also ends for the other console.
If you use different browser windows or different devices to sign in to Open Single Management Platform Console and KUMA Console, you have to re-enter the credentials. In this case, when you sign out of one console on the browser window or device where it is open, the session continues on the window or device where the other console is open.
To sign out of Open Single Management Platform Console,
In the main menu, go to your account settings, and then select Sign out.
Open Single Management Platform Console is closed and the sign-in page is displayed.
Page topKaspersky Next XDR Expert maintenance
This section describes updating, removing, and reinstalling Kaspersky Next XDR Expert components by using KDT. Also, the section provides instructions on how to stop the Kubernetes cluster nodes, update custom certificates for public Kaspersky Next XDR Expert services, as well as obtain the current version of the configuration file, and perform other actions with Kaspersky Next XDR Expert components by using KDT.
Updating Kaspersky Next XDR Expert components
KDT allows you to update the Kaspersky Next XDR Expert components (including management web plug-ins). New versions of the Kaspersky Next XDR Expert components are included in the distribution package.
Installing components of an earlier version is not supported.
To update the Kaspersky Next XDR Expert components:
- Download the distribution package with the new versions of the Kaspersky Next XDR Expert components.
- If necessary, on the administrator host, export the current version of the configuration file.
You do not need to export the configuration file if the installation parameters are not added or modified.
- Update the Kaspersky Next XDR Expert components:
- Run the following command for standard updating of the Kaspersky Next XDR Expert components:
./kdt apply -k <path_to_XDR_updates_archive> -i <path_to_configuration_file> - If the version of the installed Kaspersky Next XDR Expert component matches the component version in the distribution package, the update of this component is skipped. Run the following command to force an update of this component by using the
forceflag:./kdt apply --force -k <path_to_XDR_updates_archive> -i <path_to_configuration_file>
- Run the following command for standard updating of the Kaspersky Next XDR Expert components:
- If the distribution package contains a new version of the Bootstrap component, run the following command to update the Kubernetes cluster:
./kdt apply -k <path_to_XDR_updates_archive> -i <path_to_configuration_file> --force-bootstrapIn the commands described above, you need specify the path to the archive with updates of the components and the path to the current configuration file. You may not specify the path to the configuration file in the command if the installation parameters are not added or modified.
- Read the End User License Agreement (EULA) and the Privacy Policy of the Kaspersky Next XDR Expert component, if a new version of the EULA and the Privacy Policy appears. The text is displayed in the command line window. Press the space bar to view the next text segment. Then, when prompted, enter the following values:
- Enter
yif you understand and accept the terms of the EULA.Enter
nif you do not accept the terms of the EULA. To use the Kaspersky Next XDR Expert component, you must accept the terms of the EULA. - Enter
yif you understand and accept the terms of the Privacy Policy, and you agree that your data will be handled and transmitted (including to third countries) as described in the Privacy Policy.Enter
nif you do not accept the terms of the Privacy Policy.
To update the Kaspersky Next XDR Expert component, you must accept the terms of the EULA and the Privacy Policy.
- Enter
After you accept the EULA and the Privacy Policy, KDT updates the Kaspersky Next XDR Expert components.
You can read the EULA and the Privacy Policy of the Kaspersky Next XDR Expert component after the update. The files are located in the /home/kdt/ directory of the user who runs the deployment of Kaspersky Next XDR Expert.
Versioning the configuration file
When working with Kaspersky Next XDR Expert, you may need to change the parameters that were specified in the configuration file before the Kaspersky Next XDR Expert deployment. For example, when changing the disk space used to store the Administration Server data, the ksc_state_size parameter is modified. The current version of the configuration file with the modified ksc_state_size parameter is updated in the Kubernetes cluster.
If you try to use the previous version of the configuration file in a KDT custom action that requires the configuration file, a conflict occurs. To avoid conflicts, you have to use only the current version on the configuration file exported from the Kubernetes cluster.
To export the current version of the configuration file,
On the administrator host where the KDT utility is located, run the following custom action, and then specify the path to the configuration file and its name:
./kdt export-config --filename <path_to_configuration_file.yaml>
The current version of the configuration file is saved to the specified directory with the specified name.
You can use the exported configuration file, for example, when updating Kaspersky Next XDR Expert components or adding management plug-ins for Kaspersky applications.
You need not export the configuration file if the installation parameters are not added or modified.
Page topRemoving Kaspersky Next XDR Expert components and management web plug-ins
KDT allows you to remove all Kaspersky Next XDR Expert components installed in the Kubernetes cluster, the cluster itself, and the KUMA services installed outside the cluster. By using KDT, you can also remove the management web plug-ins of Kaspersky applications, for example, the plug-in of Kaspersky Endpoint Security for Windows.
Removing Kaspersky Next XDR Expert
To remove the Kaspersky Next XDR Expert components and related data:
On the administrator host, run the following command:
./kdt remove --allAll Kaspersky Next XDR Expert components installed in the Kubernetes cluster and the cluster itself are removed. If you installed a DBMS inside the cluster, the DBMS is removed, too.
Also, KDT removes the KUMA services installed outside the cluster on the hosts that were specified in the inventory file.
Data related to the Kaspersky Next XDR Expert components is deleted from the administrator host.
If the administrator host does not have network access to a target host, removing the components is interrupted. You can restore network access and restart the removal of Kaspersky Next XDR Expert. Alternatively, you can remove the Kaspersky Next XDR Expert components from the target hosts manually (refer to the next instruction).
If you use multiple Kubernetes clusters managing by contexts, this command removes only the current Kubernetes context, the corresponding cluster, and the Kaspersky Next XDR Expert components installed in the cluster. Other contexts and their clusters with Kaspersky Next XDR Expert instances are not removed.
- Remove the DBMS and data related to the Kaspersky Next XDR Expert components manually, if you installed the DBMS on a separate server outside the cluster.
- Close the ports used by Kaspersky Next XDR Expert that were opened during the deployment, if needed. These ports are not closed automatically.
Remove the operating system packages that were automatically installed during the deployment, if needed. These packages are not removed automatically.
- Remove KDT and the contents of the
/home/kdtand/home/.kdtdirectories.
The Kaspersky Next XDR Expert components, DBMS, and related data are removed, and the ports used by Kaspersky Next XDR Expert are closed.
To remove the Kaspersky Next XDR Expert components from the target hosts manually:
On the target host, run the following command to stop the k0s service:
/usr/local/bin/k0s stopRemove the contents of the following directories:
Required directories:
/etc/k0s//var/lib/k0s//usr/libexec/k0s//usr/local/bin/
Optional directories:
/var/lib/containerd//var/cache/k0s//var/cache/kubelet//var/cache/containerd/
You can remove the
/var/lib/containerd/and/var/cache/containerd/directories if the containerd service is used only for the function of Kaspersky Next XDR Expert. Otherwise, your data contained in the/var/lib/containerd/and/var/cache/containerd/directories may be lost.Contents of the
/var/cache/k0s/,/var/cache/kubelet/, and/var/cache/containerd/directories is automatically removed after you restart the target host. You do not have to clear these folders manually.
The Kaspersky Next XDR Expert components are deleted from the target hosts.
Removing management web plug-ins
You can remove the management web plug-ins of Kaspersky applications that provide additional functionality for Kaspersky Next XDR Expert. The Kaspersky Next XDR Expert services plug-ins are used for the correct function of Kaspersky Next XDR Expert and cannot be removed (for example, the plug-in of Incident Response Platform).
To remove a management web plug-in:
If needed, run the following command to obtain the name of the plug-in that you want to remove:
./kdt statusThe list of components is displayed.
On the administrator host, run the following command. Specify the name of the plug-in that you want to remove:
./kdt remove --cnab <plug-in_name>
The specified management web plug-in is removed by KDT.
Page topReinstalling Kaspersky Next XDR Expert after a failed installation
During the installation of Kaspersky Next XDR Expert, on the administrator host, KDT displays an installation log that shows whether the Kaspersky Next XDR Expert components are installed correctly.
After installing Kaspersky Next XDR Expert, you can run the following command to view the list of all installed components:
./kdt status
The installed components list is displayed. Correctly installed components have the Success status. If the component installation failed, this component has the Failed status.
To view the full installation log of the incorrectly installed Kaspersky Next XDR Expert component, run the following command:
./kdt status -l <component_name>
You can also output all diagnostic information about Kaspersky Next XDR Expert components by using the following command:
./kdt logs get --to-archive
You can use the obtained logs to troubleshoot problems on your own or with the help of Kaspersky Technical Support.
To reinstall incorrectly installed Kaspersky Next XDR Expert components,
- If you did not modify the configuration file, run the following command, and then specify the same transport archive that was used for the Kaspersky Next XDR Expert installation:
./kdt apply -k <path_to_transport_archive> - If you need to change the installation parameters, export the configuration file, modify it, and then run the following command with the transport archive and the updated configuration file:
./kdt apply -k <path_to_transport_archive> -i <path_to_configuration_file>
KDT reinstalls only the incorrectly installed Kaspersky Next XDR Expert components.
Page topStopping the Kubernetes cluster nodes
You may need to stop the entire Kubernetes cluster or temporarily detach one of the nodes of the cluster for maintenance.
In a virtual environment, do not power off virtual machines that are hosting active Kubernetes cluster nodes.
To stop a multi-node Kubernetes cluster (distributed deployment scheme):
- Log in to a worker node and initiate graceful shut down. Repeat this process for all worker nodes.
- Log in to the primary node and initiate graceful shut down.
To stop a single-node Kubernetes cluster (single node deployment scheme):
Log in to the primary node and initiate graceful shut down.
Page topUsing certificates for public Kaspersky Next XDR Expert services
For working with public Kaspersky Next XDR Expert services, you can use self-signed or custom certificates. By default, Kaspersky Next XDR Expert uses self-signed certificates.
Certificates are required for the following Kaspersky Next XDR Expert public services:
- console.<smp_domain>—Access to the OSMP Console interface.
- admsrv.<smp_domain>—Interaction with Administration Server.
- api.<smp_domain>—Access to the Kaspersky Next XDR Expert API.
The list of FQDNs of public Kaspersky Next XDR Expert services, for which self-signed or custom certificates are defined during the deployment, is specified in the pki_fqdn_list installation parameter.
A custom certificate must be specified as a file in the PEM format that contains the complete certificate chain (or only one certificate) and an unencrypted private key.
You can specify the intermediate certificate from your organization's private key infrastructure (PKI). Custom certificates for public Kaspersky Next XDR Expert services are issued from this custom intermediate certificate. Alternatively, you can specify leaf certificates for each of the public services. If leaf certificates are specified only for a part of the public services, then self-signed certificates are issued for the other public services.
For the console.<smp_domain> and api.<smp_domain> public services, you can specify custom certificates only before the deployment in the configuration file. Specify the intermediate_bundle and intermediate_enabled installation parameters to use the custom intermediate certificate.
If you want to use the leaf custom certificates to work with the public Kaspersky Next XDR Expert services, specify the corresponding console_bundle, admsrv_bundle, and api_bundle installation parameters. Set the intermediate_enabled parameter to false and do not specify the intermediate_bundle parameter.
For the admsrv.<smp_domain> service, you can replace the issued Administration Server self-signed certificate with a custom certificate by using the klsetsrvcert utility.
Automatic rotation of certificates is not supported. Take into account the validity term of the certificate, and then update the certificate when it expires.
To update custom certificates:
- On the administrator host, export the current version of the configuration file.
- In the exported configuration file, specify the path to a new custom intermediate certificate in the
intermediate_bundleinstallation parameter. If you use the leaf custom certificates for each of the public services, specify theconsole_bundle,admsrv_bundle, andapi_bundleinstallation parameters. - Run the following command and specify the path to the modified configuration file:
./kdt apply -i <path_to_configuration_file>
Custom certificates are updated.
Page topModifying the self-signed KUMA Console certificate
You can use your company certificate and key instead of self-signed web console certificate. For example, if you want to replace self-signed CA Core certificate with a certificate issued by an enterprise CA, you must provide an external.cert and an unencrypted external.key in PEM format.
The following example shows how to replace a self-signed CA Core certificate with an enterprise certificate in PFX format. You can use the instructions as an example and adapt the steps according to your needs.
To replace the KUMA Console certificate with an external certificate:
- If you are using a certificate and key in a PFX container, in OpenSSL, convert the PFX file to a certificate and encrypted key in PEM format by executing the following command:
openssl pkcs12 -in kumaWebIssuedByCorporateCA.pfx -nokeys -out external.certopenssl pkcs12 -in kumaWebIssuedByCorporateCA.pfx -nocerts -nodes -out external.keyWhen carrying out the command, you are required to specify the PFX key password (Enter Import Password).
As a result, the external.cert certificate and the external.key in PEM format are returned.
- In the KUMA Console, go to the Settings → General → KUMA Core section. Under External TLS pair, click Upload certificate and Upload key and upload the external.cert file and the unencrypted external.key file in PEM format.
- Restart KUMA:
systemctl restart kuma-core - Refresh the web page or restart the browser hosting the KUMA Console.
Your company certificate and key have been replaced.
Page topCalculation and changing of disk space for storing Administration Server data
Administration Server data includes the following objects:
- Information about assets (devices).
- Information about events logged on the Administration Server for the selected client device.
- Information about the domain in which the assets are included.
- Data of the Application Control component.
- Updates. The shared folder additionally requires at least 4 GB to store updates.
- Installation packages. If some installation packages are stored on the Administration Server, the shared folder will require an additional amount of free disk space equal to the total size of all of the available installation packages to be installed.
- Remote installation tasks. If remote installation tasks are present on the Administration Server, an additional amount of free disk space equal to the total size of all installation packages to be installed will be required.
Calculation of the minimum disk space for storing Administration Server data
The minimum disk space required for storing the Administration Server data can be estimated approximately by using the formula:
(724 * C + 0.15 * E + 0.17 * A + U), KB
where:
- C is the number of assets (devices).
- E is the number of events to store.
- A is the total number of domain objects:
- Device accounts
- User accounts
- Accounts of security groups
- Organizational units
- U is the size of updates (at least 4 GB).
If domain polling is disabled, A is considered to equal zero.
The formula calculates the disk space required for storing typical data from managed devices and the typical size of updates. The formula does not include the amount of disk space occupied by data that is independent of the number of managed devices for the Application Control component, installation packages, and remote installation tasks.
Changing of the disk space for storing the Administration Server data
The amount of free disk space allocated to store the Administration Server data is specified in the configuration file before the deployment of Kaspersky Next XDR Expert (the ksc_state_size parameter). Take into account the minimum disk space calculated by using the formula.
To check the disk space used to store the Administration Server data after the deployment of Kaspersky Next XDR Expert,
On the administrator host where the KDT utility is located, run the following command:
./kdt invoke ksc --action getPvSize
The amount of the required free disk space in gigabytes is displayed.
To change the disk space used to store the Administration Server data after the deployment of Kaspersky Next XDR Expert,
On the administrator host where the KDT utility is located, run the following command and specify the required free disk space in gigabytes (for example, "50Gi"):
./kdt invoke ksc --action setPvSize --param ksc_state_size="<new_disk_space_amount>Gi"
The amount of free disk space allocated to store the Administration Server data is changed.
Page topRotation of secrets
KDT allows you to rotate the secrets that are used to connect to the Kubernetes cluster, to the infrastructure components of Kaspersky Next XDR Expert, and to the DBMS. The rotation period of these secrets can be specified in accordance with the information security requirements of your organization. Secrets are located on the administrator host.
Secrets that are used to connect to the Kubernetes cluster include a client certificate and a private key. Secrets for access to the Registry and DBMS include the corresponding DSNs.
To rotate the secrets for connection to the Kubernetes cluster manually,
On the administrator host where the KDT utility is located, run the following command:
./kdt invoke bootstrap --action RotateK0sConfig
New secrets for connection to the Kubernetes cluster are generated.
When updating Bootstrap, secrets for connection to the Kubernetes cluster are updated automatically.
To rotate the secrets for connection to the Registry manually,
On the administrator host where the KDT utility is located, run the following command:
./kdt invoke bootstrap --action RotateRegistryCreds
New secrets for connection to the Registry are generated.
Page topAdding hosts for installing the additional KUMA services
If you need to expand the storage, or add new collectors and correlators for the increased flow of events, you can add additional hosts for installation of the KUMA services.
You must specify the parameters of the additional hosts in the expand.inventory.yml file. This file is located in the distribution package with the transport archive, KDT, the configuration file, and other files. In the expand.inventory.yml file, you can specify several additional hosts for collectors, correlators, and storages at once. Ensure that hardware, software, and installation requirements for the selected hosts are met.
To prepare the required infrastructure on the hosts specified in the expand.inventory.yml file, you need to create the service directories to which the files that are required for the service installation are added. To prepare the infrastructure, run the following command and specify the expand.inventory.yml file:
./kdt invoke kuma --action addHosts --param hostInventory=<path_to_inventory_file>
On the hosts specified in the expand.inventory.yml file, the service directories to which the files that are required for the service installation are added.
Adding an additional storage, collector, or correlator
You can add an additional storage cluster, collector, or correlator to your existing infrastructure. If you want to add several services, it is recommended to install them in the following order: storages, collectors, and correlators.
To add an additional storage cluster, collector, or correlator:
- Sign in to KUMA Console.
You can use one of the following methods:
- In the main menu of OSMP Console, go to Settings → KUMA.
- In your browser, go to
https://kuma.<smp_domain>:7220.
- In the KUMA Console, create a resource set for each KUMA service (storages, collectors, and correlators) that you want to install on the prepared hosts.
- Create services for storages, collectors and correlators in KUMA Console.
- Obtain the service identifiers to bind the created resource sets and the KUMA services:
- In the KUMA Console main menu, go to Resources → Active services.
- Select the required KUMA service, and then click the Copy ID button.
- Install the KUMA services on each prepared host listed in the kuma_storage, kuma_collector, and kuma_correlator sections of the expand.inventory.yml inventory file. On each machine, in the installation command, specify the service ID corresponding to the host. Run the corresponding commands to install the KUMA services:
- Installation command for the storage:
sudo /opt/kaspersky/kuma/kuma storage --core https://<KUMA Core server FQDN>:7210 --id <service ID copied from the KUMA Console> --install - Installation command for the collector:
sudo /opt/kaspersky/kuma/kuma collector --core https://<KUMA Core server FQDN>:7210 --id <service ID copied from the KUMA Console> --api.port <port used for communication with the installed component> - Installation command for the correlator:
sudo /opt/kaspersky/kuma/kuma correlator --core https://<KUMA Core server FQDN>:7210 --id <service ID copied from the KUMA Console> --api.port <port used for communication with the installed component> --installThe collector and correlator installation commands are automatically generated on the Setup validation tab of the Installation Wizard, and the port used for communication is added to the command automatically. Use the generated commands to install the collector and correlator on the hosts. This will allow you to make sure that the ports for communication with the services specified in the command are available.
By default, the FQDN of the KUMA Core is
kuma.<smp_domain>.The port that is used for connection to KUMA Core cannot be changed. By default, port 7210 is used.
- Installation command for the storage:
The additional KUMA services are installed.
Adding hosts to an existing storage
You can expand an existing storage (storage cluster) by adding hosts as new storage cluster nodes.
To add hosts to an existing storage:
- Sign in to KUMA Console.
You can use one of the following methods:
- In the main menu of OSMP Console, go to Settings → KUMA.
- In your browser, go to
https://kuma.<smp_domain>:7220.
- Add new nodes to the storage cluster. To do this, edit the settings of the existing storage cluster:
- In the Resources → Storages section, select an existing storage, and then open the storage for editing.
- In the ClickHouse cluster nodes section, click Add nodes, and then specify roles in the fields for the new node. Specify the corresponding host domain names from the kuma_storage section of the expand.inventory.yml file, and then specify the roles for the new nodes.
- Save changes.
You do not need to create a separate storage because you are adding servers to an existing storage cluster.
- Create storage services for each added storage cluster node in KUMA Console, and then bind the services to the storage cluster.
- Obtain the storage service identifiers for each prepared host to install the KUMA services:
- In the KUMA Console main menu, go to Resources → Active services.
- Select the required KUMA service, and then click the Copy ID button.
- Install the storage service on each prepared host listed in the kuma_storage section of the expand.inventory.yml inventory file. On each machine, in the installation command, specify the service ID corresponding to the host. Run the following command to install the storage service:
sudo /opt/kaspersky/kuma/kuma storage --core https://<KUMA Core server FQDN>:7210 --id <service ID copied from the KUMA Console> --installBy default, the FQDN of the KUMA Core is
kuma.<smp_domain>.The port that is used for connection to KUMA Core cannot be changed. By default, port 7210 is used.
The additional hosts are added to the storage cluster.
Specify the added hosts in the distributed.inventory.yml inventory file so that it has up-to-date information in case of a KUMA components update.
Page topReplacing a host that uses KUMA storage
To replace a host that uses KUMA storage with another one:
- Fill in the expand.inventory.yml file, specifying the parameters of the host you want to replace.
- Run the following command, specifying the expand.inventory.yml file to remove the host:
./kdt invoke kuma --action removeHosts --param hostInventory=<path_to_inventory_file> - Fill in the expand.inventory.yml file, specifying the parameters of the new host that you want to replace the previous host, and then run the following command:
./kdt invoke kuma --action addHosts --param hostInventory=<path_to_inventory_file> - Follow steps 2-6 of the instruction for adding new hosts for KUMA services to add a new host with the KUMA storage.
The host with the KUMA storage is replaced with another one.
If your storage configuration includes a shard containing two replicas, and you replaced the second replica host with a new one by using the steps described above, then you may receive an error when installing a new replica. In this case, the new replica will not work.
To fix an error when adding a new replica of a shard:
- On another host with a replica of the same shard that owns the incorrectly added replica, launch the ClickHouse client by using the command:
/opt/kaspersky/kuma/clickhouse/bin/client.shIf this host is unavailable, run the client on any other host with a replica included in the same storage cluster.
- Run the command to remove the data about the host you wanted to replace.
- If the host with a replica of the same shard that owns the incorrectly added replica is available, run the following command:
SYSTEM DROP REPLICA '<replica number of read-only node>' FROM TABLE kuma.events_local_v2 - If you are using another storage cluster host with a replica, run the following command:
SYSTEM DROP REPLICA '<replica number of read-only node>' FROM ZKPATH '/clickhouse/tables/kuma/<shard number of read-only node>/kuma/events_local_v2
- If the host with a replica of the same shard that owns the incorrectly added replica is available, run the following command:
- Run the following command to restore the operation of the added host with a replica:
SYSTEM RESTORE REPLICA kuma.events_local_v2
Operability of the added host with a replica is restored.
Page top