Contents
- Configuring Kaspersky applications
- Scenario: Configuring network protection
- About device-centric and user-centric security management approaches
- Policy setup and propagation: Device-centric approach
- Policy setup and propagation: User-centric approach
- Policies and policy profiles
- Network Agent policy settings
- Usage of Network Agent for Windows, Linux, and macOS: Comparison
- Comparison of Network Agent settings by operating systems
- Manual setup of the Kaspersky Endpoint Security policy
- Configuring Kaspersky Security Network
- Checking the list of the networks protected by Firewall
- Disabling the scan of network devices
- Excluding software details from the Administration Server memory
- Configuring access to the Kaspersky Endpoint Security for Windows interface on workstations
- Saving important policy events in the Administration Server database
- Manual setup of the group update task for Kaspersky Endpoint Security
- Kaspersky Security Network (KSN)
- Managing tasks
- About tasks
- About task scope
- Creating a task
- Starting a task manually
- Starting a task for selected devices
- Viewing the task list
- General task settings
- Exporting a task
- Importing a task
- Starting the Change tasks password wizard
- Viewing task run results stored on the Administration Server
- Manual setup of the group task for scanning a device with Kaspersky Endpoint Security
- General task settings
- Application tags
- Granting offline access to the external device blocked by Device Control
- Registering Kaspersky Industrial CyberSecurity for Networks application in OSMP Console
Configuring Kaspersky applications
This section contains information about manual configuration of policies and tasks, about user roles, about building an administration group structure and hierarchy of tasks.
Scenario: Configuring network protection
Create and configure policies and tasks required for your network.
Prerequisites
Before you start, make sure that you have done the following:
- Installed Kaspersky Security Center Administration Server
- Installed OSMP Console
- Completed the Open Single Management Platform main installation scenario
Configuring network protection proceeds in stages:
- Setup and propagation of Kaspersky application policies and policy profiles
To configure and propagate settings for Kaspersky applications installed on the managed devices, you can use two different security management approaches—device-centric or user-centric. These two approaches can also be combined.
- Configuring tasks for remote management of Kaspersky applications
Manually create and configure the following policies and tasks in the Managed devices administration group:
- Policy of Kaspersky Endpoint Security
- Group task for updating Kaspersky Endpoint Security
- Policy of Network Agent
How-to instructions: Setting up the group task for updating Kaspersky Endpoint Security.
If necessary, create additional tasks to manage the Kaspersky applications installed on the client devices.
- Evaluating and limiting the event load on the database
Information about events during the operation of managed applications is transferred from a client device and registered in the Administration Server database. To reduce the load on the Administration Server, evaluate and limit the maximum number of events that can be stored in the database.
How-to instructions: Setting the maximum number of events.
Results
Upon completion of this scenario, your network will be protected by configuration of Kaspersky applications, tasks, and events received by the Administration Server:
- The Kaspersky applications are configured according to the policies and policy profiles.
- The applications are managed through a set of tasks.
- The maximum number of events that can be stored in the database is set.
When the network protection configuration is complete, you can proceed to configuring regular updates to Kaspersky databases and applications.
About device-centric and user-centric security management approaches
You can manage security settings from the standpoint of device features and from the standpoint of user roles. The first approach is called device-centric security management and the second is called user-centric security management. To apply different application settings to different devices, you can use either or both types of management in combination.
Device-centric security management enables you to apply different security application settings to managed devices depending on device-specific features. For example, you can apply different settings to devices allocated in different administration groups.
User-centric security management enables you to apply different security application settings to different user roles. You can create several user roles, assign an appropriate user role to each user, and define different application settings to the devices owned by users with different roles. For example, you may want to apply different application settings to devices of accountants and human resources (HR) specialists. As a result, when user-centric security management is implemented, each department—accounts department and HR department—has its own settings configuration for Kaspersky applications. A settings configuration defines which application settings can be changed by users and which are forcibly set and locked by the administrator.
By using user-centric security management, you can apply specific application settings to individual users. This may be required when an employee has a unique role in the company or when you want to monitor security issues related to devices of a specific person. Depending on the role of this employee in the company, you can expand or limit the rights of this person to change application settings. For example, you might want to expand the rights of a system administrator who manages client devices in a local office.
You can also combine the device-centric and user-centric security management approaches. For example, you can configure a specific application policy for each administration group, and then create policy profiles for one or several user roles of your enterprise. In this case, the policies and policy profiles are applied in the following order:
- The policies created for device-centric security management are applied.
- They are modified by the policy profiles according to the policy profile priorities.
- The policies are modified by the policy profiles associated with user roles.
Policy setup and propagation: Device-centric approach
When you complete this scenario, the applications will be configured on all of the managed devices in accordance with the application policies and policy profiles that you define.
Prerequisites
Before you start, make sure that you have installed Kaspersky Security Center Administration Server and OSMP Console. You might also want to consider user-centric security management as an alternative or additional option to the device-centric approach. Learn more about two management approaches.
Stages
The scenario of device-centric management of Kaspersky applications consists of the following steps:
- Configuring application policies
Configure settings for Kaspersky applications installed on the managed devices by creating a policy for each application. The set of policies will be propagated to the client devices.
If you have a hierarchical structure of several Administration Servers and/or administration groups, the secondary Administration Servers and child administration groups inherit the policies from the primary Administration Server by default. You can force the inheritance by the child groups and secondary Administration Servers to prohibit any modifications of the settings configured in the upstream policy. If you want only part of the settings to be forcibly inherited, you can lock them in the upstream policy. The rest unlocked settings will be available for modification in the downstream policies. The created hierarchy of policies will allow you to effectively manage devices in the administration groups.
How-to instructions: Creating a policy
- Creating policy profiles (optional)
If you want devices within a single administration group to run under different policy settings, create policy profiles for those devices. A policy profile is a named subset of policy settings. This subset is distributed on target devices together with the policy, supplementing it under a specific condition called the profile activation condition. Profiles only contain settings that differ from the "basic" policy, which is active on the managed device.
By using profile activation conditions, you can apply different policy profiles, for example, to the devices having a specific hardware configuration or marked with specific tags. Use tags to filter devices that meet specific criteria. For example, you can create a tag called CentOS, mark all devices running CentOS operating system with this tag, and then specify this tag as an activation condition for a policy profile. As a result, Kaspersky applications installed on all devices running CentOS will be managed by their own policy profile.
How-to instructions:
- Propagating policies and policy profiles to the managed devices
By default, the Administration Server automatically synchronizes with managed devices every 15 minutes. During the synchronization, the new or changed policies and policy profiles are propagated to the managed devices. You can circumvent auto-synchronization and run the synchronization manually by using the Force synchronization command. When synchronization is complete, the policies and policy profiles are delivered and applied to the installed Kaspersky applications.
You can check whether the policies and policy profiles were delivered to a device. Open Single Management Platform specifies the delivery date and time in the properties of the device.
How-to instructions: Forced synchronization
Results
When the device-centric scenario is complete, the Kaspersky applications are configured according to the settings specified and propagated through the hierarchy of policies.
The configured application policies and policy profiles will be applied automatically to the new devices added to the administration groups.
Policy setup and propagation: User-centric approach
This section describes the scenario of user-centric approach to the centralized configuration of Kaspersky applications installed on the managed devices. When you complete this scenario, the applications will be configured on all of the managed devices in accordance with the application policies and policy profiles that you define.
Prerequisites
Before you start, make sure that you have successfully installed Kaspersky Security Center Administration Server and OSMP Console, and completed the main deployment scenario. You might also want to consider device-centric security management as an alternative or additional option to the user-centric approach. Learn more about two management approaches.
Process
The scenario of user-centric management of Kaspersky applications consists of the following steps:
- Configuring application policies
Configure settings for Kaspersky applications installed on the managed devices by creating a policy for each application. The set of policies will be propagated to the client devices.
If you have a hierarchical structure of several Administration Servers and/or administration groups, the secondary Administration Servers and child administration groups inherit the policies from the primary Administration Server by default. You can force the inheritance by the child groups and secondary Administration Servers to prohibit any modifications of the settings configured in the upstream policy. If you want only part of the settings to be forcibly inherited, you can lock them in the upstream policy. The rest unlocked settings will be available for modification in the downstream policies. The created hierarchy of policies will allow you to effectively manage devices in the administration groups.
How-to instructions: Creating a policy
- Specifying owners of the devices
Assign the managed devices to the corresponding users.
How-to instructions: Assigning a user as a device owner
- Defining user roles typical for your enterprise
Think about different kinds of work that the employees of your enterprise typically perform. You must divide all employees in accordance with their roles. For example, you can divide them by departments, professions, or positions. After that you will need to create a user role for each group. Keep in mind that each user role will have its own policy profile containing application settings specific for this role.
- Creating user roles
Create and configure a user role for each group of employees that you defined on the previous step or use the predefined user roles. The user roles will contain set of rights of access to the application features.
How-to instructions: Creating a user role
- Defining the scope of each user role
For each of the created user roles, define users and/or security groups and administration groups. Settings associated with a user role apply only to devices that belong to users who have this role, and only if these devices belong to groups associated with this role, including child groups.
How-to instructions: Editing the scope of a user role
- Creating policy profiles
Create a policy profile for each user role in your enterprise. The policy profiles define which settings will be applied to the applications installed on users' devices depending on the role of each user.
How-to instructions: Creating a policy profile
- Associating policy profiles with the user roles
Associate the created policy profiles with the user roles. After that: the policy profile becomes active for a user that has the specified role. The settings configured in the policy profile will be applied to the Kaspersky applications installed on the user's devices.
How-to instructions: Associating policy profiles with roles
- Propagating policies and policy profiles to the managed devices
By default, Open Single Management Platform automatically synchronizes the Administration Server with the managed devices every 15 minutes. During the synchronization, the new or changed policies and policy profiles are propagated to the managed devices. You can circumvent auto-synchronization and run the synchronization manually by using the Force synchronization command. When synchronization is complete, the policies and policy profiles are delivered and applied to the installed Kaspersky applications.
You can check whether the policies and policy profiles were delivered to a device. Open Single Management Platform specifies the delivery date and time in the properties of the device.
How-to instructions: Forced synchronization
Results
When the user-centric scenario is complete, the Kaspersky applications are configured according to the settings specified and propagated through the hierarchy of policies and policy profiles.
For a new user, you will have to create a new account, assign the user one of the created user roles, and assign the devices to the user. The configured application policies and policy profiles will be automatically applied to the devices of this user.
Policies and policy profiles
In OSMP Console, you can create policies for Kaspersky applications. This section describes policies and policy profiles, and provides instructions for creating and modifying them.
About policies and policy profiles
A policy is a set of Kaspersky application settings that are applied to an administration group and its subgroups. You can install several Kaspersky applications on the devices of an administration group. Kaspersky Security Center provides a single policy for each Kaspersky application in an administration group. A policy has one of the following statuses:
The status of the policy
Status |
Description |
|---|---|
Active |
The current policy that is applied to the device. Only one policy may be active for a Kaspersky application in each administration group. Devices apply the settings values of an active policy for a Kaspersky application. |
Inactive |
A policy that is not currently applied to a device. |
Out-of-office |
If this option is selected, the policy becomes active when the device leaves the corporate network. |
Policies function according to the following rules:
- Multiple policies with different values can be configured for a single application.
- Only one policy can be active for the current application.
- A policy can have child policies.
Generally, you can use policies as preparations for emergency situations, such as a virus attack. For example, if there is an attack via flash drives, you can activate a policy that blocks access to flash drives. In this case, the current active policy automatically becomes inactive.
In order to prevent maintaining multiple policies, for example, when different occasions assume changing of several settings only, you may use policy profiles.
A policy profile is a named subset of policy settings values that replaces the settings values of a policy. A policy profile affects the effective settings formation on a managed device. Effective settings are a set of policy settings, policy profile settings, and local application settings that are currently applied for the device.
Policy profiles function according to the following rules:
- A policy profile takes effect when a specific activation condition occurs.
- Policy profiles contain values of settings that differ from the policy settings.
- Activation of a policy profile changes the effective settings of the managed device.
- A policy can include a maximum of 100 policy profiles.
About lock and locked settings
Each policy setting has a lock button icon ( ). The table below shows lock button statuses:
Lock button statuses
Status |
Description |
|---|---|
|
If an open lock is displayed next to a setting and the toggle button is disabled, the setting is not specified in the policy. A user can change these settings in the managed application interface. These type of settings are called unlocked. |
|
If a closed lock is displayed next to a setting and the toggle button is enabled, the setting is applied to the devices where the policy is enforced. A user cannot modify the values of these settings in the managed application interface. These type of settings are called locked. |


We highly recommend that you close locks for the policy settings that you want to apply on the managed devices. The unlocked policy settings can be reassigned by Kaspersky application settings on a managed device.
You can use a lock button for performing the following actions:
- Locking settings for an administration subgroup policy
- Locking settings of a Kaspersky application on a managed device
Thus, a locked setting is used for implementing effective settings on a managed device.
A process of effective settings implementation includes the following actions:
- Managed device applies settings values of Kaspersky application.
- Managed device applies locked settings values of a policy.
A policy and managed Kaspersky application contain the same set of settings. When you configure policy settings, the Kaspersky application settings change values on a managed device. You cannot adjust locked settings on a managed device (see the figure below):
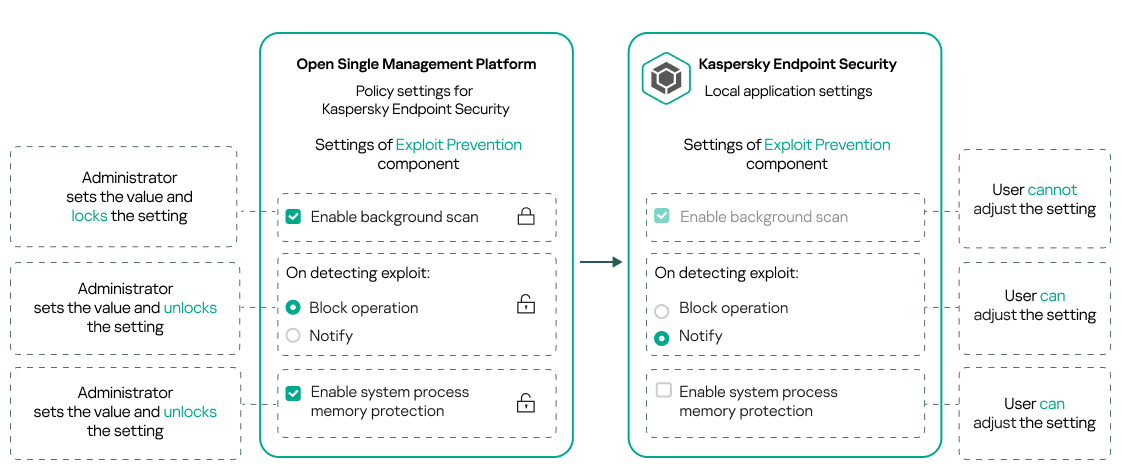
Locks and Kaspersky application settings
Inheritance of policies and policy profiles
This section provides information about the hierarchy and inheritance of policies and policy profiles.
Hierarchy of policies
If different devices need different settings, you can organize devices into administration groups.
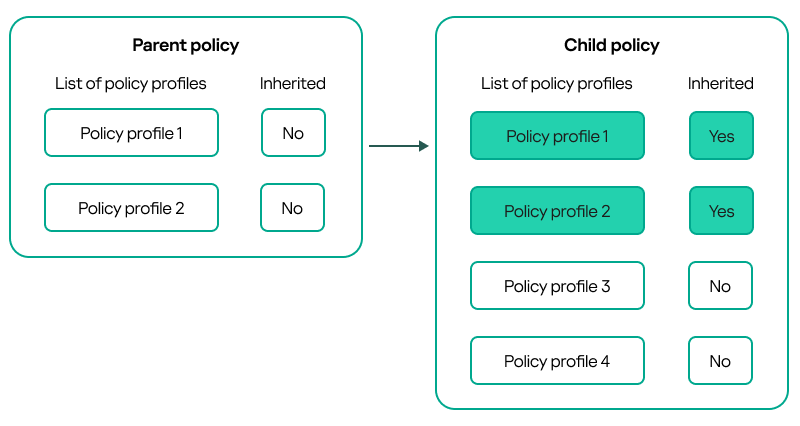
You can specify a policy for a single administration group. Policy settings can be inherited. Inheritance means receiving policy settings values in subgroups (child groups) from a policy of a higher-level (parent) administration group.
Hereinafter, a policy for a parent group is also referred to as a parent policy. A policy for a subgroup (child group) is also referred to as a child policy.
By default, at least one managed devices group exists on Administration Server. If you want to create custom groups, they are created as subgroups (child groups) within the managed devices group.
Policies of the same application act on each other, according to a hierarchy of administration groups. Locked settings from a policy of a higher-level (parent) administration group will reassign policy settings values of a subgroup (see the figure below).

Hierarchy of policies
Page topPolicy profiles in a hierarchy of policies
Policy profiles have the following priority assignment conditions:
- A profile's position in a policy profile list indicates its priority. You can change a policy profile priority. The highest position in a list indicates the highest priority (see the figure below).

Priority definition of a policy profile
- Activation conditions of policy profiles do not depend on each other. Several policy profiles can be activated simultaneously. If several policy profiles affect the same setting, the device takes the setting value from the policy profile with the highest priority (see the figure below).

Managed device configuration fulfills activation conditions of several policy profiles
Policy profiles in a hierarchy of inheritance
Policy profiles from different hierarchy level policies comply with the following conditions:
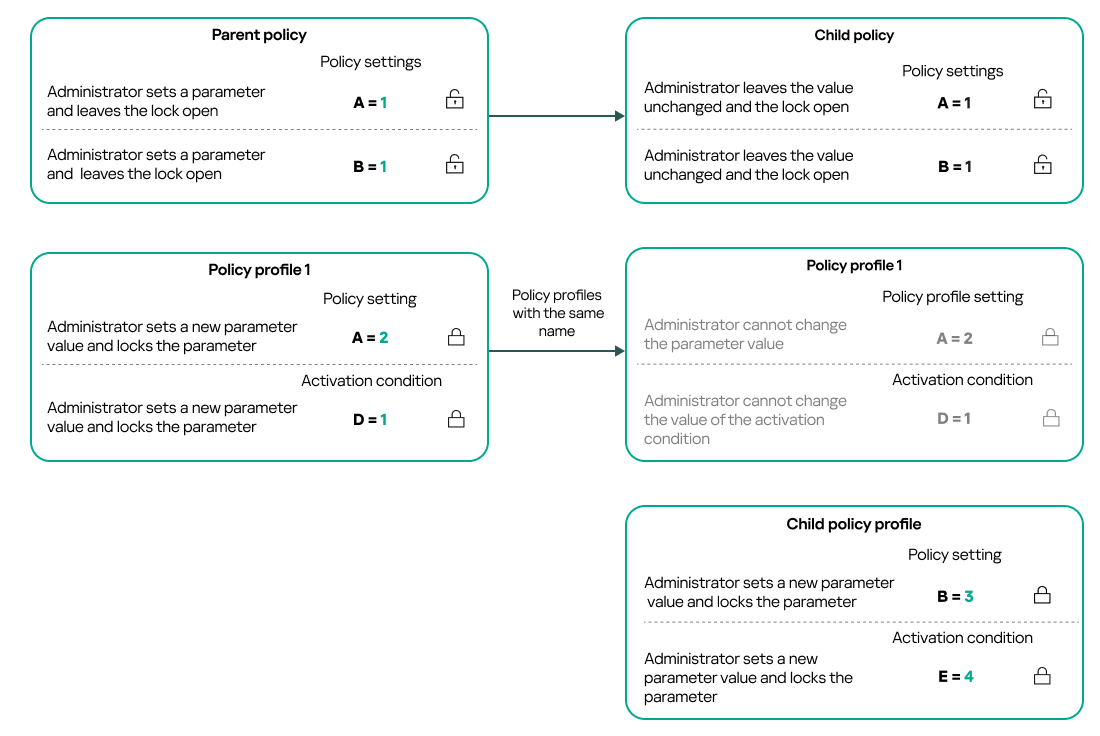
- A lower-level policy inherits policy profiles from a higher-level policy. A policy profile inherited from a higher-level policy obtains higher priority than the original policy profile's level.
- You cannot change a priority of an inherited policy profile (see the figure below).
Inheritance of policy profiles
Policy profiles with the same name
If there are two policies with the same names in different hierarchy levels, these policies function according to the following rules:
- Locked settings and the profile activation condition of a higher-level policy profile changes the settings and profile activation condition of a lower-level policy profile (see the figure below).
Child profile inherits settings values from a parent policy profile
- Unlocked settings and the profile activation condition of a higher-level policy profile do not change the settings and profile activation condition of a lower-level policy profile.
How settings are implemented on a managed device
Implementation of effective settings on a managed device can be described as follows:
- The values of all settings that have not been locked are taken from the policy.
- Then they are overwritten with the values of managed application settings.
- And then the locked settings values from the effective policy are applied. Locked settings values change the values of unlocked effective settings.
Managing policies
This section describes managing policies and provides information about viewing the list of policies, creating a policy, modifying a policy, copying a policy, moving a policy, forced synchronization, viewing the policy distribution status chart, and deleting a policy.
Viewing the list of policies
You can view lists of policies created for the Administration Server or for any administration group.
To view a list of policies:
- In the main menu, go to Assets (Devices) → Hierarchy of groups.
- In the administration group structure, select the administration group for which you want to view the list of policies.
The list of policies appears in tabular format. If there are no policies, the table is empty. You can show or hide the columns of the table, change their order, view only lines that contain a value that you specify, or use search.
Creating a policy
You can create policies; you can also modify and delete existing policies.
To create a policy:
- In the main menu, go to Assets (Devices) → Policies & profiles.
- Select the administration group for which the policy is to be created:
- For the root group.
In this case you can proceed to the next step.
- For a subgroup:
- Click the current path link at the top of the window.
- In the panel that opens, click the link with the name of the required subgroup.
The current path changes to reflect the selected subgroup.
- For the root group.
- Click Add.
The Select application window opens.
- Select the application for which you want to create a policy.
- Click Next.
The new policy settings window opens with the General tab selected.
- If you want, change the default name, default status, and default inheritance settings of the policy.
- Select the Application settings tab.
Or, you can click Save and exit. The policy will appear in the list of policies, and you can edit its settings later.
- On the Application settings tab, in the left pane select the category that you want and in the results' pane on the right, edit the settings of the policy. You can edit policy settings in each category (section).
The set of settings depends on the application for which you create a policy. For details, refer to the following:
- Administration Server configuration
- Network Agent policy settings
- Kaspersky Endpoint Security for Linux Help
- Kaspersky Endpoint Security for Windows Help
For details about settings of other security applications, refer to the documentation for the corresponding application.
When editing the settings, you can click Cancel to cancel the last operation.
- Click Save to save the policy.
The policy will appear in the list of policies.
General policy settings
General
In the General tab, you can modify the policy status and specify the inheritance of policy settings:
- In the Policy status block, you can select one of the policy modes:
- In the Settings inheritance settings group, you can configure the policy inheritance:
Event configuration
The Event configuration tab allows you to configure event logging and event notification. Events are distributed by importance level on the following tabs:
- Critical
The Critical section is not displayed in the Network Agent policy properties.
- Functional failure
- Warning
- Info
In each section, the list shows the types of events and the default event storage term on the Administration Server (in days). Clicking an event type lets you specify the following settings:
- Event registration
You can specify how many days to store the event and select where to store the event:
- Export to SIEM system using Syslog
- Store in the OS event log on device
- Store in the OS event log on Administration Server
- Event notifications
You can select if you want to be notified about the event in one of the following ways:
- Notify by email
- Notify by SMS
- Notify by running an executable file or script
- Notify by SNMP
By default, the notification settings specified on the Administration Server properties tab (such as recipient address) are used. If you want, you can change these settings in the Email, SMS, and Executable file to be run tabs.
Revision history
The Revision history tab allows you to view the list of the policy revisions and roll back changes made to the policy, if necessary.
Modifying a policy
To modify a policy:
- In the main menu, go to Assets (Devices) → Policies & profiles.
- Click the policy that you want to modify.
The policy settings window opens.
- Specify the general settings and settings of the application for which you create a policy. For details, refer to the following:
- Administration Server configuration
- Network Agent policy settings
- Kaspersky Endpoint Security for Linux Help
- Kaspersky Endpoint Security for Windows Help
For details about settings of other security applications, refer to the documentation for that application.
- Click Save.
The changes made to the policy will be saved in the policy properties, and will appear in the Revision history section.
Page topEnabling and disabling a policy inheritance option
To enable or disable the inheritance option in a policy:
- Open the required policy.
- Open the General tab.
- Enable or disable policy inheritance:
- If you enable Inherit settings from parent policy in a child policy and an administrator locks some settings in the parent policy, then you cannot change these settings in the child policy.
- If you disable Inherit settings from parent policy in a child policy, then you can change all of the settings in the child policy, even if some settings are locked in the parent policy.
- If you enable Force inheritance of settings in child policies in the parent group, this enables the Inherit settings from parent policy option for each child policy. In this case, you cannot disable this option for any child policy. All of the settings that are locked in the parent policy are forcibly inherited in the child groups, and you cannot change these settings in the child groups.
- Click the Save button to save changes or click the Cancel button to reject changes.
By default, the Inherit settings from parent policy option is enabled for a new policy.
If a policy has profiles, all of the child policies inherit these profiles.
Copying a policy
You can copy policies from one administration group to another.
To copy a policy to another administration group:
- In the main menu, go to Assets (Devices) → Policies & profiles.
- Select the check box next to the policy (or policies) that you want to copy.
- Click the Copy button.
On the right side of the screen, the tree of the administration groups appears.
- In the tree, select the target group, that is, the group to which you want to copy the policy (or policies).
- Click the Copy button at the bottom of the screen.
- Click OK to confirm the operation.
The policy (policies) will be copied to the target group with all its profiles. The status of each copied policy in the target group will be Inactive. You can change the status to Active at any time.
If a policy with the name identical to that of the newly moved policy already exists in the target group, the name of the newly moved policy is expanded with the (<next sequence number>) index, for example: (1).
Moving a policy
You can move policies from one administration group to another. For example, you want to delete a group, but you want to use its policies for another group. In this case, you may want move the policy from the old group to the new one before deleting the old group.
To move a policy to another administration group:
- In the main menu, go to Assets (Devices) → Policies & profiles.
- Select the check box next to the policy (or policies) that you want to move.
- Click the Move button.
On the right side of the screen, the tree of the administration groups appears.
- In the tree, select the target group, that is, the group to which you want to move the policy (or policies).
- Click the Move button at the bottom of the screen.
- Click OK to confirm the operation.
If a policy is not inherited from the source group, it is moved to the target group with all its profiles. The status of the policy in the target group is Inactive. You can change the status to Active at any time.
If a policy is inherited from the source group, it remains in the source group. It is copied to the target group with all its profiles. The status of the policy in the target group is Inactive. You can change the status to Active at any time.
If a policy with the name identical to that of the newly moved policy already exists in the target group, the name of the newly moved policy is expanded with the (<next sequence number>) index, for example: (1).
Exporting a policy
Open Single Management Platform allows you to save a policy, its settings, and the policy profiles to a KLP file. You can use this KLP file to import the saved policy both to Kaspersky Security Center Windows and Kaspersky Security Center Linux.
To export a policy:
- In the main menu, go to Assets (Devices) → Policies & profiles.
- Select the check box next to the policy that you want to export.
You cannot export multiple policies at the same time. If you select more than one policy, the Export button will be disabled.
- Click the Export button.
- In the opened Save as window, specify the policy file name and path. Click the Save button.
The Save as window is displayed only if you use Google Chrome, Microsoft Edge, or Opera. If you use another browser, the policy file is automatically saved in the Downloads folder.
Importing a policy
Open Single Management Platform allows you to import a policy from a KLP file. The KLP file contains the exported policy, its settings, and the policy profiles.
To import a policy:
- In the main menu, go to Assets (Devices) → Policies & profiles.
- Click the Import button.
- Click the Browse button to choose a policy file that you want to import.
- In the opened window, specify the path to the KLP policy file, and then click the Open button. Note that you can select only one policy file.
The policy processing starts.
- After the policy is processed successfully, select the administration group to which you want to apply the policy.
- Click the Complete button to finish the policy import.
The notification with the import results appears. If the policy is imported successfully, you can click the Details link to view the policy properties.
After a successful import, the policy is displayed in the policy list. The settings and profiles of the policy are also imported. Regardless of the policy status that was selected during the export, the imported policy is inactive. You can change the policy status in the policy properties.
If the newly imported policy has a name identical to that of an existing policy, the name of the imported policy is expanded with the (<next sequence number>) index, for example: (1), (2).
Page topForced synchronization
Although Open Single Management Platform automatically synchronizes the status, settings, tasks, and policies for managed devices, in some cases the administrator must know for certain, at a given moment, whether synchronization has already been performed for a specified device.
Synchronizing a single device
To force synchronization between the Administration Server and a managed device:
- In the main menu, go to Assets (Devices) → Managed devices.
- Click the name of the device that you want to synchronize with the Administration Server.
A property window opens with the General section selected.
- Click the Force synchronization button.
The application synchronizes the selected device with the Administration Server.
Synchronizing multiple devices
To force synchronization between the Administration Server and multiple managed devices:
- Open the device list of an administration group or a device selection:
- In the main menu, go to Assets (Devices) → Managed devices, click the path link in the Current path field above the list of managed devices, then select the administration group that contains devices to synchronize.
- Run a device selection to view the device list.
- Select the check boxes next to the devices that you want to synchronize with the Administration Server.
- Above the list of managed devices, click the ellipsis button (
 ), and then click the Force synchronization button.
The application synchronizes the selected devices with the Administration Server.
- In the device list, check that the time of last connection to the Administration Server has changed, for the selected devices, to the current time. If the time has not changed, update the page content by clicking the Refresh button.
The selected devices are synchronized with the Administration Server.
Viewing the time of a policy delivery
After changing a policy for a Kaspersky application on the Administration Server, the administrator can check whether the changed policy has been delivered to a specific managed device. A policy can be delivered during a regular synchronization or a forced synchronization.
To view the date and time that an application policy was delivered to a managed device:
- In the main menu, go to Assets (Devices) → Managed devices.
- Click the name of the device that you want to synchronize with the Administration Server.
A property window opens with the General section selected.
- Click the Applications tab.
- Select the application for which you want to view the policy synchronization date.
The application policy window opens with the General section selected and the policy delivery date and time displayed.
Viewing the policy distribution status chart
In Open Single Management Platform, you can view the status of policy application on each device in a policy distribution status chart.
To view the policy distribution status on each device:
- In the main menu, go to Assets (Devices) → Policies & profiles.
- Select check box next to the name of the policy for which you want to view the distribution status on devices.
- In the menu that appears, select the Distribution link.
The <Policy name> distribution results window opens.
- In the <Policy name> distribution results window that opens, the Status description of the policy is displayed.
You can change number of results displayed in the list with policy distribution. The maximum number of devices is 100000.
To change the number of devices displayed in the list with policy distribution results:
- In the main menu, go to your account settings, and then select Interface options.
- In the Limit of devices displayed in policy distribution results, enter the number of devices (up to 100000).
By default, the number is 5000.
- Click Save.
The settings are saved and applied.
Deleting a policy
You can delete a policy if you do not need it anymore. You can delete only a policy that is not inherited in the specified administration group. If a policy is inherited, you can only delete it in the upper-level group for which it was created.
To delete a policy:
- In the main menu, go to Assets (Devices) → Policies & profiles.
- Select the check box next to the policy that you want to delete, and click Delete.
The Delete button becomes unavailable (dimmed) if you select an inherited policy.
- Click OK to confirm the operation.
The policy is deleted together with all its profiles.
Managing policy profiles
This section describes managing policy profiles and provides information about viewing the profiles of a policy, changing a policy profile priority, creating a policy profile, copying a policy profile, creating a policy profile activation rule, and deleting a policy profile.
Viewing the profiles of a policy
To view profiles of a policy:
- In the main menu, go to Assets (Devices) → Policies & profiles.
- Click the name of the policy whose profiles you want to view.
The policy properties window opens with the General tab selected.
- Open the Policy profiles tab.
The list of policy profiles appears in tabular format. If the policy does not have profiles, an empty table appears.
Changing a policy profile priority
To change a policy profile priority:
- Proceed to the list of profiles of a policy that you want.
The list of policy profiles appears.
- On the Policy profiles tab, select the check box next to the policy profile for which you want to change priority.
- Set a new position of the policy profile in the list by clicking Prioritize or Deprioritize.
The higher a policy profile is located in the list, the higher its priority.
- Click the Save button.
Priority of the selected policy profile is changed and applied.
Creating a policy profile
To create a policy profile:
- Proceed to the list of profiles of the policy that you want.
The list of policy profiles appears. If the policy does not have profiles, an empty table appears.
- Click Add.
- If you want, change the default name and default inheritance settings of the profile.
- Select the Application settings tab.
Alternatively, you can click Save and exit. The profile that you have created appears in the list of policy profiles, and you can edit its settings later.
- On the Application settings tab, in the left pane, select the category that you want and in the results pane on the right, edit the settings for the profile. You can edit policy profile settings in each category (section).
When editing the settings, you can click Cancel to cancel the last operation.
- Click Save to save the profile.
The profile will appear in the list of policy profiles.
Copying a policy profile
You can copy a policy profile to the current policy or to another, for example, if you want to have identical profiles for different policies. You can also use copying if you want to have two or more profiles that differ in only a small number of settings.
To copy a policy profile:
- Proceed to the list of profiles of a policy that you want.
The list of policy profiles appears. If the policy does not have profiles, an empty table appears.
- On the Policy profiles tab, select the policy profile that you want to copy.
- Click Copy.
- In the window that opens, select the policy to which you want to copy the profile.
You can copy a policy profile to the same policy or to a policy that you specify.
- Click Copy.
The policy profile is copied to the policy that you selected. The newly copied profile gets the lowest priority. If you copy the profile to the same policy, the name of the newly copied profile will be expanded with the () index, for example: (1), (2).
Later, you can change the settings of the profile, including its name and its priority; the original policy profile will not be changed in this case.
Creating a policy profile activation rule
To create a policy profile activation rule:
- Proceed to the list of profiles of a policy that you want.
The list of policy profiles appears.
- On the Policy profiles tab, click the policy profile for which you need to create an activation rule.
If the list of policy profiles is empty, you can create a policy profile.
- On the Activation rules tab, click the Add button.
The window with policy profile activation rules opens.
- Specify a name for the rule.
- Select the check boxes next to the conditions that must affect activation of the policy profile that you are creating:
- General rules for policy profile activation
For this option, specify at the next step:
- Rules for specific device owner
For this option, specify at the next step:
- Rules for hardware specifications
For this option, specify at the next step:
- Rules for role assignment
For this option, specify at the next step:
- Rules for tag usage
For this option, specify at the next step:
The number of additional pages of the wizard depends on the settings that you select at the first step. You can modify policy profile activation rules later.
- General rules for policy profile activation
- Check the list of the configured parameters. If the list is correct, click Create.
The profile will be saved. The profile will be activated on the device when activation rules are triggered.
Policy profile activation rules created for the profile are displayed in the policy profile properties on the Activation rules tab. You can modify or remove any policy profile activation rule.
Multiple activation rules can be triggered simultaneously.
Page topDeleting a policy profile
To delete a policy profile:
- Proceed to the list of profiles of a policy that you want.
The list of policy profiles appears.
- On the Policy profiles tab, select the check box next to the policy profile that you want to delete, and click Delete.
- In the window that opens, click Delete again.
The policy profile is deleted. If the policy is inherited by a lower-level group, the profile remains in that group, but becomes the policy profile of that group. This is done to eliminate significant change in settings of the managed applications installed on the devices of lower-level groups.
Network Agent policy settings
To configure the Network Agent policy:
- In the main menu, go to Assets (Devices) → Policies & profiles.
- Click the name of the Network Agent policy.
The properties window of the Network Agent policy opens. The properties window contains the tabs and settings described below.
Consider that for Linux and Windows-based devices, various settings are available.
General
On this tab, you can modify the policy name, policy status and specify the inheritance of policy settings:
- In the Policy status block, you can select one of the following policy modes:
- In the Settings inheritance settings group, you can configure the policy inheritance:
Event configuration
On this tab, you can configure event logging and event notification. Events are distributed according to importance level in the following sections:
- Functional failure
- Warning
- Info
In each section, the list shows the types of events and the default event storage period on the Administration Server (in days). After you click the event type, you can specify the settings of event logging and notifications about events selected in the list. By default, common notification settings specified for the entire Administration Server are used for all event types. However, you can change specific settings for the required event types.
For example, in the Warning section, you can configure the Security issue has occurred event type. Such events may happen, for instance, when the free disk space of a distribution point is less than 2 GB (at least 4 GB are required to install applications and download updates remotely). To configure the Security issue has occurred event, click it and specify where to store the occurred events and how to notify about them.
If Network Agent detected a security issue, you can manage this issue by using the settings of a managed device.
Application settings
Settings
In the Settings section, you can configure the Network Agent policy:
- Distribute files through distribution points only
- Maximum size of event queue, in MB
- Application is allowed to retrieve policy's extended data on device
- Protect the Network Agent service against unauthorized removal or termination, and prevent changes to the settings
- Use uninstallation password
Repositories
In the Repositories section, you can select the types of objects whose details will be sent from Network Agent to Administration Server. If modification of some settings in this section is prohibited by the Network Agent policy, you cannot modify these settings.
Connectivity
The Connectivity section includes three subsections:
- Network
- Connection profiles
- Connection schedule
In the Network subsection, you can configure the connection to Administration Server, enable the use of a UDP port, and specify the UDP port number.
- In the Connect to Administration Server settings group, you can configure connection to the Administration Server and specify the time interval for synchronization between client devices and the Administration Server:
- Use UDP port
- UDP port number
In the Connection profiles subsection, you can specify the network location settings and enable out-of-office mode when Administration Server is not available. The settings in the Connection profiles section are available only on devices running Windows:
- Network location settings
- Administration Server connection profiles
- Enable out-of-office mode when Administration Server is not available
In the Connection schedule subsection, you can specify the time intervals during which Network Agent sends data to the Administration Server:
Network polling by distribution points
In the Network polling by distribution points section, you can configure automatic polling of the network. You can use the following options to enable the polling and set its frequency:
Network settings for distribution points
In the Network settings for distribution points section, you can specify the internet access settings:
- Use proxy server
- Address
- Port number
- Bypass proxy server for local addresses
- Proxy server authentication
- User name
- Password
KSN Proxy (distribution points)
In the KSN Proxy (distribution points) section, you can configure the application to use the distribution point to forward Kaspersky Security Network (KSN) requests from the managed devices:
- Enable KSN Proxy on the distribution point side
- Forward KSN requests to Administration Server
- Access KSN Cloud/KPSN directly over the internet
- Port
- UDP port
Updates (distribution points)
In the Updates (distribution points) section, you can enable the downloading diff files feature, so distribution points take updates in the form of diff files from Kaspersky update servers.
Restart management
In the Restart management section, you can specify the action to be performed if the operating system of a managed device has to be restarted for correct use, installation, or uninstallation of an application. The settings in the Restart management section are available only on devices running Windows:
- Do not restart the operating system
- Restart the operating system automatically if necessary
- Prompt user for action
Usage of Network Agent for Windows, Linux, and macOS: Comparison
The Network Agent usage varies depending on the operating system of the device. The Network Agent policy and installation package settings also differ depending on the operating system. The table below compares Network Agent features and usage scenarios available for Windows, Linux, and macOS operating systems.
Network Agent feature comparison
Network Agent feature |
Windows |
Linux |
macOS |
|---|---|---|---|
Installation |
|||
Installing by cloning an image of the administrator's hard drive with the operating system and Network Agent using third-party tools |
|
|
|
Installing with third-party tools for remote installation of applications |
|
|
|
Installing manually, by running application installers on devices |
|
|
|
Installing Network Agent in silent mode |
|
|
|
Manually connecting a client device to the Administration Server. klmover utility |
|
|
|
Automatic installing of updates and patches for Open Single Management Platform components |
|
|
|
Automatic distributing of a key |
|
|
|
Forced synchronization |
|
|
|
Distribution point |
|||
Using as distribution point |
|
|
|
|
Without using Network Location Awareness (NLA). |
Without using Network Location Awareness (NLA). |
|
Offline model of update download |
|
|
|
Network polling |
|
|
|
Running KSN proxy service on a distribution point side |
|
|
|
Downloading updates via Kaspersky update servers to the distribution points repositories that distribute updates to managed devices |
|
|
(If one or more devices running Linux or macOS are within the scope of the Download updates to the repositories of distribution points task, the task completes with the Failed status, even if it has successfully completed on all Windows devices.) |
Push installation of applications |
|
Restricted: it is not possible to perform push installation on Windows devices by using Linux distribution points. |
Restricted: it is not possible to perform push installation on Windows devices by using macOS distribution points. |
Using as a push server |
|
|
|
Handling third-party applications |
|||
Remote installing of applications on devices |
|
|
|
Configuring operating system updates in a Network Agent policy |
|
|
|
Viewing information about software vulnerabilities |
|
|
|
Scanning applications for vulnerabilities |
|
|
|
Software updates |
|
|
|
Inventory of software installed on devices |
|
|
|
Virtual machines |
|||
Installing Network Agent on a virtual machine |
|
|
|
Optimization settings for virtual desktop infrastructure (VDI) |
|
|
|
Support of dynamic virtual machines |
|
|
|
Other |
|||
Auditing actions on a remote client device by using Windows Desktop Sharing |
|
|
|
Monitoring the anti-virus protection status |
|
|
|
Managing device restarts |
|
|
|
Support of file system rollback |
|
|
|
Using a Network Agent as connection gateway |
|
|
|
Connection Manager |
|
|
|
Network Agent switching from one Administration Server to another (automatically by network location) |
|
|
|
Checking the connection between a client device and the Administration Server. klnagchk utility |
|
|
|
Remotely connecting to the desktop of a client device |
|
|
By using the Virtual Network Computing (VNC) system. |
Downloading a stand-alone installation package through the Migration wizard |
|
|
|
Comparison of Network Agent settings by operating systems
The table below shows which Network Agent settings are available depending on the operating system of the managed device where Network Agent was installed.
Network Agent settings: comparison by operating systems
Settings section |
Windows |
Linux |
macOS |
|---|---|---|---|
General |
|
|
|
Event configuration |
|
|
|
Settings |
|
The following options are available:
|
|
Repositories |
|
The following options are available:
|
|
Connectivity → Network |
|
Except the Open Network Agent ports in Microsoft Windows Firewall option. |
|
Connectivity → Connection profiles |
|
|
|
Connectivity → Connection schedule |
|
|
|
Network polling by distribution points |
The following options are available:
|
The following options are available:
|
|
Network settings for distribution points |
|
|
|
KSN Proxy (distribution points) |
|
|
|
Updates (distribution points) |
|
|
|
Revision history |
|
|
|
Manual setup of the Kaspersky Endpoint Security policy
This section provides recommendations on how to configure the Kaspersky Endpoint Security policy. You can perform setup in the policy properties window. When you edit a setting, click the lock icon to the right of the relevant group of settings to apply the specified values to a workstation.
Configuring Kaspersky Security Network
Kaspersky Security Network (KSN) is the infrastructure of cloud services that contains information about the reputation of files, web resources, and software. Kaspersky Security Network enables Kaspersky Endpoint Security for Windows to respond faster to different kinds of threats, enhances the performance of the protection components, and decreases the likelihood of false positives. For more information about Kaspersky Security Network, see the Kaspersky Endpoint Security for Windows Help.
To specify recommended KSN settings:
- In the main menu, go to Assets (Devices) → Policies & profiles.
- Click the policy of Kaspersky Endpoint Security for Windows.
The properties window of the selected policy opens.
- In the policy properties, go to Application settings → Advanced Threat Protection → Kaspersky Security Network.
- Make sure that the Use KSN Proxy option is enabled. Using this option helps to redistribute and optimize traffic on the network.
If you use Managed Detection and ResponseKSN Proxy, you must enable option for the distribution point and enable extended KSN mode.
- Enable use of KSN servers if the KSN proxy service is not available. KSN servers may be located either on the side of Kaspersky (when KSN is used) or on the side of third parties (when KPSN is used).
- Click OK.
The recommended KSN settings are specified.
Checking the list of the networks protected by Firewall
Make sure that Kaspersky Endpoint Security for Windows Firewall protects all your networks. By default, Firewall protects networks with the following types of connection:
- Public network. Security applications, firewalls, or filters do not protect devices in such a network.
- Local network. Access to files and printers is restricted for devices in this network.
- Trusted network. Devices in such a network are protected from attacks and unauthorized access to files and data.
If you configured a custom network, make sure that Firewall protects it. For this purpose, check the list of the networks in the Kaspersky Endpoint Security for Windows policy properties. The list may not contain all the networks.
For more information about Firewall, see the Kaspersky Endpoint Security for Windows Help.
To check the list of networks:
- In the main menu, go to Assets (Devices) → Policies & profiles.
- Click the policy of Kaspersky Endpoint Security for Windows.
The properties window of the selected policy opens.
- In the policy properties, go to Application settings → Essential Threat Protection → Firewall.
- Under Available networks, click the Network settings link.
The Network connections window opens. This window displays the list of networks.
- If the list has a missing network, add it.
Disabling the scan of network devices
When Kaspersky Endpoint Security for Windows scans network drives, this can place a significant load on them. It is more convenient to perform indirect scanning on file servers.
You can disable scanning of network drives in the Kaspersky Endpoint Security for Windows policy properties. For a description of these policy properties, see the Kaspersky Endpoint Security for Windows Help.
To disable scanning of network drives:
- In the main menu, go to Assets (Devices) → Policies & profiles.
- Click the policy of Kaspersky Endpoint Security for Windows.
The properties window of the selected policy opens.
- In the policy properties, go to Application settings → Essential Threat Protection → File Threat Protection.
- Under Protection scope, disable the All network drives option.
- Click OK.
Scanning of network drives is disabled.
Excluding software details from the Administration Server memory
We recommend that Administration Server does not save information about software modules that are started on the network devices. As a result, the Administration Server memory does not overrun.
You can disable saving this information in the Kaspersky Endpoint Security for Windows policy properties.
To disable saving information about installed software modules:
- In the main menu, go to Assets (Devices) → Policies & profiles.
- Click the policy of Kaspersky Endpoint Security for Windows.
The properties window of the selected policy opens.
- In the policy properties, go to Application settings → General Settings → Reports and Storage.
- Under Data transfer to Administration Server, disable the About started applications check box if it is still enabled in the top-level policy.
When this check box is selected, the Administration Server database saves information about all versions of all software modules on the networked devices. This information may require a significant amount of disk space in the Open Single Management Platform database (dozens of gigabytes).
The information about installed software modules is no longer saved to the Administration Server database.
Configuring access to the Kaspersky Endpoint Security for Windows interface on workstations
If the threat protection on the organization's network must be managed in centralized mode through Open Single Management Platform, specify the interface settings in the Kaspersky Endpoint Security for Windows policy properties, as described below. As a result, you will prevent unauthorized access to Kaspersky Endpoint Security for Windows on workstations and the changing of Kaspersky Endpoint Security for Windows settings.
For a description of these policy properties, see the Kaspersky Endpoint Security for Windows Help.
To specify recommended interface settings:
- In the main menu, go to Assets (Devices) → Policies & profiles.
- Click the policy of Kaspersky Endpoint Security for Windows.
The properties window of the selected policy opens.
- In the policy properties, go to Application settings → General Settings → Interface.
- Under Interaction with user, select the No interface option. This disables the display of the Kaspersky Endpoint Security for Windows user interface on workstations, so their users cannot change the settings of Kaspersky Endpoint Security for Windows.
- Under Password protection, enable the toggle switch. This reduces the risk of unauthorized or unintended changes in the settings of Kaspersky Endpoint Security for Windows on workstations.
The recommended settings for the interface of Kaspersky Endpoint Security for Windows are specified.
Saving important policy events in the Administration Server database
To avoid the Administration Server database overflow, we recommend that you save only important events to the database.
To configure registration of important events in the Administration Server database:
- In the main menu, go to Assets (Devices) → Policies & profiles.
- Click the policy of Kaspersky Endpoint Security for Windows.
The properties window of the selected policy opens.
- In the policy properties, open the Event configuration tab.
- In the Critical section, click Add event and select check boxes next to the following events only:
- End User License Agreement violated
- Application autorun is disabled
- Activation error
- Active threat detected. Advanced Disinfection should be started
- Disinfection impossible
- Previously opened dangerous link detected
- Process terminated
- Network activity blocked
- Network attack detected
- Application startup prohibited
- Access denied (local bases)
- Access denied (KSN)
- Local update error
- Cannot start two tasks at the same time
- Error in interaction with Kaspersky Security Center
- Not all components were updated
- Error applying file encryption / decryption rules
- Error enabling portable mode
- Error disabling portable mode
- Could not load encryption module
- Policy cannot be applied
- Error changing application components
- Click OK.
- In the Functional failure section, click Add event and select check box next to the event Invalid task settings. Settings not applied.
- Click OK.
- In the Warning section, click Add event and select check boxes next to the following events only:
- Self-Defense is disabled
- Protection components are disabled
- Incorrect reserve key
- Legitimate software that can be used by intruders to damage your computer or personal data was detected (local bases)
- Legitimate software that can be used by intruders to damage your computer or personal data was detected (KSN)
- Object deleted
- Object disinfected
- User has opted out of the encryption policy
- File was restored from quarantine on the Kaspersky Anti Targeted Attack Platform server by the administrator
- File was quarantined on the Kaspersky Anti Targeted Attack Platform server by administrator
- Application startup blockage message to administrator
- Device access blockage message to administrator
- Web page access blockage message to administrator
- Click OK.
- In the Info section, click Add event and select check boxes next to the following events only:
- A backup copy of the object was created
- Application startup prohibited in test mode
- Click OK.
Registration of important events in the Administration Server database is configured.
Manual setup of the group update task for Kaspersky Endpoint Security
The optimal and recommended schedule option for Kaspersky Endpoint Security is When new updates are downloaded to the repository when the Use automatically randomized delay for task starts check box is selected.
Kaspersky Security Network (KSN)
This section describes how to use an online service infrastructure named Kaspersky Security Network (KSN). The section provides the details on KSN, as well as instructions on how to enable KSN, configure access to KSN, and view the statistics of the use of KSN proxy server.
Updates functionality (including providing anti-virus signature updates and codebase updates), as well as KSN functionality may not be available in the software in the U.S.
About KSN
Kaspersky Security Network (KSN) is an online service infrastructure that provides access to the online Knowledge Base of Kaspersky, which contains information about the reputation of files, web resources, and software. The use of data from Kaspersky Security Network ensures faster responses by Kaspersky applications to threats, improves the effectiveness of some protection components, and reduces the risk of false positives. KSN allows you to use Kaspersky reputation databases to retrieve information about applications installed on managed devices.
By participating in KSN, you agree to send to Kaspersky in automatic mode information about the operation of Kaspersky applications installed on client devices that are managed through Open Single Management Platform. Information is transferred in accordance with the current KSN access settings.
Open Single Management Platform supports the following KSN infrastructure solutions:
- Global KSN is a solution that allows you to exchange information with Kaspersky Security Network. If you participate in KSN, you agree to send to Kaspersky, in automatic mode, information about the operation of Kaspersky applications installed on client devices that are managed through Open Single Management Platform. Information is transferred in accordance with the current KSN access settings. Kaspersky analysts additionally analyze received information and include it in the reputation and statistical databases of Kaspersky Security Network. Open Single Management Platform uses this solution by default.
- Kaspersky Private Security Network (KPSN) is a solution that allows users of devices with Kaspersky applications installed to obtain access to reputation databases of Kaspersky Security Network, and other statistical data, without sending data to KSN from their own computers. KPSN is designed for corporate customers who are unable to participate in Kaspersky Security Network for any of the following reasons:
- User devices are not connected to the internet.
- Transmission of any data outside the country or outside the corporate LAN is prohibited by law or restricted by corporate security policies.
You can set up access settings of Kaspersky Private Security Network in the KSN Proxy settings section of the Administration Server properties window.
You can start or stop using KSN at any moment.
You use KSN in accordance with the KSN Statement that you read and accept when you enable KSN. If the KSN Statement is updated, it is displayed to you when you update or upgrade Administration Server. You can accept the updated KSN Statement or decline it. If you decline it, you keep using KSN in accordance with the previous version of KSN Statement that you accepted before.
When KSN is enabled, Open Single Management Platform checks if the KSN servers are accessible. If access to the servers using system DNS is not possible, the application uses public DNS servers. This is necessary to make sure the level of security is maintained for the managed devices.
Client devices managed by the Administration Server interact with KSN through KSN proxy server. KSN proxy server provides the following features:
- Client devices can send requests to KSN and transfer information to KSN even if they do not have direct access to the internet.
- The KSN proxy server caches processed data, thus reducing the load on the outbound channel and the time period spent for waiting for information requested by a client device.
You can configure the KSN proxy server in the KSN Proxy settings section of the Administration Server properties window.
Page topSetting up access to KSN
You can set up access to Kaspersky Security Network (KSN) on the Administration Server and on a distribution point.
To set up Administration Server access to KSN:
- In the main menu, click the settings icon (
 ) next to the name of the required Administration Server.
 The Administration Server properties window opens.
- On the General tab, select the KSN Proxy settings section.
- Switch the toggle button to the Enable KSN Proxy on Administration Server Enabled position.
Data is sent from client devices to KSN in accordance with the Kaspersky Endpoint Security policy, which is active on those client devices. If this check box is cleared, no data will be sent to KSN from the Administration Server and client devices through Open Single Management Platform. However, client devices can send data to KSN directly (bypassing Open Single Management Platform), in accordance with their respective settings. The Kaspersky Endpoint Security policy, which is active on client devices, determines which data will be sent directly (bypassing Open Single Management Platform) from those devices to KSN.
- Switch the toggle button to the Use Kaspersky Security Network Enabled position.
If this option is enabled, client devices send patch installation results to Kaspersky. When enabling this option, make sure to read and accept the terms of the KSN Statement.
If you are using
, switch the toggle button to the Use Kaspersky Private Security Network Enabled position and click the Select file with KSN Proxy settings button to download the settings of KPSN (files with the extensions pkcs7 and pem). After the settings are downloaded, the interface displays the provider's name and contacts, as well as the creation date of the file with the settings of KPSN.When you switch the toggle button to the Use Kaspersky Private Security Network Enabled position, a message appears with details about KPSN.
The following Kaspersky applications support KPSN:
- Open Single Management Platform
- Kaspersky Endpoint Security for Linux
- Kaspersky Endpoint Security for Windows
If you enable KPSN in Open Single Management Platform, these applications receive information about supporting KPSN. In the settings window of the application, in the Kaspersky Security Network subsection of the Advanced Threat Protection section, the information about selected KSN provider is displayed — KSN or KPSN.
Open Single Management Platform does not send any statistical data to Kaspersky Security Network if KPSN is configured in the KSN Proxy settings section of the Administration Server properties window.
- If you have the proxy server settings configured in the Administration Server properties, but your network architecture requires that you use KPSN directly, enable the Ignore proxy server settings when connecting to KPSN option. Otherwise, requests from the managed applications cannot reach KPSN.
- Under Connection settings, configure the Administration Server connection to the KSN proxy service:
- The TCP port 13111 is used for connecting to the KSN proxy server. For the root Administration Server, this port number cannot be changed.
- If you want the Administration Server to connect to the KSN proxy server through a UDP port, enable the Use UDP port option. By default, this option is disabled, and TCP port is used. If this option is enabled, the UDP port 15111 is used by default. For the root Administration Server, this port number cannot be changed.
- Switch the toggle button to the Connect secondary Administration Servers to KSN through primary Administration Server Enabled position.
If this option is enabled, secondary Administration Servers use the primary Administration Server as the KSN proxy server. If this option is disabled, secondary Administration Servers connect to KSN on their own. In this case, managed devices use secondary Administration Servers as KSN proxy servers.
Secondary Administration Servers use the primary Administration Server as a proxy server if in the right pane of the KSN Proxy settings section, in the properties of secondary Administration Servers the toggle button is switched to the Enable KSN Proxy on Administration Server Enabled position.
- Click the Save button.
The KSN access settings will be saved.
You can also set up distribution point access to KSN, for example, if you want to reduce the load on the Administration Server. The distribution point that acts as a KSN proxy server sends KSN requests from managed devices to Kaspersky directly, without using the Administration Server.
To set up distribution point access to Kaspersky Security Network (KSN):
- Make sure that the distribution point is assigned manually.
- In the main menu, click the settings icon () next to the name of the required Administration Server.
The Administration Server properties window opens.
- On the General tab, select the Distribution points section.
- Click the name of the distribution point to open its properties window.
- In the distribution point properties window, in the KSN Proxy section, enable the Enable KSN Proxy on the distribution point side option, and then enable the Access KSN Cloud/KPSN directly over the internet option.
- Click OK.
The distribution point will act as a KSN proxy server.
Please note that the distribution point does not support managed device authentication by using the NTLM protocol.
Page topEnabling and disabling the usage of KSN
To enable the usage of KSN:
- In the main menu, click the settings icon () next to the name of the required Administration Server.
The Administration Server properties window opens.
- On the General tab, select the KSN Proxy settings section.
- Switch the toggle button to the Enable KSN Proxy on Administration Server Enabled position.
The KSN proxy server is enabled and sends data to KSN to increase the efficiency of Kaspersky Security Center components and improve the performance of Kaspersky applications.
- Depending on the KSN infrastructure solution that you are using, enable the corresponding toggle buttons.
- If you are using Global KSN, switch the toggle button to the Use Kaspersky Security Network Enabled position.
Sending data to KSN is now available. When enabling this option, you have to read and accept the terms of the KSN Statement.
- If you are using KPSN, switch the toggle button to the Use Kaspersky Private Security Network Enabled position, and then click the Select file with KSN Proxy settings button to download the settings of KPSN (files with the extensions pkcs7 and pem). After the settings are downloaded, the interface displays the provider's name and contacts, as well as the creation date of the file with the settings of KPSN.
When you switch the toggle button to the Use Kaspersky Private Security Network Enabled position, a message appears with details about KPSN.
- If you are using Global KSN, switch the toggle button to the Use Kaspersky Security Network Enabled position.
- Click the Save button.
To disable the usage of KSN:
- In the main menu, click the settings icon () next to the name of the required Administration Server.
The Administration Server properties window opens.
- On the General tab, select the KSN Proxy settings section.
- Switch the toggle button to the Enable KSN Proxy on Administration Server Disabled position to disable the KSN proxy service.
- Click the Save button.
Viewing the accepted KSN Statement
When you enable Kaspersky Security Network (KSN), you must read and accept the KSN Statement. You can view the accepted KSN Statement at any time.
To view the accepted KSN Statement:
- In the main menu, click the settings icon () next to the name of the required Administration Server.
The Administration Server properties window opens.
- On the General tab, select the KSN Proxy settings section.
- Click the View Kaspersky Security Network Statement link.
In the window that opens, you can view the text of the accepted KSN Statement.
Page topAccepting an updated KSN Statement
You use KSN in accordance with the KSN Statement that you read and accept when you enable KSN. If the KSN Statement is updated, it is displayed to you when you upgrade a version of Administration Server. You can accept the updated KSN Statement or decline it. If you decline it, you will continue using KSN in accordance with the version of the KSN Statement that you previously accepted.
After upgrading a version of Administration Server, the updated KSN Statement is displayed automatically. If you decline the updated KSN Statement, you can still view and accept it later.
To view and then accept or decline an updated KSN Statement:
- Click the View notifications link in the upper-right corner of the main application window.
The Notifications window opens.
- Click the View the updated KSN Statement link.
The Kaspersky Security Network Statement update window opens.
- Read the KSN Statement, and then make your decision by clicking one of the following buttons:
- I accept the updated KSN Statement
- Use KSN under the old Statement
Depending on your choice, KSN keeps working in accordance with the terms of the current or updated KSN Statement. You can view the text of the accepted KSN Statement in the properties of Administration Server at any time.
Page topChecking whether the distribution point works as KSN proxy server
On a managed device assigned to work as a distribution point, you can enable Kaspersky Security Network (KSN) Proxy. A managed device works as the KSN proxy server when the ksnproxy service is running on the device. You can check, turn on, or turn off this service on the device locally.
You can assign a Windows-based or a Linux-based device as a distribution point. The method of distribution point checking depends on the operating system of this distribution point.
To check whether the Linux-based distribution point works as KSN proxy server:
- On the distribution point device, run the
ps auxcommand to display the list of running processes. - In the list of running processes, check whether the
/opt/kaspersky/klnagent64/sbin/ksnproxyprocess is running.
If /opt/kaspersky/klnagent64/sbin/ksnproxy process is running, then Network Agent on the device participates in Kaspersky Security Network and works as the KSN proxy server for the managed devices included in the scope of the distribution point.
To check whether the Windows-based distribution point works as KSN proxy server:
- On the distribution point device, in Windows, open Services (All Programs → Administrative Tools → Services).
- In the list of services, check whether the ksnproxy service is running.
If the ksnproxy service is running, then Network Agent on the device participates in Kaspersky Security Network and works as KSN proxy server for the managed devices included in the scope of the distribution point.
If you want, you may turn off the ksnproxy service. In this case, Network Agent on the distribution point stops participating in Kaspersky Security Network. This requires local administrator rights.
Page topAbout tasks
Open Single Management Platform manages Kaspersky security applications installed on devices by creating and running tasks. Tasks are required for installing, launching, and stopping applications, scanning files, updating databases and software modules, and performing other actions on applications.
Tasks for a specific application can be created using OSMP Console only if the management plug-in for that application is installed on OSMP Console Server.
Tasks can be performed on the Administration Server and on devices.
The tasks that are performed on the Administration Server include the following:
- Automatic distribution of reports
- Downloading of updates to the repository
- Backup of Administration Server data
- Maintenance of the database
The following types of tasks are performed on devices:
- Local tasks—Tasks that are performed on a specific device
Local tasks can be modified either by the administrator, using OSMP Console, or by the user of a remote device (for example, through the security application interface). If a local task has been modified simultaneously by the administrator and the user of a managed device, the changes made by the administrator will take effect because they have a higher priority.
- Group tasks—Tasks that are performed on all devices of a specific group
Unless otherwise specified in the task properties, a group task also affects all subgroups of the selected group. A group task also affects (optionally) devices that have been connected to secondary and virtual Administration Servers deployed in the group or any of its subgroups.
- Global tasks—Tasks that are performed on a set of devices, regardless of whether they are included in any group.
For each application, you can create any number of group tasks, global tasks, or local tasks.
You can make changes to the settings of tasks, view the progress of tasks, and copy, export, import, and delete tasks.
A task is started on a device only if the application for which the task was created is running.
Execution results of tasks are saved in the operating system event log on each device, in the operating system event log on the Administration Server, and in the Administration Server database.
Do not include private data in task settings. For example, avoid specifying the domain administrator password.
Page topAbout task scope
The scope of a task is the set of devices on which the task is performed. The types of scope are as follows:
- For a local task, the scope is the device itself.
- For an Administration Server task, the scope is the Administration Server.
- For a group task, the scope is the list of devices included in the group.
When creating a global task, you can use the following methods to specify its scope:
- Specifying certain devices manually.
You can use an IP address (or IP range) or DNS name as the device address.
- Importing a list of devices from a .txt file with the device addresses to be added (each address must be placed on an individual line).
If you import a list of devices from a file or create a list manually, and if devices are identified by their names, the list can only contain devices for which information has already been entered into the Administration Server database. Moreover, the information must have been entered when those devices were connected or during device discovery.
- Specifying a device selection.
Over time, the scope of a task changes as the set of devices included in the selection change. A selection of devices can be made on the basis of device attributes, including software installed on a device, and on the basis of tags assigned to devices. Device selection is the most flexible way to specify the scope of a task.
Tasks for device selections are always run on a schedule by the Administration Server. These tasks cannot be run on devices that lack connection to the Administration Server. Tasks whose scope is specified by using other methods are run directly on devices and therefore do not depend on the device connection to the Administration Server.
Tasks for device selections are not run on the local time of a device; instead, they are run on the local time of the Administration Server. Tasks whose scope is specified by using other methods are run on the local time of a device.
Creating a task
To create a task:
- In the main menu, go to Assets (Devices) → Tasks.
- Click Add.
The New task wizard starts. Follow its instructions.
- If you want to modify the default task settings, enable the Open task details when creation is complete option on the Finish task creation page. If you do not enable this option, the task is created with the default settings. You can modify the default settings later, at any time.
- Click the Finish button.
The task is created and displayed in the list of tasks.
To create a new task assigned to the selected devices:
- In the main menu, go to Assets (Devices) → Managed devices.
The list of managed devices is displayed.
- In the list of managed devices, select check boxes next to the devices to run the task for them. You can use the search and filter functions to find the devices you're looking for.
- Click the Run task button, and then select Add a new task.
The New task wizard starts.
On the first step of the wizard, you can remove the devices selected to include in the task scope. Follow the wizard instructions.
- Click the Finish button.
The task is created for the selected devices.
Starting a task manually
The application starts tasks according to the schedule settings specified in the properties of each task. You can start a task manually at any time from the task list. Alternatively, you can select devices in the Managed devices list, and then start an existing task for them.
To start a task manually:
- In the main menu, go to Assets (Devices) → Tasks.
- In the task list, select the check box next to the task that you want to start.
- Click the Start button.
The task starts. You can check the task status in the Status column or by clicking the Result button.
Starting a task for selected devices
You can select one or more client devices in the list of devices, and then launch a previously created task for them. This allows you to run tasks created earlier for a specific set of devices.
This changes the devices to which the task was assigned to the list of devices that you select when you run the task.
To start a task for selected devices:
- In the main menu, go to Assets (Devices) → Managed devices. The list of managed devices is displayed.
- In the list of managed devices, use the check boxes to select the devices to run the task for them. You can use the search and filter functions to find the devices you're looking for.
- Click the Run task button, and then select Apply existing task.
The list of the existing tasks is displayed. - The selected devices are displayed above the task list. If necessary, you can remove a device from this list. You can delete all but one device.
- Select the desired task in the list. You can use the search box above the list to search for the desired task by name. Only one task can be selected.
- Click Save and start task.
The selected task is immediately started for the selected devices. The scheduled start settings in the task are not changed.
Page topViewing the task list
You can view the list of tasks that are created in Open Single Management Platform.
To view the list of tasks,
In the main menu, go to Assets (Devices) → Tasks.
The list of tasks is displayed. The tasks are grouped by the names of applications to which they are related. For example, the Install application remotely task is related to the Administration Server, and the Update task refers to Kaspersky Endpoint Security.
To view properties of a task,
Click the name of the task.
The task properties window is displayed with several named tabs. For example, the Task type is displayed on the General tab, and the task schedule—on the Schedule tab.
Page topGeneral task settings
This section contains the settings that you can view and configure for most of your tasks. The list of settings available depends on the task you are configuring.
Settings specified during task creation
You can specify the following settings when creating a task. Some of these settings can also be modified in the properties of the created task.
- Operating system restart settings:
- Task scheduling settings:
- Devices to which the task will be assigned:
- Account settings:
Settings specified after task creation
You can specify the following settings only after a task is created.
- Group task settings:
- Advanced scheduling settings:
- Notification settings:
- Store task history block:
- Notify administrator of task execution results
- Notify of errors only
- Security settings.
- Task scope settings.
Depending on how the task scope is determined, the following settings are present:
- Revision history.
Exporting a task
Open Single Management Platform allows you to save a task and its settings to a KLT file. You can use this KLT file to import the saved task both to Kaspersky Security Center Windows and Kaspersky Security Center Linux.
To export a task:
- In the main menu, go to Assets (Devices) → Tasks.
- Select the check box next to the task that you want to export.
You cannot export multiple tasks at the same time. If you select more than one task, the Export button will be disabled. Administration Server tasks are also unavailable for export.
- Click the Export button.
- In the opened Save as window, specify the task file name and path. Click the Save button.
The Save as window is displayed only if you use Google Chrome, Microsoft Edge, or Opera. If you use another browser, the task file is automatically saved in the Downloads folder.
Importing a task
Open Single Management Platform allows you to import a task from a KLT file. The KLT file contains the exported task and its settings.
To import a task:
- In the main menu, go to Assets (Devices) → Tasks.
- Click the Import button.
- Click the Browse button to choose a task file that you want to import.
- In the opened window, specify the path to the KLT task file, and then click the Open button. Note that you can select only one task file.
The task processing starts.
- After the task is processed successfully, select the devices to which you want to assign the task. To do this, select one of the following options:
- Specify the task scope.
- Click the Complete button to finish the task import.
The notification with the import results appears. If the task is imported successfully, you can click the Details link to view the task properties.
After a successful import, the task is displayed in the task list. The task settings and schedule are also imported. The task will be started according to its schedule.
If the newly imported task has an identical name to an existing task, the name of the imported task is expanded with the (<next sequence number>) index, for example: (1), (2).
Page topStarting the Change tasks password wizard
For a non-local task, you can specify an account under which the task must be run. You can specify the account during task creation or in the properties of an existing task. If the specified account is used in accordance with security instructions of the organization, these instructions might require changing the account password from time to time. When the account password expires and you set a new one, the tasks will not start until you specify the new valid password in the task properties.
The Change tasks password wizard enables you to automatically replace the old password with the new one in all tasks in which the account is specified. Alternatively, you can change this password manually in the properties of each task.
To start the Change tasks password wizard:
- In the main menu, go to Assets (Devices) → Tasks.
- Click Manage credentials of accounts for starting tasks.
Follow the instructions of the wizard.
Step 1. Specifying credentials
Specify new credentials that are currently valid in your system. When you switch to the next step of the wizard, Open Single Management Platform checks if the specified account name matches the account name in the properties of each non-local task. If the account names match, the password in the task properties will be automatically replaced with the new one.
To specify the new account, select an option:
If you fill in the Previous password (optional; if you want to replace it with the current one) field, Open Single Management Platform replaces the password only for those tasks in which both the account name and the old password are found. The replacement is performed automatically. In all other cases you have to choose an action to take in the next step of the wizard.
Step 2. Selecting an action to take
If you did not specify the previous password in the first step of the wizard or if the specified old password has not matched the passwords in the task properties, you must choose an action to take for the tasks found.
To choose an action for a task:
- Select the check box next to the task for which you want to choose an action.
- Perform one of the following:
- To remove the password in the task properties, click Delete credentials.
The task is switched to run under the default account.
- To replace the password with a new one, click Enforce the password change even if the old password is wrong or not provided.
- To cancel the password change, click No action is selected.
- To remove the password in the task properties, click Delete credentials.
The chosen actions are applied after you move to the next step of the wizard.
Step 3. Viewing the results
On the last step of the wizard, view the results for each of the found tasks. To complete the wizard, click the Finish button.
Viewing task run results stored on the Administration Server
Open Single Management Platform allows you to view the results for group tasks, tasks for specific devices, and Administration Server tasks. No run results can be viewed for local tasks.
To view the task results:
- In the task properties window, select the General section.
- Click the Results link to open the Task results window.
Manual setup of the group task for scanning a device with Kaspersky Endpoint Security
The quick start wizard creates a group task for scanning a device. If the automatically specified schedule of the group scanning task is not appropriate for your organization, you must manually set up the most convenient schedule for this task based on the workplace rules adopted in the organization.
For example, the task is assigned a Run on Fridays at 7:00 PM schedule with automatic randomization, and the Run missed tasks check box is cleared. This means that if the devices in the organization are shut down on Fridays, for example, at 6:30 PM, the device scan task will never run. In this case you need to set up the group scanning task manually.
General task settings
This section contains the settings that you can view and configure for most of your tasks. The list of settings available depends on the task you are configuring.
Settings specified during task creation
You can specify the following settings when creating a task. Some of these settings can also be modified in the properties of the created task.
- Operating system restart settings:
- Task scheduling settings:
- Devices to which the task will be assigned:
- Account settings:
Settings specified after task creation
You can specify the following settings only after a task is created.
- Group task settings:
- Advanced scheduling settings:
- Notification settings:
- Store task history block:
- Notify administrator of task execution results
- Notify of errors only
- Security settings.
- Task scope settings.
Depending on how the task scope is determined, the following settings are present:
- Revision history.
Application tags
Open Single Management Platform enables you to tag the applications from applications registry. A tag is the label of an application that can be used for grouping or finding applications. A tag assigned to applications can serve as a condition in device selections.
For example, you can create the [Browsers] tag and assign it to all browsers such as Microsoft Internet Explorer, Google Chrome, Mozilla Firefox.
Creating an application tag
To create an application tag:
- In the main menu, go to Operations → Third-party applications → Application tags.
- Click Add.
A new tag window opens.
- Enter the tag name.
- Click OK to save the changes.
The new tag appears in the list of application tags.
Renaming an application tag
To rename an application tag:
- In the main menu, go to Operations → Third-party applications → Application tags.
- Select the check box next to the tag that you want to rename, and then click Edit.
A tag properties window opens.
- Change the tag name.
- Click OK to save the changes.
The updated tag appears in the list of application tags.
Assigning tags to an application
To assign one or several tags to an application:
- In the main menu, go to Operations → Third-party applications → Applications registry.
- Click the name of the application to which you want to assign tags.
- Select the Tags tab.
The tab displays all application tags that exist on the Administration Server. For tags assigned to the selected application, the check box in the Tag assigned column is selected.
- For tags that you want to assign, select check boxes in the Tag assigned column.
- Click Save to save the changes.
The tags are assigned to the application.
Removing assigned tags from an application
To remove one or several tags from an application:
- In the main menu, go to Operations → Third-party applications → Applications registry.
- Click the name of the application from which you want to remove tags.
- Select the Tags tab.
The tab displays all application tags that exist on the Administration Server. For tags assigned to the selected application, the check box in the Tag assigned column is selected.
- For tags that you want to remove, clear check boxes in the Tag assigned column.
- Click Save to save the changes.
The tags are removed from the application.
The removed application tags are not deleted. If you want, you can delete them manually.
Deleting an application tag
To delete an application tag:
- In the main menu, go to Operations → Third-party applications → Application tags.
- In the list, select the application tag that you want to delete.
- Click the Delete button.
- In the window that opens, click OK.
The application tag is deleted. The deleted tag is automatically removed from all of the applications to which it was assigned.
Granting offline access to the external device blocked by Device Control
In Device Control component of the Kaspersky Endpoint Security policy, you can manage user access to external devices that are installed on or connected to the client device (for example, hard drives, cameras, or Wi-Fi modules). This lets you protect the client device from infection when such external devices are connected, and prevent loss or leaks of data.
If you need to grant temporary access to the external device blocked by Device Control, but it is not possible to add the device to the list of trusted devices, you can grant temporary offline access to the external device. Offline access means that the client device has no access to the network.
You can grant offline access to the external device blocked by Device Control only if the Allow request for temporary access option is enabled in the settings of the Kaspersky Endpoint Security policy, in the Application settings → Security Controls → Device Control section.
Granting offline access to the external device blocked by Device Control includes the following stages:
- In the Kaspersky Endpoint Security dialog window, device user who wants to have access to the blocked external device, generates a request access file and sends it to the Open Single Management Platform administrator.
- Getting this request, the Open Single Management Platform administrator creates an access key file and send it to the device user.
- In the Kaspersky Endpoint Security dialog window, the device user activates the access key file and obtains temporary access to the external device.
To grant temporary access to the external device blocked by Device Control:
- In the main menu, go to Assets (Devices) → Managed devices.
The list of managed devices is displayed.
- In this list, select the user's device that requests access to the external device blocked by Device Control.
You can select only one device.
- Above the list of managed devices, click the ellipsis button (), and then click the Grant access to the device in offline mode button.
- In the Application settings window that opens, in the Device Control section, click the Browse button.
- Select the request access file that you have received from the user, and then click the Open button. The file should have the AKEY format.
The details of the locked device to which the user has requested access is displayed.
- Specify the value of the Access duration setting.
This setting defines the length of time for which you grant the user access to the locked device. The default value is the value that was specified by the user when creating the request access file.
- Specify the value of the Activation period setting.
This setting defines the time period during which the user can activate access to the blocked device by using the provided access key.
- Click the Save button.
- In the window that opens, select the destination folder in which you want to save the file containing the access key for the blocked device.
- Click the Save button.
As a result, when you send the user the access key file and the user activates it in the Kaspersky Endpoint Security dialog window, the user has temporary access to the blocked device for the specific period.
Registering Kaspersky Industrial CyberSecurity for Networks application in OSMP Console
To start working with the Kaspersky Industrial CyberSecurity for Networks application via OSMP Console, you must first register it in OSMP Console.
To register the Kaspersky Industrial CyberSecurity for Networks application:
- Make sure that the following is done:
- You have downloaded and installed the Kaspersky Industrial CyberSecurity for Networks web plug-in.
You can do it later while waiting for the Kaspersky Industrial CyberSecurity for Networks Server to synchronize with the Administration Server. After the plug-in is downloaded and installed, the KICS for Networks section is displayed in the OSMP Console main menu.
- In the Kaspersky Industrial CyberSecurity for Networks web interface, interaction with Open Single Management Platform is configured and enabled. For details, refer to the Kaspersky Industrial CyberSecurity for Networks Online Help.
- You have downloaded and installed the Kaspersky Industrial CyberSecurity for Networks web plug-in.
- Move the device where Kaspersky Industrial CyberSecurity for Networks Server is installed from the Unassigned devices group to the Managed devices group:
- In the main menu, go to Discovery & deployment → Unassigned devices.
- Select the check box next to the device where the Kaspersky Industrial CyberSecurity for Networks Server is installed.
- Click the Move to group button.
- In the hierarchy of administration groups, select the check box next to the Managed devices group.
- Click the Move button.
- Open the properties window of the device where the Kaspersky Industrial CyberSecurity for Networks Server is installed.
- On the device properties page, in the General section, select the Do not disconnect from the Administration Server option, and then click the Save button.
- On the device properties page, select the Applications section.
- In the Applications section, select Kaspersky Security Center Network Agent.
- If the current status of the application is Stopped, wait until it changes to Running.
This may take up to 15 minutes. If you have not yet installed the Kaspersky Industrial CyberSecurity for Networks web plug-in, you can do it now.
- If you want to view the statistics of Kaspersky Industrial CyberSecurity for Networks, you may add widgets on the dashboard. To add the widgets, do the following:
- In the main menu, go to Monitoring & Reporting → Dashboard.
- On the dashboard, click the Add or restore web widget button.
- In the widget menu that opens, select Other.
- Select the widgets that you want to add:
- KICS for Networks deployment map
- Information about KICS for Networks Servers
- Up-to-date events of KICS for Networks
- Devices with issues in KICS for Networks
- Critical events in KICS for Networks
- Statuses in KICS for Networks
- To proceed to the Kaspersky Industrial CyberSecurity for Networks web interface, do the following:
- In the main menu, go to KICS for Networks → Search.
- Click the Find events or devices button.
- In the Query parameters window that opens, click the Server field.
- Select the Kaspersky Industrial CyberSecurity for Networks Server from the drop-down list of servers that are integrated with Open Single Management Platform, and then click the Find button.
- Click the Go to Server link next to the name of the Kaspersky Industrial CyberSecurity for Networks Server.
The Kaspersky Industrial CyberSecurity for Networks sign-in page is displayed.
To log in to the Kaspersky Industrial CyberSecurity for Networks web interface, you need to provide the application user account credentials.