Contents
- Configuring Kaspersky Thin Client
- Scenario: Quick Start for administrators
- Scenario: Migrating management of Kaspersky Thin Client to a new Kaspersky Security Center Server
- Scenario: Switching Kaspersky Thin Client to trusted mode
- Configuring general settings
- Configuring network settings
- Configuring settings for connecting Kaspersky Thin Client to Kaspersky Security Center
- Changing settings for connecting Kaspersky Thin Client to Kaspersky Security Center
- Managing Kaspersky Thin Client certificates
- Configuring RDP connection settings
- Configuring settings for connecting to Basis.WorkPlace remote desktops
- Managing power-saving mode
- Configuring monitors layout
- Managing access to Kaspersky Thin Client settings
- Configuring the date and time
- Resetting Kaspersky Thin Client settings
Configuring Kaspersky Thin Client
This section describes how to configure Kaspersky Thin Client.
Scenario: Quick Start for administrators
This section describes the sequence of steps that must be performed by the administrator to install and configure Kaspersky Thin Client and Kaspersky Security Center, and to establish a connection between them.
The scenario for installing Kaspersky Thin Client and Kaspersky Security Center and configuring a connection between them consists of the following steps:
- Installing Kaspersky Security Center
Download the Kaspersky Security Center distribution package and install the full version of Kaspersky Security Center on the server. The distribution package for the full version of Kaspersky Security Center includes the Kaspersky Security Center Web Console. We recommend selecting the standard installation. For details on installing Kaspersky Security Center, please refer to the Installation of Kaspersky Security Center section of the Kaspersky Security Center Online Help Guide.
- Configuring firewall rules
If you plan to use the default port to connect the thin client to Kaspersky Security Center, set the rules allowing TCP connections through port 13292 for the operating system firewall of the server on which Kaspersky Security Center is installed. If you plan to use a port other than 13292, set the permissions accordingly. For detailed information on configuring firewall rules, please refer to the relevant documentation on the operating system you are using.
- Installing the Kaspersky Security Management Suite web plug-in
In the Kaspersky Security Center Web Console, install the Kaspersky Security Management Suite web plug-in. A ZIP archive containing the web plug-in distribution package is included in the distribution kit.
- Preparing ports
Kaspersky Thin Client uses a mobile protocol to connect to Kaspersky Security Center. On the Kaspersky Security Center Administration Server, enable use of the TCP port that you set up access to in step 2. For details on TCP port enabling on the Kaspersky Security Center Administration Server, see the Modifying the Mobile Device Management settings section of the Kaspersky Security Center Online Help Guide.
- Turning on Kaspersky Thin Client
Turn on Kaspersky Thin Client and wait for the system to load. Please read the terms and conditions of the End User License Agreement and accept the agreement.
- Configuring Kaspersky Thin Client settings
After turning on Kaspersky Thin Client and accepting the End User License Agreement, configure general settings and network connection settings.
- Configuring a connection between Kaspersky Thin Client and Kaspersky Security Center
In the Kaspersky Thin Client interface, configure the connection to Kaspersky Security Center.
- Adding Kaspersky Thin Client to the list of managed devices
Connect to the Kaspersky Security Center Web Console and add Kaspersky Thin Client to the list of managed devices in Kaspersky Security Center. Policies in the Kaspersky Security Center Web Console are applied only for managed devices.
- Creating an active Kaspersky Security Center policy for Kaspersky Thin Client
If you need to manage a group of devices, create an active policy for Kaspersky Thin Client.
- Enabling trusted mode for a group of devices
Switch devices in an administration group to trusted mode. We also recommend adding a reserve certificate for connecting Kaspersky Thin Client to Kaspersky Security Center.
When these actions are complete, Kaspersky Thin Client will be ready for operation. You will be able to manage Kaspersky Thin Client through the Kaspersky Thin Client interface or through the Kaspersky Security Center Web Console, and monitor events of Kaspersky Thin Client.
Scenario: Migrating management of Kaspersky Thin Client to a new Kaspersky Security Center Server
This section describes the sequence of steps that must be performed by the administrator when connecting a group of devices running Kaspersky Thin Client to a new Kaspersky Security Center Administration Server if this group was previously managed by a different instance of Kaspersky Security Center.
The scenario for configuring Kaspersky Thin Client management when migrating to a new instance of Kaspersky Security Center consists of the following steps:
- Installing a new Kaspersky Security Center Administration Server
Download the Kaspersky Security Center distribution package and install the full version of Kaspersky Security Center on the server. The distribution package for the full version of Kaspersky Security Center includes the Kaspersky Security Center Web Console. We recommend selecting the standard installation. For details on installing Kaspersky Security Center, please refer to the Installation of Kaspersky Security Center section of the Kaspersky Security Center Online Help Guide.
- Configuring firewall rules
If you plan to use the default port to connect the thin client to Kaspersky Security Center, set the rules allowing TCP connections through port 13292 for the operating system firewall of the server on which Kaspersky Security Center is installed. If you plan to use a port other than 13292, set the permissions accordingly. For detailed information on configuring firewall rules, please refer to the relevant documentation on the operating system you are using.
- Installing the Kaspersky Security Management Suite web plug-in
In the Web Console, install the Kaspersky Security Management Suite web plug-in for the new Kaspersky Security Center Administration Server. A ZIP archive containing the web plug-in distribution package is included in the distribution kit.
- Preparing ports
Kaspersky Thin Client uses a mobile protocol to connect to Kaspersky Security Center. On the Kaspersky Security Center Administration Server, enable use of the TCP port that you set up access to in step 2. For details on TCP port enabling on the Kaspersky Security Center Administration Server, see the Modifying the Mobile Device Management settings section of the Kaspersky Security Center Online Help Guide.
- Turning on Kaspersky Thin Client
Turn on Kaspersky Thin Client and wait for the system to load.
- Creating an active Kaspersky Security Center policy for Kaspersky Thin Client
In the previously used Web Console, create an active policy for the group of devices that will be managed through the new instance of Kaspersky Security Center.
- Saving the mobile certificate of the new Kaspersky Security Center Administration Server
Locally save the mobile certificate of the new Kaspersky Security Center Administration Server.
- Uploading a reserve certificate in the utilized Kaspersky Security Center Web Console
Upload the mobile certificate of the new Kaspersky Security Center Administration Server as the reserve certificate in the previously used Kaspersky Security Center Web Console. If necessary, a user certificate for connecting Kaspersky Thin Client to Kaspersky Security Center can be uploaded as a reserve certificate. To do so, you must first create a user certificate and upload it in the Kaspersky Security Center Web Console.
Wait for Kaspersky Thin Client to fully synchronize with Kaspersky Security Center. The synchronization period (heartbeat) is defined when configuring Kaspersky Thin Client through the Kaspersky Security Center Web Console. After synchronization, devices in the administration group will receive the mobile certificates of the new Kaspersky Security Center Administration Server.
- Configuring a connection between Kaspersky Thin Client and the new Kaspersky Security Center
If a DHCP server is deployed in your enterprise infrastructure and the settings for connecting Kaspersky Thin Client to Kaspersky Security Center are received automatically, use option 224 to define the IP address or domain name of the new Kaspersky Security Center Administration Server and wait for all devices running Kaspersky Thin Client to finish synchronizing with Kaspersky Security Center.
Devices in the administration group will be connected to the new Kaspersky Security Center Administration Server and you will be able to manage them through the Web Console interface.
If a DHCP server is not deployed in your enterprise infrastructure, manually configure the connection to the new Kaspersky Security Center in the Kaspersky Thin Client interface.
Scenario: Switching Kaspersky Thin Client to trusted mode
Kaspersky Thin Client is cyberimmune only when it is running in trusted mode.
Trusted mode is an operating mode of Kaspersky Thin Client in which the thin client is connected to and managed via Kaspersky Security Center. Kaspersky Security Center must be installed and configured in advance.
The scenario for switching Kaspersky Thin Client to trusted mode consists of the following steps:
- Configuring a connection to Kaspersky Security Center
In the Kaspersky Thin Client interface, configure the connection to Kaspersky Security Center.
- Creating an active Kaspersky Security Center policy for Kaspersky Thin Client
In the Kaspersky Security Center Web Console interface, create an active policy for the group of devices for which you want to enable centralized control via Kaspersky Security Center.
- Adding certificates for securely connecting to remote desktops
In the interface of the Kaspersky Security Center Web Console, add certificates for securely connecting to remote desktops (managed by Basis.WorkPlace or via RDP) and move the toggle button in the right part of the page to the Enforced position. Wait for Kaspersky Thin Client to fully synchronize with Kaspersky Security Center. The synchronization period (heartbeat) is defined when configuring Kaspersky Thin Client through the Kaspersky Security Center Web Console. After synchronization, devices will receive the Kaspersky Security Center Administration Server certificates.
When these actions are complete, Kaspersky Thin Client will operate in trusted mode.
In some cases, such as when switching to a new Kaspersky Security Center Administration Server, you can switch a device running Kaspersky Thin Client out of trusted mode by deleting the security certificates and disabling management of the group via Kaspersky Security Center.
Page topConfiguring general settings
In the Kaspersky Thin Client interface, you can configure the general settings of the thin client. For example, you can specify the thin client name that will be displayed in the Kaspersky Thin Client taskbar and in the Kaspersky Security Center Web Console, and select the language of the Kaspersky Thin Client interface.
If Kaspersky Thin Client is included in an administration group and is controlled centrally through the Web Console, the device name is assigned by the Kaspersky Security Center administrator. When the Enforced function is enabled, the Thin client name field in the Kaspersky Thin Client interface cannot be edited.
To configure general settings of Kaspersky Thin Client:
- In the Kaspersky Thin Client control panel, click
 and select Settings in the menu that opens.
 - In the window that opens, select the General section (see the figure below).
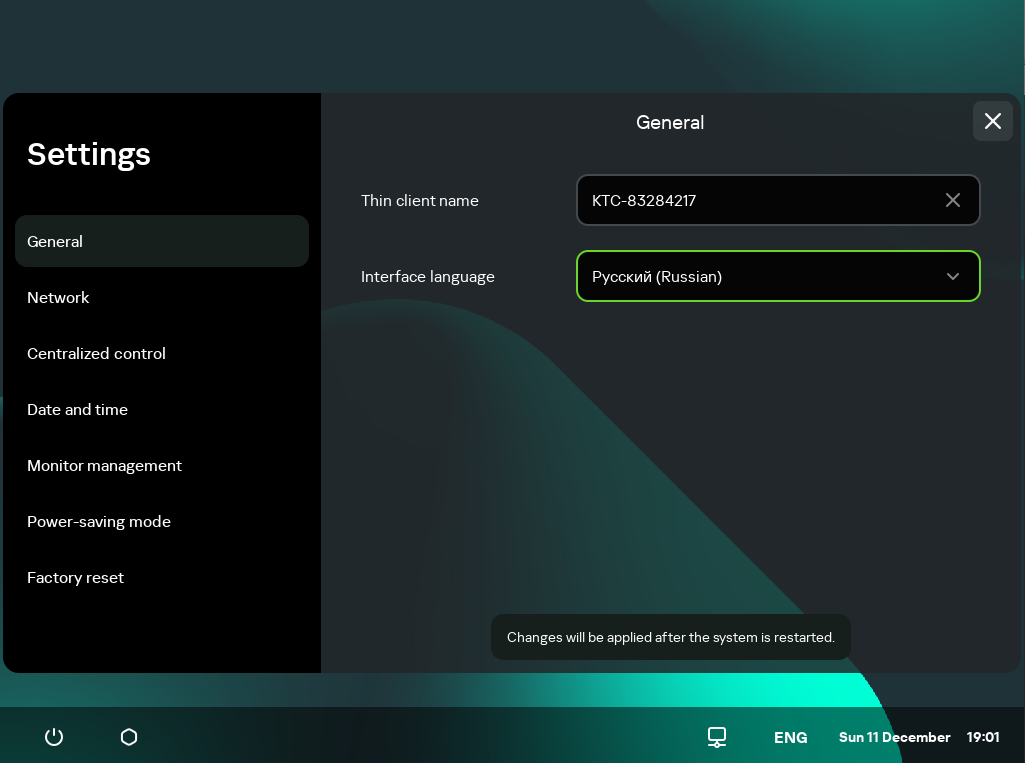
Settings. General section
- In the Thin client name field, enter the name that will be displayed for Kaspersky Thin Client in the Web Console. The name can contain uppercase and lowercase letters of the Latin and Cyrillic alphabets, numerals and a hyphen. The length of the thin client name must not exceed 30 characters.
- In the Interface language drop-down list, select the language for the Kaspersky Thin Client interface.
Changes will be applied after the system is restarted.
Page topConfiguring network settings
In the Settings → Network section, you can configure the settings for connecting Kaspersky Thin Client to the network.
To configure the network settings:
- In the Kaspersky Thin Client control panel, click and select Settings in the menu that opens.
- In the window that opens, select the Network section (see the figure below).
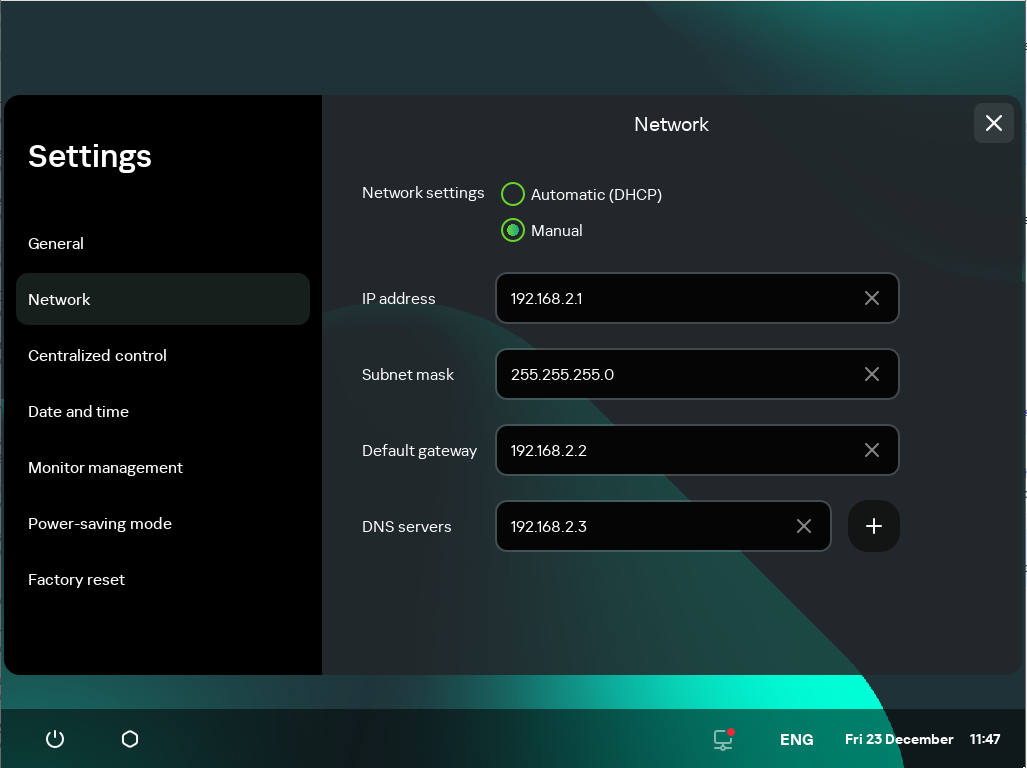
Settings. Network section
- Configure the settings for connecting Kaspersky Thin Client to the network:
- If you need to receive the network settings automatically via DHCP, select Automatic (DHCP) for the Network settings parameter. In this mode, the IP address, Subnet mask, Default gateway and DNS servers fields are not accessible.
- If you need to manually specify the network settings, select Manual for the Network settings parameter and do the following:
- In the IP address field, enter the IP address of Kaspersky Thin Client in IPv4 format.
- In the Subnet mask field, enter the subnet mask.
- In the Default gateway field, enter the address of the network gateway.
- In the DNS servers field, enter the addresses of the DNS servers. You can enter no more than two addresses. This field is optional.
- Click Save in the lower part of the window to save the changes.
Configuring settings for connecting Kaspersky Thin Client to Kaspersky Security Center
To control a thin client through the Web Console, you must configure settings for connecting Kaspersky Thin Client to the Kaspersky Security Center Administration Server.
If the certificate used for connecting Kaspersky Thin Client to Kaspersky Security Center has been changed in Kaspersky Security Center, you must confirm the certificate change to continue configuring the connection.
To configure settings for connecting Kaspersky Thin Client to the Kaspersky Security Center Administration Server:
- In the Kaspersky Thin Client control panel, click and select Settings in the menu that opens.
- In the window that opens, select the Centralized control section (see the figure below).

Settings. Centralized control section
- In the Centralized control window that opens, configure the following settings for connecting Kaspersky Thin Client to Kaspersky Security Center:
- If you want to use the DHCP protocol to automatically receive the settings for connecting Kaspersky Thin Client to Kaspersky Security Center, select Automatic (DHCP) in the Method for determining the server IP address block. In this mode, the IP address/server name field cannot be edited.
To use this connection option, a DHCP server must be deployed in the enterprise infrastructure and option 224 must be used to define the IP address or domain name of the Kaspersky Security Center Administration Server to which you plan to connect Kaspersky Thin Client. Kaspersky Thin Client receives string values in
IP address:Portformat orServer name:Portformat in option 224. For example,192.168.2.4orksc.example.com:12345. The port must be specified only if a port other than port 13292 is used for the connection.By default, use of DHCP is enabled to automatically receive the settings for connecting Kaspersky Thin Client to Kaspersky Security Center.
- If you want to manually define the settings for connecting Kaspersky Thin Client to Kaspersky Security Center, select Manual in the Method for determining the server IP address block and in the IP address/server name field enter the IP address or name of the Kaspersky Security Center Administration Server. If you are using a port other than port 13292, indicate it in
IP address:Portformat orServer name:Portformat.
- If you want to use the DHCP protocol to automatically receive the settings for connecting Kaspersky Thin Client to Kaspersky Security Center, select Automatic (DHCP) in the Method for determining the server IP address block. In this mode, the IP address/server name field cannot be edited.
- Activate the Connection to Kaspersky Security Center toggle button.
- If you are connecting to Kaspersky Security Center for the first time, check the settings of the certificate used for connecting Kaspersky Thin Client to Kaspersky Security Center in the Adding certificate window and click the Add certificate button. The added certificate will be used for subsequent connections between Kaspersky Thin Client and Kaspersky Security Center.
Kaspersky Thin Client will attempt to connect to Kaspersky Security Center. Following successful connection to Kaspersky Security Center, the Connected to Kaspersky Security Center status will be displayed.
Page topChanging settings for connecting Kaspersky Thin Client to Kaspersky Security Center
If Kaspersky Thin Client is a member of an administration group and is controlled centrally through the Web Console, the settings for connecting Kaspersky Thin Client to Kaspersky Security Center cannot be changed.
To change the settings for connecting Kaspersky Thin Client to Kaspersky Security Center:
- In the Kaspersky Thin Client control panel, click and select Settings in the menu that opens.
- In the window that opens, select the Centralized control section.
- Deactivate the Connection to Kaspersky Security Center toggle button.
- In the Confirm disconnection window that opens, view and memorize the confirmation code for disconnecting Kaspersky Thin Client from Kaspersky Security Center, then provide it to the Kaspersky Security Center administrator. The administrator contact details are provided in the Confirm disconnection window. The administrator should send you a confirmation code in response.
- Click Next.
- In the Confirmation code window that opens, enter the code provided by the Kaspersky Security Center administrator and click the Confirm button.
Kaspersky Thin Client will be disconnected from management through Kaspersky Security Center.
- In the Centralized control window, manually configure settings for connecting to Kaspersky Security Center.
- Activate the Connection to Kaspersky Security Center toggle button.
The thin client will attempt to connect to Kaspersky Security Center. Following successful connection to Kaspersky Security Center, the Connected to Kaspersky Security Center status will be displayed.
Page topManaging Kaspersky Thin Client certificates
The TLS encryption protocol ensures data transfer security using SSL connection certificates. An SSL connection certificate (hereinafter referred to as an "SSL certificate" or simply "certificate") is a block of data containing information about the certificate owner, the owner's public key, and the start and end dates of certificate validity.
Kaspersky Thin Client does not check to see if the certificate is on the Certificate Revocation List.
Kaspersky Thin Client uses the following certificates:
- Certificate for connecting Kaspersky Thin Client to Kaspersky Security Center.
- Certificate for authenticating the RDP server when connecting to a remote desktop.
- Certificate for authenticating the connection broker when connecting to a remote desktop managed by Basis.WorkPlace.
- Certificate for connecting to the log server.
We recommend updating certificates in the following cases:
- Current certificates have been compromised.
- Certificates have expired.
- Certificates need to be regularly updated in accordance with the information security requirements of your enterprise.
Kaspersky Thin Client uses a mobile certificate for connecting to Kaspersky Security Center. A mobile certificate is created automatically when installing Kaspersky Security Center. For details on how to reissue a mobile certificate, please refer to the Reissuing the Web Server certificate section of the Kaspersky Security Center Online Help Guide.
To securely connect Kaspersky Thin Client to a remote desktop via RDP, to a connection broker for remote desktops managed by Basis.WorkPlace, or to a log server, you must add the appropriate security certificate. All added certificates are saved in the system store of Kaspersky Thin Client.
For a thin client that is not in an administration group and is not managed through the Kaspersky Security Center Web Console, you can manually add a certificate in the Kaspersky Thin Client interface in the following situations:
- When connecting Kaspersky Thin Client to Kaspersky Security Center for the first time.
- When connecting to a remote desktop managed by Basis.WorkPlace or via RDP for the first time.
- When connecting to a log server for the first time.
For a thin client that is added to an administration group and is managed through the Kaspersky Security Center Web Console, the Kaspersky Security Center administrator adds certificates through the Kaspersky Security Center Web Console interface. In this case, you will be able to connect only to the servers for which the administrator added a certificate. If the certificate added to the policy is a root certificate, the connection is established based on the server domain name only.
If the Kaspersky Security Center administrator replaces the certificate for connecting to Kaspersky Security Center, some situations may require confirmation of the certificate replacement to connect to Kaspersky Security Center. For example, this may be required if the thin client was turned off for a long time, has not synchronized with Kaspersky Security Center, and the certificate previously used to connect to Kaspersky Security Center has expired.
To confirm replacement of the certificate for connecting to Kaspersky Security Center:
- Turn on Kaspersky Thin Client.
- In the Certificate replacement required window that opens, view and memorize the confirmation code and provide it to the Kaspersky Security Center administrator. The administrator contact details are provided in the Certificate replacement required window. The Kaspersky Security Center administrator sends you a certificate replacement code in response.
- Click Next.
- In the Certificate replacement code window that opens, enter the code provided by the Kaspersky Security Center administrator and click the Confirm button.
As a result, the new certificate for connecting to Kaspersky Security Center will be saved in the Kaspersky Thin Client certificate store and will be subsequently used to connect to Kaspersky Security Center.
Page topConfiguring RDP connection settings
Kaspersky Thin Client lets you configure redirection of USB devices to a remote desktop, and configure settings for connecting to a remote desktop via RDP.
To correctly redirect USB devices to a remote desktop using the Windows 10 operating system, you must enable Remote Desktop Services and allow redirection of Plug and Play devices in the settings of Remote Desktop Services. For Microsoft Windows Server 2016 and Microsoft Windows Server 2019 operating systems, you must also allow a remote connection using Remote Desktop Services and allow remote management rules to be set for user sessions in Remote Desktop Services. Redirection of smart cards, flash drives, and tokens to a remote desktop running the Microsoft Windows 7 operating system is not supported.
To configure settings for connecting to a remote desktop via RDP:
- In the main window of Kaspersky Thin Client, click the RDP button.
- In the remote desktop connection window that opens, click Settings in the left part of the window.
This opens a window in which you can configure settings for connecting to a remote desktop (see the figure below).
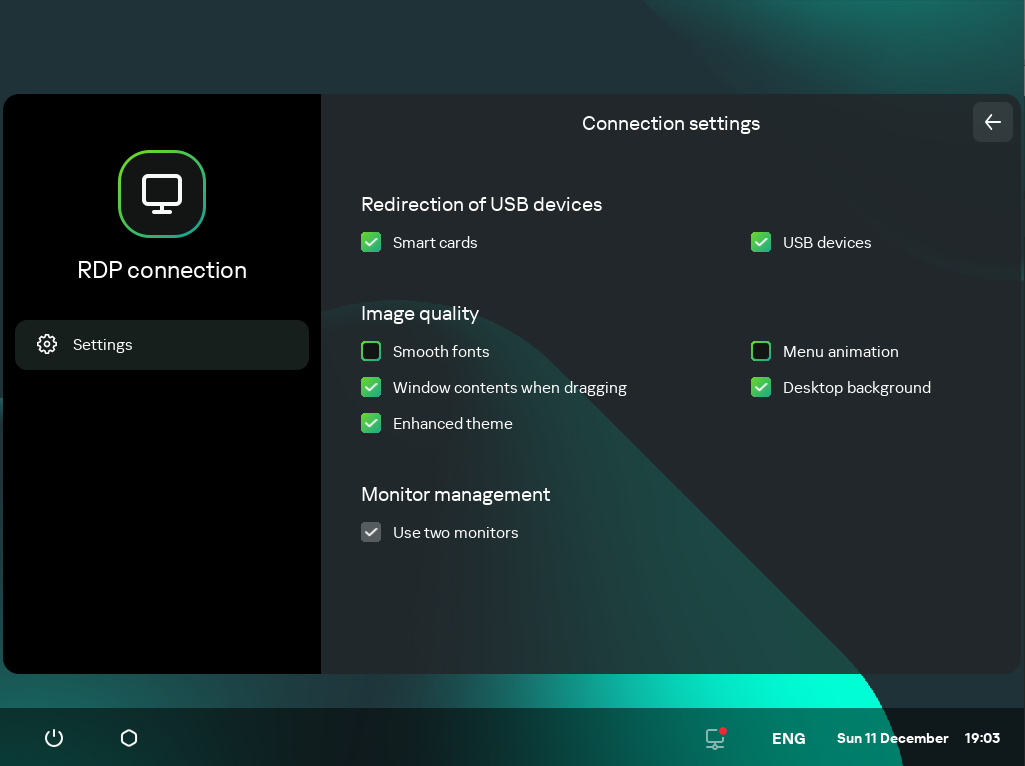
Window for configuring settings for connecting to a remote desktop via RDP
- In the Redirection of USB devices settings block, select the check boxes next to the devices connected to Kaspersky Thin Client via USB that you need to pass through to the remote desktop:
- The USB devices check box enables or disables redirection of USB devices.
- The Smart cards check box enables or disables redirection of smart cards and tokens.
- In the Image quality block, select the check boxes next to the remote desktop graphics settings that you need to use:
- Smooth fonts
- Menu animation
- Desktop background
- Window contents when dragging
- Enhanced theme
Enabling remote desktop display settings may affect the speed of Kaspersky Thin Client operations.
- If two monitors are installed at your workstation and you want a remote desktop image to be displayed on both monitors, select the Use two monitors check box in the Monitor management block. If necessary, you can configure the layout of monitors.
- Click the back arrow in the upper-right corner of the window to return to the remote desktop connection window.
Configuring settings for connecting to Basis.WorkPlace remote desktops
Kaspersky Thin Client lets you configure settings for connecting to remote desktops managed by Basis.WorkPlace.
To configure settings for connecting to remote desktops managed by Basis.WorkPlace:
- In the main window of Kaspersky Thin Client, click the Basis.WorkPlace button.
- In the remote desktop connection window that opens, click Settings in the left part of the window.
This opens a window in which you can configure settings for connecting to a remote desktop (see the figure below).
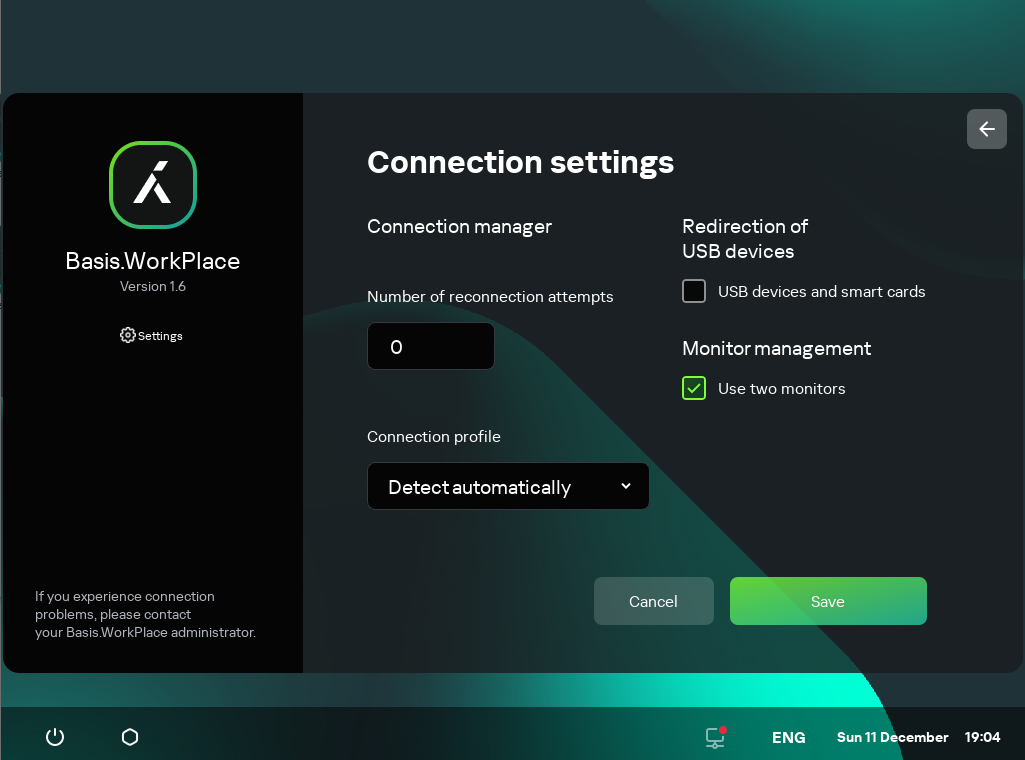
Window for configuring settings for connecting to a remote desktop managed by Basis.WorkPlace
- If you need to enable or disable redirection of USB devices to a remote desktop, select or clear the USB devices and smart cards check box in the Redirection of USB devices block.
Redirection of USB devices to a remote desktop managed by Basis.WorkPlace may be blocked by the Basis.WorkPlace administrator.
- In the Number of reconnection attempts field, enter the number of times that Kaspersky Thin Client should attempt to reconnect to the Basis.WorkPlace connection broker if disconnected. You can indicate no more than five attempts at reconnection.
- In the Connection profile drop-down list, select the type of connection between Kaspersky Thin Client and the Basis.WorkPlace connection broker. The type of connection depends on the connection speed. The following values are available:
- Detect automatically
- Modem
- Low-speed broadband connection
- Satellite
- High-speed broadband connection
- Wide area network
- Local area network
- If two monitors are installed at your workstation and you want a remote desktop image to be displayed on both monitors, select the Use two monitors check box in the Monitor management block. If necessary, you can configure the layout of monitors.
- Click Save in the lower part of the window to save the changes.
- Click the back arrow in the upper-right corner of the window to return to the remote desktop connection window.
Managing power-saving mode
Power-saving mode reduces energy consumption by the device. In this mode, Kaspersky Thin Client continues to operate normally while retaining the active remote desktop connection.
If Kaspersky Thin Client is a member of an administration group and is controlled centrally through the Web Console, and the Enforced function is enabled, power-saving mode management is unavailable in the Kaspersky Thin Client interface.
You can configure the time to wait before a monitor is switched to power-saving mode. The monitor will turn on automatically when you click your mouse, press a key on your keyboard, or move your mouse cursor. You can also configure a Kaspersky Thin Client inactivity period after which the thin client will be turned off. To resume operations of the thin client, you will have to turn it on.
To configure power-saving mode:
- In the Kaspersky Thin Client control panel, click and select Settings in the menu that opens.
- In the window that opens, select the Power-saving mode section (see the figure below).
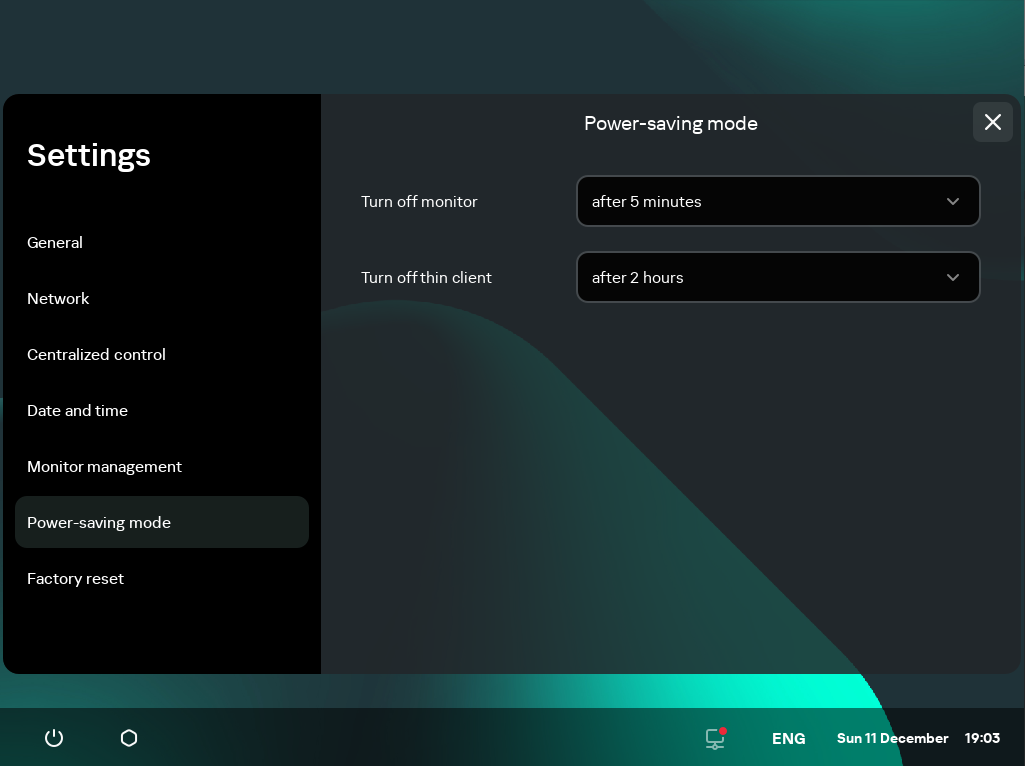
Settings. Power-saving mode section
- In the Turn off monitor drop-down list, select the system inactivity period after which the monitor will be switched to power-saving mode.
- In the Turn off thin client drop-down list, select the system inactivity period after which the thin client will be turned off.
You can also configure power-saving mode through the Kaspersky Security Center Web Console interface.
Page topConfiguring monitors layout
If two monitors are installed at your workstation, you can select which monitor will be used as the primary monitor and which one will be used as the secondary monitor when showing the remote desktop screen. When connected to the remote desktop, the connection panel is displayed in the upper part of the screen on the primary monitor.
To use two monitors, you must first enable dual monitors support in the settings for connecting to remote desktops either via RDP or managed by Basis.WorkPlace.
To change the layout of monitors for displaying the remote desktop:
- In the Kaspersky Thin Client control panel, click and select Settings in the menu that opens.
- In the window that opens, select the Monitor management section (see the figure below).
The window that opens displays the layout of monitors schematically. The primary monitor is always positioned on the left and labeled.
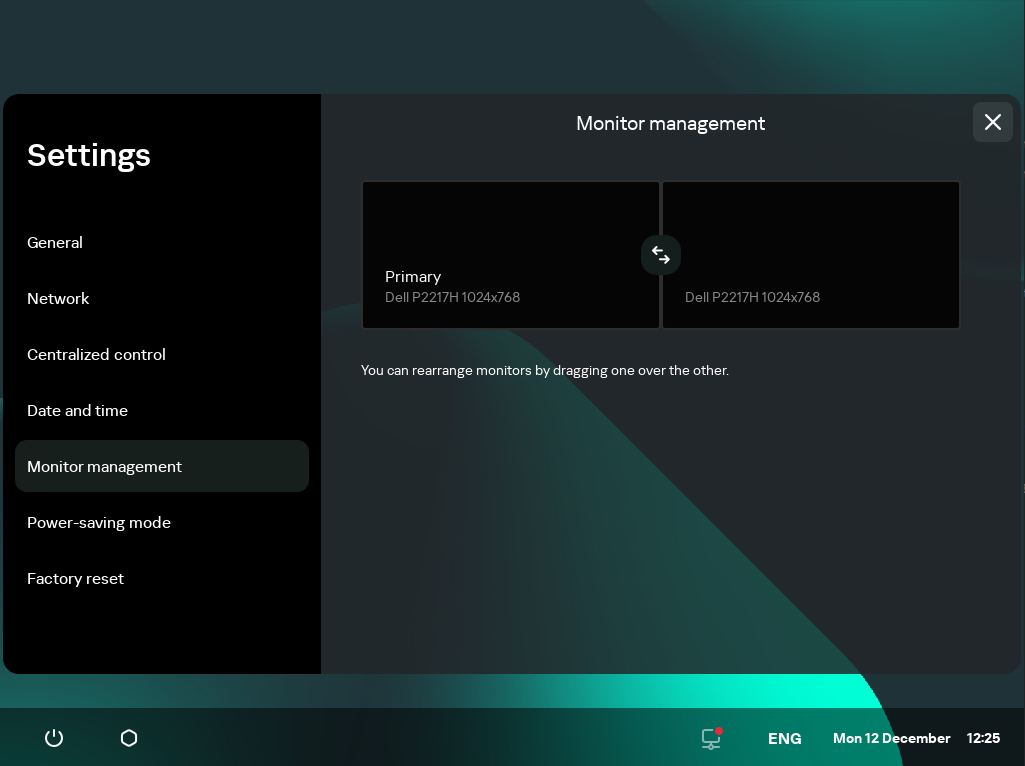
Settings. Monitor management section
- Change the position of monitors by clicking the
 button located between the monitors on the layout.
The layout of monitors for displaying the remote desktop will be changed.
Page topManaging access to Kaspersky Thin Client settings
You can configure the Kaspersky Thin Client interface to display or hide settings that are configured once and are no longer used in core operating scenarios of the thin client.
Kaspersky Thin Client lets you hide the following system settings simultaneously:
- RDP connection settings
- Basis.WorkPlace connection settings
- General settings
- Network settings
- Kaspersky Security Center connection settings
- Date and time
- Power-saving mode settings
- Layout of monitors
- Reset of Kaspersky Thin Client settings
If Kaspersky Thin Client is a member of an administration group and is controlled centrally through the Web Console, the settings listed above are hidden in the Kaspersky Thin Client interface.
To enable or disable the display of Kaspersky Thin Client settings:
- In the Kaspersky Thin Client control panel, click and select Tools in the menu that opens.
- In the window that opens, select the Access to settings section (see the figure below) and do one of the following:
- If you need to hide the settings, move the toggle button to the Access is closed position.
The settings will be hidden.
- If you need to display the settings, move the toggle button to the Access is open position.
The settings will be displayed. You will be able to define new values for these settings.

Tools. Access to settings section
- If you need to hide the settings, move the toggle button to the Access is closed position.
Configuring the date and time
When Kaspersky Thin Client is connected to Kaspersky Security Center, it receives the date and time from the Kaspersky Security Center Administration Server. You can manually change the date and time of Kaspersky Thin Client only if the system is not being controlled via Kaspersky Security Center.
To change the date and time of Kaspersky Thin Client:
- In the Kaspersky Thin Client control panel, click and select Settings in the menu that opens.
- In the window that opens, select the Date and time section (see the figure below).
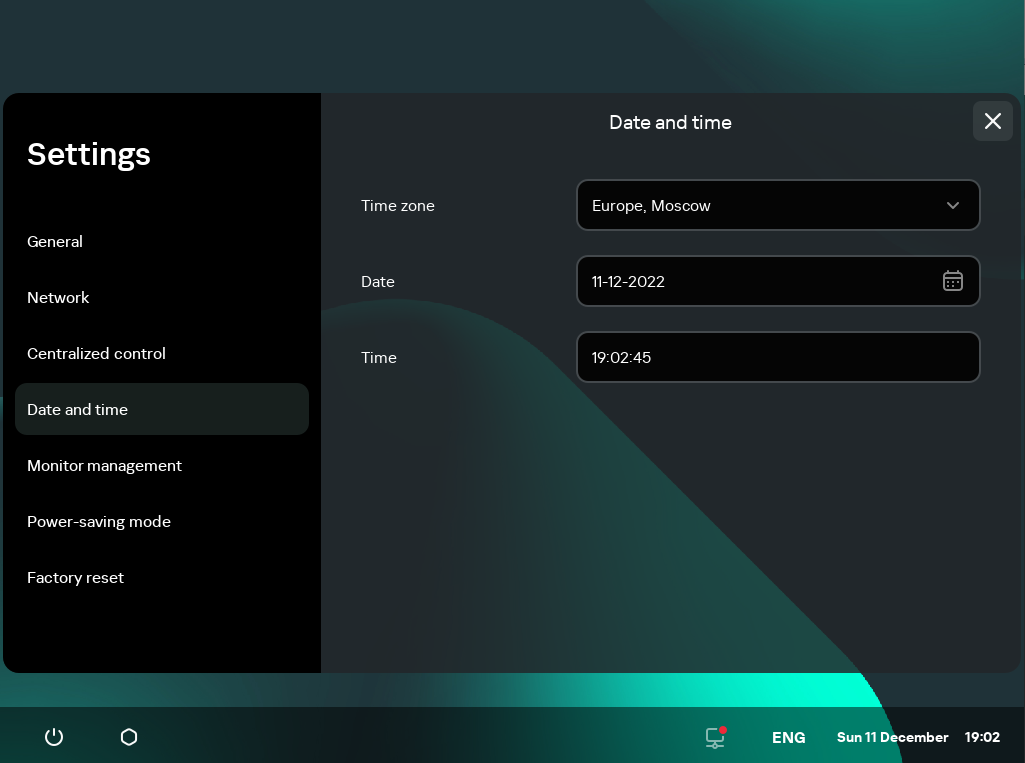
Settings. Date and time section
- Configure the date and time settings:
- Select the relevant time zone from the Time zone drop-down list.
- Click the Date field and use the mouse or keyboard to select the date in the form that opens. To navigate between dates on the calendar using the keyboard, you can use the following keys:
- TAB lets you move one month ahead on the calendar.
- SHIFT+TAB lets you move one month back on the calendar.
- The right arrow (→) lets you move one day ahead on the calendar.
- The left arrow (←) lets you move one day back on the calendar.
- In the Time field, enter the current time in
HH:MM:SSformat.If Kaspersky Thin Client is a member of an administration group and is controlled centrally through the Web Console, the Date and Time fields cannot be changed.
- Click Save in the lower part of the window to save the changes.
Resetting Kaspersky Thin Client settings
Reset will result in the loss of all defined settings and all data of Kaspersky Thin Client (except the audit log and system date), and will disconnect the device from Kaspersky Security Center. We recommend performing a reset only after approval with your company administrator.
To reset the settings of Kaspersky Thin Client:
- In the Kaspersky Thin Client control panel, click and select Settings in the menu that opens.
- In the window that opens, select the Factory reset section (see the figure below).
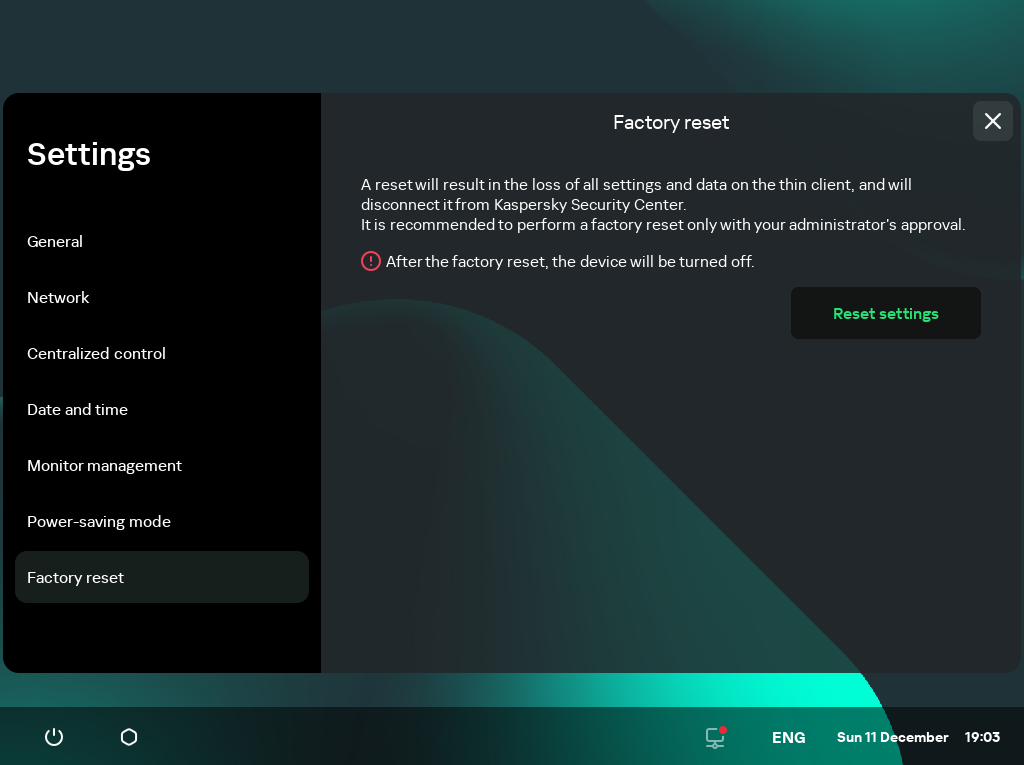
Settings. Factory reset section
- In the window that opens, click the Reset settings button.
This opens the Confirm reset window showing a confirmation code.
- Provide the confirmation code to the Kaspersky Security Center administrator. The administrator contact details are provided in the Confirm reset window. The Kaspersky Security Center administrator sends you a confirmation code in response.
- Click Next.
- In the Confirmation code window that opens, enter the code provided by the Kaspersky Security Center administrator and click the Confirm button.
As a result, all defined settings of Kaspersky Thin Client will be restored to their original values (default), all data on the device will be deleted (except the audit log and system date), and Kaspersky Thin Client will be disconnected from Kaspersky Security Center. After reset, the thin client turns off.