Contents
Working with Kaspersky Thin Client
The main scenario for working with Kaspersky Thin Client involves preparing the system before startup, starting the system, and connecting it to a remote desktop. Once you are finished working with the remote desktop, the connection session is supposed to be closed, and the system turned off. You spend the rest of the time in a familiar software environment and do not need to interact with the Kaspersky Thin Client interface.
The main operating scenario for working with Kaspersky Thin Client consists of the following steps:
- Preparing Kaspersky Thin Client for startup
Connect a monitor, keyboard, and mouse to the device before starting it for the first time. If necessary, you can also connect USB devices and/or USB tokens.
- Starting Kaspersky Thin Client
Turn on the thin client to get started.
- Connecting to a remote desktop
Connect to a remote desktop and start working.
- Locking the desktop and resuming operations
If you need to temporarily leave your workstation, lock your remote desktop. Resume operations when you return to your workstation. For detailed information about locking the remote desktop and resuming operations, see the manual of the operating system you are connecting to remotely.
- Closing a connection session
Close the remote desktop connection session when you are finished working with it.
- Stopping Kaspersky Thin Client
Turn off the thin client at the end of the workday.
Connecting to a remote desktop
Kaspersky Thin Client lets you choose to either directly connect to a remote desktop via RDP or connect to remote desktops managed by Basis.WorkPlace. Depending on the infrastructure in your enterprise, you can select one of the following options:
- Connecting to a remote desktop via RDP
- Connecting to a remote desktop managed by Basis.WorkPlace
When working with Kaspersky Thin Client via Basis.WorkPlace, the following limitations apply:
- Users cannot be authorized with smart cards in the Basis.WorkPlace connection manager.
- Users cannot initiate a password change in Kaspersky Thin Client.
- Simultaneous connection to multiple remote desktops managed by Basis.WorkPlace is not supported.
The Basis.WorkPlace administrator can restrict access to desktops managed by Basis.WorkPlace. For example, the administrator can lock your user account or block access to remote desktops managed by Basis.WorkPlace that were previously available to your user account. If you encounter any problems connecting to a remote desktop, we recommend contacting your Basis.WorkPlace administrator.
To connect to a remote desktop managed by Basis.WorkPlace:
- Turn on Kaspersky Thin Client.
- In the main window of Kaspersky Thin Client, click the Basis.WorkPlace button.
- In the connection window that opens, specify the Basis.WorkPlace connection settings:
- In the Server field, specify the IP address or name of the Basis.WorkPlace connection manager server.
Kaspersky Thin Client saves the address of the Basis.WorkPlace connection manager with which a connection was successfully established, so you do not need to enter it again when reconnecting.
- In the Domain field, enter the domain name.
- In the User name field, enter the user name.
Kaspersky Thin Client saves the user name that last successfully connected to Basis.WorkPlace, so you do not need to enter it again when reconnecting.
- In the Password field, enter the user password.
The password is cleared each time you exit the window for connecting to desktops managed by Basis.WorkPlace.
If the number of allowed incorrect password entry attempts is exceeded, the user account will be blocked. The corresponding message will be displayed in the remote desktop connection window. The number of allowed password entry attempts is defined by the active security policy set by the Basis.WorkPlace administrator.
- In the Server field, specify the IP address or name of the Basis.WorkPlace connection manager server.
- Click the Connect button.
If you are connecting to a remote desktop managed by Basis.WorkPlace for the first time and Kaspersky Thin Client is not included in an
, check the settings of the added certificate in the opened Adding certificate window and click the Add certificate button.If Kaspersky Thin Client was previously added to an administration group that is managed through the Kaspersky Security Center Web Console and the Kaspersky Security Center administrator added a certificate for authenticating the Basis.WorkPlace connection broker for this administration group, the connection to a remote desktop managed by Basis.WorkPlace is established automatically.
The certificate for authenticating the Basis.WorkPlace connection broker will be added to the system certificate store of Kaspersky Thin Client and will be used for subsequent connections.
A window for selecting a remote desktop opens showing all desktops that are available for connection.
- If you need to refresh the list of desktops, click the Reload button.
- Click the button with the name of the desktop to which you want to connect.
After a few seconds, the monitor will show the remote desktop to which you are connected.
In the window for connecting to desktops managed by Basis.WorkPlace, you can also configure the connection settings by clicking Settings.

When connecting to a remote desktop, Kaspersky Thin Client uses TLS encryption to protect the connection session and protect data from interception or falsification.
Page topViewing information about Kaspersky Thin Client
You can view information about Kaspersky Thin Client under Tools → System info.
The System info section (see the figure below) shows the following data:
- Kaspersky Thin Client version number
- KasperskyOS version number
- Link to the Kaspersky Thin Client Online Help Guide.
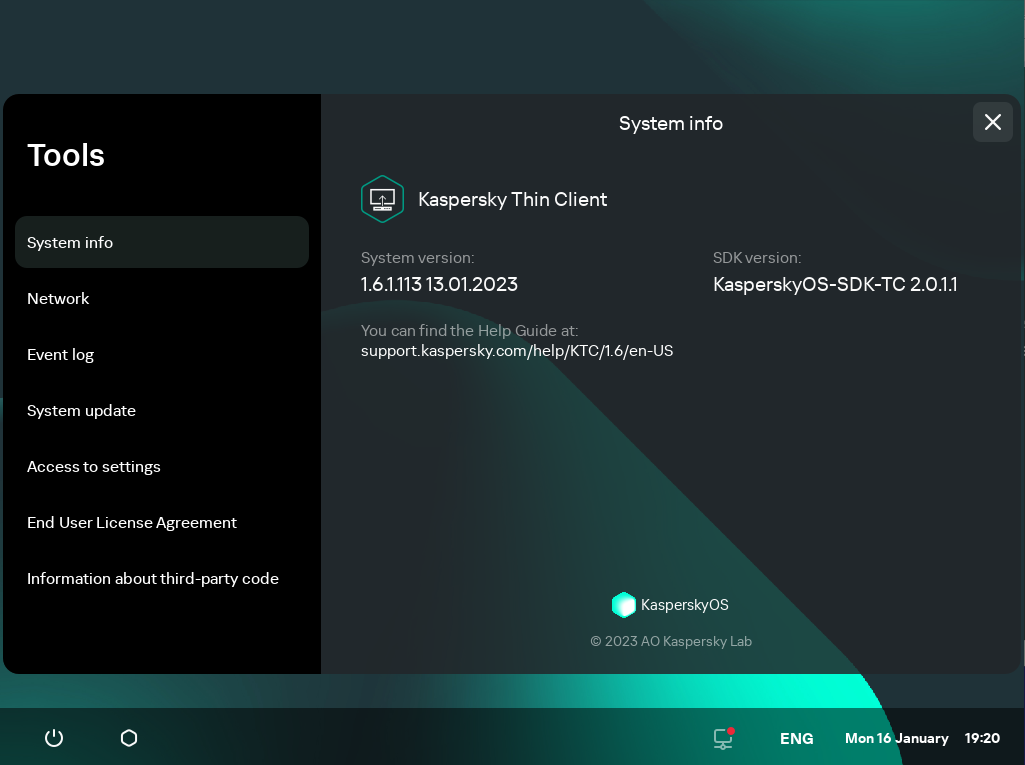
Tools. System info section
Viewing network status information
You can view Kaspersky Thin Client network connection settings and network status under Tools → Network. Information about Kaspersky Thin Client network connection settings is updated automatically at least once every second.
The Network section displays the following information about the settings for connecting Kaspersky Thin Client to the network (see the figure below):
- MAC address: MAC address of the device where Kaspersky Thin Client is installed.
- IP address: IP address of the device where Kaspersky Thin Client is installed.
- Subnet mask: subnet mask that contains the IP address of the device.
- Default gateway: address of the network gateway.
- DNS servers: addresses of DNS servers. To view all addresses (if there are more than three), hover the mouse over the setting value.
- Connection: status of the network connection of Kaspersky Thin Client and the connection speed.
- Sent: number and total size of network packets sent from Kaspersky Thin Client.
- Received: number and total size of network packets received by Kaspersky Thin Client.
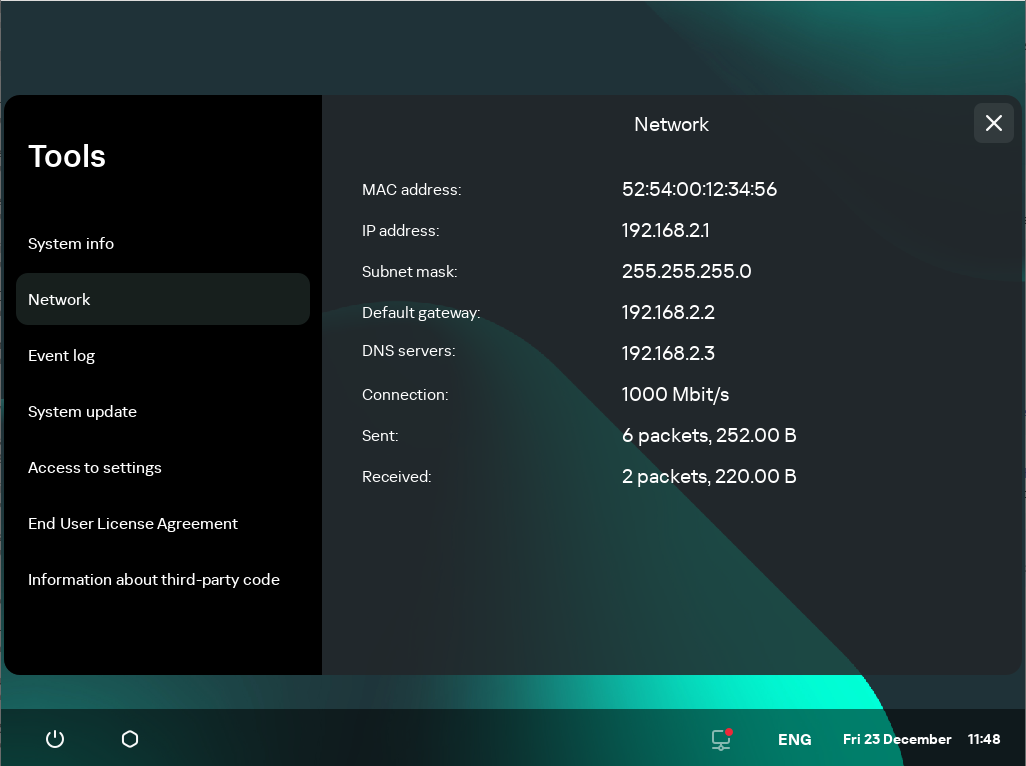
Tools. Network section
Managing Kaspersky Thin Client logs
This section provides information about working with Kaspersky Thin Client logs.
About Kaspersky Thin Client logs
Kaspersky Thin Client maintains two types of logs:
- Event log. This log saves all registered by Kaspersky Thin Client components. You can view the event log in the Kaspersky Thin Client interface, and forward it to a log server.
- Audit log. This log stores data on the certificates uploaded to Kaspersky Thin Client, and contains information on instances when Kaspersky Security Center was used to enable or disable management of thin clients. The audit log cannot be viewed in the Kaspersky Thin Client interface. You can forward the audit log file to a log server.
The Kaspersky Thin Client event log contains the following information:
- Date and time when the event occurred.
- Name of the Kaspersky Thin Client component that registered the event.
- Event severity. The following values are possible:
- Trace is all possible messages and warnings that occur during application operation.
- Debug is debug messages and all informational and important messages, and all warnings and messages about common and critical errors.
- Info is informational messages, important messages and all warnings, and messages about common and critical errors.
- Warn is all warnings and messages about ordinary and critical errors.
- Error is messages about errors and critical errors in application operation.
- Fatal is messages about critical errors in application operation.
- Debug information in <File>:<Line Number>,<Function> format, where:
- File means file name.
- Line Number means number of the line in the file.
- Function means debug information.
- Process ID and thread ID.
- Product version ID.
The Kaspersky Thin Client audit log contains the following information:
- Upload date and time of the certificate for connecting Kaspersky Thin Client to Kaspersky Security Center.
- Address of the Kaspersky Security Center Administration Server (IP address and/or domain server name).
- Kaspersky Security Center Administration Server port number.
- List of certificate attributes: issuer name, subject name, certificate fingerprint, validity start date and time, validity end date and time, thin client ID.
- Information about incidents when management of Kaspersky Thin Client via the Kaspersky Security Center Web Console was enabled or disabled.
Forwarding of event and audit logs
You can view the Kaspersky Thin Client event log through the Kaspersky Thin Client interface under Tools → Event log. You can also forward the event log to a log server. The audit log is automatically sent to the server together with the event log.
To forward Kaspersky Thin Client audit and event logs to a log server, a log server must first be deployed in your enterprise infrastructure. For detailed information on server deployment, please refer to the Administrator's Guide for this server.
The maximum file sizes for the event log and audit log are 150 MB and 512 MB, respectively. When the file size of event or audit logs reaches its corresponding limit, Kaspersky Thin Client deletes the existing logs and starts to record new ones. Each time event and audit logs are updated, the current version of Kaspersky Thin Client is recorded at the beginning of the log.
To forward Kaspersky Thin Client audit and event logs:
- In the Kaspersky Thin Client control panel, click
 and select Tools in the menu that opens.
 - In the window that opens, select the Event log section (see the figure below).
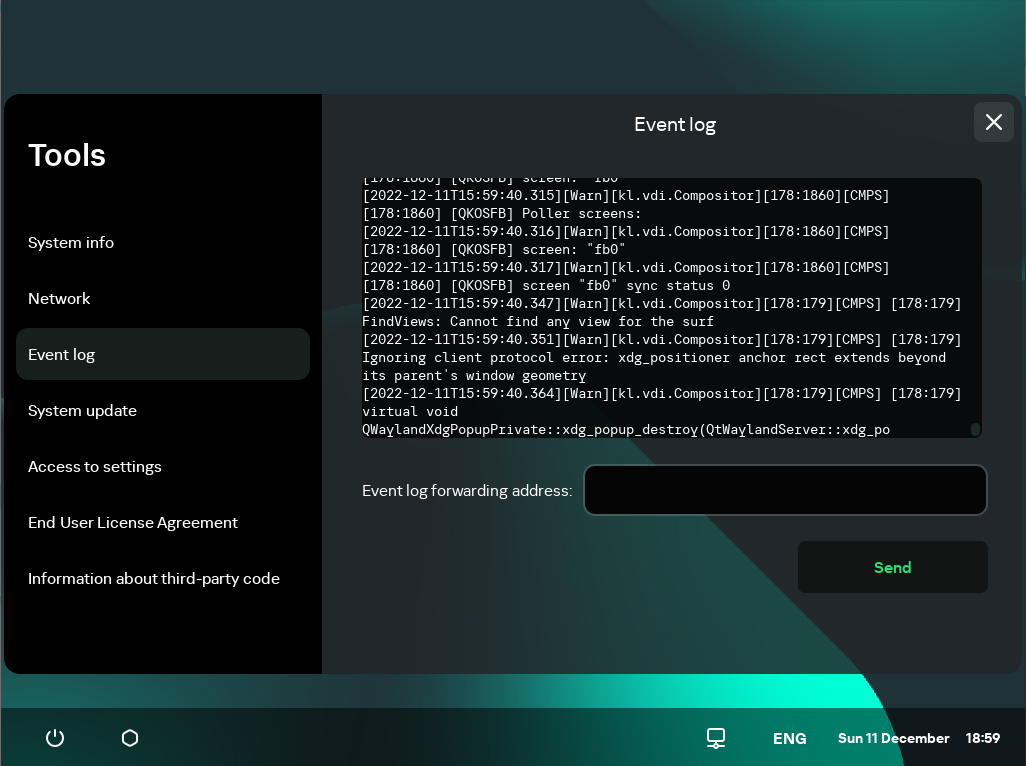
Tools. Event log section
This displays information about registered events of Kaspersky Thin Client.
- In the Event log forwarding address field, enter the address of the destination server that should receive audit and event logs, and click the Send button.
If Kaspersky Thin Client is a member of an administration group and is centrally controlled through the Web Console, and the Enforced function is enabled, the Event log forwarding address field will contain the value set by the Kaspersky Security Center administrator that cannot be changed.
We recommend verifying the correct address of the destination server to which you are sending logs. If the wrong address is indicated, logs could be sent to unauthorized third parties. If this is the case, the confidentiality of the data they contain could be compromised.
- In the window that opens, confirm that you want to forward audit and event logs.
If Kaspersky Thin Client is not in an administration group and you are forwarding audit and event logs to a log server for the first time, check the settings of the certificate being added in the opened Adding certificate window and click the Add certificate button. The certificate will be added to the system certificate store of Kaspersky Thin Client and will be used for subsequent connections.
Kaspersky Thin Client audit and event logs will be forwarded to the specified server.
Page topUpdating Kaspersky Thin Client
Kaspersky Thin Client can be updated only if the thin client is connected to Kaspersky Security Center.
Available updates are downloaded to the thin client from the Kaspersky Security Center Administration Server or from Kaspersky update servers only after Kaspersky Security Center administrator approves these updates in the Web Console interface. If a new End User License Agreement is generated for the new Kaspersky Thin Client version, Kaspersky Security Center administrator accepts it in the Kaspersky Security Center Web Console interface. For detailed information on approving updates by the administrator, refer to the Approving and declining software updates section of the Kaspersky Security Center Online Help Guide. Additionally, Kaspersky Security Center administrator can configure regular checks for Kaspersky Thin Client updates (for details, refer to the Scenario: Regular updating Kaspersky databases and applications section of the Kaspersky Security Center Online Help Guide).
After the updates are downloaded to the device, the Kaspersky Thin Client interface displays a notification with the time when the update will be applied.
You can install an update in one of the following ways:
- Directly from the notification about the available update
- When restarting or turning off the thin client
- In the Kaspersky Thin Client control panel, click the shutdown button
 .
. - Depending on whether you plan to quit or continue working with Kaspersky Thin Client after the update, do one of the following:
- If you want to continue working, select Update and restart in the menu that opens.
The updates will be installed, and Kaspersky Thin Client will restart.
- If you want to quit working, select Update and shut down in the menu that opens.
The updates will be installed, and Kaspersky Thin Client will shut down.
- If you want to continue working, select Update and restart in the menu that opens.
- In the Kaspersky Thin Client control panel, click the shutdown button
- In the System update section
- In the Kaspersky Thin Client control panel, click and select Tools in the menu that opens.
- Select the System update section.
A window opens, displaying information about the current system version and downloaded updates (see the figure below).
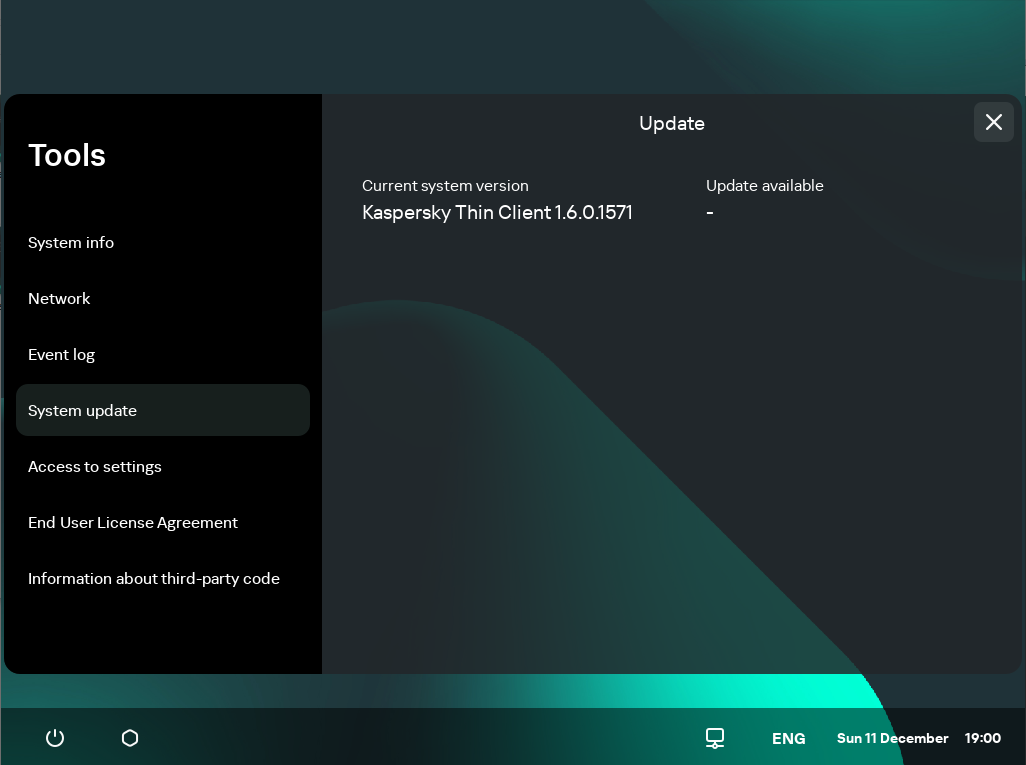
Tools. System update section
- Click Install and restart. If no updates are available, the button is not displayed.
The updates will be installed, and Kaspersky Thin Client will restart.
- In the Kaspersky Thin Client control panel, click
If a Kaspersky Thin Client update has been downloaded but you have not yet restarted, the update will be installed automatically during the next restart or shutdown of the device.
Page topClosing a connection session
To close a remote desktop connection session:
- Click the Kaspersky Thin Client connection panel in the center of the upper part of the remote desktop.
- In the connection panel that expands, click the Disconnect from server button.
As a result, the desktop connection session will be closed and the monitor will show the remote desktop connection window.
If the Basis.WorkPlace administrator has set an idle timeout period for Kaspersky Thin Client that terminates the connection session with a remote desktop managed by Basis.WorkPlace, this connection will be closed automatically when the session is idle for this period of time.
Page top