Contents
- Deployment
- Solution architecture
- Deployment scenarios for Kaspersky Endpoint Security for Android
- Deployment scenarios for iOS MDM profile
- Preparing the Administration Console for deployment of the integrated solution
- Configuring Administration Server settings for connection of mobile devices
- Configuring a connection gateway to connect mobile devices to Kaspersky Security Center Administration Server
- Displaying the Mobile Device Management folder in the Administration Console
- Creating an administration group
- Creating a rule for device automatic allocating to administration groups
- Working with certificates of mobile devices
- Deploying mobile device management systems
- Scenario: Mobile Device Management deployment
- Enabling Mobile Device Management
- Deploying a system for management by using iOS MDM protocol
- iOS MDM Server deployment scenarios
- Simplified deployment scheme
- Deployment scheme involving Kerberos constrained delegation (KCD)
- Enabling support of Kerberos Constrained Delegation
- Installing iOS MDM Server
- Receiving an APNs certificate
- Renewing an APNs certificate
- Configuring a reserve iOS MDM Server certificate
- Installing an APNs certificate on an iOS MDM Server
- Configuring access to Apple Push Notification service
- Connecting KES devices to the Administration Server
- Disabling Mobile Device Management
- Installing Kaspersky Endpoint Security for Android
- Permissions
- Installation of Kaspersky Endpoint Security for Android on personal devices
- Installation of Kaspersky Endpoint Security for Android in device owner mode
- Installation of Kaspersky Endpoint Security for Android in device owner mode in a closed network
- Other methods of installation of Kaspersky Endpoint Security for Android
- Configuring synchronization settings
- Activating the Kaspersky Endpoint Security for Android app
- Installing an iOS MDM profile
- Installing administration plug-ins
- Updating a previous version of the application
- Removing Kaspersky Endpoint Security for Android
The help for this version of the solution is no longer updated, so it may contain outdated information. For up-to-date information about the solution refer to the Kaspersky Secure Mobility Management 4.1 Help.
Deployment
This Help section is intended for specialists who install Kaspersky Secure Mobility Management, as well as for specialists who provide technical support to organizations that use Kaspersky Secure Mobility Management.
The help for this version of the solution is no longer updated, so it may contain outdated information. For up-to-date information about the solution refer to the Kaspersky Secure Mobility Management 4.1 Help.
Solution architecture
Kaspersky Secure Mobility Management includes the following components:
- Kaspersky Endpoint Security for Android mobile app
The Kaspersky Endpoint Security for Android app ensures protection of mobile devices against web threats, viruses, and other programs that pose threats. It supports interaction between the mobile device and the Kaspersky Security Center Administration Server using Firebase Cloud Messaging.
- Kaspersky Endpoint Security for Android Administration Plug-in
The Administration Plug-in of Kaspersky Endpoint Security for Android provides the interface for managing mobile devices and mobile apps installed on them through the Administration Console of Kaspersky Security Center.
- Kaspersky Device Management for iOS Administration Plug-in
The Administration Plug-in of Kaspersky Device Management for iOS provides an interface for managing mobile devices connected by means of the iOS MDM protocol through the Administration Console of Kaspersky Security Center.
The architecture of the Kaspersky Secure Mobility Management integrated solution is shown in the figure below.
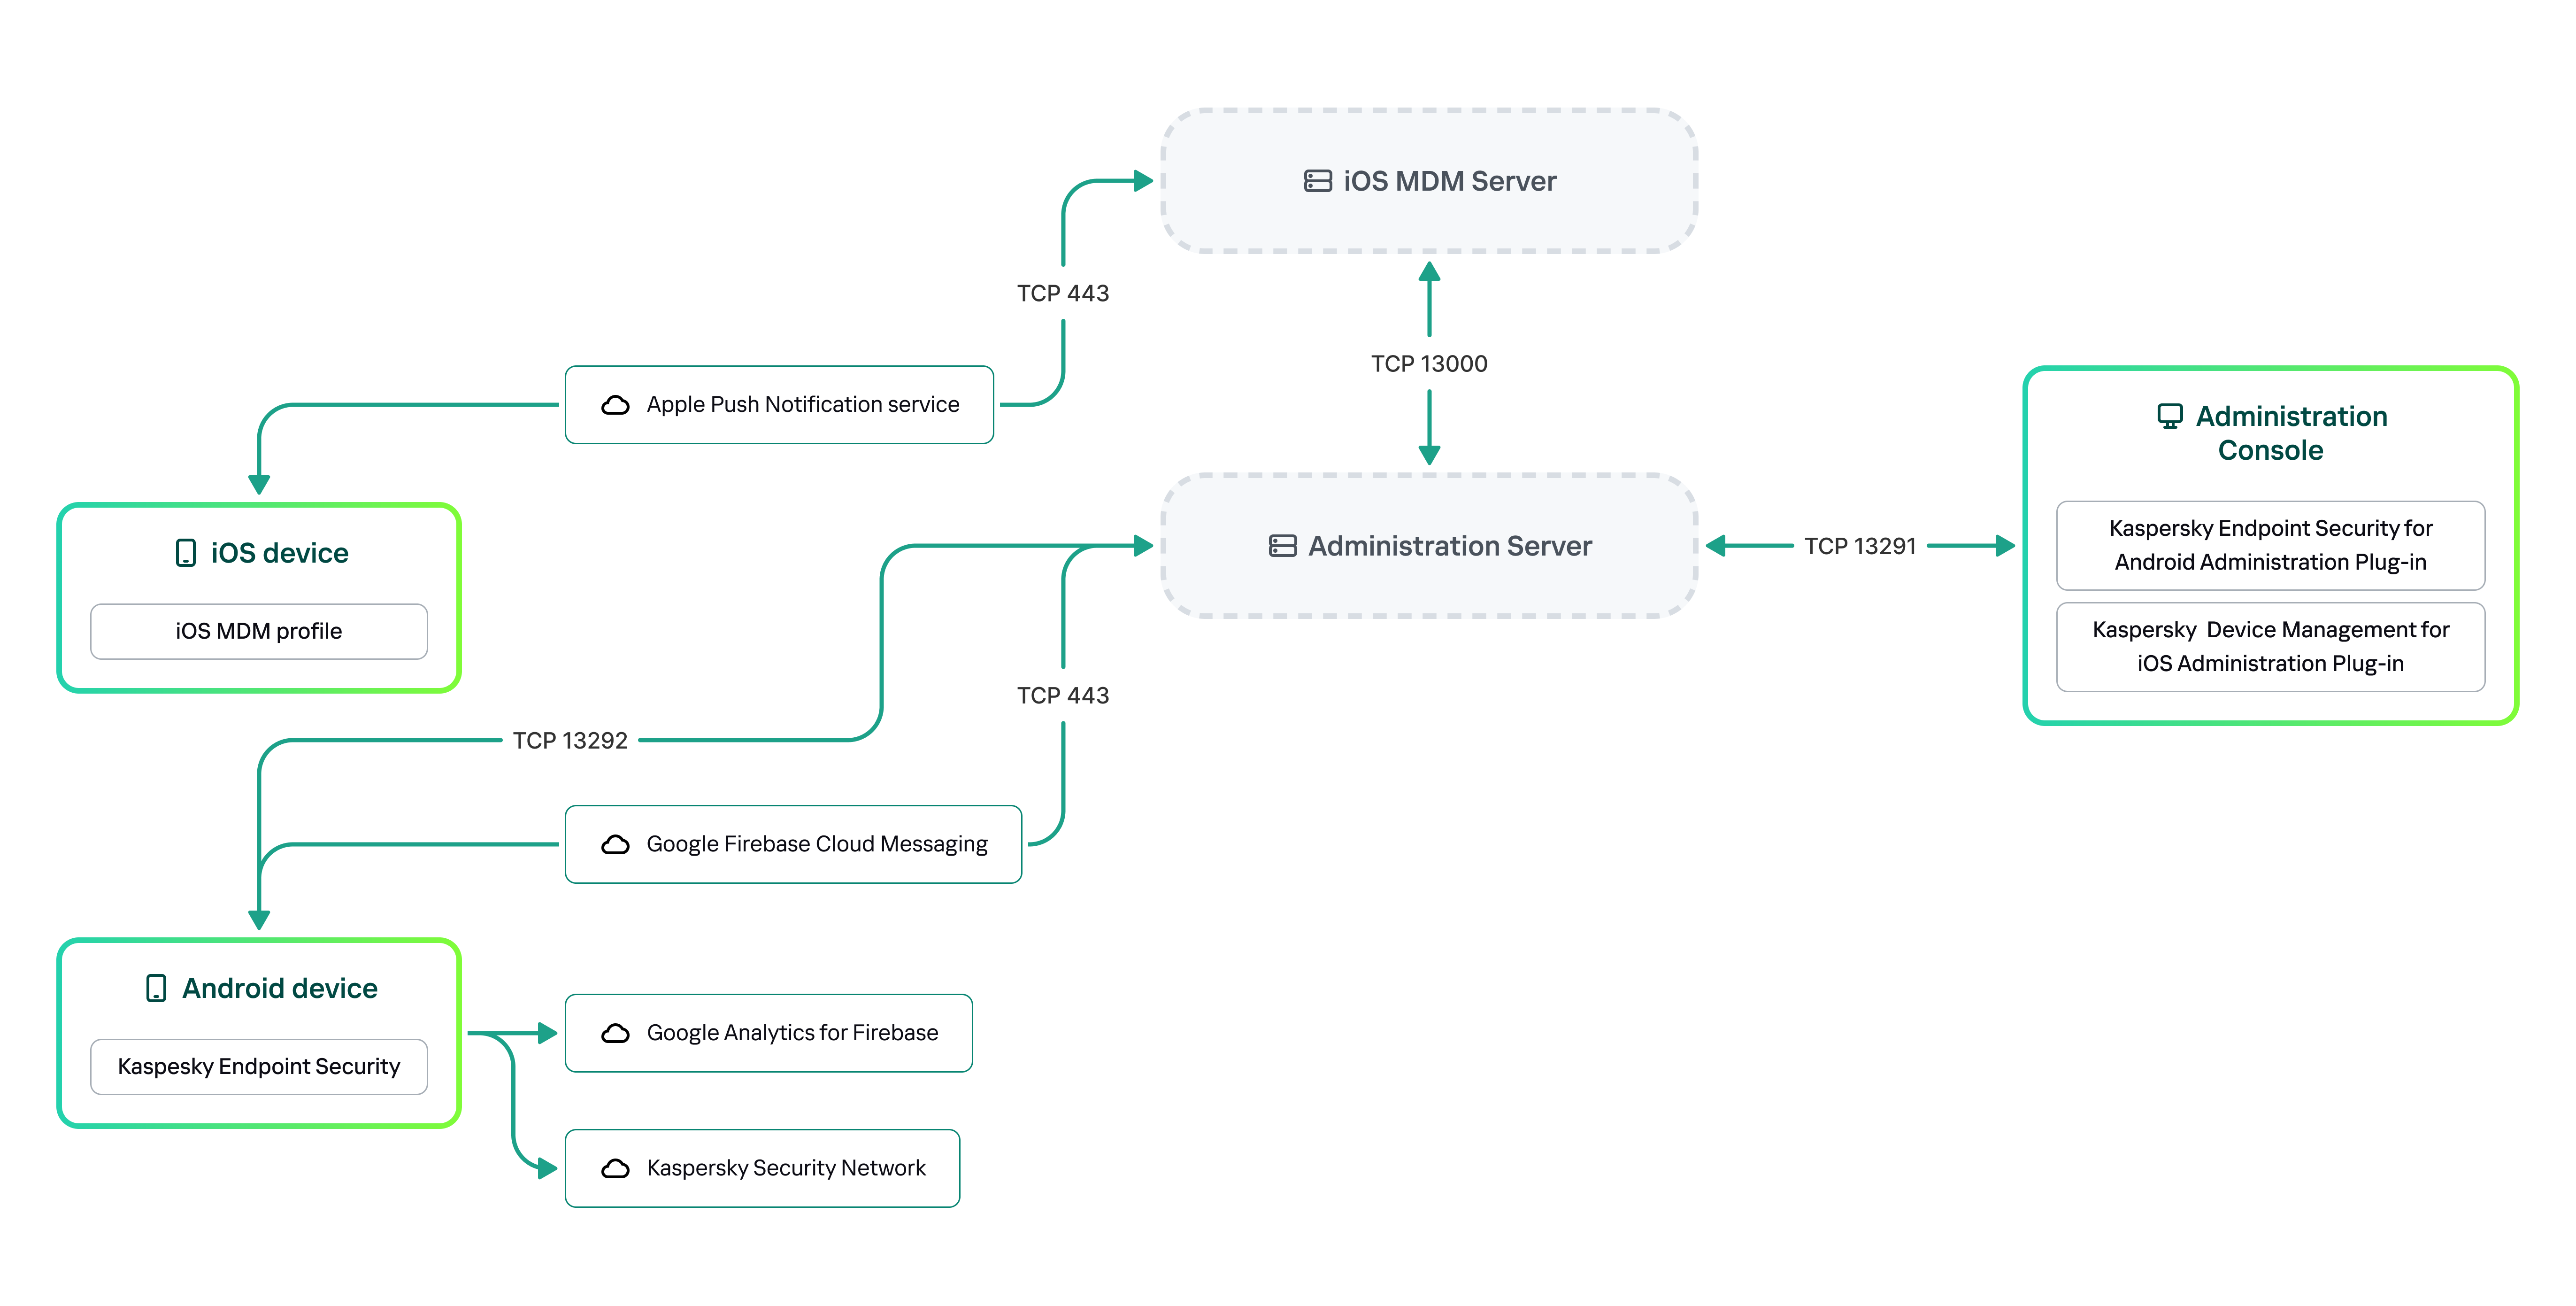
The architecture of Kaspersky Secure Mobility Management
For details on Administration Console, Administration Server, and iOS MDM Server, please refer to Kaspersky Security Center Help.
Page topThe help for this version of the solution is no longer updated, so it may contain outdated information. For up-to-date information about the solution refer to the Kaspersky Secure Mobility Management 4.1 Help.
Deployment scenarios for Kaspersky Endpoint Security for Android
Kaspersky Endpoint Security for Android can be deployed on mobile devices within the corporate network in several ways. You can use the most suitable deployment scenario for your organization or combine several deployment scenarios.
For details on deploying Kaspersky Endpoint Security for Android in Kaspersky Endpoint Security Cloud, please refer to Kaspersky Endpoint Security Cloud help.
Deploying Kaspersky Endpoint Security for Android via Kaspersky Security Center on personal devices
For personal devices, you can deploy Kaspersky Endpoint Security for Android via Kaspersky Security Center by using the following methods:
- Deliver messages with the link to download the app from Google Play (recommended)
- Deliver messages with the link to download the app installation package from Kaspersky Security Center
Deployment of Kaspersky Endpoint Security for Android using Google Play consists in sending messages containing the Google Play link to users of devices from the Administration Console.
To deploy Kaspersky Endpoint Security for Android via the installation package, do the following:
- Create and configure an app installation package.
- Create a standalone installation package.
- Send messages with the link to download a standalone installation package to users of Android devices. Mass mailing is available.
The user installs Kaspersky Endpoint Security for Android on a mobile device after receiving the message with the link. No additional preparations are needed to begin using the app.
When deploying the app via the installation package downloaded from Kaspersky Security Center, the "Blocked by Play Protect" message may appear on the device. The issue is caused by the installation package signing certificate being different from the one specified in Google Play. The user should continue the installation by choosing Install anyway. If OK is selected, the installation process will be interrupted and the device will be reset to factory settings.
Deploying Kaspersky Endpoint Security for Android via Kaspersky Security Center on company-owned devices (device owner mode)
For company-owned devices (device owner mode), you can deploy Kaspersky Endpoint Security for Android via Kaspersky Security Center by using the following methods:
- Deliver the QR code with the link to download the app from Kaspersky website
- Deliver the QR code with the link to download the app installation package from Kaspersky Security Center
To deploy Kaspersky Endpoint Security for Android in device owner mode via the app from Kaspersky website, do the following:
- Create a QR code for app installation from the Administration Console.
- Pre-configure the mobile device and install Kaspersky Endpoint Security for Android using the QR code.
To deploy Kaspersky Endpoint Security for Android in device owner mode via the app installation package, do the following:
- Create and configure an app installation package.
- Create a standalone installation package.
- Create a QR code for app installation via the installation package.
- Pre-configure the mobile device and install Kaspersky Endpoint Security for Android using the QR code.
When deploying the app via the installation package downloaded from Kaspersky Security Center, after the device is reset to factory settings and the QR code is scanned, the Blocked by Play Protect message may appear on the device. The issue is caused by the installation package signing certificate being different from the one specified in Google Play. The user should continue the installation by choosing Install anyway. If OK is selected, the installation process will be interrupted and the device will be reset to factory settings.
Deploying Kaspersky Endpoint Security for Android from Google Play
Kaspersky Endpoint Security for Android is installed from Google Play independently by the users of devices. Users download the mobile app distribution package from Google Play and install the app on devices. After the app has been installed on the device, you need to make additional preparations before you can begin using it: configure the settings of the connection to the Administration Server and install a mobile certificate.
Deploying Kaspersky Endpoint Security for Android via KNOX Mobile Enrollment
Deployment of Kaspersky Endpoint Security for Android consists of adding a KNOX MDM profile to mobile devices. The KNOX MDM profile contains a link to an app deployed on the Kaspersky Security Center Web Server or another server. After the app is installed on the mobile device, you must also install a mobile certificate.
You can read about installation through KNOX Mobile Enrollment in the Samsung KNOX section.
Page topThe help for this version of the solution is no longer updated, so it may contain outdated information. For up-to-date information about the solution refer to the Kaspersky Secure Mobility Management 4.1 Help.
Deployment scenarios for iOS MDM profile
An iOS MDM profile is a profile that contains the settings for connecting mobile devices running iOS to Kaspersky Security Center. After installation of an iOS MDM profile and synchronization with Kaspersky Security Center, the device becomes a managed device. Mobile devices are managed through the Apple Push Notification service (APNs).
Using an iOS MDM profile, you can do the following:
- Remotely configure the settings of iOS MDM devices by using group policies.
- Send device lock and data wipe commands.
- Remotely install Kaspersky apps and other third-party apps.
An iOS MDM profile can be deployed on mobile devices within the corporate network in several ways. You can use the most suitable deployment scenario for your organization or combine several deployment scenarios.
Before deploying an iOS MDM profile, you must deploy a mobile device management system.
For details on deploying an iOS MDM profile in Kaspersky Endpoint Security Cloud, please refer to Kaspersky Endpoint Security Cloud help.
Deploying an iOS MDM profile via Kaspersky Security Center
Deployment of an iOS MDM profile via Kaspersky Security Center can be carried out by sending messages containing a link to download the iOS MDM profile. Mass mailing is available.
The user installs the iOS MDM profile to a mobile device after receiving the message with a link to the Kaspersky Security Center Web Server. No additional preparations for the iOS MDM profile are required.
Page topThe help for this version of the solution is no longer updated, so it may contain outdated information. For up-to-date information about the solution refer to the Kaspersky Secure Mobility Management 4.1 Help.
Preparing the Administration Console for deployment of the integrated solution
This section provides instructions on preparing the Administration Console for deployment of the integrated solution.
The help for this version of the solution is no longer updated, so it may contain outdated information. For up-to-date information about the solution refer to the Kaspersky Secure Mobility Management 4.1 Help.
Configuring Administration Server settings for connection of mobile devices
In order for mobile devices to be able to connect to the Administration Server, before installing the Kaspersky Endpoint Security mobile app, configure the mobile device connection settings in the Administration Server properties.
To configure Administration Server settings for connecting mobile devices:
- In the context menu of the Administration Server, select Properties.
The Administration Server settings window opens.
- Configure the Administration Server ports that will be used by mobile devices:
- Select Administration server connection settings → Additional ports.
- Select the Open port for mobile devices check box.
- In the Port for mobile device synchronization field, specify the port through which mobile devices will connect to the Administration Server.
Port 13292 is used by default.
If the Open port for mobile devices check box is cleared or the wrong connection port is specified, mobile devices will not be able to connect to the Administration Server.
- In the Port for mobile device activation field, specify the port to be used by mobile devices to connect to the Administration Server for activation of the Kaspersky Endpoint Security for Android app.
Port 17100 is used by default.
- Click OK.
- If necessary, replace the certificate used by devices to connect to the Administration Server:
By default, the certificate that has been created during the Administration Server installation is used. Replace this certificate with a different one or reissue the certificate.
- Select the Certificates section.
- Define the required settings.
- Specify a reserve Administration Server certificate.
You need to specify a reserve Administration Server certificate to meet the security requirements of your organization and maintain a continuous connection between managed devices and the Administration Server. A reserve certificate is not issued by default.
- Click Save to save the changes you have made to the settings and exit the Administration Server properties window.
After you configure the mobile device connection settings, you can install the Kaspersky Endpoint Security app on mobile devices and connect them to the Administration Server by using the specified settings.
Page topThe help for this version of the solution is no longer updated, so it may contain outdated information. For up-to-date information about the solution refer to the Kaspersky Secure Mobility Management 4.1 Help.
Configuring a connection gateway to connect mobile devices to Kaspersky Security Center Administration Server
This topic describes how to configure a connection gateway to connect mobile devices to Kaspersky Security Center Administration Server. The configuration proceeds in the following steps:
- Install Network Agent in the connection gateway role on a host
- Configure the connection gateway on Kaspersky Security Center Administration Server
This article contains an overview of the scenario. For detailed instructions, please refer to the Kaspersky Security Center documentation.
Requirements
For a connection gateway to work correctly with mobile devices, the following requirements must be met:
- Port 13292 must be open on the host with the connection gateway.
- Port 13000 must be open between the connection gateway and Kaspersky Security Center. It does not need to be open outside the DMZ.
- The host must have a static address accessible from the internet.
Install Network Agent in the connection gateway role on a host
First, you need to install Network Agent on the selected host device acting in the gateway connection role. You can download a full installation package of Kaspersky Security Center or use a local installation of Kaspersky Security Center.
By default, the installation file is located at: \\<server name>\KLSHARE\PkgInst\NetAgent_<version number>
To install Network Agent in the connection gateway role:
- Start the Network Agent Setup Wizard and follow its instructions leaving default values for all of the options until the Select Administration Server window opens.
- In the Select Administration Server window, configure the following settings:
- Enter the address of the device with Administration Server installed.
- In the Port, SSL port, and UDP port fields, leave the default values.
- Select the Use SSL to connect to Administration Server check box to establish a connection to the Administration Server through a secure port via SSL.
We recommend that you do not clear this check box so your connection remains secured.
- Select the Allow Network Agent to open UDP port check box to manage client devices and receive information about them.
- Click Next and proceed through the Wizard with default settings up to the Connection gateway window.
- In the Connection gateway window, select Use Network Agent as a connection gateway in DMZ.
This mode simultaneously activates the connection gateway role and tells Network Agent to wait for connections from Administration Server, rather than establish connections to Administration Server.
- Click Next and start the installation.
Network Agent is now installed and configured in the connection gateway role.
Configure the connection gateway on Kaspersky Security Center Administration Server
Once you have installed Network Agent in the connection gateway role, you need to connect it to Administration Server. Administration Server does not yet list the device with the connection gateway among the managed devices because the connection gateway has not tried to connect to Administration Server. Therefore, you need to add the connection gateway as a distribution point to ensure that Administration Server initiates a connection to the connection gateway.
To configure the connection gateway on Administration Server:
- Add the connection gateway as a distribution point in Kaspersky Security Center.
- In the console tree, select the Administration Server node.
- In the context menu of Administration Server, select Properties.
- In the Administration Server properties window, select the Distribution points section.
- Click the Add button.
The Add distribution point window opens.
- In the Add distribution point window, perform the following actions:
- Specify the IP address of the device with Network Agent installed in the Device to act as distribution point field. To do this, select Add connection gateway in DMZ by address in the drop-down list.
Enter the IP address of the connection gateway or enter the name if the connection gateway is accessible by name.
- In the Distribution point scope field, select the group to which the connection gateway will be distributed from the drop-down list, and then click OK.
- Specify the IP address of the device with Network Agent installed in the Device to act as distribution point field. To do this, select Add connection gateway in DMZ by address in the drop-down list.
- In the Distribution points section, click OK to save the changes you have made.
The connection gateway will be saved as a new entry named Temporary entry for connection gateway.
Administration Server almost immediately attempts to connect to the connection gateway at the address that you specified. If it succeeds, the entry name changes to the name of the connection gateway device. This process takes up to five minutes.
While the temporary entry for the connection gateway is being converted to a named entry, the connection gateway also appears in the Unassigned devices group.
- Create a new group under the Managed devices group. This new group will contain external managed devices.
- Move the connection gateway from the Unassigned devices group to the group that you have created for external devices.
- Configure properties of the connection gateway that you have deployed:
- In the Distribution points section of the Administration Server properties, select the connection gateway and click Properties.
- In the General section, under DNS domain names of the distribution point for access by mobile devices (included in the certificate), specify your connection gateway DNS name that will be used to connect to the mobile device.
- In the Connection Gateway section, select the following check boxes and leave the default port numbers:
- Open port for mobile devices (SSL authentication of the Administration Server only)
- Open port for mobile devices (two-way SSL authentication)
- Click OK to save the changes you have made.
The connection gateway is now configured. You can now add new mobile devices by specifying the connection gateway address. New devices will appear on Administration Server.
Page topThe help for this version of the solution is no longer updated, so it may contain outdated information. For up-to-date information about the solution refer to the Kaspersky Secure Mobility Management 4.1 Help.
Displaying the Mobile Device Management folder in the Administration Console
By displaying the Mobile Device Management folder in the Administration Console, you can view the list of mobile devices managed by the Administration Server, configure the mobile device management settings, and install certificates on mobile devices of users.
To enable the display of the Mobile Device Management folder in the Administration Console:
- In the context menu of the Administration Server, select View → Configuring interface.
- In the window that opens, select the Display Mobile Device Management check box.
- Click OK.
The Mobile Device Management folder is displayed in the Administration Console tree after the Administration Console is restarted.
Page topThe help for this version of the solution is no longer updated, so it may contain outdated information. For up-to-date information about the solution refer to the Kaspersky Secure Mobility Management 4.1 Help.
Creating an administration group
To perform centralized configuration of the Kaspersky Endpoint Security for Android app installed on the users' mobile devices, the group policies must be applied to the devices.
To apply the policy to a device group, you are advised to create a separate group for these devices in the Managed devices prior to installing mobile apps on user devices.
After creating an administration group, it is recommended to configure the option to automatically allocate devices on which you want to install the apps to this group. Then configure settings that are common to all devices using a group policy.
To create administration group, follow the steps below:
- In the console tree, select the Managed devices folder.
- In the workspace of the Managed devices folder or subfolder, select the Devices tab.
- Click the New group button.
This opens the window in which you can create a new group.
- In the Group name window type the group name and click OK.
A new administration group folder with the specified name appears in the console tree. For more detailed information on use of administration groups, see Kaspersky Security Center Help.
Page topThe help for this version of the solution is no longer updated, so it may contain outdated information. For up-to-date information about the solution refer to the Kaspersky Secure Mobility Management 4.1 Help.
Creating a rule for device automatic allocating to administration groups
You can centrally administer the settings of Kaspersky Endpoint Security for Android app installed on users' mobile devices only if the devices belong to a previously created administration group for which a group policy has been configured.
If the rule to automatically allocate mobile devices detected on the network to the administration group is not configured, during the first synchronization of the device with the Administration Server, the device is automatically sent to the Administration Console in the Advanced → Device discovery → Domains → KES10 folder (KES10 is used by default). A group policy does not apply to this device.
To create the rule for automatic allocating of mobile devices to administration group, follow the steps below:
- In the console tree, select the Unassigned devices folder.
- From the context menu of the Unassigned devices folder, select Properties.
The Properties: Unassigned devices window appears.
- In the Move devices section, click Add to start the process of creating a rule for automatically allocating devices to an administration group.
The New rule window appears.
- Type the rule name.
- Specify the administration group to which mobile devices should be allocated after the Kaspersky Endpoint Security for Android mobile app has been installed on them. To do so, click Browse to the right of the Group to move devices to field and select the group in the window that appears.
- In the Apply rule section, select Run once for each device.
- Select the Move only devices not added to administration groups check box to prevent allocating to the selected group the mobile devices that were allocated to other administration groups when applying the rule.
- Select the Enable rule check box, so that the rule can be applied to newly detected devices.
- Open the Applications section and do the following:
- Select the Operating system version check box.
- Select one or several types of operating systems of the devices to be allocated to the specified group: Android or iOS.
- Click OK.
The newly created rule is displayed in the list of device allocation rules in the Move devices section in the properties window of the Unassigned devices folder.
According to the rule, Kaspersky Security Center allocates all devices that meet the specified requirements from the Unassigned devices folder to the selected group. The mobile devices which were earlier allocated to the Unassigned devices folder can also be allocated to the required administration group of the Managed devices folder manually. For more detailed information on administration groups management and actions with undistributed devices, see Kaspersky Security Center Help.
Page topThe help for this version of the solution is no longer updated, so it may contain outdated information. For up-to-date information about the solution refer to the Kaspersky Secure Mobility Management 4.1 Help.
Working with certificates of mobile devices
This section contains information about how to work with certificates of mobile devices. The section contains instructions on how to install certificates on users' mobile devices and how to configure certificate issuance rules. The section also contains instructions on how to integrate the application with the public keys infrastructure and how to configure the support of Kerberos.
The help for this version of the solution is no longer updated, so it may contain outdated information. For up-to-date information about the solution refer to the Kaspersky Secure Mobility Management 4.1 Help.
Reissuing the mobile Administration Server certificate
You need to specify a reserve Administration Server certificate to meet the security requirements of your organization and maintain a continuous connection between managed devices and the Administration Server. A reserve certificate is not issued by default.
We recommend that you specify a reserve certificate when installing the Administration Server or no later than 30 days before the expiration of the existing certificate. The exact expiration time is available in the Valid to field of the certificate settings (in the context menu of the Administration Server, select Properties → Administration server connection settings → Certificates).
The maximum validity period of any Administration Server certificate does not exceed 397 days.
The reserve certificate is delivered to the device during synchronization and becomes the main certificate immediately after the existing certificate expires. If the certificate expires and no reserve has been specified, the connection between the Administration Server and Kaspersky Endpoint Security on managed devices will be lost. In this case, to reconnect devices, you must specify a new certificate and reinstall Kaspersky Endpoint Security on each of the managed devices.
To reissue the Administration Server certificate with delayed activation (to use a certificate as a reserve one):
- In the console tree, in the context menu of the Administration Server, select Properties.
- In the Administration Server properties window, select Administration server connection settings → Certificates.
- If you plan to continue using the certificate issued by Kaspersky Security Center:
- In the Administration Server authentication by mobile devices group of settings, select the Certificate issued through Administration Server option and click Reissue.
- In the Reissue certificate window that opens:
- In the Connection address group of settings, select Use old connection address or Change connection address to, if a new connection address will be used.
- In the Activation term group of settings, select After this period expires, days to use the certificate as a reserve one.
It is recommended to specify a certificate activation period of at least 30 days so that all devices have time to receive the certificate. Please note that the specified period must be greater than the period for synchronizing devices with the Administration Server. For more information about configuring settings for device synchronization with the Administration Server, see the Configuring synchronization settings section.
- Click OK.
- In the confirmation window, click Yes.
Alternatively, if you plan to use your own custom certificate:
- Check whether your certificate meets the requirements of Kaspersky Security Center and the requirements for trusted certificates by Apple. If necessary, modify the certificate.
- Select the Other certificate option and click Browse.
- In the Certificate window that opens, in the Certificate type field, select the type of your certificate and then specify the certificate location and settings:
- If you select PKCS #12 container, click the Browse button next to the Certificate file field and specify the certificate file on your hard drive. If the certificate file is password-protected, enter the password in the Password (if any) field.
- If you select X.509 certificate, click the Browse button next to the Private key (.prk, .pem) field and specify the private key on your hard drive. If the private key is password-protected, enter the password in the Password (if any) field. Then click the Browse button next to the Public key (.cer) field and specify the private key on your hard drive.
- In the Activation term group of settings, select After this period expires, days to use the certificate as a reserve one.
- In the Certificate window, click OK.
- In the confirmation window, click Yes.
The certificate is reissued for use as the Administration Server certificate or as a reserve one.
To immediately reissue the Administration Server certificate (not recommended if you have any managed mobile devices):
Do not select Immediately if you have any managed mobile devices. If you select this option, the connection with all managed devices will be lost, since the new certificate will not be delivered to devices, and the previously existing certificate will no longer be valid.
- In the console tree, in the context menu of the Administration Server, select Properties.
- In the Administration Server properties window, select Administration server connection settings → Certificates.
- If you plan to continue using the certificate issued by Kaspersky Security Center:
- In the Administration Server authentication by mobile devices group of settings, select the Certificate issued through Administration Server option and click Reissue.
- In the Reissue certificate window that opens:
- In the Connection address group of settings, select Use old connection address or Change connection address to, if a new connection address will be used.
- In the Activation term group of settings, select Immediately.
- Click OK.
- In the confirmation window, click Yes.
Alternatively, if you plan to use your own custom certificate:
- Check whether your certificate meets the requirements of Kaspersky Security Center and the requirements for trusted certificates by Apple. If necessary, modify the certificate.
- Select the Other certificate option and click Browse.
- In the Certificate window that opens, in the Certificate type field select the type of your certificate and then specify the certificate location and settings:
- If you select PKCS #12 container, click the Browse button next to the Certificate file field and specify the certificate file on your hard drive. If the certificate file is password-protected, enter the password in the Password (if any) field.
- If you select X.509 certificate, click the Browse button next to the Private key (.prk, .pem) field and specify the private key on your hard drive. If the private key is password-protected, enter the password in the Password (if any) field. Then click the Browse button next to the Public key (.cer) field and specify the private key on your hard drive.
- In the Activation term group of settings, select Immediately.
- In the Certificate window, click OK.
- In the confirmation window, click Yes.
The certificate is reissued for use as the Administration Server certificate or as a reserve one.
For more information about certificates, please refer to the Kaspersky Security Center Help.
Page topThe help for this version of the solution is no longer updated, so it may contain outdated information. For up-to-date information about the solution refer to the Kaspersky Secure Mobility Management 4.1 Help.
Creating a certificate of mobile devices
You can create the following types of certificates on a user's mobile device:
- Mobile certificates for identifying the mobile device
- Mail certificates for configuring the corporate mail on the mobile device
- VPN certificate for configuring access to a virtual private network on the mobile device
To create a certificate of mobile devices:
- In the console tree, select the Mobile Device Management → Certificates folder.
- In the workspace of the Certificates folder, click the Add certificate button to start the Certificate Installation Wizard.
- In the Certificate type window of the Wizard, specify the type of certificate that must be installed on the user's mobile device:
- Mobile certificate
This certificate is needed for identifying the mobile device.
- Mail certificate
This certificate is needed for configuring the corporate mail on the mobile device.
- VPN certificate
This certificate is needed for configuring access to a virtual private network on the mobile device.
- Mobile certificate
- In the Selecting device type window of the Wizard, Specify the type of the operating system on the device:
- iOS MDM device
Select this option if you want to install a certificate on a mobile device that is connected to the iOS MDM Server by using iOS MDM protocol.
- KES device managed by Kaspersky Security for Mobile
Select this option if you want to install a certificate on a KES device. In this case, the certificate will be used for user identification upon every connection to the Administration Server.
- KES device connected to Administration Server without user certificate authentication
Select this option if you want to install a certificate on a KES device using no certificate authentication. In this case, at the final step of the wizard, in the User notification method window you must select the user authentication type used at every connection to the Administration Server.
This window is displayed only if you selected Mail certificate or VPN certificate as the certificate type.
- iOS MDM device
- In the User selection window of the Wizard, select users, user groups, or Active Directory user groups for which you want to create the certificate.
- In the Certificate source window of the Wizard, select the method by which the certificate is created.
- To create a certificate automatically by using Administration Server tools, select Issue certificate through Administration Server tools.
- To assign a previously created certificate to a user, select the Specify certificate file option. Click the Browse button to open the Certificate window and specify the certificate file in it.
- In the Certificate publishing settings window of the Wizard, select the Do not notify the user about a new certificate check box if you do not want to notify the user about certificate creation. In this case, the User notification method window will not be displayed.
- In the User notification method window of the Wizard, configure the settings of mobile device user notification about certificate creation using a text message or via email.
This window is not displayed if you selected iOS MDM device as the device type or if you selected the Do not notify the user about a new certificate option.
- In the Authentication method field, specify the user authentication type:
This field is displayed if you selected Mobile certificate in the Certificate type window or if you selected KES device connected to Administration Server without user certificate authentication as the device type.
- Select the user notification option:
- In the Authentication method field, specify the user authentication type:
- In the Generating the certificate window of the Wizard, click Done to finish the Certificate Installation Wizard.
After the wizard finishes, a certificate is created and added to the list of the user's certificates; in addition, a notification is sent to the user, providing the user with a link for downloading and installing the certificate on the mobile device. You can delete and reissue certificates, as well as view their properties.
Page topThe help for this version of the solution is no longer updated, so it may contain outdated information. For up-to-date information about the solution refer to the Kaspersky Secure Mobility Management 4.1 Help.
Configuring certificate issuance rules
The certificates are used for the device authentication on the Administration Server. All managed mobile devices must have certificates. You can configure how the certificates are issued.
To configure certificate issuance rules:
- In the console tree, expand the Mobile Device Management folder and select the Certificates subfolder.
- In the workspace of the Certificates folder, click the Add certificate button to open the Certificate issuance rules window.
- Proceed to the section with the name of a certificate type:
Issuance of mobile certificates—To configure the issuance of certificates for the mobile devices.
Issuance of mail certificates—To configure the issuance of mail certificates.
Issuance of VPN certificates—To configure the issuance of VPN certificates.
- In the Issuance settings section, configure the issuance of the certificate:
- Specify the certificate term in days.
- Select a certificate source (Administration Server or Certificates are specified manually).
Administration Server is selected as the default source of certificates.
- Specify a certificate template (Default template, Other template).
Configuration of templates is available if the Integration with PKI section features the integration with Public Key Infrastructure enabled.
- For VPN and mail certificates if the integration with the PKI is configured, enable and configure automatic issuance of the certificate on device connection to Kaspersky Security Center.
To do so, in the Automatic issuance of <certificate type> certificate on device connection section, select the Issue for KES devices managed by Kaspersky Secure Mobility Management and/or Issue for iOS MDM devices check boxes.
If you selected the Issue for iOS MDM devices check box, select the tag for the certificate issuance from the drop-down list. The following tags are available: Certificate template 1, Certificate template 2, or Certificate template 3.
You can configure the further use of the selected tag for the certificate issuance in the following sections:
- If the Issuance of mail certificates section has been selected in the Certificate issuance rules window:
- In the properties of the Email account for iOS MDM devices.
- In the properties of the Exchange ActiveSync account for iOS MDM devices.
- If the Issuance of VPN certificates section has been selected in the Certificate issuance rules window:
- In the properties of the VPN network for iOS MDM devices.
- If the Issuance of mail certificates section has been selected in the Certificate issuance rules window:
- In the Automatic Updates settings section, configure automatic updates of the certificate:
- In the Renew when certificate is to expire in (days) field, specify how many days before expiration the certificate must be renewed.
- To enable automatic updates of certificates, select the Reissue certificate automatically if possible check box.
A mobile certificate can be renewed manually only.
- In the Password protection section, enable and configure the use of a password when decrypting certificates.
Password protection is only available for mobile certificates.
- Select the Prompt for password during certificate installation check box.
- Use the slider to define the maximum number of symbols in the password for encryption.
- Click OK.
The help for this version of the solution is no longer updated, so it may contain outdated information. For up-to-date information about the solution refer to the Kaspersky Secure Mobility Management 4.1 Help.
Integration with Public Key Infrastructure
Integration with Public Key Infrastructure (hereinafter referred to as PKI) is primarily intended for simplifying the issuance of domain user certificates by Administration Server. Following integration, certificates are issued automatically.
The minimum supported PKI server version is Windows Server 2008.
The administrator can assign a domain certificate for a user in Administration Console. This can be done by using one of the following methods:
- Assign the user a special (customized) certificate from a file in the Certificate installation wizard.
- Perform integration with PKI and assign PKI to act as the source of certificates for a specific type of certificates or for all types of certificates.
General principle of integration with PKI for issuance of domain user certificates
Please note the following:
- The settings of integration with PKI provide you the possibility to specify the default template for all types of certificates. Note that the rules for issuance of certificates (available in the workspace of the Mobile Device Management / Certificates folder by clicking the Configure certificate issuance rules button) allow you to specify an individual template for every type of certificates.
- A special Enrollment Agent (EA) certificate must be installed on the device with Administration Server, in the certificates repository of the account under which integration with PKI is performed. The Enrollment Agent (EA) certificate is issued by the administrator of the domain's CA (Certificate Authority).
The account under which integration with PKI is performed must meet the following criteria:
- It is a domain user.
- It is a local administrator of the device with Administration Server from which integration with PKI is initiated.
- It has the right to Log On As Service.
- The device with Administration Server installed must be run at least once under this account to create a permanent user profile.
To create a permanent user profile, log on at least once under the configured user account on the device with Administration Server installed. In this user's certificate repository on the Administration Server device, install the Enrollment Agent certificate provided by domain administrators.
Configuring integration with PKI
To configure integration with the public keys infrastructure:
- In the console tree, expand the Mobile Device Management folder and select the Certificates subfolder.
- In the workspace, click the Certificate type button to open the Integration with PKI section of the Certificate issuance rules window.
The Integration with PKI section of the Certificate issuance rules window opens.
- Select the Integrate issuance of certificates with PKI check box.
- In the Account field, specify the name of the user account to be used for integration with the public key infrastructure.
- In the Password field, enter the domain password for the account.
- In the Certificate template name in PKI system list, select the certificate template that will be used for the issuance of certificates to domain users.
A dedicated service is run in Kaspersky Endpoint Security under the specified user account. This service is responsible for issuing users' domain certificates. The service is run when the list of certificate templates is loaded by clicking the Refresh list button or when a certificate is generated.
- Click OK to save the settings.
Following integration, certificates are issued automatically.
The help for this version of the solution is no longer updated, so it may contain outdated information. For up-to-date information about the solution refer to the Kaspersky Secure Mobility Management 4.1 Help.
Deploying mobile device management systems
This section describes the deployment of mobile device management systems by using the iOS MDM and Kaspersky Endpoint Security protocols.
The help for this version of the solution is no longer updated, so it may contain outdated information. For up-to-date information about the solution refer to the Kaspersky Secure Mobility Management 4.1 Help.
Scenario: Mobile Device Management deployment
This section provides a scenario for configuring the Mobile Device Management feature in Kaspersky Security Center.
Prerequisites
Make sure that you have a license that grants access to the Mobile Device Management feature.
Stages
Deployment of the Mobile Device Management feature proceeds in stages:
- Preparing the ports
Make sure that port 13292 is available on the Administration Server. This port is required for connecting mobile devices. Also, you may want to make port 17100 available. This port is only required for the activation proxy server for managed mobile devices; if managed mobile devices have internet access, you do not have to make this port available.
- Enabling Mobile Device Management
You can enable Mobile Device Management when you are running the Administration Server quick start wizard or later.
- Specifying the external address of the Administration Server
You can specify the external address when you run the Administration Server quick start wizard or later. If you did not select Mobile Device Management for installation and did not specify the address in the installation wizard, specify the external address in the installation package properties.
- Adding mobile devices to the Managed devices group
Add the mobile devices to the Managed devices group so that you can manage these devices through policies. You can create a moving rule in one of the steps of the Administration Server quick start wizard. You can also create the moving rule later. If you do not create such a rule, you can add mobile devices to the Managed devices group manually.
You can add mobile devices to the Managed devices group directly, or you can create a subgroup (or multiple subgroups) for them.
At any time afterward, you can connect any new mobile device to the Administration Server using the Mobile device connection wizard.
- Creating a policy for mobile devices
To manage mobile devices, create a policy (or multiple polices) for them in the group where these devices belong. You can change the settings of this policy at any time afterward.
Results
Upon completion of the scenario, you can manage Android and iOS devices by using Kaspersky Security Center. You can work with certificates of mobile devices and send commands to mobile devices.
Page topThe help for this version of the solution is no longer updated, so it may contain outdated information. For up-to-date information about the solution refer to the Kaspersky Secure Mobility Management 4.1 Help.
Enabling Mobile Device Management
To manage mobile devices, you must enable Mobile Device Management. If you did not enable this feature in the quick start wizard of Kaspersky Security Center, you can enable it later. Mobile Device Management requires a license.
Enabling Mobile Device Management is only available on the primary Administration Server.
To enable Mobile Device Management:
- In the console tree, select the Mobile Device Management folder.
- In the workspace of the folder, click the Enable Mobile Device Management button. This button is only available if you have not enabled Mobile Device Management before.
The Additional components page of the Administration Server quick start wizard is displayed.
- Select Enable Mobile Device Management in order to manage mobile devices.
- On the Select application activation method page, activate the application by using a key file or activation code.
Management of mobile devices will not be possible until you activate the Mobile Device Management feature.
- On the Proxy server settings to gain access to the Internet page, select the Use proxy server check box if you want to use a proxy server when connecting to the internet. When this check box is selected, the fields become available for entering settings. Specify the settings for proxy server connection.
- On the Check for updates for plug-ins and installation packages page, select one of the following options:
- Check whether plug-ins and installation packages are up to date
- Skip check
Skipping the check of updates for plug-ins may result in improper functioning of the application.
- On the Latest plug-in versions available page, download and install the latest versions of plug-ins in the language that your application version requires. Updating the plug-ins does not require a license.
After you install the plug-ins and packages, the application checks whether all plug-ins required for proper functioning of mobile devices have been installed. If outdated versions of some plug-ins are detected, the wizard prompts you to download up-to-date versions to replace the outdated ones.
- On the Mobile device connection settings page, set up the Administration Server ports.
When the wizard completes, the following changes will be made:
- The Kaspersky Endpoint Security for Android policy will be created.
- The Kaspersky Device Management for iOS policy will be created.
- Ports will be opened on the Administration Server for mobile devices.
The help for this version of the solution is no longer updated, so it may contain outdated information. For up-to-date information about the solution refer to the Kaspersky Secure Mobility Management 4.1 Help.
Deploying a system for management by using iOS MDM protocol
Kaspersky Endpoint Security allows you to manage mobile devices running iOS. iOS MDM devices refer to iOS mobile devices that are connected to an iOS MDM Server and managed by an Administration Server.
Connection of mobile devices to an iOS MDM Server is performed in the following sequence:
- The administrator installs iOS MDM Server on the selected client device.
- The administrator retrieves an Apple Push Notification Service (APNs) certificate.
The APNs certificate allows Administration Server to connect to the APNs server to send push notifications to iOS MDM devices.
- The administrator installs the APNs certificate on the iOS MDM Server.
- The administrator creates an iOS MDM profile for the user of the iOS mobile device.
The iOS MDM profile contains a collection of settings for connecting iOS mobile devices to Administration Server.
- The administrator issues a shared certificate to the user.
The shared certificate is required to confirm that the mobile device is owned by the user.
- The user clicks the link sent by the administrator and downloads an installation package to the mobile device.
The installation package contains a certificate and an iOS MDM profile.
After the iOS MDM profile is downloaded and the iOS MDM device is synchronized with the Administration Server, the device is displayed in the Mobile devices folder, which is a subfolder of the Mobile Device Management folder in the console tree.
- The administrator adds a configuration profile on the iOS MDM Server and installs the configuration profile on the mobile device after it is connected.
The configuration profile contains a collection of settings and restrictions for the iOS MDM device, for example, settings for installation of applications, settings for the use of various features of the device, email and scheduling settings. A configuration profile allows you to configure iOS MDM mobile devices in accordance with the organization's security policies.
- If necessary, the administrator adds provisioning profiles on the iOS MDM Server and then installs these provisioning profiles on mobile devices.
Provisioning profile is a profile that is used for managing applications distributed in ways other than through App Store. A provisioning profile contains information about the license; it is linked to a specific application.
The help for this version of the solution is no longer updated, so it may contain outdated information. For up-to-date information about the solution refer to the Kaspersky Secure Mobility Management 4.1 Help.
iOS MDM Server deployment scenarios
The number of copies of iOS MDM Server to be installed can be selected either based on available hardware or on the total number of mobile devices covered.
Please keep in mind that the recommended maximum number of mobile devices for a single installation of Kaspersky Device Management for iOS is 50,000 at most. In order to reduce the load, the entire pool of devices can be distributed among several servers that have iOS MDM Server installed.
Authentication of iOS MDM devices is performed through user certificates (any profile installed on a device contains the certificate of the device owner). Thus, two deployment schemes are possible for an iOS MDM Server:
Page topThe help for this version of the solution is no longer updated, so it may contain outdated information. For up-to-date information about the solution refer to the Kaspersky Secure Mobility Management 4.1 Help.
Simplified deployment scheme
When deploying an iOS MDM Server under the simplified scheme, mobile devices connect to the iOS MDM web service directly. In this case, user certificates issued by Administration Server can only be applied for devices authentication. Integration with Public Key Infrastructure (PKI) is impossible for user certificates.
Page topThe help for this version of the solution is no longer updated, so it may contain outdated information. For up-to-date information about the solution refer to the Kaspersky Secure Mobility Management 4.1 Help.
Deployment scheme involving Kerberos constrained delegation (KCD)
The deployment scheme with Kerberos constrained delegation (KCD) requires the Administration Server and the iOS MDM Server to be located on the internal network of the organization.
This deployment scheme provides for the following:
- Integration with Microsoft Forefront TMG
- Use of KCD for authentication of mobile devices
- Integration with the PKI for applying user certificates
When using this deployment scheme, you must do the following:
- In Administration Console, in the settings of the iOS MDM web service, select the Ensure compatibility with Kerberos constrained delegation check box.
- As the certificate for the iOS MDM web service, specify the customized certificate that was defined when the iOS MDM web service was published on TMG.
- User certificates for iOS devices must be issued by the Certificate Authority (CA) of the domain. If the domain contains multiple root CAs, user certificates must be issued by the CA that was specified when the iOS MDM web service was published on TMG.
You can ensure that the user certificate is in compliance with the this CA-issuance requirement by using one of the following methods:
- Specify the user certificate in the New iOS MDM profile wizard and in the Certificate installation wizard.
- Integrate the Administration Server with the domain's PKI and define the corresponding setting in the rules for issuance of certificates:
- In the console tree, expand the Mobile Device Management folder and select the Certificates subfolder.
- In the workspace of the Certificates folder, click the Configure certificate issuance rules button to open the Certificate issuance rules window.
- In the Integration with PKI section, configure integration with the Public Key Infrastructure.
- In the Issuance of mobile certificates section, specify the source of certificates.
Below is an example of setup of Kerberos Constrained Delegation (KCD) with the following assumptions:
- The iOS MDM web service is running on port 443.
- The name of the device with TMG is tmg.mydom.local.
- The name of device with the iOS MDM web service is iosmdm.mydom.local.
- The name of external publishing of the iOS MDM web service is iosmdm.mydom.global.
Service Principal Name for http/iosmdm.mydom.local
In the domain, you have to register the service principal name (SPN) for the device with the iOS MDM web service (iosmdm.mydom.local):
setspn -a http/iosmdm.mydom.local iosmdm
Configuring the domain properties of the device with TMG (tmg.mydom.local)
To delegate traffic, trust the device with TMG (tmg.mydom.local) to the service that is defined by the SPN (http/iosmdm.mydom.local).
To trust the device with TMG to the service defined by the SPN (http/iosmdm.mydom.local), the administrator must perform the following actions:
- In the Microsoft Management Console snap-in named "Active Directory Users and Computers", select the device with TMG installed (tmg.mydom.local).
- In the device properties, on the Delegation tab, set the Trust this computer for delegation to specified service only toggle to Use any authentication protocol.
- Add the SPN (http/iosmdm.mydom.local) to the Services to which this account can present delegated credentials list.
Special (customized) certificate for the published web service (iosmdm.mydom.global)
You have to issue a special (customized) certificate for the iOS MDM web service on the FQDN iosmdm.mydom.global and specify that it replaces the default certificate in the settings of iOS MDM web service in Administration Console.
Please note that the certificate container (file with the p12 or pfx extension) must also contain a chain of root certificates (public keys).
Publishing the iOS MDM web service on TMG
On TMG, for traffic that goes from a mobile device to port 443 of iosmdm.mydom.global, you have to configure KCD on the SPN (http/iosmdm.mydom.local), using the certificate issued for the FQDN (iosmdm.mydom.global). Please note that publishing, and the published web service must share the same server certificate.
The help for this version of the solution is no longer updated, so it may contain outdated information. For up-to-date information about the solution refer to the Kaspersky Secure Mobility Management 4.1 Help.
Enabling support of Kerberos Constrained Delegation
The application supports usage of Kerberos Constrained Delegation.
To enable support of Kerberos Constrained Delegation:
- In the console tree, open the Mobile Device Management folder.
- In the Mobile Device Management folder in the console tree, select the Mobile Device Servers subfolder.
- In the workspace of the Mobile Device Servers folder, select an iOS MDM Server.
- In the context menu of the iOS MDM Server, select Properties.
- In the properties window of the iOS MDM Server, select the Settings section.
- In the Settings section, select the Ensure compatibility with Kerberos constrained delegation check box.
- Click OK.
The help for this version of the solution is no longer updated, so it may contain outdated information. For up-to-date information about the solution refer to the Kaspersky Secure Mobility Management 4.1 Help.
Installing iOS MDM Server
To install iOS MDM Server on a client device:
- In the Mobile Device Management folder of the console tree, select the Mobile Device Servers subfolder.
- Click the Install iOS MDM Server button.
The iOS MDM Server Deployment wizard starts. Proceed through the wizard by using the Next button.
- On the Select installation package step of the wizard, select the iOS MDM Server installation package that you want to install.
If there is no suitable package in the list, click the New button and create the required package.
- If necessary, on the Selecting Network Agent installation package for combined installation step of the wizard, keep the Install Network Agent together with this application check box, and then select the Network Agent version that you want to install. is needed for the iOS MDM Server to connect to Kaspersky Security Center. You can skip this step if Network Agent is already installed on the device where you plan to install the iOS MDM Server.
- On the Connection settings step of the wizard, in the External port for connection to iOS MDM field, specify an external port for connecting mobile devices to the iOS MDM service.
External port 5223 is used by mobile devices for communication with the APNs server. Make sure that port 5223 is open in the firewall for connection with the address range 17.0.0.0/8.
Port 443 is used for connection to iOS MDM Server by default. If port 443 is already in use by another service or application, it can be replaced with, for example, port 9443.
The iOS MDM Server uses external port 2197 to send notifications to the APNs server.
APNs servers run in load-balancing mode. Mobile devices do not always connect to the same IP addresses to receive notifications. The 17.0.0.0/8 address range is reserved for Apple, and it is therefore recommended to specify this entire range as an allowed range in Firewall settings.
- If you want to configure interaction ports for application components manually, select the Set up local ports manually option, and then specify values for the following settings:
- Port for connection to Network Agent
In this field, specify a port for connecting the iOS MDM service to Network Agent. The default port number is 9799.
- Local port to connect to iOS MDM service
In this field, specify a local port for connecting Network Agent to the iOS MDM service. The default port number is 9899.
It is recommended to use default values.
- Port for connection to Network Agent
- Under iOS MDM Server address, specify the address of the client device on which iOS MDM Server is to be installed.
This address will be used for connecting managed mobile devices to the iOS MDM service. The client device must be available for connection of iOS MDM devices.
You can specify the address of a client device in any of the following formats:
- Use device FQDN
The fully qualified domain name (FQDN) of the device will be used.
- Use this address
Specify the specific address of the device manually.
Please avoid adding the URL scheme and the port number in the address string: these values will be added automatically.
- Use device FQDN
- On the Select devices for installation step of the wizard, select the devices on which you want to install the iOS MDM Server.
- On the Move to list of managed devices step of the wizard, select whether you want to move the devices to any administration group after Network Agent installation.
This option is applicable if you selected one or more unassigned devices on the previous step. If you selected only managed devices, skip this step.
- Define other settings of the wizard. For detailed information about the remote installation of apps, please refer to Kaspersky Security Center help.
When the wizard finishes, iOS MDM Server is installed on the selected devices. The iOS MDM Server is displayed in the Mobile Device Management folder in the console tree.
The wizard proceeds to the Install APNs certificate step. If you do not want to manage the certificate right now, you can create a certificate or install an already existing certificate later.
Page topThe help for this version of the solution is no longer updated, so it may contain outdated information. For up-to-date information about the solution refer to the Kaspersky Secure Mobility Management 4.1 Help.
Receiving an APNs certificate
If you already have an APNs certificate, please consider renewing it instead of creating a new one. When you replace the existing APNs certificate with a newly created one, the Administration Server loses the ability to manage the currently connected iOS mobile devices.
When the Certificate Signing Request (CSR) is created at the first step of the APNs Certificate Wizard, its private key is stored in the RAM of your device. Therefore, all the steps of the wizard must be completed within a single session of the application.
To receive an APNs certificate:
- In the Mobile Device Management folder of the console tree, select the Mobile Device Servers subfolder.
- In the workspace of the Mobile Device Servers folder, select an iOS MDM Server.
- In the context menu of the iOS MDM Server, select Properties.
This opens the properties window of the iOS MDM Server.
- In the properties window of the iOS MDM Server, select the Certificates section.
- In the Certificates section, in the Apple Push Notification certificate group of settings, click the Request new button.
The Request new APNs certificate wizard starts.
- Create a Certificate Signing Request (hereinafter referred to as CSR):
- Click the Create CSR button.
- In the Create CSR window that opens, specify a name for your request, the names of your company and department, your city, region, and country.
- Click the Save button and specify a name for the file to which your CSR will be saved.
The private key of the certificate is saved in the device memory.
- Use your CompanyAccount to send the file with the CSR you have created to Kaspersky to be signed.
Signing of your CSR will only be available after you upload to CompanyAccount portal a key that allows using Mobile Device Management.
After your online request is processed, you will receive a CSR file signed by Kaspersky.
- Send the signed CSR file to Apple Inc. website, using a random Apple ID.
We recommend that you avoid using a personal Apple ID. Create a dedicated Apple ID to make it your corporate ID. After you have created an Apple ID, link it with the organization's mailbox, not a mailbox of an employee.
After your CSR is processed in Apple Inc., you will receive the public key of the APNs certificate. Save the file on disk.
- Export the APNs certificate together with the private key created when generating the CSR, in PFX file format:
- In the Request new APNs certificate wizard, click the Complete CSR button.
- In the Open window, choose a file with the public key of the certificate received from Apple Inc. as the result of CSR processing, and then click the Open button.
The certificate export process starts.
- In the next window, enter the private key password and click OK.
This password will be used for the APNs certificate installation on the iOS MDM Server.
- In the Save APNs certificate window that opens, specify a file name for APNs certificate, choose a folder, and then click Save.
The private and public keys of the certificate are combined, and the APNs certificate is saved in PFX format. After this, you can install the APNs certificate on the iOS MDM Server.
The help for this version of the solution is no longer updated, so it may contain outdated information. For up-to-date information about the solution refer to the Kaspersky Secure Mobility Management 4.1 Help.
Renewing an APNs certificate
To renew an APNs certificate:
- In the Mobile Device Management folder of the console tree, select the Mobile Device Servers subfolder.
- In the workspace of the Mobile Device Servers folder, select an iOS MDM Server.
- In the context menu of the iOS MDM Server, select Properties.
This opens the properties window of the iOS MDM Server.
- In the properties window of the iOS MDM Server, select the Certificates section.
- In the Certificates section, in the Apple Push Notification certificate group of settings click the Renew button.
The Renew APNs certificate wizard starts.
- Create a Certificate Signing Request (hereinafter referred to as CSR):
- Click the Create CSR button.
- In the Create CSR window that opens, specify a name for your request, the names of your company and department, your city, region, and country.
- Click the Save button and specify a name for the file to which your CSR will be saved.
The private key of the certificate is saved in the device memory.
- Use your CompanyAccount to send the file with the CSR you have created to Kaspersky to be signed.
Signing of your CSR will only be available after you upload to CompanyAccount portal a key that allows using Mobile Device Management.
After your online request is processed, you will receive a CSR file signed by Kaspersky.
- Send the signed CSR file to Apple Inc. website, using a random Apple ID.
We recommend that you avoid using a personal Apple ID. Create a dedicated Apple ID to make it your corporate ID. After you have created an Apple ID, link it with the organization's mailbox, not a mailbox of an employee.
After your CSR is processed in Apple Inc., you will receive the public key of the APNs certificate. Save the file on disk.
- Request the public key of the certificate. To do this, perform the following actions:
- Proceed to Apple Push Certificates portal. To log in to the portal, use the Apple Id received at the initial request of the certificate.
- In the list of certificates, select the certificate whose APSP name (in "APSP: <number>" format) matches the APSP name of the certificate used by iOS MDM Server and click the Renew button.
The APNs certificate is renewed.
- Save the certificate created on the portal.
- Export the APNs certificate together with the private key created when generating the CSR, in PFX file format:
- In the Renew APNs certificate wizard, click the Complete CSR button.
- In the Open window, choose a file with the public key of the certificate, received from Apple Inc. as the result of CSR processing, and click the Open button.
The certificate export process will start.
- In the next window, enter the private key password and click OK.
This password will be used for the APNs certificate installation on the iOS MDM Server.
- In the Renew APNs certificate window that opens, specify a file name for APNs certificate, choose a folder, and then click Save.
The private and public keys of the certificate are combined, and the APNs certificate is saved in PFX format.
The help for this version of the solution is no longer updated, so it may contain outdated information. For up-to-date information about the solution refer to the Kaspersky Secure Mobility Management 4.1 Help.
Configuring a reserve iOS MDM Server certificate
The iOS MDM Server functionality enables you to issue a reserve certificate. This certificate is intended for use in iOS MDM profiles, to ensure seamless switching of managed iOS devices after the iOS MDM Server certificate expires.
If your iOS MDM Server uses a default certificate issued by Kaspersky, you can issue a reserve certificate (or specify your own custom certificate as reserve) before the iOS MDM Server certificate expires. By default, the reserve certificate is automatically issued 60 days before the iOS MDM Server certificate expiration. The reserve iOS MDM Server certificate becomes the main certificate immediately after the iOS MDM Server certificate expiration. The public key is distributed to all managed devices through configuration profiles, so you do not have to transmit it manually.
To issue an iOS MDM Server reserve certificate or specify a custom reserve certificate:
- In the console tree, in the Mobile Device Management folder, select the Mobile Device Servers subfolder.
- In the list of Mobile Device Servers, select the relevant iOS MDM Server, and on the right pane, click the Configure iOS MDM Server button.
- In the iOS MDM Server settings window that opens, select the Certificates section.
- In the Reserve certificate block of settings, do one of the following:
- If you plan to continue using a self-signed certificate (that is, the one issued by Kaspersky):
- Click the Issue button.
- In the Activation date window that opens, select one of the two options for the date when the reserve certificate must be applied:
- If you want to apply the reserve certificate at the time of expiration of the current certificate, select the When current certificate expires option.
- If you want to apply the reserve certificate before the current certificate expires, select the After specified period (days) option. In the entry field next to this option, specify the duration of the period after which the reserve certificate must replace the current certificate.
The validity period of the reserve certificate that you specify cannot exceed the validity term of the current iOS MDM Server certificate.
- Click the OK button.
The reserve iOS MDM Server certificate is issued.
- If you plan to use a custom certificate issued by your certification authority:
- Click the Add button.
- In the File Explorer window that opens, specify a certificate file in the PEM, PFX, or P12 format, which is stored on your device, and then click the Open button.
Your custom certificate is specified as the reserve iOS MDM Server certificate.
- If you plan to continue using a self-signed certificate (that is, the one issued by Kaspersky):
You have a reserve iOS MDM Server certificate specified. The details of the reserve certificate are displayed in the Reserve certificate block of settings (certificate name, issuer name, expiration date, and the date the reserve certificate must be applied, if any).
The help for this version of the solution is no longer updated, so it may contain outdated information. For up-to-date information about the solution refer to the Kaspersky Secure Mobility Management 4.1 Help.
Installing an APNs certificate on an iOS MDM Server
After you receive the APNs certificate, you must install it on the iOS MDM Server.
To install the APNs certificate on the iOS MDM Server:
- In the Mobile Device Management folder of the console tree, select the Mobile Device Servers subfolder.
- In the workspace of the Mobile Device Servers folder, select an iOS MDM Server.
- In the context menu of the iOS MDM Server, select Properties.
This opens the properties window of the iOS MDM Server.
- In the properties window of the iOS MDM Server, select the Certificates section.
- In the Certificates section, in the Apple Push Notification certificate group of settings click the Install button.
- Select the PFX file that contains the APNs certificate.
- Enter the password of the private key specified when exporting the APNs certificate.
The APNs certificate will be installed on the iOS MDM Server. The certificate details will be displayed in the properties window of the iOS MDM Server, in the Certificates section.
Page topThe help for this version of the solution is no longer updated, so it may contain outdated information. For up-to-date information about the solution refer to the Kaspersky Secure Mobility Management 4.1 Help.
Configuring access to Apple Push Notification service
To ensure a proper functioning of the iOS MDM web service and timely responses of mobile devices to the administrator's commands, you need to specify an Apple Push Notification Service certificate (hereinafter referred to as APNs certificate) in the iOS MDM Server settings.
Interacting with Apple Push Notification (hereinafter referred to as APNs), the iOS MDM web service connects to the external address api.push.apple.com through port 2197 (outbound). Therefore, the iOS MDM web service requires access to port TCP 2197 for the range of addresses 17.0.0.0/8. From the iOS device side is access to port TCP 5223 for the range of addresses 17.0.0.0/8.
If you intend to access APNs from the iOS MDM web service side through a proxy server, you must perform the following actions on the device with the iOS MDM web service installed:
- Add the following strings to the registry:
- For 32-bit operating systems:
HKEY_LOCAL_MACHINE\SOFTWARE\KasperskyLab\Components\34\Connectors\KLIOSMDM\1.0.0.0\Conset
"ApnProxyHost"="<Proxy Host Name>"
"ApnProxyPort"="<Proxy Port>"
"ApnProxyLogin"="<Proxy Login>"
"ApnProxyPwd"="<Proxy Password>"
- For 64-bit operating systems:
HKEY_LOCAL_MACHINE\SOFTWARE\Wow6432Node\KasperskyLab\Components\34\Connectors\KLIOSMDM\1.0.0.0\Conset
"ApnProxyHost"="<Proxy Host Name>"
"ApnProxyPort"="<Proxy Port>"
"ApnProxyLogin"="<Proxy Login>"
"ApnProxyPwd"="<Proxy Password>"
- Restart the iOS MDM web service.
The help for this version of the solution is no longer updated, so it may contain outdated information. For up-to-date information about the solution refer to the Kaspersky Secure Mobility Management 4.1 Help.
Connecting KES devices to the Administration Server
Depending on the method used for connection of devices to the Administration Server, two deployment schemes are possible for Kaspersky Device Management for iOS for KES devices:
- Scheme of deployment with direct connection of devices to the Administration Server
- Scheme of deployment involving Forefront Threat Management Gateway (TMG)
The help for this version of the solution is no longer updated, so it may contain outdated information. For up-to-date information about the solution refer to the Kaspersky Secure Mobility Management 4.1 Help.
Direct connection of devices to the Administration Server
KES devices can connect directly to port 13292 of the Administration Server.
Depending on the method used for authentication, two options are possible for connection of KES devices to the Administration Server:
- Connecting devices with a user certificate
- Connecting devices without a user certificate
Connecting a device with a user certificate
When connecting a device with a user certificate, that device is associated with the user account to which the corresponding certificate has been assigned through Administration Server tools.
In this case, two-way SSL authentication (mutual authentication) will be used. Both the Administration Server and the device will be authenticated with certificates.
Connecting a device without a user certificate
When connecting a device without a user certificate, that device is associated with none of the user's accounts on the Administration Server. However, when the device receives any certificate, the device will be associated with the user to which the corresponding certificate has been assigned through Administration Server tools.
When connecting that device to the Administration Server, one-way SSL authentication will be applied, which means that only the Administration Server is authenticated with the certificate. After the device retrieves the user certificate, the type of authentication will change to two-way SSL authentication (2-way SSL authentication, mutual authentication).
Page topThe help for this version of the solution is no longer updated, so it may contain outdated information. For up-to-date information about the solution refer to the Kaspersky Secure Mobility Management 4.1 Help.
Scheme for connecting KES devices to the Server involving Kerberos constrained delegation (KCD)
The scheme for connecting KES devices to the Administration Server involving Kerberos constrained delegation (KCD) provides for the following:
- Integration with Microsoft Forefront TMG.
- Use of Kerberos Constrained Delegation (hereinafter referred to as KCD) for authentication of mobile devices.
- Integration with Public Key Infrastructure (hereinafter referred to as PKI) for applying user certificates.
When using this connection scheme, please note the following:
- The type of connection of KES devices to TMG must be "two-way SSL authentication", that is, a device must connect to TMG through its proprietary user certificate. To do this, you need to integrate the user certificate into the installation package of Kaspersky Endpoint Security for Android, which has been installed on the device. This KES package must be created by the Administration Server specifically for this device (user).
- You must specify the special (customized) certificate instead of the default server certificate for the mobile protocol:
- In the Administration Server properties window, in the Settings section, select the Open port for mobile devices check box and select Add certificate in the drop-down list.
- In the window that opens, specify the same certificate that was set on TMG when the point of access to the mobile protocol was published on the Administration Server.
- User certificates for KES devices must be issued by the Certificate Authority (CA) of the domain. Keep in mind that if the domain includes multiple root CAs, user certificates must be issued by the CA, which has been set in the publication on TMG.
You can make sure the user certificate is in compliance with the above-described requirement, using one of the following methods:
- Specify the special user certificate in the New package wizard and in the Certificate installation wizard.
- Integrate the Administration Server with the domain's PKI and define the corresponding setting in the rules for issuance of certificates:
- In the console tree, expand the Mobile Device Management folder and select the Certificates subfolder.
- In the workspace of the Certificates folder, click the Configure certificate issuance rules button to open the Certificate issuance rules window.
- In the Integration with PKI section, configure integration with the Public Key Infrastructure.
- In the Issuance of mobile certificates section, specify the source of certificates.
Below is an example of setup of Kerberos Constrained Delegation (KCD) with the following assumptions:
- Point of access to the mobile protocol on the Administration Server is set up on port 13292.
- The name of the device with TMG is tmg.mydom.local.
- The name of the device with Administration Server is ksc.mydom.local.
- Name of the external publishing of the point of access to the mobile protocol is kes4mob.mydom.global.
Domain account for Administration Server
You must create a domain account (for example, KSCMobileSrvcUsr) under which the Administration Server service will run. You can specify an account for the Administration Server service when installing the Administration Server or through the klsrvswch utility. The klsrvswch utility is located in the installation folder of Administration Server.
A domain account must be specified by the following reasons:
- The feature for management of KES devices is an integral part of Administration Server.
- To ensure a proper functioning of Kerberos Constrained Delegation (KCD), the receive side (i.e., the Administration Server) must run under a domain account.
Service Principal Name for http/kes4mob.mydom.local
In the domain, under the KSCMobileSrvcUsr account, add an SPN for publishing the mobile protocol service on port 13292 of the device with Administration Server. For the kes4mob.mydom.local device with Administration Server, this will appear as follows:
setspn -a http/kes4mob.mydom.local:13292 mydom\KSCMobileSrvcUsr
Configuring the domain properties of the device with TMG (tmg.mydom.local)
To delegate traffic, you must trust the device with TMG (tmg.mydom.local) to the service defined by the SPN (http/kes4mob.mydom.local:13292).
To trust the device with TMG to the service defined by the SPN (http/kes4mob.mydom.local:13292), the administrator must perform the following actions:
- In the Microsoft Management Console snap-in named "Active Directory Users and Computers", select the device with TMG installed (tmg.mydom.local).
- In the device properties, on the Delegation tab, set the Trust this computer for delegation to specified service only toggle to Use any authentication protocol.
- In the Services to which this account can present delegated credentials list, add the SPN http/kes4mob.mydom.local:13292.
Special (customized) certificate for the publishing (kes4mob.mydom.global)
To publish the mobile protocol of Administration Server, you must issue a special (customized) certificate for the FQDN kes4mob.mydom.global and specify it instead of the default server certificate in the settings of the mobile protocol of Administration Server in Administration Console. To do this, in the properties window of the Administration Server, in the Settings section select the Open port for mobile devices check box and then select Add certificate in the drop-down list.
Please note that the server certificate container (file with the p12 or pfx extension) must also contain a chain of root certificates (public keys).
Configuring publication on TMG
On TMG, for traffic that goes from the mobile device side to port 13292 of kes4mob.mydom.global, you have to configure KCD on the SPN (http/kes4mob.mydom.local:13292), using the server certificate issued for the FQND kes4mob.mydom.global. Please note that publishing and the published access point (port 13292 of the Administration Server) must share the same server certificate.
The help for this version of the solution is no longer updated, so it may contain outdated information. For up-to-date information about the solution refer to the Kaspersky Secure Mobility Management 4.1 Help.
Using Google Firebase Cloud Messaging
To ensure timely delivery of commands to KES devices managed by the Android operating system, Kaspersky Security Center uses the mechanism of push notifications. Push notifications are exchanged between KES devices and Administration Server through Google Firebase Cloud Messaging (hereinafter referred to as FCM). In Kaspersky Security Center Administration Console, you can specify the Google Firebase Cloud Messaging settings to connect KES devices to the service.
To retrieve the settings of Google Firebase Cloud Messaging, you must have a Google account.
To enable the use of FCM:
- In Administration Console, select the Mobile Device Management node, and the Mobile devices folder.
- In the context menu of the Mobile devices folder, select Properties.
- In the folder properties, select the Google Firebase Cloud Messaging settings section.
- In the Sender ID and Server key fields, specify the FCM settings: SENDER_ID and API Key.
At the next synchronization with Administration Server, KES devices managed by Android operating systems will be connected to Google Firebase Cloud Messaging.
You can edit the Google Firebase Cloud Messaging settings by clicking the Reset settings button.
FCM service runs in the following address ranges:
- From the KES device's side, access is required to ports 443 (HTTPS), 5228 (HTTPS), 5229 (HTTPS), and 5230 (HTTPS) of the following addresses:
- google.com
- fcm.googleapis.com
- android.apis.google.com
- All of the IP addresses listed in Google's ASN of 15169
- From the Administration Server side, access is required to port 443 (HTTPS) of the following addresses:
- fcm.googleapis.com
- All of the IP addresses listed in Google's ASN of 15169
If the proxy server settings (Advanced / Configuring Internet access) have been specified in the Administration Server properties in Administration Console, they will be used for interaction with FCM.
Configuring FCM: retrieving SENDER_ID and API Key
To configure FCM:
- Register on Google portal.
- Go to Developers portal.
- Create a new project by clicking the Create Project button, specify the project's name, and specify the ID.
- Wait for the project to be created.
On the first page of the project, in the upper part of the page, the Project Number field shows the relevant SENDER_ID.
- Go to the APIs & auth / APIs section and enable Google Firebase Cloud Messaging for Android.
- Go to the APIs & auth / Credentials section and click the Create New Key button.
- Click the Server key button.
- Impose restrictions (if any), click the Create button.
- Retrieve the API Key from the properties of the newly created key (Server key field).
Google Firebase Cloud Messaging is configured.
Page topThe help for this version of the solution is no longer updated, so it may contain outdated information. For up-to-date information about the solution refer to the Kaspersky Secure Mobility Management 4.1 Help.
Disabling Mobile Device Management
Disabling Mobile Device Management is only available on the primary Administration Server.
To disable Mobile Device Management:
- In the console tree, select the Mobile Device Management folder.
- In the workspace of this folder, click the Add iOS mobile device link.
The Additional components page of the Administration Server quick start wizard is displayed.
- Select Do not enable Mobile Device Management if you do not want to manage mobile devices any longer.
- Click OK.
Previously connected mobile devices will not be able to connect to Administration Server. The port for mobile device connection and the port for mobile device activation will be closed automatically.
Policies that were created for Kaspersky Endpoint Security for Android and Kaspersky Device Management for iOS will not be deleted. The certificate issuance rules will not be modified. The plug-ins that have been installed will not be removed. The moving rule for mobile devices will not be deleted.
After you re-enable Mobile Device Management on managed mobile devices, you may have to reinstall mobile apps that are required for mobile device management.
The help for this version of the solution is no longer updated, so it may contain outdated information. For up-to-date information about the solution refer to the Kaspersky Secure Mobility Management 4.1 Help.
Installing Kaspersky Endpoint Security for Android
This section describes the methods for deploying Kaspersky Endpoint Security for Android on a corporate network.
The help for this version of the solution is no longer updated, so it may contain outdated information. For up-to-date information about the solution refer to the Kaspersky Secure Mobility Management 4.1 Help.
Permissions
For all features of apps, Kaspersky Endpoint Security for Android prompts the user for the required permissions. Kaspersky Endpoint Security for Android prompts for the mandatory permissions while completing the Setup Wizard, as well as after installation prior to using individual features of apps. It is impossible to install Kaspersky Endpoint Security for Android without providing the mandatory permissions.
On certain devices (for example, HUAWEI, Meizu, and Xiaomi), you must manually add Kaspersky Endpoint Security for Android to the list of apps that are started when the operating system starts in the device settings. If the app is not added to the list, Kaspersky Endpoint Security for Android stops performing all of its functions after the mobile device is restarted.
On devices running Android 11 or later or Android 6-10 with Google Play services, you must disable the Remove permissions if app isn't used system setting. Otherwise, after the app is not used for a few months, the system automatically resets the permissions that the user granted to the app.
Permissions requested by Kaspersky Endpoint Security for Android
Permission |
App function |
|---|---|
Phone (for Android 5.0 – 9) |
Connect to Kaspersky Security Center (device ID) |
Storage (mandatory) |
Anti-Malware |
Access to manage all files (for Android 11 or later) |
Anti-Malware |
Nearby Bluetooth devices (for Android 12 or later) |
Restrict use of Bluetooth On some Xiaomi and HUAWEI devices running Android 12, Kaspersky Endpoint Security for Android does not prompt the user for the Nearby Bluetooth devices permission. This issue is caused by the specific features of MIUI firmware on Xiaomi and EMUI firmware on HUAWEI. Despite the absence of the request for this permission, all features related to using Bluetooth work correctly on these devices. |
Ignore battery optimization (for Android 12 or later)
|
App Control |
Web Protection |
|
Anti-Theft |
|
Notifications (for Android 13) |
Notify the user about security issues and app events |
Allow running in the background (for Android 12 or later) |
Ensure continuous operation of the app. If permission is not granted, the app may be unloaded from memory and unable to restart. |
Device administrator (mandatory)
|
Anti-Theft – lock the device (only for Android 5.0 – 6) |
Anti-Theft – take a mugshot with frontal camera |
|
Anti-Theft – sound an alarm |
|
Anti-Theft – full reset |
|
Password protection |
|
App removal protection |
|
Install security certificate |
|
App Control |
|
Manage KNOX (only for Samsung devices) |
|
Configure Wi-Fi |
|
Configure Exchange ActiveSync |
|
Restrict use of the camera, Bluetooth, and Wi-Fi |
|
|
|
Camera |
Anti-Theft – take a mugshot with frontal camera On devices running Android 11 or later, the user must grant the "While using the app" permission when prompted. |
Location |
Anti-Theft – locate device On devices running Android 10 or later, the user must grant the "All the time" permission when prompted. |
Accessibility |
Anti-Theft – lock the device (only for Android 7.0 or later) |
Web Protection |
|
App Control |
|
App removal protection (only for Android 7.0 or later) |
|
Display of warnings of Kaspersky Endpoint Security for Android (only for Android 10 or later) |
|
Restrict use of the camera (only for Android 11 or later) |
|
|
|
Display pop-up window (for some Xiaomi devices) |
Web Protection |
Display pop-up windows while running in the background (for some Xiaomi devices) |
Web Protection |
Run in the background (for Xiaomi devices with MIUI firmware on Android 11 or earlier) |
App Control |
Web Protection |
|
Anti-Theft |
The help for this version of the solution is no longer updated, so it may contain outdated information. For up-to-date information about the solution refer to the Kaspersky Secure Mobility Management 4.1 Help.
Installation of Kaspersky Endpoint Security for Android on personal devices
Kaspersky Endpoint Security for Android is installed on the mobile devices of users whose user accounts have been added in Kaspersky Security Center. For more details about user accounts in Kaspersky Security Center, please refer to Kaspersky Security Center Help.
You can install the Kaspersky Endpoint Security for Android app on devices through Kaspersky Security Center by using one of the following methods:
- Download the app from Google Play (recommended method)
- Download the app installation package from Kaspersky Security Center
To install Kaspersky Endpoint Security for Android through Kaspersky Security Center on personal devices:
- In the console tree, select the Mobile Device Management → Mobile devices folder.
- In the workspace of the Mobile devices folder, click the Add mobile device button.
This starts the New Mobile Device Connection Wizard. Follow the instructions of the Wizard.
- In the Operating system section, select Android.
- In the Device type section, select Personal device.
Kaspersky Security Center checks for administration plug-in updates. If Kaspersky Security Center detects updates, you can install the new version of the administration plug-in. When the administration plug-in is updated, you can accept the Terms and Conditions of the End User of the License Agreement (EULA) and additional Statements for Kaspersky Endpoint Security for Android. If the administrator accepts the License Agreement and additional Statements in Administration Console, Kaspersky Endpoint Security for Android skips the acceptance step during installation of the app. This feature is available in Kaspersky Security Center version 12.
- On the Method to install Kaspersky Endpoint Security for Android on devices page, select one of two options:
- Download the app from Google Play (recommended default option)
- Download the app installation package from Kaspersky Security Center if Google Play cannot be used for some reason or you need a specific version of the app (for example, for device owner mode)
- On the Select users page of the Wizard, select one or more users for installation of Kaspersky Endpoint Security for Android to their mobile devices.
If a user is not in the list, you can add a new user account without exiting the New Mobile Device Connection Wizard.
- On the Certificate source page of the Wizard, select the source of the certificate for protection of data transfer between Kaspersky Endpoint Security for Android and Kaspersky Security Center:
- Issue certificate through Administration Server tools. In this case, the certificate will be created automatically.
- Specify certificate file. In this case, your own certificate must be prepared ahead of time and then selected in the window of the Wizard. This option cannot be used if you want to install Kaspersky Endpoint Security for Android to several mobile devices. A separate certificate must be created for each user.
- On the User notification method page of the Wizard, select the channel used to forward the app installation link:
- To send the link by email, select Send link to Kaspersky Endpoint Security and configure the settings in the By email section. Make sure that the email address is specified in the settings of user accounts.
- To install Kaspersky Endpoint Security for Android using a QR code, select Show link to installation package and scan the QR code using the camera of the mobile device.
- If none of the listed methods are suitable for you, select Show link to installation package → Copy to copy the link for installing Kaspersky Endpoint Security for Android to the clipboard. Use any available method to deliver the app installation link. You can also use other methods of installation of Kaspersky Endpoint Security for Android.
- Click Finish to close the New Mobile Device Connection Wizard.
After installing Kaspersky Endpoint Security for Android on users' mobile devices, you will be able to configure the settings for devices and apps by using group policies. You will also be able to send commands to mobile devices for data protection in case devices are lost or stolen.
Page topThe help for this version of the solution is no longer updated, so it may contain outdated information. For up-to-date information about the solution refer to the Kaspersky Secure Mobility Management 4.1 Help.
Installation of Kaspersky Endpoint Security for Android in device owner mode
Device owner mode is the device operation mode for company-owned Android devices. This mode lets you have full control over the entire device and configure a wide range of device functions.
Kaspersky Security Center lets you install the Kaspersky Endpoint Security for Android app in device owner mode by generating a QR code for app installation on the device.
Kaspersky Endpoint Security for Android is installed on the mobile devices of users whose user accounts have been added in Kaspersky Security Center. For more details about user accounts in Kaspersky Security Center, please refer to Kaspersky Security Center Help.
Ways to install the app
The Kaspersky Endpoint Security for Android app can be installed via a QR code in one of the following ways:
- Download the app from Kaspersky website
Choose this method for mobile devices that can access the internet to download the APK installation file from the Kaspersky website. The app will then be updated using Google Play or HUAWEI AppGallery.
- Download the app installation package from Kaspersky Security Center
The app's installation package will be downloaded from the Kaspersky Security Center server. The app will also be updated through Kaspersky Security Center using policy settings. You can also choose this method if mobile devices in your company have no access to the internet.
For this method, follow the steps below before generating a QR-code:
- Create and configure an app installation package.
- Create a standalone installation package.
When deploying the app via the installation package downloaded from Kaspersky Security Center, after the device is reset to factory settings and the QR code is scanned, the Blocked by Play Protect message may appear on the device. The issue is caused by the installation package signing certificate being different from the one specified in Google Play. The user should continue the installation by choosing Install anyway. If OK is selected, the installation process will be interrupted and the device will be reset to factory settings.
Generating QR code for app installation
To generate a QR code for app installation in device owner mode:
- In the console tree, select the Mobile Device Management → Mobile devices folder.
- In the workspace of the Mobile devices folder, click the Add mobile device button.
This starts the New Mobile Device Connection Wizard. Follow the instructions of the Wizard.
- In the Operating system section, select Android.
- In the Device type section, select Company-owned device (device owner mode).
- In the Network for downloading the Kaspersky Endpoint Security app section, select one of the following options:
- Prompt the user to select a Wi-Fi network on the device
If you choose this option, the device user will be prompted to connect to any available Wi-Fi network for downloading the app.
This option is selected by default.
- Use only the specified Wi-Fi network (Android 9.0+)
If you choose this option, the device will try to automatically connect to the network that you have specified. This option is supported on Android 9.0 or later.
Be sure to correctly specify all the network parameters. Otherwise, if any parameter is incorrect or the network is not available, the installation process will be interrupted and the device will be reset to the factory settings.
To configure the connection for the required Wi-Fi network, click the Specify network button. In the Wi-Fi network for downloading Kaspersky Endpoint Security window, specify the following parameters:
- Try to use mobile data (Android 8.0+)
If you choose this option, the device will try to use mobile data to download the app. If the device does not have a SIM card, or the mobile network is not available, the user will be prompted to select any available Wi-Fi network.
This option is supported on Android 8.0 or later.
- Prompt the user to select a Wi-Fi network on the device
- In the Additional section, select the Enable all system apps check box if you want system apps to be active on the device. If the check box is cleared, all system apps are disabled.
- Click Next.
Kaspersky Security Center checks for administration plug-in updates. If Kaspersky Security Center detects updates, you can install the new version of the administration plug-in. When the administration plug-in is updated, you can accept the Terms and Conditions of the End User of the License Agreement (EULA) and additional Statements for Kaspersky Endpoint Security for Android. If the administrator accepts the License Agreement and additional Statements in Administration Console, Kaspersky Endpoint Security for Android skips the acceptance step during installation of the app.
- On the Method to install Kaspersky Endpoint Security for Android on devices in device owner mode page, select an installation method:
- Download the app from Kaspersky website
- Download the app installation package from Kaspersky Security Center
If you choose this option, leave the Allow HTTP use for app download in device owner mode check box selected to ensure the app is downloaded. Otherwise, the app will be downloaded via HTTPS only if the Kaspersky Security Center Web Server certificate was issued by a trusted certificate authority.
For more details about these methods, see the Ways to install the app section above.
- On the Select users page of the Wizard, select one or more users for installation of Kaspersky Endpoint Security for Android to their mobile devices.
If a user is not in the list, you can add a new user account without exiting the New Mobile Device Connection Wizard.
- On the Certificate source page of the Wizard, select the source of the certificate for protection of data transfer between Kaspersky Endpoint Security for Android and Kaspersky Security Center:
- Issue certificate through Administration Server tools. In this case, the certificate will be created automatically.
- Specify certificate file. In this case, your own certificate must be prepared ahead of time and then selected in the window of the Wizard. This option cannot be used if you want to install Kaspersky Endpoint Security for Android to several mobile devices. A separate certificate must be created for each user.
- On the User notification method page, select the method used to forward the QR code for the app installation:
- Select Show QR code in wizard to scan the QR code with the camera of the mobile device on which you want to install Kaspersky Endpoint Security for Android.
- Select Send QR code to user to send the QR code by email to users of your organization. If you select this method, specify email addresses. Make sure that the email address is specified in the user account settings in Kaspersky Security Center. The users then need to scan the QR code using the camera of their mobile device to install the app.
- On the Result page, verify the information and save the QR code.
- Click Finish to close the New Mobile Device Connection Wizard.
Additional configuration on the Android device is required to install Kaspersky Endpoint Security for Android in device owner mode.
After installing Kaspersky Endpoint Security for Android on users' mobile devices, you will be able to configure the settings for devices and apps by using group policies. You will also be able to send commands to mobile devices for data protection in case devices are lost or stolen.
Page topThe help for this version of the solution is no longer updated, so it may contain outdated information. For up-to-date information about the solution refer to the Kaspersky Secure Mobility Management 4.1 Help.
Installation of Kaspersky Endpoint Security for Android in device owner mode in a closed network
When deploying Kaspersky Endpoint Security for Android in device owner mode via QR code on devices with pre-installed Google Mobile Services (GMS), their connectivity to certain Google endpoints via Wi-Fi networks is checked. If a Wi-Fi network has no access to the internet, the connectivity check fails and the deployment finishes with an error.
To avoid the connectivity check, you can deploy the Kaspersky Endpoint Security for Android app in device owner mode in a closed network by using a Proxy Auto-Configuration (PAC) file.
To use a PAC file for Kaspersky Endpoint Security for Android app deployment:
- Create a PAC file (for example, proxy.pac) with the following contents:
function FindProxyForURL(url, host) {
return "DIRECT";
} - Publish the created PAC file on a resource which will be available within the closed network (for example, on the IIS Web server).
Save the link to the PAC file (for example, https://intranet.mycompany.com/files/proxy.pac).
- Make sure the APK file of the Kaspersky Endpoint Security for Android app being deployed is available within the closed network. To do this, use one of the methods below:
- Download the app installation package from the Kaspersky Security Center server. If the server is accessible, the installation packages will be available there.
- Download the APK installation file from the Kaspersky website and upload it to the closed network.
Choose the general version of the app as a source.
- Generate the QR code for app installation in device owner mode and forward it to the user by following the instructions of the New Mobile Device Connection Wizard.
When connecting the device to Kaspersky Security Center, you will be asked to specify the network for downloading the Kaspersky Endpoint Security for Android app. At this step, configure the use of the previously created PAC file for network connection by linking it to the Wi-Fi network settings on a device. To do this, use one of the methods below:
- In the Network for downloading the Kaspersky Endpoint Security for Android section, choose Prompt the user to select a Wi-Fi network on the device. While deploying the app, the user will need to specify the link to the PAC file (step 2) in the network settings while choosing a Wi-Fi network on the device. After the connection is established, the user will be able to continue the device setup and activate the app by following the instructions of the app's Initial Configuration Wizard.
- In the Network for downloading the Kaspersky Endpoint Security for Android section, choose Use only the specified Wi-Fi network (Android 9.0+), click the Specify network button, insert the link to the previously created PAC file (step 2) in the PAC file URL field, and then click OK.
If the APK installation file has been downloaded from the Kaspersky website (step 3), you need to change the link in the QR code by specifying the closed network link address.
For more information about configuring the Kaspersky Endpoint Security for Android app in device owner mode, please refer to the Installing the app in device owner mode section.
When deploying the app via the installation package downloaded from Kaspersky Security Center, after the device is reset to factory settings and the QR code is scanned, the Blocked by Play Protect message may appear on the device. The issue is caused by the installation package signing certificate being different from the one specified in Google Play. The user should continue the installation by choosing Install anyway. If OK is selected, the installation process will be interrupted and the device will be reset to factory settings.
The Kaspersky Endpoint Security for Android app is installed on the device in device owner mode in a closed network.
Page topThe help for this version of the solution is no longer updated, so it may contain outdated information. For up-to-date information about the solution refer to the Kaspersky Secure Mobility Management 4.1 Help.
Other methods of installation of Kaspersky Endpoint Security for Android
You can install Kaspersky Endpoint Security for Android using a link to your own web server or instruct the users to install the app manually.
The help for this version of the solution is no longer updated, so it may contain outdated information. For up-to-date information about the solution refer to the Kaspersky Secure Mobility Management 4.1 Help.
Manual installation from Google Play or HUAWEI AppGallery
Users can manually install Kaspersky Endpoint Security for Android from Google Play or HUAWEI AppGallery. The app can be installed by following the standard installation procedure of the Android platform. Users use their own Google accounts to install the application.
For details on the procedure of installing Kaspersky Endpoint Security for Android from Google Play, see the Google technical support website.
For details on the procedure of installing Kaspersky Endpoint Security for Android from HUAWEI AppGallery, see the HUAWEI Support website.
Some HUAWEI and Honor devices do not have Google services and therefore an access to apps in Google Play. If some users of HUAWEI and Honor devices cannot install the app from Google Play, they should be instructed to install the app from HUAWEI App Gallery.
After installing Kaspersky Endpoint Security for Android from Google Play or HUAWEI AppGallery, you must prepare the app for use. The process of preparing the app for use includes the following steps:
- The administrator sends the settings of mobile device synchronization with the Administration Server (server address and port number) using any available method (for example, by sending an email message).
- The user can configure the settings of mobile device synchronization with the Administration Server during operation of the Initial Configuration Wizard or in the Kaspersky Endpoint Security for Android settings.
- The administrator creates a mobile certificate for the mobile device user.
- The user receives an automatic notification with a prompt to install the mobile certificate. When installation is confirmed, the mobile certificate is installed on the mobile device.
Internet access should be enabled on the mobile device for synchronization with the Administration Server.
See the "Configuring synchronization settings" section for details on how to configure the settings of mobile device synchronization with the Administration Server and receive a mobile certificate.
During the next synchronization of the mobile device with Administration Server, the user's mobile device on which Kaspersky Endpoint Security for Android is installed is moved to the Advanced → Device discovery → Domains folder in the administration group that was specified during installation of the application (the default group is KES10). You can move a mobile device to the administration group that you created in the Managed devices folder either manually or using automatic allocation rules.
This installation method is convenient if you want to install a specific version of Kaspersky Endpoint Security for Android.
To install Kaspersky Endpoint Security for Android by using a link to your own web server:
- Create an installation package and configure its settings.
The installation package is a set of files created for remote installation of the Kaspersky app through Kaspersky Security Center.
- Create a standalone installation package.
A standalone installation package is the installation file of a mobile app that contains the settings of the app connection to the Administration Server and an indicator of acceptance of the Terms and Conditions of the End User License Agreement (EULA) for the Kaspersky Endpoint Security for Android. It is created on the basis of the Kaspersky Endpoint Security for Android installation package. The standalone installation package is a special case of an installation package.
The user will receive a link to the web server hosting the standalone installation package for Kaspersky Endpoint Security for Android. To install the app, the user must run the APK file. Additional configuration of Kaspersky Endpoint Security for Android after installation is not required.
To install Kaspersky Endpoint Security for Android using a link to your own web server, installation of apps from unknown sources must be allowed on the user's mobile device.
Page topThe help for this version of the solution is no longer updated, so it may contain outdated information. For up-to-date information about the solution refer to the Kaspersky Secure Mobility Management 4.1 Help.
Creating and configuring an installation package
The Kaspersky Endpoint Security for Android installation package is the sc_package.exe self-extracting archive. The archive includes files required for installing mobile app on devices:
adb.exe,AdbWinApi.dll,AdbWinUsbApi.dll– Set of files required for installing Kaspersky Endpoint Security for Android.installer.ini– Configuration file that contains the Administration Server connection settings.KES10_xx_xx_xxx.apk– Setup file for Kaspersky Endpoint Security for Android.kmlisten.exe– Utility for delivering the application installation package through a the workstation.kmlisten.ini– Configuration file that contains the settings for the installation package delivery utility.kmlisten.kpd– Application description file.
To create the Kaspersky Endpoint Security for Android installation package:
- In the console tree, select the Advanced → Remote installation → Installation packages folder.
- In the workspace of the Installation packages folder, click the Create installation package button.
The Installation Package Creation Wizard starts. Follow the instructions of the Wizard.
- In the Select installation package type window of the Wizard, click the Create installation package for Kaspersky application button.
- In the Defining installation package name window of the Wizard, enter the installation package name to be displayed in the workspace of the Installation packages folder.
- In the Select application installation package for installation window of the Wizard, select the
sc_package.exeself-extracting archive included in the distribution kit.If you have already unpacked the archive, choose the application description file,
kmlisten.kpd. The application name and the version number appear in the entry field.If you create an installation package with the
sc_package.exearchive in the Kaspersky Security Center version earlier than 14.2, the installation of Kaspersky Endpoint Security for Android app will fail on devices running Android 10 or later. To avoid this issue, please upgrade to Kaspersky Security Center 14.2 or contact Technical Support to receive an appropriate version of the archive. - In the Accept EULA window of the Wizard, read, understand, and accept the terms and conditions of the End User License Agreement.
You must accept the terms and conditions of the End User License Agreement for creating the installation package. If you accept the terms of License Agreement in the Administration Console, Kaspersky Endpoint Security for Android skips the acceptance step during installation of the app.
If you decide to stop the protection of the mobile devices, you can uninstall Kaspersky Endpoint Security for Android app and revoke your End User License Agreement (EULA) for the app. To learn more about revoking EULA, please refer to Kaspersky Security Center Help.
After the Wizard finishes, the created installation package appears in the Installation packages folder workspace. The installation packages are stored in the Packages folder, in the public shared folder on the Administration Server.
To configure the installation package settings:
- In the console tree, select the Advanced → Remote installation → Installation packages folder.
- In the context menu of the Kaspersky Endpoint Security for Android installation package, select Properties.
- On the Settings tab, specify the Administration Server connection settings for mobile devices and the name of the administration group to which the mobile devices will be added automatically after the first synchronization with the Administration Server. Follow the steps below:
- In the Connection to the Administration Server section, in the Server address field, type the name of the Administration Server for mobile devices in the format that was used for installing Mobile devices support during the Administration Server deployment.
Depending on the Administration Server name format for the Mobile devices support component, specify the DNS name or the IP address of the Administration Server. In the SSL port number field, specify the number of the port open on the Administration Server for connecting mobile devices. Port 13292 is used by default.
- In the Allocation of computers to groups section, in the Group name field, type the name of the group to which mobile devices will be added after the first synchronization with the Administration Server (KES10 is used by default).
The specified group will be automatically created in the Advanced → Device discovery → Domains folder.
- In the Actions during installation section, select the Request email address check box if you want the app to ask users to provide their corporate email address when the app is started for the first time.
The user's email address is used to form the name of the mobile device when it is added to the administration group.
- In the Connection to the Administration Server section, in the Server address field, type the name of the Administration Server for mobile devices in the format that was used for installing Mobile devices support during the Administration Server deployment.
- To apply the specified settings, click Apply.
The help for this version of the solution is no longer updated, so it may contain outdated information. For up-to-date information about the solution refer to the Kaspersky Secure Mobility Management 4.1 Help.
Creating a standalone installation package
To create a standalone installation package, follow the steps below:
- In the console tree, select the Advanced → Remote installation → Installation packages folder.
- Choose the installation package of Kaspersky Endpoint Security for Android.
- In the context menu of the installation package, select Create a stand-alone installation package.
The wizard that creates the standalone installation package will be started. Follow the instructions of the Wizard.
- Configure ways in which the standalone installation package is distributed:
- To distribute the path to the created standalone installation package among users via email, in the Further actions section click the link Email link to stand-alone installation package.
The message editor window opens, and the text in the window contains the path to the shared folder with the standalone installation package.
- To post the link to the created standalone installation package on your corporate website, click the link Sample HTML code for link publication on a website.
A tmp file containing HTML_RJL links opens.
- To distribute the path to the created standalone installation package among users via email, in the Further actions section click the link Email link to stand-alone installation package.
- To publish the created standalone installation package on the Kaspersky Security Center Web Server and view the entire list of standalone packages for the selected installation package, in the Stand-alone installation package creation wizard window select the Open the stand-alone packages list check box.
After the wizard closes, the window List of standalone packages for the installation package <Installation package name> opens.
The List of standalone packages for the installation package <Installation package name> window contains the following information:
- A list of standalone installation packages.
- The network path to the shared folder in the Path field.
- The address of the standalone package on the Kaspersky Security Center Web Server in the URL field.
When sending email notifications, you can specify either the address in the URL field or the path in the Path field as a resource from which users can download the setup file of the app. When sending text message notifications to users, you have to specify the download link appearing in the URL field.
You are advised to copy the address of the created standalone package to clipboard and then paste the link to the required installation package into the email or text message notification for users.
Page topThe help for this version of the solution is no longer updated, so it may contain outdated information. For up-to-date information about the solution refer to the Kaspersky Secure Mobility Management 4.1 Help.
Configuring synchronization settings
To manage mobile devices and receive reports or statistics from mobile devices of users, you must configure the synchronization settings. Mobile device synchronization with Kaspersky Security Center may be performed in the following ways:
- By schedule. Synchronization by schedule is performed by using the HTTP protocol. You can configure the synchronization schedule in the group policy settings. Modifications to group policy settings, commands and tasks will be performed when the device is synchronizing with Kaspersky Security Center according to the schedule, i.e. with a delay. By default, mobile devices are synchronized with the Kaspersky Security Center automatically every 6 hours.
- Forced. Forced synchronization is performed by using push notifications of the FCM service (Firebase Cloud Messaging). Forced synchronization is primarily intended for timely delivery of commands to a mobile device. It might be useful when a device is in battery saver mode, because in this case the app may perform tasks later than specified. If you want to use forced synchronization, make sure that the FCM settings are configured in Kaspersky Security Center.
To configure the settings of mobile device synchronization with the Kaspersky Security Center:
- In the console tree, in the Managed devices folder, select the administration group to which the Android devices belong.
- In the workspace of the group, select the Policies tab.
- Open the policy properties window by double-clicking any column.
Complete the following steps within 15 minutes. Otherwise, you may face an error when saving changes to the policy.
- In the policy Properties window, select the Synchronization section.
- Select the frequency of synchronization in the Synchronize drop-down list.
- To disable synchronization of a device with Kaspersky Security Center while roaming, select the Do not synchronize while roaming check box.
The device user can manually perform synchronization in the app settings (
 → Settings → Synchronization → Synchronize).
 - To hide synchronization settings (server address, port and administration group) from the user in the app settings, clear the Show synchronization settings on device check box. It is impossible to modify hidden settings.
- Click the Apply button to save the changes you have made.
Mobile device settings are changed after the next device synchronization with Kaspersky Security Center. You can manually synchronize the mobile device by using a special command. To learn more about working with commands for mobile devices, please refer to the "Sending commands" section.
Page topThe help for this version of the solution is no longer updated, so it may contain outdated information. For up-to-date information about the solution refer to the Kaspersky Secure Mobility Management 4.1 Help.
Activating the Kaspersky Endpoint Security for Android app
In Kaspersky Security Center, the license can cover various groups of features. To ensure that the Kaspersky Endpoint Security for Android app is fully functional, the Kaspersky Security Center license purchased by the organization must provide for the Mobile Device Management functionality. The Mobile Device Management functionality is intended for connecting mobile devices to Kaspersky Security Center and managing them.
For detailed information about the licensing of Kaspersky Security Center and licensing options, please refer to Kaspersky Security Center Help.
Activating the Kaspersky Endpoint Security for Android app on a mobile device is done by providing valid license information to the app. License information is delivered to the mobile device, together with the policy, when the device is synchronized with Kaspersky Security Center.
If the activation of the Kaspersky Endpoint Security for Android app is not completed within 30 days from the time of installation on the mobile device, the app is automatically switched to the limited functionality mode. In this mode, most of the app components are not operational. When switched to the limited functionality mode, the app stops performing automatic synchronization with Kaspersky Security Center. Therefore, if the activation of the app has not been completed within 30 days after the installation, the user must synchronize the device with Kaspersky Security Center manually.
If Kaspersky Security Center is not deployed in your organization or is not accessible to mobile devices, users can activate the Kaspersky Endpoint Security for Android app on their devices manually.
To activate the Kaspersky Endpoint Security for Android app:
- In the console tree, in the Managed devices folder, select the administration group to which the Android devices belong.
- In the workspace of the group, select the Policies tab.
- Open the policy properties window by double-clicking any column.
Complete the following steps within 15 minutes. Otherwise, you may face an error when saving changes to the policy.
- In the policy Properties window, select the Licensing section.
- In the Licensing section, open the Key drop-down list, and then select the required application activation key from the key storage of the Kaspersky Security Center Administration Server.
The details of the app for which the license has been purchased are displayed in the field below.
- Select the Activate with a key from Kaspersky Security Center storage check box.
If the app was activated without a key stored in the Kaspersky Security Center storage, Kaspersky Secure Mobility Management replaces this key with the activation key selected in the Key drop-down list.
- To activate the app on the user's mobile device, block changes to settings.
- Click the Apply button to save the changes you have made.
Mobile device settings are changed after the next device synchronization with Kaspersky Security Center.
The help for this version of the solution is no longer updated, so it may contain outdated information. For up-to-date information about the solution refer to the Kaspersky Secure Mobility Management 4.1 Help.
Installing an iOS MDM profile
This section describes the methods of deploying iOS MDM profiles on a corporate network.
Before deploying an iOS MDM profile, you must deploy a mobile device management system.
For details on deploying an iOS MDM profile in Kaspersky Endpoint Security Cloud, please refer to Kaspersky Endpoint Security Cloud help.
The help for this version of the solution is no longer updated, so it may contain outdated information. For up-to-date information about the solution refer to the Kaspersky Secure Mobility Management 4.1 Help.
About iOS device management modes
You can deploy an iOS device management system in several different ways. The management mode depends on the owner of the mobile device (personal or corporate) and corporate security requirements. You can choose the management mode that is most suitable for the company, and use several modes at the same time.
Unsupervised devices
Unsupervised iOS devices are employees' personal devices that are connected to Kaspersky Security Center. In this mode, the user is allowed to use a personal Apple ID, work with any apps, and store personal data on the device. You can use a Kaspersky Device Management for iOS group policy to configure access to corporate resources, security settings, and other settings. By default, all iOS devices are unsupervised.
Supervised devices
Supervised iOS devices are corporate devices that are connected to Kaspersky Security Center. Initial configuration of the mobile device is performed in Apple Configurator. Apple Configurator is an application designed to prepare and configure iOS devices. Apple Configurator is installed on a computer running OS X. For more details about working with Apple Configurator, please refer to the Apple Technical Support website. You can use a Kaspersky Device Management for iOS group policy for further configuration. On supervised devices, you can access an extended selection of settings. For example, you can configure Global HTTP Proxy and additional restrictions (for example, blocked use of iMessage and Game Center), and you can block user account modifications.
To work with supervised and unsupervised iOS devices, the iOS MDM Server must have an APNs certificate installed, and an iOS MDM profile must be installed on the mobile devices of users.
Page topThe help for this version of the solution is no longer updated, so it may contain outdated information. For up-to-date information about the solution refer to the Kaspersky Secure Mobility Management 4.1 Help.
Installing via Kaspersky Security Center
The iOS MDM profile is installed to the mobile devices of users whose user accounts have been added in Kaspersky Security Center. For more details about user accounts in Kaspersky Security Center, please refer to Kaspersky Security Center Help.
To install an iOS MDM profile:
- In the console tree, select the Mobile Device Management → Mobile devices folder.
- In the workspace of the Mobile devices folder, click the Add mobile device button.
This starts the New Mobile Device Connection Wizard. Follow the instructions of the Wizard.
- In the Operating system section, select iOS.
- In the Selecting iOS MDM Server window of the Wizard, select an iOS MDM Server from the list.
- In the Select users window of the Wizard, select one or several users for installation of the iOS MDM profile to their mobile devices.
If the user is not in the list, you can add a new user account without exiting the New Mobile Device Connection Wizard.
- In the Certificate source window of the Wizard, select the source of the certificate for protection of data transfer between the mobile device and Kaspersky Security Center:
- Issue certificate through Administration Server tools. In this case, the certificate will be created automatically.
- Specify certificate file. In this case, your own certificate must be prepared ahead of time and then selected in the window of the Wizard. This option cannot be used if you want to install the iOS MDM profile to several mobile devices. A separate certificate must be created for each user.
- In the User notification method window of the Wizard, select the channel used to forward the app installation link:
- To send the link by email, select Send link to iOS MDM profile and configure the settings in the By email section. Make sure that the email address is specified in the settings of user accounts.
- To install the iOS MDM profile using a QR code, select Show link to installation package and scan the QR code using the camera of the mobile device.
- If none of the listed methods are suitable for you, select Show link to installation package → Copy to copy the iOS MDM profile installation link to the clipboard. Use any available method to deliver the app installation link.
- Finish the New Mobile Device Connection Wizard.
After installing the iOS MDM profile to users' mobile devices, you will be able to configure the app settings by using group policies. You will also be able to send commands to mobile devices for data protection in case devices are lost or stolen.
On mobile devices running iOS 12.1 or later, you must manually confirm installation of an iOS MDM profile on the mobile device. You must also grant permission for remote management of the device.
Page topThe help for this version of the solution is no longer updated, so it may contain outdated information. For up-to-date information about the solution refer to the Kaspersky Secure Mobility Management 4.1 Help.
Installing administration plug-ins
To manage mobile devices, the following administration plug-ins must be installed to the administrator's workstation:
- The Administration Plug-in of Kaspersky Endpoint Security for Android provides the interface for managing mobile devices and mobile apps installed on them through the Administration Console of Kaspersky Security Center.
- The Administration Plug-in of Kaspersky Device Management for iOS provides an interface for managing mobile devices connected by means of the iOS MDM protocol through the Administration Console of Kaspersky Security Center.
You can install administration plug-ins by using the following methods:
- Install an administration plug-in using Quick Start Wizard of Kaspersky Security Center.
The application automatically prompts you to run the Quick Start Wizard after Administration Server installation, at the first connection to it. You can also start the Quick Start Wizard manually at any time.
The Quick Start Wizard allows you to accept the Terms and Conditions of the End User License Agreement (EULA) for the Kaspersky Endpoint Security for Android app in Administration Console. If the administrator accepts the terms of the License Agreement in Administration Console, Kaspersky Endpoint Security for Android skips the acceptance step during installation of the app. For more details on the Quick Start Wizard for Kaspersky Security Center, please refer to Kaspersky Security Center Help.
- Install the administration plug-in using the list of available distribution packages in Administration Console of Kaspersky Security Center.
The list of available distribution packages is updated automatically after new versions of Kaspersky applications are released.
- Download the distribution package from an external source and install the administration plug-in using the EXE file.
For example, the distribution package of the administration plug-in can be downloaded on the Kaspersky website.
Installing administration plug-ins from the list in Administration Console
To install the administration plug-ins:
- In the console tree, select Advanced → Remote installation → Installation packages.
- In the workspace, select Additional actions → View current versions of Kaspersky applications.
This opens the list of up-to-date versions of Kaspersky applications.
- In the Mobile devices section, select the Kaspersky Endpoint Security for Android or Kaspersky Device Management for iOS plug-in.
- Click Download distribution package button.
A plug-in distribution will be downloaded to the computer memory (EXE file).
- Run the EXE file and follow the instructions of the Installation Wizard.
Installing administration plug-ins from the distribution package
To install the Kaspersky Endpoint Security for Android Administration Plug-in,
Copy the plug-in installation file klcfinst.exe from the integrated solution distribution package and run it on the administrator's workstation.
The installation is performed by the Wizard, and you do not have to configure the settings.
To install the Kaspersky Device Management for iOS Administration Plug-in,
Copy the plug-in installation file klmdminst.exe from the integrated solution distribution package and run it on the administrator's workstation.
The installation is performed by the Wizard, and you do not have to configure the settings.
You can make sure that the administration plug-ins are installed by viewing the list of installed app administration plug-ins in the properties window of the Administration Server in the Advanced → Details of application management plug-ins installed section.
Page topThe help for this version of the solution is no longer updated, so it may contain outdated information. For up-to-date information about the solution refer to the Kaspersky Secure Mobility Management 4.1 Help.
Updating a previous version of the application
The application upgrade must meet the following requirements:
- The version of the Kaspersky Endpoint Security for Android Administration Plug-in and the version of the Kaspersky Endpoint Security for Android mobile app must match.
You can view the build numbers of the versions of the Administration Plug-in and mobile app in the Release Notes for Kaspersky Secure Mobility Management.
- Make sure that Kaspersky Security Center satisfies the software requirements of Kaspersky Secure Mobility Management.
- The administration plug-ins of Kaspersky Endpoint Security for Android 10.0 Service Pack 2 (Build 10.6.0.1801) and Kaspersky Device Management for iOS 10.0 Service Pack 2 (Build 10.6.0.1767) and later versions can be automatically upgraded to the current version. Upgrades of earlier versions of administration plug-ins are not supported.
To upgrade administration plug-ins of earlier versions, you must remove the installed administration plug-ins and group policies that were created with them. Then install the new versions of the administration plug-ins. For details on removing administration plug-ins, please visit the Kaspersky Technical Support website.
- Use the same version of Kaspersky Endpoint Security for Android on all mobile devices of the organization.
The terms and conditions of technical support for Kaspersky Secure Mobility Management versions are available on the Kaspersky Technical Support website.
To view the version and build number of administration plug-ins:
- In the console tree in the context menu of the Administration Server, select Properties.
- In the Administration Server properties window, select Advanced → Details of application management plug-ins installed.
The workspace displays information about installed administration plug-ins in the format <Plug-in name> <Version> <Build>.
You can view the version and build number of the Kaspersky Endpoint Security for Android app by using the following methods:
- If Kaspersky Endpoint Security for Android was installed with a standalone installation package, you can view the version and build number of the app in the package properties.
- If Kaspersky Endpoint Security for Android was installed through Google Play, you can view the build number in the app settings ( → About the app).
Updates functionality (including providing anti-malware signature updates and codebase updates), as well as KSN functionality will not be available in the software in the U.S. territory from 12:00 AM Eastern Daylight Time (EDT) on September 10, 2024 in accordance with the restrictive measures.
The help for this version of the solution is no longer updated, so it may contain outdated information. For up-to-date information about the solution refer to the Kaspersky Secure Mobility Management 4.1 Help.
Upgrading the previous version of Kaspersky Endpoint Security for Android
Kaspersky Endpoint Security for Android can be updated in the following ways:
- Using Google Play. The mobile device user downloads the new version of the app from Google Play and installs it on the device.
- Using Kaspersky Security Center. You can remotely update the version of the app on the device using the Kaspersky Security Center remote administration system.
You can select the app update method that is most suitable for your organization. You can use only one update method.
Updating the app from Google Play
The app can be updated from Google Play by following the standard update procedure of the Android platform. The following conditions must be met in order for the app to be updated:
- The device user must have a Google account.
- The device must be linked to your Google account.
- The device must be connected to the internet.
After downloading the app from Google Play, Kaspersky Endpoint Security for Android checks the Terms and Conditions of the End User License Agreement (EULA). If the terms of the EULA are updated, the app sends a request to the Kaspersky Security Center. If the administrator accepts the EULA in Administration Console, Kaspersky Endpoint Security for Android skips the acceptance step during installation of the app. If the administrator uses an outdated version of the administration plug-in, Kaspersky Security Center prompts you to update the administration plug-in. When updating the administration plug-in, an administrator can accept the terms of the EULA in Administration Console for the Kaspersky Endpoint Security for Android.
You can update the app through Google Play if Kaspersky Endpoint Security for Android was installed from Google Play. If the app was installed using another method, you cannot update the app through Google Play.
Updating the app through Kaspersky Security Center
Kaspersky Endpoint Security for Android can be upgraded using Kaspersky Security Center after application of a group policy. In the group policy settings, you can select the Kaspersky Endpoint Security for Android standalone installation package of the version that meets the corporate security requirements.
You can update through Kaspersky Security Center if Kaspersky Endpoint Security for Android was installed through Kaspersky Security Center. If the app was installed from Google Play, you cannot update the app through Kaspersky Security Center.
To upgrade Kaspersky Endpoint Security for Android using a standalone installation package, installation of apps from unknown sources must be allowed on the user's mobile device. For details about installing apps without Google Play, please refer to the Android Help Guide.
To update the version of the app:
- In the console tree, in the Managed devices folder, select the administration group to which the Android devices belong.
- In the workspace of the group, select the Policies tab.
- Open the policy properties window by double-clicking any column.
Complete the following steps within 15 minutes. Otherwise, you may face an error when saving changes to the policy.
- In the policy Properties window, select the Additional section.
- In the Upgrading Kaspersky Endpoint Security for Android section, click the Select button.
This opens the Upgrading Kaspersky Endpoint Security for Android window.
- In the list of Kaspersky Endpoint Security for Android standalone installation packages, select the package whose version meets the corporate security requirements.
You can upgrade Kaspersky Endpoint Security for Android only to a more recent application version. Kaspersky Endpoint Security for Android cannot be upgraded to an older application version.
- Click the Select button.
A description of the selected standalone installation package is displayed in the Upgrading Kaspersky Endpoint Security for Android section.
- Click the Apply button to save the changes you have made.
Mobile device settings are changed after the next device synchronization with Kaspersky Security Center. The mobile device user is prompted to install the new version of the app. After the user gives consent, the new app version is installed on the mobile device.
Page topThe help for this version of the solution is no longer updated, so it may contain outdated information. For up-to-date information about the solution refer to the Kaspersky Secure Mobility Management 4.1 Help.
Installing an earlier version of Kaspersky Endpoint Security for Android
If you want to prevent automatic update of the app and use a specific version of Kaspersky Endpoint Security for Android, disable automatic update of the app in Google Play settings. For more detail, refer to the Google technical support website.
Automatic update of Kaspersky Endpoint Security for Android is available only if the app was installed from Google Play or through Kaspersky Security Center using the Google Play link. If the app was installed through Kaspersky Security Center using a link to your own web server (using the standalone installation package), automatic update is not available. In this case, you can use a group policy to manually update Kaspersky Endpoint Security for Android.
To install an earlier version of Kaspersky Endpoint Security for Android:
- Remove Kaspersky Endpoint Security for Android from users' mobile devices.
- Install Kaspersky Endpoint Security for Android through Kaspersky Security Center using a link to your own web server. To do so, you will need the installation package for the specific version. You can download the distribution package for earlier versions of Kaspersky Endpoint Security for Android on the Kaspersky Technical Support website.
For details on earlier versions of Kaspersky Endpoint Security for Android, please refer to the Help for the appropriate version of Kaspersky Secure Mobility Management.
Page topThe help for this version of the solution is no longer updated, so it may contain outdated information. For up-to-date information about the solution refer to the Kaspersky Secure Mobility Management 4.1 Help.
Upgrading previous versions of administration plug-ins
You can upgrade administration plug-ins by using the following methods:
- Install new version administration plug-in from the list of available distribution packages in Administration Console of Kaspersky Security Center.
The list of available distribution packages is updated automatically after new versions of Kaspersky applications are released.
- Download the distribution package from an external source and install new version administration plug-in using the EXE file.
To upgrade Kaspersky Endpoint Security for Android and Kaspersky Device Management for iOS Administration Plug-ins, you need to download the latest version of the application from the web page of Kaspersky Secure Mobility Management and run the Setup Wizard for each of the two plug-ins. Previous versions of plug-ins are removed automatically during operation of the Installation Wizard.
Kaspersky experts recommend using the same version of the app and administration plug-ins. If user upgrades the app from Google Play, the Kaspersky Security Center shows notification with a prompt to upgrade the administration plug-in.
When administration plug-ins are updated, the existing administration groups in the Managed devices folder and rules for the automatic allocation of devices from the Unassigned devices folder to these groups are saved. The existing group policies for mobile devices are also saved. New policy settings that implement the new functions of the Kaspersky Secure Mobility Management integrated solution will be added to the existing policies and will have the default values.
If new settings have been added or the default values have been changed in the new version of the administration plug-in, the changes will be applied only after a group policy is opened. Until the administrator opens a group policy, the settings of the previous version of the plug-in will be applied on mobile devices even if the plug-in version has been updated.
Upgrading from the list in Administration Console
To upgrade the administration plug-ins:
- In the console tree, select Advanced → Remote installation → Installation packages.
- In the workspace, select Additional actions → View current versions of Kaspersky applications.
This opens the list of up-to-date versions of Kaspersky applications.
- In the Mobile devices section, select the Kaspersky Endpoint Security for Android or Kaspersky Device Management for iOS plug-in.
- Click Download distribution package button.
A plug-in distribution will be downloaded to computer memory (EXE file). Run the EXE file. Follow the instructions of the Installation Wizard.
Upgrading from the distribution package
To upgrade the Kaspersky Endpoint Security for Android Administration Plug-in,
Copy the plug-in installation file klcfinst.exe from the integrated solution distribution package and run it on the administrator's workstation.
The installation is performed by the Wizard, and you do not need to configure the settings.
To upgrade the Kaspersky Device Management for iOS Administration Plug-in,
Copy the plug-in installation file klmdminst.exe from the integrated solution distribution package and run it on the administrator's workstation.
Plug-in installation is performed by the Wizard, and you do not need to configure the settings.
You can make sure that the administration plug-ins are upgraded by viewing the list of installed app administration plug-ins in the properties window of the Administration Server, in the Advanced → Details of application management plug-ins installed section.
Page topThe help for this version of the solution is no longer updated, so it may contain outdated information. For up-to-date information about the solution refer to the Kaspersky Secure Mobility Management 4.1 Help.
Removing Kaspersky Endpoint Security for Android
Kaspersky Endpoint Security for Android can be removed in the following ways:
- App removal by the user
The user removes Kaspersky Endpoint Security for Android manually using the app interface. In order for users to be able to remove the app, app removal should be allowed in the policy applied to the device.
- App removal by the administrator
The administrator removes the app remotely using the Administration Console of Kaspersky Security Center. The app can be removed from a separate device or from several devices at once.
To remove Kaspersky Endpoint Security for Android from a device operating in device owner mode:
- Send the Reset to factory settings command from Administration Console to the device. This command removes all device data and rolls back device settings to their factory values.
- Manually remove the device from the list of managed devices in Administration Console.
If the device is not removed from Administration Console, there can be problems with further installation of Kaspersky apps on this device.
The help for this version of the solution is no longer updated, so it may contain outdated information. For up-to-date information about the solution refer to the Kaspersky Secure Mobility Management 4.1 Help.
Remote app removal
You can remove Kaspersky Endpoint Security for Android from users' mobile devices remotely in the following ways:
- Using a group policy. This method is convenient if you want to remove the app from several devices at once.
- By configuring local app settings. This method is convenient if you want to remove the app from a separate device.
For information about removing Kaspersky Endpoint Security for Android from devices operating in device owner mode, see the App removal in device owner mode section below.
To remove the app by applying a group policy:
- In the console tree, in the Managed devices folder, select the administration group to which the Android devices belong.
- In the workspace of the group, select the Policies tab.
- Open the policy properties window by double-clicking any column.
Complete the following steps within 15 minutes. Otherwise, you may face an error when saving changes to the policy.
- In the policy Properties window, select the Additional section.
- In the Removal of Kaspersky Endpoint Security for Android section, select the Remove Kaspersky Endpoint Security for Android from device check box.
This setting doesn't apply to devices operating in device owner mode.
- Click the Apply button to save the changes you have made.
As a result, Kaspersky Endpoint Security for Android is removed from mobile devices after synchronization with the Administration Server. Users of mobile devices receive a notification that the app has been removed.
To remove the app by configuring local settings:
- In the console tree, select Mobile Device Management → Mobile devices.
- In the list of devices, select the device on which you want to remove the app.
- Open the device properties window double-clicking.
- Select Applications → Kaspersky Endpoint Security for Android.
- Open the Kaspersky Endpoint Security properties window by double-clicking.
- Select the Additional section.
- In the Removal of Kaspersky Endpoint Security for Android section, select the Remove Kaspersky Endpoint Security for Android from device check box.
This setting doesn't apply to devices operating in device owner mode.
- Click the Apply button to save the changes you have made.
As a result, Kaspersky Endpoint Security for Android is removed from mobile device after synchronization with the Administration Server. The mobile device user receives a notification that the app has been removed.
App removal in device owner mode
To remove Kaspersky Endpoint Security for Android from a device operating in device owner mode:
- In the console tree, select Mobile Device Management → Mobile devices.
- In the list of devices, select the device on which you want to remove the app.
- Right-click the device.
- In the context menu, select Mobile Device Management → Reset to factory settings.
The Reset to factory settings command is sent to the device. This command removes all device data and rolls back device settings to their factory values.
- In the list of devices, right-click the device and select Delete.
The device is removed from the list of managed devices in Administration Console.
If the device is not removed from Administration Console, there can be problems with further installation of Kaspersky apps on this device.
The help for this version of the solution is no longer updated, so it may contain outdated information. For up-to-date information about the solution refer to the Kaspersky Secure Mobility Management 4.1 Help.
Permitting users to remove the app
To protect the app from removal on devices running Android 7.0 or later, Kaspersky Endpoint Security for Android must be set as an Accessibility feature. When the Initial Configuration Wizard is running, Kaspersky Endpoint Security for Android prompts the user to grant the application all required permissions. The user can skip these steps or disable these permissions in the device settings at a later time. If this is the case, the app is not protected from removal.
You can allow users to remove Kaspersky Endpoint Security for Android from their mobile devices in the following ways:
- Using a group policy. This method is convenient if you want to allow users to remove the app from several devices at once.
- Using local app settings. This method is convenient if you want to allow the user of a separate device to remove the app.
On devices operating in device owner mode, Kaspersky Endpoint Security for Android can be removed only by the administrator. For instructions, please refer to Remote app removal.
To allow removal of the app in a group policy:
- In the console tree, in the Managed devices folder, select the administration group to which the Android devices belong.
- In the workspace of the group, select the Policies tab.
- Open the policy properties window by double-clicking any column.
Complete the following steps within 15 minutes. Otherwise, you may face an error when saving changes to the policy.
- In the policy Properties window, select the Additional section.
- In the Removal of Kaspersky Endpoint Security for Android section, set the Allow removal of Kaspersky Endpoint Security for Android check box.
This setting doesn't apply to devices operating in device owner mode.
- Click the Apply button to save the changes you have made.
As a result, removal of the app by users is allowed on mobile devices after synchronization with the Administration Server. The app removal button becomes available in the Kaspersky Endpoint Security for Android settings.
To allow removal of the app in the local app settings:
- In the console tree, select Additional → Mobile Device Management → Mobile devices.
- In the list of devices, select the device from which you want to allow app removal by the user.
- Open the device properties window by double-clicking.
- Select Applications → Kaspersky Endpoint Security for Mobile.
- Open the Kaspersky Endpoint Security properties window by double-clicking.
- Select the section Additional.
- In the Removal of Kaspersky Endpoint Security for Android section, set the Allow removal of Kaspersky Endpoint Security for Android check box.
This setting doesn't apply to devices operating in device owner mode.
- Click the Apply button to save the changes you have made.
As a result, removal of the app by the user is allowed on the mobile device after synchronization with the Administration Server. The app removal button becomes available in the Kaspersky Endpoint Security for Android settings.
Page topThe help for this version of the solution is no longer updated, so it may contain outdated information. For up-to-date information about the solution refer to the Kaspersky Secure Mobility Management 4.1 Help.
App removal by the user
To independently remove Kaspersky Endpoint Security for Android from a mobile device, the user must do the following:
- In the main window of Kaspersky Endpoint Security for Android, tap → Uninstall the app.
A confirmation prompt appears on the screen.
If the Uninstall the app button is missing, this means that the administrator enabled protection against removal of Kaspersky Endpoint Security for Android or the device operates in device owner mode.
On devices operating in device owner mode, Kaspersky Endpoint Security for Android can be removed only by the administrator. For instructions, please refer to Remote app removal.
- Confirm removal of Kaspersky Endpoint Security for Android.
The Kaspersky Endpoint Security for Android app will be removed from the user's mobile device.
Page top