Contents
- About this Help Guide
- About Kaspersky Security for Virtualization 6.1 Agentless
- What’s new
- Application architecture
- Managing the application via Kaspersky Security Center
- Preparing for application installation
- Installing the application
- Installation of the Kaspersky Security main administration plug-in and Integration Server
- Installation of the Kaspersky Security administration plug-in for tenants
- Result of installation of the Kaspersky Security administration plug-ins and Integration Server
- Configuring the Integration Server
- Registration of Kaspersky Security services
- Connecting to VMware NSX Manager
- Selecting an SVM image for the file system protection service
- Selecting an SVM image for the network protection service
- Selecting the traffic processing mode for the Network Threat Protection component
- Configuring the connection settings for an SVM
- Creating passwords for accounts on SVMs
- Selecting the time zone for SVMs
- Configuring the settings for connecting to network data storage
- Confirming Kaspersky Security settings
- Registration of Kaspersky Security services
- Exiting the wizard
- Viewing registered services
- Deploying SVMs and configuring protection settings in the infrastructure managed by VMware NSX-T Manager
- Deploying SVMs with the File Threat Protection component in the infrastructure managed by VMware NSX-T Manager
- Deploying SVMs with the Network Threat Protection component in the infrastructure managed by VMware NSX-T Manager
- Configuring NSX Groups in the infrastructure managed by VMware NSX-T Manager
- Configuring and applying NSX Policy for File Threat Protection in the Infrastructure managed by VMware NSX-T Manager
- Configuring and applying NSX Policy for Network Threat Protection in the Infrastructure managed by VMware NSX-T Manager
- Deploying SVMs and configuring protection settings in the infrastructure managed by VMware NSX-V Manager
- Preparing the application for operation and initial configuration
- Configuring protection of tenant organizations
- Creating a virtual Administration Server for a tenant
- Connecting the Integration Server to the Kaspersky Security Center Administration Server
- Configuring a list of mappings between Cloud Director organizations and virtual Administration Servers
- Working with the tenant virtual machine protection report
- Upgrading from a previous version of the application
- Application upgrade when migrating to VMware NSX-T platform
- Application upgrade in the infrastructure managed by VMware NSX-V Manager
- Upgrade of administration plug-in for Kaspersky Security, Integration Server, and Integration Server Console
- Updating SVM in the infrastructure managed by VMware NSX-V Manager
- Changing settings of Kaspersky Security
- Changing the connection settings for interaction between the Integration Server and VMware NSX Manager
- Changing the SVM image for the file system protection service
- Changing the SVM image for the network protection service
- Viewing information about the traffic processing mode for the Network Threat Protection component
- Changing the connection settings for an SVM
- Changing passwords for accounts on SVMs
- Changing the time zone for SVMs
- Changing settings for connecting to network data storage
- Starting Kaspersky Security reconfiguration
- Kaspersky Security reconfiguration process
- Exiting the wizard
- Removing the application
- Removing Kaspersky Security components in the virtual infrastructure managed by VMware NSX-T Manager
- Removing Kaspersky Security components in the virtual infrastructure managed by VMware NSX-V Manager
- Unregistering Kaspersky Security services and the Integration Server
- Removing the Kaspersky Security main administration plug-in and Integration Server
- Removing the Kaspersky Security administration plug-in for tenants
- Application licensing
- About the End User License Agreement
- About data provision
- About the license
- About the License Certificate
- About the license key
- About the key file
- About the activation code
- About subscription
- About application activation
- Application activation procedure
- Renewing a license
- Renewing subscription
- Viewing information about keys in use
- Starting and stopping the application
- Protection status
- Virtual machine file threat protection
- Conditions for protection of virtual machines against file threats
- Configuring main protection profile settings
- Managing additional protection profiles
- Creating an additional protection profile
- Viewing the protected infrastructure in a policy
- Information about the assignment of file protection settings using the virtual infrastructure tree
- Information about assigning the file protection settings using NSX Vendor Template (in infrastructure managed by VMware NSX-T Manager)
- Information about assigning the file protection settings using NSX Profile Configuration (in infrastructure managed by VMware NSX-V Manager)
- Assigning protection profiles to virtual infrastructure objects
- Assigning protection profile using NSX Vendor Templates / NSX Profile Configurations
- Changing the protected infrastructure for a policy
- Disabling file threat protection for virtual infrastructure objects
- Scanning virtual machines
- Conditions for anti-virus scan of virtual machines
- Creating a full scan task
- Creating a custom scan task by using the main plug-in
- Creating a custom scan task by using the tenant plug-in
- Configuring virtual machine scan settings in a scan task
- Configuring the scan scope in a scan task
- Configuring the Custom Scan task scope
- Configuring the scan task run schedule
- Network Threat Protection
- Application database update
- Backup
- Events, notifications, and reports
- Participating in Kaspersky Security Network
- SNMP Monitoring of SVM status
- Automatic installation of application patches
- Instructions on managing the application for a tenant organization administrator
- About Kaspersky Security for Virtualization 6.1 Agentless
- Deploying protection of the virtual infrastructure of a tenant organization
- Managing File Threat Protection
- Scanning virtual machines
- Participating in Kaspersky Security Network
- Obtaining protection status information
- Removing the Kaspersky Security administration plug-in for tenants
- Contact Technical Support
- Sources of information about the application
- Appendix. Brief instructions on installing the application
- Glossary
- Activating an application
- Activation code
- Active key
- Administration group
- Administration Server
- Application activation task
- Application database update task
- Backup
- Backup copy of a file
- Compound file
- Custom Scan task
- Database of malicious web addresses
- Database of phishing web addresses
- Desktop key
- End User License Agreement
- Full Scan task
- Kaspersky CompanyAccount
- Kaspersky Security Network (KSN)
- Key file
- Key with a limitation on the number of processor cores
- Key with a limitation on the number of processors
- KSC cluster
- KSC cluster protected infrastructure
- License
- License certificate
- License key (key)
- Main protection profile
- Multitenancy mode
- Network Agent
- OLE object
- Policy
- Protection profile
- Reserve key
- Server key
- SVM
- Update rollback task
- Updates source
- Information about third-party code
- Trademark notices
About this Help Guide
This Help Guide is intended for technical professionals whose responsibilities include administration of Kaspersky Security, and support for organizations using Kaspersky Security. The Guide is intended for technical professionals who have experience working with virtual infrastructures on the VMware vSphere platform and with Kaspersky Security Center, which is a system designed for remote centralized management of Kaspersky applications.
|
Hardware and software requirements
Initial configuration of the application
Upgrading from a previous version of the application
Configuring protection settings
Obtaining information about application operation Contacting Technical Support |
Application operation in multitenancy mode
For Anti-Virus protection providers Configuring protection of tenant organizations
For the administrator of the tenant organization Deploying protection of an organization Configuring protection settings
|
About Kaspersky Security for Virtualization 6.1 Agentless
Kaspersky Security for Virtualization 6.1 Agentless (hereinafter also "Kaspersky Security") is an integrated solution that protects virtual machines on the VMware ESXi hypervisor against viruses and other malware, as well as against network threats.
Kaspersky Security lets you protect virtual machines running Windows guest operating systems, including those running server operating systems, and virtual machines running Linux guest operating systems.
Kaspersky Security lets you configure the protection of virtual machines at any level of the hierarchy of VMware virtual infrastructure objects: VMware vCenter server, Datacenter object, VMware cluster, resource pool, vApp object, and virtual machine. The application supports the protection of virtual machines during their migration within a VMware DRS cluster.
In an infrastructure managed by a VMware Cloud Director server, Kaspersky Security can be used to protect isolated virtual infrastructures, such as virtual Datacenters corresponding to Cloud Director organizations. One instance of Kaspersky Security in multitenancy mode allows multiple tenants of a cloud infrastructure (tenant organizations or divisions of one organization) to independently manage the protection of their own virtual infrastructure.
Kaspersky Security includes the following components:
- File Threat Protection. Protects the file system objects of a virtual machine against infection. The component is launched at the startup of Kaspersky Security. It protects virtual machines and scans the file system of virtual machines.
- Network Threat Protection. This component lets you detect and block activity that is typical of network attacks and other suspicious network activity, and lets you scan web addressed requested by a user or application, and block access to web addresses if a threat is detected.
- Integration Server. The component facilitates interaction between Kaspersky Security components and a VMware virtual infrastructure.
Kaspersky Security features:
- Protection. Kaspersky Security scans all files that the user or an application opens, saves, or launches on a virtual machine.
- If the file is free of malware, Kaspersky Security will grant access to the file.
- If malware is detected in the file, Kaspersky Security will perform the action that is specified in its settings. For example, it will delete the file or block access to the file.
Kaspersky Security protects only powered-on virtual machines that meet all the conditions for virtual machine protection.
- Scan. The application lets you perform a virus scan on files of virtual machines. Virtual machine files must be scanned regularly with new anti-virus databases to prevent the spread of malicious objects. You can perform an on-demand scan or specify a scan schedule.
Kaspersky Security scans only virtual machines that meet all the conditions for scanning virtual machines. Kaspersky Security can scan virtual machine templates and powered-off virtual machines that have the following file systems: NTFS, FAT32, EXT2, EXT3, EXT4, XFS, BTRFS.
- Intrusion Prevention. Kaspersky Security lets you analyze network traffic of protected virtual machines and detect network attacks and suspicious network activity that may be a sign of an intrusion into the protected infrastructure. When it detects an attempted network attack on a virtual machine or suspicious network activity, Kaspersky Security can terminate the connection and block traffic from the IP address from which the network attack or suspicious network activity originated.
- Web addresses scan. Kaspersky Security lets you scan web addresses that are requested over the HTTP protocol by a user or application installed on the virtual machine. If Kaspersky Security detects a web address from one of the web address categories selected for detection, the application can block access to the web address. By default, Kaspersky Security scans web addresses to check if they are malicious, phishing, or advertising web addresses.
- Storing backup copies of files. The application allows storing backup copies of files that have been deleted or modified during disinfection. Backup copies of files are stored in Backup in a special format and pose no danger. If a disinfected file contained information that is partly or completely inaccessible after disinfection, you can attempt to save the file from its backup copy.
- Application database update. Downloading updated application databases ensures up-to-date protection of the virtual machine against viruses and other malware. You can manually run an application database update or set a schedule for updating application databases.
Kaspersky Security is administered by Kaspersky Security Center, the remote centralized Kaspersky application administration system. You can use Kaspersky Security Center to:
- Configure the application settings
- Administer the application:
- Manage virtual machine protection by using policies
- Manage scan tasks
- Manage license keys for the application
- Update application databases
- Work with backup copies of files in Backup
- Generate application event reports
Kaspersky Security sends the Kaspersky Security Center Administration Server information about all events that occur during anti-virus protection and scanning of virtual machines, as well as information about events that occur when preventing intrusions and scanning web addresses.
Update functionality (including antivirus signature updates and codebase updates) and KSN functionality may not be available in the program in the United States.
Distribution kit
For information about purchasing the application, please visit the Kaspersky website at http://www.kaspersky.com or contact our partners.
The distribution kit contains the files necessary for installing application components, including:
- File for starting the Wizard for installing Kaspersky Security components (the Kaspersky Security administration plug-in, Integration Server, and Integration Server Console).
- File for starting the Wizard for installing the Kaspersky Security administration plug-in for tenants (this plug-in is required if you are using the application in multitenancy mode).
- SVM (secure virtual machine) images with installed Kaspersky Security components.
- MIB files that you can use to receive SVM status information with the aid of the SNMP Monitoring system.
- File containing the text of the End User License Agreement detailing the terms on which you may use the application, and the text of the Privacy Policy describing the handling and transmission of data.
The contents of the distribution kit can vary from region to region.
Information required to activate the application is forwarded by email after payment.
Page top
Hardware and software requirements
This section contains the hardware and software requirements of Kaspersky Security.
Requirements for Kaspersky Security Center components
For Kaspersky Security to operate in an organization's local network, one of the following versions of Kaspersky Security Center must be installed:
- Kaspersky Security Center 14.
- Kaspersky Security Center 13.2.
- Kaspersky Security Center 13.1.
- Kaspersky Security Center 12.
- Kaspersky Security Center 11.
This document describes how to work with Kaspersky Security Center 13.1.
The following Kaspersky Security Center components are required in order for the application to work:
- Administration Server.
The following services must be configured on the Administration Server:
- Activation proxy server service – used when activating Kaspersky Security. The activation proxy server service is configured in the properties of Kaspersky Security Center Administration Server. If the activation proxy server service is disabled, it is not possible to activate the application using the activation code.
- KSN proxy server service – provides data exchange between Kaspersky Security and Kaspersky Security Network. The KSN proxy server service is configured in the properties of Kaspersky Security Center Administration Server.
For more information about the activation proxy server service and KSN proxy server service, refer to Kaspersky Security Center documentation.
- MMC-based Administration Console (hereinafter also referred to as "Administration Console").
- Network Agent. This component is included in Kaspersky Security SVM images.
Kaspersky Security Center installation instructions and hardware requirements are described in Kaspersky Security Center documentation.
The operating system of the computer where Kaspersky Security Center is installed must be compatible with the Integration Server component.
Page top
Requirements for the Integration Server installation
The computer must have one of the following operating systems to support installation and operation of the Integration Server component:
- Windows Server 2019 Standard / Datacenter / Essentials (64-bit)
- Windows Server 2016 Standard / Datacenter (64-bit)
- Windows Server 2012 R2 Datacenter / Standard / Essentials (64-bit)
The operating system of the computer where you want to install the Integration Server Console must be installed in the Desktop experience mode.
The Microsoft .NET Framework 4.6.1 platform is required for installation and proper operation of the Integration Server, Integration Server Console, and Kaspersky Security administration plug-in.
The computer must meet the following minimum hardware requirements to support installation and operation of the Integration Server:
- 3 GB of available disk space
- Available RAM:
- For operation of the Integration Server Console – 50 MB.
- For operation of the Integration Server that serves no more than 30 hypervisors and 2,000 to 2,500 protected virtual machines – 300 MB. RAM size may change depending on the size of the VMware virtual infrastructure.
Requirements for the virtual infrastructure
File Threat Protection and Network Threat Protection requirements
For the File Threat Protection and the Network Threat Protection components to work properly, the virtual infrastructure must meet the following software requirements:
- VMware ESXi hypervisor 8.0 or later, 7.0 Update 1c or later, 6.7 Update 3 or later, 6.5 Update 3 or later.
- VMware vCenter Server 8.0 or later, 7.0 Update 1d or later, 6.7 Update 3 or later, 6.5 Update 3 or later.
All hypervisors must be managed by VMware vCenter Server. Kaspersky Security does not protect virtual machines running on a stand-alone hypervisor.
- VMware NSX Manager of one of the following types:
- VMware NSX-V Manager from the VMware NSX Data Center for vSphere 6.4.10 package.
- VMware NSX-T Manager from the VMware NSX 4.0.1.1, VMware NSX 4.0.0.1, VMware NSX-T Data Center 3.2.0.1, VMware NSX-T Data Center 3.1.3, VMware NSX-T Data Center 3.1.1 or VMware NSX-T Data Center 3.0.3 package—for installation and operation of the File Threat Protection component.
- VMware NSX-T Manager from the VMware NSX 4.0.1.1, VMware NSX 4.0.0.1, VMware NSX-T Data Center 3.2.0.1 or VMware NSX-T Data Center 3.0.3 package—for installation and operation of the Network Threat Protection component.
Simultaneous use of VMware NSX-V Manager and VMware NSX-T Manager for the same VMware vCenter Server is not supported.
Kaspersky Security operation is not supported in the infrastructure managed by VMware NSX Manager, to which several VMware vCenter Servers are connected.
Kaspersky Security components protect virtual machines that have the following guest operating systems installed:
- Windows desktop operating systems:
- Windows 10
- Windows 8.1
- Windows 8
- Windows 7 Service Pack 1
- Windows server operating systems:
- Windows Server 2019
- Windows Server 2016
- Windows Server 2012 R2 without ReFS (Resilient File System) support
- Windows Server 2012 without ReFS (Resilient File System) support
- Windows Server 2008 R2 Service Pack 1
On protected virtual machines running Windows operating systems, one of the following file systems must be used: FAT, FAT32, NTFS, ISO9660, UDF, CIFS.
- Linux server operating systems:
- Ubuntu Server 18.04 GA (64-bit)
- Ubuntu Server 16.04 GA (64-bit)
- Ubuntu Server 14.04 GA (64-bit)
- Red Hat Enterprise Linux Server 7.7 GA (64-bit)
- Red Hat Enterprise Linux Server 7.4 GA (64-bit)
- Red Hat Enterprise Linux Server 7.0 GA (64-bit)
- SUSE Linux Enterprise Server 12 GA (64-bit)
- CentOS 7.7 GA (64-bit)
- CentOS 7.4 GA (64-bit)
- CentOS 7.0 GA (64-bit)
On protected virtual machines running Linux operating systems, one of the following file systems must be used:
- Local file systems: EXT2, EXT3, EXT4, XFS, BTRFS, VFAT, ISO9660.
- Network file systems: NFS, CIFS.
To protect virtual machines against file threats, install the Guest Introspection Thin Agent component.
- On the virtual machines running Windows, the NSX File Introspection Driver, which is included in VMware Tools version 11.2.5 package acts as the Guest Introspection Thin Agent component. By default, NSX File Introspection Driver is not installed, so when installing the VMware Tools package, select NSX File Introspection Driver to install.
- On virtual machines running Linux, special packages are provided for installing the Guest Introspection Thin Agent component. There is no need to install VMware Tools.
To protect virtual machines against network threats, install the VMware Tools kit version 11.2.5 or open-vm-tools.
A current license for NSX for vSphere Advanced or NSX for vSphere Enterprise is required in order for the Network Threat Protection component to work.
The Network Threat Protection component protects only those virtual machines that use the E1000 or VMXNET3 network adapter.
The instructions on how to install and update VMware components, and the hardware requirements for VMware virtual infrastructure are described in VMware product documentation.
Requirements for the application operation in multitenancy mode
VMware Cloud Director 10.4, VMware Cloud Director 10.3.3.2, VMware Cloud Director 10.3.2.1, VMware Cloud Director 10.3.0 or VMware Cloud Director 10.1.2 must be installed in the virtual infrastructure for Kaspersky Security to operate in multitenancy mode.
There are limitations on the application installation and operation in a virtual infrastructure managed by VMware Cloud Director 10.3.0 or later. See the Knowledge Base for details.
Page top
Requirements for deploying SVMs with Kaspersky Security components
The application distribution kit includes several SVM images with the File Threat Protection component and several SVM images with the Network Threat Protection component. You can use these images to deploy SVMs with the necessary configuration. Minimum amount of system resources required for an SVM depends on the selected configuration.
Deploying SVM images with the File Threat Protection component in the infrastructure managed by VMware NSX-T Manager:
Configuration |
Number of processors |
Allocated RAM size, GB |
Available disk space, GB |
Small |
2 |
2 |
42 |
Medium |
2 |
4 |
44 |
Large |
4 |
8 |
48 |
Deploying SVM images with the Network Threat Protection component in the infrastructure managed by VMware NSX-T Manager:
Configuration |
Number of processors |
Allocated RAM size, GB |
Available disk space, GB |
Small |
2 |
1 |
26 |
Medium |
4 |
2 |
27 |
Large |
8 |
4 |
29 |
Deploying SVM images with the File Threat Protection component in the infrastructure managed by VMware NSX-V Manager:
Configuration |
Number of processors |
Allocated RAM size, GB |
Available disk space, GB |
2 CPU 2 GB RAM |
2 |
2 |
42 |
2 CPU 4 GB RAM |
2 |
4 |
44 |
2 CPU 8 GB RAM |
2 |
8 |
48 |
4 CPU 4 GB RAM |
4 |
4 |
44 |
4 CPU 8 GB RAM |
4 |
8 |
48 |
Deploying SVM images with the Network Threat Protection component in the infrastructure managed by VMware NSX-V Manager:
Configuration |
Number of processors |
Allocated RAM size, GB |
Available disk space, GB |
2 CPU 1 GB RAM |
2 |
1 |
26 |
4 CPU 2 GB RAM |
4 |
2 |
27 |
8 CPU 4 GB RAM |
8 |
4 |
29 |
What’s new
New features in Kaspersky Security for Virtualization 6.1 Agentless include:
- Capability to install and run Kaspersky Security in the infrastructure managed by VMware NSX-T Manager is implemented. The following is supported:
- Registration of Kaspersky Security services with a set of SVM images of different configurations.
- Virtual machine protection against file threats and network threats.
- Usage of Security Tags when viruses or other malware are detected.
- VMware vSphere versions 8.0 and 7.0 are now supported.
- VMware Cloud Director versions 10.4, 10.3.3.2, 10.3.2.1, 10.3.0 and 10.1.2 are now supported.
- Handling of exclusions by mask in policies and scan tasks is improved:
- Masks cannot be used in the paths to the excluded folders.
- Masks can only be used to exclude files.
Application architecture
Kaspersky Security is supplied as two SVM images:
- SVM image with the File Threat Protection component
- SVM image with the Network Threat Protection component
An SVM (secure virtual machine) is a virtual machine on which a component of Kaspersky Security is installed. SVMs are deployed on VMware ESXi hypervisors. For protection and scanning, the application does not need to be installed on each virtual machine.
Kaspersky Security components are registered as services in VMware NSX Manager:
- The File Threat Protection component is registered as a file system protection service (Kaspersky File Antimalware Protection).
- The Network Threat Protection component is registered as a network protection service (Kaspersky Network Protection).
Kaspersky Security services are deployed on the VMware cluster during installation of the application. When Kaspersky Security services are deployed, SVMs with Kaspersky Security components are deployed on the hypervisors in the cluster (see the figure below).
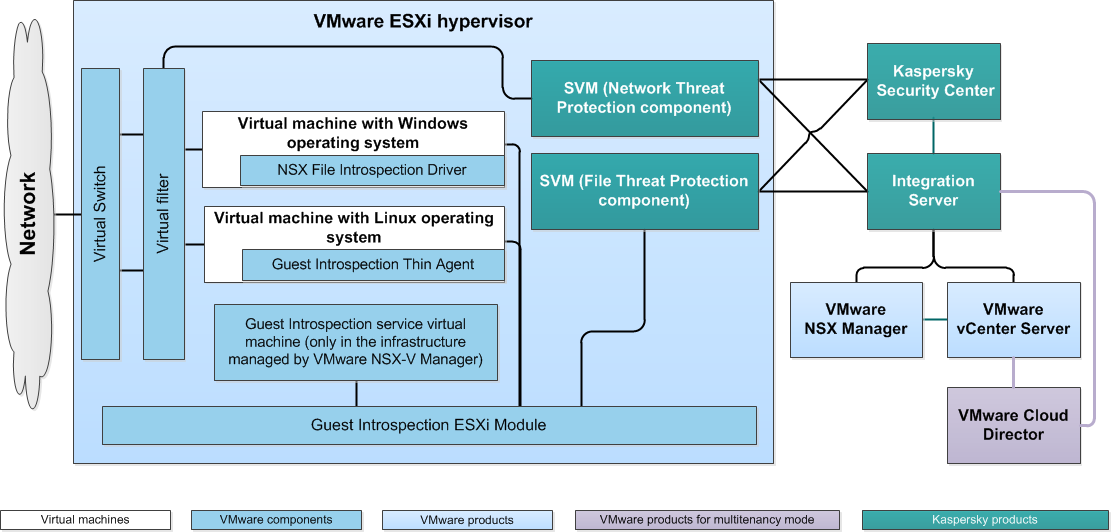
Application architecture
SVMs with the File Threat Protection component provide the following:
- Protection against viruses and other malware for all virtual machines that meet the conditions for protection of virtual machines.
- Anti-virus scanning of files of all virtual machines that meet the conditions for scanning virtual machines.
SVMs with the Network Threat Protection component provide protection against network threats for all virtual machines that meet the conditions for protection of virtual machines against network threats.
The Integration Server component enables interaction between the VMware virtual infrastructure and Kaspersky Security components.
The application is managed through Kaspersky Security Center, which is the remote centralized system for managing Kaspersky applications. Kaspersky Security interacts with Kaspersky Security Center via Network Agent, which is a component of Kaspersky Security Center. Network Agent is included in the SVM image.
The Kaspersky Security main administration plug-in provides the interface for managing the Kaspersky Security application through Kaspersky Security Center. If the application is operating in
, the Kaspersky Security administration plug-in for tenants is also required for application management.Kaspersky Security administration plug-ins are included in the Kaspersky Security distribution kit.
Kaspersky Security administration plug-ins must be installed on the computer hosting the Kaspersky Security Center Administration Console.
Contents of the Kaspersky Security SVM images
The SVM image with the File Threat Protection component includes the following:
- CentOS 7.9 operating system.
- File Threat Protection component of Kaspersky Security.
- EPSec library. A component provided by VMware. The EPSec library provides access to the files on the virtual machines protected by Kaspersky Security.
- Network Agent. A component of Kaspersky Security Center. Network Agent interacts with the Kaspersky Security Center Administration Server enabling Kaspersky Security Center to manage Kaspersky Security.
The SVM image with the Network Threat Protection component includes the following:
- CentOS 7.9 operating system.
- Network Threat Protection component of Kaspersky Security.
- NetX NSX SDK. A component provided by VMware. Guest Introspection SDK enables monitoring network traffic of virtual machines at the network packet level and creating virtual filters.
- Network Agent. A component of Kaspersky Security Center. Network Agent interacts with the Kaspersky Security Center Administration Server enabling Kaspersky Security Center to manage Kaspersky Security.
Application usage options
Protecting a virtual infrastructure managed by one or more VMware vCenter Servers
SVMs with Kaspersky Security components are deployed on VMware ESXi hypervisors managed by one or more standalone VMware vCenter Servers and protect the virtual machines running on these hypervisors. The application operates in normal mode.
The Kaspersky Security main administration plug-in is required for application management. You can use the main administration plug-in to configure individual settings for protecting a virtual infrastructure managed by each VMware vCenter Server or general settings for protecting the entire virtual infrastructure.
Protecting virtual infrastructure managed by VMware Cloud Director
SVMs with Kaspersky Security components are deployed on VMware ESXi hypervisors managed by VMware vCenter Servers connected to the VMware Cloud Director Server. SVMs can protect all virtual machines operating within the virtual infrastructure, including virtual machines that are part of Cloud Director organization.
This application usage option lets you protect isolated virtual infrastructures of tenant organizations or divisions of one organization (hereinafter also referred to as "tenants"). The application operates in multitenancy mode, which means that one instance of the application installed in the infrastructure of the anti-virus protection provider (hereinafter also referred to as the "provider") simultaneously provides multiple tenants with the capability for independent management of the protection of their virtual infrastructure.
The Kaspersky Security main administration plug-in and administration plug-in for tenants are required for application management. The main administration plug-in lets you configure general application settings, Network Threat Protection settings, and File Threat Protection settings for the virtual machines that are not part of Cloud Director organizations, such as the virtual machines of the provider. The administration plug-in for tenants lets you configure the individual settings of File Threat Protection for each tenant.
Virtual Administration Servers of Kaspersky Security Center are used to manage protection of tenants. The provider's administrator creates a separate virtual Administration Server for each tenant and provides the tenant's administrator with access to it. The tenant's administrator can use the virtual Administration Server and administration plug-in for tenants to manage File Threat Protection of their virtual infrastructure. The provider handles management of network protection, application database updates, application activation, and management of file copies placed in Backup.
The provider's administrator can obtain information about the protection of tenants' virtual machines using the report available on the Integration Server.
The application installation procedure depends on the selected application usage option. It is recommended to select the application usage option before starting the installation. If you decide to switch to using the application in multitenancy mode after installing the application in an infrastructure managed by one or more VMware vCenter Servers, to ensure correct operation of the application you need to perform the additional steps described in the Knowledge Base.
Page top
Integration of Kaspersky Security components with VMware virtual infrastructure
Requirements for integration of Kaspersky Security components with VMware virtual infrastructure:
- Virtual infrastructure administration server (VMware vCenter Server, VMware Cloud Director). The component performs administration and centralized management of a VMware virtual infrastructure. The component participates in the deployment of Kaspersky Security. The virtual infrastructure administration server sends the Integration Server information about the VMware virtual infrastructure that is required for operation of the application.
- VMware NSX Manager. The component prepares VMware ESXi hypervisors for deployment of protection, registration and deployment of Kaspersky Security services.
- Virtual filter. This component lets you intercept incoming and outgoing network packets in the traffic of protected virtual machines. In infrastructure managed by VMware NSX-V Manager, the VMware DVFilter technology acts as a virtual filter. In the infrastructure managed by VMware NSX-T Manager, the components of the VMware Network Service Insertion (SI) Service Chaining technology act as a virtual filter.
- Guest Introspection Thin Agent. The component collects data on virtual machines and transmits files to Kaspersky Security for scanning. To enable Kaspersky Security to protect virtual machines, the Guest Introspection Thin Agent component must be installed on these virtual machines. On the virtual machines running Windows, the NSX File Introspection Driver, which is included in VMware Tools package, acts as the Guest Introspection Thin Agent component. For more details please refer to documentation attached to VMware products.
- Guest Introspection service. Provides interaction between the Guest Introspection Thin Agent component installed on the virtual machine and the SVM. In the infrastructure managed by VMware NSX-T Manager, the Guest Introspection ESXi Module acts as the Guest Introspection service. In the infrastructure managed by VMware NSX-V Manager, the Guest Introspection service virtual machine and the Guest Introspection ESXi Module act as the Guest Introspection service.
The File Threat Protection component interacts with the VMware virtual infrastructure in the following way:
- The user or any application opens, saves, or runs files on a virtual machine that is protected by Kaspersky Security.
- The Guest Introspection Thin Agent component intercepts information about these events and sends it to the Guest Introspection service.
- The Guest Introspection service relays information about received events to the File Threat Protection component installed on the SVM.
- If File Threat Protection is enabled in the active Kaspersky Security policy, the File Threat Protection component scans files that the user or an application opens, saves, or runs on the protected virtual machine:
- If no viruses or other malware are detected in the files, Kaspersky Security grants access to the files.
- If the files contain viruses or other malware, Kaspersky Security performs the action that is specified in the settings of the protection profile assigned to this virtual machine. For example, Kaspersky Security disinfects or blocks a file.
Interaction between the Network Threat Protection component and the virtual infrastructure depends on the traffic processing mode of the component. If you use the standard traffic processing mode, the Network Threat Protection component interacts with the VMware virtual infrastructure as follows:
- The virtual filter intercepts inbound and outbound network packets in the traffic of protected virtual machines and redirects them to the Network Threat Protection component installed on SVMs.
- If Network Threat Protection is enabled in the active Kaspersky Security policy, in accordance with the configured protection settings, the Network Threat Protection component can scan network packets to detect activity typical of network attacks and suspicious network activity that may be a sign of an intrusion into the protected infrastructure, and can also scan all web addresses in the HTTP-requests to check if they belong to the web address categories specified in the Web Addresses Scan settings.
If Kaspersky Security does not detect a network attack, or suspicious network activity, or a web address belonging to the web address categories selected for detection, it allows transfer of the network packet.
If a network threat is detected, Kaspersky Security does the following:
- If activity typical of network attacks is detected, Kaspersky Security will perform the action that is specified in the settings of the policy. For example, Kaspersky Security blocks or allows network packets coming from the IP address from which the network attack originated.
- If suspicious network activity is detected, Kaspersky Security performs the action that is specified in the policy settings. For example, Kaspersky Security blocks or allows network packets coming from the IP address from which the network attack originated.
- If a web address belongs to one or more of the web address categories selected for detection, Kaspersky Security performs the action that is specified in the policy settings. For example, Kaspersky Security blocks or allows access to the web address.
If Kaspersky Security is deployed in the infrastructure managed by VMware NSX-V Manager and the network protection is running in the monitoring mode, the Network Threat Protection component interacts with the virtual infrastructure as follows:
- The virtual filter passes a copy of virtual machine traffic to the Network Threat Protection component.
- If Network Threat Protection is enabled in the active Kaspersky Security policy, in accordance with the configured protection settings, the Network Threat Protection component can scan network packets and web addresses as in the standard mode. When Kaspersky Security detects signs of intrusions or attempts to access dangerous or undesirable web addresses, it does not take any actions to prevent the threats, but only sends information about the detected threats to Kaspersky Security Center Administration Server.
About the Integration Server
The Integration Server is a Kaspersky Security component that enables interaction between Kaspersky Security components and a VMware virtual infrastructure.
The Integration Server is used for performing the following tasks:
- Registration of Kaspersky Security services in VMware NSX Manager: the file system protection service (Kaspersky File Antimalware Protection) and the network protection service (Kaspersky Network Protection). Kaspersky Security services are required for installation of application components in a VMware infrastructure.
The settings required for registration and deployment of Kaspersky Security services are entered in a Wizard that is started from the Integration Server Console.
- Configuring new SVMs and reconfiguring previously deployed SVMs. The Integration Server sends SVMs the settings that you specify in the Integration Server Console.
- Retrieval of information about a virtual infrastructure (about hypervisors and virtual machines operating on each hypervisor) from VMware vCenter Server and transmission of retrieved information to application components. The Kaspersky Security administration plug-in and SVMs query the Integration Server for information about the virtual infrastructure.
- Configuring the list of mappings between Cloud Director organizations and Kaspersky Security Center virtual Administration Servers. If you use Kaspersky Security in multitenancy mode, set mapping between a virtual Administration Server and a Cloud Director organization containing the tenant virtual machines, to protect the virtual infrastructure of each tenant organization. The list of mappings is configured in the Integration Server Console.
During its operation, the Integration Server saves the following information:
- Integration Server connection settings, including passwords for Integration Server accounts
- Settings for connecting the Integration Server to VMware vCenter Server, VMware Cloud Director, and VMware NSX Manager
- SVM settings, including passwords of the root and klconfig accounts used on SVMs
- List of protected virtual machines, including the time of last events that occurred during protection and scanning of file system objects and during scanning of network traffic and web addresses
All data except the list of protected virtual machines is securely stored. Information is stored on the computer on which Integration Server is installed and is not sent to Kaspersky.
Page top
About Integration Server Console
The Integration Server Console contains the following sections:
Integration Server settings section
In this section, you can view information about the Integration Server.
Integration Server user accounts section
In this section, you can change the passwords of accounts that are used to connect to the Integration Server.
The Virtual infrastructure protection section.
This section opens by default after the Integration Server Console is started. In this section, you can configure the connection of the Integration Server to virtual infrastructure administration servers (VMware vCenter Server and VMware Cloud Director), define or change the settings for registering and deploying Kaspersky Security services, or unregister Kaspersky Security services.
The table displays all virtual infrastructure administration servers (VMware vCenter Server and VMware Cloud Director) to which Integration Server connection is configured.
The following buttons are provided above the table:
- The Add button opens the Connection to virtual infrastructure window. In this window, you can select the type of virtual infrastructure administration servers to which you need to configure connection, and specify the connection settings to VMware vCenter Server or VMware Cloud Director: IP address in IPv4 format or fully qualified domain name (FQDN), name and password of the account used by the Integration Server to connect to the server.
- The Refresh button lets you update the status of interaction between the Integration Server and the virtual infrastructure.
For each VMware vCenter Server, the following information is displayed in the table:
- IP address in IPv4 format or fully qualified domain name (FQDN) of the VMware vCenter Server.
- Group of settings containing connection error messages (if any) and a list of actions that you can perform when configuring the connection to this VMware vCenter Server and for subsequent deployment of protection of the virtual infrastructure managed by this VMware vCenter Server. You can expand or collapse the list of possible actions for each VMware vCenter Server by clicking on the address or name of the server.
- Information about deployment of protection on VMware clusters managed by this VMware vCenter Server, presented in the format
N/M, where:- N is the number of VMware clusters on which the file system protection service (Kaspersky File Antimalware Protection) is deployed, or a dash if the service is not registered in VMware NSX Manager.
- M is the number of VMware clusters on which the network protection service (Kaspersky Network Protection) is deployed, or a dash if the service is not registered in VMware NSX Manager.
The total number of VMware clusters managed by this VMware vCenter Server is shown in parentheses.
The table displays the following information for each VMware Cloud Director Server:
- IP address in IPv4 format or fully qualified domain name (FQDN) of VMware Cloud Director server.
- Group of settings containing connection error messages (if any) and the list of actions that you can perform when configuring connection to this VMware Cloud Director and for subsequent protection deployment of the virtual infrastructure managed by this VMware Cloud Director. You can expand or collapse the list of possible actions for each VMware Cloud Director server by clicking the server address or name.
If connection to VMware vCenter Server, VMware Cloud Director, or VMware NSX Manager cannot be established, the table shows a warning.
If connection error occurs because the certificate received from the VMware vCenter Server, VMware Cloud Director, or VMware NSX Manager is not trusted for the Integration Server, but the received certificate complies with the security policy of your organization, you can confirm the authenticity of the certificate and establish connection. To do so, click the link in the problem description to open the Certificate validation window and click the Install certificate button. The received certificate is saved as a trusted certificate for the Integration Server.
Certificates that are trusted in the operating system in which the Integration Server is installed are also considered to be trusted for the Integration Server.
If there are problems with the SSL certificate, it is recommended to make sure that the utilized data transfer channel is secure.
The table also displays a warning if the file system protection service (Kaspersky File Antimalware Protection) and / or the network protection service (Kaspersky Network Protection) is registered in VMware NSX Manager, but NSX Policies that defile the file / network threat protection settings are not configured.
List of possible actions for the VMware vCenter Server:
- Register Kaspersky Security services – starts the Wizard that lets you enter the settings necessary for registering Kaspersky Security services in VMware NSX Manager and deploying those services on VMware clusters, and for configuring new SVMs. When you have finished entering the settings, Integration Server registers the Kaspersky Security services in VMware NSX Manager.
- Change settings of Kaspersky Security – starts the Wizard that lets you change the connection settings for interaction between the Integration Server and VMware NSX Manager, specify or change the SVM images for the file system protection service (Kaspersky File Antimalware Protection) and/or the network protection service (Kaspersky Network Protection), and change the SVM settings that are applied on the new SVMs and previously deployed SVMs. When you have finished entering the settings, the Integration Server applies the new settings and, if necessary, re-registers the Kaspersky Security services in VMware NSX Manager.
- Unregister Kaspersky Security services – opens a window in which you can specify the Kaspersky Security service that you need to unregister in VMware NSX Manager. You can unregister one or both Kaspersky Security services. Unregistration is performed by the Integration Server.
Kaspersky Security services can be unregistered only if all SVMs have been removed from VMware clusters and the services are not used in NSX Policies.
- Change VMware vCenter Server connection settings – opens the Connection to virtual infrastructure window in which you can change the settings for connecting the Integration Server to a VMware vCenter Server.
- Remove VMware vCenter Server from the list – opens a window in which you can confirm deletion of the settings for connecting the Integration Server to this VMware vCenter Server. The VMware vCenter Server will be removed from the list of virtual infrastructure administration servers to which the Integration Server connects.
Removing a VMware vCenter Server from the list is possible only if Kaspersky Security services are not registered in VMware NSX Manager.
List of available actions for VMware Cloud Director:
- Map Cloud Director organizations – opens the Cloud Director organizations to virtual administration Servers mapping list window where you can map Cloud Director organizations containing tenant virtual machines to Kaspersky Security Center virtual Administration Servers.
- Change VMware Cloud Director connection settings – opens the Connection to virtual infrastructure window where you can change the settings for connecting the Integration Server to VMware Cloud Director.
- Remove VMware Cloud Director from the list – opens the window where you can confirm deletion of the settings for connecting the Integration Server to this VMware Cloud Director. The VMware Cloud Director Server will be removed from the list of virtual infrastructure administration servers to which the Integration Server connects.
Manage protection of tenant organizations section
This section is used only if the application is operating in multitenancy mode.
In this section, you can do the following:
- Connect the Integration Server to the Kaspersky Security Center Administration Server.
The Integration Server connects to Kaspersky Security Center Administration Server to receive information about virtual Administration Servers created in Kaspersky Security Center, and to map virtual Administration Servers to Cloud Director organizations that contain tenant virtual machines.
- View or configure the list of mappings between Cloud Director organizations that contain tenant virtual machines and Kaspersky Security Center virtual Administration Servers.
A Cloud Director organization must be mapped to a virtual Administration Server so that Kaspersky Security can be used to protect virtual machines that are part of the Cloud Director organization.
About data processing
During their operation, Kaspersky Security components may save and send to other application components (and to Kaspersky Security Center) the following information that may contain personal data:
- To generate reports and events, SVMs send information about application operation to the Kaspersky Security Center Administration Server. The transmitted information may include the names of processed files and paths to them in the file system, the names and addresses of virtual machines, and processed web addresses.
- To ensure the capability to work with Backup objects via Kaspersky Security Center, SVMs send the Kaspersky Security Center Administration Server information about objects that have been placed in Backup. The transmitted information may include the object name and path to it in the file system. If requested by the administrator, the objects placed in Backup may also be sent to Kaspersky Security Center.
- While tasks are running, SVMs send information about task settings and results to the Kaspersky Security Center Administration Server.
- SVMs send a list of protected virtual machines to the Kaspersky Security Center Administration Server to be displayed in the Kaspersky Security Center Administration Console. The transmitted information may include the name of the protected virtual machine and the path to it in the virtual infrastructure.
- SVMs receive the policy-defined operating settings from the Kaspersky Security Center Administration Server. The transmitted information may include file paths and web addresses.
- While SVM settings are being configured, the Integration Server sends the SVM the user-defined root and klconfig account passwords, the network data storage connection settings for SVMs, the IP address of the Integration Server, and the settings for connecting to the Integration Server and to Kaspersky Security Center Administration Server.
- To support the operation of the application, the Integration Server receives information about the virtual infrastructure from the VMware vCenter Server and sends that information to SVMs.
The specified information is transmitted over encrypted data channels.
Page top
Managing the application via Kaspersky Security Center
Kaspersky Security for Virtualization 6.1 Agentless is controlled using Kaspersky Security Center, a centralized system that enables remote administration of Kaspersky applications. In the case of Kaspersky Security for Virtualization 6.1 Agentless, a client device of Kaspersky Security Center is an SVM. Protected virtual machines are not considered client devices from the perspective of Kaspersky Security Center because the Kaspersky Security Center Network Agent is not installed on them.
After Kaspersky Security has been installed in the virtual infrastructure, SVMs send their details to Kaspersky Security Center. Based on this information, Kaspersky Security Center combines SVMs into KSC clusters (Kaspersky Security Center clusters):
- The "VMware vCenter Agentless" cluster is a KSC cluster that corresponds to the standalone VMware vCenter Server. This cluster contains all SVMs deployed on VMware ESXi hypervisors managed by one standalone VMware vCenter Server.
The KSC cluster corresponding to the VMware vCenter Server is assigned the name
VMware vCenter '<name>' (<IP address or domain name>) Agentless, where:- <name> is the name of the VMware vCenter Server corresponding to this KSC cluster. If the name of the VMware vCenter Server is not defined or matches its IP address, the name is omitted.
- <IP address or domain name> is the IP address or domain name of the VMware vCenter Server corresponding to this KSC cluster.
Virtual machines that are managed by this VMware vCenter Server form the protected infrastructure of the "VMware vCenter Agentless" cluster.
- A VMware Cloud Director Agentless cluster is a KSC cluster corresponding to the VMware Cloud Director server. This cluster contains all SVMs deployed on VMware ESXi hypervisors managed by all VMware vCenter Servers connected to one VMware Cloud Director.
The
VMware Cloud Director (<IP address or domain name>) Agentlessname is assigned to the KSC cluster corresponding to the VMware Cloud Director server (<IP address or domain name> refers to the IP address or domain name of the VMware Cloud Director corresponding to this KSC cluster).Virtual machines that are managed by VMware vCenter Servers connected to this VMware Cloud Director Server, including virtual machines within Cloud Director organizations, form the protected infrastructure of the "VMware Cloud Director Agentless" cluster corresponding to the VMware Cloud Director.
Kaspersky Security Center creates a separate administration group for each KSC cluster in the Managed devices folder of the Administration Console and assigns the name of the KSC cluster to this group. When an administration group with the name of a KSC cluster is selected in the console tree, the Devices tab in the workspace displays a list of SVMs belonging to this KSC cluster.
You can open the cluster properties window by selecting the Clusters and server arrays subfolder within the folder of the administration group named after the KSC cluster. The window can be opened by double-clicking the name of the cluster or using the Properties item of the context menu. In the properties window of the KSC cluster, you can view the following:
- List of virtual machines within the protected infrastructure of this KSC cluster
- List of tasks created for SVMs of this KSC cluster
- List of SVMs within this KSC cluster (the Nodes section)
Kaspersky Security is managed through Kaspersky Security Center by using policies and tasks:
- A policy is a set of application settings that are defined for an administration group. For Kaspersky Security, a policy is applied on SVMs and determines the settings used by SVMs to protect virtual machines that are within the scope of the policy.
Each policy contains one or multiple protection profiles. Protection profiles let you configure the settings for file protection of virtual machines.
- Tasks are performed on SVMs and they implement application functions such as application activation, scanning of virtual machines, updating application databases, and automatic installation of patches for the application.
For more detailed information about policies and tasks, please refer to the Kaspersky Security Center documentation.
About Kaspersky Security policies
When configuring virtual infrastructure protection, it is recommended to account for the specific features of Kaspersky Security policies.
The policy scope, which is a set of virtual machines for which a policy can be used for protection, depends on the type of policy and the protected infrastructure that was selected during configuration of the policy and policy scope (set of SVMs on which the policy is applied).
Kaspersky Security policy types
The following types of policies are provided for Kaspersky Security:
- Main policy. This policy lets you configure the settings for virtual machine file threat protection using protection profiles, network threat protection settings, and the following application settings:
- Settings of notifications about events in application operation.
- Backup settings.
- Kaspersky Security Network usage settings.
- SNMP monitoring settings.
If the application operates in multitenancy mode, the main policy determines the Network Threat Protection settings for all virtual machines and the File Threat Protection settings for the virtual machines that are not part of Cloud Director organizations.
It is recommended to create main policies on the main Administration Server of Kaspersky Security Center. Main policies are created using the Kaspersky Security main administration plug-in.
- Tenant policy (used only if the application is operating in multitenancy mode). This policy lets you configure protection settings for virtual machines that are part of Cloud Director organizations. You can use this policy to define the following settings:
- Settings of notifications about events that occur when protecting and scanning virtual machines of a tenant (only in a policy that was created on the main Administration Server of Kaspersky Security Center).
- Individual file protection settings for virtual machines of the tenant.
- KSN usage settings for the tenant organization.
You can create tenant policies on the main Administration Server or on virtual Administration Servers of Kaspersky Security Center by using the Kaspersky Security administration plug-in for tenants.
Protected infrastructure of a policy
Depending on the protected infrastructure that you select when configuring a policy, the following policies are distinguished as follows:
- Policy for one VMware vCenter Server – lets you configure the settings for protecting a virtual infrastructure managed by one VMware vCenter Server.
- Policy for the entire protected infrastructure – lets you configure the settings for protecting a virtual infrastructure managed by all VMware vCenter Servers to which the Integration Server connects.
Policy application scope
In Kaspersky Security, a policy is applied on SVMs. Each SVM can protect only the virtual machines running on the same hypervisor where the SVM is deployed. Therefore, the policy protection scope (set of virtual machines for which a policy can be used for protection) depends on the policy application scope (set of SVMs on which the policy is applied).
The policy application scope is determined by the location of the policy within the hierarchy of Kaspersky Security Center administration groups. A policy is applied on SVMs as follows:
- The main policy in an administration group containing a KSC cluster is applied on all SVMs of this KSC cluster.
- The main policy in an administration group or folder that is the parent in relation to the groups containing KSC clusters is applied on all SVMs of child KSC clusters.
- The tenant policy on a virtual Administration Server created in the group of the "VMware Cloud Director Agentless" cluster corresponding to VMware Cloud Director is applied on all SVMs of this KSC cluster.
Inheriting policy settings
According to the order of inheritance of Kaspersky Security Center policies, by default the settings of policies are transferred to policies of nested administration groups and subordinate Administration Servers (for more details, please refer to the Kaspersky Security Center documentation). The settings and settings groups of policies have a "lock" attribute, that shows whether or not you are allowed to change these settings in nested policies. If a setting or a group of settings in a policy is "locked" ( ), the values of these settings are defined in nested policies and cannot be redefined.
About Kaspersky Security protection profiles
The following protection profiles are provided in Kaspersky Security policies:
- The main protection profile is automatically created when a policy is created. Although the main protection profile cannot be deleted, you can edit its settings.
- You can create additional protection profiles after creating a policy. Additional protection profiles let you flexibly configure different protection settings for different virtual machines within the protected infrastructure. A policy can contain multiple additional protection profiles.
You can configure the following File Threat Protection settings in protection profiles:
- Security level. You can select one of the preset security levels (High, Recommended, Low) or configure your own security level (Custom). The security level defines the following scan settings:
- Scanning of archives, self-unpacking archives, embedded OLE objects, and compound files
- Restriction on file scan duration
- List of objects to detect
- Action that Kaspersky Security performs after detecting infected files.
- Protection scope (scanning of network drives during protection of virtual machines).
- Exclusions from protection (by name, by file extension or full path, by file mask or path to the folder containing files to be skipped).
A protection profile can be assigned to an individual VMware virtual infrastructure object or to the root element of the protected infrastructure, which can include an Integration Server, for example (see the figure below).
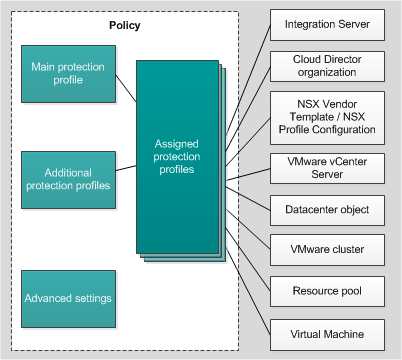
Protection profiles
By default, a protection profile assigned to the root element of a protected infrastructure is inherited by all child elements of the protected infrastructure (for example, by all VMware vCenter Servers to which the Integration Server connects). Protection profiles are also inherited according to the hierarchy of VMware virtual infrastructure objects: by default, the protection profile assigned to a virtual infrastructure object is inherited by all of its child objects, including by virtual machines. You can either assign a specific protection profile to a virtual machine, or let it inherit the protection profile that is used by its parent object.
In the main policy that defines protection settings for a virtual infrastructure managed by a single VMware vCenter Server, you can assign protection profiles to the virtual infrastructure objects either directly or by mapping protection profiles to NSX Vendor Templates or NSX Profile Configurations (depending on VMware NSX Manager type you use: VMware NSX-T Manager or VMware NSX-V Manager).
Only one protection profile may be assigned to a single virtual infrastructure object. Kaspersky Security protects virtual machines according to the settings that are specified in the protection profile assigned to these virtual machines.
Virtual infrastructure objects that have no assigned protection profile are excluded from protection.
If you exclude a virtual infrastructure object from protection, all child objects are also excluded from protection by default. You can indicate whether or not to exclude child objects that have been assigned their own protection profile.
Protection profile inheritance makes it possible to simultaneously assign identical protection settings to multiple virtual machines or exclude them from protection. For example, you can assign identical protection profiles to the virtual machines within a VMware cluster or resource pool.
Page top
About managing policies
Policies are created using the Wizard, which is started by clicking the New policy button located in the workspace of the folder or administration group on the Policies tab.
In a folder or administration group, you can create multiple policies but only one of them can be active. When you create a new active policy, the previous active policy becomes inactive.
You can change the settings of a policy after its creation in the policy properties window.
To open the policy properties window:
- In the Kaspersky Security Center Administration Console, select the folder or administration group in which the policy was created.
- In the workspace, select the Policies tab.
- In the list of policies, select the policy and open the Properties: <Policy name> window by double-clicking on the policy or by selecting Properties in the context menu.
You can also perform the following actions with policies:
- Copy policies from one folder or administration group into another.
- Export policies to a file and import policies from a file.
- Convert policies of the previous version of the application.
- Delete policies.
For more information about managing policies, see Kaspersky Security Center documentation.
Page top
Special considerations when using Kaspersky Security policies
Main policy in the Managed devices folder of the main Administration Server
This policy is automatically created using the Quick Start Wizard for the managed application after installing the Kaspersky Security main administration plug-in. You can also create such policy manually using the Policy Wizard.
The policy is applied on all SVMs of all KSC clusters.
The entire protected infrastructure must be selected as the protected infrastructure for this policy. The Integration Server serves as the root element of the protected infrastructure.
The scope of this policy includes the following virtual machines:
- File protection applies to all virtual machines within the protected infrastructure of the policy, except for virtual machines that are part of Cloud Director organizations.
- Network protection applies to all virtual machines within the protected infrastructure of the policy (including virtual machines that are part of Cloud Director organizations).
File protection and network protection are disabled by default.
To enable file protection, you need to assign protection profiles to objects of the protected infrastructure in policy properties. You can assign the automatically created main protection profile or create and assign additional protection profiles.
Please keep in mind that the settings of the main policy located in the Managed devices folder are inherited by the main policies located in all nested administration groups. Settings that are closed with a "lock" cannot be redefined in nested policies.
To enable network protection, you need to configure the settings for Intrusion Prevention and Web Addresses Scan in policy properties.
Main policy in the group that contains the "VMware vCenter Agentless" cluster
You can create this policy manually by using the New Policy Wizard. The policy is applied on all SVMs of this "VMware vCenter Agentless" cluster.
You must select one VMware vCenter Server as the protected infrastructure for this policy and indicate the VMware vCenter Server corresponding to the "VMware vCenter Agentless" cluster. The root element of the protected infrastructure is the indicated VMware vCenter Server.
The scope of this policy includes all virtual machines within the protected infrastructure of this "VMware vCenter Agentless" cluster.
File protection is enabled by default: the main protection profile is assigned to the VMware vCenter Server and is inherited by all child objects of the virtual infrastructure. If you want to configure different file protection settings for different virtual machines within the protected infrastructure of this KSC cluster, you need to create and assign additional protection profiles in the policy properties.
Network protection is disabled by default. To enable network protection, you need to configure the settings for Intrusion Prevention and Web Addresses Scan in policy properties.
Main policy in the group that contains the "VMware Cloud Director Agentless" cluster
You can create this policy manually by using the New Policy Wizard. The policy is applied on all SVMs of this "VMware Cloud Director Agentless" cluster.
The entire protected infrastructure must be selected as the protected infrastructure for this policy. The Integration Server serves as the root element of the protected infrastructure.
The scope of this policy includes the following virtual machines:
- File protection applies to all virtual machines within the protected infrastructure of the "VMware Cloud Director Agentless" cluster that are not part of Cloud Director organizations.
- Network protection applies to all virtual machines within the protected infrastructure of the "VMware Cloud Director Agentless" cluster, including virtual machines that are part of Cloud Director organizations.
File protection and network protection are disabled by default.
To enable file protection, you need to assign protection profiles to objects of the protected infrastructure in policy properties. You can assign the automatically created main protection profile or create and assign additional protection profiles.
In the properties of the main policy for the "VMware Cloud Director Agentless" cluster, you can assign protection profiles to any objects of the protected infrastructure. However, file protection settings will be applied only for protecting virtual machines that are not part of Cloud Director organizations and are managed by VMware vCenter Servers connected to VMware Cloud Director mapped to the "VMware Cloud Director Agentless" cluster.
To enable network protection, you need to configure the settings for Intrusion Prevention and Web Addresses Scan in policy properties.
Tenant policy in the Managed devices folder of the main Administration Server
This policy is automatically created using the Quick Start Wizard for the managed application after installing the Kaspersky Security administration plug-in for tenants on the main Administration Server. You can also create such policy manually using the Policy Wizard.
If the Managed devices folder of the main Administration Server is missing a tenant policy, Kaspersky Security Center does not register events that occur when scanning and protecting virtual machines of tenants, and does not display virtual machines of tenants within the KSC cluster protected infrastructure or in the list of virtual machines protected by SVMs.
The settings of this policy are not used directly for the protection of virtual machines: the protected infrastructure is not selected for this policy. However, the settings of the main protection profile and KSN usage settings configured in this policy may be inherited in tenant policies located in nested administration groups, for example, in the Managed devices folder of the virtual Administration Server. This way, you can define the same file protection settings for the virtual infrastructures of all tenants.
In this policy, you can configure the settings for notifications about events that occur when protecting and scanning virtual machines of tenants.
Please keep in mind that the settings that are closed with a "lock" in a tenant policy on the main Administration Server will be unavailable for editing on virtual Administration Servers. The administrators of tenants will not be able to configure these settings.
If you want to centrally enable Kaspersky Security Network usage for protection of all the tenant virtual machines, you need first to obtain the consent of the tenants to send KSN usage information and other information to Kaspersky depending on the KSN usage mode that you selected (standard KSN or extended KSN).
Tenant policy in the group that contains the "VMware Cloud Director Agentless" cluster
This policy is equivalent to a tenant policy in the Managed devices folder of the main Administration Server (see above). You can create this policy manually by using the New Policy Wizard.
Tenant policy in the Managed devices folder of the virtual Administration Server
You can create this policy manually by using the New Policy Wizard.
The policy is applied on all SVMs of the "VMware Cloud Director Agentless" cluster corresponding to VMware Cloud Director mapped to the Cloud Director organization that containing the virtual machines of the tenant.
The protected infrastructure for this policy is selected automatically. The root element is the "Cloud Director organization" object that combines all virtual Datacenters of the tenant.
The scope of this policy includes all virtual machines within the Cloud Director organization that corresponds to this virtual Administration Server.
File protection is enabled by default: the main protection profile is assigned to the "Cloud Director organization" root element and is inherited by all objects of the tenant virtual infrastructure. If you want to configure different file protection settings for different virtual machines within the virtual infrastructure of the tenant, you need to create and assign additional protection profiles in the policy properties.
Page top
About Kaspersky Security tasks
It is recommended to use the following types of tasks for managing Kaspersky Security through Kaspersky Security Center:
- Group task – a task that is performed on the client devices of the selected administration group. For Kaspersky Security, group tasks can be run on SVMs of one KSC cluster or on all SVMs.
- Task for specific devices. A task for one or more SVMs regardless of whether or not they are included in an administration group.
For more information about managing tasks, see Kaspersky Security Center manuals.
The following tasks are available for Kaspersky Security:
- Full and Custom Scan tasks, which let you scan all or just the specified virtual machines within the task scope.
- Service tasks, which let you activate the application, update the application databases, roll back updates, and install application patches.
Full Scan task
The Full Scan task lets you run a virus scan on the files of all virtual machines within the task scope. The scope of a task depends on where the task is located within the hierarchy of administration groups of Kaspersky Security Center, and depends on the Kaspersky Security administration plug-in that you use to create the task.
You can create Full Scan tasks by using one of the Kaspersky Security administration plug-ins:
- Main administration plug-in – to scan virtual machines that are not part of a Cloud Director organization.
- Administration plug-in for tenants – to scan virtual machines that are part of a Cloud Director organization, that is to scan tenant virtual machines.
Full Scan task created using the main administration plug-in
If you are creating a Full Scan task using the Kaspersky Security main administration plug-in, the task scope is determined as follows:
- The task in the Managed devices folder of the main Administration Server of Kaspersky Security Center lets you scan all virtual machines within the entire protected infrastructure that are not part of a Cloud Director organization.
- The task in a group that contains a KSC cluster lets you scan all virtual machines within the protected infrastructure of this KSC cluster that are not part of a Cloud Director organization.
- The task in the Tasks folder configured for one or more SVMs lets you scan all virtual machines that are protected by the specified SVMs but that are not part of a Cloud Director organization.
An SVM can scan only the virtual machines running on the same hypervisor where the SVM is deployed.
Full Scan task created using the administration plug-in for tenants
Creation of a Full Scan task for virtual machines of tenants is supported only on a virtual Administration Server of Kaspersky Security Center. You can create a Full Scan task using the Kaspersky Security administration plug-in for tenants in the Managed devices folder of the virtual Administration Server. The scope of this task includes all virtual machines within the Cloud Director organization that corresponds to this virtual Administration Server.
Page top
Custom Scan task
The Custom Scan task lets you run a virus scan on files of specified virtual machines from the task scope. The scope of a task depends on where the task is located within the hierarchy of administration groups of Kaspersky Security Center, and depends on the Kaspersky Security administration plug-in that you use to create the task.
You can create Custom Scan tasks by using one of the Kaspersky Security administration plug-ins:
- Main administration plug-in – to scan virtual machines that are not part of a Cloud Director organization.
- Administration plug-in for tenants – to scan virtual machines that are part of a Cloud Director organization, that is to scan tenant virtual machines.
Custom Scan task created using the main administration plug-in
A Custom Scan task created using the main administration plug-in lets you scan virtual machines that are managed by one VMware vCenter Server and are not part of a Cloud Director organization.
It is recommended to create Custom Scan tasks by using the main administration plug-in in the following administration groups:
- To scan virtual machines that are managed by a standalone VMware vCenter Server, create a task in the group that contains the VMware vCenter Agentless cluster corresponding to this VMware vCenter Server and indicate this VMware vCenter Server as the task scope.
- To scan virtual machines managed by a VMware vCenter Server connected to VMware Cloud Director, create a task in the group that contains the VMware Cloud Director Agentless cluster corresponding to VMware Cloud Director, and indicate the necessary VMware vCenter Server as the task scope. You need to create a separate Custom Scan task for each VMware vCenter Server connected to VMware Cloud Director.
In the selected scope, you need to indicate the virtual machines that need to be scanned. You can specify individual virtual machines, VMware virtual infrastructure objects of a higher hierarchy level, or NSX Groups that include the desired virtual machines.
Due to the specifics of configuring the scope of a Custom Scan task, it is recommended to create a Custom Scan task only in the specified administration groups, which means group tasks. If a Custom Scan task is configured for one or more SVMs (meaning a local or global task), correct configuration of the task scope cannot be guaranteed.
Custom Scan task created using the administration plug-in for tenants
Creation of a Custom Scan task for virtual machines of tenants is supported only on a virtual Administration Server of Kaspersky Security Center. You can create a Custom Scan task using the Kaspersky Security administration plug-in for tenants in the Managed devices folder of the virtual Administration Server. The scope of this task includes all virtual machines within the Cloud Director organization that corresponds to this virtual Administration Server. In this scope, you need to indicate the virtual machines that need to be scanned. You can specify individual virtual machines or VMware virtual infrastructure objects of a higher level of the hierarchy.
Page top
Service tasks
You can use the following service tasks to manage the application:
- Update. This task installs updates for application databases on the SVMs on which the task is run.
- Rollback. This task rolls back the last update of application databases on the SVMs on which the task is run.
- Application activation. As a result of this task, a license key for activating the application or for renewing the license term is added to SVMs on which the task is run.
- Automatic installation of patches. This task installs application patches on the SVMs on which the task is run.
You can create service tasks using the Kaspersky Security main administration plug-in on the main Administration Server.
The set of SVMs on which service tasks are run depends on the task's location within the hierarchy of Kaspersky Security Center administration groups:
- A task in the Managed devices folder is run on all SVMs.
- A task in a group that contains a KSC cluster is run on all SVMs of one KSC cluster.
- A task in the Tasks folder configured for one or more SVMs is run on the specified SVMs.
About task management
Tasks are created using the Wizard, which is started by clicking the New task button located in the workspace of the folder or administration group on the Tasks tab.
You can change the settings of a task after its creation in the task properties window.
To edit the settings of a task:
- In the Kaspersky Security Center Administration Console, select the folder or administration group in which the task was created.
If you selected the Managed devices folder or an administration group containing a KSC cluster, select the Tasks tab in the workspace.
- In the list of tasks, select the task and open the Properties: <Task name> window in one of the following ways:
- By double-clicking.
- Right-click to bring up the context menu of the task and select Settings.
- Edit the task settings.
- To save changes, click the Apply button or the OK button in the Properties: <Task name> window.
Regardless of the selected task run mode, you can start or stop the task at any time.
To start or stop a task:
- In the Kaspersky Security Center Administration Console, select the folder or administration group in which the task was created.
If you selected the Managed devices folder or an administration group containing a KSC cluster, select the Tasks tab in the workspace.
- In the list of tasks, select the task that you want to start or stop.
- Do one of the following:
- If you want to start the task, right-click to open the context menu and select Run.
- If you want to stop the task, right-click to open the context menu and select Stop.
Information about the progress and results of the task can be viewed in the Kaspersky Security Center Administration Console in one of the following ways:
- In the Task results window. The window can be opened by selecting the Results item in the task context menu.
- In the list of events that Kaspersky Security sends to Kaspersky Security Center Administration Server. You can view the event lists on the Events tab in the workspace of the Administration Server <Server name> node. Information on the Events tab is presented as event selections. Each selection includes only events of a specific type. The list displays events from the selection that is currently specified in the Event selections drop-down list. To display a list of the selection events, click the Run selection button. To refresh the list, click the Refresh link.
You can also perform the following actions with tasks:
- Copy tasks from one folder or administration group into another.
- Export tasks to a file and import tasks from a file.
- Convert tasks from the previous version of the application.
- Delete tasks.
For more information about managing tasks, see Kaspersky Security Center documentation.
Page top
About access rights to the settings of policies and tasks
The rights to access the settings of policies and tasks (read, write, execute) are defined for each user who has access to the Kaspersky Security Center Administration Server. In the Kaspersky Security Center Administration Console, you can grant user accounts the rights to perform certain actions within functional scopes of Kaspersky Security.
Kaspersky Security has the following functional scopes:
- Anti-Virus protection. This functional scope includes the following settings and functions:
- Enables or disables the anti-virus protection function.
- All security level settings in policies:
- Scan archives, self-extracting archives and embedded OLE objects.
- Scan large compound files.
- File scan duration limit.
- List of objects to detect.
- Action that Kaspersky Security performs when it detects infected files during virtual machine protection.
- Scan files on network drives during virtual machine protection.
- Enabling and disabling the web address scanning function.
- List of web address categories detected by Kaspersky Security.
- Action that Kaspersky Security performs if it detects a web address that belongs to one or more of the web address categories selected for detection.
- Backup settings.
- KSN usage settings.
- List of additional protection profiles in a policy.
- Assigning or changing the protected infrastructure for a policy.
- Assigning protection profiles to VMware virtual infrastructure objects.
- Full scan tasks and custom scan tasks.
- Basic functionality. This functional scope includes the following settings and functions:
- SNMP monitoring settings.
- Language of the blocked web address notification that is displayed in the browser on the protected virtual machine.
- Application database update task and latest application database update rollback task.
- Application activation task.
- Automatic patch installation task.
- Intrusion Prevention. This functional scope includes the following settings and functions:
- Enabling and disabling the Network Attack Blocker feature.
- Action that Kaspersky Security performs when it detects a network attack.
- Enabling and disabling Network Activity Scanner for virtual machines.
- Action that Kaspersky Security performs when it detects suspicious network activity.
- List of application categories whose signs of network activity are detected by Kaspersky Security.
- Duration for blocking the IP address from which the network attack or suspicious network activity originated.
- Trusted zone. This functional scope includes the following settings and functions:
- List of file extensions excluded from protection.
- List of file extensions included in the protection scope.
- List of folders and files excluded from protection.
- List of rules for identifying suspicious network activity that Kaspersky Security does not apply when analyzing traffic of protected virtual machines.
- List of network threat protection exclusion rules.
- List of web addresses that Kaspersky Security does not block, regardless of the configured web address scan settings.
The following actions are available to the user regardless of the rights of the user account within the functional scopes of Kaspersky Security:
- Viewing the settings of policies and tasks.
- Creating a policy.
Rights within the functional scopes of Kaspersky Security are required for performing the following actions with policies and tasks:
- To reconfigure a previously saved policy, the user account must have modification rights within the functional scopes of those settings.
- To modify the status of a policy (active / inactive) or remove a policy, the user account must have modification rights within the functional scopes of all policy settings. If a user account does not have the rights to edit any policy setting, the user cannot remove the policy or change the status of the policy.
- To create, remove, or configure the settings of tasks, the user account must have modification rights within the functional scope of the task.
- To run a task, the user account must have execution rights within the functional scope of the task.
Access to functional scopes of Kaspersky Security is configured in the properties window of the Kaspersky Security Center Administration Server in the Security section.
By default, the Security section is not displayed in the Administration Server properties window. To enable the display of the Security section, you must select the Display security settings sections check box in the Configure interface window (View → Configure interface menu) and restart the Kaspersky Security Center Administration Console.
For more details on access rights to Kaspersky Security Center objects, please refer to the Kaspersky Security Center documentation.
Page top
Preparing for application installation
Before installing Kaspersky Security components, perform the following:
- Check whether the Kaspersky Security Center components and VMware components meet the software requirements of Kaspersky Security.
- Prepare the virtual infrastructure for application installation. The preparatory steps depend on the type of VMware NSX Manager you use: VMware NSX-T Manager or VMware NSX-V Manager.
- You can download the files required for the installation of the application from Kaspersky website.
The file necessary for running the Kaspersky Security components Installation Wizard and SVM images are also available for downloading in the Kaspersky Security Center Administration Console in the list of current versions of Kaspersky applications. The list of the current application versions is displayed in the workspace of the Administration Server <Server name> node on the Monitoring tab in the Update section by clicking the View current versions of Kaspersky applications link. You can filter the list by Virtualization value.
- Prepare SVM images:
- Make sure the SVM images are received from a trusted source (for more information about validating the SVM image, refer to the application page in the Knowledge Base).
- Place all SVM image files in the same folder on a network resource that is accessible over the HTTP or HTTPS protocol. For example, you can publish SVM images on the Kaspersky Security Center Web Server.
The path to the folder with SVM image files must not contain special characters and the characters of the national alphabets.
- In the settings of the network hardware or software used for traffic monitoring, open the ports that are required for the application operation.
- Configure the settings of the accounts that are required for installation and operation of the application.
- If you are planning to use network data storage for SVMs, create a network folder for hosting the network data storage and a user account for connecting SVMs. Network data storage is used for storing backup copies of files that have been moved to Backups on SVMs.
An SMB network folder accessible via the SMBv3 protocol is required for network data storage. The amount of space necessary for the network data storage can be estimated based on the following formula: (N+1) GB, where N is the number of SVMs that connect to the network data storage.
You need to make sure that the amount of space allocated for network data storage is sufficient for storing backup copies of files. Kaspersky Security does not monitor availability of free space in the network data storage and does not notify you if backup copies of files cannot be stored. It is recommended to use third-party tools to monitor the available space in the network folder.
Accounts for installing and using the application
User account for installing the Kaspersky Security administration plug-in and Integration Server
Installation of the Kaspersky Security administration plug-in and Integration Server requires an account that has software installation privileges (for example, an account from the group of local administrators).
If the computer hosting the Kaspersky Security Center Administration Console belongs to an Active Directory domain, connection to the Integration Server requires a domain account that belongs to the KLAdmins group or an account that belongs to the group of local administrators.
To prevent unauthorized access, it is recommended to ensure the security of the account that is used to connect to the Integration Server.
User accounts for deploying and removing SVMs, and for operation of the application
The following user accounts are required to deploy, delete and work with the SVMs that have Kaspersky Security components:
- To connect the Integration Server to VMware vCenter Server, you can use one of the following accounts:
- VMware vCenter Server account to which the ReadOnly predefined system role is assigned with the Propagate to children flag. To ensure that powered-off virtual machines can be scanned, the following privileges need to be assigned to this account:
- Virtual machine → Change Configuration → Add existing disk
- Virtual machine → Change Configuration → Add or remove device
- Virtual machine → Change Configuration → Remove disk
- ESX Agent Manager → Modify
- VMware vCenter Server account to which the Administrator predefined system role is assigned with the Propagate to children flag.
- VMware vCenter Server account to which the ReadOnly predefined system role is assigned with the Propagate to children flag. To ensure that powered-off virtual machines can be scanned, the following privileges need to be assigned to this account:
- To connect the Integration Server to VMware NSX Manager, you need a VMware NSX Manager account that has the Enterprise Admin or Enterprise Administrator role assigned (depending on VMware NSX Manager version). Integration Server connection is required to enable registration of Kaspersky Security services and configuration of new SVM settings.
- In the infrastructure managed by VMware NSX-T Manager, a VMware vCenter Server administrator account or an account with the following privileges is required to connect VMware NSX-T Manager to VMware vCenter Server:
- Extension → Register extension
- Extension → Unregister extension
- Extension → Update extension
- Sessions → Message
- Sessions → Validate session
- Sessions → View and stop sessions
- Host → Configuration → Maintenance
- Host → Configuration → NetworkConfiguration
- Host → Local Operations → virtual machine
- Host → Local Operations → Delete virtual machine
- Host → Local Operations → Reconfigure virtual machine
- Tasks
- Scheduled task
- Global → Cancel task
- Permissions → Reassign role permissions
- Resource → Assign vApp to resource pool
- Resource → Assign virtual machine to resource pool
- Virtual Machine → Configuration
- Virtual Machine → Guest Operations
- Virtual Machine → Provisioning
- Virtual Machine → Inventory
- Network → network
- vApp
- If you want to use Kaspersky Security to protect the virtual infrastructure managed by VMware Cloud Director, you also need a VMware Cloud Director account that has the following permissions to connect the Integration Server to VMware Cloud Director:
- General → Perform administrator queries
- Organization → View Organizations
Roles must be assigned to user accounts at the top level of the hierarchy of VMware virtual infrastructure objects.
For information on how to create user accounts in a VMware infrastructure, please refer to VMware documentation.
User account for connecting the Integration Server to Kaspersky Security Center
This account is used if the application is operating in multitenancy mode.
The Integration Server connects to Kaspersky Security Center to receive information about virtual Administration Servers created in Kaspersky Security Center, and to map virtual Administration Servers to Cloud Director organizations that contain tenant virtual machines.
Connecting the Integration Server to Kaspersky Security Center requires an account with read permissions in the following Kaspersky Security Center functional scopes:
- General functions → Basic functionality
- General functions → Virtual Administration Servers
You can create and configure the account used for connecting the Integration Server to Kaspersky Security Center in the properties window of the Kaspersky Security Center Administration Server in the Security section.
By default, the Security section is not displayed in the Administration Server properties window. To enable the display of the Security section, you must select the Display security settings sections check box in the Configure interface window (View → Configure interface menu) and restart the Kaspersky Security Center Administration Console.
For more details on the rights of user accounts in Kaspersky Security Center, please refer to the Kaspersky Security Center documentation.
User account for connecting SVMs to network data storage
This user account is required if you are using network data storage for SVMs. Network data storage is used for storing backup copies of files that have been moved to Backups on SVMs.
To connect SVMs to network data storage, you need an account with read and write permissions in the network folder hosting the storage.
It is recommended to restrict access to this network folder for all other user accounts.
Page top
Ports used
To install and run application components, in the network hardware or software settings used to control network traffic between virtual machines, you must open the following ports as described in the table below.
Ports used by the application
Port and protocol |
Direction |
Purpose and description |
|---|---|---|
13000 TCP |
From the SVM to the Kaspersky Security Center Administration Server. |
To manage the application via Kaspersky Security Center. |
15000 UDP |
From the Kaspersky Security Center Administration Server to the SVM. |
To manage the application via Kaspersky Security Center. |
13111 TCP |
From the SVM to the Kaspersky Security Center Administration Server. |
For interaction between SVM and the KSN proxy. |
17000 TCP |
From the SVM to the Kaspersky Security Center Administration Server. |
For interaction between SVM and Kaspersky activation servers. |
13111 TCP |
From the SVM to the Kaspersky Security Center Administration Server. |
For interaction between SVM and the KSN proxy. |
17000 TCP |
From the SVM to the Kaspersky Security Center Administration Server. |
For interaction between SVM and Kaspersky activation servers. |
13291 TCP |
From the Kaspersky Security Center Administration Console to the Kaspersky Security Center Administration Server. |
To connect the Administration Console to the Kaspersky Security Center Administration Server. |
22 TCP |
From the Integration Server to the SVM. |
For interaction between the SVM and Integration Server. |
7271 TCP |
From the SVM to Integration Server. |
For interaction between the SVM and Integration Server. |
7271 TCP |
From the VMware NSX Manager to the Integration Server. |
For interaction between the VMware NSX Manager and the Integration Server. |
443 TCP |
From the Integration Server to VMware NSX Manager. |
For interaction between the Integration Server and the virtual infrastructure. |
443 TCP |
From the Integration Server to virtual infrastructure administration servers (VMware vCenter Server and VMware Cloud Director). |
For interaction between the Integration Server and the virtual infrastructure. |
Publishing SVM images on the Kaspersky Security Center Web Server
You can publish SVM images on the Kaspersky Security Center Web Server or place them on another network resource that is accessible over the HTTP or HTTPS protocol.
To publish SVM images on the Kaspersky Security Center Web Server:
- Make sure that the Web Server is running. To do so, start the services.msc snap-in and verify that the Kaspersky Web Server service has the Running status.
- In the shared folder of the Administration Server, create a subfolder named public.
To find out the path to the shared folder:
- View the shared folder name and the name of the computer on which it is located in the Administration Server properties window in the Additional → Administration Server shared folder section.
- On the specified computer, carry out the following command in the command line:
net share <shared folder name>.After this command is executed, the
Pathstring will show the path to the shared folder in the file system.
- Copy all Kaspersky Security SVM image files into the public folder.
- Make sure that the SVM images have been published. To do so, open your browser and enter the following in the address bar:
http://<IP address for connecting to the Kaspersky Security Center Administration Server>:8060/publicAn IP address must be specified as the Administration Server address; localhost should not be specified.
Port 8060 is used by default. If you have modified the default settings, in the address field specify the port that is defined in the Web server section of the Kaspersky Security Center Administration Server properties window.
If publication of SVM images completed successfully, you will see a page containing a list of Kaspersky Security image files.
Page top
Preparing virtual infrastructure managed by VMware NSX-T Manager
Before installing Kaspersky Security in the infrastructure managed by VMware NSX-T Manager, do the following:
- Combine VMware ESXi hypervisors into one or several VMware clusters.
- If you want to use an N-VDS switch, reserve one physical network interface for configuring N-VDS on each VMware ESXi hypervisor.
- Configure the Agent VM Settings in the properties of each hypervisor: select a network and storage for service virtual machines and SVMs. For details on configuring Agent VM Settings, please refer to the VMware product documentation.
- Install the Guest Introspection Thin Agent component on each virtual machine that you want to protect using Kaspersky Security.
On the virtual machines running Windows, the NSX File Introspection Driver, which is included in VMware Tools version 11.2.5 package acts as the Guest Introspection Thin Agent component. By default, NSX File Introspection Driver is not installed, so when installing the VMware Tools package, select NSX File Introspection Driver to install.
Special packages are provided for installation of the Guest Introspection Thin Agent component on the virtual machines running Linux operating system. For more details please refer to documentation attached to VMware products.
- Perform the following actions in the VMware NSX Manager Web Console:
- Register VMware vCenter Server to which VMware NSX-T Manager is connected as NSX Compute Manager.
- Create an NSX Transport Node Profile for the NSX Transport Zone of the Overlay type, to which the protected virtual machines are connected. You can use the default NSX transport zone.
- Prepare hypervisors for protection deployment. To do this, apply the created NSX Transport Node Profile on each VMware cluster where the SVMs with Kaspersky Security components will be deployed. As a result, NSX Transport Nodes will be configured and VMware NSX components will be installed on VMware ESXi hypervisors.
- If you want to install the Network Threat Protection component, perform the following additional actions:
- Make sure that the correct license type is used for VMware NSX-T Data Center.
- In the NSX Transport Zone for which you created the NSX Transport Node Profile, create an NSX Segment and connect the protected virtual machines to it.
Registering NSX Compute Manager
VMware vCenter Server is registered as NSX Compute Manager in VMware NSX Manager Web Console, in the System → Fabric → Compute Managers section. Specify the account for connecting VMware NSX-T Manager to VMware vCenter Server and connection settings.
After registration of the added VMware vCenter Server is completed, the table displays the following information:
- Registration Status –
Registered. - Connection Status –
Up.
For more information about registering VMware vCenter Server as NSX Compute Manager, refer to VMware product documentation and the Knowledge base.
Page top
Creating NSX Transport Node Profile
The NSX Transport Node Profile is created in VMware NSX Manager Web Console, in the System → Fabric → Profiles section on the Transport Node Profiles tab.
Specify the following settings:
- Name – an arbitrary name for the new NSX Transport Node Profile.
- In the New Node Switch section:
- Type – switch type. If you want to use a VDS switch, create a Distributed Virtual Switch (dvSwitch) in your Datacenter.
- Mode –
Standard. - Name – depending on the selected switch type:
- If you selected N-VDS – an arbitrary name of the switch that will be created as a result of applying the NSX Transport Node Profile on VMware ESXi hypervisors.
- If you selected VDS – VMware vCenter Server name and Distributed Virtual Switch name.
- Transport Zone – NSX Transport Zone of the Overlay type, to which protected virtual machines are connected.
- Uplink Profile –
nsx-default-uplink-hostswitch-profile. - IP Assignment (TEP) – a way to assign IP addresses in the virtual infrastructure: using DHCP or using a static pool of IP addresses. If you use pools of IP addresses, preconfigure and select the pool of IP addresses for the tunnel endpoints on hypervisors in the field below.
- Teaming Policy Uplink Mapping – if you select the N-VDS switch type, you can specify the physical network interface. The N-VDS switch will be created based on this interface as a result of applying the NSX Transport Node Profile on the VMware ESXi hypervisors.
For more information on creating NSX Transport Node Profile, refer to the VMware product documentation and the Knowledge Base.
Page top
Preparing hypervisors for protection deployment
To prepare hypervisors for protection deployment, apply the NSX Transport Node Profile that was created before on each VMware cluster where you want to deploy SVM. As a result, NSX Transport Nodes will be configured and the required VMware NSX components will be installed on VMware ESXi hypervisors.
The procedure is performed by clicking the Configure NSX button on the Host Transport Nodes tab, in the System → Fabric → Nodes section of VMware NSX Manager Web Console. The list of clusters opens after you select the VMware vCenter Server that you registered as the NSX Compute Manager in the Managed by field.
Specify the NSX Transport Node Profile that was created before for the clusters on which you want to deploy SVMs.
If the procedure finishes successfully, the table displays the following information for each selected cluster:
- NSX Configuration –
Success. - Node Status –
Up.
For more information about preparing hypervisors for protection deployment refer to VMware product documentation and to the Knowledge Base.
Page top
Creating NSX Segment
NSX Segment is created in VMware NSX Manager Web Console in the Networking → Segments section on the Segments tab.
Specify the name for the new NSX Segment and select the NSX Transport Zone where you previously created the NSX Transport Node Profile.
After creating the NSX segment, connect to it the network interfaces of the virtual machines that you want to protect from the network threats. Connection is established in the virtual machine properties, in VMware vSphere Client console.
For more details on configuring the NSX Segment, refer to the VMware product documentation and the Knowledge base.
Page top
Viewing information about the NSX Data Center license
The Network Threat Protection component requires a valid license of one of the following types:
- NSX Data Center Advanced.
- NSX Data Center Enterprise Plus.
- NSX Data Center for Remote Office Branch Office.
- NSX for vSphere Advanced.
- NSX for vSphere Enterprise.
When a different type of license id used, the Network Service Insertion (Third Party Integration) function that is required for enabling Network Threat Protection on VMware ESXi hypervisors is not available.
You can view information about the used licenses in VMware NSX Manager Web Console in the System → Licenses section.
For more information about working with NSX Data Center licenses, refer to VMware product documentation.
Page top
Preparing virtual infrastructure managed by VMware NSX-V Manager
Before installing Kaspersky Security in the infrastructure managed by VMware NSX-V Manager, do the following:
- Combine VMware ESXi hypervisors into one or several VMware clusters.
- Configure the Agent VM Settings in the properties of each hypervisor: select a network and storage for service virtual machines and SVMs. For details on configuring Agent VM Settings, please refer to the VMware product documentation.
- Deploy the Guest Introspection service on each VMware cluster on which you want to deploy the SVMs with the File Threat Protection component. As a result, the Guest Introspection service virtual machines are deployed on each hypervisor that is part of the cluster.
Deployment of the Guest Introspection service is performed in the VMware vSphere Client console.
- Install the Guest Introspection Thin Agent component on each virtual machine that you want to protect using Kaspersky Security.
On the virtual machines running Windows, the NSX File Introspection Driver, which is included in VMware Tools version 11.2.5 package acts as the Guest Introspection Thin Agent component. By default, NSX File Introspection Driver is not installed, so when installing the VMware Tools package, select NSX File Introspection Driver to install.
Special packages are provided for installation of the Guest Introspection Thin Agent component on the virtual machines running Linux operating system. For more details please refer to documentation attached to VMware products.
- If you want to install the Network Threat Protection component, perform the following additional actions:
- Make sure that the correct license type is used for VMware NSX Data Center for vSphere.
- Install VMware NSX components on hypervisors. Installation is performed in the VMware vSphere Client console in the Networking & Security → Installation and Upgrade section on the Host Preparation tab. You need to select the VMware cluster on which the SVMs with the Network Threat Protection component will be deployed and perform the Actions → Install action. Refer to the Knowledge Base for more details.
Deploying the Guest Introspection service virtual machines
To deploy the Guest Introspection service virtual machines on VMware clusters:
- In the VMware vSphere Client console, start the Deployment Wizard for network services and protection services for virtual machines (in the Networking & Security → Installation and Upgrade section on the Service Deployments tab).
- Use the Wizard to specify the deployment settings:
- Select the Guest Introspection service in the table.
- Select one or several VMware clusters on which you want to install the File Threat Protection component.
- If required, change the default settings for all Guest Introspection service virtual machines that will be deployed on hypervisors within the selected VMware cluster:
- Network that will be used by the service virtual machines.
- Storage for deployment of service virtual machines.
- Method of assigning IP addresses. By default, service virtual machines receive network settings via the DHCP protocol. You can configure a static pool of IP addresses that will be used for assigning IP addresses to service virtual machines.
- Finish the Wizard and wait for deployment of the Guest Introspection service to complete.
A Guest Introspection service virtual machine will be deployed on each hypervisor within the VMware cluster that you selected.
For more details about deploying the Guest Introspection service, please refer to the Knowledge Base.
Page top
Viewing information about the license for NSX for vSphere
The Network Threat Protection component requires a valid license of one of the following types:
- NSX for vSphere Advanced.
- NSX for vSphere Enterprise.
When using a standard NSX for vSphere license, the Network Service Insertion (Third Party Integration) function that is required for enabling protection against network threats on VMware ESXi hypervisors is unavailable.
You can view information about the utilized licenses in the VMware vSphere Client console in the Administration → Licenses section on the Products tab (for details, please refer to the Knowledge Base).
For more details on working with NSX for vSphere licenses, please refer to the VMware product documentation.
Page top
Installing the application
Installation of Kaspersky Security consists of the following steps:
- Installation of the Kaspersky Security administration plug-in(s) and Integration Server.
Regardless of the selected application usage option, you need to install the Kaspersky Security main administration plug-in, Integration Server, and Integration Server Console.
If you want to use the application in multitenancy mode, you need to also install Kaspersky Security administration plug-in for tenants.
When the Kaspersky Security Center Administration Console starts for the first time after the Kaspersky Security administration plug-ins are installed, the Quick Start Wizard for the managed application is automatically started. The Wizard lets you create default policies and tasks.
If the Quick Start Wizard for the managed application was not started automatically, it is recommended to start it manually. Default policies let you register events and display protected virtual machines in the Kaspersky Security Center Administration Console immediately after installing the application.
- Configuring the settings for connecting the Integration Server to one or more virtual infrastructure administration servers.
- Registering Kaspersky Security services in VMware NSX Manager:
- If you want to install the File Threat Protection component, you need to register the file system protection service (Kaspersky File Antimalware Protection).
- If you want to install the Network Threat Protection component, you need to register the network protection service (Kaspersky Network Protection).
The settings required for registration and deployment of Kaspersky Security services are entered through a Wizard that is started from the Integration Server Console. When you have finished entering the settings, Integration Server registers the Kaspersky Security services in VMware NSX Manager.
You can verify that Kaspersky Security services are registered successfully in VMware NSX Manager Web Console or in VMware vSphere Client console (depending on the type of VMware NSX Manager you use: VMware NSX-T Manager or VMware NSX-V Manager).
- Deploying SVMs with Kaspersky Security components and configuring protection settings in the virtual infrastructure.
Actions to be performed depend on the type of VMware NSX Manager you use: VMware NSX-T Manager or VMware NSX-V Manager.
After the application is installed, prepare it for operation: activate the application on all deployed SVMs, make sure that the application databases are updated on all deployed SVMs, and configure the application operation settings by using a policy.
If you want to use the application in multitenancy mode, configure protection of tenant organizations after the application is installed and prepared for operation.
Installation of the Kaspersky Security main administration plug-in and Integration Server
The Kaspersky Security main administration plug-in and Integration Server Console must be installed on the computer on which the Kaspersky Security Center Administration Console is installed. The Integration Server must be installed on the computer on which the Administration Server of Kaspersky Security Center is installed.
The main administration plug-in for Kaspersky Security and Integration Server components should be installed using an account that has software installation privileges (for example, an account from the group of local administrators).
You can install the Kaspersky Security main administration plug-in, Integration Server, and the Integration Server Console by using one of the following methods:
- In interactive mode using the Wizard
- In silent mode via the command line
Prior to beginning installation of the Kaspersky Security main administration plug-in, Integration Server, and Integration Server Console, it is recommended to close the Kaspersky Security Center Administration Console.
The Microsoft .NET Framework 4.6.1 platform is required for installation of the Integration Server, Integration Server Console, and Kaspersky Security administration plug-in. You can install the Microsoft .NET Framework 4.6.1 platform in advance or it will be installed automatically during the installation of Kaspersky Security application components. Internet access is required to install Microsoft .NET Framework. If there are any problems with the installation of Microsoft .NET Framework 4.6.1, make sure that Windows updates KB2919442 and KB2919355 have been installed on the computer.
Depending on the availability of Kaspersky Security Center components installed on the computer, the following operations are performed once installation is started:
- If only the Administration Console of Kaspersky Security Center is installed on the computer, the Kaspersky Security administration plug-in and the Integration Server Console are installed.
- If the Kaspersky Security Center Administration Server and the Administration Console of Kaspersky Security Center are installed on the computer, the Kaspersky Security administration plug-in, the Integration Server, and the Integration Server Console are installed.
A secure SSL connection is used for interaction between the Integration Server and the Integration Server Console, SVMs, the VMware vCenter Server, and VMware NSX Manager. To eliminate known vulnerabilities in the operating system for the SSL protocol, during installation of the Integration Server changes described in the Microsoft technical support database are made to the operating system registry. These changes result in the disabling of the following encryption ciphers and protocols:
- SSL 3.0
- SSL 2.0
- AES 128
- RC2 40/56/128
- RC4 40/56/64/128
- 3DES 168
While the Integration Server is being installed, the Integration Server's self-signed SSL certificate used for establishing a secure connection with the Integration Server is installed in the operating system registry. If necessary, you can replace the SSL certificate of the Integration Server (the certificate replacement procedure is described in the Knowledge Base).
If the Integration Server was previously installed in your virtual infrastructure and you removed it but saved data used in the operation of the Integration Server, this data is used automatically when you install the Integration Server again.
Installation in interactive mode
To install the Kaspersky Security main administration plug-in and Integration Server components in interactive mode using the Wizard:
- On the computer with Kaspersky Security Center Administration Console and Kaspersky Security Center Administration Server installed, start the ksv-components_6.1.0.XXX_mlg.exe file, where 6.1.0.XXX is the application version number. This file is included in the distribution kit.
If the Kaspersky Security Center Administration Server is not installed on a computer, the Integration Server will not be installed on that computer. Only the Kaspersky Security administration plug-in and Integration Server Console will be installed.
The Kaspersky Security Components Installation Wizard will start.
- Select the localization language of the Wizard and of the Kaspersky Security components and proceed to the next step of the Wizard.
By default, the window uses the localization language of the operating system installed on the computer where the Wizard was started.
- Read the End User License Agreement concluded between you and Kaspersky, and the Privacy Policy describing the handling and transmission of data.
To continue the installation, you must confirm that you have fully read and accept the terms of the End User License Agreement and the Privacy Policy. To confirm, select both check boxes in the window of the Wizard.
Proceed to the next step of the wizard.
- If the Kaspersky Security Center Administration Server is installed on the computer running the Wizard and this computer does not belong to an Active Directory domain, you must create a password for the Integration Server administrator account. The Integration Server administrator account (admin) is used for managing the Integration Server.
Enter a password in the Password and Confirm password fields. The account name cannot be edited.
A password must be no longer than 60 characters. You can use only letters of the Latin alphabet (uppercase and lowercase letters), numerals, and the following special characters:
! # $ % & ' ( ) * " + , - . / \ : ; < = > _ ? @ [ ] ^ ` { | } ~. For security purposes, you are advised to set a password that is at least 8 characters long and use at least three of the four categories of characters: lowercase letters, uppercase letters, numerals, and special characters.Proceed to the next step of the wizard.
- If the Kaspersky Security Center Administration Server is installed on the computer running the Wizard and port 7271 used to connect to the Integration Server by default is busy, you must specify a port number for connecting to the Integration Server.
In the Port field, specify a port number in the range of 1025–65536 and proceed to the next step of the Wizard.
- Review the information about the actions that the Wizard will perform and click Next to begin performing the listed actions.
- Wait for the wizard to finish.
If an error occurs during wizard operation, the wizard rolls back the changes made.
- Click Finish to close the Wizard window.
Information about the work of the Wizard is written to Kaspersky Security Components Installation Wizard trace files. If the Wizard ended with an error, you can use these files when contacting Technical Support.
Page top
Installing via the command line
Prior to installing the administration plug-in, it is recommended to carefully read the text of the End User License Agreement and the Privacy Policy. To do so, type the following command in the command line:
ksv-components_6.1.0.XXX_mlg.exe --lang=<language ID> --show-EulaAndPrivacyPolicy
where 6.1.0.XXX is the number of the application version.
The text of the End User License Agreement and the Privacy Policy is output to the EulaAndPrivacyPolicy_<language ID>.txt file in the %temp% folder.
To install the Kaspersky Security main administration plug-in and Integration Server components via the command line,
type one of the following commands in the command line:
- if the computer on which installation is performed belongs to an Active Directory domain:
ksv-components_6.1.0.XXX_mlg.exe -q --lang=<language ID> --accept-EulaAndPrivacyPolicy=yes - if the computer on which installation is performed does not belong to an Active Directory domain:
ksv-components_6.1.0.XXX_mlg.exe -q --lang=<language ID> --accept-EulaAndPrivacyPolicy=yes --viisPass=<password>
where:
6.1.0.XXXis the number of the application version.<language ID>is the ID of the language of components to install.The language ID must be indicated in the following format: ru, en, de, fr, zh-Hans, ja. It is case sensitive.
<password>is the password of the Integration Server administrator account. If the computer on which Integration Server is installed does not belong to an Active Directory domain, the Integration Server administrator account (admin) is used to manage the Integration Server.A password must be no longer than 60 characters. You can use only letters of the Latin alphabet (uppercase and lowercase letters), numerals, and the following special characters:
! # $ % & ' ( ) * " + , - . / \ : ; < = > _ ? @ [ ] ^ ` { | } ~. For security purposes, you are advised to set a password that is at least 8 characters long and use at least three of the four categories of characters: lowercase letters, uppercase letters, numerals, and special characters.accept-EulaAndPrivacyPolicy=yesmeans that you accept the terms of the End User License Agreement and the Privacy Policy describing the handling and transmission of data. By setting the value toyes, you confirm the following:- You have fully read, understand, and accept the provisions and terms of the End User License Agreement.
- You have fully read and understand the Privacy Policy, you understand and consent that your data will be processed and transmitted (including to third-party countries) in accordance with the Privacy Policy.
You must accept the terms of the End User License Agreement and Privacy Policy if you want to install the Kaspersky Security administration plug-in and Integration Server components.
Port number 7271 is used by default for connecting to the Integration Server. If you want to use a different port to connect to the Integration Server, specify --viisPort=<port number in the range of 1025–65536> in the command.
Installation of the Kaspersky Security main administration plug-in and Integration Server components may take some time. Information about the installation result is written to Kaspersky Security Components Installation Wizard trace files. If installation ended with an error, you can use these files when contacting Technical Support.
Page top
Installation of the Kaspersky Security administration plug-in for tenants
The actions described in this section must be performed only if you are using the application in multitenancy mode.
The Kaspersky Security administration plug-in for tenants must be installed on the same computer on which the Kaspersky Security Center Administration Console is installed.
The administration plug-in for tenants should be installed using an account that has software installation privileges (for example, an account from the group of local administrators).
You can install the Kaspersky Security administration plug-in for tenants in one of the following ways:
- In interactive mode using the Wizard
- In silent mode via the command line
Prior to beginning installation of the Kaspersky Security administration plug-in for tenants, it is recommended to close the Kaspersky Security Center Administration Console.
Installation in interactive mode
To install the Kaspersky Security administration plug-in for tenants in interactive mode using the Wizard:
- On the computer where the Kaspersky Security Center Administration Console is installed, start the file named ksv-t-components_6.1.0.XXX_mlg.exe. (6.1.0.XXX represents the application version number). This file is included in the distribution kit.
The Installation Wizard starts for the Kaspersky Security administration plug-in for tenants.
- Select the localization language of the Wizard and the Kaspersky Security administration plug-in for tenants and proceed to the next step of the Wizard.
By default, the window uses the localization language of the operating system installed on the computer where the Wizard was started.
- Read the End User License Agreement concluded between you and Kaspersky, and the Privacy Policy describing the handling and transmission of data.
To continue the installation, you must confirm that you have fully read and accept the terms of the End User License Agreement and the Privacy Policy. To confirm, select both check boxes in the window of the Wizard.
Proceed to the next step of the wizard.
- Review the information about the actions that the Wizard will perform and click Next to begin performing the listed actions.
- Wait for the wizard to finish.
If an error occurs during wizard operation, the wizard rolls back the changes made.
- Click Finish to close the Wizard window.
Information about the work of the Wizard is written to Kaspersky Security administration plug-in for tenants Installation Wizard trace files. If the Wizard ended with an error, you can use these files when contacting Technical Support.
Page top
Installing via the command line
Prior to installing the administration plug-in, it is recommended to carefully read the text of the End User License Agreement and the Privacy Policy. To do so, type the following command in the command line:
ksv-t-components_6.1.0.XXX_mlg.exe --lang=<language ID> --show-EulaAndPrivacyPolicy
where 6.1.0.XXX is the number of the application version.
The text of the End User License Agreement and the Privacy Policy is output to the EulaAndPrivacyPolicy_<language ID>.txt file in the %temp% folder.
To install the Kaspersky Security administration plug-in for tenants, enter the following command in the command line:
ksv-t-components_6.1.0.XXX_mlg.exe -q --lang=<language ID> --accept-EulaAndPrivacyPolicy=yes
where:
6.1.0.XXXis the number of the application version.<language ID>is the ID of the language of components to install.The language ID must be indicated in the following format: ru, en, de, fr, zh-Hans, ja. It is case sensitive.
accept-EulaAndPrivacyPolicy=yesmeans that you accept the terms of the End User License Agreement and the Privacy Policy describing the handling and transmission of data. By setting the value toyes, you confirm the following:- You have fully read, understand, and accept the provisions and terms of the End User License Agreement.
- You have fully read and understand the Privacy Policy, you understand and consent that your data will be processed and transmitted (including to third-party countries) in accordance with the Privacy Policy.
You must accept the terms of the End User License Agreement and Privacy Policy if you want to install the Kaspersky Security administration plug-in.
Information about the installation result is written to Kaspersky Security administration plug-in for tenants Installation Wizard trace files. If installation ended with an error, you can use these files when contacting Technical Support.
Page top
Result of installation of the Kaspersky Security administration plug-ins and Integration Server
Installation of the Kaspersky Security main administration plug-in and Integration Server components includes the following:
- In Kaspersky Security Center Administration Console, the following link is created for starting the Integration Server Console: Manage Kaspersky Security for Virtualization 6.1 Agentless. The link is displayed in the workspace of the Administration Server <Server name> node on the Monitoring tab in the Deployment section.
- When the Kaspersky Security Center Administration Console is started for the first time after the administration plug-in is installed, the Managed Application Quick Start Wizard starts and creates the default main policy and tasks in the Managed devices folder of the main Administration Server. The Wizard can also be started manually.
- The Kaspersky Security main administration plug-in appears in the list of installed administration plug-ins in the properties of the Kaspersky Security Center Administration Server.
Installation of the Kaspersky Security administration plug-in for tenants results in the following:
- When the Kaspersky Security Center Administration Console is started for the first time after the administration plug-in is installed, the Managed Application Quick Start Wizard starts and creates the default tenant policy in the Managed devices folder of the main Administration Server. The Wizard can also be started manually.
- The Kaspersky Security administration plug-in for tenants appears in the list of installed administration plug-ins in the properties of the Kaspersky Security Center Administration Server.
Viewing the list of installed administration plug-ins
To view the list of installed administration plug-ins:
- In Kaspersky Security Center Administration Console, select the Administration Server <Server name> node.
- Open the Administration Server properties window in one of the following ways:
- Select Properties in the context menu of the node.
- In the workspace of the node, click the Administration Server properties link in the Administration Server section, on the Monitoring tab.
The Properties: Administration Server <Server name> window opens.
- In the Administration Server properties window in the Additional section, select the Information about the installed application administration plug-ins subsection.
The main Kaspersky Security administration plug-in – Kaspersky Security for Virtualization 6.1 Agentless is displayed in the list of installed administration plug-ins in the right part of the window.
If you install Kaspersky Security administration plug-in for tenants, Kaspersky Security for Virtualization 6.1 Agentless (for tenants) is also displayed.
Starting the Quick Start Wizard for the managed application
When the Kaspersky Security Center Administration Console starts for the first time after the Kaspersky Security main administration plug-in is installed, the Quick Start Wizard for the managed application is automatically started. The Wizard results in creation of a default main policy, application database update task, and Full Scan task for the virtual machines that are not part of a Cloud Director organization in the Managed devices folder of the main Kaspersky Security Center Administration Server.
If you also installed the Kaspersky Security administration plug-in for tenants, the Quick Start Wizard for the managed application is started again and automatically creates a default tenant policy in the Managed devices folder of the main Administration Server.
A default tenant policy is not created automatically on a virtual Administration Server of Kaspersky Security Center.
If the Quick Start Wizard for the managed application was not started automatically, it is recommended to start it manually. Default policies let you register events and display protected virtual machines in the Kaspersky Security Center Administration Console immediately after installing the application.
To manually start the Initial Configuration Wizard:
- In Kaspersky Security Center Administration Console, select the Administration Server <Server name> node.
- In the context menu of the node, select All Tasks → Managed Application Quick Start Wizard.
- In the window of the welcome screen, click Next.
- At the next step, select the managed application: Kaspersky Security for Virtualization 6.1 Agentless and click Next.
- Wait for the Wizard to finish and close the Wizard window.
- If you use the application in multitenancy mode, repeat steps 1–3, and select the managed application at the next step: Kaspersky Security for Virtualization 6.1 Agentless (for tenants). Then click Next.
- Wait for the Wizard to finish and close the Wizard window.
Default policies and tasks
As a result of the Initial Configuration Wizard for the managed application, the following policies and tasks are created in the Managed devices folder of the main Kaspersky Security Center Administration Server.
Default main policy
This policy is displayed in the workspace of the Managed devices folder of the main Administration Server on the Policies tab and is named KSV Agentless 6.1 default policy.
Default policy settings take the following values:
- File Threat Protection disabled (a protection profile is not assigned to objects of the protected infrastructure).
- SNMP monitoring of the status of SVMs is disabled.
- Use of Backup is enabled. Storage period for backup copies of files is 30 days.
- Use of Kaspersky Security Network is disabled.
- Network Threat Protection is disabled.
If you want to use the default main policy for virtual machine protection, you need to enable anti-virus protection and configure Network Threat Protection in this policy.
All settings of the default main policy can be redefined in nested policies (all "locks" are open).
The availability of a default main policy lets you use the following capabilities of Kaspersky Security Center immediately after SVM deployment and before you manually create a policy:
- Display the list of protected virtual machines in KSC cluster properties.
- Register events that occur during scan and protection of virtual machines that are not part of Cloud Director organizations.
- Display information about the virtual machines whose protection involves the use of license keys in a key report.
- Display information about protected virtual machines in a protection status report.
If you want to delete the default main policy, make sure that one of the policies created by you is applied on all SVMs. If the main policy is not applied on an SVM, Kaspersky Security Center does not register the events from this SVM that occur during scan and protection of virtual machines that are not part of Cloud Director organizations, and does not display these virtual machines in reports.
Default tenant policy
This policy is created only on the main Kaspersky Security Center Administration Server if you installed the Kaspersky Security administration plug-in for tenants.
This policy is displayed in the workspace of the Managed devices folder of the main Administration Server on the Policies tab and is named KSV Agentless 6.1 (for tenants) default policy.
The settings of this policy are not used directly for the protection of virtual machines. However, the settings of the main protection profile and KSN usage settings configured in this policy may be inherited in tenant policies located in nested administration groups, for example, in the Managed devices folder of the virtual Administration Server.
If you want to centrally enable KSN usage for protection of all the tenant virtual machines, you need first to obtain the consent of the tenants to send KSN usage information and other information to Kaspersky depending on the KSN usage mode that you select (standard KSN or extended KSN).
All settings of the default tenant policy can be redefined in nested policies (all "locks" are open).
There must be a tenant policy in the Managed devices folder of the main Administration Server of Kaspersky Security Center to register events that occur during scans and protection of virtual machines of tenants, and to display virtual machines of tenants within the protected infrastructure of the KSC cluster and in the list of virtual machines protected by SVMs.
In the default tenant policy, you can configure the settings for notifications about events that occur during scans and protection of virtual machines of tenants.
Application database default update task
This task is displayed in the workspace of the Managed devices folder of the main Administration Server on the Tasks tab and is named Program database update.
The task is started each time an update package is downloaded to the storage of Kaspersky Security Center Administration Server, and it lets you update the databases on all SVMs.
Default Full Scan task
This task is displayed in the workspace of the Managed devices folder of the main Administration Server on the Tasks tab and is named Default Full Scan task.
This task lets you scan all virtual machines that are within the entire protected infrastructure but are not part of a Cloud Director organization.
The settings of the full scan task take the following values:
- Security level – Recommended:
- Archive scanning is disabled.
- Scanning of self-extracting archives and embedded OLE objects is enabled.
- Kaspersky Security does not scan compound files larger than 8 MB.
- File scan duration is unlimited.
- Kaspersky Security scans files of virtual machines to detect viruses, worms, Trojans, malicious tools, auto-dialers, adware, and multi-packed files.
- Kaspersky Security automatically attempts to disinfect infected files. If disinfection fails, the application deletes such files. If deletion fails, Kaspersky Security blocks the infected files.
- Kaspersky Security does not scan powered-off virtual machines, virtual machine templates, or files on optical drives.
- The scan task ends 120 minutes after the task was started.
- Scan task exclusions are not defined.
You can manually run this task.
Page top
Configuring the Integration Server
After installing the Integration Server, you must configure the settings for connecting the Integration Server to the virtual infrastructure.
The settings of the Integration Server can be configured in the Integration Server Console.
Starting the Integration Server Console
If the computer hosting the Integration Server Console belongs to an Active Directory domain, make sure that your domain account belongs to the KLAdmins group or the group of local administrators on the computer where the Integration Server is installed.
To install the Integration Server Console:
- In Kaspersky Security Center Administration Console, select the Administration Server <Server name> node.
- Start the Integration Server Console by clicking the Manage Kaspersky Security for Virtualization 6.1 Agentless link on the Monitoring tab in the Deployment section.
- If one of the following conditions is satisfied, a window opens for entering the Integration Server connection settings:
- If the computer hosting the Integration Server Console does not belong to an Active Directory domain.
- If the computer hosting the Integration Server Console belongs to a domain but a connection to the Integration Server could not be established using the connection address and port specified in the Integration Server Console settings.
Specify the following connection settings:
- Address and port of the Integration Server to which the connection is established.
- User account for connecting to the Integration Server:
- If the computer hosting the Integration Server Console belongs to a domain or your domain account belongs to the KLAdmins group or to the group of local administrators on the computer hosting the Integration Server, you can use the domain account. To do so, select the Use domain account check box.
If you want to use the account of an Integration Server administrator (admin), enter the administrator account password in the Password field.
- If the computer hosting the Integration Server Console does not belong to a domain, or the computer belongs to a domain but your domain account does not belong to the KLAdmins group or to the group of local administrators on the computer hosting the Integration Server, you can use only the account of the Integration Server administrator (admin). Enter the password of the Integration Server administrator account in the Password field.
- If the computer hosting the Integration Server Console belongs to a domain or your domain account belongs to the KLAdmins group or to the group of local administrators on the computer hosting the Integration Server, you can use the domain account. To do so, select the Use domain account check box.
Click the Connect button.
- The console checks the SSL certificate received from the Integration Server. If the received certificate is not trusted or does not match the previously installed certificate, the Certificate verification window with the appropriate message opens. Click a link in this window to view the details of the certificate received. The SSL certificate is used to establish a secure connection to the Integration Server. If there are problems with the SSL certificate, it is recommended to make sure that the utilized data transfer channel is secure.
To continue connecting to the Integration Server, click the Consider certificate to be trusted button in the Certificate verification window. The certificate that has been received is installed as a trusted certificate. The certificate is saved in the registry of the operating system on the computer hosting the Integration Server Console.
The Integration Server Console opens.
Page top
Configuring the settings for connecting the Integration Server to the virtual infrastructure administration server
Depending on the virtual infrastructure that you want to protect using Kaspersky Security, you need to configure a connection to the following virtual infrastructure administration servers:
- To protect a virtual infrastructure managed by one or multiple VMware vCenter Servers, you need to configure the connection of the Integration Server to each of these VMware vCenter Servers.
- To protect a virtual infrastructure managed by VMware vCenter Servers connected to the VMware Cloud Director Server, configure the Integration Server connection to each of these VMware vCenter Servers, and to the VMware Cloud Director Server.
The connection to each virtual infrastructure administration server is established separately.
In an infrastructure managed by VMware Cloud Director, you can connect the Integration Server to VMware vCenter Servers and VMware Cloud Director Servers in any order. The Integration Server automatically determines whether each added VMware vCenter Server is a standalone server or is connected to a VMware Cloud Director Server.
Kaspersky Security operation is not supported in the infrastructure managed by VMware NSX Manager, to which several VMware vCenter Servers are connected.
To configure the settings for connecting the Integration Server to the virtual infrastructure administration server:
- Start the Integration Server Console.
- In the Virtual infrastructure protection section, click the Add button.
- In the opened Connection to virtual infrastructure window, select the type of virtual infrastructure administration server to which you need to configure a connection, and click Next.
- Specify the following settings:
- IP address in IPv4 format or fully qualified domain name (FQDN) of the virtual infrastructure administration server to which the Integration Server connects.
- Name and password of the account that the Integration Server uses to connect to the virtual infrastructure administration server.
The entered connection settings (except the password) are saved in the registry of the operating system in encrypted form.
- Click the Validate button. The Integration Server checks the specified connection settings and the SSL certificate received from the virtual infrastructure administration server. If a connection could not be established or certificate errors are detected during the connection, the window displays an error message.
If a connection error occurs because the certificate received from the virtual infrastructure administration server is not trusted for the Integration Server, the Certificate validation window opens. If the received certificate complies with the security policy of your organization, you can confirm the authenticity of the certificate and establish the connection. To do so, click the Install certificate button in the opened window. The received certificate is saved as a trusted certificate for the Integration Server.
Certificates that are trusted in the operating system in which the Integration Server is installed are also considered to be trusted for the Integration Server.
If there are problems with the SSL certificate, it is recommended to make sure that the utilized data transfer channel is secure.
- After establishing a connection with the virtual infrastructure administration server, click OK in the Connection to virtual infrastructure window.
The entered address or name of the virtual infrastructure administration server is displayed in the table in the Virtual infrastructure protection section.
If you configure connection to the VMware Cloud Director Server and to the VMware vCenter Servers connected to it, the rows containing information about these VMware vCenter Servers are automatically grouped into a list located under the row with this VMware Cloud Director.
For each virtual infrastructure administration server, the table displays a list of actions that you can perform when configuring a connection to this server and for subsequent deployment of virtual infrastructure protection. You can expand or collapse the list of possible actions by clicking on the address or name of the virtual infrastructure administration server in the Address column.
If necessary, you can change or delete previously enter settings for connecting the Integration Server to the virtual infrastructure administration server.
To change the settings for connecting the Integration Server to the virtual infrastructure administration server:
- Expand the list of possible actions for the selected virtual infrastructure administration server by clicking on the address or name of the virtual infrastructure administration server in the Address column.
- Depending on the type of virtual infrastructure administration server, select Change VMware vCenter Server connection settings or Change VMware Cloud Director connection settings. The Connection to virtual infrastructure window opens.
- Enter the new connection settings and verify the capability to connect, as described in the procedure for configuring the settings for connecting the Integration Server to the virtual infrastructure administration server (see items 4–6 of the previous instructions).
To delete the settings for connecting the Integration Server to the virtual infrastructure administration server:
- Expand the list of possible actions for the selected virtual infrastructure administration server by clicking on the address or name of the virtual infrastructure administration server in the Address column.
- Depending on the type of virtual infrastructure administration server, select Remove VMware vCenter Server from the list or Remove VMware Cloud Director from the list.
- Confirm the deletion in the window that opens.
Removing a VMware vCenter Server from the list is possible only if Kaspersky Security services are not registered in VMware NSX Manager.
After configuring the connection between the Integration Server and one or several VMware vCenter Servers, you can proceed to deploying protection in the VMware virtual infrastructure.
Page top
Changing passwords of Integration Server accounts
If necessary, in the Integration Server user accounts section you can change passwords for Integration Server user accounts:
- Password of the Integration Server administrator account (admin).
- Password of the account used for connecting SVMs to the Integration Server (svm).
SVM account password is required in order to configure the connection between the SVM with the File Threat Protection component and the Integration Server that will support interaction between the VMware vCenter Server and the SVM.
- Service account password for connecting VMware NSX Manager to the Integration Server (NSX_220E116B-B6D5-42).
Account names cannot be edited.
To change the password of the Integration Server account:
- Start the Integration Server Console.
- In the list on the left, select the Integration Server user accounts section.
- In the table, select the name of the account whose password you want to change.
- Click the Change the account password link to open the Account password window and enter the new password in the Password and Confirm password fields.
A password must be no longer than 60 characters. You can use only letters of the Latin alphabet (uppercase and lowercase letters), numerals, and the following special characters:
! # $ % & ' ( ) * " + , - . / \ : ; < = > _ ? @ [ ] ^ ` { | } ~. For security purposes, you are advised to set a password that is at least 8 characters long and use at least three of the four categories of characters: lowercase letters, uppercase letters, numerals, and special characters. - In the Account password window, click OK.
Viewing Integration Server settings
To view Integration Server settings:
- Start the Integration Server Console.
- In the list on the left, select the Integration Server settings section.
The right part of the Console shows the following settings of the Integration Server to which the connection has been established:
- Integration Server version.
- Name of the user account that was used to establish the connection to the Integration Server.
- Type of authentication used when connecting to the Integration Server.
- New IP address in IPv4 format or the fully qualified domain name (FQDN) of the Integration Server.
If you enabled the logging of information to the Integration Server trace file, you can view this file by clicking the View trace file link. The trace file can be viewed with the Notepad text editor.
Page top
Registration of Kaspersky Security services
After configuring the connection between the Integration Server and the VMware vCenter Server, you must start the Kaspersky Security service registration process and enter the settings required for completing the following steps of application installation:
- Registration of Kaspersky Security services in VMware NSX Manager: the file system protection service (Kaspersky File Antimalware Protection) and the network protection service (Kaspersky Network Protection)
- Deployment of Kaspersky Security services
- Initial configuration of new SVMs after deployment of Kaspersky Security services
Registration of Kaspersky Security services in VMware NSX Manager and configuration of new SVMs is performed by the Integration Server.
To enter the settings required for registration and deployment of Kaspersky Security services:
- Start the Integration Server Console.
The Virtual infrastructure protection section opens.
- In the list, select the VMware vCenter Server and expand the list of available actions by clicking the address or name of the VMware vCenter Server in the Address column.
- In the Manage protection section, select Register Kaspersky Security services.
This starts the Registration of Kaspersky Security Services Wizard. Follow the wizard instructions.
Connecting to VMware NSX Manager
At this step, specify the settings used by the Integration Server for interaction with VMware NSX Manager where the Integration Server registers Kaspersky Security services.
To specify the settings for connecting the Integration Server to VMware NSX Manager:
- In the VMware NSX Manager type drop-down list, select the type of VMware NSX Manager that is used in your virtual infrastructure.
- Specify the following connection settings:
- IP address in IPv4 format or the fully qualified domain name (FQDN) of VMware NSX Manager.
- Name and password of the account used to connect the Integration Server to VMware NSX Manager. The Enterprise Admin or Enterprise Administrator role (depending on VMware NSX Manager version) must be assigned this account.
At this step, you can also configure the settings used by VMware NSX Manager to transmit information to the Integration Server. By default, the settings that are used when connecting the Integration Server Console to the Integration Server are specified. The Address field contains the fully qualified domain name (FQDN) of the computer on which the Integration Server is installed (if the computer is in a domain), the name of the computer in a Windows workgroup (if the computer is not in a domain), or the computer IP address.
Make sure that VMware NSX Manager can connect to the Integration Server using the default settings or change those settings. To change the settings, select the Specify the settings for connecting VMware NSX Manager to Integration Server check box, and specify the IP address or fully qualified domain name of the computer on which the Integration Server is installed and the connection port.
Proceed to the next step of the wizard.
The Wizard checks whether it can connect to VMware NSX Manager and to the Integration Server using the specified settings.
When establishing the connection to VMware NSX Manager, the Wizard verifies the SSL certificate received from VMware NSX Manager. If the received certificate contains an error, the Wizard displays an error message. Click the View certificate link to view information about the received certificate.
If a connection error occurs because the certificate received from VMware NSX Manager is not trusted for the Integration Server but the received certificate complies with the security policy of your organization, you can confirm the authenticity of the certificate and establish a connection. To do so, click the Install certificate button. The received certificate is saved as a trusted certificate for the Integration Server.
Certificates that are trusted in the operating system in which the Integration Server is installed are also considered to be trusted for the Integration Server.
If there are problems with the SSL certificate, it is recommended to make sure that the utilized data transfer channel is secure.
If checking the Integration Server connection settings ends with an error, the Wizard window displays an error message and you cannot proceed to the next step of the Wizard. If you want to correct the entered settings, click Cancel. If the settings have been entered correctly, you can ignore the error message. If this is the case, click Continue to proceed to the next step of the Wizard.
Page top
Selecting an SVM image for the file system protection service
At this step, you can specify the image for deploying SVM with the File Threat Protection component.
If you do not want to install the File Threat Protection component, clear the Register the file system protection service check box.
If you want to install the File Threat Protection component, follow these steps depending on the type of VMware NSX Manager you use (VMware NSX-T Manager or VMware NSX-V Manager):
- If you deploy Kaspersky Security in the infrastructure managed by VMware NSX-T Manager, specify the description file (XML file) of the SVM images with the File Threat Protection component at this step. The Integration Server will register Kaspersky File Antimalware Protection service with a set of different configurations of SVM images in VMware NSX Manager. After registration finishes, you can deploy the file system protection service on VMware clusters. During deployment, you select the SVM image of the desired configuration. As a result, SVMs with the File Threat Protection component will be deployed from the selected image.
- If you deploy Kaspersky Security in the infrastructure managed by VMware NSX-V Manager, select the desired configuration of the SVM image with the File Threat Protection component at this step. The Integration Server will register Kaspersky File Antimalware Protection service with the specified SVM image in VMware NSX Manager. After registration finishes, you can deploy the file system protection service on VMware clusters. As a result, SVMs will be deployed from the specified image.
All files of the SVM image with the File Threat Protection component must be located in the same folder on a network resource that is accessible over the HTTP or HTTPS protocol.
Selecting an image to deploy in the infrastructure managed by VMware NSX-T Manager
To select a set of SVM images to deploy:
- Enter the address of the description file (XML file) of the SVM images with the File Threat Protection component located on a network resource accessible via HTTP or HTTPS.
- Click the Validate button.
The Wizard checks availability and status of all SVM image files at the specified address. If the files are not available, images are corrupted, or the image version is not supported, the Wizard displays an error message.
If validation is successful, the following information on the selected SVM image will appear at the bottom of the window:
- Application name. Name of the application that is installed on the SVM.
- SVM version. Number of the SVM version.
- Vendor. Vendor of the application that is installed on the SVM.
- Description. Brief description of the application.
- SVM configuration. A list of SVM configurations with the File Threat Protection component that are available for deployment. You can select the desired SVM configuration while deploying Kaspersky File Antimalware Protection service.
Selecting an image to deploy in the infrastructure managed by VMware NSX-V Manager
To select an SVM image to deploy:
- Enter the address of the description file (XML file) of the SVM images with the File Threat Protection component or the address of the SVM image OVF file corresponding to the desired SVM configuration. The files are located on a network resource accessible via HTTP or HTTPS.
- Click the Validate button.
The Wizard checks availability and status of all SVM image files at the specified address. If the files are not available, image is corrupted, or the image version is not supported, the Wizard displays an error message.
If validation is successful, the following information on the selected SVM image will appear at the bottom of the window:
- SVM configuration. SVM configuration settings – the number of processors and amount RAM allocated for the SVM.
If you specified the address of the SVM image description file (XML file), you can select the necessary SVM configuration in the drop-down list in the SVM configuration field.
- Application name. Name of the application that is installed on the SVM.
- SVM version. Number of the SVM version.
- Vendor. Vendor of the application that is installed on the SVM.
- Description. Brief description of the application.
- Required disk space. Amount of disk space in the data storage required for deploying the SVM from the specified image.
- SVM configuration. SVM configuration settings – the number of processors and amount RAM allocated for the SVM.
Proceed to the next step of the wizard.
Page top
Selecting an SVM image for the network protection service
At this step, you can specify the image for deploying SVM with the Network Threat Protection component.
If you do not want to install the Network Threat Protection component, clear the Register the network protection service check box.
If you want to install the Network Threat Protection component, follow these steps depending on the type of VMware NSX Manager you use (VMware NSX-T Manager or VMware NSX-V Manager):
- If you deploy Kaspersky Security in the infrastructure managed by VMware NSX-T Manager, specify the description file (XML file) of the SVM images with the Network Threat Protection component at this step. The Integration Server will register Kaspersky Network Protection service with a set of different configurations of SVM images in VMware NSX Manager. After registration finishes, you can deploy the network protection service on VMware clusters. During deployment, you select the SVM image of the desired configuration. As a result, SVMs with the Network Threat Protection component will be deployed from the selected image.
- If you deploy Kaspersky Security in the infrastructure managed by VMware NSX-V Manager, select the desired configuration of the SVM image with the Network Threat Protection component at this step. The Integration Server will register Kaspersky Network Protection service with the specified SVM image in VMware NSX Manager. After registration finishes, you can deploy the network protection service on VMware clusters. As a result, SVMs will be deployed from the specified image.
All files of the SVM image with the Network Threat Protection component must be located in the same folder on a network resource that is accessible over the HTTP or HTTPS protocol.
Selecting an image to deploy in the infrastructure managed by VMware NSX-T Manager
To select a set of SVM images to deploy:
- Enter the address of the description file (XML file) of the SVM images with the Network Threat Protection component located on a network resource accessible via HTTP or HTTPS.
- Click the Validate button.
The Wizard checks availability and status of all SVM image files at the specified address. If the files are not available, images are corrupted, or the image version is not supported, the Wizard displays an error message.
If validation is successful, the following information on the selected SVM image will appear at the bottom of the window:
- Application name. Name of the application that is installed on the SVM.
- SVM version. Number of the SVM version.
- Vendor. Vendor of the application that is installed on the SVM.
- Description. Brief description of the application.
- SVM configuration. A list of SVM configurations with the Network Threat Protection component that are available for deployment. You can select the desired SVM configuration while deploying Kaspersky Network Protection service.
Selecting an image to deploy in the infrastructure managed by VMware NSX-V Manager
To select an SVM image to deploy:
- Enter the address of the description file (XML file) of the SVM images with the Network Threat Protection component or the address of the SVM image OVF file corresponding to the desired SVM configuration. The files are located on a network resource accessible via HTTP or HTTPS.
- Click the Validate button.
The Wizard checks availability and status of all SVM image files at the specified address. If the files are not available, image is corrupted, or the image version is not supported, the Wizard displays an error message.
If validation is successful, the following information on the selected SVM image will appear at the bottom of the window:
- SVM configuration. SVM configuration settings – the number of processors and amount RAM allocated for the SVM.
If you specified the address of the SVM image description file (XML file), you can select the necessary SVM configuration in the drop-down list in the SVM configuration field.
- Application name. Name of the application that is installed on the SVM.
- SVM version. Number of the SVM version.
- Vendor. Vendor of the application that is installed on the SVM.
- Description. Brief description of the application.
- Required disk space. Amount of disk space in the data storage required for deploying the SVM from the specified image.
- SVM configuration. SVM configuration settings – the number of processors and amount RAM allocated for the SVM.
Proceed to the next step of the wizard.
Page top
Selecting the traffic processing mode for the Network Threat Protection component
This step is displayed only if you deploy Kaspersky Security in the infrastructure managed by VMware NSX-V Manager.
If you specified an SVM image with the Network Threat Protection component at the previous step, at this step select the traffic processing mode for the Network Threat Protection component.
The Standard mode is selected by default.
Select Monitoring mode if you want Kaspersky Security not to take any action to prevent threats when it detects signs of intrusions or attempts to access dangerous or undesirable web addresses, but only to send information about events to Kaspersky Security Center Administration Server.
After network protection service registration and SVM deployment, the traffic processing mode cannot be changed. To select a different traffic processing mode, remove the Network Threat Protection component and the objects created in the infrastructure because of the component installation, unregister the network protection service, and then re-register the network protection service with the new traffic processing mode and deploy new SVMs.
Proceed to the next step of the wizard.
Page top
Configuring the connection settings for an SVM
At this step, specify the IP address of the Kaspersky Security Center Administration Server and SSL port that the SVM will use to connect to Kaspersky Security Center.
At this step, you can also configure the settings for connecting an SVM to the Integration Server. The settings that the Integration Server Console used for connecting to the Integration Server are set by default. The Address field contains the fully qualified domain name (FQDN) of the computer on which the Integration Server is installed (if the computer is in a domain), the name of the computer in a Windows workgroup (if the computer is not in a domain), or the computer IP address.
Make sure that SVM can connect to the Integration Server using the default settings or change those settings. To change the settings, select the Specify the settings for connecting SVMs to Integration Server check box, and specify the IP address or fully qualified domain name of the computer on which the Integration Server is installed, and the connection port.
Proceed to the next step of the wizard.
The Wizard checks whether it can connect to the Kaspersky Security Center and to the Integration Server using the specified settings.
If checking the connection settings ends with an error, the Wizard window displays an error message and you cannot proceed to the next step of the Wizard. If you want to correct the entered settings, click Cancel. If the settings have been entered correctly, you can ignore the error message. If this is the case, click Continue to proceed to the next step of the Wizard.
Page top
Creating passwords for accounts on SVMs
At this step, create a password for the klconfig user account (configuration password) and a password for the root user account on SVMs. The configuration password is required to change SVM settings. The root account is used for accessing the operating system on SVMs and for accessing SVM trace files.
Enter a password for each user account in the Password and Confirm password fields.
The passwords should be up to 60 characters long. You can use only letters of the Latin alphabet (uppercase and lowercase letters), numerals, and the following special characters: ! # $ % & ' ( ) * " + , - . / \ : ; < = > _ ? @ [ ] ^ ` { | } ~. For security purposes, you are advised to set passwords that are at least 8 characters long and use at least three of the four categories of characters: lowercase letters, uppercase letters, numerals, and special characters.
To prevent unauthorized access to an SVM after SVM deployment, it is recommended to change the configuration password regularly. You can change the configuration password by using the Kaspersky Security reconfiguration procedure.
Proceed to the next step of the wizard.
Page top
Selecting the time zone for SVMs
At this step, you can select the time zone that will be used on all SVMs. By default, the time zone for SVMs corresponds to the time zone that has been set on the computer on which the Integration Server Console is installed.
If you need to change the time zone for SVMs, select a value from the drop-down list.
Proceed to the next step of the wizard.
Page top
Configuring the settings for connecting to network data storage
At this step, you can configure the following settings for using network data storage:
- Allow or block the use of network data storage for SVMs.
- Specify the settings for connecting SVMs to network data storage.
Network data storage can be used for storing backup copies of files that have been moved to Backups on SVMs. By default, SVMs do not use network data storage.
If you want to allow the use of network data storage for SVMs, select the Use network data storage option and define the following settings for connecting to storage:
- Network data storage address in UNC format.
The defined address cannot be localhost or 127.0.0.1.
- Account used by SVMs to connect to the network data storage, in the format <domain>\<user name>.
- Connection account password.
Proceed to the next step of the wizard.
The Wizard checks whether it can connect to the network data storage using the specified settings.
If checking the connection settings ends with an error, the Wizard window displays an error message and you cannot proceed to the next step of the Wizard. If you want to correct the entered settings, click Cancel. If the settings have been entered correctly, you can ignore the error message. If this is the case, click Continue to proceed to the next step of the Wizard.
Page top
Confirming Kaspersky Security settings
At this step, check the entered settings of Kaspersky Security.
Proceed to the next step of the wizard to start registration of Kaspersky Security services.
Page top
Registration of Kaspersky Security services
This step displays information about operations performed by the Integration Server in order to register Kaspersky Security services and prepare the settings that will be distributed to new SVMs after they are deployed.
If an error occurred during such operations, the Wizard displays the relevant information. The Wizard performs rollback of changes.
After all operations have been completed, proceed to the next step of the Wizard.
Page top
Exiting the wizard
This step displays information about the result of Kaspersky Security service registration.
If the services were registered successfully, exit the Wizard.
If registration of services ended with an error, the Wizard displays information about the error. If this is the case, exit the Wizard, eliminate the cause of the error, and restart the procedure. For detailed information about errors, you can view the Integration Server trace files (if you enabled the logging of information to Integration Server trace files).
Page top
Viewing registered services
Registration of Kaspersky Security services in VMware NSX Manager is performed by the Integration Server. After registration finishes, you can view the list of registered services in VMware NSX Manager Web Console or in VMware vSphere Client console (depending on the type of VMware NSX Manager you use: VMware NSX-T Manager or VMware NSX-V Manager).
- If you use VMware NSX-T Manager, you can view the list of registered services in VMware NSX Manager Web Console in the System → Service Deployments section on the Catalog tab.
- If you use VMware NSX-V Manager, you can view the list of registered services in the Networking & Security → Service Definitions section on the Services tab.
Deploying SVMs and configuring protection settings in the infrastructure managed by VMware NSX-T Manager
To protect virtual machines in the infrastructure managed by VMware NSX-T Manager, perform the following actions in the VMware NSX Manager Web Console:
- Deploy SVMs with Kaspersky Security components on VMware ESXi hypervisors. For this purpose, you need to deploy Kaspersky Security services on VMware clusters:
- If you want to protect virtual machines from file threats, you need to deploy Kaspersky File Antimalware Protection service. The SVMs with the File Threat Protection component will be deployed on the hypervisors.
- If you want to protect virtual machines from network threats, you need to deploy Kaspersky Network Protection service. The SVMs with the Network Threat Protection component will be deployed on the hypervisors.
When deploying an SVM in the infrastructure managed by VMware NSX-T Manager, the certificate used to sign the SVM image is verified. If the certificate verification fails, SVM deployment from this image finishes with an error. If a certificate verification error occurs during SVM deployment, perform the following actions:
- Remove Kaspersky Security service deployment that finishes with an error.
- Connect to VMware NSX-T Manager using SSH with the root account permissions.
- Open the /config/vmware/auth/ovf_validation.properties file.
- Set the following value of the setting: THIRD_PARTY_OVFS_VALIDATION_FLAG=2 and save the file.
- Redeploy the Kaspersky Security service.
After SVMs are deployed, the Integration Server sends to each new SVM the settings that you specified when registering Kaspersky Security services.
Kaspersky Security Center places the deployed SVMs to KSC clusters.
- Include virtual machines that you want to protect into one or several NSX Groups.
- Create NSX Policies for Kaspersky Security services:
- To protect virtual machines from file threats, create an NSX policy for File Threat Protection. To do so, perform the following actions:
- Create an NSX Service Profile for the Kaspersky File Antimalware Protection service.
- Create an NSX policy for File Threat Protection and configure the Endpoint Protection Rule in the policy. In the rule settings, specify the NSX group that includes the protected virtual machines, and the Kaspersky File Antimalware Protection service profile created before.
- To protect the virtual machines from network threats, create an NSX policy for Network Threat Protection and configure the rules for redirecting network traffic of the protected virtual machines to Kaspersky Security network protection service. To do so, perform the following actions:
- Create an NSX Service Profile for the Kaspersky Network Protection service.
- Create an NSX Service Chain that uses the Kaspersky Network Protection service profile created before.
- Create an NSX policy that redirects traffic to the NSX Service Chain that contains Kaspersky Network Protection service profile. Depending on the type of traffic you want to scan, configure a rule for incoming and/or outgoing traffic in the policy. Specify the NSX group, which includes the protected virtual machines, in the rule settings.
- To protect virtual machines from file threats, create an NSX policy for File Threat Protection. To do so, perform the following actions:
Deploying SVMs with the File Threat Protection component in the infrastructure managed by VMware NSX-T Manager
To deploy SVMs with the File Threat Protection component:
- In the VMware NSX Manager Web Console in the System → Service Deployments section, on the Deployment tab, in the Partner Service field, select the Kaspersky File Antimalware Protection service.
- Click the Deploy Service button and specify the deployment settings as follows:
- Service Deployment Name – an arbitrary name for the deployment.
- Compute Manager – VMware vCenter Server to which VMware NSX-T Manager is connected.
- Cluster – VMware cluster on which you want to deploy SVM with the File Threat Protection component.
- Data Store – storage for SVM deployment.
- Networks – network settings for all SVMs that will be deployed on hypervisors. You can specify network settings using the Set link. Specify the following settings:
- Network – network to be used by SVMs.
- Network Type – method of assigning IP addresses. By default, SVMs receive network settings via the DHCP protocol. You can configure a static pool of IP addresses that will be used for assigning IP addresses to the SVMs.
- Deployment Specification – configuration of the SVMs with the File Threat Protection component that will be deployed on hypervisors (Small, Medium or Large).
- Deployment template –
KSV_DeploymentTemplate.
- Click Save and wait until deployment of Kaspersky File Antimalware Protection service finishes.
If deployment of Kaspersky File Antimalware Protection service completes successfully, the Up value is displayed in the Status column. The hypervisors of the selected VMware cluster have SVMs of the selected configuration with the File Threat Protection component deployed.
After the deployment finishes, you can change the SVM configuration at any time by deploying an SVM of a different configuration from the set of SVM images registered with Kaspersky File Antimalware Protection service. To do this, open the available actions menu by clicking the button to the left of the deployment name, select the Change Appliance action, in the window that opens select the SVM configuration and click Update. Previously deployed SVMs will be removed from the hypervisors and new SVMs of the selected configuration will be deployed. After completing the procedure, activate the application on all new SVMs and make sure that the application databases are updated.
For more information about the service deployment, refer to the VMware product documentation and the Knowledge Base.
Page top
Deploying SVMs with the Network Threat Protection component in the infrastructure managed by VMware NSX-T Manager
To deploy SVMs with the Network Threat Protection component:
- In the VMware NSX Manager Web Console in the System → Service Deployments section, on the Deployment tab, in the Partner Service field, select the Kaspersky Network Protection service.
- Click the Deploy Service button and specify the deployment settings as follows:
- Service Deployment Name – an arbitrary name for the deployment.
- Compute Manager – VMware vCenter Server to which VMware NSX-T Manager is connected.
- Deployment Type – how SVMs with the Network Threat Protection component will be deployed:
Host Based– SVMs will be deployed on each hypervisor within the selected VMware cluster. When a new hypervisor is added to the cluster, the SVM will also be deployed on it.Clustered– the number of SVMs specified in the Clustered Deployment Count field will be deployed within the selected VMware cluster. In the Host field, you can specify the hypervisor on which these SVMs will be deployed. If the Host field is set toAny, the hypervisors where the SVM will be deployed are selected automatically.
- Cluster – VMware cluster where SVMs will be deployed.
- Data Store – storage for SVM deployment.
- Networks – network settings for all SVMs that will be deployed on hypervisors. For SVMs with the Network Threat Protection component, you need to use both network interfaces. For this purpose in the window that opens by clicking the Set link, do the following:
- Specify the following settings for the eth0 network interface:
- Network – network to be used by SVMs.
- Network Type – method of assigning IP addresses. By default, SVMs receive network settings via the DHCP protocol. You can configure a static pool of IP addresses that will be used for assigning IP addresses to the SVMs.
- Select the check box next to the eth1 network interface. Leave the default valuesfor all settings.
- Specify the following settings for the eth0 network interface:
- Deployment Specification – configuration of the SVMs with the Network Threat Protection component that will be deployed on hypervisors (Small, Medium or Large).
- Deployment template –
KSVNS_DeploymentTemplate. - Service Segment – NSX Service Segment. If the NSX Service Segment was not created before, you can create it by clicking the Action button. Specify an arbitrary NSX Service Segment name and NSX Transport Zone. The
Not Setvalue must be specified in the Connected To field.
- Click Save and wait until deployment of Kaspersky Network Protection service finishes.
If deployment of Kaspersky Network Protection service completes successfully, the Up value is displayed in the Status column. The hypervisors of the selected VMware cluster have SVMs with the Network Threat Protection component deployed.
After the deployment finishes, you can change the SVM configuration at any time by deploying an SVM of a different configuration from the set of SVM images registered with Kaspersky Network Protection service. To do this, open the available actions menu by clicking the button to the left of the deployment name, select the Change Appliance action, in the window that opens select the SVM configuration and click Update. Previously deployed SVMs will be removed from the hypervisors and new SVMs of the selected configuration will be deployed. After completing the procedure, activate the application on all new SVMs and make sure that the application databases are updated.
For more information about the service deployment, refer to the VMware product documentation and the Knowledge Base.
Page top
Configuring NSX Groups in the infrastructure managed by VMware NSX-T Manager
Include all virtual machines that you want to protect by Kaspersky Security in one or several NSX Groups.
To configure an NSX Group:
- In VMware NSX Manager Web Console, in the Inventory → Groups section, click the Add Group button.
- Enter the name of the new NSX Group (for example,
Kaspersky Security GrouporProtected by Kaspersky). - Click the Set Members link to open the Select Members window, configure the rules for adding virtual machines to the group and save your changes (the Apply button).
Virtual machines can be added to NSX Groups using the following methods:
- Adding virtual machines to the NSX Group dynamically. The group includes all virtual machines that meet these criteria.
- Adding the specified virtual machines to the NSX Group.
- Save the group (the Save button).
For more details on configuring NSX Groups, refer to the VMware product documentation and the Knowledge base.
Page top
Configuring and applying NSX Policy for File Threat Protection in the Infrastructure managed by VMware NSX-T Manager
To configure NSX policy for File Threat Protection in the infrastructure managed by VMware NSX-T Manager:
- Create an NSX Service Profile for the Kaspersky File Antimalware Protection service as follows:
- In the VMware NSX Manager Web Console, in the Security → Endpoint Protection Rules section, go to the Service Profiles tab and select the Kaspersky File Antimalware Protection service in the Partner Service drop-down list.
- Click the Add Service Profile button and specify the following settings:
- Service Profile Name – an arbitrary name for the profile.
- Vendor Template –
Default Configuration.
- Save the profile of the Kaspersky File Antimalware Protection service (the Save button).
- Create an NSX Policy for file threat protection as follows:
- In VMware NSX Manager Web Console, in the Security → Endpoint Protection Rules section, on the Rules tab, click the Add Policy button and specify the policy name.
- Select the created policy and click the Add Rule button to create a new rule.
- Enter an arbitrary name for the rule and specify the following settings:
- Groups – one or several NSX Groups that include protected virtual machines. The window for selecting groups is opened by clicking the button on the right side of the field.
- Service Profiles – NSX Service Profile for which the policy is created. Select the NSX Service Profile created at the previous step of the procedure (Kaspersky File Antimalware Protection service profile). The window for selecting NSX Service Profile is opened by clicking the button on the right side of the field.
- Save the new rule (the Publish button).
For more details on configuring NSX Policies, refer to the VMware product documentation and the Knowledge base.
Page top
Configuring and applying NSX Policy for Network Threat Protection in the Infrastructure managed by VMware NSX-T Manager
To configure NSX policy for Network Threat Protection in the infrastructure managed by VMware NSX-T Manager:
- Create an NSX Service Profile for the Kaspersky Network Protection service as follows:
- In the VMware NSX Manager Web Console, in the Security → Network Introspection Settings section, go to the Service Profiles tab and select the Kaspersky Network Protection service in the Partner Service drop-down list.
- Click the Add Service Profile button and specify the following settings:
- Service Profile Name – an arbitrary name of NSX Service Profile.
- Vendor Template –
Default Configuration.
- Save the profile of the Kaspersky Network Protection service (the Save button).
- Configure the NSX Service Chain as follows:
- In VMware NSX Manager Web Console, in the Security → Network Introspection Settings section, go to the Service Chains tab.
- Click the Add Chain button and specify the following settings:
- Service Chain Name – an arbitrary name of NSX Service Chain.
- Service segment – NSX Service Segment that you specified when deploying an SVM with Network Threat Protection component.
- Forward Path – the profile of the service that processes traffic. Select the NSX Service Profile created at the previous step of the procedure (Kaspersky Network Protection service profile). The window for selecting an NSX Service Profile opens by clicking the Set Forward Path link.
It is not recommended to add other NSX Service Profiles to the NSX service chain that contains the Kaspersky Network Protection service profile.
- Reverse Path – make sure that the Inverse Forward Path check box is selected.
- Failure Policy –
Allow.
- Save the NSX Service Chain (the Save button).
- Create an NSX Policy for network protection as follows:
- In the VMware NSX Manager Web Console in the Security → Network Introspection (E-W) section, click the Add Policy button and specify the following settings:
- Name – arbitrary policy name.
- Redirect To – NSX Service Chain to which the traffic is redirected. Select the NSX Service Chain that you created at the previous step of the procedure.
- Save the policy (the Publish button).
- In the VMware NSX Manager Web Console in the Security → Network Introspection (E-W) section, click the Add Policy button and specify the following settings:
- If you want to scan inbound traffic of the virtual machines, create a rule for inbound traffic in the NSX Policy as follows:
- Select the created policy and click the Add Rule button.
- Specify the following settings:
- Name – arbitrary rule name.
- Sources –
Any. - Destinations – NSX Group that includes protected virtual machines.
- Services –
Any. - Applied To – NSX Group that includes protected virtual machines.
- Action –
Redirect.
- Save the policy (the Publish button).
- If you want to scan outbound traffic of the virtual machines, create a rule for outbound traffic in the NSX Policy as follows:
- Select the created policy and click the Add Rule button.
- Specify the following settings:
- Name – arbitrary rule name.
- Sources – NSX Group that includes protected virtual machines.
- Destinations –
Any. - Services –
Any. - Applied To – NSX Group that includes protected virtual machines.
- Action –
Redirect.
- Save the NSX Policy (the Publish button).
If you created both rules, the configured policy will redirect inbound and outbound traffic of the protected virtual machines to the Kaspersky Network Protection service for scan.
For more details on configuring NSX Policies, refer to the VMware product documentation and the Knowledge base.
Page top
Deploying SVMs and configuring protection settings in the infrastructure managed by VMware NSX-V Manager
To protect virtual machines in the infrastructure managed by VMware NSX-V Manager, perform the following actions in the VMware vSphere Client console:
- Deploy Kaspersky Security services on VMware clusters. As a result, SVMs with Kaspersky Security components are deployed on VMware ESXi hypervisors.
- If you want to protect virtual machines from file threats, you need to deploy Kaspersky File Antimalware Protection service. The SVMs with the File Threat Protection component will be deployed on the hypervisors.
- If you want to protect virtual machines from network threats, you need to deploy Kaspersky Network Protection service. The SVMs with the Network Threat Protection component will be deployed on the hypervisors.
After SVMs are deployed, the Integration Server sends to each new SVM the settings that you specified when registering Kaspersky Security services.
Kaspersky Security Center places the deployed SVMs to KSC clusters.
- Include virtual machines that you want to protect into one or several NSX Groups.
- Create NSX Policy that uses Kaspersky Security services:
- File system protection service (Kaspersky File Antimalware Protection), if you want to protect virtual machines from file threats.
- Network protection service (Kaspersky Network Protection), if you want to protect virtual machines from network threats.
Apply the created NSX policy to NSX groups, which include protected virtual machines.
Deploying SVM in the infrastructure managed by VMware NSX-V Manager
To deploy SVMs with Kaspersky Security components:
- In the VMware vSphere Client console, start the Deployment Wizard for network services and protection services for virtual machines (in the Networking & Security → Installation and Upgrade section on the Service Deployments tab).
- Use the Wizard to specify the following settings:
- In the table, select the service that you need to deploy:
- Kaspersky File Antimalware Protection, if you want to deploy an SVM with the File Threat Protection component
- Kaspersky Network Protection, if you want to deploy an SVM with the Network Threat Protection component
You can select both Kaspersky Security services if you need to deploy an SVM with the File Threat Protection component and an SVM with the Network Threat Protection component on the same hypervisors and assign the same settings to them. If the SVM settings or the hypervisors on which the SVMs will be deployed must be different, you need to separately deploy the Kaspersky Security services.
- Select one or more VMware clusters on which you want to deploy SVMs with Kaspersky Security components.
- If required, change the default settings for all SVMs that will be deployed on hypervisors within every selected VMware cluster:
- Network that will be used by SVMs.
- Storage for SVM deployment.
- Method of assigning IP addresses. By default, SVMs receive network settings via the DHCP protocol. You can configure a static pool of IP addresses that will be used for assigning IP addresses to the SVMs.
- In the table, select the service that you need to deploy:
- Finish the Wizard and wait for deployment of Kaspersky Security services to complete.
SVMs with the File Threat Protection component and SVMs with the Network Threat Protection component will be deployed on each hypervisor within each VMware cluster that you selected.
For more details about the procedure for deploying SVMs with Kaspersky Security components, please refer to the Knowledge Base.
Page top
Configuring NSX Groups in the infrastructure managed by VMware NSX-V Manager
To configure an NSX Group:
- In the VMware vSphere Client console, start the NSX Group Wizard in the Networking & Security section, Security → Service Composer subsection, on the Security Groups tab.
- Using the Wizard, enter the name of the new NSX Group (for example,
Kaspersky Security GrouporProtected by Kaspersky) and configure the rules for including virtual machines into this group.Virtual machines can be added to NSX Groups using the following methods:
- Adding virtual machines to the NSX Group dynamically. The group includes all virtual machines that meet these criteria.
- Inclusion of the specified VMware virtual infrastructure objects into the NSX Group. You can select objects to be included in the group, such as a Datacenter object, VMware cluster, resource pool, or individual virtual machines. By default, the group includes all child objects of the specified object. You can also specify individual virtual infrastructure objects to be excluded from the NSX Group.
You can combine these methods when configuring the rules for including virtual machines into the NSX Group. For example, you can configure dynamic inclusion of virtual machines into the group based on specific criteria, and specify VMware inventory objects that must be excluded from the group.
For more information about configuring NSX Groups, refer to the Knowledge Base.
Page top
Configuring and applying NSX Policies in the infrastructure managed by VMware NSX-V Manager
To configure and apply an NSX Policy:
- In the VMware vSphere Client console, start the NSX Policy Wizard in the Networking & Security section, Security → Service Composer subsection, on the Security Policies tab.
- If you want to protect virtual machines against file threats, at the Guest Introspection Services step of the Wizard, add the Kaspersky File Antimalware Protection service with a user-defined name and the default action (
Apply). - If you want to scan outbound traffic of virtual machines, at the Network Introspection Services step of the Wizard, add the Kaspersky Network Protection service and specify the following values for its settings:
- User-defined name
- Redirect to service – enabled. The setting is responsible for redirecting traffic to Kaspersky Network Protection service.
- Source –
Policy's Security Groups(selected by default) - Destination –
Any(selected by default)
- If you want to scan inbound traffic of the virtual machines, at the same step of the Network Introspection Services wizard, add the Kaspersky Network Protection service once again and specify the following values for its settings:
- User-defined name
- Redirect to service – enabled. The setting is responsible for redirecting traffic to Kaspersky Network Protection service.
- Source –
Any - Destination –
Policy's Security Groups
- Finish the NSX Policy Wizard.
- In the list of NSX policies on the Security Policies tab, apply the policy (Apply) to the NSX Group that includes the protected virtual machines.
For more information about configuring NSX policies, refer to the Knowledge Base.
Page top
Preparing the application for operation and initial configuration
After the application is installed, you must prepare the application for operation. To do so, perform the following actions:
- Activate the application on all new SVMs.
- Update the application databases on all new SVMs.
- Enable protection of virtual machines against file threats and network threats. By default, Kaspersky Security does not protect virtual machines.
Activating the application on new SVMs
To activate the application, you must add a license key to all SVMs. It is recommended to configure an activation task that will be automatically started on all new SVMs immediately after they are deployed.
If you are using a licensing scheme that is based on the number of protected virtual machines, you need to create two activation tasks for protection of virtual machines running desktop operating systems and running server operating systems: a task for adding a server key to SVMs and a task for adding a desktop key to SVMs.
To configure an activation task:
- Add a license key to Kaspersky Security Center key storage.
- In the tree of the Kaspersky Security Center Administration Console, select the Managed devices folder. In the workspace, select the Tasks tab and click the New task button. The New Task Wizard starts.
- Specify the application for which the task is being created, and the type of task. To do so, in the Kaspersky Security for Virtualization 6.1 Agentless list, select Application activation.
Proceed to the next step of the wizard.
- Click the Select button. The Select a license key window opens. Select a key from the Kaspersky Security Center key storage and click the OK button.
Proceed to the next step of the wizard.
- Configure the task run schedule settings:
- In the Scheduled start drop-down list, select the Once mode. In the Start date and Start time fields, leave the default settings.
- Select the Run skipped tasks check box.
Proceed to the next step of the wizard.
- Enter the name of the task and proceed to the next step of the wizard.
- Finish the wizard.
According to the configured schedule settings, the task will start on all new SVMs immediately after they are deployed. You can view information on the results of a task in the Kaspersky Security Center Administration Console.
Page top
Updating application databases on new SVMs
After installing the Kaspersky Security administration plug-in, the application database update task is automatically created. This task is started each time an update package is downloaded to the storage of Kaspersky Security Center Administration Server, and it lets you update the application databases on all SVMs. You can use the automatically created database update task. If necessary, you can change the settings of this task or delete it, and configure the application database update task for SVMs of one or several KSC clusters belonging to one administration group.
To update the application databases after the application is installed or upgraded:
- Make sure that a download updates to the storage task has been created in Kaspersky Security Center. If the download updates to the storage task does not exist, create it (see the Kaspersky Security Center documentation).
- Manually start the download updates to the storage task or wait for a scheduled task to start automatically. Make sure that the download updates to the storage task has been completed successfully (see Kaspersky Security Center documentation for details).
- Make sure that an application database update task has been created in Kaspersky Security Center.
The application database update task that was automatically created after installation of the Kaspersky Security administration plug-in is located on the Tasks tab in the Managed devices folder.
If the application database update task has not been created, create it.
- Wait for the application database update task to start according to the schedule or manually start the task.
- Make sure that the application database update task has been completed successfully.
After the application has been installed or upgraded, SVMs relay information to Kaspersky Security Center regarding the type of application databases required for the operation of Kaspersky Security. If Kaspersky Security Center has not yet downloaded the necessary databases to the storage when the database update task is started, the task could end with an error. If this is the case, you can manually start the download updates to the storage task, wait for it to complete, and then manually start the application database update task.
Kaspersky Security checks the integrity of application databases during updates. If this check is unsuccessful, the application database update task ends with an error and Kaspersky Security continues to use the previous set of application databases. If the application database update task ends with an error on new SVMs, you are advised to contact Technical Support. If application databases are missing from SVMs, Kaspersky Security will not protect the virtual machines.
Page top
Enabling protection of virtual machines
By default, Kaspersky Security does not protect virtual machines. After installing Kaspersky Security, you must enable protection of virtual machines by using a policy.
You can use the default main policy or create a main policy for File Threat Protection of virtual machines that are not part of Cloud Director organizations.
If the application is operating in multitenancy mode, protection of the virtual infrastructure of tenants against file threats requires that you create a tenant policy on each virtual Administration Server of Kaspersky Security Center corresponding to the tenant organization. A tenant policy can be created by the provider's administrator or the tenant's administrator. The settings for protecting the virtual infrastructure of tenants against network threats are determined by the main policy whose scope includes the virtual machines of the tenant.
File Threat Protection
To protect a virtual machine against file threats, you need to assign a protection profile to the virtual machine. A virtual machine that has no assigned protection profile is excluded from protection.
A protection profile can be assigned to virtual infrastructure objects, including virtual machines, either directly or by mapping a protection profile to NSX Vendor Template / NSX Profile Configuration (depending on VMware NSX Manager type you use: VMware NSX-T Manager or VMware NSX-V Manager).
You can assign the main protection profile that is generated automatically when a policy is created, or create and assign additional protection profiles if you want to use different protection settings for different virtual infrastructure objects. Profiles are assigned in policy properties.
Kaspersky Security protects only those virtual machines that meet all the conditions for virtual machine protection from file threats.
Network Threat Protection
To protect a virtual machine against network threats, you need to configure the settings for Intrusion Prevention and/or Web Addresses Scan in the properties of the policy whose scope includes the virtual machine.
Kaspersky Security protects only those virtual machines that meet all the conditions for virtual machine protection from network threats.
If the application is not activated or the application databases are missing on SVMs, Kaspersky Security does not protect the virtual machines.
Page top
Creating a main policy
The main policy determines the File Threat Protection settings for virtual machines that are not part of Cloud Director organizations, the Network Threat Protection settings for virtual machines, and the application operation settings.
To create the main policy:
- In the Kaspersky Security Center Administration Console, start the New Policy Wizard:
- In the console tree, select the folder or administration group in which you want to create a policy.
- In the workspace, select the Policies tab and click the New policy button.
- At the first step of the New Policy Wizard, select Kaspersky Security for Virtualization 6.1 Agentless from the list and proceed to the next step of the Wizard.
- Enter the name of the new policy and proceed to the next step of the wizard.
- The Wizard establishes a connection to the Integration Server to receive information about the VMware virtual infrastructure.
It is recommended to specify the Integration Server address in the <address:port> format.
If the computer hosting the Administration Console of Kaspersky Security Center belongs to a domain or your domain user account belongs to the KLAdmins group or to the group of local administrators on the computer hosting the Integration Server, your domain user account is used by default to connect to the Integration Server. The Use domain account check box is selected by default. You can also use the Integration Server administrator account (admin). To do so, clear the Use domain account check box and enter the administrator password in the Password field.
If the computer hosting the Kaspersky Security Center Administration Console does not belong to a domain, or the computer belongs to a domain but your domain account does not belong to the KLAdmins group or to the group of local administrators on the computer hosting the Integration Server, you can use only the account of the Integration Server administrator (admin) to connect to the Integration Server. Enter the administrator password in the Password field.
If the connection to the Integration Server is established using the Integration Server administrator account (admin), you can save the administrator password. To do so, select the Save password check box. The saved administrator password will be used the next time a connection is established with this Integration Server. If you clear the check box selected during the previous connection to the Integration Server, Kaspersky Security removes the previously saved password of the Integration Server administrator.
The Save password check box may be unavailable if Windows updates KB 2992611 and/or KB 3000850 have been installed on the computer hosting the Kaspersky Security Center Administration Console. To restore the capability to save the administrator password, you can uninstall these Windows updates or modify the operating system registry as described in the Knowledge Base.
Proceed to the next step of the Policy Wizard.
The wizard checks the SSL certificate received from the Integration Server. If the received certificate contains an error, the Certificate verification window containing the error message opens. The SSL certificate is used to establish a secure connection to the Integration Server. If there are problems with the SSL certificate, it is recommended to make sure that the utilized data transfer channel is secure. To view information on the received certificate, click the View the received certificate button in the window containing the error message. You can install the certificate you received as a trusted certificate to avoid receiving a certificate error message at the next connection to the Integration Server. To do so, select the Install received certificate and stop showing warnings for <Integration Server address> check box.
To continue connecting, click the Continue button in the Certificate verification window. If you selected the Install received certificate and stop showing warnings for <Integration Server address> check box, the received certificate is saved in the operating system registry on the computer where the Kaspersky Security Center Administration Console is installed. The application also checks the previously installed trusted certificate for the Integration Server. If the received certificate does not match the previously installed certificate, a window opens to confirm replacement of the previously installed certificate. To replace the previously installed certificate with the certificate received from the Integration Server and continue connecting, click the Yes button in this window.
After the connection is established, the Choice of protected infrastructure window opens. Select one of the following options:
- If you are creating a policy in an administration group that contains the "VMware vCenter Agentless" cluster, select the One VMware vCenter Server option. Then select the listed VMware vCenter Server corresponding to this KSC cluster.
If the selected VMware vCenter Server does not correspond to the administration group that contains the policy, Kaspersky Security does not protect virtual machines.
- If you are creating a policy located in any other folder or administration group, select the Entire protected infrastructure option.
Click OK in the Choice of protected infrastructure window.
- If you are creating a policy in an administration group that contains the "VMware vCenter Agentless" cluster, select the One VMware vCenter Server option. Then select the listed VMware vCenter Server corresponding to this KSC cluster.
- At this step, you can change the default settings of the main protection profile.
If a policy is being created in a group that contains the "VMware vCenter Agentless" cluster, the main protection profile is assigned to the VMware vCenter Server by default and is inherited by all child objects of the virtual infrastructure.
Proceed to the next step of the wizard.
- At this step, you can enable SNMP monitoring of the SVM status.
To prevent unauthorized access to the SNMP service, you can create a list of IP addresses to which the SNMP Agent must relay SVM status information.
Proceed to the next step of the wizard.
- Decide on whether or not to participate in Kaspersky Security Network. To do so, carefully read the Kaspersky Security Network Statement, then perform one of the following actions:
- If you want the application to use KSN in its operations and you agree to all the terms of the Statement, select I have read, understand, and accept the terms of this Kaspersky Security Network Statement.
- If you do not want to participate in KSN, select the I do not accept the terms of this Kaspersky Security Network Statement option and confirm your decision in the window that opens.
If you want the application to use Private KSN in its operations, select the Use Private KSN check box.
If you want Kaspersky Security to use the KSN, please make sure the required KSN type is configured in Kaspersky Security Center. To use Global KSN, the KSN proxy server service must be enabled in Kaspersky Security Center. To use Private KSN, it must be enabled and configured in Kaspersky Security Center. See Kaspersky Security Center documentation for more information.
If necessary, you will be able to change the settings for KSN usage in the application at a later time.
Proceed to the next step of the wizard.
- Exit the Policy Wizard.
The created policy will be displayed in the list of policies of the administration group on the Policies tab and in the Policies folder of the console tree.
After creating a policy, you can assign protection profiles to virtual machines that you want to protect.
In a policy located in an administration group that contains the "VMware vCenter Agentless" cluster, file protection is enabled by default (the main protection profile is used). In policies located in the Managed devices folder or in the administration group that contains the "VMware Cloud Director Agentless" cluster, file protection is disabled by default.
Network protection is disabled by default in all policies. You can configure Network Threat Protection settings in policy properties.
The policy will be applied to SVMs after the Kaspersky Security Center Administration Server relays the information to Kaspersky Security at the next SVM connection. Kaspersky Security will start protecting virtual machines according to the policy settings.
If no license key has been added on an SVM or the application databases are missing, the SVM does not protect the virtual machines.
Page top
Creating a tenant policy
A tenant policy is used only if the application is operating in multitenancy mode. A tenant policy lets you configure the File Threat Protection settings for virtual machines that are part of Cloud Director organizations.
To create a tenant policy:
- In the Kaspersky Security Center Administration Console, start the New Policy Wizard:
- In the console tree, select the folder or administration group in which you want to create a policy.
- In the workspace, select the Policies tab and click the New policy button.
- At the first step of the Wizard, select Kaspersky Security for Virtualization 6.1 Agentless (for tenants) from the list and proceed to the next step of the Wizard.
- Enter the name of the new policy and proceed to the next step of the wizard.
- Specify the Integration Server address and proceed to the next step of the Wizard.
It is recommended to specify the Integration Server address in the <address:port> format.
The Wizard establishes a connection to the Integration Server to receive information about the VMware virtual infrastructure.
The wizard checks the SSL certificate received from the Integration Server. If the received certificate contains an error, the Certificate verification window containing the error message opens. The SSL certificate is used to establish a secure connection to the Integration Server. If there are problems with the SSL certificate, it is recommended to make sure that the utilized data transfer channel is secure. To view information on the received certificate, click the View the received certificate button in the window containing the error message. You can install the certificate you received as a trusted certificate to avoid receiving a certificate error message at the next connection to the Integration Server. To do so, select the Install received certificate and stop showing warnings for <Integration Server address> check box.
To continue connecting, click the Continue button in the Certificate verification window. If you selected the Install received certificate and stop showing warnings for <Integration Server address> check box, the received certificate is saved in the operating system registry on the computer where the Kaspersky Security Center Administration Console is installed. The application also checks the previously installed trusted certificate for the Integration Server. If the received certificate does not match the previously installed certificate, a window opens to confirm replacement of the previously installed certificate. To replace the previously installed certificate with the certificate received from the Integration Server and continue connecting, click the Yes button in this window.
- At this step, you can change the default settings of the main protection profile.
In the policy located in the Managed devices folder of the virtual Administration Server, the main protection profile is assigned by default to all virtual machines within the protected infrastructure of the tenant.
Proceed to the next step of the wizard.
- Decide on whether or not to participate in Kaspersky Security Network. To do so, carefully read the Kaspersky Security Network Statement, then perform one of the following actions:
- If you want the application to use KSN in its operations and you agree to all the terms of the Statement, select I have read, understand, and accept the terms of this Kaspersky Security Network Statement.
- If you do not want to participate in KSN, select the I do not accept the terms of this Kaspersky Security Network Statement option and confirm your decision in the window that opens.
You will be able to change your decision later if necessary.
KSN usage settings (KSN mode and type) are determined by the main policy whose scope includes the virtual machines of the tenant.
Proceed to the next step of the wizard.
- Exit the Policy Wizard.
The created tenant policy will be displayed in the list of policies of the administration group on the Policies tab and in the Policies folder of the console tree.
In a tenant policy that is located in the Managed devices folder of the virtual Administration Server, file protection is enabled by default (the main protection profile is used). If you want to configure different file protection settings for different virtual machines within the protected infrastructure, you need to create and assign additional protection profiles in the policy properties.
File protection is disabled by default in a tenant policy that is located in the Managed devices folder of the main Administration Server or in the administration group that contains the VMware Cloud Director Agentless cluster.
The policy will be applied to SVMs after the Kaspersky Security Center Administration Server relays the information to Kaspersky Security at the next SVM connection. Kaspersky Security will start protecting virtual machines according to the policy settings.
Page top
Configuring protection of tenant organizations
The actions described in this section must be performed only if you are using the application in multitenancy mode.
To configure protection of tenant organizations, you need to do the following after installing the application:
- In the Kaspersky Security Center Administration Console, for each tenant whose virtual machines need to be protected, create a virtual Administration Server and account that will be used by the tenant administrator to connect to the virtual Administration Server.
- In the Kaspersky Security Center Administration Console, create the account that the Integration Server will use to connect to the Kaspersky Security Center Administration Server. This connection is required for obtaining information about virtual Administration Servers created in Kaspersky Security Center, and for configuring mappings between virtual Administration Servers and Cloud Director organizations that contain tenant virtual machines.
- In the Integration Server Console, connect the Integration Server to Kaspersky Security Center Administration Server and configure the list of mappings between Cloud Director organizations and Kaspersky Security Center virtual Administration Servers.
If a Cloud Director organization is not mapped to a virtual Administration Server, Kaspersky Security does not protect the virtual machines that are part of this Cloud Director organization.
- Provide the following information to the tenant administrator:
- Integration Server address.
- Address of the virtual Administration Server configured for this tenant.
- Name and password of the account used to connect to the virtual Administration Server.
- Make sure that the application is prepared for operation and that policies are configured for the protection of the virtual infrastructure of each tenant:
- For File Threat Protection, a tenant policy must be configured on each virtual Administration Server of Kaspersky Security Center corresponding to the tenant organization.
- For Network Threat Protection, there must be a configured main policy whose scope includes the virtual machines of the tenant.
Creating a virtual Administration Server for a tenant
The actions described in this section must be performed only if you are using the application in multitenancy mode.
A virtual Administration Server is required to manage protection of virtual machines that are part of Cloud Director organization.
The virtual Administration Server must be created in the administration group, which contains the "VMware Cloud Director Agentless" cluster, in the Administration Servers subfolder. The cluster must match the VMware Cloud Director server that manages the Cloud Director organization containing tenant virtual machines.
To create a virtual Administration Server of Kaspersky Security Center:
- In Kaspersky Security Center Administration Console, in the Managed devices folder, select the administration group that contains the "VMware Cloud Director Agentless" cluster and then select the Administration Servers subfolder.
- In the workspace of the Administration Servers folder, click the Add virtual Administration Server link.
The New Virtual Administration Server Wizard starts.
- At the first step of the Wizard, specify the name of the created virtual Administration Server.
The name of a virtual Administration Server cannot contain more than 255 characters or the following special characters:
" * < > ? \ : |.Proceed to the next step of the wizard.
- Please specify the Kaspersky Security Center Administration Server address on which the virtual administration server is created, and proceed to the next step of the Wizard.
- Specify the account that the tenant administrator will use to connect to the virtual Administration Server. You can specify a previously created account of an internal user of Kaspersky Security Center or create an account by using the Create button.
Proceed to the next step of the wizard.
- Start the creation of the virtual Administration Server by clicking Next.
- At the next step, clear the All packages check box (installation packages are not required for application operation), proceed to the next step, and finish the Wizard.
A node named Administration Server – <Virtual Server name> will be created in the console tree.
For more details about working with virtual Administration Servers, please refer to the Kaspersky Security Center documentation.
Page top
Connecting the Integration Server to the Kaspersky Security Center Administration Server
The actions described in this section must be performed only if you are using the application in multitenancy mode.
The Integration Server must be connected to the Kaspersky Security Center Administration Server to receive information about virtual Administration Servers created in Kaspersky Security Center.
To connect the Integration Server to the Kaspersky Security Center Administration Server:
- Start the Integration Server Console.
- In the list on the left, select the Manage protection of tenant organizations section.
- In the Settings for connecting to Kaspersky Security Center section, specify the connection settings:
- IP address in IPv4 format or fully qualified domain name (FQDN) of the Kaspersky Security Center Administration Server.
- Name and password of the account used by the Integration Server to connect to the Kaspersky Security Center Administration Server.
- Click the Connect button. The status of the connection between the Integration Server and the Kaspersky Security Center Administration Server is displayed in the Kaspersky Security Center connection status in the upper part of the window.
After connecting the Integration Server to the Kaspersky Security Center Administration Server, you can map virtual Administration Servers to Cloud Director organizations containing tenant virtual machines.
If a connection was already established and you want to change the connection settings, you can disconnect the current connection by using the Disconnect button located in the Kaspersky Security Center connection status section and then connect with the new settings.
If the Kaspersky Security Center Administration Server includes one or several virtual Administration Servers that are mapped to Cloud Director organizations, a warning is displayed when there is a disconnection attempt. If there is no connection, you cannot set new mappings between virtual Administration Servers and Cloud Director organizations. The previously set mappings are retained.
Page top
Configuring a list of mappings between Cloud Director organizations and virtual Administration Servers
The actions described in this section must be performed only if you are using the application in multitenancy mode.
The list of mappings between Cloud Director organizations and virtual Administration Servers can be configured in the Integration Server Console. In the list of mappings, you can do the following:
- Map Cloud Director organizations to Kaspersky Security Center virtual Administration Servers.
- View the list of mappings.
- Cancel mapping.
To open the list of mappings between Cloud Director organizations and virtual Administration Servers:
- Start the Integration Server Console.
- In the list on the left, select the Manage protection of tenant organizations section and make sure that the Integration Server is connected to the Kaspersky Security Center Administration Server. Connect if a connection is not already established.
If the Integration Server is not connected to Kaspersky Security Center Administration Server, you cannot set new mappings between virtual Administration Servers and Cloud Director organizations. Previously set mappings are retained, but you can cancel them.
- Open the list of mappings between Cloud Director organizations and virtual Administration Servers by using one of the following methods:
- In the Virtual infrastructure protection section, expand the list of available actions for a VMware Cloud Director server that manages the Cloud Director organization, and click the Map Cloud Director organizations link. This opens the list of mappings for Cloud Director organizations that are managed by this VMware Cloud Director Server.
- In the Manage protection of tenant organizations section, click the Open list button located in the Cloud Director organizations to virtual administration Servers mapping list section. This opens the list of mappings for Cloud Director organizations that are managed by all VMware Cloud Director servers.
The Cloud Director organizations to virtual administration Servers mapping list window opens.
The list of mappings is displayed as a table. Each row of the table contains the following data:
- Virtual Server – name of the virtual Administration Server mapped to the organization from the Cloud Director organization column. If no mapping to a Cloud Director organization is set for this virtual Administration Server, the column displays
none. - Cloud Director organization – name of the Cloud Director organization mapped to the virtual Administration Server from the Virtual Server column. If no mapping to a virtual Administration Server is set for this Cloud Director organization, the column displays
none. - VMware Cloud Director – IP address or name of the VMware Cloud Director Server that manages the organization from the Cloud Director organization column. If no Cloud Director organization is specified in this row, the column displays
none.
When viewing the list of mappings, you can use the following capabilities:
- Filter. To apply a filter, you can use the following links located above the table:
- All – show all rows in the table. This value is selected by default.
- Mapped – show only the rows that display the name of the Cloud Director organization and the name of the virtual Administration Server that is mapped to it.
- Not mapped – show only rows that display the name of the Cloud Director organization or the name of the virtual Administration Server that have no mappings.
- Search any column of the table. You can enter a search criterion in the search bar located above the table to find a Cloud Director organization, virtual Administration Server, or VMware Cloud Director Server. The search starts as you enter characters. The table displays all rows that contain a value that satisfies the search criteria. To reset the search results, delete the contents of the search field.
Mapping a Cloud Director organization to a virtual Administration Server
The actions described in this section must be performed only if you are using the application in multitenancy mode.
To map a Cloud Director organization to a virtual Administration Server:
- Start the Integration Server Console.
- Select the Manage protection of tenant organizations section and make sure that the Integration Server is connected to the Kaspersky Security Center Administration Server. Connect if a connection is not already established.
- Open the list of mappings of Cloud Director organizations to virtual Administration Servers.
- Do one of the following:
- If you want to set mapping for a Cloud Director organization, find the row that contains the name of the Cloud Director organization in the table, and click the link located in the Virtual Server column. The Select a virtual Administration Server window opens. The window displays a list of all virtual Administration Servers that have not yet been mapped to a Cloud Director organization.
- If you want to set mapping for a virtual Administration Server, find the link that contains the name of the virtual Administration Server in the table, and click the link located in the Cloud Director organization column. The Select a Cloud Director organization window opens. The window displays a list of all Cloud Director organizations that have not yet been mapped to a virtual Administration Server. The list of Cloud Director organizations is grouped by VMware Cloud Director servers.
To search for the relevant row in the table, you can use the filter or search bar.
- In the window that opens, select the virtual Administration Server or Cloud Director organization and click OK.
The selection window closes, the new mapping appears in the Cloud Director organizations to virtual Administration Servers mapping list window.
Cancellation of Cloud Director organization mapping to a virtual Administration Server
The actions described in this section must be performed only if you are using the application in multitenancy mode.
If a Cloud Director organization is removed from VMware Cloud Director or if the virtual machines that are part of a Cloud Director organization no longer need to be protected, you can cancel a previously set mapping between a Cloud Director organization and a virtual Administration Server.
To cancel mapping between a Cloud Director organization and a virtual Administration Server:
- Start the Integration Server Console.
- Open the list of mappings of Cloud Director organizations to virtual Administration Servers.
- In the table, find the row that contains the Cloud Director organization and the virtual Administration Server for which you want to cancel mapping.
To search for the relevant row in the table, you can use the filter or search bar.
- Click the
 icon located in the row, and confirm the unmapping in the opened window.
 - Close the Cloud Director organizations to virtual administration Servers mapping list window.
If a Cloud Director organization is not mapped to a virtual Administration Server, Kaspersky Security does not protect the virtual machines that are part of this Cloud Director organization.
Working with the tenant virtual machine protection report
You can obtain information about protection of tenants' virtual machines using the report that is available on the Integration Server.
The tenant protection report is generated based on the information from the Integration Server database about the time intervals when tenant virtual machines were protected by Kaspersky Security. By default, this information is not saved in the Integration Server database. If you want to receive tenant protection reports, enable the report data retention in the Integration Server configuration file.
If report data retention is enabled, the default data retention period is three months. After that, information about the tenant virtual machines protection periods is automatically deleted from the Integration Server database. You can change the retention period.
After you have enabled data retention for the reports, you can download the tenant protection reports. You can include in the report all data stored in the Integration Server database, or select the data you need; for example, information about the protection of virtual machines of the specified tenant, information for the specified reporting period.
Configuring data retention for tenant protection reports
Data retention settings for tenant protection reports can be configured in the Integration Server configuration file. Changes to the configuration file can be made under an account that is a member of the local administrators group.
To enable or disable data retention for tenant protection reports:
- Open the Integration Server configuration file for editing. To do so, run the following command as administrator:
notepad "%ProgramFiles(x86)%\Kaspersky Lab\Kaspersky VIIS\viislaservice.exe.config" - Set the
IsProtectionPeriodsSavingEnabledparameter to one of the following values:value="true”– to enable data retention for tenant protection reports.value="false”– to disable data retention for tenant protection reports.
If you enabled data retention for reports, the required data is stored in the Integration Server database.
- The default data retention period is 3 months (7776000 seconds). If you want to change the data retention for tenant protection reports, set the
MaxProtectionPeriodRecordAgeSecondsparameter to the required value (in seconds). - Save the Integration Server configuration file.
- Restart the Integration Server.
Uploading tenant protection reports
Tenant protection reports are downloaded using the Integration Server REST API. Interaction with the Integration Server REST API is based on requests and responses and is carried out using the HTTP protocol.
If the computer on which the Integration Server is installed belongs to an Active Directory domain, authentication is performed using the NTLM or Kerberos protocols. Make sure that your domain account is a member of the KLAdmins group or the local administrators group on the computer where the Integration Server is installed.
If the computer where the Integration Server is installed is not included in the Active Directory domain, specify the settings of the Integration Server administrator account in the Authorization request header, in the form of the following string: {account name}:{password} encoded by the Base64 method. Authentication of the Basic type is used.
To download a tenant protection report, execute the following query:
GET https://{IP-address}:{port}/api/1.0/reports/protectionPeriods?[infraId={ID}&tenantId={ID}&periodStart={date and time}&periodEnd={date and time}]
where:
{IP-address}– Integration Server IP-address.{port}– port for connecting to the Integration Server (by default 7271).infraId={ID}– identifier assigned to the virtual infrastructure to which the virtual machine belongs (optional). If this parameter is specified, the report contains only information about the virtual machines that belong to the specified virtual infrastructure.You can get a list of the infrastructure IDs using the following query:
GET https://{IP address}:{portal}/api/1.0/im/vsphereThe query returns the infrastructure identifiers in the
<infrastructure id="{ID}">parameter.tenantId={ID|none}– identifier assigned to the virtual Administration Server in Kaspersky Security Center, or thenonevalue (optional). If the parameter is specified, and the virtual Administration Server identifier is specified, the report contains information only about protection periods of the virtual machines from the Cloud Director organization, which is mapped to the specified virtual server. If the parameter is specified, and thenonevalue is specified, the report contains information only about protection periods of the virtual machines from the Cloud Director organizations, which are not mapped to any virtual Administration Server.You can get a list of all virtual Administration Servers using the following query:
GET https://{IP address}:{port}/api/1.0/mt/tenantsThe query returns the infrastructure identifiers in the
<vKSC id="{ID}">parameter.periodStart={date and time}– date and time of the reporting period start in the YYYY-MM-DDThh:mm:ssZ format. If the parameter is not specified, the date of the earliest record in the Integration Server database is used.periodEnd={date and time}– date and time of the reporting period end in the YYYY-MM-DDThh:mm:ssZ format. If the parameter not specified, the current date is used.
To execute API queries, you can use any applications or plug-ins for HTTP queries, such as the cURL command line utility. cURL utility usage example:
curl -i -S -s -o - --noproxy '*' --insecure -u admin:1 -X GET "https://192.168.77.7:7271/api/1.0/reports/protectionPeriods?infraId={ID}&tenantId={ID}"
As a result of the query execution, the report data is displayed as a table. Each line contains information about one virtual machine protection period in the following format:
{virtual Administration Server ID};{virtual Administration Server name};{virtual machine ID};{virtual machine name};{infrastructure ID};{infrastructure name};{date and time when protection was enabled};{date and time when protection was disabled}
where:
{virtual Administration Server ID}– identifier of the virtual Administration Server assigned to the tenant. If the virtual machine is included in the Cloud Director organization, which is not mapped to any virtual Administration Server, nothing is specified.{virtual Administration Server name}– name of the virtual Administration Server assigned to the tenant. If the virtual machine is included in the Cloud Director organization, which is not mapped to any virtual Administration Server, nothing is specified.{virtual machine ID}– identifier of the virtual machine that was protected by the application.{virtual machine name}– name of the virtual machine that was protected by the application.{infrastructure ID}– identifier of the virtual infrastructure to which the virtual machine belongs.{infrastructure name}– name of the virtual infrastructure to which the virtual machine belongs.{date and time when protection was enabled}– date and time of the virtual machine protection period start.{date and time when protection was disabled}– date and time of the virtual machine protection period end.
If during the reporting period the virtual machine was protected by the application several times (protection was enabled and disabled), the report displays each virtual machine protection period.
Page top
Upgrading from a previous version of the application
You can upgrade Kaspersky Security for Virtualization 6.0 Agentless to Kaspersky Security for Virtualization 6.1 Agentless. Upgrading of earlier Kaspersky Security versions to version 6.1 is not provided.
Before starting the application update, you need to do the following:
- Prepare SVM images:
- Download all SVM image files from the Kaspersky website.
- Make sure the SVM images are received from a trusted source (for more information about validating the SVM image, refer to the application page in the Knowledge Base).
- Place all SVM image files in the same folder on a network resource that is accessible over the HTTP or HTTPS protocol. For example, you can publish SVM images on the Kaspersky Security Center Web Server.
- Make sure that one of the supported Kaspersky Security Center versions is installed, or upgrade Kaspersky Security Center to one of the supported versions.
For Kaspersky Security Center update instructions, see the Kaspersky Security Center documentation.
- Make sure that the ports required for application operation are open in the settings of the network equipment or software used for traffic monitoring.
- Make sure that you have configured the settings of the accounts that are required for installation and operation of the application.
- If you are planning to use network data storage for SVMs, create a network folder for hosting the network data storage and a user account for connecting SVMs. Network data storage is used for storing backup copies of files that have been moved to Backups on SVMs.
An SMB network folder accessible via the SMBv3 protocol is required for network data storage. The amount of space necessary for the network data storage can be estimated based on the following formula: (N+1) GB, where N is the number of SVMs that connect to the network data storage.
The application upgrade procedure depends on the type of VMware NSX Manager used in your infrastructure: VMware NSX-T Manager or VMware NSX-V Manager. The following application upgrade options are available:
- Application upgrade in the infrastructure managed by VMware NSX-V Manager.
- Application upgrade when migrating to VMware NSX-T platform.
Application upgrade when migrating to VMware NSX-T platform
An upgrade consists of the following steps:
- Removing the components of the previous Kaspersky Security version in VMware virtual infrastructure. The removal procedure is described in Kaspersky Security for Virtualization 6.0 Agentless help.
When an SVM with the File Threat Protection component is removed, the copies of files that were placed in Backup are automatically deleted.
- Updating VMware virtual infrastructure to meet Kaspersky Security software requirements and migrating to VMware NSX-T platform (for more information about migration to VMware NSX-T, refer to VMware documentation).
- Preparing virtual infrastructure managed by VMware NSX-T Manager for installation of Kaspersky Security components.
- Update of administration plug-ins for Kaspersky Security, Integration Server, and Integration Server Console.
- Configuring the settings for connecting the Integration Server to one or more virtual infrastructure administration servers.
- Registering Kaspersky Security services in VMware NSX Manager.
- If you want to install the File Threat Protection component, you need to register the file system protection service (Kaspersky File Antimalware Protection).
- If you want to install the Network Threat Protection component, you need to register the network protection service (Kaspersky Network Protection).
The settings required for registration and deployment of Kaspersky Security services are entered through a Wizard that is started from the Integration Server Console. When you have finished entering the settings, Integration Server registers the Kaspersky Security services in VMware NSX Manager.
You can verify that Kaspersky Security services are registered successfully in VMware NSX Manager Web Console or in VMware vSphere Client console (depending on the type of VMware NSX Manager you use: VMware NSX-T Manager or VMware NSX-V Manager).
- Deploying SVMs with Kaspersky Security components and configuring protection settings in the virtual infrastructure.
- Removing SVMs with the components of the previous application version from Kaspersky Security Center Administration Console. To ensure correct calculation of the licensing restrictions, manually remove SVMs from Kaspersky Security Center Administration Console after the application update is completed.
After the application is updated, prepare it for operation: activate the application on all new SVMs, make sure that the application databases are updated on all new SVMs, and configure the application operation settings by using a policy.
After upgrading the application, you can use policies and tasks configured for the previous Kaspersky Security version. The policies and tasks are automatically converted to the policies and tasks for Kaspersky Security for Virtualization 6.1 Agentless after policy protection settings and task scan settings are edited and saved for the first time.
Page top
Application upgrade in the infrastructure managed by VMware NSX-V Manager
An upgrade consists of the following steps:
- Update of VMware NSX for vSphere and other VMware virtual infrastructure components to supported versions.
If the VMware clusters protected by Kaspersky Security include VMware ESXi 6.0 Update 3, perform the following actions:
- For all VMware clusters that include one or more VMware ESXi 6.0 Update 3 hypervisors, remove all SVMs. SVM removal is performed by deleting Kaspersky Security service deployments in the VMware vSphere Client console (in the Networking & Security → Installation and Upgrade section on the Service Deployment tab, perform the Delete action).
- Upgrade all VMware ESXi 6.0 Update 3 hypervisors to supported versions or remove all VMware ESXi 6.0 Update 3 hypervisors from the VMware clusters that you want to protect using Kaspersky Security.
- Update of administration plug-ins for Kaspersky Security, Integration Server, and Integration Server Console.
- Updating SVMs with Kaspersky Security components in the virtual infrastructure.
If you want to use the application in multitenancy mode, it is recommended to configure the settings for connecting the Integration Server to the VMware Cloud Director Server before updating SVMs.
When an SVM with the File Threat Protection component is updated, the copies of files that were placed in Backup are automatically deleted.
- Removing SVMs with the components of the previous application version from Kaspersky Security Center Administration Console. To ensure correct calculation of the licensing restrictions, manually remove SVMs from Kaspersky Security Center Administration Console after the application update is completed.
After an upgrade is complete, you are advised to make sure that the application is prepared for operation on new SVMs.
After upgrading the application, you can use policies and tasks configured for the previous Kaspersky Security version. The policies and tasks are automatically converted to the policies and tasks for Kaspersky Security for Virtualization 6.1 Agentless after policy protection settings and task scan settings are edited and saved for the first time.
Page top
Upgrade of administration plug-in for Kaspersky Security, Integration Server, and Integration Server Console
The administration plug-ins for Kaspersky Security, Integration Server, and Integration Server Console are updated by installing the new versions of these components. You do not need to uninstall previous versions of the components, they are removed automatically.
Regardless of the selected application usage option, you need to install the Kaspersky Security main administration plug-in, Integration Server, and Integration Server Console.
If you want to use the application in multitenancy mode, you need to also install Kaspersky Security administration plug-in for tenants.
When the Kaspersky Security Center Administration Console starts for the first time after the Kaspersky Security administration plug-ins are installed, the Quick Start Wizard for the managed application is automatically started. The Wizard lets you create default policies and tasks.
If the Quick Start Wizard for the managed application was not started automatically, it is recommended to start it manually. Default policies let you register events and display protected virtual machines in the Kaspersky Security Center Administration Console immediately after installing the application.
Page top
Updating SVM in the infrastructure managed by VMware NSX-V Manager
If you want to use the application in multitenancy mode, it is recommended to configure the settings for connecting the Integration Server to the VMware Cloud Director Server before updating SVMs. If you connect the Integration Server to VMware Cloud Director after updating SVMs, to ensure proper operation of the application, perform the additional steps described in the Knowledge Base.
To update SVMs with Kaspersky Security components:
- Perform the change settings of Kaspersky Security procedure for each VMware vCenter Server that manages the operation of SVMs with the previous version of the application. During the procedure, specify the SVM images with the new version of Kaspersky Security components intended for deployment in the infrastructure managed by VMware NSX-V Manager.
After the Reconfiguration Wizard completes, the Integration Server re-registers the Kaspersky Security services with the new settings.
- In the VMware vSphere Client console, perform one of the following actions:
- If the VMware cluster included VMware ESXi 6.0 Update 3 hypervisors and you removed the deployed Kaspersky Security services prior to starting the application update, deploy Kaspersky Security services on the cluster.
- If the VMware cluster did not include VMware ESXi 6.0 Update 3 hypervisors, update the deployed Kaspersky Security services on the cluster. You need to select the service deployment in the Networking & Security → Installation and Upgrade section on the Service Deployment tab and perform the Upgrade action.
Changing settings of Kaspersky Security
You can use the procedure for changing settings of the Kaspersky Security to perform the following actions:
- Change the settings for connecting the Integration Server to VMware NSX Manager in which the Integration Server registers Kaspersky Security services. The type of the new VMware NSX Manager must match the type specified when registering Kaspersky Security services.
- Change the address and port used by VMware NSX Manager to transmit information to the Integration Server.
- Change the SVM images that were specified when registering Kaspersky Security services. After Reconfiguration Wizard finishes, the Integration Server will re-register the services with the new settings and you can deploy SVMs from the new image.
Actions to be performed for deployment of new SVMs depend on the type of VMware NSX Manager you use: VMware NSX-T Manager or VMware NSX-V Manager.
In the infrastructure managed by VMware NSX-T Manager, do the following:
- In VMware NSX Manager Web Console, select the desired Kaspersky Security service in the System → Service Deployments section, on the Deployment tab, in the Partner Service field, then select the previous service deployment in the list and perform the Delete action (the list of available actions is opened using the button to the left of the deployment name).
- Redeploy Kaspersky Security service on the same VMware cluster. During deployment, select the desired SVM configuration in the Deployment Specification field.
To deploy new SVMs in the infrastructure managed by VMware NSX-V Manager, select the Kaspersky Security service deployment in the list in the Networking & Security → Installation and Upgrade section on the Service Deployment tab of VMware vSphere Client console, and perform the Upgrade action.
As a result, the new SVMs will be deployed in the virtual infrastructure.
- Specify the SVM image for Kaspersky Security service that was not registered before (if while registering Kaspersky Security services you registered only one of the two services). After the Reconfiguration Wizard finishes, you can deploy Kaspersky Security service on VMware clusters. Deployment is performed in VMware NSX Manager Web Console or in VMware vSphere Client console (depending on the type of VMware NSX Manager you use: VMware NSX-T Manager or VMware NSX-V Manager). As a result, SVMs with Kaspersky Security components are deployed on VMware ESXi hypervisors.
- Change the following SVM settings:
- IP address of the Kaspersky Security Center Administration Server and SSL port that the SVM will use to connect to Kaspersky Security Center.
- Address and port used for connecting SVMs to Integration Server.
- Configuration password and root account password on the SVM.
- Time zone that is used on all SVMs.
- Settings for connecting SVMs to network data storage.
The listed settings are applied for configuration of the new SVMs that you deploy after the Wizard finishes, and for reconfiguration of the previously deployed SVMs with installed components of Kaspersky Security for Virtualization 6.1 Agentless.
If the localization language of previously deployed SVMs differs from the localization language of the Integration Server Console in which you start the Kaspersky Security reconfiguration procedure, the localization language of SVMs changes as a result of this procedure. The localization language of the Integration Server Console is applied on SVMs.
If, after updating the application, SVMs continue to work in your virtual infrastructure with Kaspersky Security components of the previous version and you want to change the settings of these SVMs, install an additional Kaspersky Security Center Administration Console on a separate workstation and install the main administration plug-in for Kaspersky Security, Integration Server, and Integration Server consoles of the previous version. As a result, the Integration Server console of the previous version will be installed on this workstation. You can use this console to change the settings of the SVMs with Kaspersky Security components of the previous version. For information on the changing the SVM settings for the previous application version, refer to the documentation of the previous Kaspersky Security version.
To change settings of Kaspersky Security:
- Start the Integration Server Console.
The Virtual infrastructure protection section opens.
- In the list, select the VMware vCenter Server and expand the list of available actions by clicking the address or name of the VMware vCenter Server in the Address column.
- In the Manage protection section, select Change settings of Kaspersky Security.
This starts the Reconfiguration Wizard. Follow the wizard instructions.
Changing the connection settings for interaction between the Integration Server and VMware NSX Manager
At this step, you can edit the following settings:
- The settings used by the Integration Server for interaction with VMware NSX Manager where the Integration Server registers Kaspersky Security services.
- Address and port used by VMware NSX Manager to transmit information to the Integration Server.
If you want to change the settings for connecting the Integration Server to VMware NSX Manager:
- Select the Change VMware NSX Manager connection settings check box.
- Specify the following connection settings:
- IP address in IPv4 format or the fully qualified domain name (FQDN) of VMware NSX Manager. In the Address field, you can also specify the SSL port number for connection in the <IP address or name>: <port> format.
The type of VMware NSX Manager must match the type that was selected when registering Kaspersky Security services and specified in the VMware NSX Manager type field. If you specified a different type of VMware NSX Manager address, an error is displayed in the window, and you cannot proceed to the next step of the wizard.
- Name and password of the account used to connect the Integration Server to VMware NSX Manager. The Enterprise Admin or Enterprise Administrator role (depending on VMware NSX Manager version) must be assigned this account.
- IP address in IPv4 format or the fully qualified domain name (FQDN) of VMware NSX Manager. In the Address field, you can also specify the SSL port number for connection in the <IP address or name>: <port> format.
If you want to change the address and port used for connecting VMware NSX Manager to Integration Server:
- Select the Change settings for connecting VMware NSX Manager to Integration Server check box.
- Specify the new IP address or fully qualified domain name (FQDN) of the computer on which the Integration Server is installed, and the connection port.
Proceed to the next step of the wizard.
The Wizard checks whether it can connect to VMware NSX Manager and to the Integration Server using the specified settings.
When establishing the connection to VMware NSX Manager, the Integration Server verifies the SSL certificate received from VMware NSX Manager. If the received certificate contains an error, the Wizard displays an error message. Click the View certificate link to view information about the received certificate.
If a connection error occurs because the certificate received from VMware NSX Manager is not trusted for the Integration Server but the received certificate complies with the security policy of your organization, you can confirm the authenticity of the certificate and establish a connection. To do so, click the Install certificate button. The received certificate is saved as a trusted certificate for the Integration Server.
Certificates that are trusted in the operating system in which the Integration Server is installed are also considered to be trusted for the Integration Server.
If there are problems with the SSL certificate, it is recommended to make sure that the utilized data transfer channel is secure.
If checking the Integration Server connection settings ends with an error, the Wizard window displays an error message and you cannot proceed to the next step of the Wizard. If you want to correct the entered settings, click Cancel. If the settings have been entered correctly, you can ignore the error message. If this is the case, click Continue to proceed to the next step of the Wizard.
Page top
Changing the SVM image for the file system protection service
At this step, you can specify or change the image for deploying SVM with the File Threat Protection component.
Actions performed at this step depend on the type of VMware NSX Manager you use (VMware NSX-T Manager or VMware NSX-V Manager):
- If Kaspersky Security is deployed in the infrastructure managed by VMware NSX-T Manager, you can specify the description file (XML file) of the SVM images with the File Threat Protection component.
If the address of the SVM image description file differs from the address specified when registering Kaspersky File Antimalware Protection service, the Integration Server will re-register the file system protection service in VMware NSX Manager with a new set of different configurations of SVM images. After the Reconfiguration Wizard finishes, you can re-deploy the file system protection service on VMware cluster. During deployment, you select the SVM image of the desired configuration.
If the file system protection service was not registered before in VMware NSX Manager, the Integration Server will register it. After the Reconfiguration Wizard finishes, you can deploy the file system protection service on VMware cluster. During deployment, you select the SVM image of the desired configuration.
As a result, SVMs with the File Threat Protection component will be deployed from the selected image.
- If Kaspersky Security is deployed in the infrastructure managed by VMware NSX-V Manager, you can specify the desired configuration of the SVM image with the File Threat Protection component.
If the selected SVM image differs from the image specified when the file system protection service (Kaspersky File Antimalware Protection) was registered, the Integration Server re-registers the file system protection service in VMware NSX Manager with the new SVM image. After the Reconfiguration Wizard finishes, you can update the deployed file system protection service on VMware clusters.
If the file system protection service was not registered before in VMware NSX Manager, the Integration Server will register it. After the Reconfiguration Wizard finishes, you can deploy the file system protection service on VMware clusters.
As a result, SVMs will be deployed from the specified image.
All files of the SVM image with the File Threat Protection component must be located in the same folder on a network resource that is accessible over the HTTP or HTTPS protocol.
Selecting an image to deploy in the infrastructure managed by VMware NSX-T Manager
To select a set of SVM images to deploy:
- Select the Specify or change the SVM image for the file system protection service check box.
- Enter the address of the description file (XML file) of the SVM images with the File Threat Protection component located on a network resource accessible via HTTP or HTTPS.
- Click the Validate button.
The Wizard checks availability and status of all SVM image files at the specified address. If the files are not available, images are corrupted, or the image version is not supported, the Wizard displays an error message.
If validation is successful, the following information on the selected SVM image will appear at the bottom of the window:
- Application name. Name of the application that is installed on the SVM.
- SVM version. Number of the SVM version.
- Vendor. Vendor of the application that is installed on the SVM.
- Description. Brief description of the application.
- SVM configuration. A list of SVM configurations with the File Threat Protection component that are available for deployment. You can select the desired SVM configuration while re-deploying Kaspersky File Antimalware Protection service.
Selecting an image to deploy in the infrastructure managed by VMware NSX-V Manager
To select an SVM image to deploy:
- Select the Specify or change the SVM image for the file system protection service check box.
- Enter the address of the description file (XML file) of the SVM images with the File Threat Protection component or the address of the SVM image OVF file corresponding to the desired SVM configuration. The files are located on a network resource accessible via HTTP or HTTPS.
- Click the Validate button.
The Wizard checks availability and status of all SVM image files at the specified address. If the files are not available, image is corrupted, or the image version is not supported, the Wizard displays an error message.
If validation is successful, the following information on the selected SVM image will appear at the bottom of the window:
- SVM configuration. The number of processors and RAM allocated for the SVM.
If you specified the address of the SVM image description file (XML file), you can select the necessary SVM configuration in the drop-down list in the SVM configuration field.
- Application name. Name of the application that is installed on the SVM.
- SVM version. Number of the SVM version.
- Vendor. Vendor of the application that is installed on the SVM.
- Description. Brief description of the application.
- Required disk space. Amount of disk space in the data storage required for deploying the SVM from the specified image.
- SVM configuration. The number of processors and RAM allocated for the SVM.
Proceed to the next step of the wizard.
Page top
Changing the SVM image for the network protection service
At this step, you can specify or change the image for deploying SVM with the Network Threat Protection component.
Actions performed at this step depend on the type of VMware NSX Manager you use (VMware NSX-T Manager or VMware NSX-V Manager):
- If Kaspersky Security is deployed in the infrastructure managed by VMware NSX-T Manager, you can specify the description file (XML file) of the SVM images with the Network Threat Protection component.
If the address of the SVM image description file differs from the address specified when registering Kaspersky Network Protection service, the Integration Server will re-register the network protection service in VMware NSX Manager with a new set of different configurations of SVM images. After the Reconfiguration Wizard finishes, you can re-deploy the network protection service on VMware cluster. During deployment, you select the SVM image of the desired configuration.
If the network protection service was not registered before in VMware NSX Manager, the Integration Server will register it. After the Reconfiguration Wizard finishes, you can deploy the network protection service on VMware cluster. During deployment, you select the SVM image of the desired configuration.
As a result, SVMs with the Network Threat Protection component will be deployed from the selected image.
- If Kaspersky Security is deployed in the infrastructure managed by VMware NSX-V Manager, you can specify the desired configuration of the SVM image with the Network Threat Protection component.
If the selected SVM image differs from the image specified when registering Kaspersky Network Protection service, the Integration Server re-registers the network protection service in VMware NSX Manager with the new SVM image. After the Reconfiguration Wizard finishes, you can update the deployed network protection service on VMware clusters.
If the network protection service was not registered before in VMware NSX Manager, the Integration Server will register it. After the Reconfiguration Wizard finishes, you can deploy the network protection service on VMware clusters.
As a result, SVMs will be deployed from the specified image.
All files of the SVM image with the Network Threat Protection component must be located in the same folder on a network resource that is accessible over the HTTP or HTTPS protocol.
Selecting an image to deploy in the infrastructure managed by VMware NSX-T Manager
To select a set of SVM images to deploy:
- Select the Specify or change the SVM image for the network protection service check box.
- Enter the address of the description file (XML file) of the SVM images with the Network Threat Protection component located on a network resource accessible via HTTP or HTTPS.
- Click the Validate button.
The Wizard checks availability and status of all SVM image files at the specified address. If the files are not available, images are corrupted, or the image version is not supported, the Wizard displays an error message.
If validation is successful, the following information on the selected SVM image will appear at the bottom of the window:
- Application name. Name of the application that is installed on the SVM.
- SVM version. Number of the SVM version.
- Vendor. Vendor of the application that is installed on the SVM.
- Description. Brief description of the application.
- SVM configuration. A list of SVM configurations with the Network Threat Protection component that are available for deployment. You can select the desired SVM configuration while re-deploying Kaspersky Network Protection service.
Selecting an image to deploy in the infrastructure managed by VMware NSX-V Manager
To select an SVM image to deploy:
- Select the Specify or change the SVM image for the network protection service check box.
- Enter the address of the description file (XML file) of the SVM images with the Network Threat Protection component or the address of the SVM image OVF file corresponding to the desired SVM configuration. The files are located on a network resource accessible via HTTP or HTTPS.
- Click the Validate button.
The Wizard checks availability and status of all SVM image files at the specified address. If the files are not available, image is corrupted, or the image version is not supported, the Wizard displays an error message.
If validation is successful, the following information on the selected SVM image will appear at the bottom of the window:
- SVM configuration. The number of processors and RAM allocated for the SVM.
If you specified the address of the SVM image description file (XML file), you can select the necessary SVM configuration in the drop-down list in the SVM configuration field.
- Application name. Name of the application that is installed on the SVM.
- SVM version. Number of the SVM version.
- Vendor. Vendor of the application that is installed on the SVM.
- Description. Brief description of the application.
- Required disk space. Amount of disk space in the data storage required for deploying the SVM from the specified image.
- SVM configuration. The number of processors and RAM allocated for the SVM.
Proceed to the next step of the wizard.
Page top
Viewing information about the traffic processing mode for the Network Threat Protection component
This step is displayed only if the virtual infrastructure is managed by VMware NSX-V Manager.
At this step you can view information about the traffic processing mode that was selected during registration of the network protection service.
You cannot change the traffic processing mode for a Network Threat Protection component installed on already deployed SVMs. To select a different traffic processing mode, remove the Network Threat Protection component and the objects created in the infrastructure because of the component installation, unregister the network protection service, and then re-register the network protection service with the new traffic processing mode and deploy new SVMs.
Proceed to the next step of the wizard.
Page top
Changing the connection settings for an SVM
At this step, you can edit the following connection settings for SVMs:
- IP address of the Kaspersky Security Center Administration Server and SSL port that the SVM will use to connect to Kaspersky Security Center.
- Address and port used for connecting SVMs to Integration Server.
If you want to change the IP address and port used for connecting SVMs to the Kaspersky Security Center Administration Server:
- Select the Change settings for connecting SVMs to Kaspersky Security Center check box.
- Specify the new IP address of the Kaspersky Security Center Administration Server and SSL port that the SVM will use to connect to Kaspersky Security Center.
If you want to change the address and port used for connecting SVMs to the Integration Server:
- Select the Change settings for connecting SVMs to Integration Server check box.
- Specify the new IP address or fully qualified domain name (FQDN) of the computer on which the Integration Server is installed, and the connection port.
Proceed to the next step of the wizard.
The Wizard checks whether it can connect to the Kaspersky Security Center and to the Integration Server using the specified settings.
If checking the connection settings ends with an error, the Wizard window displays an error message and you cannot proceed to the next step of the Wizard. If you want to correct the entered settings, click Cancel. If the settings have been entered correctly, you can ignore the error message. If this is the case, click Continue to proceed to the next step of the Wizard.
Page top
Changing passwords for accounts on SVMs
At this step you can change the password for the klconfig user account (configuration password) and the root account password. The specified passwords will be used on all SVMs that you deploy after re-registration of Kaspersky Security services, and on previously deployed SVMs. The configuration password is required to change SVM settings. The root account is used for accessing the operating system on SVMs and for accessing SVM trace files.
If you want to change the configuration password:
- Select the Change the klconfig account password (configuration password) check box.
- Enter a new password in the Password and Confirm password fields.
If you want to change the root user account password:
- Select the Change the root account password check box.
- Enter a new password in the Password and Confirm password fields.
The passwords should be up to 60 characters long. You can use only letters of the Latin alphabet (uppercase and lowercase letters), numerals, and the following special characters: ! # $ % & ' ( ) * " + , - . / \ : ; < = > _ ? @ [ ] ^ ` { | } ~. For security purposes, you are advised to set passwords that are at least 8 characters long and use at least three of the four categories of characters: lowercase letters, uppercase letters, numerals, and special characters.
Proceed to the next step of the wizard.
Page top
Changing the time zone for SVMs
At this step, you can change the time zone used on SVMs. The specified time zone will be used on all SVMs that you deploy after re-registration of Kaspersky Security services, and on previously deployed SVMs.
To change the time zone on SVMs, select the Change the time zone for SVMs check box and select a value from the drop-down list.
Proceed to the next step of the wizard.
Page top
Changing settings for connecting to network data storage
At this step, you can configure the following settings for using network data storage:
- Allow or block the use of network data storage for SVMs.
- Define or change previously specified settings for connecting SVMs to network data storage.
Network data storage can be used for storing backup copies of files that have been moved to Backups on SVMs.
If you want to configure the settings for using network data storage:
- Select the Change settings for connecting to network data storage check box.
- If SVMs must not use network data storage, select the Do not use network data storage option.
- If you want to allow the use of network data storage for SVMs, select the Use network data storage option and define the following settings for connecting to storage:
- Network data storage address in UNC format.
The defined address cannot be localhost or 127.0.0.1.
- Account used by SVMs to connect to the network data storage, in the format <domain>\<user name>.
- Connection account password.
- Network data storage address in UNC format.
Proceed to the next step of the wizard.
The Wizard checks whether it can connect to the network data storage using the specified settings.
If checking the connection settings ends with an error, the Wizard window displays an error message and you cannot proceed to the next step of the Wizard. If you want to correct the entered settings, click Cancel. If the settings have been entered correctly, you can ignore the error message. If this is the case, click Continue to proceed to the next step of the Wizard.
Page top
Starting Kaspersky Security reconfiguration
At this step, you can view information about the settings that will be changed as a result of the procedure.
The list of modified settings shows the SVM localization language if the localization language of the Integration Server Console in which you are starting the Kaspersky Security reconfiguration procedure differs from the localization language of previously deployed SVMs. The localization language of the Integration Server Console will be used on all SVMs.
Proceed to the next step of the Wizard to start changing the parameters.
Page top
Kaspersky Security reconfiguration process
This step displays information about operations that are performed by the Integration Server to apply new settings.
If an error occurred during such operations, the Wizard displays the relevant information. The Wizard performs rollback of changes.
After all operations have been completed, proceed to the next step of the Wizard.
Page top
Exiting the wizard
This step displays information about the results of the changed settings of Kaspersky Security.
If the settings were successfully changed, exit the Wizard.
If reconfiguration ended with an error, the Wizard displays information about the error. If this is the case, exit the Wizard, eliminate the cause of the error, and restart the procedure. For detailed information about errors, you can view the Integration Server trace files (if you enabled the logging of information to Integration Server trace files).
Page top
Removing the application
You can remove Kaspersky Security fully or remove just one of the application components (File Threat Protection or Network Threat Protection).
If you want to fully remove Kaspersky Security, you must perform the following actions:
- Remove from the VMware virtual infrastructure the following: both Kaspersky Security components (File Threat Protection and Network Threat Protection) and the objects created in the infrastructure as a result of Kaspersky Security deployment.
Removal is performed in VMware NSX Manager Web Console or in VMware vSphere Client console (depending on the type of VMware NSX Manager you use: VMware NSX-T Manager or VMware NSX-V Manager).
- Unregister both Kaspersky Security services in VMware NSX Manager.
Kaspersky Security services can be unregistered in the Integration Server Console.
- Remove main Kaspersky Security administration plug-in, Integration Server Console, and Integration Server.
- Removal of the main administration plug-in and the Integration Server Console is performed on the computer where Kaspersky Security Center Administration Console is installed.
- Removal of the Integration Server is performed on the computer where Kaspersky Security Center Administration Server is installed.
You can also delete policies and tasks created for Kaspersky Security in Kaspersky Security Center.
- If you use the application in multitenancy mode, remove Kaspersky Security administration plug-in for tenants from the computer where Kaspersky Security Center Administration Console is installed, and also remove Kaspersky Security Center virtual Administration Servers that were created to manage protection of tenant virtual machines.
For details on removing virtual Administration Servers, please refer to the Kaspersky Security Center documentation.
If you want to remove one of the Kaspersky Security components, you must perform the following actions:
- Remove from the VMware virtual infrastructure the following: Kaspersky Security component (File Threat Protection or Network Threat Protection) and the objects created in the infrastructure as a result of the component installation.
Removal is performed in VMware NSX Manager Web Console or in VMware vSphere Client console (depending on the type of VMware NSX Manager you use: VMware NSX-T Manager or VMware NSX-V Manager).
- In VMware NSX Manager, unregister the Kaspersky Security service corresponding to the removed component (Kaspersky File Antimalware Protection or Kaspersky Network Protection).
When an SVM with the File Threat Protection component is removed, the copies of files that were placed in Backup on the SVM are automatically deleted. If the use of network data storage was enabled for an SVM, backup copies of files from this SVM are saved in a separate folder in the network data storage.
After removal of the File Threat Protection and Network Threat Protection components, SVMs continue to be displayed in the Kaspersky Security Center Administration Console. When the period specified in the Kaspersky Security Center settings elapses (see the Kaspersky Security Center documentation), the SVMs are automatically removed from the Administration Console. To ensure correct calculation of the licensing restrictions, manually remove SVMs from Kaspersky Security Center Administration Console after the application removal is completed.
Events received from remote SVMs and the list of backup copies of files that are moved to Backups on the SVMs with the File Threat Protection component are automatically removed from Kaspersky Security Center after the SVM is removed from the Administration Console.
If the application is removed completely, you can also delete the administration groups created for KSC clusters from the Managed devices folder in Kaspersky Security Center Administration Console tree.
Removing Kaspersky Security components in the virtual infrastructure managed by VMware NSX-T Manager
To remove the File Threat Protection component in the VMware NSX-T Manager virtual infrastructure:
- Remove all SVMs with the File Threat Protection component on VMware clusters.
Removing SVMs is performed by removing the previous deployment of the file system protection service (Kaspersky File Antimalware Protection) from VMware clusters.
Service deployment can be removed in VMware NSX Manager Web Console in the System → Service Deployments section on the Deployment tab. Select the Kaspersky File Antimalware Protection service in the Partner Service field, open the menu of available actions by clicking the button to the left of the deployment name and perform the Delete action.
- Remove the NSX Policy that uses Kaspersky File Antimalware Protection service for file protection. The policy is removed in VMware NSX Manager Web Console in the Security → Endpoint Protection Rules section on the Rules tab. Select the NSX policy for file protection, perform the Delete action and apply your changes using the Publish button.
- Remove the NSX Service Profile that you created for the Kaspersky File Antimalware Protection service. The policy is removed in VMware NSX Manager Web Console in the Security → Endpoint Protection Rules section on the Service Profiles tab. Open the menu of available actions by clicking the button to the left of the NSX Service Profile name and perform the Delete action.
To remove the Network Threat Protection component in a VMware virtual infrastructure, you must perform the following actions:
- Remove all SVMs with the Network Threat Protection component on VMware clusters. Removing SVMs is performed by removing the previous deployment of the network protection service (Kaspersky Network Protection) from VMware clusters.
Service deployment can be removed in VMware NSX Manager Web Console in the System → Service Deployments section on the Deployment tab. Select the Kaspersky Network Protection service in the Partner Service field, open the menu of available actions by clicking the button to the left of the deployment name and perform the Delete action.
- Remove the NSX Policy that uses Kaspersky Network Protection service for network protection. The policy is removed in VMware NSX Manager Web Console in the Security → Network Introspection (E-W) section. Select the NSX policy for network protection, perform the Delete action and apply your changes using the Publish button.
- Remove the NSX Service Chain that you created for the Kaspersky Network Protection service. The NSX Service Chain is removed in VMware NSX Manager Web Console, in the Security → Network Introspection Settings section, on the Service Chains tab. Open the menu of available actions by clicking the button to the left of the NSX Service Chain name and perform the Delete action.
- Remove the NSX Service Profile that you created for the Kaspersky Network Protection service. The NSX Service Profile is removed in VMware NSX Manager Web Console, in the Security → Network Introspection Settings section, on the Service Profiles tab. Open the menu of available actions by clicking the button to the left of the NSX Service Profile name and perform the Delete action.
- Remove the NSX Service Segment that you created for Kaspersky Network Protection service. The NSX Service Segment is removed in VMware NSX Manager Web Console, in the Security → Network Introspection Settings section, on the Service Segments tab. Open the menu of available actions by clicking the button to the left of the NSX Service Segment name and perform the Delete action.
You can also remove the NSX Group that includes the protected virtual machines. NSX Group is removed in VMware NSX Manager Web Console, in the Inventory → Groups section.
For more information about removing Kaspersky Security components and the infrastructure objects created because of Kaspersky Security deployment, refer to the Knowledge Base.
Page top
Removing Kaspersky Security components in the virtual infrastructure managed by VMware NSX-V Manager
To remove the File Threat Protection component in the VMware NSX-V Manager virtual infrastructure:
- Remove all SVMs with the File Threat Protection component on VMware clusters. Removing SVMs is performed by removing the previous deployment of the file system protection service (Kaspersky File Antimalware Protection) from VMware clusters.
The service deployment is removed in VMware vSphere Client console, in the Networking & Security → Installation and Upgrade section on the Service Deployment tab. In the list of deployments, remove the deployment of the Kaspersky File Antimalware Protection service on the clusters from which you want to remove the SVM (see the Knowledge Base for details).
- Remove the NSX Policy that uses the file system protection service (Kaspersky File Antimalware Protection). The NSX Policy is removed in the VMware vSphere Client console, in the Networking & Security section, the Security → Service Composer subsection, on the Security Policies tab. Select the NSX Policy and perform the Actions → Delete action.
To remove the Network Threat Protection component in a VMware virtual infrastructure, you must perform the following actions:
- Remove all SVMs with the Network Threat Protection component on VMware clusters. Removing SVMs is performed by removing the previous deployment of the network protection service (Kaspersky Network Protection) from VMware clusters.
The service deployment is removed in VMware vSphere Client console, in the Networking & Security → Installation and Upgrade section on the Service Deployment tab. In the list of deployments, remove the deployment of the Kaspersky Network Protection service on the clusters from which you want to remove the SVM (see the Knowledge Base for details).
- Remove the NSX Policy that uses the Kaspersky Network Protection service. The NSX Policy is removed in the VMware vSphere Client console, in the Networking & Security section, the Security → Service Composer subsection, on the Security Policies tab. Select the NSX Policy and perform the Actions → Delete action.
You can also remove the NSX Group that includes the protected virtual machines. The NSX Group is removed in the VMware vSphere Client console, in the Networking & Security section, the Security → Service Composer subsection, on the Security Groups tab.
For details about NSX Policy or NSX Group removal, refer to the Knowledge Base.
Page top
Unregistering Kaspersky Security services and the Integration Server
Unregistering Kaspersky Security service is possible only if all SVMs on VMware clusters, as well as all NSX Service Profiles and NSX Policies created for Kaspersky Security service, are removed.
To unregister Kaspersky Security services in VMware NSX Manager:
- Start the Integration Server Console.
The Virtual infrastructure protection section opens.
- In the list, select the VMware vCenter Server and expand the list of available actions by clicking the address or name of the VMware vCenter Server in the Address column.
- In the Manage protection section, select Unregister Kaspersky Security services.
- In the window that opens, do one of the following:
- If you remove the File Threat Protection component, select the Kaspersky File Antimalware Protection check box.
- If you remove the Network Threat Protection component, select the Kaspersky Network Protection check box.
- If you fully remove the application, select both check boxes. Both Kaspersky Security services will be unregistered in VMware NSX Manager.
If one of the Kaspersky Security services has already been unregistered, the check box is unavailable.
- Click OK.
Removing the Kaspersky Security main administration plug-in and Integration Server
You can remove the Kaspersky Security main administration plug-in, Integration Server, and the Integration Server Console by using one of the following methods:
- In interactive mode using the operating system's standard tools for removing programs. In the list of applications, select Kaspersky Security for Virtualization 6.1 Agentless – management components for removal. The wizard is used to perform removal.
- In silent mode via the command line. You must type the following command in the command line:
ksv-components_6.1.0.XXX_mlg.exe -q -uninstallwhere
6.1.0.XXXis the number of the application version.
While removing Integration Server using the wizard, you can save the following data used in the operation of the Integration Server:
- The SSL certificate used to establish a secure connection to the Integration Server
- Data saved by the Integration Server during operation
- Trace files of the Integration Server and Integration Server Console
If you want to save the specified data, click the Save button in the window prompting you to save data. The saved data and settings are automatically used when you install the Integration Server again.
Page top
Removing the Kaspersky Security administration plug-in for tenants
You can remove the Kaspersky Security administration plug-in for tenants in one of the following ways:
- In interactive mode using the operating system's standard tools for removing programs.
In the applications list, select Kaspersky Security for Virtualization 6.1 Agentless (for tenants) – administration plug-in for removal. The wizard is used to perform removal.
- In silent mode via the command line. You must type the following command in the command line:
ksv-t-components_6.1.0.XXX_mlg.exe -q -uninstallwhere
6.1.0.XXXis the number of the application version.
Application licensing
This section contains information about the basic concepts related to Kaspersky Security licensing.
About the End User License Agreement
The End User License Agreement is a binding agreement between you and AO Kaspersky Lab, stipulating the terms on which you may use the application.
Read through the terms of the End User License Agreement carefully before you start using the application.
You can review the terms of the End User License Agreement in the following ways:
- During installation of the Kaspersky Security administration plug-in and Integration Server.
- By reading the license.txt document. This file is included in the application's distribution kit.
After the application is installed, you can read the text of the End User License Agreement and Privacy Policy describing the handling and transmission of data, in the file on the computer where Kaspersky Security administration plug-in, Integration Server, and/or Integration Server Console are installed:
%ProgramFiles(x86)%\Kaspersky Lab\KSV\Kaspersky Security for Virtualization 6.1 Agentless\EULA\license_<Language ID>.txt,
where <language ID> is the ID of the localization language of installed Kaspersky Security components.
You accept the terms of the End User License Agreement when you confirm your consent to the End User License Agreement during installation of the application. If you do not accept the terms of the End User License Agreement, you must abort application installation and must not use the application.
Page top
About data provision
By accepting the terms of the End User License Agreement, you agree to automatically send to Kaspersky the following information:
- When updating Kaspersky Security databases:
- ID of Kaspersky Security
- ID of the active license
- Unique ID of the Kaspersky Security installation
- Unique ID of the update task start
- Full version of Kaspersky Security
- Application localization
- When following links from the Kaspersky Security interface:
- Kaspersky Security application type
- Kaspersky Security version
- Kaspersky Security interface language
- ID of the web page being accessed
- If an activation code is being applied to activate Kaspersky Security:
- ID, version and localization of Kaspersky Security, and IDs of compatible applications
- SVM ID and unique ID of the Kaspersky Security installation
- Activation code and time when the application was activated
- Type, version, and bit rate of the operating system, and the name of the virtual environment in which Kaspersky Security is installed
- Information about the packaging of regularly transmitted confirmations of the license key status
Information is transmitted periodically for the purpose of verifying that the application is being used appropriately.
You also agree to transmit the following information:
- Type, version, and localization of Kaspersky Security
- Type and version of the hypervisor on which the SVM is deployed, and the type, version and bit rate of the operating system on the protected virtual machine and the approximate number of virtual machines on which this operating system is installed
- Universal unique SVM ID
- License type, license order number, and licensing scheme type
- Number of licensing units for which the key can be used and the number of licensing units for which the key is already in use
Kaspersky may use this information to generate statistical information about the distribution and use of Kaspersky software.
By using an activation code, you agree to automatically send to Kaspersky the data listed above. If you do not agree to send this information, you should use a key file to activate Kaspersky Security.
The received information is protected by Kaspersky in accordance with the requirements established by the law and the current Kaspersky rules. Data is transmitted via encrypted communication channels.
For more detailed information about processing, storage, and destruction of information obtained during the use of the application and transmitted to Kaspersky, please refer to the Privacy Policy on Kaspersky website.
Page top
About the license
A license is a time-limited right to use the application, granted under the End User License Agreement.
The license covers the right to use the application in accordance with the terms of the End User License Agreement and to receive technical support. The scope of available features and validity period depend on the type of license under which the application was activated.
The following license types are provided:
- Trial. A free license for users to get to know the application.
Trial licenses have a short validity period. On expiry of a trial license, all the functions of Kaspersky Security become unavailable. To continue using the application, you need to purchase the commercial license. You can activate the application under the trial license only once.
- Commercial. A paid license offered upon purchase of the application.
When the commercial license expires, the application continues to work in limited functionality mode: Kaspersky Security stops updating the application databases and stops using the Kaspersky Security Network. You can still protect and scan virtual machines, but only using application databases that were installed before the license expiration date. To continue using all the features of Kaspersky Security, you must renew your commercial license. To ensure full protection against computer security threats, we recommend that you renew the license before its expiration.
Application functionality that is available under a commercial license depends on the license edition. The following license editions are available for Kaspersky Security application:
- standard license
- enterprise license
The suspicious network activity detection functionality is available only if you are using the application under an enterprise license.
The following licensing schemes are available for Kaspersky Security:
- Licensing by number of virtual machines protected using the application. This licensing scheme employs server or desktop keys (depending on the type of operating system of the protected virtual machines). According to licensing limitations, the application protects a certain number of virtual machines.
- Licensing by the number of physical processor cores used on all hypervisors on which SVMs are installed. The licensing scheme employs keys with a limitation on the number of processor cores. In accordance with the licensing restrictions, the application is used to protect all virtual machines deployed on hypervisors that use a certain number of kernels in their physical processors.
- Licensing by the number of processors used on the hypervisors on which protected virtual machines are running. The licensing scheme employs keys with a limitation on the number of processors. In accordance with the licensing restrictions, the application is used to protect all virtual machines deployed on hypervisors that use a certain number of processors.
You may use only server keys or keys with a limitation on the number of processor cores or processors to protect virtual machines running Linux guest operating systems.
If you are using a licensing scheme that is based on the number of virtual machines, the license restriction count includes all virtual machines that were under the protection of the application over the last 30 days, even if those virtual machines are currently powered off.
If you do not want a virtual machine to be included in the license restriction count, you can exclude the virtual machine from the protected virtual machines by using one of the following methods:
- Disable protection of the virtual machine.
- Exclude the virtual machine from the NSX Group managed by the NSX Policy which uses the file system protection service (Kaspersky File Antimalware Protection).
Within the infrastructure managed by a single VMware vCenter Server, you can use only one of the provided licensing schemes.
Page top
About the License Certificate
The License Certificate is a document provided together with the key file or activation code.
If you use the application under subscription, no license certificate is issued.
A license certificate contains the following information about the license provided:
- Information about the license user
- Information about the application that can be activated by the license
- Restrictions on the number of license units (for example, devices on which the application can be used under the license)
- License start date
- License expiration date or validity period
- Type of license
About the license key
A license key (hereinafter also referred to as simply "key") is a sequence of bits with which you can activate and subsequently use the application in accordance with the terms of the End User License Agreement. A key is generated by Kaspersky experts.
You can add the license key to the application in one of the following ways:
- Apply a key file
- Enter the activation code
After you add a license key to the application, the license key is displayed in the application interface as a unique alphanumeric sequence.
After adding keys, you can replace them with other keys.
Kaspersky can black-list a key over violations of the End User License Agreement. If the license key has been blocked, you need to add another one if you want to use the application.
Kaspersky Security uses the following types of license keys:
- Server key. An application key that is used to protect virtual machines running server operating systems.
- Desktop key. An application key that is used to protect virtual machines running desktop operating systems.
- Key with a limitation on the number of processor cores. An application key for protecting virtual machines regardless of the operating system installed on them. In accordance with the licensing restrictions, the application is used to protect virtual machines running on hypervisors that use a certain number of physical processor cores.
- Key with a limitation on the number of processors. An application key for protecting virtual machines regardless of the operating system installed on them. In accordance with the licensing restriction, the application is used to protect all virtual machines running on hypervisors that use a certain number of processors.
A license key may be active or reserve.
An active key is a key currently in use to run the application. A trial license key, commercial license key (commercial key), or subscription key can be added as the active key. No more than one active key of each type (server key, desktop key, key with a limitation on the number of processor cores, key with a limitation on the number of processors) can be added on each SVM. If an SVM is used in a virtual infrastructure for the protection of virtual machines running server operating systems and desktop operating systems, you need to add two keys to the SVM: a server key and a desktop key.
A reserve key is a key that confirms the right to use the application, but is not currently in use. The reserve key automatically becomes active when the license associated with the current active key expires.
A reserve key can be added only if the active key of the same type is available. The active key and the reserve key must match the same type of license.
A trial license key or a subscription key can be added only as the active key. A trial license key or a subscription key cannot be added as a reserve key. A trial license key cannot replace the active commercial key.
Page top
About the key file
A key file is a file with the .key extension that you receive from Kaspersky. Key files are designed to activate the application by adding a key.
You receive a key file at the email address that you provided when you bought Kaspersky Security or ordered the trial version of Kaspersky Security.
You do not need to connect to Kaspersky activation servers in order to activate the application with a key file.
You can restore a key file if it has been accidentally deleted. You may need a key file to register a Kaspersky CompanyAccount, for example.
To restore the key file, you need to contact the Kaspersky partner from whom you purchased the license.
Page top
About the activation code
An activation code is a unique sequence of twenty Latin letters and numerals. You have to enter an activation code in order to add a license key that activates Kaspersky Security. You receive the activation code at the email address that you provided when you bought Kaspersky Security or ordered the trial version of Kaspersky Security.
To activate the application with an activation code, you need Internet access in order to connect to Kaspersky activation servers.
If you lost your activation code after activating the application, contact the Kaspersky partner from whom you purchased the license.
Page top
About subscription
A subscription for Kaspersky Security is a purchase order for the application with specific parameters (subscription expiration date, number of devices protected). You can order a subscription for Kaspersky Security from your service provider (such as your ISP).
You can pause and resume subscription, renew it automatically, or opt out of your subscription. To manage your subscription, you need to contact the vendor from which you purchased Kaspersky Security.
The possible subscription management options may vary with each vendor.
Subscription can be limited (for one year, for example) or unlimited (without an expiration date). To continue using Kaspersky Security after a limited subscription expires, you must renew it. Unlimited subscription is renewed automatically if the vendor's services have been prepaid on time.
If your subscription is paused, you may be offered a subscription renewal grace period during which the application retains its functionality. The vendor decides whether or not to grant a grace period and, if so, determines the duration of the grace period.
After the subscription or the grace period (if any) for subscription renewal expires, Kaspersky Security continues to work but stops updating the application databases and stops using Kaspersky Security Network.
Depending on the service provider, application functionality may be restricted as follows after the subscription or grace period expires: Kaspersky Security stops updating application databases, using Kaspersky Security Network, and protecting and scanning virtual machines. For details on application functionality restrictions that apply upon expiration of a subscription and grace period, contact the service provider that sold you Kaspersky Security.
To use Kaspersky Security under a subscription, you have to apply the activation code received from the service provider. After the activation code is applied, a subscription key is added to the application – the active key corresponding to the subscription license for the application.
A subscription key can be added only as the active key. A subscription key cannot be added as a reserve key.
Page top
About application activation
Application Activation is the procedure to activate the license and receive the right to use the fully-functional version of the application during the course of the license validity period.
To activate the application, a license key must be added to all SVMs. The application activation task is used to add a key to SVMs.
When the application activation task is created, a key from the Kaspersky Security Center key storage is used.
You can add a key to the Kaspersky Security Center key storage in one of the following ways:
- using the key file
- using the activation code
You can add a key to the Kaspersky Security Center key storage while creating an application activation task for SVMs or in advance.
Conditions for activating the application using the activation code
Adding a key using an activation code requires a connection to Kaspersky activation servers. The Key Storage Wizard sends data to Kaspersky activation servers to validate the activation code that was entered. The activation proxy service establishes a connection to the activation servers. If the activation proxy service is disabled, the key cannot be added to the storage by using an activation code. If Internet access is provided via a proxy server, the proxy server settings must be configured in the properties of the Kaspersky Security Center Administration Server.
For more details on the activation proxy service, please refer to the Kaspersky Security Center documentation.
Page top
Special considerations when adding license keys
When adding license keys, you should take the following into consideration:
- Simultaneous use of several license keys of the same type on an SVM is not supported. If you add a key on the SVM with a previously added key of the same type, the new key replaces the previous key.
- If you are using a licensing scheme based on the number of protected virtual machines, the type of key that you use to activate the application must match the guest operating system type of the virtual machines:
- For the protection of virtual machines running server operating systems, you need to add a server key to SVMs.
- For the protection of virtual machines running desktop operating systems, you need to add a desktop key to SVMs.
- For the protection of virtual machines running server operating systems and desktop operating systems, you need to add two keys to SVMs: a server key and a desktop key.
If you are using a licensing scheme based on the number of processor cores or based on the number of processors, you need one key (with a limitation on the number of processor cores or with a limitation on the number of processors), irrespective of the type of operating system installed on the virtual machines.
To protect virtual machines running Linux guest operating systems, you can use only server keys, keys with a limitation on the number of processor cores, and keys with a limitation on the number of processors.
- Simultaneous use of keys corresponding to different licensing schemes on SVMs is not supported. After activation of the application, if you add a key that corresponds to a different licensing scheme, the previously added key is removed from the SVM. For example, if you add a key with a limitation on the number of processor cores, and a desktop key and/or server key was previously added to the SVM, the active and (if available) the reserve desktop and/or server keys are deleted when the task is completed. They are replaced by the key with a limitation on the number of processor cores as the active key.
On an SVM, only keys corresponding to the same licensing scheme can be simultaneously used, for example, a desktop key and a server key (a licensing scheme based on the number of protected virtual machines).
A key that was removed from one SVM can be added to another SVM if the term of the license bound to the key has not expired.
- Simultaneous use of commercial keys and subscription keys on an SVM is not supported.
For example, if you add a commercial key on an SVM with a previously added subscription key, the subscription key is removed from the SVM. The commercial key is added in its place.
- Simultaneous use of keys matching different types of licenses (standard license or enterprise license) on an SVM is not supported.
For example, if you add a key that corresponds to an enterprise license but the application was previously used with a standard license, all active and (if available) reserve keys that correspond to the standard license are removed from the SVM. A key that corresponds to an enterprise license is added instead of them.
Application activation procedure
To activate the application:
- Create an application activation task. You can create the Application Activation task for all SVMs, for the SVMs of one KSC cluster, or for an individual SVM.
When the application activation task is created, a key from the Kaspersky Security Center key storage is used. You can add a key to the Kaspersky Security Center key storage in advance or while creating an application activation task.
If the application is being used based on a subscription, you cannot create an activation task during the grace period. You can use a previously created application activation task to add a key.
- Start the application activation task.
The task activates the application on those SVMs on which an active key was missing. On SVMs on which the application has already been activated, the task replaces the old key with the new one.
If both a server key and a desktop key have been added on your SVM, the application usage period is the longer of the following two periods: the period of application use with the server key or the period of application use with the desktop key.
If the number of licensing units for which the key is being used exceeds the number specified in the License Certificate, Kaspersky Security sends the Kaspersky Security Center Administration Server an event containing information about the violation of the license restrictions (please refer to the Kaspersky Security Center documentation).
Adding a key to the key storage of Kaspersky Security Center
To add a key to the key storage of Kaspersky Security Center:
- In the Kaspersky Security Center Administration Console, run the Key Storage Wizard:
- In the console tree, select the Kaspersky Licenses folder.
- In the workspace, click the Add activation code or key file button.
- In the Select application activation method window of the Wizard, select the method used to add the key to storage:
- Click the Activate application with activation code button if you want to add the key using an activation code.
- Click the Activate application with key file button if you want to add the key using a key file.
- Depending on your selected add key method:
- Enter the activation code.
- Specify the path to the key file. To do so, click Browse and in the window that opens select the file (with the .key extension).
- Clear the Automatically deploy license key to managed devices check box (the capability to automatically deploy keys to managed devices is not supported for Kaspersky Security for Virtualization 6.1 Agentless). Proceed to the next step of the wizard.
- Finish the Key Storage Wizard.
The added key will appear in the list of keys in the Kaspersky licenses folder of the console tree.
Keys added to Kaspersky Security Center key storage can be used when creating an application activation task for SVMs.
Page top
Creating an application activation task
To create an application activation task:
- In the Kaspersky Security Center Administration Console, select the relevant folder or administration group:
- If you want to activate the application on all SVMs, select the Managed devices folder of the main Administration Server of Kaspersky Security Center. In the workspace, select the Tasks tab and click the New task button to start the New Task Wizard.
- If you want to activate the application on SVMs of one KSC cluster, in the Managed devices folder of the console tree select the administration group containing this KSC cluster. In the workspace, select the Tasks tab and click the New task button to start the New Task Wizard.
- If you want to activate the application on one or multiple SVMs, perform one of the following actions:
- In the console tree, open the Tasks folder. Click the New task button to start the New Task Wizard.
- In the console tree, select the Kaspersky Licenses folder. Click the Deploy key to managed devices button to start the New Task Wizard.
- At the first step of the Wizard, select the type of task.
- If you start the New Task Wizard from the Managed devices folder or from the Tasks folder, select the following type of task: Kaspersky Security for Virtualization 6.1 Agentless → Application activation.
- If you start the New Task Wizard from the Kaspersky licenses folder, specify the application for which the task is created: Kaspersky Security for Virtualization 6.1 Agentless.
Proceed to the next step of the New Task Wizard.
- To select a key from the Kaspersky Security Center key storage, click the Select button. The Select a license key window opens.
If you added a key to the Kaspersky Security Center key storage in advance, select the key and click OK.
If the relevant key is not in the key storage, add it as follows:
- Click the Add button located in the upper part of the Select a license key window. This starts the Key Storage Wizard that adds a key to the key storage of Kaspersky Security Center.
- Follow the instructions of the Wizard to add a key to key storage.
- Finish the Key Storage Wizard.
After the Wizard finishes, select the added key in the Select a license key window and click OK.
Information about the selected key appears in the lower part of the window.
If you want to use the added key as a reserve key, select the Use the license key as a reserve key check box.
The check box is not available when adding a key for a trial license or a subscription key. A trial license key or a subscription key cannot be added as a reserve key.
Proceed to the next step of the New Task Wizard.
- If you started the New Task Wizard from the Tasks folder or from the Kaspersky licenses folder, specify the method for selecting the SVMs on which the task must run:
- Click the Select network devices detected by Administration Server button if you want to select SVMs from the list of devices detected by Administration Server while polling the local area network.
- Click the Specify device addresses manually or import from list button if you want to specify the addresses of SVMs manually or import the list of SVMs from a file. Addresses are imported from a TXT file with a list of addresses of SVMs, with each address in a separate row.
If you import a list of addresses from file or specify the addresses manually and the SVMs are identified by name, the list of SVMs for which the task is being created can be supplemented only with those SVMs whose details have already been included in the Administration Server database upon connection of SVMs or following a poll of the local area network.
- Click the Assign task to a device selection button if the task must be run on all SVMs that are part of a selection based on a predefined criterion. For details on creating a selection of devices, please refer to the Kaspersky Security Center documentation.
- Click the Assign task to an administration group button if the task must be run on all SVMs within an administration group.
Depending on the specified method of SVM selection, perform one of the following operations in the window that opens:
- In the list of detected devices, specify the SVMs on which the task will be run. To do so, select check boxes in the list on the left of the name of the relevant SVMs.
- Click the Add or Add IP range button and specify the addresses of SVMs.
- Click the Import button, and in the window that opens select the TXT file containing the list of SVM addresses.
- Click the Browse button and in the opened window specify the name of the selection containing the SVMs on which the task will be run.
- Click the Browse button and select an administration group or manually enter the name of an administration group.
Proceed to the next step of the New Task Wizard.
- Configure the task run schedule.
- Scheduled start. Choose the task run mode in the drop-down list. The settings displayed in the window depend on the task run mode chosen.
- Run skipped tasks. If this check box is selected, an attempt to start the task is made the next time the application is started on the SVM. In the Manually and Once modes, the task is started as soon as an SVM appears on the network.
If this check box is cleared, the task is started on an SVM by schedule only, and in Manually and Once modes it is started only on the SVMs that are visible on the network.
- Use automatically randomized delay for task starts. By default, the time of task start on SVMs is randomized with the scope of a certain time period. This period is calculated automatically depending on the number of SVMs covered by the task:
- 0–200 SVMs – task start is not randomized
- 200-500 SVMs – task start is randomized within the scope of 5 minutes
- 500-1000 SVMs – task start is randomized within the scope of 10 minutes
- 1000-2000 SVMs – task start is randomized within the scope of 15 minutes
- 2000-5000 SVMs – task start is randomized within the scope of 20 minutes
- 5000-10000 SVMs – task start is randomized within the scope of 30 minutes
- 10000–20000 SVMs – task start is randomized within the scope of 1 hour
- 20000–50000 SVMs – task start is randomized within the scope of 2 hours
- over 50000 SVMs – task start is randomized within the scope of 3 hours
If you do not need to randomize the time of task starts within an automatically calculated time period, clear the Use automatically randomized delay for task starts check box. This check box is set by default.
- Use randomized delay for task starts within an interval of (min): If you want the task to start at a random time within a specified period of time after the scheduled task start, select this check box. In the text box, enter the maximum task start delay. In this case, the task starts at a random time within the specified period of time after the scheduled start. This check box can be changed if the Use automatically randomized delay for task starts check box is cleared.
Randomized task start times help prevent situations in which a large number of SVMs contact the Kaspersky Security Center Administration Server at the same time.
Proceed to the next step of the New Task Wizard.
- In the Name field, enter the task name and proceed to the next step of the New Task Wizard.
- If you want the task to start as soon as the New Task Wizard finishes, select the Run task when the wizard is complete check box.
Finish the wizard.
The created custom scan task appears in the list of tasks. If you configured a task start schedule in the Task start schedule settings window, the task is started according to this schedule. You can also run the application activation task manually at any time.
Page top
Renewing a license
When your license approaches expiration, you can renew it by adding a reserve key. This prevents the impairment of application functionality after the current license expires and before you activate the application under a new license.
The application activation task is used to add a reserve key on an SVM.
A reserve key cannot be added if you are using the application under subscription.
The type of reserve key must match the type of the previously added active key.
If you are using a licensing scheme that is based on the number of protected virtual machines, the type of reserve key must match the type of the guest operating system of the virtual machines: a server reserve key is intended for virtual machines with server operating systems; a desktop reserve key is intended for virtual machines with desktop operating systems.
If an SVM is used in a virtual infrastructure for the protection of virtual machines running server operating systems and desktop operating systems, it is recommended to add two reserve keys to the SVM: a server key and a desktop key.
If you use a licensing scheme based on the number of processors or processor cores, you need one reserve key with a limitation on the number of processors or processor cores, irrespective of the type of operating system installed on the virtual machines.
The reserve key must match the same license edition as the active key (standard license or enterprise license).
To renew a license:
- Create an application activation task for the SVMs on which you want to add a reserve key. You can create a task for all SVMs, for the SVMs of one KSC cluster, or for an individual SVM.
- Select the Use the license key as a reserve key check box at Step 2 of the task creation wizard.
- Start the application activation task.
The task adds the reserve key on those SVMs in the KSC cluster on which the active key has already been added. The reserve key is automatically used as the active key after Kaspersky Security license expires.
If you use an activation code for application activations, at the expiry of the license the application automatically connects to Kaspersky activation servers in order to replace the active key that has expired. If the automatic connection of the application to Kaspersky activation servers ends with an error, you have to manually start the application activation task in order to renew the license to use Kaspersky Security.
The application activation task on an SVM completes with an error and the reserve key is not added if one of the following conditions is met:
- There is no active key on the SVM.
- A subscription key has been added as the active key.
- The type of reserve key being added does not match the type of the previously added active key.
If an SVM has an active key and a reserve key and you choose to replace the active key, Kaspersky Security checks the expiration date of the reserve key. If the reserve key expires before the previously renewed license term, Kaspersky Security automatically removes the reserve key. In this case, you can add a different reserve key after adding the active key.
Page top
Renewing subscription
When you use the application under subscription, Kaspersky Security contacts Kaspersky activation servers at specific intervals until your subscription expires.
If you use the application under unlimited subscription, Kaspersky Security checks Kaspersky activation servers for a renewed key in background mode and, if it is available, adds it by replacing the previous key. In this way, unlimited subscription for Kaspersky Security is renewed without user involvement.
If you use the application under limited subscription, on the day when subscription (or the grace period after subscription expiry during which subscription renewal is available) expires, Kaspersky Security sends the relevant information to the Administration Server of Kaspersky Security Center and stops attempting to renew subscription automatically. Kaspersky Security stops updating the application databases and stops using the Kaspersky Security Network.
You can renew your subscription by contacting the vendor that sold you Kaspersky Security.
After renewing subscription, you have to restart the key addition task that you created to add a subscription key.
Page top
Viewing information about keys in use
Information about the keys being used can be viewed in the Kaspersky Security Center Administration Console:
- In the Kaspersky licenses folder in the console tree
- In the properties of the application installed on the SVM
- In the properties of the application activation task
- In the key usage report
Viewing details of the key in the Kaspersky licenses folder
To view details of the key in the Kaspersky licenses folder:
- In the Kaspersky Security Center Administration Console, select the Kaspersky licenses folder.
The workspace shows a list of keys added to the Kaspersky Security Center key storage.
- In the list of keys, select a key whose details you wish to view.
On the right of the key list, the following key details appear:
- Unique alphanumeric sequence (key).
- Application. The name of the application for which the key is intended, and license information.
- Type. License type. Possible options:
trial,commercialorsubscription. - License term (days). The number of days during which you may use the application activated by adding this key (for example,
365 days). If you are using the application under subscription, the field value is<Unavailable>. - License key expiration date. Key expiration date. You can activate the application by adding this key and use it only before this expiration date. If you are using the application under unlimited subscription, the field value is
Unlimited. - License expiration date. The date when your right to use the application activated with the current key expires. If you are using the application under unlimited subscription, the field value is
Unlimited. - Maximum number of devices. Depending on the key type:
- For a server key – the maximum number of virtual machines running a server operating system that you can protect.
- For a desktop key – the maximum number of virtual machines running a desktop operating system that you can protect.
For server and desktop keys, the license restriction count includes all virtual machines that were under the protection of the application over the last 30 days, even if those virtual machines are currently powered off. If you do not want a virtual machine to be included in the license restriction count, you can exclude the virtual machine from the protected virtual machines.
- For a key with a limitation on the number of processor cores – the maximum number of physical processor cores used on all hypervisors whose virtual machines you can protect.
- For a key with a limitation on the number of processors – the maximum number of physical processors used on all hypervisors whose virtual machines you can protect.
- Devices with the active key – the number of SVMs on which the key is added as an active key.
- Devices with the reserve key – the number of SVMs on which the key is added as a reserve key.
If you have selected a subscription key in the list, the following information is also displayed to the right of the list:
- Type of validity period restriction – if the application is being used under an unlimited subscription,
Unlimitedis displayed in the field. If the subscription is limited, the field is not displayed. - Grace period. The number of days after subscription suspension during which the application retains its functionality.
- Subscription provider's web address – web address of the service provider with whom the subscription is registered.
- Subscription status. The current status of the subscription. Possible values:
active,paused,expired,canceled,grace period activated.
Subscription details are also displayed in the subscription key properties window in the About subscription section.
If both a server key and a desktop key have been added on an SVM, the Kaspersky licenses folder of Kaspersky Security Center shows information on these keys and the following information about the combination of the server key and desktop key:
- Unique alphanumeric sequence is the combination of a server key and a desktop key.
- Validity period (days) – the longer of the following two application usage periods: the period of application usage under the server key, or the period of application usage under the desktop key.
- License key expiration date – the later of the following two key expiration dates: server key expiration date or desktop key expiration date.
- License expiration date – the later of the following two dates: the end date of application usage under the server key, or the end date of application usage under the desktop key.
- Maximum number of devices – the sum of the following values: the maximum number of virtual machines with desktop operating systems and the maximum number of virtual machines with server operating systems that you can protect using the application.
- Grace period – only for subscription keys: the longer of the following two grace periods: the grace period corresponding to the server key or the grace period corresponding to the desktop key.
- Subscription status – only for subscription keys: the field shows the
Activestatus if a subscription corresponding to at least one of the keys (server or desktop) has the active status. If both subscriptions are inactive, the field displays the better status (for example, if one subscription hasNot activestatus and the other one hasGrace period activatedstatus, the field displays theGrace period activatedstatus).
Viewing key details in the properties of the application
To view information about a key in the properties of the application installed on an SVM:
- In the Kaspersky Security Center Administration Console, open the properties window of the SVM for which you want to view key details:
- Select the administration group containing the KSC cluster that includes the relevant SVM.
- In the workspace, select the Devices tab.
- In the list, select the SVM and open the SVM properties window by double-clicking or by selecting Properties in the context menu.
The Properties: <SVM name> window opens.
- In the SVM properties window in the list on the left, select the Applications section.
A list of applications that are installed on this SVM appears in the right part of the window.
- Select Kaspersky Security for Virtualization 6.1 Agentless and open the application settings window by double-clicking or by selecting Properties in the context menu.
The Kaspersky Security for Virtualization 6.1 Agentless settings window opens.
- In the application settings window, in the list on the left, select the License keys section.
The details of the key added to the SVM appear in the right part of the window. The Active license key section displays information about the active key. The Reserve license key section displays information about the reserve key. If no reserve key is added, the Reserve license key section shows the <Not added> string.
The following information about the key is displayed in the Active license key section:
- Unique alphanumeric sequence (key).
- License type. Type of license. Possible options:
trial,commercialorsubscription. - Activation date – the date when the application was activated with this key.
- License expiration date. The date when your right to use the application activated with the current key expires. If you are using the application under unlimited subscription, the field value is
Unlimited. - License term. The number of days during which you may use the application activated by adding this key (for example,
365 days). If you are using the application under subscription, the field value is<Unavailable>. - Maximum number of devices. Depending on the key type:
- For a server key – the maximum number of virtual machines running a server operating system that you can protect.
- For a desktop key – the maximum number of virtual machines running a desktop operating system that you can protect.
For server and desktop keys, the license restriction count includes all virtual machines that were under the protection of the application over the last 30 days, even if those virtual machines are currently powered off. If you do not want a virtual machine to be included in the license restriction count, you can exclude the virtual machine from the protected virtual machines.
- For a key with a limitation on the number of processor cores – the maximum number of physical processor cores used on all hypervisors whose virtual machines you can protect.
- For a key with a limitation on the number of processors – the maximum number of physical processors used on all hypervisors whose virtual machines you can protect.
The following information about the key is displayed in the Reserve license key section:
- Unique alphanumeric sequence (key).
- License type. License type:
commercial. - License term. The number of days during which you may use the application activated by adding this key (for example,
365 days). - Maximum number of devices. Depending on the key type:
- For a server key – the maximum number of virtual machines running a server operating system that you can protect.
- For a desktop key – the maximum number of virtual machines running a desktop operating system that you can protect.
For server and desktop keys, the license restriction count includes all virtual machines that were under the protection of the application over the last 30 days, even if those virtual machines are currently powered off. If you do not want a virtual machine to be included in the license restriction count, you can exclude the virtual machine from the protected virtual machines.
- For a key with a limitation on the number of processor cores – the maximum number of physical processor cores used on all hypervisors whose virtual machines you can protect.
- For a key with a limitation on the number of processors – the maximum number of physical processors used on all hypervisors whose virtual machines you can protect.
If both a server key and a desktop key have been added on an SVM, the Kaspersky Security Center properties window shows the following information about the combination of the server key and desktop key:
- Unique alphanumeric sequence is the combination of a server key and a desktop key.
- License expiration date – the later of the following two dates: the end date of application usage under the server key, or the end date of application usage under the desktop key.
- Validity period – the longer of the following two application usage periods: the period of application usage under the server key, or the period of application usage under the desktop key.
- Maximum number of devices – the sum of the following values: the maximum number of virtual machines with desktop operating systems and the maximum number of virtual machines with server operating systems that you can protect using the application.
Viewing key details in the properties of the application activation task
To view key details in the properties of the application activation task:
- In the Kaspersky Security Center Administration Console, perform one of the following actions:
- If you want to view the properties of an activation task that activates the application on all SVMs, select the Managed devices folder of the console tree. In the workspace, select the Tasks tab.
- If you want to view the properties of an activation task that activates the application on SVMs of one KSC cluster, in the Managed devices folder of the console tree select the administration group containing this KSC cluster. In the workspace, select the Tasks tab.
- If you want to view the properties of an activation task that activates the application on one or multiple SVMs, select the Tasks folder of the console tree.
- In the list of tasks, select the activation task whose properties you want to view, and open the task properties window by double-clicking or by selecting Properties in the task context menu.
The Properties: <Task name> window opens.
- In the task properties window, select the Adding a license key section.
In the right part of the window, the details of the key that this task is adding on SVMs appear:
- License Key – a unique alphanumeric sequence.
- License type – the following options are available:
trial,commercial, orcommercial (subscription). - Maximum number of devices. Depending on the key type:
- For a server key – the maximum number of virtual machines running a server operating system that you can protect.
- For a desktop key – the maximum number of virtual machines running a desktop operating system that you can protect.
For server and desktop keys, the license restriction count includes all virtual machines that were under the protection of the application over the last 30 days, even if those virtual machines are currently powered off. If you do not want a virtual machine to be included in the license restriction count, you can exclude the virtual machine from the protected virtual machines.
- For a key with a limitation on the number of processor cores – the maximum number of physical processor cores used on all hypervisors whose virtual machines you can protect.
- For a key with a limitation on the number of processors – the maximum number of physical processors used on all hypervisors whose virtual machines you can protect.
- License term. The application usage period specified in the License Certificate (for example,
365 days). This field is not displayed if you are using the application under a subscription. - Expiration date. Key expiration date. You can activate the application by adding this key and use it only before this expiration date. If you are using the application under an unlimited subscription, the field's value is
Unlimited. - Grace period. The number of days after subscription suspension during which the application retains its functionality. The field is displayed if you are using the application under subscription and the service provider with which you registered your subscription offers a grace period for renewing your subscription.
- Functionality. The list of application components and features whose availability depends on the license edition associated with the selected key:
- The application components and features that are available when using the application under the license corresponding to the selected key are marked with the
 icon in the list.
 - The application components and features that are not available when using the application under the license corresponding to the selected key are marked with the
 icon in the list.
- The application components and features that are available when using the application under the license corresponding to the selected key are marked with the
Viewing the license key usage report
To view the license key usage report:
- In Kaspersky Security Center Administration Console, select the Administration Server <Server name> node.
- In the workspace of the node, go to the Reports tab.
- In the list of report templates, select the License key usage report template and open the report window by double-clicking or by selecting Show report in the context menu.
This opens a window containing the report that was generated based on the License key usage report template.
The chart in the upper part of the window shows the following license key usage details for each key:
- Number of licensing units on which the key is already in use
- Number of licensing units on which the key can be used according to the licensing restrictions
- Number of licensing units by which the licensing restrictions for the key are exceeded
The license key usage report consists of two tables:
- The summary table contains information about the keys in use
- The detailed information table contains information about SVMs on which keys have been added, or about virtual machines for whose protection the key is used
You can configure the content of fields shown in each table. See Kaspersky Security Center documentation on how to add or remove fields in the report tables.
The summary table contains information about the keys in use:
- License Key – a unique alphanumeric sequence.
- Used as active on. Depending on the key type:
- For a server or desktop key, this is the number of virtual machines for whose protection the key is used.
- For a key with a limitation on the number of processor cores – the number of physical processor cores used on all VMware ESXi hypervisors on which SVMs are deployed.
- For a key with a limitation on the number of processors – the number of physical processors used on all hypervisors whose virtual machines you can protect.
- Used as active for workstations – the number of virtual machines with a desktop operating system protected using the key.
- Used as active for servers – the number of virtual machines with a server operating system protected using the key.
- Used as reserve – the number of SVMs on which the key is added as a reserve key.
- Restriction – depending on the key type:
- For a server key – the maximum number of virtual machines running a server operating system that you can protect.
- For a desktop key – the maximum number of virtual machines running a desktop operating system that you can protect.
For server and desktop keys, the license restriction count includes all virtual machines that were under the protection of the application over the last 30 days, even if those virtual machines are currently powered off. If you do not want a virtual machine to be included in the license restriction count, you can exclude the virtual machine from the protected virtual machines.
- For a key with a limitation on the number of processor cores – the maximum number of physical processor cores used on all hypervisors whose virtual machines you can protect.
- For a key with a limitation on the number of processors – the maximum number of physical processors used on all hypervisors whose virtual machines you can protect.
- The license expiration date. The date when your right to use the application activated with your current key expires.
- Use license key until. The key expiration date.
- Additional properties – additional key properties.
- Service info. Service information relating to the key and license.
The row below contains the following consolidated information:
- License keys. Total number of keys in use.
- License keys more than 90% used. Total number of keys that have been used up by more than 90% of the licensing restriction. For example, the restriction is set at 100 virtual machines. A key is used on two SVMs: the first one protects 42 virtual machines and the second one protects 53 virtual machines. The key is therefore 95% used and is included in the number of keys specified in this field.
- License keys with exceeded limit. Total number of keys that have exceeded the license limit, for example, imposed on the number of protected virtual machines with server or desktop operating systems, or on the number of physical processor cores used on all hypervisors (depending on the key type).
The detailed information table shows information about the SVM on which the key has been added (for keys of all types) and information about the protected virtual machine for which the key is being used (for a server or desktop key):
- Group. The administration group that includes the SVM with the added key.
- Device name. The name of the SVM for which the key was added or the name of the protected virtual machine for which the key is used.
- Application. The name of the application that was activated by adding this key on the SVM.
- Version number. The version number of the application that was activated by adding this key on the SVM.
- Active license key. The key that was added as an active key on the SVM or is used for protection of the virtual machine.
- Reserve license key. The key that was added as the reserve key on the SVM.
- License valid until. The expiration date for using the application with this key.
- Use license key until. The key expiration date.
- IP address. The IP address of the SVM on which the key was added or the IP address of the protected virtual machine.
- Last visible on the network. The date and time when the SVM or virtual machine was last visible on the corporate LAN.
- Last connection to Administration Server. The date and time of the last connection between the SVM and Kaspersky Security Center Administration Server.
- NetBIOS name. The name of the protected virtual machine and the path to it in the virtual infrastructure.
- DNS name. The domain name of the SVM or the name of the protected virtual machine and the path to it in the virtual infrastructure.
- Used. Depending on the type of key:
- For a server key and desktop key – the number of virtual machines with a server operating system or desktop operating system that are protected by the application.
- For a key with a limitation on the number of processor cores – the maximum number of physical processor cores used on all hypervisors on which SVMs are deployed.
- For a key with a limitation on the number of processors – the number of physical processors used on all hypervisors on which SVMs are deployed.
- Used for workstations – the number of virtual machines with a desktop operating system that are under the protection of the application.
- Used for servers – the number of virtual machines with a server operating system that are under the protection of the application.
If both a server key and a desktop key have been added on an SVM, the Kaspersky Security Center key usage report shows the following information about the combination of the server key and desktop key:
- License key, Active license key, Reserve license key – unique combination of a server key and a desktop key.
- Nearest license expiration date – the later of the following two dates: the end date of application usage under the server key, or the end date of application usage under the desktop key.
- Use license key until – the later of the following two key expiration dates: server key expiration date or desktop key expiration date.
- Used as active on – the total number of virtual machines with server operating systems and desktop operating systems protected using the key.
- Restriction – the sum of the following values: the maximum number of protected virtual machines with desktop operating systems plus the maximum number of protected virtual machines with server operating systems.
- Used – the total number of virtual machines with server operating systems and desktop operating systems that are protected by the application.
Starting and stopping the application
Kaspersky Security starts automatically when the operating system on an SVM is started.
The virtual machine file threat protection function is enabled automatically at startup of Kaspersky Security if you activated the application and enabled protection in the policy.
Kaspersky Security protects virtual machines against network threats only if the policy applied to SVMs is configured for Intrusion Prevention and Web Addresses Scan.
The application does not protect virtual machines if the application databases are missing from the SVMs.
The virtual machine scan task starts according to its schedule.
Kaspersky Security stops automatically when the operating system is shut down on an SVM.
Page top
Protection status
Information on virtual infrastructure protection status is displayed in Kaspersky Security Center using on of the following methods:
- By the client device status (OK, Critical, Warning). In the case of Kaspersky Security for Virtualization 6.1 Agentless, a client device of Kaspersky Security Center is an SVM. Protected virtual machines are not considered client devices from the perspective of Kaspersky Security Center because the Kaspersky Security Center Network Agent is not installed on them. When problems are detected in the Kaspersky Security application operation or in the protection of virtual machines, the status of the SVM that protects those virtual machines changes.
The Kaspersky Security Center client device status may change to Critical or Warning for the following reasons:
- The status changes according to the rules defined in Kaspersky Security Center. For example, the status changes if a security application is not installed on the device, a virus scan has not been performed in a long time, anti-virus databases are out of date, or the license has expired. For more details about the reasons for status changes and configuring status assignment conditions, please refer to the Kaspersky Security Center documentation.
- Kaspersky Security Center receives the device status from the managed application, i.e. Kaspersky Security.
Kaspersky Security Center must be configured to receive the device status from the managed application. To ensure that this function is enabled, in the properties of the Managed devices folder, in the Device status section, make sure that the Device status defined by the application check boxes are selected in the lists of conditions for the Critical and Warning statuses.
Kaspersky Security may change the SVM status to Critical or Warning in the following cases:
- The application is not activated or problems associated with the license key or license are detected (for example, the key is in the denylist).
- The SVM is not connected to the Integration Server or there were problems receiving information about the protected virtual infrastructure.
- Problems and limitations have been detected in KSN operation (an error occurred when connecting to KSN, temporary restriction on use of KSN is enabled, KSN settings in the policy do not match the KSN settings in the properties of the Kaspersky Security Center Administration Server).
- Application databases are missing or an error occurred when downloading them.
- Errors were detected in application components (for example, a virus scan is not being performed, errors were detected in Network Attack Blocker functionality or suspicious network activity was detected, web addresses scan is not being performed).
- Problems were detected in the interaction between an SVM and network data storage (if the use of network data storage is configured for the SVM).
For details on client device statuses, see the Kaspersky Security Center documentation. Information on the client device (SVM) statuses can be viewed in the device list of the Kaspersky Security Center Administration Console and in the protection status report.
- By the virtual machines protection status. Information on the virtual machines protection status can be viewed in protection status report.
Protected virtual machines are not considered as client devices of Kaspersky Security Center, and cannot be assigned the client device status. The report shows the protection status, assigned to the virtual machine by Kaspersky Security Center based on the information received from the SVM, protecting this virtual machine.
Virtual machine protection status can be changed to Critical or Warning, if the following information is received from the SVM:
- The virtual machine has "not protected" status. Information on the virtual machine status (protected, not protected, powered off) can be viewed in the list of virtual machines within the KSC cluster protected infrastructure.
- A virus scan has not been performed in a long time on the virtual machine.
- The application databases have not been updated for a long time on the SVM, protecting the virtual machine.
About security tags
Kaspersky Security can assign the security tags to protected virtual machines:
If viruses or other malware is detected on the virtual machine, Kaspersky Security assigns the ANTI_VIRUS.VirusFound.threat=high security tag to the virtual machine.
The assigned ANTI_VIRUS.VirusFound.threat=high security tag is automatically removed if no viruses or other malware are detected when a scan task is executed on the virtual machine.
If Kaspersky Security is installed in the infrastructure managed by VMware NSX-V Manager, Kaspersky Security can also assign the IDS_IPS.threat=high security tag to the virtual machines. The tag is assigned to a virtual machine whose traffic displayed activity typical of network attacks or activity that may be a sign of an intrusion into the protected infrastructure. The IDS_IPS.threat=high security tag can be manually removed.
You can view the security tags assigned to the virtual machine in the properties of the virtual machine:
- In the VMware vSphere Client console, in the Hosts and Clusters section of the Summary tab.
- In VMware NSX Manager web console, in the Inventory → Virtual Machines section.
You can manually assign or remove security tags.
Page top
Viewing information about virtual machines within the KSC cluster protected infrastructure
To view the list of virtual machines within the KSC cluster protected infrastructure:
- In the Kaspersky Security Center Administration Console, in the Managed devices folder, select the administration group containing the KSC cluster and then select the Clusters and server arrays subfolder.
- In the workspace, select the KSC cluster and double-click the Properties: <KSC cluster name> window to open it.
- In the KSC cluster properties window, select the List of virtual machines section.
The right part of the window displays a list of all virtual machines that are part of the protected infrastructure of this KSC cluster.
The list does not show virtual machine templates and SVMs.
The list of virtual machines is displayed as a table containing the following columns:
- Status
Virtual machine status. The following icons signify the virtual machine status:
 – the virtual machine is protected. A virtual machine is considered to be protected only if file protection is applied to it, which means that it is under the protection of an SVM with the File Threat Protection component installed. The presence of network protection does not affect the virtual machine status.
 – the virtual machine is not protected. A virtual machine is considered to be unprotected if file protection is not applied to it. The presence of network protection does not affect the virtual machine status.
 – the virtual machine is powered off or paused.
Information about network protection of a virtual machine is displayed in the detailed list of virtual machines.
- VM name
- Path to VM
- Status
- To view additional information about virtual machines within the KSC cluster protected infrastructure, click the Detailed information button. A table containing a detailed list of virtual machines opens in a separate window.
The table displays information about the status of protection indicated in the Protection type field located above the table. You can select one of the following values:
- File system protection. Select this option if you want to view information on the status of virtual machine file threat protection. This option is selected by default.
- Network protection. Select this option if you want to view information on the status of network protection of virtual machines.
The table columns show the following additional details of each virtual machine:
- Status
Virtual machine status.
If File system protection is selected in the Protection type field, the status is designated as follows:
- – the virtual machine is under the protection of an SVM that has the File Threat Protection component installed.
- – file protection is not applied to the virtual machine.
- – the virtual machine is powered off or paused.
If the Network protection value is selected in the Protection type field and the virtual machine is running in the infrastructure managed by VMware NSX-V Manager, the status is indicated as follows:
- – the virtual machine is under the protection of an SVM that has the Network Threat Protection component installed.
- – the virtual machine is not protected against network threats.
- – the virtual machine is powered off or paused.
If the virtual machine is running in the infrastructure managed by VMware NSX-T Manager, the
status is not displayed for the virtual machine, even if the virtual machine is under protection of an SVM that has the Network Threat Protection component installed.The virtual machine status does not depend on traffic processing mode used by the Network Threat Protection component.
- Tenant
- NSX Policy
- Available protection functions
- OS type
- Protection profile
- Key type
- Database update
- Scan date
In the main and detailed lists of virtual machines, you can perform the following operations:
- Sort the list by any column of the table.
- Filter the list by protection status.
- Search for a virtual machine in the list.
- Export the list of virtual machines to a file in XML or CSV format.
The main and detailed lists of virtual machines are automatically refreshed every 5 minutes. If required, you can refresh the list at any time by clicking the Refresh list button below the list.
To filter the list of virtual machines by protection status,
click one of the following buttons above the list:
- – show protected virtual machines
- – show unprotected virtual machines
- – show turned off and paused virtual machines
You can combine filtering conditions by pressing several buttons.
To cancel filtering of the list of virtual machines, click the  button.
To search for a virtual machine in the list,
Enter a virtual machine search condition in the search field.
In the main list of virtual machines, you can perform a search based on the value of any column except the Status column. In the detailed list of virtual machines, you can perform a search based on the value of any column except the Status, Scan date and Database update columns.
To export the list of virtual machines to a file in XML or CSV format,
Click the Export list button below the list. In the window that opens, specify the name and format of the file.
Information about virtual machines within the protected infrastructure of this KSC cluster will be saved to a file in the selected format.
If you pre-filtered the list of virtual machines or performed a search for a virtual machine, only information that matches the filter conditions or the search conditions is saved to the file.
Page top
Viewing information about virtual machines protected by an SVM
You can view information about virtual machines protected by the SVM with the File Threat Protection component in the properties of the application installed on this SVM.
If Kaspersky Security is deployed in the infrastructure managed by VMware NSX-V Manager, you can also view information about virtual machines protected by the SVM with the Network Threat Protection component in the properties of the application installed on this SVM. If Kaspersky Security is deployed in the infrastructure managed by VMware NSX-T Manager, information about virtual machines protected by the SVM is not displayed in the properties of an application installed on the SVM with the Network Threat Protection component.
The virtual machine is protected by an SVM if connection is established between the SVM and the Guest Introspection Thin Agent installed on the virtual machine. In this case, the virtual machine can still be unprotected.
The SVM with the File Threat Protection component protects only those virtual machines that meet all conditions for protection of virtual machines from file threats. The SVM with the Network Threat Protection component protects only those virtual machines that meet all conditions for protection of virtual machines from network threats.
To view information about the virtual machines protected by an SVM:
- In the Kaspersky Security Center Administration Console, open the SVM properties window as follows:
- Select the administration group containing the KSC cluster that includes the relevant SVM.
- In the workspace, select the Devices tab.
- In the list, select the SVM and open the SVM properties window by double-clicking or by selecting Properties in the context menu.
The Properties: <SVM name> window opens.
- In the SVM properties window in the list on the left, select the Applications section.
A list of applications that are installed on this SVM appears in the right part of the window.
- Select Kaspersky Security for Virtualization 6.1 Agentless and open the application settings window by double-clicking or by selecting Properties in the context menu.
The Kaspersky Security for Virtualization 6.1 Agentless settings window opens.
- In the application settings window in the list on the left, select the List of protected virtual machines section.
The right part of the window displays a table containing information about the virtual machines protected by the SVM.
The table displays the following information for each virtual machine:
- Virtual machine name.
- Name of the virtual Administration Server of Kaspersky Security Center that is used to manage the protection of the tenant organization that owns the virtual machine. If the virtual machine does not belong to any tenant organization,
Nois displayed in the column. - IP address of the virtual machine.
- Version of the operating system installed on the virtual machine.
- Type of operating system installed on the virtual machine: server operating system or desktop operating system.
- ID of the virtual machine (vmID).
- Path to the virtual machine within the virtual infrastructure.
In the table containing a list of virtual machines, you can do the following:
- Sort the list by any column of the table.
- Search for a virtual machine in the list.
- Update information about virtual machines by clicking the Refresh button.
Virtual machine file threat protection
In this section, SVM refers to an SVM with the File Threat Protection component.
An SVM with the File Threat Protection component protects virtual machines on the VMware ESXi hypervisor. Kaspersky Security protects only powered-on virtual machines that meet all the conditions for virtual machine protection.
If the application is not activated or the application databases are missing on SVMs, Kaspersky Security does not protect the virtual machines.
Kaspersky Security starts protecting virtual machines only after you have enabled protection by using a policy. The policy defines the settings that SVMs apply when protecting virtual machines from file threats.
File Threat Protection is enabled for virtual machines if a protection profile is assigned to these virtual machines. You can assign the main protection profile that is generated automatically when a policy is created, or create and assign additional protection profiles if you want to use different protection settings for different virtual infrastructure objects.
You can assign protection profiles directly to virtual machines and other virtual infrastructure objects. In a policy that defines protection settings for a virtual infrastructure managed by a single VMware vCenter Server, you can also assign protection profiles to the virtual machines by mapping protection profiles to NSX Vendor Templates / NSX Profile Configurations (depending on VMware NSX Manager type you use: VMware NSX-T Manager or VMware NSX-V Manager).
When a user or program attempts to access a virtual machine file, Kaspersky Security scans this file.
- If no viruses or other malware are detected in the file, Kaspersky Security grants access to this file.
- If viruses or other malware is detected in a file, Kaspersky Security assigns the Infected status to the file. If the scan cannot conclusively determine whether or not the file is infected (the file may contain a code sequence that is characteristic of viruses or other malware, or contain modified code from a known virus), Kaspersky Security also assigns the Infected status to the file.
Kaspersky Security then performs the action that is specified in the protection profile of the virtual machine; for example, it disinfects or blocks the file.
If an application that collects information and sends it to be processed is installed on a virtual machine, Kaspersky Security may classify this application as malware. To avoid this, you can exclude the application from protection. The list of exclusions is configured in the protection profile settings.
The Signature analysis and machine learning scan method is used for protection of virtual machines. Protection using signature analysis and machine learning provides the minimum acceptable security level. Kaspersky Security uses application databases containing information about known threats and about the methods to neutralize them. Based on the recommendations of Kaspersky experts, the Signature analysis and machine learning scan method is always enabled.
Additionally, during virtual machines protection, the Heuristic analysis is used. This is a technology designed for detecting threats that cannot be detected with the aid of Kaspersky application databases. Heuristic analysis detects files that could be infected with malware for which there are not yet any database signatures or infected with a new variety of a known virus. Files in which a threat is detected during heuristic analysis are marked as Infected.
The heuristic analysis level depends on the selected security level:
- If the security level is set to Low, the superficial heuristic analysis level is applied. Heuristic Analyzer does not perform all instructions in executable files while scanning executable files for malicious code. At this heuristic analysis level, the probability of detecting a threat is lower than at the medium heuristic analysis level. Scanning is faster and consumes less resources of the SVM.
- If the security level is set to Recommended, High, or Custom, the medium heuristic analysis level is applied. While scanning files for malicious code, Heuristic Analyzer performs the number of instructions in executable files that is recommended by Kaspersky experts.
Information about all events that occur during protection of virtual machines is logged in a report.
You are advised to regularly view the list of files blocked in the course of virtual machine protection and manage them. For example, you can save file copies to a location that is inaccessible to a virtual machine user or delete the files. You can view the details of blocked files in the threats report or by filtering events by the File blocked event (please refer to the Kaspersky Security Center documentation).
To gain access to files that were blocked as a result of virtual machine protection, you must exclude these files from protection in the settings of the protection profile assigned to the virtual machines, or temporarily disable the protection of these virtual machines.
Conditions for protection of virtual machines against file threats
Kaspersky Security protects virtual machines that meet the following conditions:
- The virtual machine is not powered off or paused.
When performing scan tasks, Kaspersky Security can scan powered-off virtual machines that have the following file systems: NTFS, FAT32, EXT2, EXT3, EXT4, XFS, BTRFS.
- The Guest Introspection Thin Agent component is installed on the virtual machine.
The NSX File Introspection Driver acting as the Guest Introspection Thin Agent component must be running on the virtual machines with Windows operating system. It starts automatically after VMware Tools are installed and the operating system is restarted.
- The virtual machine is included in the NSX Group managed by the NSX Policy which uses the file system protection service (Kaspersky File Antimalware Protection).
- A protection profile is being applied to the virtual machine.
If even one of the listed conditions is not fulfilled, Kaspersky Security does not protect the virtual machine.
Page top
Configuring main protection profile settings
The main protection profile is automatically generated during creation of the main policy and tenant policy. You can configure the settings of the main protection profile while creating a policy (during the Configure main protection profile settings step) or in the properties of the policy after it is created (in the Main protection profile subsection in the File Threat Protection section).
To configure main protection profile settings:
- In the Security level section, select the security level at which Kaspersky Security scans virtual machines:
- If you want to install one of the pre-installed security levels (High, Recommended, or Low), use the slider to select one.
- To change the security level to Recommended, click the Default button.
- If you want to configure the security level on your own, click the Settings button. In the Security level settings window that opens:
- In the Scanning archives and compound files section, specify the values of the following settings:
- In the Performance section, specify the values of the following settings:
- In the Objects to detect section, click the Settings button. In the Objects to detect window that opens, specify the values of the following settings:
- Malicious tools
- Auto-dialers
- Adware
- Other
- Multi-packed files
Kaspersky Security always scans virtual machine files for viruses, worms, and Trojans. That is why the Viruses and worms and Trojans settings in the Malware section cannot be changed.
- In the Objects to detect window, click OK.
- In the Security level settings window, click OK.
If you have changed security level settings, the application creates a custom security level. The name of the security level in the Security level section changes to Custom.
- In the Action on threat detection section, select an action in the drop-down list.
- If you do not want Kaspersky Security to scan files on network drives when protecting virtual machines running Windows operating systems, clear the Scan network drives check box in the Protection scope section. By default, when protecting virtual machines running Windows operating systems, the application scans all files that have not been excluded from protection on network drives.
When protecting virtual machines running Linux operating systems, Kaspersky Security always scans files of supported network file systems (NFS and CIFS). If you want to exclude files of network file systems from the protection scope, you must configure a protection exclusion for the directory in which the network file system is mounted.
Kaspersky Security always scans files on removable and hard drives. For this reason the Scan all removable drives and hard drives setting in the Protection scope section cannot be edited.
- To exclude certain files of virtual machines from protection, in the Exclusions from protection section, click the Settings button.
In the Exclusions from protection window that opens, specify the following settings:
- In the File extensions section, choose one of the following options:
- Scan all except files with the following extensions. In the text box, specify a list of extensions of files to not scan when a virtual machine is being protected. Kaspersky Security ignores the case of characters in the extensions of files that are to be excluded from the protection scope.
- Scan files with the following extensions only. In the text box, specify a list of extensions of files to scan when the virtual machine is being protected. When protecting virtual machines running Linux operating systems, Kaspersky Security is case sensitive regarding the characters in the extensions of files that are to be included in the protection scope. When protecting virtual machines running Windows operating systems, the application ignores the cases of characters in file extensions.
You can type file extensions in the field by separating them with a blank space, or by typing each extension in a new line. File extensions may contain any characters except
. * | \ : " < > ? /. If an extension includes a blank space, the extension should be typed inside quotation marks:"doc x".If you have selected Scan files with the following extensions only in the drop-down list but have not specified the extensions of files to scan, Kaspersky Security scans all files.
- In the Files and folders table, use the Add, Change, and Delete buttons to create the list of objects to be excluded from protection.
By default, the list of exclusions includes the objects recommended by Microsoft (please refer to the list of recommended exclusions on the Microsoft website). Kaspersky Security excludes these objects from protection on all virtual machines to which the main protection profile has been assigned. You can view and edit the list of these objects in the Files and folders table.
You can exclude objects of the following types from protection:
- Folders. Files stored in folders at the specified path are excluded from protection. For each folder, you can specify whether to apply the exclusion from protection to subfolders.
The
*and?characters in the paths to excluded folders are not supported. The folder path must be absolute. - Files by mask. Files located at the specified path, or files matching the specified mask are excluded from protection.
Kaspersky Security ignores the case of characters in paths to files and folders that are excluded from protection.
You can save a configured list of exclusions to a file using the Export button or load a previously saved list of exclusions from a file using the Import button. To import or export a list of exclusions, you can use a file in XML format. You can also import a list of exclusions from a file in DAT format. Using a file in DAT format, you can import a list of exclusions that was generated in other Kaspersky applications.
- Folders. Files stored in folders at the specified path are excluded from protection. For each folder, you can specify whether to apply the exclusion from protection to subfolders.
If your exclusions list uses an environment variable that has multiple values depending on the bit rate of the application that uses it, in 64-bit Windows operating systems, objects corresponding to all values of the variable are excluded from protection. For example, if you use the %ProgramFiles% variable, objects located in the C:\Program files folder and in the C:\Program files (x86) folder are excluded from protection.
- In the File extensions section, choose one of the following options:
- In the Exclusions from protection window, click OK.
- Save the changes by clicking Next (in the New Policy Wizard) or Apply (in the policy properties).
The new protection profile settings are applied after data is synchronized between Kaspersky Security Center and the SVMs.
Page top
Managing additional protection profiles
You can manage additional protection profiles in the properties of a policy in the list of additional protection profiles.
To open the list of additional protection profiles in the policy properties:
- In the Kaspersky Security Center Administration Console, open the policy properties:
- In the console tree, select the folder or administration group in which the policy was created.
- In the workspace, select the Policies tab.
- Select a policy in the list of policies and double-click the policy to open the Properties: <Policy name> window.
- In the policy properties window, in the File Threat Protection section, select the additional protection profiles subsection.
A list of additional protection profiles will appear in the right part of the window. If you have not yet created additional protection profiles in this policy, the list of protection profiles is empty.
In the list of additional protection profiles, you can do the following:
- Create additional protection profiles.
- Change the name of an additional protection profile by clicking the Rename button.
- Edit the settings of the additional protection profile by clicking the Change button. The settings are edited in the Protection settings window. The additional protection profile settings are identical to the main protection profile settings. The new protection profile settings are applied after data is synchronized between Kaspersky Security Center and the SVMs.
- Export the settings of an additional protection profile to a file by clicking the Export button. To save the settings of an additional protection profile, you need to specify the path to a file in JSON format. You can use previously saved settings when creating a new additional protection profile.
- Delete the additional protection profile by clicking the Delete button. If the protection profile was assigned to virtual machines, the application will protect these virtual machines using the settings of the protection profile that was assigned to their parent object in the virtual infrastructure. If the parent object has been excluded from protection, the application does not protect such virtual machines.
If file protection settings are defined using NSX Vendor Templates / NSX Profile Configurations, protection profile removal will result in cancellation of mapping between the deleted protection profile and the NSX Vendor Template / NSX Profile Configuration. If you have not disabled the default protection profile, the NSX Vendor Template / NSX Profile Configuration will be automatically assigned the default protection profile. If you do not use the default protection profile, the virtual machines managed by NSX policies that use these NSX Vendor Templates / NSX Profile Configurations will be excluded from protection.
Creating an additional protection profile
To create an additional protection profile:
- In the Kaspersky Security Center Administration Console, open the list of additional protection profiles in the properties of the policy for which you want to create an additional protection profile.
- Click the Add button.
The Protection profile window opens.
- In the window that opens, enter the name of the new protection profile.
A protection profile name cannot contain more than 255 characters.
- If you want to use previously saved protection profile settings when creating a new protection profile, select the Import settings from file check box and specify the path to the file in JSON format.
- In the Protection profile window, click OK.
The Protection settings window opens. In this window, you can configure the settings of the new protection profile or change protection profile settings that were imported from a file.
The additional protection profile settings are identical to the main protection profile settings, with the exception of the default list of exclusions.
By default, the list of exclusions does not include objects recommended by Microsoft Corporation (please refer to the list of exclusions recommended by Microsoft on the Microsoft website). If you want the objects recommended by Microsoft to be excluded from protection on all virtual machines that have been assigned this protection profile, you need to import the microsoft_file_exclusions.xml file into the protection profile exclusions. The microsoft_file_exclusions.xml file is included in the application distribution kit and is located in the setup folder of the Kaspersky Security administration plug-in on the computer on which the Kaspersky Security Center Administration Console is installed. After importing the file, you can view and edit the list of these objects in the Files and folders table in the Exclusions from protection window.
- After configuring all settings of the protection profile, click OK in the Protection settings window.
In the Properties: <Policy name> window, a new protection profile appears in the list of additional protection profiles.
You can assign the created additional profiles to the virtual machines or other objects of VMware virtual infrastructure either directly or by mapping protection profiles to NSX Vendor Templates or NSX Profile Configurations (depending on VMware NSX Manager type you use: VMware NSX-T Manager or VMware NSX-V Manager).
Page top
Viewing the protected infrastructure in a policy
In policy properties, you can view the protected infrastructure selected for the policy, and information about the use of protection profiles.
To view information about the protected infrastructure in a policy:
- In the Kaspersky Security Center Administration Console, open the policy properties:
- In the console tree, select the folder or administration group in which the policy was created.
- In the workspace, select the Policies tab.
- Select a policy in the list of policies and double-click the policy to open the Properties: <Policy name> window.
- In the policy properties window, in the File threat protection section, select the Protected infrastructure subsection.
- The Kaspersky Security administration plug-in attempts to automatically connect to the Integration Server. If the connection fails, the Connection to Integration Server window opens.
It is recommended to specify the Integration Server address in the <address:port> format.
If the computer hosting the Administration Console of Kaspersky Security Center belongs to a domain or your domain user account belongs to the KLAdmins group or to the group of local administrators on the computer hosting the Integration Server, your domain user account is used by default to connect to the Integration Server. The Use domain account check box is selected by default. You can also use the Integration Server administrator account (admin). To do so, clear the Use domain account check box and enter the administrator password in the Password field.
If the computer hosting the Kaspersky Security Center Administration Console does not belong to a domain, or the computer belongs to a domain but your domain account does not belong to the KLAdmins group or to the group of local administrators on the computer hosting the Integration Server, you can use only the account of the Integration Server administrator (admin) to connect to the Integration Server. Enter the administrator password in the Password field.
If the connection to the Integration Server is established using the Integration Server administrator account (admin), you can save the administrator password. To do so, select the Save password check box. The saved administrator password will be used the next time a connection is established with this Integration Server. If you clear the check box selected during the previous connection to the Integration Server, Kaspersky Security removes the previously saved password of the Integration Server administrator.
The Save password check box may be unavailable if Windows updates KB 2992611 and/or KB 3000850 have been installed on the computer hosting the Kaspersky Security Center Administration Console. To restore the capability to save the administrator password, you can uninstall these Windows updates or modify the operating system registry as described in the Knowledge Base.
In the Connection to Integration Server window, specify the connection settings and click OK.
- The Kaspersky Security administration plug-in verifies the SSL certificate received from the Integration Server. If the received certificate contains an error, the Certificate verification window containing the error message opens. The SSL certificate is used to establish a secure connection to the Integration Server. If there are problems with the SSL certificate, it is recommended to make sure that the utilized data transfer channel is secure. To view information on the received certificate, click the View the received certificate button in the window containing the error message. You can install the certificate you received as a trusted certificate to avoid receiving a certificate error message at the next connection to the Integration Server. To do so, select the Install received certificate and stop showing warnings for <Integration Server address> check box.
To continue connecting, click the Continue button in the Certificate verification window. If you selected the Install received certificate and stop showing warnings for <Integration Server address> check box, the received certificate is saved in the operating system registry on the computer where the Kaspersky Security Center Administration Console is installed. The application also checks the previously installed trusted certificate for the Integration Server. If the received certificate does not match the previously installed certificate, a window opens to confirm replacement of the previously installed certificate. To replace the previously installed certificate with the certificate received from the Integration Server and continue connecting, click the Yes button in this window.
After connecting to the Integration Server, the right part of the window displays information about the protected infrastructure and the use of protection profiles.
In the properties of the main policy, which determines the protection settings for a virtual infrastructure managed by one VMware vCenter Server, you can select the method for assigning file protection settings in the drop-down list located in the upper part of the window:
- Use virtual infrastructure tree. If this option is selected, the table displays a tree of VMware virtual infrastructure objects and protection profiles assigned to the virtual infrastructure objects.
- Use NSX Vendor Templates / NSX Profile Configurations. If this option is selected, the data displayed in the table depends on the virtual infrastructure where Kaspersky Security is deployed:
- If the application is deployed in the infrastructure managed by VMware NSX-T Manager, the table displays the NSX Vendor Templates configured in the protected infrastructure and the protection profiles mapped to them.
- If the application is deployed in the infrastructure managed by VMware NSX-V Manager, the table displays the NSX Profile Configurations configured in the protected infrastructure and the protection profiles mapped to them.
If the entire protected infrastructure is selected as the protected infrastructure in the main policy properties, you cannot use NSX Vendor Templates or NSX Profile Configurations to assign the file protection settings. Use virtual infrastructure tree option is selected in the drop-down list.
Page top
Information about the assignment of file protection settings using the virtual infrastructure tree
If the Use virtual infrastructure tree option is selected in the drop-down list located in the upper part of the window, the Protected infrastructure section displays a tree of objects of the VMware virtual infrastructure and the protection profiles assigned to objects of the virtual infrastructure.
The protected infrastructure is displayed as a tree of items:
- In the properties of a policy for one VMware vCenter Server, you will see the protected infrastructure of the "VMware vCenter Agentless" cluster: the root element is the VMware vCenter Server, and under it you will see Datacenter objects, VMware clusters, resource pools, vApp objects, and virtual machines.
- In the properties of a policy for the entire protected infrastructure, the root element is the Integration Server, and under it you will see all VMware vCenter Servers, each containing the protected infrastructure of the "VMware vCenter Agentless" cluster corresponding to this VMware vCenter Server.
- In the properties of the tenant policy located in the Managed devices folder of the virtual Administration Server, the root element is the "Cloud Director organization" object that combines all virtual Datacenters of the tenant. Under this object there are all virtual machines within the Cloud Director organization that corresponds to this virtual Administration Server.
If the virtual infrastructure contains two or more virtual machines with the same ID (vmID), only one virtual machine appears in the object tree. If this virtual machine has been assigned a protection profile, the settings of this protection profile are applied to all virtual machines that have the same ID (vmID).
The Protection profile column displays information about the assignment of protection profiles to objects of the protected infrastructure. Kaspersky Security uses the settings of assigned protection profiles when protecting virtual machines.
The Protection profile field may contain the following values:
- Name of the protection profile that is assigned to a virtual machine or to a VMware virtual infrastructure object.
- Protection profile name, inherited from the parent object and displayed as "
inherited: <N>", where <N> – is the name of the inherited protection profile. (Not assigned)orinherited: (Not assigned)– if the protection profile was not assigned or its assignment has been canceled (the Do not use protection profile value was selected). Virtual machines or virtual infrastructure objects that have no assigned protection profile are excluded from protection.
Information about assigning the file protection settings using NSX Vendor Template (in infrastructure managed by VMware NSX-T Manager)
If the Use NSX Vendor Templates / NSX Profile Configurations option is selected in the drop-down list at the top of the window and the application is deployed in the infrastructure managed by VMware NSX-T Manager, the following information is displayed in the Protected infrastructure section:
- Name of the default protection profile. This protection profile is automatically assigned to NSX Vendor Templates for which the mapping to protection profile has not been set yet or has been canceled as a result of deleting that protection profile. As a result, the default protection profile settings are used to protect virtual machines managed by the NSX Policy that uses the NSX Service Profile based on this NSX Vendor Template.
Main protection profile is set as the default protection profile. If you canceled the use of default protection profile, the
Do not use protection profilevalue is displayed. - The table of correspondence between the protection profiles and NSX Vendor Templates configured in the protected infrastructure.
The correspondence table displays the following information:
- The NSX Vendor Template / NSX Profile Configuration column displays the name of the NSX Vendor Template. If several NSX Vendor Templates with the same identifier (vendor_template_id) are created in the virtual infrastructure, their names are separated by comma. Kaspersky Security processes NSX Vendor Templates with the same ID as one NSX Vendor Template.
- If a mapping is set between the protection profile and the NSX Vendor Template displayed in the NSX Vendor Template / NSX Profile Configuration column, the Protection profile column displays the name of the protection profile. Kaspersky Security uses the settings of the specified protection profile to protect virtual machines managed by the NSX Policy that uses the NSX Service Profile based on this NSX Vendor Template.
- If mapping between the protection profile and the NSX Vendor Template displayed in the NSX Vendor Template / NSX Profile Configuration column is canceled, the Protection profile column displays the
(Not assigned)value. If no security profile is mapped to an NSX Vendor Template, the virtual machines that are managed by the NSX policy which uses the NSX Service Profile based on this NSX Vendor Template are excluded from protection.
Information about assigning the file protection settings using NSX Profile Configuration (in infrastructure managed by VMware NSX-V Manager)
If the Use NSX Vendor Templates / NSX Profile Configurations option is selected in the drop-down list at the top of the window and the application is deployed in the infrastructure managed by VMware NSX-V Manager, the following information is displayed in the Protected infrastructure section:
- Name of the default protection profile. This protection profile is automatically assigned to those NSX Profile Configurations, for which mapping to the protection profile has not been set yet, or has been canceled as a result of deleting a protection profile. As a result, the default protection profile settings are used to protect virtual machines managed by the NSX Policy that uses this NSX Profile Configuration or NSX Service Profile based on it.
Main protection profile is set as the default protection profile. If you canceled the use of default protection profile, the
Do not use protection profilevalue is displayed. - The table of correspondence between the protection profiles and NSX Profile Configurations configured in the protected infrastructure.
The correspondence table displays the following information:
- The NSX Vendor Template / NSX Profile Configuration column displays the name of the NSX Profile Configuration. If several NSX Profile Configurations with the same Configuration ID are created in the virtual infrastructure, their names are separated by comma. Kaspersky Security processes the NSX Profile Configurations with the same ID as one NSX Configuration Profile.
- If a mapping is set between the protection profile and the NSX Profile Configuration displayed in the NSX Vendor Template / NSX Profile Configuration column, the Protection profile column displays the name of the protection profile. Kaspersky Security uses the settings of the specified protection profile to protect virtual machines managed by the NSX Policy that uses this NSX Profile Configuration or NSX Service Profile based on it.
- If mapping between the protection profile and the NSX Profile Configuration displayed in the NSX Vendor Template / NSX Profile Configuration column is canceled, the Protection profile column displays the
(Not assigned)value. If no protection profile is mapped to an NSX Profile Configuration, the virtual machines managed by the NSX Policy that uses this NSX Profile Configuration or NSX Service Profile based on it are excluded from protection.
Assigning protection profiles to virtual infrastructure objects
To assign a protection profile to a virtual machine or to another VMware virtual infrastructure object:
- In the properties of the policy whose scope includes the relevant virtual machines or other VMware virtual infrastructure objects, select the Protected infrastructure subsection.
- If you are configuring a policy for one VMware vCenter Server, make sure that the Use virtual infrastructure tree option is selected in the drop-down list located in the upper part of the window. This value is selected by default.
- Select one or multiple objects of the virtual infrastructure in the table.
If you want to assign the same protection profile to multiple virtual machines that are child objects of a single virtual infrastructure object, select this object in the table. You can simultaneously select multiple virtual machines or other virtual infrastructure objects in the table by holding down the CTRL key.
- Click the Select protection profile button.
The Selecting protection profile window opens.
- Select one of the following options:
- Inherit parent protection profile: <name>. Select this option if you want to assign the protection profile of the parent object to a virtual machine or other virtual infrastructure object.
- Use protection profile. Select this option and indicate the protection profile name in the drop-down list to assign this protection profile to a virtual machine or other virtual infrastructure object. The list contains the main protection profile and all additional protection profiles that you configured in this policy.
- If the selected virtual infrastructure object has child objects, the protection profile is assigned to the object and to all of its child objects, including objects that have been assigned their own protection profile or that have been excluded from protection. If you want to assign the protection profile only to the selected virtual infrastructure object and to its child objects that have not been assigned their own protection profile and that have not been excluded from protection, clear the Apply to all child objects check box.
- Click OK.
The Selecting protection profile window will close, and the assigned protection profile will be displayed in the table in the Protected infrastructure subsection.
- In the Properties: <Policy name> window, click OK.
Assigning protection profile using NSX Vendor Templates / NSX Profile Configurations
In a virtual infrastructure managed by one VMware vCenter Server, you can assign protection settings to the virtual machines depending on the type of VMware NSX Manager you use (VMware NSX-T Manager or VMware NSX-V Manager) as follows:
- If Kaspersky Security is deployed in the infrastructure managed by VMware NSX-T Manager, you can use NSX Vendor Templates). To do so, perform the following actions:
- Create an NSX Service Profile for the Kaspersky File Antimalware Protection service based on the NSX Vendor Template.
By default, one NSX Vendor Template is available – Default Configuration. It is created automatically as a result of registering the Kaspersky File Antimalware Protection service. To create other NSX Vendor Templates, use the NSX REST API. For more information refer to VMware documentation.
- Create an NSX policy for File Threat Protection and configure the Endpoint Protection Rule in the policy. In the rule settings, specify the NSX group that includes the protected virtual machines, and the NSX Service Profile created before.
NSX Service Profiles and NSX Policies are created using VMware NSX-T Manager. For more information refer to VMware documentation.
- Map the protection profile to the NSX Vendor Template in Kaspersky Security Center Administration Console in Kaspersky Security policy properties. The protection profile settings are used to protect virtual machines managed by the NSX Policy that uses the NSX Service Profile based on the NSX Vendor Template.
- Create an NSX Service Profile for the Kaspersky File Antimalware Protection service based on the NSX Vendor Template.
- If Kaspersky Security is deployed in the infrastructure managed by VMware NSX-V Manager, you can use NSX Profile Configurations. To do so, perform the following actions:
- Create NSX Profile Configuration.
In the infrastructure based on VMware vSphere 6.5, you can create NSX Profile Configurations in VMware vSphere Client console in the properties of Kaspersky File Antimalware Protection service (in the Networking & Security → Service Definitions section, on the Services tab, the Edit Settings action) on the Manage → Profile Configurations tab. In the infrastructure based on VMware vSphere 6.7 and later, the NSX REST API is used to create NSX Profile Configurations. For more information refer to VMware documentation.
- Create an NSX Policy that uses this NSX Profile Configuration or the NSX Service Profile based on this NSX Profile Configuration, and apply this policy to the virtual machine group.
- Map the protection profile to the NSX Profile Configuration in Kaspersky Security Center Administration Console in Kaspersky Security policy properties. The protection profile settings are used to protect virtual machines managed by the NSX Policy that uses this NSX Profile Configuration or NSX Service Profile based on it.
- Create NSX Profile Configuration.
To map a protection profile to NSX Vendor Template or NSX Profile Configuration:
- In the policy properties for one VMware vCenter Server, select the Protected infrastructure subsection.
- In the drop-down list located in the upper part of the window, select the Use NSX Vendor Templates / NSX Profile Configurations option.
- In the table, select the NSX Vendor Template / NSX Profile Configuration for which you want to set mapping and double-click it to open the Selecting protection profile window.
- In the window that opens, select the Use protection profile option. In the drop-down list, select the name of the protection profile to be mapped to the NSX Vendor Template / NSX Profile Configuration. The list contains the main protection profile and all additional protection profiles that you configured in this policy.
- Click OK.
The Selecting protection profile window will close, and the assigned mapping will be displayed in the table in the Protected infrastructure subsection.
- In the Properties: <Policy name> window, click OK.
You can configure to use the default protection profile. This protection profile can be assigned by default to the NSX Vendor Templates / NSX Profile Configurations, for which the mapping to protection profile has not been set yet, or has been canceled as a result of deleting a protection profile.
To set the usage of the default protection profile:
- In the policy properties for one VMware vCenter Server, select the Protected infrastructure subsection.
- In the drop-down list located in the upper part of the window, select the Use NSX Vendor Templates / NSX Profile Configurations option.
- Click the Change button located on the right of the default protection profile name.
The Selecting protection profile window opens.
- If you want to change the default protection profile, select the Use protection profile option and indicate the name of the protection profile in the drop-down list. The list contains the main protection profile and all additional protection profiles that you configured in this policy.
- If you want to cancel use of the default protection profile, select the Do not use protection profile option.
- Click OK.
The Selecting protection profile window will close, and the name of the selected protection profile will be displayed in the Protected infrastructure subsection in the upper part of the window.
- In the Properties: <Policy name> window, click OK.
Changing the protected infrastructure for a policy
You can change the protected infrastructure selected for a policy. This may be required, for example, if you want to copy the policy from one administration group to another. In this case, you need to change the protected infrastructure for the copied policy so that the protected infrastructure matches the location of the policy:
- If the policy is located in the group that contains the "VMware vCenter Agentless" cluster, the VMware vCenter Server corresponding to this cluster must be selected as the protected infrastructure for the policy.
- If the policy is located in the Managed devices folder or in the group that contains the "VMware Cloud Director Agentless" cluster, the entire protected infrastructure must be selected as the protected infrastructure for the policy.
To change the protected infrastructure selected for a policy:
- In the properties of the policy whose protected infrastructure you want to change, select the Protected infrastructure subsection.
- In the right part of the window, click the Change button.
The Connection to Integration Server window opens. The window displays the settings for connecting to the Integration Server whose address is indicated in the lower part of the window in the Protected infrastructure subsection.
- If required, edit the connection settings and click OK.
It is recommended to specify the Integration Server address in the <address:port> format.
- After the connection is established, the Choice of protected infrastructure window opens. Select one of the following options:
- If you are configuring a policy located in an administration group that contains the "VMware vCenter Agentless" cluster, select the One VMware vCenter Server option. Then select the listed VMware vCenter Server corresponding to this "VMware vCenter Agentless" cluster.
If the selected VMware vCenter Server does not correspond to the "VMware vCenter Agentless" cluster whose group contains the policy, Kaspersky Security does not protect virtual machines.
- If you are configuring a policy located in any other folder or administration group, select the Entire protected infrastructure option.
- If you are configuring a policy located in an administration group that contains the "VMware vCenter Agentless" cluster, select the One VMware vCenter Server option. Then select the listed VMware vCenter Server corresponding to this "VMware vCenter Agentless" cluster.
- Click OK in the Choice of protected infrastructure window and, in the opened window, confirm the change to the protected infrastructure.
- In the Properties: <Policy name> window, click OK.
Disabling file threat protection for virtual infrastructure objects
You can disable file threat protection for virtual infrastructure objects in the following ways:
- If the file protection settings were defined by assigning protection profiles to virtual infrastructure objects, you can cancel assignment of the protection profile to a virtual machine or other virtual infrastructure object. Virtual machines that have no protection profile assigned are excluded from protection.
- If file protection settings are defined using NSX Vendor Templates / NSX Profile Configurations, you can cancel mapping between the protection profile and the NSX Vendor Template / NSX Profile Configuration. The following virtual machines will be excluded from protection:
- Virtual machines managed by the NSX Policy that uses the NSX Service Profile based on this NSX Vendor Template (in the infrastructure managed by VMware NSX-T Manager).
- Virtual machines managed by the NSX Policy that uses this NSX Profile Configuration or NSX Service Profile, based on it (in the infrastructure managed by VMware NSX-V Manager).
- You can disable protection for all virtual machines that are within Kaspersky Security policy scope.
If the file protection settings were defined by assigning protection profiles to virtual infrastructure objects, you can disable protection for one or more virtual machines by doing the following:
- In the properties of the policy whose scope includes the relevant virtual machines, select the Protected infrastructure subsection.
- If you are configuring a policy for one VMware vCenter Server, make sure that the Use virtual infrastructure tree option is selected in the drop-down list located in the upper part of the window.
- Select one or multiple objects of the virtual infrastructure in the Name column.
To disable protection for multiple virtual machines that are child objects of a single virtual infrastructure object, select that object. You can simultaneously select multiple virtual machines or other virtual infrastructure objects in the table by holding down the CTRL key.
- Click the Select protection profile button.
The Selecting protection profile window opens.
- Select the Do not use protection profile option.
- If the selected virtual infrastructure object has child objects, by default protection will be disabled for the selected object and for all its child objects, including objects that have been assigned their own protection profile. If you want to disable protection only for the selected virtual infrastructure object and for those of its child objects that inherit the protection profile, clear the Apply to all child objects check box.
Protection will be removed from the parent object and from those of its child objects that inherited their protection profile from the parent object. The application will continue protecting the child objects that have been assigned their own protection profile.
- Click OK.
The Selecting protection profile window closes. In the table in the Protected infrastructure subsection, the value shown in the Protection profile column for objects that have been excluded from protection is
(Not assigned). - In the Properties: <Policy name> window, click OK.
If the file protection settings are defined using NSX Vendor Templates / NSX Profile Configurations, you can disable virtual machine protection by doing the following:
- In the properties of the policy whose scope includes the relevant virtual machines, select the Protected infrastructure subsection.
- In the drop-down list located in the upper part of the window, select the Use NSX Vendor Templates / NSX Profile Configurations option.
- In the table, select NSX Vendor Template or NSX Profile Configuration, depending on the type of VMware NSX Manager you use (VMware NSX-T Manager or VMware NSX-V Manager):
- If Kaspersky Security is deployed in the infrastructure managed by VMware NSX-T Manager, select the NSX Vendor Template, on the basis of which the NSX Service Profile is created, that is used in the NSX Policy that manages the virtual machines.
- If Kaspersky Security is deployed in the infrastructure managed by VMware NSX-V Manager, select the NSX Profile Configuration used in the NSX Policy that manages the virtual machines.
- Double-click to open the Selecting protection profile window.
- In the opened window, select the Do not use protection profile option.
- Click OK.
The Selecting protection profile window closes. In the table in the Protected infrastructure subsection, the
(Not assigned)value is displayed in the Protection profile column for the selected NSX Vendor Template / NSX Profile Configuration. - In the Properties: <Policy name> window, click OK.
To disable protection for all virtual machines that are managed by Kaspersky Security policy:
- In the properties of the policy whose scope includes the relevant virtual machines, select the Protected infrastructure subsection.
- Clear the Use File Threat Protection check box located in the upper part of the window.
- In the Properties: <Policy name> window, click OK.
Scanning virtual machines
In this section, SVM refers to an SVM with the File Threat Protection component.
An SVM with the File Threat Protection component lets you perform virus scan of the files on virtual machines on the VMware ESXi hypervisor. Virtual machine files need to be scanned regularly with new anti-virus databases to prevent the spread of malicious objects.
The settings that SVMs apply while scanning virtual machines are defined by using scan tasks. Kaspersky Security uses the following scan tasks:
- Full Scan. This task lets you run a virus scan on the files of all virtual machines within the task scope. The scope of a task depends on where the task is located within the hierarchy of administration groups of Kaspersky Security Center, and depends on the Kaspersky Security administration plug-in that you use to create the task.
A Full Scan task is automatically created after installing the Kaspersky Security main administration plug-in in the Managed devices folder of the main Administration Server of Kaspersky Security Center. This task lets you perform virus scan of all virtual machines that are protected by all SVMs and are not part of a Cloud Director organization. You can manually run this task.
- Custom Scan. This task lets you run a virus scan on files of specified virtual machines from the task scope. The scope of a task depends on where the task is located within the hierarchy of administration groups of Kaspersky Security Center, and depends on the Kaspersky Security administration plug-in that you use to create the task. In the selected scope, you need to indicate the virtual machines that need to be scanned. You can specify individual virtual machines, VMware virtual infrastructure objects of a higher hierarchy level, or NSX Groups that include the desired virtual machines.
You can start scan tasks manually, define a scan task run schedule, and view information about the progress and results of tasks.
Kaspersky Security scans only virtual machines that meet all the conditions for scanning virtual machines.
If viruses or other malware are detected in a file during scanning of virtual machine files, Kaspersky Security assigns the Infected status to the file. If the scan cannot conclusively determine whether or not the file is infected (the file may contain a code sequence that is characteristic of viruses or other malware, or contain modified code from a known virus), Kaspersky Security also assigns the Infected status to the file.
The Signature analysis and machine learning scan method is used when scanning virtual machines. Scanning using signature analysis and machine learning provides the minimum acceptable security level. Kaspersky Security uses application databases containing information about known threats and about the methods to neutralize them. Based on the recommendations of Kaspersky experts, the Signature analysis and machine learning scan method is always enabled.
When scanning virtual machines, Heuristic analysis is used. This is a technology designed for detecting threats that cannot be detected with the aid of Kaspersky application databases. Heuristic analysis detects files that could be infected with malware for which there are not yet any database signatures or infected with a new variety of a known virus. Files in which a threat is detected during heuristic analysis are marked as Infected.
The deep heuristic analysis level is always used during virtual machine scanning irrespective of the selected security level. Heuristic Analyzer performs the maximum number of instructions in executable file, which raises the probability of threat detection.
If an application that collects information and sends it to be processed is installed on a virtual machine, Kaspersky Security may classify this application as malware. To avoid this, you can exclude the application from the scan scope.
Special considerations for scanning virtual machines:
- When performing scan tasks, Kaspersky Security can scan powered-off virtual machines that have the following file systems: NTFS, FAT32, EXT2, EXT3, EXT4, XFS, BTRFS.
- When performing scan tasks, Kaspersky Security can scan virtual machine templates.
- When scanning virtual machines running Windows operating systems, Kaspersky Security does not scan files in network folders. Kaspersky Security is able to scan files in network folders only when the user or an application accesses those files. If you want to regularly scan files in network folders, you must configure a scan task for virtual machines that have open network access to files and folders, and include those files and folders into the task scan scope.
When scanning virtual machines running Linux operating systems, Kaspersky Security scans files in CIFS network file systems if the directories in which the CIFS network file systems are mounted are included in the task scan scope. Scanning files in NFS network file systems is not supported.
- During execution of the scan task, one SVM with the File Threat Protection component simultaneously scans files on no more than four virtual machines.
Information on the scan results and on events that occurred during scan tasks execution is logged in a report.
After a scan task finishes, you are advised to view the list of files that are blocked as a result of the scan task and manage them manually. For example, you can save file copies in a location that is inaccessible for a virtual machine user or delete the files. You must first exclude the blocked files from protection in the settings of the protection profile assigned to the virtual machines, or temporarily disable protection of the virtual machines on which these files were blocked. You can view the details of blocked files in the threats report or by filtering events by the File blocked event (please refer to the Kaspersky Security Center documentation).
Conditions for anti-virus scan of virtual machines
Kaspersky Security scans virtual machines that meet the following conditions:
- For powered-off virtual machines: NTFS, FAT32, EXT2, EXT3, EXT4, XFS or BTRFS file system is used on the virtual machine.
- For powered-on virtual machines:
- The Guest Introspection Thin Agent component is installed on the virtual machine. The NSX File Introspection Driver acting as the Guest Introspection Thin Agent component must be running on the virtual machines with Windows operating system. It starts automatically after VMware Tools are installed and the operating system is restarted.
- The virtual machine is included in the NSX Group managed by the NSX Policy which uses the file system protection service (Kaspersky File Antimalware Protection).
Kaspersky Security can scan powered-off virtual machines with the NTFS, FAT32, EXT2, EXT3, EXT4, XFS, or BTRFS file system according to the scan settings, regardless of whether or not those virtual machines are included in the NSX Group.
If even one of the listed conditions is not fulfilled, Kaspersky Security does not scan the virtual machine.
Kaspersky Security also does not scan a virtual machine when one of the following conditions is met:
- The virtual machine is added to the list of VMware virtual infrastructure objects (Inventory) or the virtual machine is created on the VMware ESXi hypervisor after the scan task was started.
- The virtual machine was removed from the list of VMware virtual infrastructure objects (Inventory) before the scan of this virtual machine started.
- The virtual machine included in the scope of a running scan task migrates to the VMware ESXi hypervisor on which the scan task was not started.
Creating a full scan task
To create a full scan task:
- In the Kaspersky Security Center Administration Console, select the folder or administration group in which you want to create the task.
If you selected the Managed devices folder or an administration group containing a KSC cluster, select the Tasks tab in the workspace.
- Click the New task button to start the New Task Wizard.
- At the first step of the Wizard, select the type of task.
- If you want to create a task for scanning virtual machines that are not part of a Cloud Director organization, select Kaspersky Security for Virtualization 6.1 Agentless → Full Scan.
- If you want to create a task for scanning virtual machines of tenants, select Kaspersky Security for Virtualization 6.1 Agentless (for tenants) → Full Scan.
Proceed to the next step of the New Task Wizard.
- Configure the settings for scanning virtual machines.
Proceed to the next step of the New Task Wizard.
- If necessary, specify the scan scope of the task: indicate the locations and extensions of the files of virtual machines that need to be scanned or excluded from scanning during a scan task.
Proceed to the next step of the New Task Wizard.
- If you started the New Task Wizard from the Tasks folder, specify the method for selecting the SVMs on which the task must be run:
- Click the Select network devices detected by Administration Server button if you want to select SVMs from the list of devices detected by Administration Server while polling the local area network.
- Click the Specify device addresses manually or import from list button if you want to specify the addresses of SVMs manually or import the list of SVMs from a file. Addresses are imported from a TXT file with a list of addresses of SVMs, with each address in a separate row.
If you import a list of addresses from file or specify the addresses manually and the SVMs are identified by name, the list of SVMs for which the task is being created can be supplemented only with those SVMs whose details have already been included in the Administration Server database upon connection of SVMs or following a poll of the local area network.
- Click the Assign task to a device selection button if the task must be run on all SVMs that are part of a selection based on a predefined criterion. For details on creating a selection of devices, please refer to the Kaspersky Security Center documentation.
- Click the Assign task to an administration group button if the task must be run on all SVMs within an administration group.
Depending on the specified method of SVM selection, perform one of the following operations in the window that opens:
- In the list of detected devices, specify the SVMs on which the task will be run. To do so, select check boxes in the list on the left of the name of the relevant SVMs.
- Click the Add or Add IP range button and specify the addresses of SVMs.
- Click the Import button, and in the window that opens select the TXT file containing the list of SVM addresses.
- Click the Browse button and in the opened window specify the name of the selection containing the SVMs on which the task will be run.
- Click the Browse button and select an administration group or manually enter the name of an administration group.
Proceed to the next step of the New Task Wizard.
- Configure the task run schedule and proceed to the next step of the Wizard.
- In the Name field, enter the task name and proceed to the next step of the Wizard.
- If you want the task to start as soon as the New Task Wizard finishes, select the Run task when the wizard is complete check box.
Finish the wizard.
The created custom scan task appears in the list of tasks. If you configured a task start schedule in the Task start schedule settings window, the task is started according to this schedule. You can also run the task manually at any time.
Page top
Creating a custom scan task by using the main plug-in
A Custom Scan task created using the Kaspersky Security main administration plug-in lets you scan virtual machines that are managed by one VMware vCenter Server and that are not part of a Cloud Director organization.
To create a Custom Scan task for virtual machines that are not part of a Cloud Director organization:
- In the Kaspersky Security Center Administration Console, select the administration group in which you want to create the task.
Due to the specifics of configuring the scope of a Custom Scan task, it is recommended to create Custom Scan tasks in administration groups that contain KSC clusters, which means group tasks. If a Custom Scan task is configured for one or more SVMs (meaning a local or global task), correct configuration of the task scope cannot be guaranteed.
- In the workspace, select the Tasks tab and click the New task button to start the New Task Wizard.
- At the first step of the Wizard, select the task of the following type: Kaspersky Security for Virtualization 6.1 Agentless → Custom Scan.
Proceed to the next step of the New Task Wizard.
- The Wizard establishes a connection to the Integration Server to receive information about the VMware virtual infrastructure.
It is recommended to specify the Integration Server address in the <address:port> format.
If the computer hosting the Administration Console of Kaspersky Security Center belongs to a domain or your domain user account belongs to the KLAdmins group or to the group of local administrators on the computer hosting the Integration Server, your domain user account is used by default to connect to the Integration Server. The Use domain account check box is selected by default.
If you want to use the account of an Integration Server administrator (admin), clear the Use domain account check box and enter the administrator password in the Password field.
If the computer hosting the Kaspersky Security Center Administration Console does not belong to a domain, or the computer belongs to a domain but your domain account does not belong to the KLAdmins group or to the group of local administrators on the computer hosting the Integration Server, you can use only the account of the Integration Server administrator (admin) to connect to the Integration Server. Enter the administrator password in the Password field.
If the connection to the Integration Server is established using the Integration Server administrator account (admin), you can save the administrator password. To do so, select the Save password check box. The saved administrator password will be used the next time a connection is established with this Integration Server. If you clear the check box selected during the previous connection to the Integration Server, Kaspersky Security removes the previously saved password of the Integration Server administrator.
The Save password check box may be unavailable if Windows updates KB 2992611 and/or KB 3000850 have been installed on the computer hosting the Kaspersky Security Center Administration Console. To restore the capability to save the administrator password, you can uninstall these Windows updates or modify the operating system registry as described in the Knowledge Base.
Proceed to the next step of the New Task Wizard.
The Task Wizard verifies the SSL certificate received from the Integration Server. If the received certificate contains an error, the Certificate verification window containing the error message opens. The SSL certificate is used to establish a secure connection to the Integration Server. If there are problems with the SSL certificate, it is recommended to make sure that the utilized data transfer channel is secure. To view information on the received certificate, click the View the received certificate button in the window containing the error message. You can install the certificate you received as a trusted certificate to avoid receiving a certificate error message at the next connection to the Integration Server. To do so, select the Install received certificate and stop showing warnings for <Integration Server address> check box.
To continue connecting, click the Continue button in the Certificate verification window. If you selected the Install received certificate and stop showing warnings for <Integration Server address> check box, the received certificate is saved in the operating system registry on the computer where the Kaspersky Security Center Administration Console is installed. The application also checks the previously installed trusted certificate for the Integration Server. If the received certificate does not match the previously installed certificate, a window opens to confirm replacement of the previously installed certificate. To replace the previously installed certificate with the certificate received from the Integration Server and continue connecting, click the Yes button in this window.
After the connection is established, the List of VMware vCenter Servers window opens. Select the VMware vCenter Server that manages the virtual machines that you want to scan, and click OK.
- At this step of the Wizard, select the task scope.
Proceed to the next step of the New Task Wizard.
- Configure the settings for scanning virtual machines.
Proceed to the next step of the New Task Wizard.
- If necessary, specify the scan scope of the task: indicate the locations and extensions of the files of virtual machines that need to be scanned or excluded from scanning during a scan task.
Proceed to the next step of the New Task Wizard.
- Configure the task run schedule and proceed to the next step of the New Task Wizard.
- In the Name field, enter the task name and proceed to the next step of the New Task Wizard.
- If you want the task to start as soon as the New Task Wizard finishes, select the Run task when the wizard is complete check box.
Finish the wizard.
The created custom scan task appears in the list of tasks. If you configured a task start schedule in the Task start schedule settings window, the task is started according to this schedule. You can also run the task manually at any time.
If a VMware vCenter Server is replaced or reinstalled, all previously created custom scan tasks will no longer work. If you want to use a previously created custom scan task, you must reconnect to the VMware vCenter Server in the properties of this task.
Page top
Creating a custom scan task by using the tenant plug-in
A Custom Scan task for virtual machines of tenants is used only if the application is operating in multitenancy mode. A Custom Scan task for virtual machines of tenants can be created only on a virtual Administration Server of Kaspersky Security Center.
To create a Custom Scan task for virtual machines of tenants:
- In the Kaspersky Security Center Administration Console, select the Managed devices folder of the virtual Administration Server corresponding to the tenant.
- In the workspace, select the Tasks tab and click the New task button to start the New Task Wizard.
- At the first step of the Wizard, select the following type of task: Kaspersky Security for Virtualization 6.1 Agentless (for tenants) → Custom Scan.
Proceed to the next step of the New Task Wizard.
- Specify the Integration Server address and proceed to the next step of the New Task Wizard.
It is recommended to specify the Integration Server address in the <address:port> format.
The Task Wizard verifies the SSL certificate received from the Integration Server. If the received certificate contains an error, the Certificate verification window containing the error message opens. The SSL certificate is used to establish a secure connection to the Integration Server. If there are problems with the SSL certificate, it is recommended to make sure that the utilized data transfer channel is secure. To view information on the received certificate, click the View the received certificate button in the window containing the error message. You can install the certificate you received as a trusted certificate to avoid receiving a certificate error message at the next connection to the Integration Server. To do so, select the Install received certificate and stop showing warnings for <Integration Server address> check box.
To continue connecting, click the Continue button in the Certificate verification window. If you selected the Install received certificate and stop showing warnings for <Integration Server address> check box, the received certificate is saved in the operating system registry on the computer where the Kaspersky Security Center Administration Console is installed. The application also checks the previously installed trusted certificate for the Integration Server. If the received certificate does not match the previously installed certificate, a window opens to confirm replacement of the previously installed certificate. To replace the previously installed certificate with the certificate received from the Integration Server and continue connecting, click the Yes button in this window.
- Select the task scope: select the check boxes for those virtual machines that you want to scan as part of the scan task being created. You can specify individual virtual machines or their combinations.
If the virtual infrastructure contains two or more virtual machines with the same ID (vmID), only one virtual machine appears in the object tree. If this virtual machine is selected to be scanned using the custom scan task, the task will be performed on all virtual machines that have the same ID (vmID).
Proceed to the next step of the New Task Wizard.
- Configure the settings for scanning virtual machines.
Proceed to the next step of the New Task Wizard.
- If necessary, specify the scan scope of the task: indicate the locations and extensions of the files of virtual machines that need to be scanned or excluded from scanning during a scan task.
Proceed to the next step of the New Task Wizard.
- Configure the task run schedule and proceed to the next step of the New Task Wizard.
- In the Name field, enter the task name and proceed to the next step of the New Task Wizard.
- If you want the task to start as soon as the New Task Wizard finishes, select the Run task when the wizard is complete check box.
Finish the wizard.
The created custom scan task appears in the list of tasks. If you configured a task start schedule in the Task start schedule settings window, the task is started according to this schedule. You can also run the task manually at any time.
Page top
Configuring virtual machine scan settings in a scan task
You can configure the virtual machine scan settings while creating the task (the Configure scan settings step) or in the task properties after its creation (the Scan settings section).
To configure the virtual machine scan settings:
- Select the security level at which Kaspersky Security scans virtual machines. To do so, in the Security level section, perform one of the following actions:
- If you want to install one of the pre-installed security levels (High, Recommended, or Low), use the slider to select one.
- To change the security level to Recommended, click the Default button.
- If you want to configure the security level on your own, click the Settings button. In the Security level settings window that opens:
- In the Scanning archives and compound files section, specify the values of the following settings:
- In the Performance section, specify the values of the following settings:
- In the Objects to detect section, click the Settings button. In the Objects to detect window that opens, specify the values of the following settings:
Kaspersky Security always scans virtual machine files for viruses, worms, and Trojans. That is why the Viruses and worms and Trojans settings in the Malware section cannot be changed.
- In the Objects to detect window, click OK.
- In the Security level settings window, click OK.
If you have changed security level settings, the application creates a custom security level. The name of the security level in the Security level section changes to Custom.
- In the Scan powered-on virtual machines section, configure the settings for scanning virtual machines that are powered on while a task is running:
- In the Scan powered-off virtual machines and virtual machine templates section, configure the settings for scanning virtual machines that are powered off or paused while a task is running, as well as for scanning virtual machine templates:
- In the Stop scan section, choose one of the following options:
- Save the changes by clicking Next (in the New Task Wizard) or Apply (in the task properties).
Configuring the scan scope in a scan task
The scan scope refers to the locations and extensions of files of virtual machines that are scanned by Kaspersky Security when it performs a scan task.
If a scan scope has not been configured, Kaspersky Security scans all files of virtual machines.
When scanning virtual machines running Windows operating systems, Kaspersky Security does not scan files in network folders. Kaspersky Security is able to scan files in network folders only when the user or an application accesses those files. If you want to scan files in network folders regularly, you must create a task for scanning virtual machines that have shared files and folders, and include those files and folders into the scan task scope.
When scanning virtual machines running Linux operating systems, Kaspersky Security scans files in CIFS network file systems if the directories in which the CIFS network file systems are mounted are included in the task scan scope. Scanning files in NFS network file systems is not supported.
You can define the scan scope of a task while creating the task (the Defining the scan scope step) or in the task properties after it is created (the Scan scope section).
To configure the scan scope of the task:
- Select one of the following options:
- Scan all files and folders except for those specified
- Scan specified files and folders only
- If you selected the Scan all files and folders except for those specified option, you can create a list of objects that must be excluded from the scan scope by using the Add, Change and Delete buttons.
You can exclude objects of the following types from the scan scope:
- Folders. Files stored in folders at the specified path are excluded from the scan scope. For each folder, you can specify whether to apply the exclusion to subfolders.
The
*and?characters in the paths to excluded folders are not supported. The folder path must be absolute. - Files by mask. Files located at the specified path, or files matching the specified mask are excluded from the scan scope.
Kaspersky Security ignores the case of characters in paths to files and folders that are excluded from the scan scope.
You can save a configured list of exclusions to file using the Export button or load a previously saved list of exclusions from file using the Import button. To import or export a list of exclusions, you can use a file in XML format. You can also import a list of exclusions from a file in DAT format. Using a file in DAT format, you can import a list of exclusions that was generated in other Kaspersky applications.
The application distribution kit includes the microsoft_file_exclusions.xml file with the list of exclusions recommended by Microsoft Corporation (see the Microsoft website for the list of exclusions recommended by Microsoft). The microsoft_file_exclusions.xml file is located in the setup folder of the Kaspersky Security administration plug-in on the computer on which the Kaspersky Security Center Administration Console is installed. You can import this file into exclusions of the scan task. After the import is completed, Kaspersky Security does not scan the objects recommended by Microsoft when it performs a scan task. You can view and edit the list of these objects in the Files and folders table.
If your exclusions list uses an environment variable that has multiple values depending on the bit rate of the application that uses it, in 64-bit Windows operating systems, objects corresponding to all values of the variable are excluded from the scan scope. For example, if you use the %ProgramFiles% variable, objects located in the C:\Program Files folder and in the C:\Program Files (x86) folder are excluded from the scan scope.
- Folders. Files stored in folders at the specified path are excluded from the scan scope. For each folder, you can specify whether to apply the exclusion to subfolders.
- If you selected the Scan all files and folders except for those specified option, in the File extensions section you can specify the extensions of files that should be included in the scan scope or excluded from the scan scope.
To do so, select one of the options below:
- Scan all except files with the following extensions. In the text box, specify a list of extensions of files to not scan during a scan task. Kaspersky Security ignores the case of characters in the extensions of files that are to be excluded from the scan scope.
- Scan files with the following extensions only. In the text box, specify a list of extensions of files to scan during a scan task. When scanning virtual machines running Linux operating systems, Kaspersky Security is case sensitive regarding the characters in the extensions of files to be included in the scan scope. When scanning virtual machines running Windows operating systems, the application ignores the cases of characters in file extensions.
You can type file extensions in the field by separating them with a blank space, or by typing each extension in a new line. File extensions may contain any characters except
. * | \ : " < > ? /. If an extension includes a blank space, the extension should be typed inside quotation marks:"doc x".If you have selected Scan files with the following extensions only in the drop-down list but have not specified the extensions of files to scan, Kaspersky Security scans all files.
Folders excluded from the scan have a higher priority than file extensions that are included in the scan scope. If a file is located in a folder that is excluded from the scan, the application skips this file even if its extension is included in the scan scope.
- If you selected the Scan specified files and folders only option, use the Add, Change, and Delete buttons to create a list of virtual machine files and folders to scan during the scan task.
When scanning virtual machines running Linux operating systems, Kaspersky Security is case sensitive regarding the characters in paths to files and directories included in the scan scope. When scanning virtual machines running Windows operating systems, paths to files and folders are not case sensitive.
If your list of objects requiring scanning uses an environment variable that has multiple values depending on the bit rate of the application that uses it, in 64-bit Windows operating systems, objects corresponding to all values of the variable are included in the scan scope. For example, if you use the %ProgramFiles% variable, objects located in the C:\Program Files folder and in the C:\Program Files (x86) folder are included in the scan scope.
- Save the changes by clicking Next (in the New Task Wizard) or Apply (in the task properties).
Configuring the Custom Scan task scope
You can configure the scope for the Custom Scan task while creating the task (the Configuring the task scope step) or in the task properties after it is created (the Task scope section).
Custom Scan task created using the main administration plug-in
For a Custom Scan task that was created using the Kaspersky Security main administration plug-in, you can configure the task scope in one of the following ways:
- Specify the virtual machines and/or virtual machine templates whose files you want to scan.
- Specify one or several NSX Groups that include the virtual machines. Kaspersky Security will scan files of all virtual machines that are included in the specified NSX Groups.
To configure the scope of a Custom Scan task that was created using the main administration plug-in:
- If you want to include virtual machines and/or virtual machine templates into the task scope, in the drop-down list in the upper part of the window, select the Virtual infrastructure objects option (this option is selected by default). The window displays the VMware virtual infrastructure managed by one VMware vCenter Server in the form of an object tree: VMware vCenter Server, Datacenter objects, VMware clusters, resource pools, vApp objects and virtual machines.
Select check boxes opposite those virtual machines that you want to scan as part of the scan task being created. You can specify individual virtual machines or their combinations.
If the virtual infrastructure contains two or more virtual machines with the same ID (vmID), only one virtual machine appears in the object tree. If this virtual machine is selected to be scanned using the custom scan task, the task will be performed on all virtual machines that have the same ID (vmID).
- If you want to include all virtual machines within one or multiple NSX Groups into the task scope, in the drop-down list at the top of the window, select the NSX Groups option.
Select the check boxes for the NSX Groups whose virtual machines you want to scan while executing the task being created.
If the task scope includes one or several NSX Groups, Kaspersky Security does not scan virtual machine templates when executing this task even if the Scan virtual machine templates check box is selected in the scan settings.
- Save the changes by clicking Next (in the New Task Wizard) or Apply (in the task properties).
Custom Scan task created using the administration plug-in for tenants
For a Custom Scan task that was created using Kaspersky Security administration plug-in for tenants, you cannot use NSX Groups to define the task scope. You can include individual virtual machines or their combinations in the scope of tasks.
To configure the scope of a Custom Scan task that was created using the administration plug-in for tenants:
- Select check boxes opposite those virtual machines that you want to scan as part of the scan task being created. You can specify individual virtual machines or their combinations.
If the virtual infrastructure contains two or more virtual machines with the same ID (vmID), only one virtual machine appears in the object tree. If this virtual machine is selected to be scanned using the custom scan task, the task will be performed on all virtual machines that have the same ID (vmID).
- Save the changes by clicking Next (in the New Task Wizard) or Apply (in the task properties).
Configuring the scan task run schedule
You can configure a schedule for running a scan task while creating the task (the Configuring the task run schedule step) or in the task properties after its creation (the Schedule section).
To configure the task run schedule:
- Define the values of the following settings:
- Scheduled start. Choose the task run mode in the drop-down list. The settings displayed in the window depend on the task run mode chosen.
- Run skipped tasks. If this check box is selected, an attempt to start the task is made the next time the application is started on the SVM. In the Manually and Once modes, the task is started as soon as an SVM appears on the network.
If this check box is cleared, the task is started on an SVM by schedule only, and in Manually and Once modes it is started only on the SVMs that are visible on the network.
- Use automatically randomized delay for task starts. By default, the time of task start on SVMs is randomized with the scope of a certain time period. This period is calculated automatically depending on the number of SVMs covered by the task:
- 0–200 SVMs – task start is not randomized
- 200-500 SVMs – task start is randomized within the scope of 5 minutes
- 500-1000 SVMs – task start is randomized within the scope of 10 minutes
- 1000-2000 SVMs – task start is randomized within the scope of 15 minutes
- 2000-5000 SVMs – task start is randomized within the scope of 20 minutes
- 5000-10000 SVMs – task start is randomized within the scope of 30 minutes
- 10000–20000 SVMs – task start is randomized within the scope of 1 hour
- 20000–50000 SVMs – task start is randomized within the scope of 2 hours
- over 50000 SVMs – task start is randomized within the scope of 3 hours
If you do not need to randomize the time of task starts within an automatically calculated time period, clear the Use automatically randomized delay for task starts check box. This check box is set by default.
- Use randomized delay for task starts within an interval of (min): If you want the task to start at a random time within a specified period of time after the scheduled task start, select this check box. In the text box, enter the maximum task start delay. In this case, the task starts at a random time within the specified period of time after the scheduled start. This check box can be changed if the Use automatically randomized delay for task starts check box is cleared.
Randomized task start times help prevent situations in which a large number of SVMs contact the Kaspersky Security Center Administration Server at the same time.
- Save the changes by clicking Next (in the New Task Wizard) or Apply (in the task properties).
Network Threat Protection
In this section, SVM refers to an SVM with the Network Threat Protection component.
An SVM with the Network Threat Protection component protects virtual machines on the VMware ESXi hypervisors. Kaspersky Security protects only virtual machines that meet all the conditions for virtual machine protection against network threats.
The Network Threat Protection component of Kaspersky Security performs the following functions:
- Intrusion Prevention. Kaspersky Security can scan the traffic of protected virtual machines to detect and block activity typical of network attacks and suspicious network activity that may be a sign of an intrusion into the protected infrastructure.
Kaspersky Security can scan traffic from IP addresses in IPv4 and IPv6 format.
- Web Addresses Scan. Kaspersky Security lets you scan web addresses that are requested by a user or application, and block access to web addresses if a threat is detected.
The settings that SVMs apply for virtual machine network threat protection are defined by using policies. Kaspersky Security starts protecting virtual machines only after you have configured network threat protection settings in the active policy.
If Kaspersky Security is installed in the infrastructure managed by VMware NSX-V Manager, the standard traffic processing mode and the monitoring mode are provided for network protection. If monitoring mode is used and Kaspersky Security detects signs of intrusions or attempts to access dangerous or undesirable web addresses, it does not take any actions to prevent the threats, but only sends information about the detected threats to Kaspersky Security Center Administration Server.
You can configure exclusions from Network Threat Protection as follows:
- Exclude from scan inbound or outbound traffic of the virtual machines that are assigned one NSX Policy which defines the network threat protection settings. You can specify which traffic to scan when configuring NSX Policy. The NSX Policy setup procedure depends on the type of VMware NSX Manager you use: VMware NSX-T Manager or VMware NSX-V Manager.
- Create network threat protection exclusion rules that Kaspersky Security can use to exclude traffic of specific IP addresses from scans or apply special actions when processing such traffic.
Information about events that occur during protection of virtual machines against network threats is transmitted to the Kaspersky Security Center Administration Server and logged in a report.
Descriptions of currently known types of network attacks, signs of intrusions, and the databases of malicious and phishing web addresses are included in the application databases and are updated during application database updates.
Conditions for protection of virtual machines against network threats
An SVM with the Network Threat Protection component protects virtual machines that meet the following conditions:
- Virtual machine is included of the NSX Group that is controlled by the NSX Policy, which redirects the virtual machine traffic to Kaspersky Network Protection service.
- The virtual machine network interface is connected to the NSX Segment.
The Network Threat Protection component can scan outbound and/or inbound traffic of virtual machines. You can specify which traffic to scan using the NSX policy, which define network protection settings. NSX policy can be configured in VMware NSX Manager Web Console or in VMware vSphere Client console (depending on the type of VMware NSX Manager you use: VMware NSX-T Manager or VMware NSX-V Manager).
Page top
About traffic processing modes
If Kaspersky Security is deployed in the infrastructure managed by VMware NSX-V Manager, the Network Threat Protection component can function in one of the following traffic processing modes:
- Standard mode. If this mode is used, Network Threat Protection receives and scans traffic from the virtual machines. When Kaspersky Security detects signs of intrusions or attempts to access dangerous or undesirable web addresses, it performs the action specified in Kaspersky Security policy settings and sends information about the detected threats and performed actions to Kaspersky Security Center Administration Server.
- Monitoring mode. If this mode is used, Network Threat Protection receives a copy of traffic from the virtual machines. When Kaspersky Security detects signs of intrusions or attempts to access dangerous or undesirable web addresses, it does not take any actions to prevent the threats, but only sends information about the detected threats to Kaspersky Security Center Administration Server.
The traffic processing mode is selected during Kaspersky Network Protection service registration in VMware NSX-V Manager. After network protection service registration and SVM deployment, the traffic processing mode cannot be changed. To select a different traffic processing mode, remove the Network Threat Protection component and the objects created in the infrastructure because of the component installation, unregister the network protection service, and then re-register the network protection service with the new traffic processing mode and deploy new SVMs.
If Kaspersky Security is deployed in the infrastructure managed by VMware NSX-T Manager, the Network Threat Protection component always functions in the Standard traffic processing mode. If you do not want Kaspersky Security to take the actions to prevent threats when it detects signs of intrusion or attempts to access dangerous or undesirable web addresses, select the Ignore action on threat detection in the network attack detection settings, in the control settings of virtual machine network activity and in the web addresses scan settings.
Page top
Intrusion Prevention
When protecting virtual machines against intrusions, Kaspersky Security can perform the following actions:
- Detect network attacks on protected virtual machines.
If Network Attack Blocker is enabled, when Kaspersky Security detects an attempted network attack on a protected virtual machine it performs the action defined in policy settings. For example, the application can terminate the connection from the virtual machine to the IP address from which the network attack originated or terminate the connection and block the traffic from this IP address to automatically protect the virtual machine against possible future network attacks from this IP address.
- Detect suspicious network activity in the traffic of protected virtual machines. Suspicious network activity in the traffic of a protected virtual machine may be a sign of an intrusion into the protected infrastructure. The virtual machine traffic analysis applies the suspicious network activity identification rules that are contained in Kaspersky Security application databases.
If Network Activity Scanner is enabled, when Kaspersky Security detects suspicious network activity it performs the action defined in policy settings. For example, the application can terminate the connection with the IP address showing the suspicious network activity or terminate the connection and block the traffic from this IP address.
If Kaspersky Security is configured to block traffic from an IP address from which a network attack or suspicious network activity originated, the blocking duration is 60 minutes by default. You can change the traffic blocking duration. When the specified time expires, traffic is automatically unblocked.
When determining the source of a network attack or suspicious network activity, the application takes into account whether or not the traffic is from a virtual LAN (VLAN). Kaspersky Security blocks traffic from an IP address only in the VLAN in which a network attack or suspicious network activity was detected.
The list of network threat sources blocked by each SVM hosting the Network Threat Detection component is displayed in the properties of the application installed on this SVM. When the block time defined in the application settings expires, the network threat source is automatically deleted from the list. If necessary, you can unblock traffic from selected IP addresses without waiting for them to be automatically unblocked.
You can configure network threat protection exclusion rules that Kaspersky Security will use to exclude traffic of specific IP addresses from scans or apply special actions when processing such traffic.
In the infrastructure managed by VMware NSX-V Manager, when Kaspersky Security detects a network attack or suspicious network activity, it assigns the security tag IDS_IPS.threat=high to the virtual machine whose traffic displayed activity typical of network attacks or suspicious network activity.
Enabling and disabling the Network Attack Blocker feature
To enable or disable the Network Attack Blocker feature:
- In the Kaspersky Security Center Administration Console, open the properties of the policy whose scope includes the relevant virtual machines:
- In the console tree, select the folder or administration group in which the policy was created.
- In the workspace, select the Policies tab.
- Select a policy in the list of policies and double-click the policy to open the Properties: <Policy name> window.
- In the policy properties window, in the Network threat protection section, select the Intrusion Prevention subsection.
- Do one of the following:
- Select the Detect network attacks check box if you want Kaspersky Security to scan the traffic of protected virtual machines for activity typical of network attacks.
If the check box is selected, when Kaspersky Security detects an attempted network attack on a protected virtual machine it performs the action defined in application settings. If network protection is working in the standard mode, by default Kaspersky Security terminates the connection between the protected virtual machine and the IP address from which the network attack originated, and also blocks traffic from this IP address for 60 minutes. You can modify this action and the traffic blocking period. If network protection is working in the monitoring mode, Kaspersky Security does not perform any actions to prevent a network attack.
- Clear the Detect network attacks check box if you do not want Kaspersky Security to scan the traffic of protected virtual machines for activity that is typical of network attacks.
- Select the Detect network attacks check box if you want Kaspersky Security to scan the traffic of protected virtual machines for activity typical of network attacks.
- In the Properties: <Policy name> window, click OK.
Configuring Network Attack Blocker settings
To configure the Network Attack Blocker settings:
- In the Kaspersky Security Center Administration Console, open the properties of the policy whose scope includes the relevant virtual machines:
- In the console tree, select the folder or administration group in which the policy was created.
- In the workspace, select the Policies tab.
- Select a policy in the list of policies and double-click the policy to open the Properties: <Policy name> window.
- In the policy properties window, in the Network threat protection section, select the Intrusion Prevention subsection.
- Select the Detect network attacks check box if the network attack detection function is disabled.
- Select an action in the drop-down list Action on detection of a network attack, if network protection is operating in standard mode.
If network protection works in the monitoring mode, when Kaspersky Security detects a network attack it performs the Ignore action.
- If necessary, change the value of the setting On threat detection, block traffic for N minutes.
- If necessary, configure network threat protection exclusion rules that Kaspersky Security will use to exclude traffic of specific IP addresses from scans or apply special actions when processing such traffic.
- In the Properties: <Policy name> window, click OK.
Enabling and disabling Network Activity Scanner for virtual machines
The suspicious network activity detection functionality is available only if you are using the application under an enterprise license.
To enable or disable Network Activity Scanner for virtual machines:
- In the Kaspersky Security Center Administration Console, open the properties of the policy whose scope includes the relevant virtual machines:
- In the console tree, select the folder or administration group in which the policy was created.
- In the workspace, select the Policies tab.
- Select a policy in the list of policies and double-click the policy to open the Properties: <Policy name> window.
- In the policy properties window, in the Network threat protection section, select the Intrusion Prevention subsection.
- Do one of the following:
- Select the Monitor virtual machine network activity check box if you want Kaspersky Security to scan the traffic of protected virtual machines to detect suspicious network activity that may be a sign of an intrusion into the protected infrastructure.
If the check box is selected and Kaspersky Security detects suspicious network activity in the traffic of protected virtual machines, it takes the action defined in the application settings. If network protection works in the standard mode, by default Kaspersky Security terminates the connection between a protected virtual machine that shows suspicious network activity and other virtual machines. You can modify this action. If network protection works in the monitoring mode, Kaspersky Security does not perform any actions on virtual machines that show suspicious network activity.
- Clear the Monitor virtual machine network activity check box if you do not want Kaspersky Security to scan the traffic of protected virtual machines for suspicious network activity.
- Select the Monitor virtual machine network activity check box if you want Kaspersky Security to scan the traffic of protected virtual machines to detect suspicious network activity that may be a sign of an intrusion into the protected infrastructure.
- In the Properties: <Policy name> window, click OK.
Configuring Network Activity Scanner for virtual machines
The suspicious network activity detection functionality is available only if you are using the application under an enterprise license.
To configure the Network Activity Scanner settings for protected virtual machines:
- In the Kaspersky Security Center Administration Console, open the properties of the policy whose scope includes the relevant virtual machines:
- In the console tree, select the folder or administration group in which the policy was created.
- In the workspace, select the Policies tab.
- Select a policy in the list of policies and double-click the policy to open the Properties: <Policy name> window.
- In the policy properties window, in the Network threat protection section, select the Intrusion Prevention subsection.
- Select the Monitor virtual machine network activity check box if virtual machine network activity scanner is disabled.
- Click the Settings button.
The Network activity scanner parameters window opens.
- Specify the application categories whose signs of network activity should be detected by Kaspersky Security:
Kaspersky Security always detects network activity that is typical of such malware as viruses, worms and Trojans in the traffic of protected virtual machines.
- If Kaspersky Security detects network activity that, in your opinion, is not a sign of an intrusion into the protected infrastructure, you can add the rule that detected this activity to the list of exclusions. The listed rules will not be applied by Kaspersky Security to detect suspicious network activity in the traffic of protected virtual machines.
You can view information about an applied rule in the text of the event that was sent to Kaspersky Security Center when it detected the suspicious network activity.
To add a rule to the list, click the Add button located above the list, and in the newly added line, enter the rule ID in the following format:
<number>:<number>:<number>. - In the Network activity scanner parameters window, click OK.
- Select an action in the drop-down list Action on detection of suspicious activity, if network protection is operating in standard mode.
If network protection works in the monitoring mode, when Kaspersky Security detects suspicious network activity it performs the Ignore action.
- If necessary, change the value of the setting On threat detection, block traffic for N minutes.
- If necessary, configure network threat protection exclusion rules that Kaspersky Security will use to exclude traffic of specific IP addresses from scans or apply special actions when processing such traffic.
- In the Properties: <Policy name> window, click OK.
Viewing the list of blocked network threat sources
In the properties of the application installed on SVMs with the Network Threat Protection component, you can view the list of network threat sources that were blocked as a result of this SVM.
To view a list of blocked network threat sources on SVMs:
- In the Kaspersky Security Center Administration Console, open the SVM properties window:
- Select the administration group containing the KSC cluster that includes the relevant SVM.
- In the workspace, select the Devices tab.
- In the list, select the SVM and open the SVM properties window by double-clicking or by selecting Properties in the context menu.
The Properties: <SVM name> window opens.
- In the SVM properties window in the list on the left, select the Applications section.
A list of applications that are installed on this SVM appears in the right part of the window.
- Select Kaspersky Security for Virtualization 6.1 Agentless and open the application settings window by double-clicking or by selecting Properties in the context menu.
The Kaspersky Security for Virtualization 6.1 Agentless settings window opens.
- In the application settings window, in the list on the left, select the List of blocked network threat sources section.
The right part of the window displays a table containing a list of sources of network threats that were blocked as a result of this SVM, which is essentially a list of IP addresses whose traffic was blocked by Kaspersky Security when it detected a network attack or suspicious network activity.
The table displays the following information for each network threat source:
- IP address. IP address whose traffic was blocked by Kaspersky Security when it detected a network attack or suspicious network activity.
- VLAN ID. ID of the VLAN associated with the blocked traffic.
- Blocked at. Date and time when Kaspersky Security blocked traffic from the IP address.
- Blocked until. Date and time when traffic from the IP address will be automatically unblocked.
In the list of blocked network threat sources, you can do the following:
- Search blocked network threat sources based on values of the IP address column. By default the table displays information only about the last 100 blocked sources of network threats. If the table is not showing a network threat source whose information you want to view, you can use the search. To do so, you need to enter the IP address, beginning of the IP address, or subnet mask into the search string and click the Find button. As a result, the table displays no more than 100 blocked sources of network threats that match the search criteria.
- Sort the list by any column of the table. If the search query is not defined, the sorting is applied to the full list of blocked sources of network threats. If you performed a search, the sorting is applied to the list of the blocked sources of network threats that match the search criteria.
- Update the information by clicking the Refresh button.
When the block time defined in the application settings expires, the network threat source is automatically deleted from the list. If necessary, you can unblock traffic from selected IP addresses without waiting for their automatic deletion.
To unlock traffic from an IP address that was recognized as a network threat source,
Select one or multiple network threat sources in the list and click the Unblock button located in the lower part of the window.
Page top
Web Addresses Scan
Kaspersky Security can scan web addresses that are requested over the HTTP protocol by a user or application installed on a protected virtual machine. When scanning web addresses, Kaspersky Security can use databases of malicious and phishing web addresses, and information about the reputation of web resources received from Global KSN.
By default, if Web Addresses Scan is enabled, Kaspersky Security scans web addresses to check if they are malicious, phishing, or advertising web addresses. Kaspersky Security can also scan web addresses to check if they belong to the category of web addresses associated with the distribution of legitimate applications that could be exploited to harm a virtual machine or user data. You can specify which categories of web addresses must be detected by the application.
To detect advertising web addresses and web addresses associated with the distribution of legitimate applications that could be exploited to harm a virtual machine or user data, Global KSN must be used by Kaspersky Security. If Global KSN is not being used, the application does not scan web addresses to check if they belong to these web address categories.
If you are using the application in multitenancy mode, Kaspersky Security scans web addresses that are requested from virtual machines but checks them only against the databases of malicious and phishing web addresses.
If this scan is enabled and Kaspersky Security detects a web address that belongs to one or more of the selected web address categories, the application takes the action defined in the application settings, for example, blocks or allows access to the specific web address.
If Kaspersky Security blocks access to a web address that the user tries to access, the browser on the protected virtual machine displays a blocked web address notification.
You can create a list of web addresses to which Kaspersky Security will not block access regardless of the action specified in the application settings.
Kaspersky Security does not scan a web address that is requested from an IP address whose traffic is excluded from scans based on the network threat protection exclusion rules.
Enabling and disabling web address scanning
To enable or disable web address scanning:
- In the Kaspersky Security Center Administration Console, open the properties of the policy whose scope includes the relevant virtual machines:
- In the console tree, select the folder or administration group in which the policy was created.
- In the workspace, select the Policies tab.
- Select a policy in the list of policies and double-click the policy to open the Properties: <Policy name> window.
- In the policy properties window, in the Network threat protection section, select the Web Addresses Scan subsection.
- Do one of the following:
- Select the Scan web addresses check box if you want Kaspersky Security to check if the web addresses requested by a user or application belong to the web address categories selected for detection. By default, Kaspersky Security scans web addresses to check if they are malicious, phishing, or advertising web addresses. You can select the web address categories for detection in the window that opens by clicking the Settings button.
When Kaspersky Security detects a web address that belongs to one or more of the selected web address categories, it blocks access to this web address by default. You can change this action, and create a list of web addresses to which Kaspersky Security will not block access if it detects a threat.
- Clear the Scan web addresses check box if you want to disable web addresses scans.
- Select the Scan web addresses check box if you want Kaspersky Security to check if the web addresses requested by a user or application belong to the web address categories selected for detection. By default, Kaspersky Security scans web addresses to check if they are malicious, phishing, or advertising web addresses. You can select the web address categories for detection in the window that opens by clicking the Settings button.
- In the Properties: <Policy name> window, click OK.
Configuring web address scan settings
To configure web address scan settings:
- In the Kaspersky Security Center Administration Console, open the properties of the policy whose scope includes the relevant virtual machines:
- In the console tree, select the folder or administration group in which the policy was created.
- In the workspace, select the Policies tab.
- Select a policy in the list of policies and double-click the policy to open the Properties: <Policy name> window.
- In the policy properties window, in the Network threat protection section, select the Web Addresses Scan subsection.
- Select the Scan web addresses check box if Web Addresses Scan is disabled.
- Click the Settings button.
The Web addresses to detect window opens.
- Specify the categories of web addresses that you want Kaspersky Security to detect.
- In the Web Addresses to detect window, click OK.
- Select an action in the Action on threat detection, if network protection is operating in standard mode drop-down list.
If network protection works in the monitoring mode, Kaspersky Security performs the Ignore action when it detects a web address that belongs to one or more of the selected categories.
- In the Do not block access to the following web addresses table, click Add or press INSERT and type a web address in the Web address column.
- In the Properties: <Policy name> window, click OK.
Configuring the blocked web address notification
After blocking a web address that the user tried to access, Kaspersky Security displays the blocked web address notification in the browser on the protected virtual machine. You can view a sample blocked web address notification and select the notification language.
To select the language of the blocked web address notification and view a sample notification:
- In the Kaspersky Security Center Administration Console, open the properties of the policy whose scope includes the relevant virtual machines:
- In the console tree, select the folder or administration group in which the policy was created.
- In the workspace, select the Policies tab.
- Select a policy in the list of policies and double-click the policy to open the Properties: <Policy name> window.
- In the policy properties window, in the Network threat protection section, select the Other subsection.
- Click the View example message link to open an example of the blocked web address notification that is displayed in the browser on the protected virtual machine.
A sample notification opens in the browser window.
- In the Localization settings section, in the Language of web address blocking message drop-down list, select the language of the blocked web address notification.
The language corresponding to the localization of the Kaspersky Security administration plug-in is selected by default.
- In the Properties: <Policy name> window, click OK.
Configuring exclusions from Network Threat Protection
In a policy, you can configure network threat protection exclusion rules that Kaspersky Security will use to exclude traffic of specific IP addresses from scans or apply special actions when processing such traffic. You can define exclusion rules for traffic from specific IP addresses or for traffic from all IP addresses in an IP subnet. When generating the scope of rules, the application takes into account whether or not the traffic is from a virtual LAN (VLAN).
If a group of virtual switch ports is running in Virtual Switch Tagging (VST) mode and exclusion rules are applied to traffic of virtual machines associated with this group of ports, the application does not take into account whether or not the traffic belongs to a virtual local area network (VLAN).
To configure a network threat protection exclusion rule:
- In the Kaspersky Security Center Administration Console, open the properties of the policy whose scope includes the relevant virtual machines:
- In the console tree, select the folder or administration group in which the policy was created.
- In the workspace, select the Policies tab.
- Select a policy in the list of policies and double-click the policy to open the Properties: <Policy name> window.
- In the policy properties window, in the Network threat protection section, select the Exclusions from protection subsection.
- Click Add or press INSERT and specify the scope of the exclusion rule in the Scope column.
- Select an exclusion rule in the Rule column.
- If necessary, use the arrows above the list to change the position of the created exclusion rule in the list. The rule priority is determined by its position in the list. If you set multiple rules for the same scope, the rule positioned higher in the list is applied first.
- In the Properties: <Policy name> window, click OK.
Application database update
Update functionality (including antivirus signature updates and codebase updates) may not be available in the program in the United States.
The application databases contain the computer security threats descriptions which allow to detect the malicious code in the scanned objects, descriptions of currently known types of network attacks and signs of intrusions, and the databases of malicious and phishing web addresses.
Application database updates ensure that the protection of virtual machines is up to date. New viruses and other types of malware appear worldwide on a daily basis. To enable Kaspersky Security to quickly detect threats, you need to update the application databases regularly.
Database updates require a current license for using the application.
An update source is a resource which contains updates for databases and application software modules of Kaspersky applications. The update source for Kaspersky Security is the storage of the Kaspersky Security Center Administration Server.
To download an update package from the Administration Server storage successfully, an SVM needs to have access to the Kaspersky Security Center Administration Server.
If application databases have not been updated for a long time, the size of the update package may be large (up to several dozen megabytes). Downloading this update package may generate additional load on the network.
Kaspersky Security Center lets you automatically distribute application database updates and install them on SVMs. This can be done using the following tasks:
- Download updates to the storage task. This task downloads the update package from the update source to the Kaspersky Security Center Administration Server storage.
- Application database update task. This task lets you distribute application database updates and install them on SVMs as soon as an update package is downloaded to the Administration Server repository.
Configuring automatic application database updates
To configure automatic updates of application databases:
- Make sure that a download updates to the storage task exists in Kaspersky Security Center.
The download updates to the storage task is created automatically by the Kaspersky Security Center Initial Configuration Wizard. If the download updates to the storage task has been removed from the list of Administration Server tasks, you can create a new task. See Kaspersky Security Center documentation for more information.
- Make sure that an application database update task has been created in Kaspersky Security Center.
The application database update task can be created automatically after installing the Kaspersky Security main administration plug-in. You can use this task to update the application databases.
If the task has not been created, create it.
The application database update task runs according to a schedule. You can view the task results and, if necessary, manually start the task.
Kaspersky Security checks the integrity of application databases during updates. If this check is unsuccessful, the application database update task ends with an error and Kaspersky Security continues to use the previous set of anti-virus databases.
Page top
Creating an application database update task
To create an application database update task:
- In the Kaspersky Security Center Administration Console, select the folder or administration group in which you want to create the task.
If you selected the Managed devices folder or an administration group containing a KSC cluster, select the Tasks tab in the workspace.
- Click the New task button to start the New Task Wizard.
- At the first step of the Wizard, select the following type of task: Kaspersky Security for Virtualization 6.1 Agentless → Update. Proceed to the next step of the New Task Wizard.
- If you started the New Task Wizard from the Tasks folder, specify the method for selecting the SVMs on which the task must be run:
- Click the Select network devices detected by Administration Server button if you want to select SVMs from the list of devices detected by Administration Server while polling the local area network.
- Click the Specify device addresses manually or import from list button if you want to specify the addresses of SVMs manually or import the list of SVMs from a file. Addresses are imported from a TXT file with a list of addresses of SVMs, with each address in a separate row.
If you import a list of addresses from file or specify the addresses manually and the SVMs are identified by name, the list of SVMs for which the task is being created can be supplemented only with those SVMs whose details have already been included in the Administration Server database upon connection of SVMs or following a poll of the local area network.
- Click the Assign task to a device selection button if the task must be run on all SVMs that are part of a selection based on a predefined criterion. For details on creating a selection of devices, please refer to the Kaspersky Security Center documentation.
- Click the Assign task to an administration group button if the task must be run on all SVMs within an administration group.
Depending on the specified method of SVM selection, perform one of the following operations in the window that opens:
- In the list of detected devices, specify the SVMs on which the task will be run. To do so, select check boxes in the list on the left of the name of the relevant SVMs.
- Click the Add or Add IP range button and specify the addresses of SVMs.
- Click the Import button, and in the window that opens select the TXT file containing the list of SVM addresses.
- Click the Browse button and in the opened window specify the name of the selection containing the SVMs on which the task will be run.
- Click the Browse button and select an administration group or manually enter the name of an administration group.
Proceed to the next step of the New Task Wizard.
- In Scheduled launch field, select When new updates are downloaded to the repository. Configure the remaining task launch schedule settings. For more information about the task launch schedule settings, please refer to the Kaspersky Security Center documentation.
Proceed to the next step of the New Task Wizard.
- In the Name field, enter the name of the application database update task and proceed to the next step of the New Task Wizard.
- If you want the task to start as soon as the New Task Wizard finishes, select the Run task when the wizard is complete check box.
Exit the New Task Wizard.
The created update rollback task appears in the list of tasks. The task will start every time an update package is downloaded to the Administration Server repository, and will distribute and install application database updates on SVMs.
After Kaspersky Security has been installed or upgraded, SVMs relay information to Kaspersky Security Center regarding the type of the databases required for the operation of the application. If Kaspersky Security Center has not yet downloaded the necessary databases to the storage when the database update task is started, the task could end with an error. If this is the case, you can manually start the download updates to the storage task (for details, please refer to the Kaspersky Security Center documentation), wait for it to complete, and then manually start the database update task.
Page top
Rolling back the last application database update
After the first update of the application databases, the option of rolling back to the previous set of the databases becomes available.
Every time an update is started on an SVM, Kaspersky Security creates a backup copy of the existing application databases before proceeding to update them. This enables you to revert to the previous version of the application databases, if necessary. The update rollback feature is used if the new application database version contains an invalid signature that causes Kaspersky Security to block a safe application.
To roll back the latest application database update:
- Create an update rollback task. You can create a task for all SVMs, for the SVMs of one KSC cluster, or for an individual SVM.
- Start an update rollback task.
Creating an update rollback task
To create an update rollback task:
- In the Kaspersky Security Center Administration Console, select the folder or administration group in which you want to create the task.
If you selected the Managed devices folder or an administration group containing a KSC cluster, select the Tasks tab in the workspace.
- Click the New task button to start the New Task Wizard.
- At the first step of the Wizard, select the following type of task: Kaspersky Security for Virtualization 6.1 Agentless → Rollback. Proceed to the next step of the New Task Wizard.
- If you started the New Task Wizard from the Tasks folder, specify the method for selecting the SVMs on which the task must be run:
- Click the Select network devices detected by Administration Server button if you want to select SVMs from the list of devices detected by Administration Server while polling the local area network.
- Click the Specify device addresses manually or import from list button if you want to specify the addresses of SVMs manually or import the list of SVMs from a file. Addresses are imported from a TXT file with a list of addresses of SVMs, with each address in a separate row.
If you import a list of addresses from file or specify the addresses manually and the SVMs are identified by name, the list of SVMs for which the task is being created can be supplemented only with those SVMs whose details have already been included in the Administration Server database upon connection of SVMs or following a poll of the local area network.
- Click the Assign task to a device selection button if the task must be run on all SVMs that are part of a selection based on a predefined criterion. For details on creating a selection of devices, please refer to the Kaspersky Security Center documentation.
- Click the Assign task to an administration group button if the task must be run on all SVMs within an administration group.
Depending on the specified method of SVM selection, perform one of the following operations in the window that opens:
- In the list of detected devices, specify the SVMs on which the task will be run. To do so, select check boxes in the list on the left of the name of the relevant SVMs.
- Click the Add or Add IP range button and specify the addresses of SVMs.
- Click the Import button, and in the window that opens select the TXT file containing the list of SVM addresses.
- Click the Browse button and in the opened window specify the name of the selection containing the SVMs on which the task will be run.
- Click the Browse button and select an administration group or manually enter the name of an administration group.
Proceed to the next step of the New Task Wizard.
- In the Scheduled launch field, select Manually. Configure the remaining task launch schedule settings. For more information about the task launch schedule settings, please refer to the Kaspersky Security Center documentation.
Proceed to the next step of the New Task Wizard.
- In the Name field, enter the name of the update rollback task and proceed to the next step of the New Task Wizard.
- If you want the task to start as soon as the New Task Wizard finishes, select the Run task when the wizard is complete check box.
Exit the New Task Wizard.
The created update rollback task appears in the list of tasks.
Page top
Backup
In this section, SVM refers to an SVM with the File Threat Protection component.
Backup is a special storage for backup copies of files that are deleted or modified during disinfection.
A backup copy of a file is a copy of a virtual machine file that is created when this file is disinfected or removed. Backup copies of files are stored in Backup in a special format and pose no danger.
When Kaspersky Security detects an infected file on a virtual machine, it blocks the virtual machine user from accessing this file and moves a copy of the file to Backup. The application then subjects the file to the action that is configured in the protection profile of this virtual machine. For example, it disinfects or deletes the file.
Sometimes it is not possible to maintain the integrity of files during disinfection. If the disinfected file contained information that becomes fully or partially unavailable after disinfection, you can save the file from the backup copy to the hard drive of a computer on which Kaspersky Security Center Administration Console is installed.
Backup is located on the SVM with the File Threat Protection component. Use of Backup is enabled by default on each SVM.
When an SVM with the File Threat Protection component is removed or updated, copies of files that were placed in Backup are automatically deleted.
The size of Backup on an SVM is 1 GB. If the total size of backup copies of files in Backup exceeds this value, Kaspersky Security removes the oldest backup copies of files to keep the size of Backup under 1 GB.
The default maximum storage period for backup copies of files in Backup is 30 days. After this time, Kaspersky Security automatically deletes backup copies of files from Backup.
You can change the maximum storage term for backup copies of files. Backup settings are specified in the policy settings.
The Kaspersky Security Center Administration Console lets you manage backup copies of files stored in Backup on SVMs. Kaspersky Security Center Administration Console displays a combined list of backup copies of files that Kaspersky Security placed in Backup on each SVM with the File Threat Protection component.
To prevent deletion of backup copies of files when deleting or updating SVMs, you can configure the use of network data storage for SVMs. If the use of network data storage is enabled, backup copies of files with each SVM are saved in a separate folder in the network data storage. An SVM connects to the storage every 10 minutes for data synchronization. If backup copies on an SVM were deleted automatically as a result of deletion or update of the SVM, they will be automatically restored. If you manually deleted backup copies of files on an SVM, these copies are also deleted from the folder in the network data storage. The term for storing backup copies of files in network data storage is determined by the Backup settings on SVMs.
To use network data storage, create an SMB network folder accessible via the SMBv3 protocol for hosting the network data storage and a user account for connecting SVMs. The amount of space necessary for the network data storage can be estimated based on the following formula: (N+1) GB, where N is the number of SVMs that connect to the network data storage.
You need to make sure that the amount of space allocated for network data storage is sufficient for storing backup copies of files. Kaspersky Security does not monitor availability of free space in the network data storage and does not notify you if backup copies of files cannot be stored. It is recommended to use third-party tools to monitor the available space in the network folder.
You can configure the use of network data storage for SVMs during installation of the application (procedure for registering Kaspersky Security services) or by using the Kaspersky Security reconfiguration procedure.
Configuring Backup settings
To configure Backup settings on SVM:
- In the Kaspersky Security Center Administration Console, open the properties of the policy that determines the SVM operation settings:
- In the console tree, select the folder or administration group in which the policy was created.
- In the workspace, select the Policies tab.
- Select a policy in the list of policies and double-click the policy to open the Properties: <Policy name> window.
- In policy properties window, select the Backup section.
- In the right part of the window, specify the following settings:
- Move files to backup
If you used Backup before clearing this check box, backup copies of files previously moved to Backup remain in Backup. Such backup copies of files are deleted depending on the value of the Store files no longer than N days setting.
- Store files no longer than N days
If you reduce the default storage period for backup copies of files, Kaspersky Security removes from Backup those copies of files that have been stored longer than the newly configured storage period.
- Move files to backup
- In the Properties: <Policy name> window, click OK.
Managing backup copies of files
You can manage backup copies of files as follows:
- View the list of backup copies of files.
- Save files from backup copies to the hard drive of a computer with the Administration Console of Kaspersky Security Center installed.
- Delete backup copies of files from Backup.
Viewing the list of backup copies of files
To view the list of backup copies of files,
Select the Backup folder in the Additional → Storages folder of the Kaspersky Security Center Administration Console.
The workspace displays a list of backup copies of files that have been moved to Backups on all SVMs.
The list of backup copies of files appears in the form of a table. Each table row contains an event that involves an infected file and information about the type of threat that was detected in the file.
The table columns show the following details:
- Device. The name and path to the virtual machine on which the file was detected.
- Name. File name.
- Status. The status that Kaspersky Security assigned to the detected file after processing:
Deleted,Disinfected. - Action being performed. The action that is currently being taken on this backup copy of the file in Backup. For example, if you have made a command to delete the backup copy of a file, this column displays
Being deleted. If the application is not taking any actions on this backup copy of the file, the field remains blank. - Date of placement. The date and time when the backup copy of the file was moved to Backup.
- Object. The name of the threat detected in the file. If multiple threats have been detected in the file, each threat appears in a separate row in the list of backup copies of files.
- Size. File size, in bytes.
- Restoration folder. Complete path to the original file on the virtual machine.
- Description. Name of the virtual machine and complete path to the original file whose backup copy has been placed in Backup.
Saving files from Backup to disk
You can save files from Backup to the hard drive of a computer that has the Administration Console of Kaspersky Security Center installed.
To save the file from Backup to disk:
- Select the Backup folder in the Advanced / Storages folder of the Kaspersky Security Center Administration Console.
The workspace displays a list of backup copies of files that have been moved to Backups on all SVMs.
- In the list of backup copies of files, select the file you want to save to disk.
- Do one of the following:
- Right-click to open the context menu and select Save to disk.
- Save the file by clicking the Save to disk link. The link is located on the right of the list of backup copies of files, in the workspace for managing the selected file.
A window opens, prompting you to select a folder on the hard drive to save the selected file.
- Select a folder on the hard drive of the computer to which you want to save the file.
- Click OK.
Kaspersky Security saves the specified file to the hard drive of a computer that has the Administration Console of Kaspersky Security Center installed.
The files are saved to the hard drive of a computer with the Administration Console of Kaspersky Security Center installed, in non-encrypted format.
Page top
Deleting backup copies of files
To delete backup copies of files:
- In the Kaspersky Security Center Administration Console, in the Additional → Storages folder, select the Backup folder.
The workspace displays a list of backup copies of files that have been moved to Backups on all SVMs.
- In the list of backup copies of files, select the files you want to delete. Use the CTRL and SHIFT keys to select multiple files.
- Do one of the following:
- Right-click to display the context menu and select Delete.
- Delete files by clicking the Delete objects link. The link is located on the right of the list of backup copies of files, in the workspace for managing the selected files.
Kaspersky Security deletes backup copies of files from Backups on SVMs. To refresh the list of backup copies of files and check it for changes, click the Refresh link.
It takes some time to refresh the list of backup copies of files. Wait for the list to be refreshed.
Page top
Events, notifications, and reports
You can receive information about Kaspersky Security operation in the Kaspersky Security Center by using the following resources:
SVMs send service messages (events) containing information about Kaspersky Security operation to the Kaspersky Security Center Administration Server. Information about events is saved in the Administration Server database.
Event importance levels are of the following types:
- Critical event. A critical event indicates the occurrence of a critical problem that may lead to data loss, an operational malfunction, or a critical error. It may indicate problems in the operation of Kaspersky Security or vulnerabilities in the protection of virtual machines.
- Error. This event indicates the occurrence of a serious problem, error or malfunction that occurred during operation of the application or while performing a procedure.
- Warning. This event requires attention because it emphasizes important situations in the operation of Kaspersky Security and may indicate a possible issue in the future.
- Info. This event informs about successful completion of an operation, proper functioning of the application, or completion of a procedure.
A notification is a message containing information about an event that occurred on an SVM. Notifications keep the user informed about application events in a timely manner. Kaspersky Security Center lets you select the event notification method and configure the settings of event notifications in the policy properties.
For detailed information on events and notifications, see the Kaspersky Security Center documentation.
Kaspersky Security Center uses events to generate different types of reports. You can use reports to obtain the details of infected files, changes to protection settings, and usage of license keys and databases. You can view reports in the Kaspersky Security Center Administration Console.
The virtual machine name displayed in reports and events of Kaspersky Security Center can be the name of the virtual machine or the path to it in the virtual infrastructure.
Configuring notification settings
To configure notifications about events:
- In the Kaspersky Security Center Administration Console, open the properties of the policy that determines the SVM operation settings:
- In the console tree, select the folder or administration group in which the policy was created.
- In the workspace, select the Policies tab.
- Select a policy in the list of policies and double-click the policy to open the Properties: <Policy name> window.
- In the policy properties window, select the Event configuration section.
- Select the tab with the name of the level of importance of events for which you want to receive notifications:
- Critical.
- Error.
- Warning.
- Info.
- Select the event types for which you want to receive notifications:
- Use the SHIFT and CTRL keys if you want to select multiple event types.
- Click the Select all button if you want to select all event types.
- Click the Properties button.
The Properties of <N events> window opens, where N is the number of event types selected.
- In the Event registration section, select the Store in the Administration Server database for (days) check box. Kaspersky Security sends the events of the selected types to the Administration Server of Kaspersky Security Center.
In the text box, specify the number of days for which you want to store events on the Administration Server. Kaspersky Security Center deletes events after this time has elapsed.
- In the Event notifications section, select the method of notification:
- In the Properties <N events> window, click OK.
- In the Properties: <Policy name> window, click OK.
Report types
You can use reports to obtain information about the operation of Kaspersky Security, such as details on protection deployment, protection status, performance of started tasks, and detected threats.
Kaspersky Security Center offers a selection of reports that contain information on the operation of Kaspersky Security:
- Kaspersky application versions report. Details of application versions installed on client devices (SVMs and the computer on which the Administration Server and the Kaspersky Security Center Administration Console are installed).
- Protection deployment report. Contains details on the deployment of application components.
- Most infected devices report. Contains information about virtual machines that are found to contain the largest number of infected files.
- Threats report. Contains information about viruses and malware that were detected on virtual machines, and information about operations performed by the Kaspersky Security on the files in which the threats were detected.
- Key usage report. Contains information about license keys added to the application.
- Errors report. Contains information about errors that occurred during application operation.
- Anti-virus database usage report. Contains information on the versions and status of application databases used on SVMs.
- Network attack report. Contains information about registered network attacks on virtual machines and suspicious network activity in the traffic of protected virtual machines that have been detected by the Network Threat Protection component.
- Web Control report. Contains information about requests by users or applications to access dangerous or undesirable web addresses registered by the Network Threat Protection component.
- Protection status report. Contains information about the protection status of virtual machines.
Kaspersky Security does not provide a report on hardware registry. You can view information on the hardware of SVMs in VMware vSphere Client console.
Each report consists of a summary table and a table with detailed information. You can configure the content of fields shown in each table.
This Guide describes how to work with reports in Kaspersky Security Center 13.1.
For details on managing reports, see the Kaspersky Security Center documentation.
Kaspersky application versions report
The Kaspersky application versions report contains information about the versions of Kaspersky Security components that are installed on SVMs and versions of Kaspersky Security Center components that are installed on client devices (SVMs and the devices on which the Kaspersky Security Center Administration Server and/or the Kaspersky Security Center Network Agent are installed).
It contains the following consolidated information:
- Application. Name of the installed Kaspersky Security component or Kaspersky Security Center component. For Kaspersky Security components, the field displays
Kaspersky Security for Virtualization 6.1 AgentlessorKaspersky Security for Virtualization 6.1 Agentless (for tenants). - Version number. Version number of the installed Kaspersky Security component or Kaspersky Security Center component.
- Devices. For Kaspersky Security components, the number of SVMs on which Kaspersky Security components are installed is displayed; for Kaspersky Security Center, the number of devices on which the Kaspersky Security Center Network Agent and/or Administration Server are installed is displayed.
- Groups number. For Kaspersky Security components, the number of administration groups that include the SVMs is displayed; for Kaspersky Security Center, this field displays the number of administration groups that include devices on which the Kaspersky Security Center Network Agent and/or Administration Server are installed.
The row below contains the following consolidated information:
- Total applications. The total number of different versions of Kaspersky Security components and Kaspersky Security Center components installed on client devices.
- Installations. The total number of installations of these components on the client devices.
- Devices. The total number of client devices on which Kaspersky Security components and Kaspersky Security Center components are installed.
- Groups number. The total number of administration groups that include these client devices.
The report contains the following detailed information:
- Application. Name of the installed Kaspersky Security component or Kaspersky Security Center component. For Kaspersky Security components, the field displays
Kaspersky Security for Virtualization 6.1 AgentlessorKaspersky Security for Virtualization 6.1 Agentless (for tenants). - Version number. Version number of the installed Kaspersky Security component or Kaspersky Security Center component.
- Group. For Kaspersky Security components, the name of the administration group that includes the SVM with Kaspersky Security component is displayed; for Kaspersky Security Center, the name of the administration group that includes the device on which Kaspersky Security Center Network Agent and/or Administration Server are installed is displayed.
- Device. For Kaspersky Security components, the name of the SVM on which the component is installed is displayed; for Kaspersky Security Center components, the name of the device on which the Kaspersky Security Center Network Agent and/or Administration Server are installed is displayed.
- Installed. The date and time of installation of the Kaspersky Security component or the Kaspersky Security Center component on the client device.
- Last visible. The date and time when the client device was last visible on the enterprise LAN.
- Last connection to Administration Server. The date and time of the last connection between the client device and Kaspersky Security Center Administration Server.
- IP address. For Kaspersky Security components, the IP address of the SVM on which the component is installed is displayed; for Kaspersky Security Center components, the IP address of the device on which the Kaspersky Security Center Network Agent and/or Administration Server are installed is displayed.
- DNS name. For Kaspersky Security components, the domain name of the SVM on which the component is installed is displayed; for Kaspersky Security Center components, the name of the device on which the Kaspersky Security Center Network Agent and/or Administration Server are installed is displayed.
Protection deployment report
The protection deployment report contains information on the Kaspersky protection components installed on the Kaspersky Security Center client devices (on SVMs and the computer on which the Kaspersky Security Center Network Agent is installed).
It contains the following consolidated information:
- Protection components. Possible options for installing Kaspersky applications and components on client devices:
- Network Agent and security application are installed
- Network Agent only is installed
- Network Agent and security application are not installed
- Devices. The number of SVMs and computers on which the specified components and applications are installed.
In the row below, the Devices field shows the total number of SVMs and computers on which Kaspersky protection components are installed.
The report contains the following detailed information:
- Group. The name of the administration group that includes the SVM with Kaspersky Security component, or the name of the administration group that includes the computer on which Kaspersky Security Center Network Agent is installed.
- Device. The name of the SVM with Kaspersky Security component or the name of the computer on which Kaspersky Security Center Network Agent is installed.
- Network Agent version. The version of Kaspersky Security Center Network Agent installed on the client device.
- Security application name. The name of the installed application providing anti-virus protection. For Kaspersky Security, the field displays
Kaspersky Security for Virtualization 6.1 Agentless. - Security application version. The version of the installed application providing anti-virus protection.
Most infected devices report
The most infected devices report contains information about the protected virtual machines that are found to contain the largest number of infected files during scanning.
The Period field displays the period of time covered by the data included in the report. By default, the report contains for the last 30 days, including the report generation date.
It contains the following consolidated information:
- Device. The name of the protected virtual machine on which the object was detected, and the path to the virtual machine in the virtual infrastructure.
- Objects infected. The total number of objects detected on the protected virtual machine in the reporting period.
- Threats detected. The number of different objects detected on the protected virtual machine for the reporting period.
- First attempted run blocked. The date and time of the first detection of the object on the protected virtual machine.
- Last attempted run blocked. The date and time of the last detection of the object on the protected virtual machine.
- Last visible. The date and time of the last event associated with the protected virtual machine on which the object was detected.
- IP address. The IP address of the protected virtual machine on which the object was detected.
- NetBIOS name, DNS name. The name of the protected virtual machine on which the object was detected, and the path to the virtual machine in the virtual infrastructure.
In the line below, the Devices infected field specifies the number of protected virtual machines found to contain the largest number of infected files during scanning. The Groups infected field always displays a
0, because protected virtual machines cannot belong to Kaspersky Security Center administration groups.
The report contains detailed information about each instance of detection:
- Device. The name of the protected virtual machine on which the object was detected, and the path to the virtual machine in the virtual infrastructure.
- Detected object. The name of the object that has been detected on the protected virtual machine.
- Detected at. The date and time of object detection on the protected virtual machine.
- Path to file. The path to the protected virtual machine file in which the object has been detected.
- Object type. The type of object detected.
- Action. The result of the action taken by Kaspersky Security on the detected object.
- Application. The name of the application providing anti-virus protection. For Kaspersky Security, the field displays
Kaspersky Security for Virtualization 6.1 AgentlessorKaspersky Security for Virtualization 6.1 Agentless (for tenants). - Version number. The version number of the application providing anti-virus protection.
- Last visible. The date and time of the last event associated with the protected virtual machine on which the object was detected.
- IP address. The IP address of the protected virtual machine on which the object was detected.
- NetBIOS name, DNS name. The name of the protected virtual machine on which the object was detected, and the path to the virtual machine in the virtual infrastructure.
- Component. The name of the component that detected the threat. Possible values:
Scan task,File Threat Protection. - Detection technology. The technology used for detecting the threat. Possible values:
Expert analysis,Automatic analysis,Cloud analysis.
Threats report
The threats report contains information on viruses and other malware detected on protected virtual machines, as well as the details of the results of the actions performed on the files in which the threats were detected.
The Period field displays the period of time covered by the data included in the report. By default, the report contains for the last 30 days, including the report generation date.
It contains the following consolidated information:
- Detected object. The name of the object that has been detected on protected virtual machines.
- Object type. The type of object detected.
- Threats detected. The total number of the specified objects detected on the protected virtual machines for the reporting period.
- As rated by KSN. The number of objects detected with KSN.
- Different files. The number of files containing the detected object.
- Devices infected. The number of protected virtual machines on which the specified objects have been detected.
- First attempted run blocked. The date and time of the first detection of the object on the protected virtual machines.
- Last attempted run blocked. The date and time of the last detection of the object on the protected virtual machines.
The row below contains the following consolidated information:
- Threats detected. The total number of different objects detected on all protected virtual machines for the reporting period.
- Different files. The total number of files containing detected objects on all protected virtual machines.
- Devices infected. The total number of protected virtual machines on which the objects were detected in the reporting period.
- Groups infected. The total number of Kaspersky Security Center administration groups that include the devices on which the objects were detected. This field always displays a
0, because protected virtual machines cannot belong to Kaspersky Security Center administration groups.
The report contains the following detailed information about each instance of threat detection:
- Device. The name of the protected virtual machine on which the object was detected, and the path to the virtual machine in the virtual infrastructure.
- Detected object. The name of the object that has been detected on the protected virtual machine.
- Detected at. The date and time of object detection on the protected virtual machine.
- File path. The path to the file containing the detected object on the protected virtual machine.
- Object type. The type of object detected.
- Action. The result of the action taken by Kaspersky Security on the detected object.
- Application. The application that detected the object.
- Version number. The version number of the application that detected the object.
- Last visible. The date and time of the last event associated with the protected virtual machine on which the object was detected.
- IP address. The IP address of the protected virtual machine on which the object was detected.
- NetBIOS name, DNS name. The name of the protected virtual machine on which the object was detected, and the path to the virtual machine in the virtual infrastructure.
- Component. The name of the component that detected the threat. Possible values:
Scan task,File Threat Protection. - Detection technology. The technology used for detecting the threat. Possible values:
Expert analysis,Automatic analysis,Cloud analysis.
Errors report
The errors report contains information about errors that occurred in application operation.
The Period field displays the period of time covered by the data included in the report. By default, the report contains for the last 30 days, including the report generation date.
It contains the following consolidated information:
- Error type. The type of error detected in the operation of the application. For example:
Task ended with an error. - Number of errors. The number of registered errors of the specified type.
- Number of products. The number of applications in which the error of this type has been detected.
- Devices. The number of SVMs on which the specified type of error was registered, or the number of protected virtual machines on which the specified type of error was registered during a scan or protection.
- Groups number. The number of administration groups that include the SVMs on which the specified type of error was detected. For errors detected during a scan or protection of the virtual machines,
0is displayed, because protected virtual machines cannot belong to Kaspersky Security Center administration groups. - First detection time. The date and time of the first detection of the error.
- Last detection time. The date and time of the last detection of the error.
The row below contains the following consolidated information:
- Total errors. The total number of errors detected in the reporting period.
- Error types. The total number of error types detected for the reporting period.
- Devices. The total number of SVMs on which the errors were registered and number of protected virtual machines where the errors were registered during a scan or protection.
- Groups number. The total number of administration groups that include SVMs on which the errors were detected. The errors detected during a scan or protection of the virtual machines, are not considered when counting the number of groups, because protected virtual machines cannot belong to Kaspersky Security Center administration groups.
The report contains the following detailed information about each error:
- Group. The name of the administration group that includes the SVM on which the error was registered. For errors detected during a scan or protection of the virtual machines,
N/Ais displayed, because protected virtual machines cannot belong to Kaspersky Security Center administration groups. - Device. The name of the SVM on which the error was registered, or the name of the protected virtual machine on which the error was detected during a scan or protection.
- Application. The name of the application in which the error was registered.
- Error type. Error type. For example:
Task ended with an error. - Error description. Detailed error description.
- Detected. The date and time when the error occurred.
- Task. The task during which the error was registered. If the error is not related to task execution,
N/Ais displayed. - IP address. The IP address of the SVM on which the error was registered, or the IP address of the protected virtual machine on which the error was registered during a scan or protection.
- Last visible. The date and time when the SVM was last visible on the enterprise LAN, or the date and time of the last event associated with the protected virtual machine.
- Last connection to Administration Server. The date and time of the last connection between the SVM on which the error was registered and Kaspersky Security Center Administration Server.
- NetBIOS name. The name of the protected virtual machine on which the error was registered during a scan or protection.
- DNS name. The domain name of the SVM on which the error was registered, or the name of the protected virtual machine on which the error was registered during a scan or protection, and the path to it in the virtual infrastructure.
Anti-virus database usage report
The anti-virus database usage report contains information about the versions and status of the application databases that are used on SVMs.
It contains the following consolidated information:
- Created. The date and time of creation of the application databases that are used on SVMs.
- Devices. The number of SVMs on which these databases are used.
- Groups number. The number of administration groups that include the SVMs with the utilized application databases.
- Anti-virus database status. Information on whether the application databases used on SVMs are considered up-to-date. The databases on SVMs are considered up-to-date, if the date and time of their release matches the date and time of release of the databases in the storage of Kaspersky Security Center Administration Server.
The row below contains the following consolidated information:
- Total number of database sets used. The total number of the application database sets used on SVMs.
- Up to date. The number of application databases with “up-to-date” status used on SVMs.
- Updated during last 24 hours. The total number of the databases updated on SVMs over the last 24 hours.
- Updated during last 3 days. The total number of the databases updated on SVMs over the last 3 days.
- Updated during last 7 days. The total number of the databases updated on SVMs over the last 7 days.
- Updated more than a week ago. The total number of the databases updated on SVMs more than 7 days ago.
The report contains the following detailed information:
- Group. The name of the administration group that includes the SVMs with the utilized databases.
- Device. The name of the SVM.
- Application. The name of the application installed on the SVM.
- Version number. The number of the application version installed on the SVM.
- Created. The date and time of creation of the application databases that are used on SVMs.
- Anti-virus database status. Information on whether the application databases used on SVMs are considered up-to-date. The databases on SVMs are considered up-to-date, if the date and time of their release matches the date and time of release of the databases in the storage of Kaspersky Security Center Administration Server.
- IP address. The IP address of the SVM.
- DNS name. The domain name of the SVM containing the utilized databases.
- Last visible. The date and time when an SVM was last visible on the corporate LAN.
- Last connection to Administration Server. The date and time of the last connection between the SVM and Kaspersky Security Center Administration Server.
- Network Agent version. The version of Kaspersky Security Center Network Agent installed on the SVM containing the utilized databases.
Network attack report
The network attack report contains information about registered network attacks targeting the protected virtual machines and about suspicious network activity detection that may be a sign of an intrusion into the protected infrastructure.
By default, the template of the network attack report is not included in the list of report templates on the Reports tab. Use the Report Template Wizard to add a network attack report template to the list of templates (see the Kaspersky Security Center documentation for details). After the Wizard finishes, the newly created report template will be added to the list on the Reports tab.
The Period field displays the period of time covered by the data included in the report.
It contains the following consolidated information:
- Attack. The type of network attack or suspicious network activity.
- Attacks count. The number of registered network attacks or suspicious network activities of this type.
- Attacking addresses. The number of IP addresses from which network attacks have been registered or which showed the suspicious network activity of this type.
- Devices attacked. Depends on the infrastructure where Kaspersky Security is deployed:
- In the infrastructure managed by VMware NSX-T Manager – number of SVMs that detected activity typical for network attacks or suspicious network activity of this type.
- In the infrastructure managed by VMware NSX-V Manager – number of protected virtual machines in whose traffic the activity typical for network attacks or suspicious network activity of this type is detected.
- Groups attacked. Depends on the infrastructure where Kaspersky Security is deployed:
- In the infrastructure managed by VMware NSX-T Manager – number of administration groups containing SVMs that detected a network attack or suspicious network activity of this type.
- In the infrastructure managed by VMware NSX-V Manager – the field displays
1, since all protected virtual machines are assigned to the same "pseudohosts" conditional group. The "pseudohosts" group does not belong to administration groups and is not displayed in the Kaspersky Security Center Administration Console. Protected virtual machines cannot belong to administration groups, because they are not considered as client devices of Kaspersky Security Center.
- First attempted run blocked. The date and time of the first detection of the activity typical of network attacks or suspicious network activity of this type.
- Last attempted run blocked. The date and time of the last detection of the activity typical of network attacks or suspicious network activity of this type.
The row below contains the following consolidated information:
- Attacks count. The number of registered network attacks or suspicious network activities of all types.
- Various attacks. The number of types of registered network attacks or suspicious network activities.
- Attack IPs. The total number of IP addresses from which network attacks have been registered or which showed the suspicious network activity.
- Devices attacked. Depends on the infrastructure where Kaspersky Security is deployed:
- In the infrastructure managed by VMware NSX-T Manager – number of SVMs that detected activity typical for network attacks or suspicious network activity.
- In the infrastructure managed by VMware NSX-V Manager – number of protected virtual machines in whose traffic the activity typical for network attacks or suspicious network activity is detected.
- Groups attacked. Depends on the infrastructure where Kaspersky Security is deployed:
- In the infrastructure managed by VMware NSX-T Manager – number of administration groups containing SVMs that detected a network attack or suspicious network activity.
- In the infrastructure managed by VMware NSX-V Manager – the field displays
1, since all protected virtual machines are assigned to the same "pseudohosts" conditional group. The "pseudohosts" group does not belong to administration groups and is not displayed in the Kaspersky Security Center Administration Console. Protected virtual machines cannot belong to administration groups, because they are not considered as client devices of Kaspersky Security Center.
- First attempted run blocked. The date and time of the first detection of the activity typical of network attacks or suspicious network activity of all types.
- Last attempted run blocked. The date and time of the last detection of the activity typical of network attacks or suspicious network activity of all types.
The report contains the following detailed information on each detection of the activity typical of network attacks or suspicious network activity:
- Group. Depends on the infrastructure where Kaspersky Security is deployed:
- In the infrastructure managed by VMware NSX-T Manager – administration group containing the SVM that detected a network attack or suspicious network activity.
- In the infrastructure managed by VMware NSX-V Manager – the field displays the
pseudohostsvalue, since all protected virtual machines are assigned to the same "pseudohosts" conditional group. Protected virtual machines cannot belong to administration groups, because they are not considered as client devices of Kaspersky Security Center.
- Device. Depends on the infrastructure where Kaspersky Security is deployed:
- In the infrastructure managed by VMware NSX-T Manager – name of the SVM that detected a network attack or suspicious network activity.
- In the infrastructure managed by VMware NSX-V Manager – name of the protected virtual machine in whose traffic the network attack or suspicious network activity is detected.
- Attacking address. The number of the IP address from which the network attack have been registered or which showed the suspicious network activity.
- Attack time. The date and time of the network attack or suspicious network activity detection.
- Attack. The type of network attack or suspicious network activity.
- Protocol. Connection protocol, in which network attack or suspicious network activity was detected.
- Port. The number of the port targeted by the network attack or which showed the suspicious network activity.
- Last visible. The date and time of the last event associated with the protected virtual machine in whose traffic the network attack or suspicious network activity was registered.
- IP address. Depends on the infrastructure where Kaspersky Security is deployed:
- In the infrastructure managed by VMware NSX-T Manager – IP address of the SVM that detected a network attack or suspicious network activity.
- In the infrastructure managed by VMware NSX-V Manager – IP address of the protected virtual machine in whose traffic the network attack or suspicious network activity is detected.
- NetBIOS name. Depends on the infrastructure where Kaspersky Security is deployed:
- In the infrastructure managed by VMware NSX-T Manager this field is left blank.
- In the infrastructure managed by VMware NSX-V Manager – name of the protected virtual machine in whose traffic the network attack or suspicious network activity is detected, and the path to the virtual machine in the virtual infrastructure.
- DNS name. Depends on the infrastructure where Kaspersky Security is deployed:
- In the infrastructure managed by VMware NSX-T Manager – name of the SVM that detected activity typical for network attacks or suspicious network activity, and the path to the SVM in the virtual infrastructure.
- In the infrastructure managed by VMware NSX-V Manager – name of the protected virtual machine in whose traffic the network attack or suspicious network activity is detected, and the path to the virtual machine in the virtual infrastructure.
- Version number. The version number of the Network Threat Protection component of Kaspersky Security.
- Attacked interface address. The IP address on which the network attack was attempted.
Web Control report
The Web Control report contains information about attempts by users or applications installed on protected virtual machines to access dangerous or inadvisable web addresses that belong to the web address categories selected for detection.
The Period field displays the period of time covered by the data included in the report. By default, the report contains for the last 30 days, including the report generation date.
It contains the following consolidated information:
- Result. The result of the action taken by Kaspersky Security when it detects an attempt to access a dangerous or undesirable web address.
- Rule. The network rule applied by the application when it takes action in response to a detected attempt to access a dangerous or undesirable web address. Possible values:
Kaspersky Security for Virtualization Agentless: Attempt to access a malicious web addressKaspersky Security for Virtualization Agentless: Attempt to access a phishing web addressKaspersky Security for Virtualization Agentless: Attempt to access an advertising web addressKaspersky Security for Virtualization Agentless: Attempt to access a web address from the "Other" category
- Attempts. Number of attempts to access a dangerous or undesirable web address.
- User accounts. The number of protected virtual machines from which attempts were made to access a dangerous or undesirable web address.
- Web addresses. The number of dangerous or undesirable web addresses for which access attempts were detected.
- Devices. Depends on the infrastructure where Kaspersky Security is deployed:
- In the infrastructure managed by VMware NSX-T Manager – number of SVMs that detected an attempt to access a dangerous or undesirable web address.
- In the infrastructure managed by VMware NSX-V Manager – number of protected virtual machines where an attempt to access a dangerous or undesirable web address was detected.
- Administration groups. Depends on the infrastructure where Kaspersky Security is deployed:
- In the infrastructure managed by VMware NSX-T Manager – number of administration groups, which include SVMs that detected an attempt to access a dangerous or undesirable web address.
- In the infrastructure managed by VMware NSX-V Manager – the field displays
1, since all protected virtual machines are assigned to the same "pseudohosts" conditional group. The "pseudohosts" group does not belong to administration groups and is not displayed in the Kaspersky Security Center Administration Console. Protected virtual machines cannot belong to administration groups, because they are not considered as client devices of Kaspersky Security Center.
- First attempt. The date and time of the first attempt to access a dangerous or undesirable web address.
- Last attempt. The date and time of the last attempt to access a dangerous or undesirable web address.
The row below contains the following consolidated information:
- Rules. The number of network rules that determine which action the application takes when it detects an attempt to access a dangerous or undesirable web address. For Kaspersky Security, the value in this field is:
4. - Blocked attempts. The number of attempts to access dangerous or undesirable web addresses blocked by Kaspersky Security.
- Warnings. The number of attempts to access dangerous or undesirable web addresses that were allowed according to the application settings.
- Blocked web addresses. The number of dangerous or undesirable web addresses that were blocked by Kaspersky Security.
- Web addresses with warnings. The number of dangerous or undesirable web addresses that were allowed to be accessed according to the application settings.
- Blocked users. The number of protected virtual machines from which attempts were made to access blocked web addresses.
- Warned users. The number of protected virtual machines for which Kaspersky Security allowed access to dangerous or undesirable web addresses.
- First blocked attempt. The date and time of the first attempt to access a dangerous or undesirable web address that was blocked by Kaspersky Security.
- Last blocked attempt. The date and time of the last attempt to access a dangerous or undesirable web address that was blocked by Kaspersky Security.
- First warning. The date and time of the first attempt to access a dangerous or undesirable web address that was allowed according to the application settings.
- Last warning. The date and time of the last attempt to access a dangerous or undesirable web address that was allowed according to the application settings.
- Rules. The number of network rules that determine which action the application takes when it detects an attempt to access a dangerous or undesirable web address. For Kaspersky Security, the value in this field is:
The report contains the following detailed information for each attempt to access a dangerous or undesirable web address:
- Result. The result of the action taken by Kaspersky Security when it detects an attempt to access a dangerous or undesirable web address.
- Rule. The network rule applied by the application when it takes action in response to a detected attempt to access a dangerous or undesirable web address. Possible values:
Kaspersky Security for Virtualization Agentless: Attempt to access a malicious web addressKaspersky Security for Virtualization Agentless: Attempt to access a phishing web addressKaspersky Security for Virtualization Agentless: Attempt to access an advertising web addressKaspersky Security for Virtualization Agentless: Attempt to access a web address from the "Other" category
- User account. The IP address of the protected virtual machine from which an attempt was made to access a dangerous or undesirable web address.
- Web address. The dangerous or undesirable web address for which an access attempt was detected.
- Time. The date and time when an attempt to access a dangerous or undesirable web address was detected.
- Group. Depends on the infrastructure where Kaspersky Security is deployed:
- In the infrastructure managed by VMware NSX-T Manager – administration group, which includes the SVM that detected an attempt to access a dangerous or undesirable web address.
- In the infrastructure managed by VMware NSX-V Manager – the field displays the
pseudohostsvalue, since all protected virtual machines are assigned to the same "pseudohosts" conditional group. The "pseudohosts" group does not belong to administration groups and is not displayed in the Kaspersky Security Center Administration Console. Protected virtual machines cannot belong to administration groups, because they are not considered as client devices of Kaspersky Security Center.
- Device. Depends on the infrastructure where Kaspersky Security is deployed:
- In the infrastructure managed by VMware NSX-T Manager – name of the SVM that detected an attempt to access a dangerous or undesirable web address, and the path to the SVM in the virtual infrastructure.
- In the infrastructure managed by VMware NSX-T Manager – name of the protected virtual machine where an attempt to access a dangerous or undesirable web address was detected, and the path to the virtual machine in the virtual infrastructure.
- Version number. The version number of the Kaspersky Security Network Threat Protection component that detected the attempt to access a dangerous or undesirable web address.
- Last visible on the network. The date and time of the last event associated with the protected virtual machine from which an attempt was made to access a dangerous or undesirable web address.
- IP address. Depends on the infrastructure where Kaspersky Security is deployed:
- In the infrastructure managed by VMware NSX-T Manager – IP address of the SVM that detected an attempt to access a dangerous or undesirable web address.
- In the infrastructure managed by VMware NSX-V Manager – IP address of the protected virtual machines where an attempt to access a dangerous or undesirable web address was detected.
- NetBIOS name. Depends on the infrastructure where Kaspersky Security is deployed:
- In the infrastructure managed by VMware NSX-T Manager this field is left blank.
- In the infrastructure managed by VMware NSX-T Manager – name of the protected virtual machine where an attempt to access a dangerous or undesirable web address was detected, and the path to the virtual machine in the virtual infrastructure.
- DNS name. Depends on the infrastructure where Kaspersky Security is deployed:
- In the infrastructure managed by VMware NSX-T Manager – name of the SVM that detected an attempt to access a dangerous or undesirable web address, and the path to the SVM in the virtual infrastructure.
- In the infrastructure managed by VMware NSX-T Manager – name of the protected virtual machine where an attempt to access a dangerous or undesirable web address was detected, and the path to the virtual machine in the virtual infrastructure.
- As rated by KSN. The information about whether the attempt to access a dangerous or undesirable web address was detected using KSN. Possible values:
YesorNo.
Protection status report
Protection status report contains details on the security application status (Kaspersky Security) installed on the client devices of Kaspersky Security Center (SVM) and details on the protection status of the virtual machines.
You can use a protection status report to obtain information about problems in virtual infrastructure protection. By default, the report displays devices with Critical and Warning statuses. If necessary, you can configure the report to include the information on devices with OK status in the report properties window of the Settings section.
It contains the following consolidated information:
- Status. The status of the client device (SVM) or virtual machine protection status.
- Reason. The reason(s) why the current status was assigned.
- Unprotected devices. The number of SVMs and virtual machines that have the specified reason for being assigned the status.
- Group number. The number of administration groups that include the SVMs that have the specified reason for being assigned the client device status. The number of administration groups that include the SVMs protecting the virtual machines is shown for virtual machines that have the specified reason for being assigned the protection status.
In the row below, the Unprotected devices field indicates the total number of SVMs and virtual machines added to the report. The Group number field displays the number of administration groups that include the SVMs added to the report, and SVMs protecting the virtual machines added to the report.
The report contains the following detailed information on SVMs and on virtual machines added to the report:
- Status. The status of the client device (SVM) or virtual machine protection status.
- Group. The name of the administration group that includes the SVM, for SVMs added to the report. The name of the administration group that includes the SVM protecting the virtual machine, for virtual machines added to the report.
- Device. The name of the SVM or name of the virtual machine.
- Last connection to Administration Server. The date and time of the last connection between the SVM and Kaspersky Security Center Administration Server, for the SVMs added to the report. For virtual machine, added to the report,
N/Ais displayed. - Reason. Reason why the current client device status was assigned to the SVM or why the protection status was assigned for virtual machine.
- Device status defined by application. The reason for assignment of the status, if Kaspersky Security Center received the device status from a managed application, meaning from Kaspersky Security.
- IP address. The IP address of the SVM or of the virtual machine. If the IP address could not be determined (for example, when the virtual machine is powered off), the report shows
0.0.0.0. - Last visible. The date and time of the SVM's last connection to the Kaspersky Security Center Administration Server or the date and time of the last event related to the virtual machine.
- NetBIOS name. The name of the virtual machine and the path to it in the virtual infrastructure.
- DNS name. The domain name of the SVM or the name of the virtual machine and the path to it in the virtual infrastructure.
- Operating system. Operating system installed on the SVM or on the virtual machine.
- Anti-virus database release date. The date and time of the release of the application databases currently installed on the SVM, for SVMs added to the report. The date and time of the release of the application databases currently installed on the SVM protecting the virtual machine, for virtual machines added to the report.
- Last full scan. Date and time when the last Full Scan task was finished.
View reports
To view a report:
- In Kaspersky Security Center Administration Console, select the Administration Server <Server name> node.
- In the workspace of the node, go to the Reports tab and select the report template that you want to view.
A report generated from the selected template is displayed in the workspace.
By default, the template of the network attack report is not included in the list of report templates on the Reports tab. Use the Report Template Wizard to add a network attack report template to the list of templates (see the Kaspersky Security Center documentation for details). After the Wizard finishes, the newly created report template will be added to the list on the Reports tab.
The report shows the following information:
- Report type and name, brief report description and reporting period, and details of the group for which the report has been generated
- Chart that illustrates the most representative report data
- Consolidated table with calculated report indicators
- Table with detailed report data
For more information on managing reports, see the Kaspersky Security Center documentation.
Page top
Viewing application operation statistics
You can view statistics on the operation of Kaspersky Security on each SVM in the Kaspersky Security Center Administration Console.
To view statistics of application operation on SVMs:
- In the Kaspersky Security Center Administration Console, open the SVM properties window:
- Select the administration group containing the KSC cluster that includes the relevant SVM.
- In the workspace, select the Devices tab.
- In the list, select the SVM and open the SVM properties window by double-clicking or by selecting Properties in the context menu.
The Properties: <SVM name> window opens.
- In the SVM properties window in the list on the left, select the Applications section.
A list of applications that are installed on this SVM appears in the right part of the window.
- Select Kaspersky Security for Virtualization 6.1 Agentless and click the Statistics button located under the list of applications.
The Statistics window opens.
If you have selected an SVM with the File Threat Protection component, the following information is displayed in the Statistics window:
- General statistics. The number of objects scanned on the SVM during protection of virtual machines and during scan tasks since the application was installed.
- Information on application databases. The date and time of release of application databases, or information stating that the application databases are corrupted.
This information is displayed only if the application databases have been installed.
- License info. The number of days remaining until license expiration, or information stating that the license has expired or the license key has been blocked. If you are using the application under unlimited subscription, the value is
Not installed. - Most scanned files. The 20 most frequently scanned files over the past 24 hours.
- Statistics for the past 24 hours. The number of objects scanned on the SVM over the past 24 hours during protection of virtual machines and during scan tasks.
- Statistics for the past 30 days. The number of objects scanned on the SVM over the past 30 days during protection of virtual machines and during scan tasks.
- Statistics for the past 7 days. The number of objects scanned on the SVM over the past 7 days during protection of virtual machines and during scan tasks.
- Version info. The version of the EPSec library installed on the SVM.
If you have selected an SVM with the Network Threat Protection component, the following information is displayed in the Statistics window:
- General statistics. The number of network packets processed on the SVM during protection of virtual machines since the application was installed.
- Information on application databases. The date and time of release of application databases, or information stating that the application databases are corrupted.
This information is displayed only if the application databases have been installed.
- License info. The number of days remaining until license expiration, or information stating that the license has expired or the license key has been blocked. If you are using the application under unlimited subscription, the value is
Not installed. - Statistics for the past 24 hours. The number of network packets processed on the SVM over the past 24 hours.
- Statistics for the past 30 days. The number of network packets processed on the SVM over the past 30 days.
- Statistics for the past 7 days. The number of network packets processed on the SVM over the past seven days.
- Version info. The version of the NetX library installed on the SVM.
Information in the Statistics window is refreshed when the window is opened, or by clicking the Refresh button located at the top of the window. Information is not updated in real time.
Page top
Participating in Kaspersky Security Network
KSN functionality may not be available in the program in the United States.
To enhance the protection of virtual machines, Kaspersky Security can use data received from Kaspersky users all over the world. Kaspersky Security Network is designed to collect such data.
Kaspersky Security Network (KSN) is an infrastructure of cloud services providing access to Kaspersky online knowledge base with information about the reputation of files, web resources, and software. Data from Kaspersky Security Network ensures faster response by Kaspersky Security to unknown threats, improves the performance of some protection components, and reduces the risk of false positive.
If you are participating in Kaspersky Security Network, KSN services provide Kaspersky Security with information about the category and reputation of scanned files.
The following types of KSN are differentiated depending on the location of the infrastructure:
- Global KSN – the infrastructure is hosted by Kaspersky servers.
- Private KSN. This infrastructure is located within the corporate network or hosted by third-party servers of the service provider, such as on the Internet service provider's network.
Information about the type of KSN used by Kaspersky Security is displayed in the policy properties.
The interaction between SVMs managed by Kaspersky Security Center and the KSN infrastructure is facilitated by the KSN Proxy service. To use KSN in Kaspersky Security operations, the KSN Proxy service must be enabled in Kaspersky Security Center.
To use Private KSN, it must be enabled and configured in Kaspersky Security Center.
The KSN Proxy service and Private KSN can be configured in the properties of the Kaspersky Security Center Administration Server in the KSN proxy server section. See Kaspersky Security Center documentation for more information.
Use of KSN by Kaspersky Security is configured in policy properties.
If the KSN Proxy service is disabled in Kaspersky Security Center, no data is exchanged between SVMs and KSN. If the use of KSN is nonetheless enabled in the Kaspersky Security policy, this could reduce the performance of Kaspersky Security. It is recommended to disable the use of KSN in the Kaspersky Security policy if the KSN Proxy service is disabled in Kaspersky Security Center.
Kaspersky Security automatically sends information about KSN usage to Kaspersky, and may send other information depending on the selected KSN usage mode (standard KSN or extended KSN). The KSN mode affects the amount of data that is transmitted to Kaspersky when KSN is being used.
Your participation in Kaspersky Security Network when using extended KSN helps Kaspersky promptly gather information about the types and sources of new threats and develop solutions for neutralizing them.
Participation in Kaspersky Security Network is voluntary. The decision to participate in Kaspersky Security Network is made during the creation of a Kaspersky Security policy, and this decision can be changed at any time.
About data provision when Kaspersky Security Network is being used
If you are participating in Kaspersky Security Network and are using KSN in standard mode, you agree to automatically transmit the following data to Kaspersky:
- Information necessary for scanning files: name and ID of the detected threat according to the Kaspersky classification, hash of the scanned object and type of hash function, and the ID of the utilized anti-virus databases.
- Information about scanned web addresses: web address or IP address whose reputation is requested, web address of the page that was used to navigate to the scanned web address, ID of the connection protocol and number of the utilized port.
- Information about utilized digital certificates required for verifying their authenticity: hash (SHA256) of the certificate with which the scanned object was signed, and the public certificate key.
- General information: type and full version of Kaspersky Security, information about the application components and about the application module updates, and information about the operating system installed on the SVMs and protected virtual machines.
If you are participating in Kaspersky Security Network and are using KSN in extended mode, you agree to automatically send Kaspersky all the data listed in the Kaspersky Security Network Statement. Files (or parts thereof) that could be exploited by hackers to harm the virtual machine or data stored in its operating system may also be sent to Kaspersky for analysis. Extended KSN is used by default. You can disable the use of extended KSN in the policy properties.
You can view the text of the Kaspersky Security Network Statement in the policy properties in the KSN settings section.
For information about the storage, protection and destruction of statistical information that is obtained during the use of KSN and transmitted to Kaspersky, please refer to the Privacy Policy on the Kaspersky website.
If you do not participate in Kaspersky Security Network, the data listed in the Kaspersky Security Network Statement is not transmitted to Kaspersky.
Page top
Viewing the Kaspersky Security Network Statement
To view the Kaspersky Security Network Statement:
- In the Kaspersky Security Center Administration Console, open the properties of the policy whose scope includes the relevant virtual machines:
- In the console tree, select the folder or administration group in which the policy was created.
- In the workspace, select the Policies tab.
- Select a policy in the list of policies and double-click the policy to open the Properties: <Policy name> window.
- In the list on the left, select the KSN settings section.
- Click the link to open the Kaspersky Security Network Statement.
The text of the Kaspersky Security Network Statement opens in a separate window.
Page top
Configuring the use of Kaspersky Security Network
KSN usage by Kaspersky Security is configured in the policy settings. If KSN usage is enabled in the active policy, KSN services are used in the operation of Kaspersky Security during virtual machine protection and when executing virtual machine scan tasks.
If the policy with the enabled use of KSN is inactive, KSN services are not used in the operation of Kaspersky Security.
If you want Kaspersky Security to use the KSN, please make sure the required KSN type is configured in Kaspersky Security Center. To use Global KSN, the KSN proxy server service must be enabled in Kaspersky Security Center. To use Private KSN, it must be enabled and configured in Kaspersky Security Center. The KSN Proxy service and Private KSN can be configured in the properties of the Kaspersky Security Center Administration Server in the KSN proxy server section. See Kaspersky Security Center documentation for more information.
To configure the use of KSN by Kaspersky Security:
- In the Kaspersky Security Center Administration Console, open the properties of the policy whose scope includes the relevant virtual machines:
- In the console tree, select the folder or administration group in which the policy was created.
- In the workspace, select the Policies tab.
- Select a policy in the list of policies and double-click the policy to open the Properties: <Policy name> window.
- In the policy properties window, select the KSN settings section.
- If you want the application to use Global KSN in its operations:
- Select the Use KSN check box.
- In the opened window, read the Kaspersky Security Network Statement.
- If you agree with all the terms of the Statement, select I have read, understand, and accept the terms of this Kaspersky Security Network Statement and click OK.
- By default, Global KSN is used in extended mode. The KSN mode affects the amount of data that is automatically transmitted to Kaspersky when KSN is being used. If you want to disable the use of extended KSN, clear the Use extended KSN check box.
- If you want to disable the use of Global KSN, clear the Use KSN check box.
- If you want the application to use Private KSN in its operations, select the Use Private KSN check box.
- If you want to disable the use of Private KSN, clear the Use Private KSN check box.
- In the Properties: <Policy name> window, click OK.
SNMP Monitoring of SVM status
You can receive information about the status of SVMs deployed in the virtual infrastructure by using any network monitoring system that utilizes the SNMP protocol. An SNMP agent is installed on the SVM. The SNMP agent can communicate the SVM status to your organization network monitoring system. If SNMP monitoring is enabled in the active policy that defines the SVM operation settings, the SNMP agent installed on the SVM becomes available for connecting via port 161. The community name specified when connecting the network monitoring system to the agent must be "ksvsnmp". Once connected, the SNMP agent starts sending SVM status information to SNMP monitoring system in your organization.
If the policy that enables SNMP monitoring is inactive, information about the status of SVMs is not relayed.
SNMP Agent can relay the following information about the status of SVMs with the File Threat Protection component:
- Information about RAM usage by the ksvmain process (as a percentage of the maximum value that, when reached, causes the application to restart)
- The number of protected virtual machines running desktop operating systems and the number of protected virtual machines running server operating systems.
The count of protected virtual machines includes all virtual machines that were under the protection of the application over the last 30 days, even if those virtual machines are currently powered off.
- Information about whether virtual machine scan tasks are currently running on the SVM
- If scan tasks are running, information about the number of virtual machines that are currently waiting to be scanned, and the number of virtual machines that are being simultaneously scanned
- Information about the status of services of the File Threat Protection component on SVMs: On (services are running) or Off (services are not running)
For SVMs with the Network Threat Protection component, SNMP Agent can transmit information about RAM usage by the nsmain process (as a percentage of the maximum value that, when reached, causes the application to restart).
This data is specific to the application and such information is contained in the MIB files named KSV-MIB.txt and KSVNS-MIB.txt that are supplied together with the application. You can use these files to receive additional information from SVMs. You can also use other MIB files to receive the necessary information from SVMs.
You can restrict the list of IP addresses to which the SNMP Agent relays SVM status information to prevent unauthorized access to the SNMP service.
Enabling and disabling SNMP Monitoring
SNMP Monitoring is enabled and disabled in the settings of the policy, which determines the SVM operation settings.
To enable or disable SNMP Monitoring:
- In the Kaspersky Security Center Administration Console, open the properties of the policy that determines the SVM operation settings:
- In the console tree, select the folder or administration group in which the policy was created.
- In the workspace, select the Policies tab.
- Select a policy in the list of policies and double-click the policy to open the Properties: <Policy name> window.
- In the policy properties window, select the SNMP monitoring settings section.
- Do one of the following:
- Select the Enable SNMP monitoring of the SVM status check box if you want to receive SVM status information.
- Clear the Enable SNMP monitoring of the SVM status check box if you want to disable SVM status monitoring.
- In the Properties: <Policy name> window, click OK.
Restricting the list of recipients of SVM status information
You can restrict the list of IP addresses to which the SNMP Agent relays SVM status information to prevent unauthorized access to the SNMP service.
To create a list of IP addresses to which SVM status information is relayed:
- In the Kaspersky Security Center Administration Console, open the properties of the policy that determines the SVM operation settings:
- In the console tree, select the folder or administration group in which the policy was created.
- In the workspace, select the Policies tab.
- Select a policy in the list of policies and double-click the policy to open the Properties: <Policy name> window.
- In the policy properties window, select the SNMP monitoring settings section.
- Select the Enable SNMP monitoring of the SVM status check box if SNMP monitoring is disabled.
- Select the Transmit information only to indicated IP addresses check box.
- Click the Add button or press the INSERT key and enter an IP address in IPv4 format or an IP subnet addresses as follows: <
IP address in IPv4 format>/<subnet mask prefix length>. - In the Properties: <Policy name> window, click OK.
Automatic installation of application patches
Kaspersky Security Center lets you automatically download and install Kaspersky Security application patches on SVMs.
Patches are automatically downloaded from the Kaspersky Security Center Administration Server storage when the application database update package is downloaded.
Patches are installed using the automatic patch installation task.
This task installs patches on the SVMs on which these patches have not yet been installed. In addition, it also checks the operation of Kaspersky Security on each SVM after the patches are installed. If problems are detected, the patch installation is automatically rolled back.
When patches are being installed, protection of virtual machines and scan tasks are paused.
After a patch is installed on an SVM, the new version number of the SVM is displayed in reports and events of Kaspersky Security Center.
If errors occur in the application after a patch is installed, you can manually roll back patch installation on SVMs. For more detailed information, please contact Technical Support experts.
Configuring automatic downloading and installation of patches
To configure automatic downloading and installation of patches:
- Make sure that a download updates to the storage task exists in Kaspersky Security Center. If the download updates to the storage task does not exist, create it (see the Kaspersky Security Center documentation).
- Make sure that an application database update task has been created in Kaspersky Security Center. If the update task has not been created, create it.
- Create an automatic patch installation task. You can create a task for all SVMs, for the SVMs of one KSC cluster, or for an individual SVM.
Creating an automatic patch installation task
To create an automatic patch installation task:
- In the Kaspersky Security Center Administration Console, select the folder or administration group in which you want to create the task.
If you selected the Managed devices folder or an administration group containing a KSC cluster, select the Tasks tab in the workspace.
- Click the New task button to start the New Task Wizard.
- At the first step of the Wizard, select the following type of task: Kaspersky Security for Virtualization 6.1 Agentless → Automatic installation of patches.
Proceed to the next step of the New Task Wizard.
- If you started the New Task Wizard from the Tasks folder, specify the method for selecting the SVMs on which the task must be run:
- Click the Select network devices detected by Administration Server button if you want to select SVMs from the list of devices detected by Administration Server while polling the local area network.
- Click the Specify device addresses manually or import from list button if you want to specify the addresses of SVMs manually or import the list of SVMs from a file. Addresses are imported from a TXT file with a list of addresses of SVMs, with each address in a separate row.
If you import a list of addresses from file or specify the addresses manually and the SVMs are identified by name, the list of SVMs for which the task is being created can be supplemented only with those SVMs whose details have already been included in the Administration Server database upon connection of SVMs or following a poll of the local area network.
- Click the Assign task to a device selection button if the task must be run on all SVMs that are part of a selection based on a predefined criterion. For details on creating a selection of devices, please refer to the Kaspersky Security Center documentation.
- Click the Assign task to an administration group button if the task must be run on all SVMs within an administration group.
Depending on the specified method of SVM selection, perform one of the following operations in the window that opens:
- In the list of detected devices, specify the SVMs on which the task will be run. To do so, select check boxes in the list on the left of the name of the relevant SVMs.
- Click the Add or Add IP range button and specify the addresses of SVMs.
- Click the Import button, and in the window that opens select the TXT file containing the list of SVM addresses.
- Click the Browse button and in the opened window specify the name of the selection containing the SVMs on which the task will be run.
- Click the Browse button and select an administration group or manually enter the name of an administration group.
Proceed to the next step of the New Task Wizard.
- Configure the task run schedule settings:
- Scheduled start. Choose the task run mode in the drop-down list. The settings displayed in the window depend on the task run mode chosen.
- Run skipped tasks. If this check box is selected, an attempt to start the task is made the next time the application is started on the SVM. In the Manually and Once modes, the task is started as soon as an SVM appears on the network.
If this check box is cleared, the task is started on an SVM by schedule only, and in Manually and Once modes it is started only on the SVMs that are visible on the network.
- Use automatically randomized delay for task starts. By default, the time of task start on SVMs is randomized with the scope of a certain time period. This period is calculated automatically depending on the number of SVMs covered by the task:
- 0–200 SVMs – task start is not randomized
- 200-500 SVMs – task start is randomized within the scope of 5 minutes
- 500-1000 SVMs – task start is randomized within the scope of 10 minutes
- 1000-2000 SVMs – task start is randomized within the scope of 15 minutes
- 2000-5000 SVMs – task start is randomized within the scope of 20 minutes
- 5000-10000 SVMs – task start is randomized within the scope of 30 minutes
- 10000–20000 SVMs – task start is randomized within the scope of 1 hour
- 20000–50000 SVMs – task start is randomized within the scope of 2 hours
- over 50000 SVMs – task start is randomized within the scope of 3 hours
If you do not need to randomize the time of task starts within an automatically calculated time period, clear the Use automatically randomized delay for task starts check box. This check box is set by default.
- Use randomized delay for task starts within an interval of (min): If you want the task to start at a random time within a specified period of time after the scheduled task start, select this check box. In the text box, enter the maximum task start delay. In this case, the task starts at a random time within the specified period of time after the scheduled start. This check box can be changed if the Use automatically randomized delay for task starts check box is cleared.
Randomized task start times help prevent situations in which a large number of SVMs contact the Kaspersky Security Center Administration Server at the same time.
Proceed to the next step of the New Task Wizard.
- In the Name field, enter the name of the automatic patch installation task and proceed to the next step of the New Task Wizard.
- If you want the task to start as soon as the New Task Wizard finishes, select the Run task when the wizard is complete check box.
Exit the New Task Wizard.
The created update rollback task appears in the list of tasks. If you configured a schedule for starting the task in the Task start schedule settings window, the task is started according to this schedule. You can also start or stop the task manually at any time.
Page top
Instructions on managing the application for a tenant organization administrator
This section is intended for an administrator of a virtual infrastructure that belongs to a tenant organization and is protected by Kaspersky Security installed within the infrastructure of the anti-virus protection provider.
This section contains the information necessary for a tenant administrator to manage the protection of the tenant's virtual infrastructure.
Management of Kaspersky Security requires experience working with a virtual infrastructure on the VMware vSphere platform and working with Kaspersky Security Center, the system designed for remote centralized management of Kaspersky applications.
About Kaspersky Security for Virtualization 6.1 Agentless
Kaspersky Security for Virtualization 6.1 Agentless (hereinafter also "Kaspersky Security") is an integrated solution that protects virtual machines on the VMware ESXi hypervisor against viruses and other malware, as well as against network threats.
Kaspersky Security lets you protect virtual machines running Windows guest operating systems, including those running server operating systems, and virtual machines running Linux guest operating systems.
Kaspersky Security includes the following components:
- File Threat Protection. Protects the file system objects of a virtual machine against infection. The component is launched at the startup of Kaspersky Security. It protects virtual machines and scans the file system of virtual machines.
- Network Threat Protection. This component lets you detect and block activity that is typical of network attacks and other suspicious network activity, and lets you scan web addressed requested by a user or application, and block access to web addresses if a threat is detected.
- Integration Server. The component facilitates interaction between Kaspersky Security components and a VMware virtual infrastructure.
The File Threat Protection and Network Threat Protection components are installed on SVMs that are deployed on VMware ESXi hypervisors within the infrastructure of the anti-virus protection provider.
Kaspersky Security features:
- Protection. Kaspersky Security scans all files that the user or an application opens, saves, or launches on a virtual machine.
- If the file is free of malware, Kaspersky Security will grant access to the file.
- If malware is detected in the file, Kaspersky Security will perform the action that is specified in its settings. For example, it will delete the file or block access to the file.
Kaspersky Security can protect only powered-on virtual machines.
- Scan. The application lets you perform a virus scan on files of virtual machines. Virtual machine files must be scanned regularly with new anti-virus databases to prevent the spread of malicious objects. You can perform an on-demand scan or specify a scan schedule.
Kaspersky Security can scan powered-on virtual machines, virtual machine templates, and powered-off virtual machines that have the following file systems: NTFS, FAT32, EXT2, EXT3, EXT4, XFS, BTRFS.
- Intrusion Prevention. Kaspersky Security lets you analyze network traffic of protected virtual machines and detect network attacks and suspicious network activity that may be a sign of an intrusion into the protected infrastructure. When it detects an attempted network attack on a virtual machine or suspicious network activity, Kaspersky Security can terminate the connection and block traffic from the IP address from which the network attack or suspicious network activity originated.
Intrusion prevention settings are defined by the anti-virus protection provider.
- Web addresses scan. Kaspersky Security lets you scan web addresses that are requested over the HTTP protocol by a user or application installed on the virtual machine. If Kaspersky Security detects a web address from one of the web address categories selected for detection, the application can block access to the web address. By default, Kaspersky Security scans web addresses to check if they are malicious or phishing web addresses.
Web address scan settings are defined by the anti-virus protection provider.
- Storing backup copies of files. The application allows storing backup copies of files that have been deleted or modified during disinfection. If a disinfected file contained information that became partially or completely inaccessible after disinfection, the file can be restored from its backup copy.
All actions taken on backup copies of files are performed by the anti-virus protection provider.
About managing the application
Kaspersky Security is administered by Kaspersky Security Center, the remote centralized Kaspersky application administration system.
The Kaspersky Security administration plug-in for tenants provides the interface for managing the Kaspersky Security application through Kaspersky Security Center. The administration plug-in must be installed on the computer where the Kaspersky Security Center Administration Console is installed.
Kaspersky Security is managed through policies and tasks.
A policy is a group of settings used by SVMs to protect virtual machines within the protected infrastructure. Each policy contains one or multiple protection profiles. Protection profiles let you configure the settings for file protection of virtual machines.
Tasks are run on SVMs and let you scan virtual machines.
Kaspersky Security sends the Kaspersky Security Center Administration Server information about all events that occur during anti-virus protection and scanning of virtual machines, as well as information about events that occur when preventing intrusions and scanning web addresses. You can receive notifications about events and view them in Kaspersky Security Center.
For detailed information about working with events, policies and tasks, please refer to the Kaspersky Security Center documentation.
Page top
About Kaspersky Security policies
A policy lets you use protection profiles to configure the settings for virtual machine file protection, and configure the settings for using Kaspersky Security Network.
Policies are created using the Wizard, which is started by clicking the New policy button located in the workspace of the Managed devices folder on the Policies tab.
You can create multiple policies, but only one of them can be active. When you create a new active policy, the previous active policy becomes inactive.
You can change the settings of a policy after its creation in the policy properties window.
To open the policy properties window:
- In the Kaspersky Security Center Administration Console, select the Managed devices folder.
- In the workspace, select the Policies tab.
- In the list of policies, select the policy and open the Properties: <Policy name> window by double-clicking on the policy or by selecting Properties in the context menu.
For more information about managing policies, see Kaspersky Security Center documentation.
Page top
About protection profiles
The following protection profiles are provided in Kaspersky Security policies:
- The main protection profile is automatically created when a policy is created. Although the main protection profile cannot be deleted, you can edit its settings.
- You can create additional protection profiles after creating a policy. Additional protection profiles let you flexibly configure different protection settings for different virtual machines within the protected infrastructure. A policy can contain multiple additional protection profiles.
You can configure the following settings in protection profiles:
- Security level. You can select one of the preset security levels (High, Recommended, Low) or configure your own security level (Custom). The security level defines the following scan settings:
- Scanning of archives, self-unpacking archives, embedded OLE objects, and compound files
- Restriction on file scan duration
- List of objects to detect
- Action that Kaspersky Security performs after detecting infected files.
- Protection scope (scanning of network drives during protection of virtual machines).
- Exclusions from protection (by name, by file extension or path, by file mask or path to the folder containing files to be skipped).
A protection profile can be assigned to an individual VMware virtual infrastructure object or to the root element of the protected infrastructure, represented by a Cloud Director organization. By default, a protection profile assigned to the root element of a protected infrastructure is inherited by all child elements of the protected infrastructure (virtual machines and their combinations).
Protection profiles are also inherited according to the hierarchy of VMware virtual infrastructure objects: the protection profile assigned to a virtual infrastructure object is inherited by all of its child objects, including virtual machines, unless the child object/virtual machine has been assigned its own protection profile or unless the child object/virtual machine has been excluded from protection. This means that you can either assign a specific protection profile to a virtual machine, or let it inherit the protection profile that is used by its parent object.
Only one protection profile may be assigned to a single virtual infrastructure object. Kaspersky Security protects virtual machines according to the settings that are specified in the protection profile assigned to these virtual machines.
Virtual infrastructure objects that have no assigned protection profile are excluded from protection.
If you exclude a virtual infrastructure object from protection, all child objects that inherited the protection profile from the parent object are also excluded from protection. You can exclude from protection all child objects that have their own protection profile assigned, or leave them under the protection of the application.
Protection profile inheritance makes it possible to assign identical protection settings to multiple virtual machines simultaneously. For example, you can assign identical protection profiles to all virtual machines that are part of a virtual Datacenter.
Page top
About tasks
The following tasks are available for Kaspersky Security:
- Full Scan task for virtual machines. This task lets you run a virus scan on the files of all virtual machines in your virtual infrastructure.
- Custom Scan task for virtual machines. This task lets you run a virus scan on the files of those virtual machines that you specified in the task settings. You can specify individual virtual machines or VMware virtual infrastructure objects of a higher level of the hierarchy.
Tasks are created by using the Wizard, which is started by clicking the New task button located in the workspace of the Managed devices folder on the Tasks tab.
You can change the settings of a task after its creation in the task properties window.
To edit the settings of a task:
- In the Kaspersky Security Center Administration Console, select the Managed devices folder.
- In the workspace, select the Tasks tab.
- In the list of tasks, select the task and open the Properties: <Task name> window in one of the following ways:
- By double-clicking.
- Right-click to bring up the context menu of the task and select Settings.
- Edit the task settings.
- To save changes, click the Apply button or the OK button in the Properties: <Task name> window.
Regardless of the selected task run mode, you can start or stop the task at any time.
To start or stop a task:
- In the Kaspersky Security Center Administration Console, select the Managed devices folder.
- In the workspace, select the Tasks tab.
- In the list of tasks, select the task that you want to start or stop.
- Do one of the following:
- If you want to start the task, right-click to open the context menu and select Run.
- If you want to stop the task, right-click to open the context menu and select Stop.
Information about the progress and results of the task can be viewed in the Kaspersky Security Center Administration Console in one of the following ways:
- In the Task results window. The window can be opened by selecting the Results item in the task context menu.
- In the list of events that Kaspersky Security sends to Kaspersky Security Center Administration Server. You can view the event lists on the Events tab in the workspace of the Administration Server <Server name> node. Information on the Events tab is presented as event selections. Each selection includes only events of a specific type. The list displays events from the selection that is currently specified in the Event selections drop-down list. To display a list of the selection events, click the Run selection button. To refresh the list, click the Refresh link.
You can also perform the following actions with tasks:
- Copy tasks from one folder or administration group into another.
- Export tasks to a file and import tasks from a file.
- Convert tasks from the previous version of the application.
- Delete tasks.
For more information about managing tasks, see Kaspersky Security Center documentation.
Page top
Deploying protection of the virtual infrastructure of a tenant organization
Deploying protection for the virtual infrastructure of a tenant organization consists of the following steps:
- Installation and configuration of all Kaspersky Security components in the virtual infrastructure of the anti-virus protection provider. All actions at this step are performed by the provider's administrator.
- Installation of the Kaspersky Security Center Administration Console on the tenant organization administrator's workstation. You can use the Kaspersky Security Center Administration Console to manage the file protection settings and the settings for scanning your virtual machines, and receive information about events that occur during the protection of your virtual infrastructure. For details on installing the Administration Console, please refer to the Kaspersky Security Center documentation.
- Installation of the Kaspersky Security administration plug-in for tenants on the tenant organization administrator's workstation.
- Connection to the virtual Administration Server of Kaspersky Security Center. You need to start the Kaspersky Security Center Administration Console and specify the settings for connecting to the virtual Administration Server given by the provider: address, user name, and account password.
- Configuration of virtual machine file threat protection using a policy.
You can also create and configure scan tasks to periodically scan files of virtual machines using new anti-virus databases.
Installation of the Kaspersky Security administration plug-in for tenants
Prior to beginning installation of the Kaspersky Security administration plug-in for tenants, it is recommended to close the Kaspersky Security Center Administration Console.
The administration plug-in for tenants should be installed using an account that has software installation privileges (for example, an account from the group of local administrators).
The Kaspersky Security administration plug-in for tenants must be installed on the same computer on which the Kaspersky Security Center Administration Console is installed.
To install the Kaspersky Security administration plug-in for tenants:
- On the computer where the Kaspersky Security Center Administration Console is installed, start the file named ksv-t-components_6.1.0.XXX_mlg.exe. (6.1.0.XXX represents the application version number).
The Installation Wizard starts for the Kaspersky Security administration plug-in for tenants.
- Select the localization language of the Wizard and the Kaspersky Security administration plug-in for tenants and proceed to the next step of the Wizard.
By default, the window uses the localization language of the operating system installed on the computer where the Wizard was started.
- Read the End User License Agreement concluded between you and Kaspersky, and the Privacy Policy describing the handling and transmission of data.
To continue the installation, you must confirm that you have fully read and accept the terms of the End User License Agreement and the Privacy Policy. To confirm, select both check boxes in the window of the Wizard.
Proceed to the next step of the wizard.
- Review the information about the actions that the Wizard will perform and click Next to begin performing the listed actions.
- Wait for the wizard to finish.
If an error occurs during wizard operation, the wizard rolls back the changes made.
- Click Finish to close the Wizard window.
Creating a policy
To create a tenant policy:
- In the Kaspersky Security Center Administration Console, select the Managed devices folder.
- In the workspace, select the Policies tab and click the New policy button.
The New Policy Wizard starts.
- At the first step of the Wizard, select Kaspersky Security for Virtualization 6.1 Agentless (for tenants) from the list and proceed to the next step of the Wizard.
- Enter the name of the new policy and proceed to the next step of the wizard.
- Specify the Integration Server address and proceed to the next step of the Wizard.
It is recommended to specify the Integration Server address in the <address:port> format.
The Wizard establishes a connection to the Integration Server to receive information about the VMware virtual infrastructure.
The wizard checks the SSL certificate received from the Integration Server. If the received certificate contains an error, the Certificate verification window containing the error message opens. The SSL certificate is used to establish a secure connection to the Integration Server. If there are problems with the SSL certificate, it is recommended to make sure that the utilized data transfer channel is secure. To view information on the received certificate, click the View the received certificate button in the window containing the error message. You can install the certificate you received as a trusted certificate to avoid receiving a certificate error message at the next connection to the Integration Server. To do so, select the Install received certificate and stop showing warnings for <Integration Server address> check box.
To continue connecting, click the Continue button in the Certificate verification window. If you selected the Install received certificate and stop showing warnings for <Integration Server address> check box, the received certificate is saved in the operating system registry on the computer where the Kaspersky Security Center Administration Console is installed. The application also checks the previously installed trusted certificate for the Integration Server. If the received certificate does not match the previously installed certificate, a window opens to confirm replacement of the previously installed certificate. To replace the previously installed certificate with the certificate received from the Integration Server and continue connecting, click the Yes button in this window.
- At this step, you can change the default settings of the main protection profile.
The main protection profile is assigned by default to all virtual machines within the protected infrastructure.
Proceed to the next step of the wizard.
- Decide on whether or not to participate in Kaspersky Security Network. To do so, carefully read the Kaspersky Security Network Statement, then perform one of the following actions:
- If you want the application to use KSN in its operations and you agree to all the terms of the Statement, select I have read, understand, and accept the terms of this Kaspersky Security Network Statement.
- If you do not want to participate in KSN, select the I do not accept the terms of this Kaspersky Security Network Statement option and confirm your decision in the window that opens.
You will be able to change your decision later if necessary.
KSN usage settings (KSN mode and type) are determined by the provider's policy whose scope includes the virtual machines of the tenant.
Proceed to the next step of the wizard.
- Exit the Policy Wizard.
The created policy is displayed in the list of policies in the Managed devices folder on the Policies tab.
If you want to configure different file protection settings for different virtual machines within the protected infrastructure, you need to create and assign additional protection profiles in the policy properties.
Page top
Managing File Threat Protection
The settings that Kaspersky Security applies for protection of virtual machines are defined using policies.
Kaspersky Security protects only powered-on virtual machines that have been assigned a protection profile.
When a user or program attempts to access a virtual machine file, Kaspersky Security scans this file.
- If no viruses or other malware are detected in the file, Kaspersky Security grants access to this file.
- If viruses or other malware is detected in a file, Kaspersky Security assigns the Infected status to the file. If the scan cannot conclusively determine whether or not the file is infected (the file may contain a code sequence that is characteristic of viruses or other malware, or contain modified code from a known virus), Kaspersky Security also assigns the Infected status to the file.
Kaspersky Security then performs the action that is specified in the protection profile of the virtual machine; for example, it disinfects or blocks the file.
If an application that collects information and sends it to be processed is installed on a virtual machine, Kaspersky Security may classify this application as malware. To avoid this, you can exclude the application from protection. The list of exclusions is configured in the protection profile settings.
The Signature analysis and machine learning scan method is used for protection of virtual machines. Protection using signature analysis and machine learning provides the minimum acceptable security level. Kaspersky Security uses application databases containing information about known threats and about the methods to neutralize them. Based on the recommendations of Kaspersky experts, the Signature analysis and machine learning scan method is always enabled.
Additionally, during virtual machines protection, the Heuristic analysis is used. This is a technology designed for detecting threats that cannot be detected with the aid of Kaspersky application databases. Heuristic analysis detects files that could be infected with malware for which there are not yet any database signatures or infected with a new variety of a known virus. Files in which a threat is detected during heuristic analysis are marked as Infected.
The heuristic analysis level depends on the selected security level:
- If the security level is set to Low, the superficial heuristic analysis level is applied. Heuristic Analyzer does not perform all instructions in executable files while scanning executable files for malicious code. At this heuristic analysis level, the probability of detecting a threat is lower than at the medium heuristic analysis level. Scanning is faster and consumes less resources of the SVM.
- If the security level is set to Recommended, High, or Custom, the medium heuristic analysis level is applied. While scanning files for malicious code, Heuristic Analyzer performs the number of instructions in executable files that is recommended by Kaspersky experts.
Information about all events that occur during protection of virtual machines is sent to the Kaspersky Security Center Administration Server.
You are advised to regularly view the list of files blocked in the course of virtual machine protection and manage them. For example, you can save file copies to a location that is inaccessible to a virtual machine user or delete the files. You can view the details of blocked files by filtering events by the File blocked event (for more details on events, please refer to the Kaspersky Security Center documentation).
To gain access to files that were blocked as a result of virtual machine protection, you must exclude these files from protection in the settings of the protection profile assigned to the virtual machines, or temporarily disable the protection of these virtual machines.
Configuring main protection profile settings
You can configure the settings of the main protection profile while creating a policy (during the Configure main protection profile settings step) or in the properties of the policy after it is created (in the Main protection profile subsection in the File Threat Protection section).
To configure main protection profile settings:
- In the Security level section, select the security level at which Kaspersky Security scans virtual machines:
- If you want to install one of the pre-installed security levels (High, Recommended, or Low), use the slider to select one.
- To change the security level to Recommended, click the Default button.
- If you want to configure the security level on your own, click the Settings button. In the Security level settings window that opens:
- In the Scanning archives and compound files section, specify the values of the following settings:
- In the Performance section, specify the values of the following settings:
- In the Objects to detect section, click the Settings button. In the Objects to detect window that opens, specify the values of the following settings:
- Malicious tools
- Auto-dialers
- Adware
- Other
- Multi-packed files
Kaspersky Security always scans virtual machine files for viruses, worms, and Trojans. That is why the Viruses and worms and Trojans settings in the Malware section cannot be changed.
- In the Objects to detect window, click OK.
- In the Security level settings window, click OK.
If you have changed security level settings, the application creates a custom security level. The name of the security level in the Security level section changes to Custom.
- In the Action on threat detection section, select an action in the drop-down list.
- If you do not want Kaspersky Security to scan files on network drives when protecting virtual machines running Windows operating systems, clear the Scan network drives check box in the Protection scope section. By default, when protecting virtual machines running Windows operating systems, the application scans all files that have not been excluded from protection on network drives.
When protecting virtual machines running Linux operating systems, Kaspersky Security always scans files of supported network file systems (NFS and CIFS). If you want to exclude files of network file systems from the protection scope, you must configure a protection exclusion for the directory in which the network file system is mounted.
Kaspersky Security always scans files on removable and hard drives. For this reason the Scan all removable drives and hard drives setting in the Protection scope section cannot be edited.
- To exclude certain files of virtual machines from protection, in the Exclusions from protection section, click the Settings button.
In the Exclusions from protection window that opens, specify the following settings:
- In the File extensions section, choose one of the following options:
- Scan all except files with the following extensions. In the text box, specify a list of extensions of files to not scan when a virtual machine is being protected. Kaspersky Security ignores the case of characters in the extensions of files that are to be excluded from the protection scope.
- Scan files with the following extensions only. In the text box, specify a list of extensions of files to scan when the virtual machine is being protected. When protecting virtual machines running Linux operating systems, Kaspersky Security is case sensitive regarding the characters in the extensions of files that are to be included in the protection scope. When protecting virtual machines running Windows operating systems, the application ignores the cases of characters in file extensions.
You can type file extensions in the field by separating them with a blank space, or by typing each extension in a new line. File extensions may contain any characters except
. * | \ : " < > ? /. If an extension includes a blank space, the extension should be typed inside quotation marks:"doc x".If you have selected Scan files with the following extensions only in the drop-down list but have not specified the extensions of files to scan, Kaspersky Security scans all files.
- In the Files and folders table, use the Add, Change, and Delete buttons to create the list of objects to be excluded from protection.
By default, the list of exclusions includes the objects recommended by Microsoft (please refer to the list of recommended exclusions on the Microsoft website). Kaspersky Security excludes these objects from protection on all virtual machines to which the main protection profile has been assigned. You can view and edit the list of these objects in the Files and folders table.
You can exclude objects of the following types from protection:
- Folders. Files stored in folders at the specified path are excluded from protection. For each folder, you can specify whether to apply the exclusion from protection to subfolders.
The
*and?characters in the paths to excluded folders are not supported. The folder path must be absolute. - Files by mask. Files located at the specified path, or files matching the specified mask are excluded from protection.
Kaspersky Security ignores the case of characters in paths to files and folders that are excluded from protection.
You can save a configured list of exclusions to a file using the Export button or load a previously saved list of exclusions from a file using the Import button. To import or export a list of exclusions, you can use a file in XML format. You can also import a list of exclusions from a file in DAT format. Using a file in DAT format, you can import a list of exclusions that was generated in other Kaspersky applications.
- Folders. Files stored in folders at the specified path are excluded from protection. For each folder, you can specify whether to apply the exclusion from protection to subfolders.
If your exclusions list uses an environment variable that has multiple values depending on the bit rate of the application that uses it, in 64-bit Windows operating systems, objects corresponding to all values of the variable are excluded from protection. For example, if you use the %ProgramFiles% variable, objects located in the C:\Program files folder and in the C:\Program files (x86) folder are excluded from protection.
- In the File extensions section, choose one of the following options:
- In the Exclusions from protection window, click OK.
- Save the changes by clicking Next (in the New Policy Wizard) or Apply (in the policy properties).
The new protection profile settings are applied after data is synchronized between Kaspersky Security Center and the SVMs.
Page top
Managing additional protection profiles
You can manage additional protection profiles in the properties of a policy in the list of additional protection profiles.
To open the list of additional protection profiles in the policy properties:
- In the tree of the Kaspersky Security Center Administration Console, select the Managed devices folder.
- In the workspace, select the Policies tab.
- Select a policy in the list of policies and double-click the policy to open the Properties: <Policy name> window.
- In the policy properties window, in the File Threat Protection section, select the additional protection profiles subsection.
A list of additional protection profiles will appear in the right part of the window. If you have not yet created additional protection profiles in this policy, the list of protection profiles is empty.
In the list of additional protection profiles, you can do the following:
- Create additional protection profiles.
- Change the name of an additional protection profile by clicking the Rename button.
- Edit the settings of additional protection profiles by clicking the Change button. The settings are edited in the Protection settings window. The additional protection profile settings are identical to the main protection profile settings.
- Export the settings of an additional protection profile to a file by clicking the Export button. To save the settings of an additional protection profile, you need to specify the path to a file in JSON format. You can use previously saved settings when creating a new additional protection profile.
- Delete additional protection profiles by clicking the Delete button. If this protection profile was used for virtual machine protection, the application will protect these virtual machines using the settings of the protection profile that was assigned to their parent object in the virtual infrastructure. If the parent object has been excluded from protection, the application does not protect such virtual machines.
Creating an additional protection profile
To create an additional protection profile:
- In the Kaspersky Security Center Administration Console, open the list of additional protection profiles in the properties of the policy for which you want to create an additional protection profile.
- Click the Add button.
The Protection profile window opens.
- In the window that opens, enter the name of the new protection profile.
A protection profile name cannot contain more than 255 characters.
- If you want to use previously saved protection profile settings when creating a new protection profile, select the Import settings from file check box and specify the path to the file in JSON format.
- In the Protection profile window, click OK.
The Protection settings window opens. In this window, you can configure the settings of the new protection profile or change protection profile settings that were imported from a file.
The additional protection profile settings are identical to the main protection profile settings, with the exception of the default list of exclusions.
By default, the list of exclusions does not include objects recommended by Microsoft Corporation (please refer to the list of exclusions recommended by Microsoft on the Microsoft website). If you want the objects recommended by Microsoft to be excluded from protection on all virtual machines that have been assigned this protection profile, you need to import the microsoft_file_exclusions.xml file into the protection profile exclusions. The microsoft_file_exclusions.xml file is included in the application distribution kit and is located in the setup folder of the Kaspersky Security administration plug-in on the computer on which the Kaspersky Security Center Administration Console is installed. After importing the file, you can view and edit the list of these objects in the Files and folders table in the Exclusions from protection window.
- After configuring all settings of the protection profile, click OK in the Protection settings window.
In the Properties: <Policy name> window, a new protection profile appears in the list of additional protection profiles.
You can assign the created protection profile to virtual machines.
Page top
Viewing the protected infrastructure in a policy
In policy properties, you can view the protected infrastructure selected for the policy, and information about the use of protection profiles.
To view information about the protected infrastructure in a policy:
- In the Kaspersky Security Center Administration Console, open the policy properties:
- In the console tree, select the Managed devices folder.
- In the workspace, select the Policies tab.
- Select a policy in the list of policies and double-click the policy to open the Properties: <Policy name> window.
- In the policy properties window, in the File threat protection section, select the Protected infrastructure subsection.
The Kaspersky Security administration plug-in attempts to automatically connect to the Integration Server. If the connection fails, the Connection to Integration Server window opens. In the Connection to Integration Server window, specify the Integration Server address and click OK.
It is recommended to specify the Integration Server address in the <address:port> format.
- The Kaspersky Security administration plug-in verifies the SSL certificate received from the Integration Server. If the received certificate contains an error, the Certificate verification window containing the error message opens. The SSL certificate is used to establish a secure connection to the Integration Server. If there are problems with the SSL certificate, it is recommended to make sure that the utilized data transfer channel is secure. To view information on the received certificate, click the View the received certificate button in the window containing the error message. You can install the certificate you received as a trusted certificate to avoid receiving a certificate error message at the next connection to the Integration Server. To do so, select the Install received certificate and stop showing warnings for <Integration Server address> check box.
To continue connecting, click the Continue button in the Certificate verification window. If you selected the Install received certificate and stop showing warnings for <Integration Server address> check box, the received certificate is saved in the operating system registry on the computer where the Kaspersky Security Center Administration Console is installed. The application also checks the previously installed trusted certificate for the Integration Server. If the received certificate does not match the previously installed certificate, a window opens to confirm replacement of the previously installed certificate. To replace the previously installed certificate with the certificate received from the Integration Server and continue connecting, click the Yes button in this window.
After connecting to the Integration Server, the right part of the window displays information about the protected infrastructure and the use of protection profiles.
Information about the protected infrastructure
The protected infrastructure is displayed as a tree of items. The root element is the "Cloud Director organization" object that combines all virtual Datacenters of your virtual infrastructure.
If the virtual infrastructure contains two or more virtual machines with the same ID (vmID), only one virtual machine appears in the object tree. If this virtual machine has been assigned a protection profile, the settings of this protection profile are applied to all virtual machines that have the same ID (vmID).
Information about the assignment of protection profiles to virtual infrastructure objects
The Protection profile column displays information about the assignment of protection profiles to objects of the protected infrastructure. Kaspersky Security uses the settings of assigned protection profiles when protecting virtual machines.
The information is displayed as follows:
- The name of an expressly assigned protection profile is highlighted in black.
- The name of a protection profile inherited from a parent object is highlighted in gray. The name is formed as follows: "
inherited: <N>", where N represents the name of the protection profile that was inherited from a parent object. - If no protection profile has been assigned to an object of the protected infrastructure (the object has been excluded from protection), the Protection profile column displays the value
(Not assigned).
By default, the main protection profile is assigned to the "Cloud Director organization" root element and is inherited by all objects in the virtual infrastructure.
Page top
Assigning protection profile to virtual machines
To assign a protection profile to a virtual machine:
- In the policy properties, select the Protected infrastructure subsection.
- In the table, select one or more virtual machines.
If you want to assign the same protection profile to all virtual machines that are child objects of a single virtual Datacenter, select this Datacenter in the table. You can simultaneously select multiple virtual machines or other virtual infrastructure objects in the table by holding down the CTRL key.
- Click the Select protection profile button.
The Selecting protection profile window opens.
- Select one of the following options:
- Inherit parent protection profile: <name>. Select this option if you want to assign the protection profile of the parent object to a virtual machine or other virtual infrastructure object.
- Use protection profile. Select this option and indicate the protection profile name in the drop-down list to assign this protection profile to a virtual machine or other virtual infrastructure object. The list contains the main protection profile and all additional protection profiles that you configured in this policy.
- If the selected virtual infrastructure object has child objects, the protection profile is assigned to the object and to all of its child objects, including objects that have been assigned their own protection profile or that have been excluded from protection. If you want to assign the protection profile only to the selected virtual infrastructure object and to its child objects that inherit the protection profile and that have not been excluded from protection, clear the Apply to all child objects check box.
- Click OK.
The Selecting protection profile window will close, and the assigned protection profile will be displayed in the table in the Protected infrastructure subsection.
- In the Properties: <Policy name> window, click OK.
Disabling file threat protection for virtual machines
To disable virtual machine protection:
- In the policy properties, select the Protected infrastructure subsection.
- If you want to disable protection for one or multiple virtual machines:
- In the table, select one or more virtual machines.
If you want to disable protection for all virtual machines that are child objects of a single virtual Datacenter, select this Datacenter in the table. You can simultaneously select multiple virtual machines or other virtual infrastructure objects in the table by holding down the CTRL key.
- Click the Select protection profile button.
The Selecting protection profile window opens.
- Select the Do not use protection profile option.
- If you selected a Datacenter, protection will be disabled by default for all virtual machines within it, including virtual machines that have been assigned their own protection profile. If you want to disable protection only for those virtual machines that inherit the protection profile from the parent object, clear the Apply to all child objects check box.
- Click OK.
The Selecting protection profile window closes. In the table in the Protected infrastructure subsection, the value shown in the Protection profile column for virtual machines that have been excluded from protection is
(Not assigned).
- In the table, select one or more virtual machines.
- If you want to disable protection for all virtual machines in your virtual infrastructure, clear the Use File Threat Protection check box located in the upper part of the window.
- In the Properties: <Policy name> window, click OK.
Scanning virtual machines
Kaspersky Security lets you run a virus scan on the files of virtual machines on a VMware ESXi hypervisor. Virtual machine files need to be scanned regularly with new anti-virus databases to prevent the spread of malicious objects.
The settings that Kaspersky Security applies while scanning virtual machines are defined by using scan tasks. Kaspersky Security uses the following scan tasks:
- Full Scan. This task lets you run a virus scan on the files of all virtual machines in your virtual infrastructure.
- Custom Scan. This task lets you run a virus scan on the files of those virtual machines that you specified in the task settings. You can specify individual virtual machines or VMware virtual infrastructure objects of a higher level of the hierarchy.
You can set a schedule for running scan tasks, manually run a scan task, and view information about the progress and results of tasks.
If viruses or other malware are detected in a file during scanning of virtual machine files, Kaspersky Security assigns the Infected status to the file. If the scan cannot conclusively determine whether or not the file is infected (the file may contain a code sequence that is characteristic of viruses or other malware, or contain modified code from a known virus), Kaspersky Security also assigns the Infected status to the file.
The Signature analysis and machine learning scan method is used when scanning virtual machines. Scanning using signature analysis and machine learning provides the minimum acceptable security level. Kaspersky Security uses application databases containing information about known threats and about the methods to neutralize them. Based on the recommendations of Kaspersky experts, the Signature analysis and machine learning scan method is always enabled.
When scanning virtual machines, Heuristic analysis is used. This is a technology designed for detecting threats that cannot be detected with the aid of Kaspersky application databases. Heuristic analysis detects files that could be infected with malware for which there are not yet any database signatures or infected with a new variety of a known virus. Files in which a threat is detected during heuristic analysis are marked as Infected.
The deep heuristic analysis level is always used during virtual machine scanning irrespective of the selected security level. Heuristic Analyzer performs the maximum number of instructions in executable file, which raises the probability of threat detection.
If an application that collects information and sends it to be processed is installed on a virtual machine, Kaspersky Security may classify this application as malware. To avoid this, you can exclude the application from the scan scope.
Special considerations for scanning virtual machines:
- When performing scan tasks, Kaspersky Security can scan powered-off virtual machines that have the following file systems: NTFS, FAT32, EXT2, EXT3, EXT4, XFS, BTRFS.
- When performing scan tasks, Kaspersky Security can scan virtual machine templates.
- When scanning virtual machines running Windows operating systems, Kaspersky Security does not scan files in network folders. Kaspersky Security is able to scan files in network folders only when the user or an application accesses those files. If you want to regularly scan files in network folders, you must configure a scan task for virtual machines that have open network access to files and folders, and include those files and folders into the task scan scope.
When scanning virtual machines running Linux operating systems, Kaspersky Security scans files in CIFS network file systems if the directories in which the CIFS network file systems are mounted are included in the task scan scope. Scanning files in NFS network file systems is not supported.
After a scan task finishes, you are advised to view the list of files that are blocked as a result of the scan task and manage them manually. For example, you can save file copies in a location that is inaccessible for a virtual machine user or delete the files. You must first exclude the blocked files from protection in the settings of the protection profile assigned to the virtual machines, or temporarily disable protection of the virtual machines on which these files were blocked. You can view the details of blocked files by filtering events by the File blocked event (for more details, please refer to the Kaspersky Security Center documentation).
Creating a full scan task
To create a full scan task:
- In the Kaspersky Security Center Administration Console, select the Managed devices folder.
- In the workspace, select the Tasks tab and click the New task button to start the New Task Wizard.
- At the first step of the Wizard, select Kaspersky Security for Virtualization 6.1 Agentless (for tenants) → Full Scan.
Proceed to the next step of the New Task Wizard.
- Configure the settings for scanning virtual machines.
Proceed to the next step of the New Task Wizard.
- If necessary, specify the scan scope of the task: indicate the locations and extensions of the files of virtual machines that need to be scanned or excluded from scanning during a scan task.
Proceed to the next step of the New Task Wizard.
- To configure the task run schedule, please define the values of the following settings:
- Scheduled start. Choose the task run mode in the drop-down list. The settings displayed in the window depend on the task run mode chosen.
- Run skipped tasks. If this check box is selected, an attempt to start the task is made the next time the application is started on the SVM. In the Manually and Once modes, the task is started as soon as an SVM appears on the network.
If this check box is cleared, the task is started on an SVM by schedule only, and in Manually and Once modes it is started only on the SVMs that are visible on the network.
- Use automatically randomized delay for task starts. By default, the time of task start on SVMs is randomized with the scope of a certain time period. This period is calculated automatically depending on the number of SVMs covered by the task:
- 0–200 SVMs – task start is not randomized
- 200-500 SVMs – task start is randomized within the scope of 5 minutes
- 500-1000 SVMs – task start is randomized within the scope of 10 minutes
- 1000-2000 SVMs – task start is randomized within the scope of 15 minutes
- 2000-5000 SVMs – task start is randomized within the scope of 20 minutes
- 5000-10000 SVMs – task start is randomized within the scope of 30 minutes
- 10000–20000 SVMs – task start is randomized within the scope of 1 hour
- 20000–50000 SVMs – task start is randomized within the scope of 2 hours
- over 50000 SVMs – task start is randomized within the scope of 3 hours
If you do not need to randomize the time of task starts within an automatically calculated time period, clear the Use automatically randomized delay for task starts check box. This check box is set by default.
- Use randomized delay for task starts within an interval of (min): If you want the task to start at a random time within a specified period of time after the scheduled task start, select this check box. In the text box, enter the maximum task start delay. In this case, the task starts at a random time within the specified period of time after the scheduled start. This check box can be changed if the Use automatically randomized delay for task starts check box is cleared.
Randomized task start times help prevent situations in which a large number of SVMs contact the Kaspersky Security Center Administration Server at the same time.
Proceed to the next step of the New Task Wizard.
- In the Name field, enter the task name and proceed to the next step of the New Task Wizard.
- If you want the task to start as soon as the New Task Wizard finishes, select the Run task when the wizard is complete check box.
Finish the wizard.
The created custom scan task appears in the list of tasks. If you configured a task start schedule in the Task start schedule settings window, the task is started according to this schedule. You can also run the task manually at any time.
Page top
Creating a custom scan task
To create a Custom Scan task for virtual machines of tenants:
- In the Kaspersky Security Center Administration Console, select the Managed devices folder of the virtual Administration Server corresponding to the tenant.
- In the workspace, select the Tasks tab and click the New task button to start the New Task Wizard.
- At the first step of the Wizard, select Kaspersky Security for Virtualization 6.1 Agentless (for tenants) → Custom Scan.
Proceed to the next step of the New Task Wizard.
- Specify the Integration Server address and proceed to the next step of the New Task Wizard.
It is recommended to specify the Integration Server address in the <address:port> format.
The Task Wizard verifies the SSL certificate received from the Integration Server. If the received certificate contains an error, the Certificate verification window containing the error message opens. The SSL certificate is used to establish a secure connection to the Integration Server. If there are problems with the SSL certificate, it is recommended to make sure that the utilized data transfer channel is secure. To view information on the received certificate, click the View the received certificate button in the window containing the error message. You can install the certificate you received as a trusted certificate to avoid receiving a certificate error message at the next connection to the Integration Server. To do so, select the Install received certificate and stop showing warnings for <Integration Server address> check box.
To continue connecting, click the Continue button in the Certificate verification window. If you selected the Install received certificate and stop showing warnings for <Integration Server address> check box, the received certificate is saved in the operating system registry on the computer where the Kaspersky Security Center Administration Console is installed. The application also checks the previously installed trusted certificate for the Integration Server. If the received certificate does not match the previously installed certificate, a window opens to confirm replacement of the previously installed certificate. To replace the previously installed certificate with the certificate received from the Integration Server and continue connecting, click the Yes button in this window.
- Select the task scope: select the check boxes for those virtual machines that you want to scan as part of the scan task being created. You can specify individual virtual machines or their combinations.
If the virtual infrastructure contains two or more virtual machines with the same ID (vmID), only one virtual machine appears in the object tree. If this virtual machine is selected to be scanned using the custom scan task, the task will be performed on all virtual machines that have the same ID (vmID).
Proceed to the next step of the New Task Wizard.
- Configure the settings for scanning virtual machines.
Proceed to the next step of the New Task Wizard.
- If necessary, specify the scan scope of the task: indicate the locations and extensions of the files of virtual machines that need to be scanned or excluded from scanning during a scan task.
Proceed to the next step of the New Task Wizard.
- To configure the task run schedule, please define the values of the following settings:
- Scheduled start. Choose the task run mode in the drop-down list. The settings displayed in the window depend on the task run mode chosen.
- Run skipped tasks. If this check box is selected, an attempt to start the task is made the next time the application is started on the SVM. In the Manually and Once modes, the task is started as soon as an SVM appears on the network.
If this check box is cleared, the task is started on an SVM by schedule only, and in Manually and Once modes it is started only on the SVMs that are visible on the network.
- Use automatically randomized delay for task starts. By default, the time of task start on SVMs is randomized with the scope of a certain time period. This period is calculated automatically depending on the number of SVMs covered by the task:
- 0–200 SVMs – task start is not randomized
- 200-500 SVMs – task start is randomized within the scope of 5 minutes
- 500-1000 SVMs – task start is randomized within the scope of 10 minutes
- 1000-2000 SVMs – task start is randomized within the scope of 15 minutes
- 2000-5000 SVMs – task start is randomized within the scope of 20 minutes
- 5000-10000 SVMs – task start is randomized within the scope of 30 minutes
- 10000–20000 SVMs – task start is randomized within the scope of 1 hour
- 20000–50000 SVMs – task start is randomized within the scope of 2 hours
- over 50000 SVMs – task start is randomized within the scope of 3 hours
If you do not need to randomize the time of task starts within an automatically calculated time period, clear the Use automatically randomized delay for task starts check box. This check box is set by default.
- Use randomized delay for task starts within an interval of (min): If you want the task to start at a random time within a specified period of time after the scheduled task start, select this check box. In the text box, enter the maximum task start delay. In this case, the task starts at a random time within the specified period of time after the scheduled start. This check box can be changed if the Use automatically randomized delay for task starts check box is cleared.
Randomized task start times help prevent situations in which a large number of SVMs contact the Kaspersky Security Center Administration Server at the same time.
Proceed to the next step of the New Task Wizard.
- In the Name field, enter the task name and proceed to the next step of the New Task Wizard.
- If you want the task to start as soon as the New Task Wizard finishes, select the Run task when the wizard is complete check box.
Finish the wizard.
The created custom scan task appears in the list of tasks. If you configured a task start schedule in the Task start schedule settings window, the task is started according to this schedule. You can also run the task manually at any time.
Page top
Configuring virtual machine scan settings in a scan task
You can configure the virtual machine scan settings while creating the task (the Configure scan settings step) or in the task properties after its creation (the Scan settings section).
To configure the virtual machine scan settings:
- Select the security level at which Kaspersky Security scans virtual machines. To do so, in the Security level section, perform one of the following actions:
- If you want to install one of the pre-installed security levels (High, Recommended, or Low), use the slider to select one.
- To change the security level to Recommended, click the Default button.
- If you want to configure the security level on your own, click the Settings button. In the Security level settings window that opens:
- In the Scanning archives and compound files section, specify the values of the following settings:
- In the Performance section, specify the values of the following settings:
- In the Objects to detect section, click the Settings button. In the Objects to detect window that opens, specify the values of the following settings:
Kaspersky Security always scans virtual machine files for viruses, worms, and Trojans. That is why the Viruses and worms and Trojans settings in the Malware section cannot be changed.
- In the Objects to detect window, click OK.
- In the Security level settings window, click OK.
If you have changed security level settings, the application creates a custom security level. The name of the security level in the Security level section changes to Custom.
- In the Scan powered-on virtual machines section, configure the settings for scanning virtual machines that are powered on while a task is running:
- In the Scan powered-off virtual machines and virtual machine templates section, configure the settings for scanning virtual machines that are powered off or paused while a task is running, as well as for scanning virtual machine templates:
- In the Stop scan section, choose one of the following options:
- Save the changes by clicking Next (in the New Task Wizard) or Apply (in the task properties).
Configuring the scan scope in a scan task
The scan scope refers to the locations and extensions of files of virtual machines that are scanned by Kaspersky Security when it performs a scan task.
If a scan scope has not been configured, Kaspersky Security scans all files of virtual machines.
When scanning virtual machines running Windows operating systems, Kaspersky Security does not scan files in network folders. Kaspersky Security is able to scan files in network folders only when the user or an application accesses those files. If you want to scan files in network folders regularly, you must create a task for scanning virtual machines that have shared files and folders, and include those files and folders into the scan task scope.
When scanning virtual machines running Linux operating systems, Kaspersky Security scans files in CIFS network file systems if the directories in which the CIFS network file systems are mounted are included in the task scan scope. Scanning files in NFS network file systems is not supported.
You can define the scan scope of a task while creating the task (the Defining the scan scope step) or in the task properties after it is created (the Scan scope section).
To configure the scan scope of the task:
- Select one of the following options:
- Scan all files and folders except for those specified
- Scan specified files and folders only
- If you selected the Scan all files and folders except for those specified option, you can create a list of objects that must be excluded from the scan scope by using the Add, Change and Delete buttons.
You can exclude objects of the following types from the scan scope:
- Folders. Files stored in folders at the specified path are excluded from the scan scope. For each folder, you can specify whether to apply the exclusion to subfolders.
The
*and?characters in the paths to excluded folders are not supported. The folder path must be absolute. - Files by mask. Files located at the specified path, or files matching the specified mask are excluded from the scan scope.
Kaspersky Security ignores the case of characters in paths to files and folders that are excluded from the scan scope.
You can save a configured list of exclusions to file using the Export button or load a previously saved list of exclusions from file using the Import button. To import or export a list of exclusions, you can use a file in XML format. You can also import a list of exclusions from a file in DAT format. Using a file in DAT format, you can import a list of exclusions that was generated in other Kaspersky applications.
The application distribution kit includes the microsoft_file_exclusions.xml file with the list of exclusions recommended by Microsoft Corporation (see the Microsoft website for the list of exclusions recommended by Microsoft). The microsoft_file_exclusions.xml file is located in the setup folder of the Kaspersky Security administration plug-in on the computer on which the Kaspersky Security Center Administration Console is installed. You can import this file into exclusions of the scan task. After the import is completed, Kaspersky Security does not scan the objects recommended by Microsoft when it performs a scan task. You can view and edit the list of these objects in the Files and folders table.
If your exclusions list uses an environment variable that has multiple values depending on the bit rate of the application that uses it, in 64-bit Windows operating systems, objects corresponding to all values of the variable are excluded from the scan scope. For example, if you use the %ProgramFiles% variable, objects located in the C:\Program Files folder and in the C:\Program Files (x86) folder are excluded from the scan scope.
- Folders. Files stored in folders at the specified path are excluded from the scan scope. For each folder, you can specify whether to apply the exclusion to subfolders.
- If you selected the Scan all files and folders except for those specified option, in the File extensions section you can specify the extensions of files that should be included in the scan scope or excluded from the scan scope.
To do so, select one of the options below:
- Scan all except files with the following extensions. In the text box, specify a list of extensions of files to not scan during a scan task. Kaspersky Security ignores the case of characters in the extensions of files that are to be excluded from the scan scope.
- Scan files with the following extensions only. In the text box, specify a list of extensions of files to scan during a scan task. When scanning virtual machines running Linux operating systems, Kaspersky Security is case sensitive regarding the characters in the extensions of files to be included in the scan scope. When scanning virtual machines running Windows operating systems, the application ignores the cases of characters in file extensions.
You can type file extensions in the field by separating them with a blank space, or by typing each extension in a new line. File extensions may contain any characters except
. * | \ : " < > ? /. If an extension includes a blank space, the extension should be typed inside quotation marks:"doc x".If you have selected Scan files with the following extensions only in the drop-down list but have not specified the extensions of files to scan, Kaspersky Security scans all files.
Folders excluded from the scan have a higher priority than file extensions that are included in the scan scope. If a file is located in a folder that is excluded from the scan, the application skips this file even if its extension is included in the scan scope.
- If you selected the Scan specified files and folders only option, use the Add, Change, and Delete buttons to create a list of virtual machine files and folders to scan during the scan task.
When scanning virtual machines running Linux operating systems, Kaspersky Security is case sensitive regarding the characters in paths to files and directories included in the scan scope. When scanning virtual machines running Windows operating systems, paths to files and folders are not case sensitive.
If your list of objects requiring scanning uses an environment variable that has multiple values depending on the bit rate of the application that uses it, in 64-bit Windows operating systems, objects corresponding to all values of the variable are included in the scan scope. For example, if you use the %ProgramFiles% variable, objects located in the C:\Program Files folder and in the C:\Program Files (x86) folder are included in the scan scope.
- Save the changes by clicking Next (in the New Task Wizard) or Apply (in the task properties).
Participating in Kaspersky Security Network
To enhance the protection of virtual machines, Kaspersky Security can use data received from Kaspersky users all over the world. Kaspersky Security Network is designed to collect such data.
Kaspersky Security Network (KSN) is an infrastructure of cloud services providing access to Kaspersky online knowledge base with information about the reputation of files, web resources, and software. Data from Kaspersky Security Network ensures faster response by Kaspersky Security to unknown threats, improves the performance of some protection components, and reduces the risk of false positive.
If you are participating in Kaspersky Security Network, KSN services provide Kaspersky Security with information about the category and reputation of scanned files.
The following types of KSN are differentiated depending on the location of the infrastructure:
- Global KSN – the infrastructure is hosted by Kaspersky servers.
- Private KSN. This infrastructure is located within the corporate network or hosted by third-party servers of the service provider, such as on the Internet service provider's network.
The KSN mode (standard KSN or extended KSN) affects the amount of data that is automatically transmitted to Kaspersky when KSN is being used. Kaspersky Security automatically sends information about KSN usage to Kaspersky, and may send other information depending on the KSN usage mode. If KSN is being used in extended mode, you agree to automatically send Kaspersky all the data listed in the Kaspersky Security Network Statement. Files (or parts thereof) that could be exploited by hackers to harm the virtual machine or data stored in its operating system may also be sent to Kaspersky for analysis.
You can view the text of the Kaspersky Security Network Statement in the policy properties in the KSN settings section.
For information about the storage, protection and destruction of statistical information that is obtained during the use of KSN and transmitted to Kaspersky, please refer to the Privacy Policy on the Kaspersky website.
Information about which KSN mode and type are being used by Kaspersky Security can be obtained from the anti-virus protection provider. KSN usage settings are determined by the policy of the provider.
Participation in Kaspersky Security Network is voluntary. The decision to participate in Kaspersky Security Network is made during the creation of a Kaspersky Security policy, and this decision can be changed at any time.
KSN is used by Kaspersky Security only if you have accepted the terms of the Kaspersky Security Network Statement and the anti-virus protection provider has enabled the use of KSN.
Viewing the Kaspersky Security Network Statement
To view the Kaspersky Security Network Statement:
- In the Kaspersky Security Center Administration Console, open the properties of the policy that determines the protection settings for your virtual infrastructure:
- In the console tree, select the Managed devices folder.
- In the workspace, select the Policies tab.
- Select a policy in the list of policies and double-click the policy to open the Properties: <Policy name> window.
- In the policy properties window, select the KSN settings section.
- Click the link to open the Kaspersky Security Network Statement.
The text of the Kaspersky Security Network Statement opens in a separate window.
Page top
Enabling and disabling use of Kaspersky Security Network
The use of KSN by Kaspersky Security is enabled or disabled in a policy. If KSN usage is enabled in the active policy and the anti-virus protection provider has enabled the use of KSN, KSN services are used in the operation of Kaspersky Security during virtual machine protection and when executing virtual machine scan tasks.
If the policy configured for KSN usage is inactive or KSN usage is disabled in the policy of the provider, KSN services are not used in the operation of Kaspersky Security.
To enable or disable the use of KSN by Kaspersky Security:
- In the Kaspersky Security Center Administration Console, open the properties of the policy that determines the protection settings for your virtual infrastructure:
- In the console tree, select the Managed devices folder.
- In the workspace, select the Policies tab.
- Select a policy in the list of policies and double-click the policy to open the Properties: <Policy name> window.
- In the policy properties window, select the KSN settings section.
- If you want to enable use of KSN by the application:
- Select the Use KSN check box.
- In the opened window, read the Kaspersky Security Network Statement.
- If you agree with all the terms of the Statement, select I have read, understand, and accept the terms of this Kaspersky Security Network Statement and click OK.
- If you want to disable the use of KSN, clear the Use KSN check box.
- In the Properties: <Policy name> window, click OK.
Obtaining protection status information
Kaspersky Security components installed on SVMs relay service messages (events) containing information about application operation to the Kaspersky Security Center Administration Server. Information about events is saved in the Administration Server database.
Event importance levels are of the following types:
- Critical event. A critical event indicates the occurrence of a critical problem that may lead to data loss, an operational malfunction, or a critical error. It may indicate problems in the operation of Kaspersky Security or vulnerabilities in the protection of virtual machines.
- Error. This event indicates the occurrence of a serious problem, error or malfunction that occurred during operation of the application or while performing a procedure.
- Warning. This event requires attention because it emphasizes important situations in the operation of Kaspersky Security and may indicate a possible issue in the future.
- Info. This event informs about successful completion of an operation, proper functioning of the application, or completion of a procedure.
You can view information from the Administration Server database in the workspace of the Administration Server <Server name> node on the Events tab.
Information on the Events tab is presented as a list of event selections. Each selection includes only events of a specific type. For example, the "Device status is Critical" selection contains only records about changes of device statuses to "Critical". The Events tab contains a number of standard event selections. You can create additional (custom) event selections and export event information to a file. For more information about event filtering, see Kaspersky Security Center documentation.
A notification is a message containing information about an event. Notifications keep the user informed about application events in a timely manner. To select the method used for notifications about events and to configure other event notification settings, you need to contact your anti-virus protection provider.
For detailed information on events and notifications, see the Kaspersky Security Center documentation.
Page top
Removing the Kaspersky Security administration plug-in for tenants
You can remove the Kaspersky Security administration plug-in for tenants in interactive mode by using the standard application removal tools in the operating system.
To do so, in the list of applications installed in the operating system, select Kaspersky Security for Virtualization 6.1 Agentless (for tenants) – administration plug-in for removal.
The wizard is used to perform removal.
Page top
Contact Technical Support
This section describes how to get technical support and the terms on which it is available.
How to get technical support
If you cannot find a solution to your issue in the help or in other sources of information about the application, we recommend you contact Technical Support. Technical Support specialists will answer any of your questions about installing and using the application.
Kaspersky provides support for this application during its lifecycle (see the Product Support Lifecycle page). Before contacting Technical Support, please read the technical support rules.
You can contact Technical Support in one of the following ways:
- Visit Technical Support website
- Send a request to Kaspersky Technical Support from the Kaspersky CompanyAccount portal.
Technical Support via Kaspersky CompanyAccount
Kaspersky CompanyAccount is a portal for companies that use Kaspersky applications. The Kaspersky CompanyAccount portal is designed to facilitate interaction between users and Kaspersky specialists through online requests. The Kaspersky CompanyAccount portal lets you monitor the progress of electronic request processing by Kaspersky specialists and store a history of electronic requests.
You can register all of your organization's employees under a single account on Kaspersky CompanyAccount. A single account lets you centrally manage electronic requests from registered employees to Kaspersky and also manage the privileges of these employees via Kaspersky CompanyAccount.
The Kaspersky CompanyAccount portal is available in the following languages:
- English
- Spanish
- Italian
- German
- Polish
- Portuguese
- Russian
- French
- Japanese
To learn more about Kaspersky CompanyAccount, visit the Technical Support website.
Page top
Collecting information for Technical Support
Report for Technical Support
After you notify Technical Support specialists about your issue, they may ask you to generate a report with the following information:
- SVM settings
- VMware ESXi hypervisor version
- VMware vCenter Server version
- VMware NSX Manager component version
- Version of the VMware Tools kit installed on the protected virtual machine
- List of VMware technologies used (View, DRS, DPM, HA, FT)
- Kaspersky Security Center version
- For a computer with Kaspersky Security Center installed – operating system version and Microsoft .NET Framework version
Send the generated report to Technical Support.
Getting data files
After you notify Technical Support experts about your issue, they may ask you to send trace files for application components and/or system statistics files from the SVM.
Information about how to obtain SVM system statistics files is available on the application page in the Knowledge Base.
Special operating modes of application components
For diagnostics of application operation, Technical Support experts may ask you to perform the following actions:
- Turn on Integration Server debug mode. A special configuration file setting is used to turn on debug mode. To receive more detailed information about the operation of the Integration Server, you may need to configure additional application settings in the configuration file.
- Start installation of Kaspersky Security components (Kaspersky Security administration plug-in, Integration Server, and Integration Server Console) in silent mode with special command line settings.
- Make changes to the application configuration files and apply those changes.
For detailed information necessary to perform the listed actions, you can contact Technical Support experts.
Using utilities from the application distribution kit
To analyze the cause of errors in the operation of Kaspersky Security, Technical Support experts may ask you to use the following utilities included in the application distribution kit:
- inventory_view_format_client – a utility for obtaining data on the VMware virtual infrastructure and data on the current protection status and protection status history
- licenser_client – a utility for managing keys and viewing license information
- check_policy_client – a utility that checks whether Kaspersky Security is using a policy that was received from Kaspersky Security Center or is using the default protection settings
- ksvscan_client – a utility used to view information about the installed application databases
- product_status_client – a utility that checks whether or not application databases are installed, the application has been activated, and protection is enabled
- qb_client – a utility for managing backup copies of files in Backup
- detect_cache_purge_client – a utility that clears the cache of statuses of detected objects
- event_log_client, emergency_event_log_client – utilities that generate events to be relayed to Kaspersky Security Center
- tracer_configurator_client – a utility that lets you configure the settings for logging information to SVM trace files
- updater_client – a utility for updating application databases or rolling back the update
- autopatch_client – a utility that installs application patches downloaded together with the application databases update package
- vicreds – a utility for viewing or editing the settings of the SVM connection to the VMware vCenter Server or Integration Server
- ksv_policy_editor, ksv_policy_manager_client – utilities that let you change the settings of a policy applied on an SVM
- klmover – a utility for editing the address of the Kaspersky Security Center Administration Server and changing the mode of data exchange in the SVM configuration settings
For details on using the utilities, see the application page in the Knowledge Base.
Page top
About trace files
A trace file helps track down step-by-step execution of application commands and detect the phase of application operation when an error occurs.
You can view data saved in trace files. Please contact Kaspersky Technical Support for advice on how to view data.
All trace files contain the following common data:
- Event time
- Number of the thread of execution
- Application component that caused the event
- Degree of event importance (informational event, warning, critical event, error)
- Description of the event involving execution of a command received from an application component, and the result of execution of this command
Trace files are not automatically sent to Kaspersky. You can use these files when contacting Technical Support. The information recorded in trace files may be needed for analysis and identification of the causes of errors in the operation of application components.
For the purpose of working with trace files, Technical Support experts may ask you to use the logcontrol.sh script that is included in the application distribution kit (for details, please refer to the Knowledge Base).
Trace files are stored in non-encrypted form. You are advised to provide protection against unauthorized access.
About Kaspersky Security components Installation Wizard trace files
Information about the progress and results of installation, upgrade, and removal of the Kaspersky Security administration plug-in, Integration Server, and Integration Server Console is logged to trace files of the Installation Wizard for Kaspersky Security components. If installation, upgrade, or removal ends in an error, you can use these files when contacting Technical Support.
Trace files of the Kaspersky Security Components Installation Wizard are files in TXT format. They are automatically saved on the same computer on which the user ran the installation, upgrade or removal of the Kaspersky Security administration plug-in, Integration Server, and Integration Server Console.
If you install Kaspersky Security components, the trace files are saved to an archive in the path %temp%\Kaspersky_Security_for_Virtualization_6.1_Agentless_BundleInitialInstall_logs_<date and time>.zip, where <date and time> is the date and time of installation completion.
If you upgrade Kaspersky Security components, the trace files are saved to an archive in the path %temp%\Kaspersky_Security_for_Virtualization_6.1_Agentless_BundleMajorUpgrade_logs_<date and time>.zip, where <date and time> is the date and time of upgrade completion.
If you remove Kaspersky Security components, the trace files are saved to an archive in the path %temp%\Kaspersky_Security_for_Virtualization_6.1_Agentless_BundleUninstall_logs_<date and time>.zip, where <date and time> is the date and time of removal completion.
Trace files of the Kaspersky Security Components Installation Wizard contain the following information:
- Diagnostic information about the process of installation, upgrade or removal of Kaspersky Security components.
- Name of the computer on which the user started the procedure for installing, upgrading or removing Kaspersky Security components, and the name of the user that started the procedure.
- Information about errors that occurred during the process of installation, upgrade or removal of Kaspersky Security components.
About trace files of the Installation Wizard for the Kaspersky Security administration plug-in for tenants
Information about the progress and results of installation, upgrade and removal of the Kaspersky Security administration plug-in for tenants is written to Wizard trace files. If installation, upgrade, or removal ends in an error, you can use these files when contacting Technical Support.
Trace files of the Installation Wizard for the Kaspersky Security administration plug-in for tenants are in TXT format. They are automatically saved on the same computer on which the installation, upgrade, or removal of the administration plug-in was performed.
If you install the Kaspersky Security administration plug-in for tenants, the trace files are saved to an archive in the path %temp%\Kaspersky_Security_for_Virtualization_6.1_Agentless_(for_tenants)_BundleInitialInstall_logs_<date and time>.zip (<date and time> is the date and time of installation completion).
If you upgrade the Kaspersky Security administration plug-in for tenants, the trace files are saved to an archive in the path %temp%\Kaspersky_Security_for_Virtualization_6.1_Agentless_(for_tenants)_BundleMajorUpgrade_logs_<date and time>.zip (<date and time> is the date and time of upgrade completion).
If you remove the Kaspersky Security administration plug-in for tenants, the trace files are saved to an archive in the path %temp%\Kaspersky_Security_for_Virtualization_6.1_Agentless_(for_tenants)_BundleUninstall_logs_<date and time>.zip (<date and time> is the date and time of removal completion).
Trace files of the Installation Wizard for the Kaspersky Security administration plug-in for tenants contain the following information:
- Diagnostic information about the process of installation, upgrade or removal of the Kaspersky Security administration plug-in for tenants
- Name of the computer on which the user started the procedure for installing, upgrading or removing the Kaspersky Security administration plug-in for tenants, and the name of the user that started the procedure
- Information about errors that occurred during the process of installation, upgrade or removal of the Kaspersky Security administration plug-in for tenants
About SVM trace files
Information about application operation may be logged to the following trace files located on SVMs:
- on an SVM with the File Threat Protection component:
- /var/log/kaspersky/ksv/connector.ksv.log
- /var/log/kaspersky/ksv/connector.ksvt.log
- /var/log/kaspersky/ksv/wdserver.log
- /var/log/kaspersky/ksv/klmount.log
- /var/log/kaspersky/ksv/ksvmain.log
- on an SVM with the Network Threat Protection component:
- /var/log/kaspersky/ksvns/connector.ksv.log
- /var/log/kaspersky/ksvns/wdserver.log
- /var/log/kaspersky/ksvns/ksvnsmain.log
- on an SVM with the File Threat Protection component and on an SVM with the Network Threat Protection component:
- /var/log/kaspersky/klnagen64/$klnagent-1103-wd.log
- /var/log/kaspersky/klnagen64/$klnagent-1103.log
- /var/log/ksv
- /var/log/secure
- /var/log/messages
- /var/log/mr_product_stat_ksv.log
- /var/log/mr_system_stat_ksv.log
By default, information about the application operation is not saved. To enable logging of information to SVM trace files, you must perform the steps described on the application page in the Knowledge Base.
In addition to general data, SVM trace files may contain the following information:
- Names of scanned files and the paths to them on the virtual machine. Personal data (last name, first name, and middle name, email address, user account name) may also be saved if this data is contained in the paths or names of scanned files.
- Scanned web addresses, IP addresses and names of virtual machines, information about the virtual local area network (VLAN), information about the Ethernet, IP, TCP, and UDP headers for each network packet.
- Information about drive mounts for scanning powered-off virtual machines, lists of file systems and their IDs.
- Information about operating system events.
- Information about events that occurred during interaction with Kaspersky Security Center.
- Information about events that occurred during operation of the watchdog service.
- Information about SVM operation in the multitenancy mode and about SVM settings received from the Integration Server.
About trace files of the Integration Server and Integration Server Console
Information about the operation of the Integration Server and the Integration Server Console may be recorded in the following trace files:
- %ProgramData%\Kaspersky Lab\VIIS\logs\service.log – the Integration Server trace file.
- %ProgramData%\Kaspersky Lab\VIIS Console\logs\console.log – the trace file of the Integration Server Console.
Trace files are created only after you have enabled the logging of information about the Integration Server and Integration Server Console. By default, information about the operation of the Integration Server and Integration Server Console is not saved.
You can enable the logging of information to Integration Server and Integration Server Console trace files, and change the level of detail of information in trace files by using configuration files:
- %ProgramFiles(x86)%\Kaspersky Lab\Kaspersky VIIS\Nlog.config – for the Integration Server trace file
- %ProgramFiles(x86)%\Kaspersky Lab\Kaspersky VIIS Console\NLog.config – for the Integration Server Console trace file
Contact Technical Support experts for details.
If you enabled the logging of information to the Integration Server trace file, you can view this file by clicking the View trace file link in the Integration Server settings section of the Integration Server Console. The link is available only if the Integration Server Console is installed on the same computer as the Integration Server.
The following information may be saved in the Integration Server trace file:
- Diagnostic information about the operation of the Integration Server, its workload, and the results of a data integrity check.
- Headers and contents of HTTP requests that are sent and received by the Integration Server during its operation.
- IP addresses of the SVM and computer hosting the Kaspersky Security Center Administration Console and the Kaspersky Security administration plug-in, if the Kaspersky Security Center Administration Console was installed separately from the Kaspersky Security Center Administration Server.
- Traces of requests to the Integration Server.
- Description of exclusions and errors that occurred when working with internal subsystems and external services.
- Names of internal Integration Server user accounts.
- IP addresses or fully qualified domain names (FQDN) of VMware vCenter Servers, VMware Cloud Director, or VMware NSX Manager to which the Integration Server connects.
- Information about the Kaspersky Security service registration process.
- Information about the Kaspersky Security reconfiguration process.
The following information may be saved in the Integration Server Console trace file:
- Diagnostic information about the operation of the Integration Server Console.
- Traces of command line parameters and results of checking them.
- Headers and contents of HTTP requests that are sent and received by the Integration Server Console during its operation.
- Information about navigations through sections of the Integration Server Console and working with interface elements.
- IP address of the Kaspersky Security Center Administration Server.
- Port numbers for interaction with the Kaspersky Security Center Administration Server through the Kaspersky Security Center Network Agent.
- Description of exclusions and errors that occurred when working with internal subsystems and external services.
- Names of internal Integration Server user accounts.
- IP addresses or fully qualified domain names (FQDN) of VMware vCenter Servers, VMware Cloud Director, or VMware NSX Manager to which the Integration Server connects.
Sources of information about the application
Kaspersky Security page on the Kaspersky website
On the Kaspersky Security web page you can view general information about the application, its functions and features.
Kaspersky Security page in the Knowledge Base
Knowledge Base is a section on the Technical Support website.
On the Kaspersky Security page in the Knowledge Base you can read articles that provide useful information, recommendations, and answers to frequently asked questions about purchasing, installing, and using the application.
Knowledge Base articles can answer questions relating both to Kaspersky Security and other Kaspersky applications. Articles in the Knowledge Base may also contain Technical Support news.
Discuss Kaspersky applications with the community
If your question does not require an urgent answer, you can discuss it with Kaspersky experts and other users on our Forum.
On this Forum, you can view existing threads, leave your own comments and create new discussion threads.
Page top
Appendix. Brief instructions on installing the application
Before you start the application installation, do the following:
- Make sure that all Kaspersky Security software and hardware requirements are met.
- Prepare VMware virtual infrastructure for Kaspersky Security installation. The preparatory steps depend on the type of VMware NSX Manager you use: VMware NSX-T Manager or VMware NSX-V Manager.
In the infrastructure managed by VMware NSX-T Manager:
- Combine VMware ESXi hypervisors into one or several VMware clusters.
- If you want to use an N-VDS switch, reserve one physical network interface on each VMware ESXi hypervisor.
- Select a network and a storage for service virtual machines and SVMs on each hypervisor (Agent VM Settings, for details refer to the VMware product documentation).
- Install Guest Introspection Thin Agent on each virtual machine that you want to protect using Kaspersky Security. For more details please refer to documentation attached to VMware products.
- Register VMware vCenter Server to which VMware NSX-T Manager is connected as NSX Compute Manager.
- Create NSX Transport Node Profile.
- Apply the created NSX Transport Node Profile on each VMware cluster where SVMs will be deployed.
- If you want to install the Network Threat Protection component:
- Create an NSX Segment and connect network interfaces of the protected virtual machines to it.
- Make sure that you are using one of the following license types for VMware NSX-T Data Center:
- NSX Data Center Advanced.
- NSX Data Center Enterprise Plus.
- NSX Data Center for Remote Office Branch Office.
- NSX for vSphere Advanced.
- NSX for vSphere Enterprise.
In the infrastructure managed by VMware NSX-V Manager:
- Combine VMware ESXi hypervisors into one or several VMware clusters.
- Select a network and a storage for service virtual machines and SVMs on each hypervisor (Agent VM Settings, for details refer to the VMware product documentation).
- Deploy the Guest Introspection service virtual machines on each VMware cluster where the SVMs with the File Threat Protection component will be deployed.
- Install Guest Introspection Thin Agent on each virtual machine that you want to protect using Kaspersky Security. For more details please refer to documentation attached to VMware products.
- If you want to install the Network Threat Protection component:
- Install VMware NSX components on each VMware cluster where SVMs with the Network Threat Protection component will be deployed. Refer to the Knowledge Base for more details.
- Make sure that you are using one of the following license types for VMware NSX for vSphere:
- NSX for vSphere Advanced.
- NSX for vSphere Enterprise.
- Download all SVM image files from Kaspersky website and place them in the same folder on a network resource accessible via HTTP or HTTPS. For example, published them on Kaspersky Security Center Web Server.
- Make sure that the ports required for the application operation are opened and the accounts required for installation and operation of the application are created.
Prior to beginning installation of Kaspersky Security, it is recommended to close the Kaspersky Security Center Administration Console.
To install the application:
- Install the Kaspersky Security main administration plug-in and Integration Server.
- If you want to use the application in multitenancy mode, install the Kaspersky Security administration plug-in for tenants.
When the Kaspersky Security Center Administration Console starts for the first time after the Kaspersky Security administration plug-ins are installed, the Quick Start Wizard for the managed application is automatically started. The Wizard lets you create default policies and tasks. If the Quick Start Wizard for the managed application was not started automatically, it is recommended to start it manually.
- Start the Integration Server Console and configure the settings for connecting the Integration Server to one or more virtual infrastructure administration servers.
- In the Integration Server Console, use the Wizard to register Kaspersky Security services in VMware NSX Manager.
- Deploy SVMs with Kaspersky Security components and configure protection settings in the virtual infrastructure. Actions to be performed depend on the type of VMware NSX Manager you use: VMware NSX-T Manager or VMware NSX-V Manager.
In the infrastructure managed by VMware NSX-T Manager, perform the following actions in the VMware NSX Manager Web Console:
- Include virtual machines that you want to protect into one or several NSX Groups.
- To protect virtual machines from file threats:
- Deploy Kaspersky File Antimalware Protection service.
- Create an NSX Service Profile for the Kaspersky File Antimalware Protection service.
- Create an NSX policy for File Threat Protection and an Endpoint Protection Rule. In the rule settings, specify the NSX group that includes the protected virtual machines, and the previously created profile of the Kaspersky File Antimalware Protection service.
- To protect virtual machines from network threats:
- Deploy Kaspersky Network Protection service.
- Create an NSX Service Profile for the Kaspersky Network Protection service.
- Create an NSX Service Chain that uses the Kaspersky Network Protection service profile created before.
- Create an NSX policy that redirects traffic to the NSX Service Chain that contains Kaspersky Network Protection service profile. Configure rules for inbound traffic and outbound traffic; specify the NSX group, which includes the protected virtual machines, in the rule settings.
In the infrastructure managed by VMware NSX-V Manager, perform the following actions in the VMware vSphere Client console:
- Include virtual machines that you want to protect into one or several NSX Groups.
- Deploy Kaspersky File Antimalware Protection service to protect virtual machines from file threats and Kaspersky Network Protection service to protect virtual machines from network threats.
- Create an NSX Policy that uses Kaspersky Security services, and apply the policy to NSX groups that include protected virtual machines.
If you want to use the application in multitenancy mode, configure protection of tenant organizations:
- In the Kaspersky Security Center Administration Console, for each tenant whose virtual machines need to be protected, create a virtual Administration Server and account that will be used by the tenant administrator to connect to the virtual Administration Server.
- In the Kaspersky Security Center Administration Console, create the account that the Integration Server will use to connect to the Kaspersky Security Center Administration Server. This connection is required for obtaining information about virtual Administration Servers created in Kaspersky Security Center, and for configuring mappings between virtual Administration Servers and Cloud Director organizations that contain tenant virtual machines.
- In the Integration Server Console, connect the Integration Server to Kaspersky Security Center Administration Server and configure the list of mappings between Cloud Director organizations and Kaspersky Security Center virtual Administration Servers.
- Provide the following information to the tenant administrator: address of the Integration Server, address of the virtual Administration Server configured for this tenant, name and password of the account used to connect to the virtual Administration Server.
After the application is installed, prepare the application for operation and perform initial configuration:
- Activate the application on all deployed SVMs.
- Make sure that the application databases are updated on all deployed SVMs.
- Enable protection of virtual machines against file threats and network threats. By default, Kaspersky Security does not protect virtual machines.
Glossary
Activating an application
The process of activating a license that allows you to use a fully featured version of the application until the license expires.
Activation code
A code provided by Kaspersky when you receive a trial license or buy a commercial license to use Kaspersky Security. This code is required to activate the application.
The activation code is a unique sequence of twenty Latin characters and numerals in the format XXXXX-XXXXX-XXXXX-XXXXX.
Active key
The key that is currently being used by the application.
Administration group
A set of devices in Kaspersky Security Center that share common functions and a set of Kaspersky applications installed on these devices. Devices are grouped so that they can be managed conveniently as a single unit. An administration group may include other groups. It is possible to create group policies and group tasks for each installed application in the administration group.
Administration Server
A component of Kaspersky Security Center providing centralized storage of information about all Kaspersky applications that are installed on the corporate network. It can also be used to manage these applications.
Application activation task
Adds a license key to SVMs selected during task creation.
Application database update task
During the execution of the task, Kaspersky Security Center automatically distributes and installs application database updates on SVMs.
Backup
A dedicated storage for backup copies of files that have been deleted or modified during disinfection.
Backup copy of a file
A copy of a virtual machine file that is created when this file is disinfected or removed. Backup copies of files are stored in Backup in a special format and pose no danger.
Compound file
A compound file is comprised of several individual files that are stored in one physical file, and each of those files is accessible. Examples of compound files include archives, installation packages, embedded OLE objects, and files in email formats. A common technique for concealing viruses is to implant them into compound files. To detect viruses concealed using this method, the compound file must be unpacked.
Custom Scan task
Determines the settings for scanning files of the specified virtual machines from the task scope. The scope of a task depends on where the task is located within the hierarchy of administration groups of Kaspersky Security Center, and depends on the Kaspersky Security administration plug-in that you use to create the task.
Database of malicious web addresses
A list of addresses of web resources whose content may be considered to be dangerous. The list is created by Kaspersky experts. It is regularly updated and included in the Kaspersky application distribution kit.
Database of phishing web addresses
A list of web addresses which Kaspersky experts have determined to be phishing-related. The database is regularly updated and included in the Kaspersky application distribution kit.
Desktop key
A license key that matches the licensing scheme in terms of the number of virtual machines with desktop operating systems.
End User License Agreement
A binding agreement between you and AO Kaspersky Lab that stipulates the terms on which you may use the application.
Full Scan task
Determines the settings for scanning files of all virtual machines within the task scope. The scope of a task depends on where the task is located within the hierarchy of administration groups of Kaspersky Security Center, and depends on the Kaspersky Security administration plug-in that you use to create the task.
Kaspersky CompanyAccount
A portal for sending requests to Kaspersky and tracking the progress made in processing them by the Kaspersky experts.
Kaspersky Security Network (KSN)
An infrastructure of cloud services that provides access to the Kaspersky online Knowledge Base which contains information about the reputation of files, web resources, and software. The use of data from Kaspersky Security Network ensures faster responses from Kaspersky applications to threats, improves the performance of certain protection components, and reduces the likelihood of false alarms.
Key file
A file of the xxxxxxxx.key type, which is provided by Kaspersky when you receive a trial license or buy a commercial license to use Kaspersky Security. A key file is required to activate the application.
Key with a limitation on the number of processor cores
A license key that matches the licensing scheme in terms of the number of cores in physical processors used on hypervisors on which protected virtual machines are running.
Key with a limitation on the number of processors
A license key that matches the licensing scheme in terms of the number of processors used on hypervisors on which protected virtual machines are running.
KSC cluster
In Kaspersky Security Center: set of SVMs deployed on VMware ESXi hypervisors managed by a standalone VMware vCenter Server or by all VMware vCenter Servers connected to one VMware Cloud Director.
KSC cluster protected infrastructure
VMware virtual infrastructure objects managed by a VMware vCenter Server or VMware Cloud Director Server corresponding to the KSC cluster.
License
A time-limited right to use the application, granted under the End User License Agreement.
License certificate
A document that Kaspersky transfers to the user together with the key file or activation code. It contains information about the license granted to the user.
License key (key)
A unique alphanumeric sequence. A license key makes it possible to use the application on the terms of the End User License Agreement (type of license, license validity term, license restrictions). You may use the application only when you have a license key file.
Main protection profile
The main protection profile is generated automatically when a policy is created and contains the File Threat Protection settings. The main protection profile cannot be deleted, but the values of its settings can be changed.
Multitenancy mode
An application operating mode in which one instance of the application installed in the infrastructure of the anti-virus protection provider gives multiple tenant organizations the ability to independently manage the protection of their virtual infrastructure.
Network Agent
A Kaspersky Security Center component that handles interaction between the Administration Server and Kaspersky Security components installed on SVMs. The Network Agent component is the same for all Kaspersky applications that run on Windows. There are separate versions of Network Agent for Kaspersky applications that run on Novell, UNIX, and Mac.
OLE object
An object attached to another file or embedded into another file through the use of the Object Linking and Embedding (OLE) technology. An example of an OLE object is a Microsoft Office Excel spreadsheet embedded into a Microsoft Office Word document.
Policy
Defines the settings for protection of virtual machines against viruses and other malware, the settings for protection of virtual machines against network threats, Backup settings, and the settings for the use of Kaspersky Security Network.
Protection profile
A protection profile defines the virtual machine file threat protection settings as part of a policy. A policy can include multiple protection profiles (main protection profile and additional protection profiles).
Protection profiles are assigned to virtual machines and other VMware virtual infrastructure objects. Only one protection profile may be assigned to a single virtual infrastructure object. An SVM protects the virtual machine according to the settings configured in the protection profile that has been assigned to it.
Virtual machines that have no assigned protection profile are excluded from protection.
Reserve key
A key that entitles the user to use the application, but is not currently in use.
Server key
A license key that matches the licensing scheme in terms of the number of virtual machines with server operating systems.
SVM
Secure virtual machine, SVM. A virtual machine deployed on a VMware ESXi hypervisor with a Kaspersky Security component installed.
Update rollback task
During the execution of the task, Kaspersky Security Center rolls back the latest application database updates on SVMs.
Updates source
Resource that contains updates for databases and application software modules of Kaspersky applications. The update source for Kaspersky Security is the storage of the Kaspersky Security Center Administration Server.
Page top
Information about third-party code
Information about third-party code is contained in the file legal_notices.txt, in the application installation folder.
Page top
Trademark notices
Registered trademarks and service marks are the property of their respective owners.
Mac is a trademark of Apple Inc.
Linux is the registered trademark of Linus Torvalds in the U.S. and other countries.
Microsoft, Active Directory, Excel, Windows and Windows Server are trademarks of Microsoft Corporation.
Novell a registered trademark of Novell Inc. in the United States and other countries.
CentOS is a trademark or registered trademark of Red Hat, Inc. or its subsidiaries in the United States and elsewhere.
Red Hat Enterprise Linux is a trademark or registered trademark of Red Hat, Inc. or its subsidiaries in the United States and elsewhere.
SUSE is a registered trademark of SUSE LLC in the United States and other countries.
VMware, VMware ESXi, VMware NSX, VMware NSX Manager, VMware NSX for vSphere, VMware vCenter, VMware vCenter Server, VMware Cloud Director, VMware vShield Manager, VMware Tools and VMware vSphere are registered trademarks or trademarks of VMware, Inc. in the United States and/or other jurisdictions.
UNIX is a registered trade mark in the United States and other countries, licensed exclusively through X/Open Company Limited.
Page top