Contents
Step 9. Configuring network routes
At this step, assign the gateway address for configuring the network route. You can also add, delete, or modify additional static network routes at this step.
Assigning a gateway address using the DHCP server
To assign the gateway address using the DHCP server:
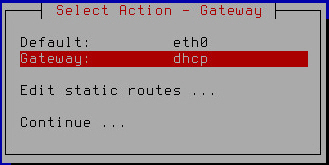
- Make sure that the value of the Gateway setting is set to dhcp (see figure below).
You may need to use the DHCP server for assigning the gateway address if you are configuring Kaspersky Secure Mail Gateway in test mode.
The use of the DHCP server for assigning the gateway address is enabled by default.
Assigning a gateway address using the DHCP server
- Select Continue.
- Press Enter.
The Initial Configuration Wizard of the Kaspersky Secure Mail Gateway virtual machine proceeds to the next step.
Assigning a static gateway address
To assign a static gateway address:
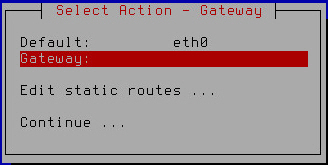
- Select the Gateway setting (see figure below).
Assigning a static gateway address
- Press Enter.
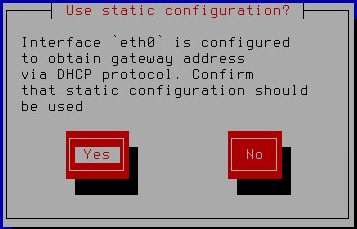
- If at the previous step of initial configuration of Kaspersky Secure Mail Gateway you chose to use the DHCP server for configuring the network interface, click Yes in the window prompting you to confirm assignment of the static gateway address (see figure below).
Confirming assignment of a static gateway address
A window for entering the static gateway address opens (see figure below).
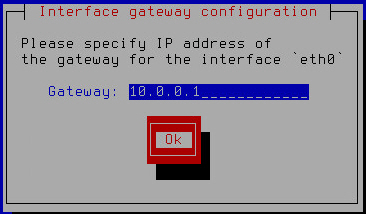
Specifying a static gateway address
- Type the gateway address in the Gateway field.
- Click OK.
The Initial Configuration Wizard of the Kaspersky Secure Mail Gateway virtual machine returns to the network routes configuration window (see figure below).
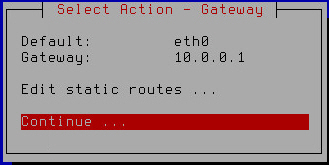
Finishing the configuration of network routes
- Make sure that the network route settings have been configured correctly.
To modify, delete, or add additional static routes, proceed to configuring additional static network routes.
- Select Continue.
- Press Enter.
The Initial Configuration Wizard of the Kaspersky Secure Mail Gateway virtual machine proceeds to the next step.
Adding an additional static route
To add an additional static network route:
- Select the Edit static routes setting (see figure below).
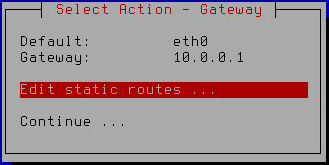
Configuring additional static network routes
- Press Enter.
A window for select additional static route configuration options opens (see figure below).
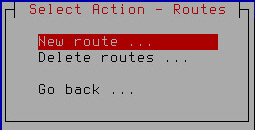
Adding a new static route
- Select New route.
- Press Enter.
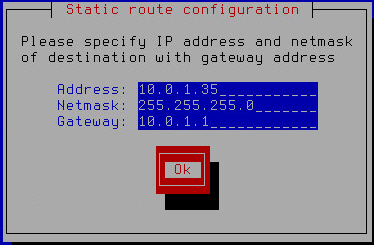
A window for entering the static route settings opens (see figure below).
Specifying static route settings
- In the Address field, enter the IP address of the static route.
- In the Netmask field, enter the mask of the static route network.
- Type the gateway address in the Gateway field.
- Click OK.
A window opens, letting you select the network interface for which you want to configure the static route (see figure below).
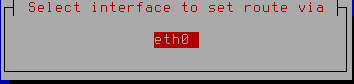
Selecting the network interface of the static route
- Select a network interface.
- Press Enter.
A window with a list of additional static routes opens (see figure below).
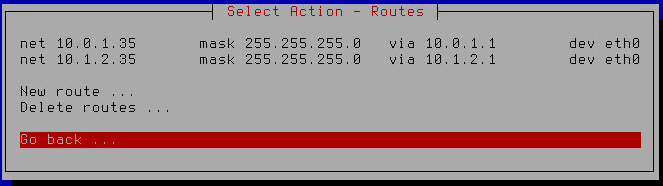
List of additional static network routes
- Select Go back.
- Press Enter.
The Initial Configuration Wizard of the Kaspersky Secure Mail Gateway virtual machine returns to the network routes configuration window (see figure below).
Finishing the configuration of network routes
- Make sure that the network route settings have been configured correctly.
- Select Continue.
- Press Enter.
The Initial Configuration Wizard of the Kaspersky Secure Mail Gateway virtual machine proceeds to the next step.
Modifying an additional static route
To modify an additional static route:
- Select the Edit static routes setting (see figure below).
Configuring additional static network routes
- Press Enter.
A window with a list of additional static routes opens (see figure below).
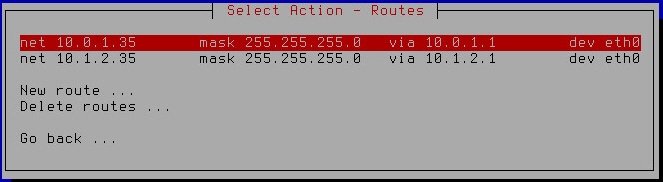
List of additional static network routes to modify
- Select an additional static network route that you want to modify.
- Press Enter.
- A window for entering the static route settings opens (see figure below).
Specifying static route settings
- Make changes in the Address field to modify the IP address of the static route.
- Make changes in the Netmask field to modify the mask of the static route network.
- Make changes in the Gateway field to modify the gateway address.
- Click OK.
A window opens, letting you select the network interface for which you want to configure the static route (see figure below).
Selecting the network interface of the static route
- Select a network interface.
- Press Enter.
A window with a list of additional static routes opens (see figure below).
List of additional static network routes
- Select Go back.
- Press Enter.
The Initial Configuration Wizard of the Kaspersky Secure Mail Gateway virtual machine returns to the network routes configuration window (see figure below).
Finishing the configuration of network routes
- Make sure that the network route settings have been configured correctly.
- Select Continue.
- Press Enter.
The Initial Configuration Wizard of the Kaspersky Secure Mail Gateway virtual machine proceeds to the next step.
Deleting an additional static route
To delete an additional static route:
- Select the Edit static routes setting (see figure below).
Configuring additional static network routes
- Press Enter.
A window with a list of additional static routes opens (see figure below).
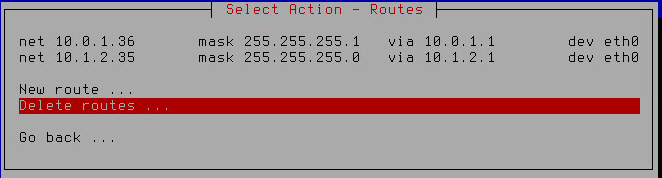
Removing additional static network routes
- Select Delete routes.
- Press Enter.
- A window for selecting the static route to delete opens (see figure below).
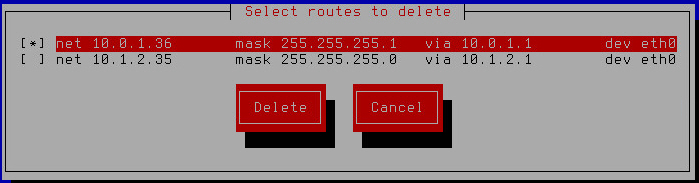
Selecting a static route to delete
- Select the route that you want to delete.
- Click the Delete button.
The Initial Configuration Wizard of the Kaspersky Secure Mail Gateway virtual machine returns to the window with a list of additional static routes that remain after deletion or, if you have deleted all additional routes, displays a window where you can select the action to take on the routes (see figure below).
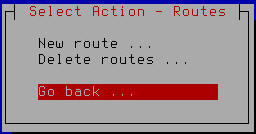
Selecting the action to perform after all static routes have been removed
- Select Go back.
- Press Enter.
The Initial Configuration Wizard of the Kaspersky Secure Mail Gateway virtual machine returns to the network routes configuration window (see figure below).
Finishing the configuration of network routes
- Make sure that the network route settings have been configured correctly.
- Select Continue.
- Press Enter.
The Initial Configuration Wizard of the Kaspersky Secure Mail Gateway virtual machine proceeds to the next step.