Contents
- Initial configuration of Kaspersky Secure Mail Gateway
- Preparing for initial configuration
- Step 1. Selecting the End User License Agreement language
- Step 2. Reviewing the License Agreement
- Step 3. Selecting the mode of operation of Kaspersky Secure Mail Gateway
- Step 4. Configuring participation in Kaspersky Security Network
- Step 5. Selecting the input language for Kaspersky Secure Mail Gateway
- Step 6. Setting the time zone
- Step 7. Assigning the host name (myhostname)
- Step 8. Configuring the network interface
- Step 9. Configuring network routes
- Step 10. Configuring DNS settings
- Step 11. Setting the web interface administrator password
- Step 12. Setting the administrator password for using the console
- Step 13. Specifying email addresses of the mail server administrator
- Step 14. Configuring the connection of Kaspersky Secure Mail Gateway to Kaspersky Security Center
- Step 15. Checking the connection of Kaspersky Secure Mail Gateway to Kaspersky Security Center
- Step 16. Displaying the settings of the connection to the web interface
Initial configuration of Kaspersky Secure Mail Gateway
Perform initial configuration of the Kaspersky Secure Mail Gateway virtual machine image after deploying it.
Initial configuration of the virtual machine is a sequence of steps. The Initial Configuration Wizard of Kaspersky Secure Mail Gateway is started automatically when the virtual machine is powered on for the first time.
Preparing for initial configuration
To begin initial configuration of the Kaspersky Secure Mail Gateway virtual machine:
- Start VMware vSphere Client.
- Select a Kaspersky Secure Mail Gateway virtual machine in the list of virtual machines in the left part of the main application window.
- Power on the virtual machine by clicking the
 button on the control panel of the main application window.
 - Open the VMware vSphere Client console by selecting the Console tab in the right part of the main application window (see figure below) and follow the steps of the wizard.
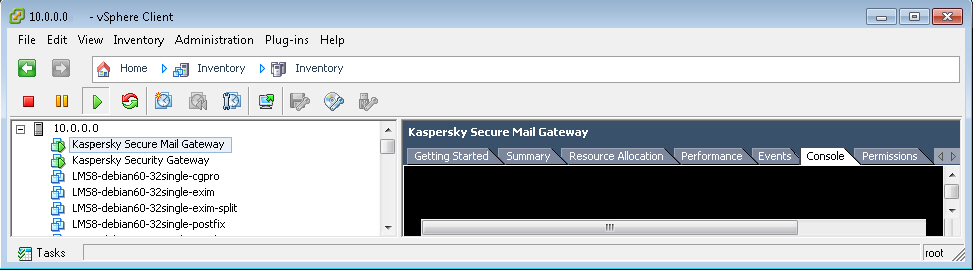
Opening the VMware vSphere Client console
Step 1. Selecting the End User License Agreement language
To set the language in which the texts of the End User License Agreement for Kaspersky Secure Mail Gateway and the Kaspersky Security Network Statement will be displayed:
- Select a language in the list (see figure below).
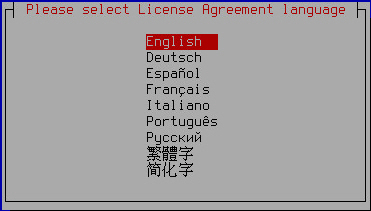
Selecting the language for viewing the End User License Agreement of Kaspersky Secure Mail Gateway and the KSN Statement
The available languages depend on the localization packages included in your Kaspersky Secure Mail Gateway distribution kit.
- Press Enter.
The Initial Configuration Wizard of the Kaspersky Secure Mail Gateway virtual machine proceeds to the next step.
Step 2. Reviewing the License Agreement
At this step, you have to accept or reject the terms of the Kaspersky Secure Mail Gateway End User License Agreement (see figure below). Use the arrow buttons to navigate the text.
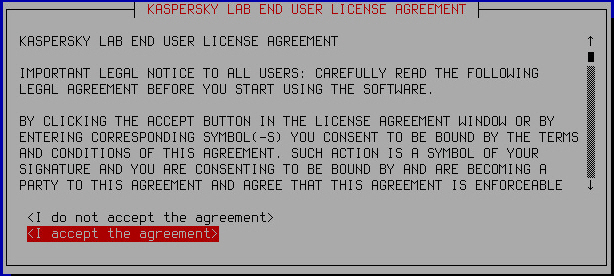
Reviewing the License Agreement
To accept or reject the terms of the End User License Agreement:
- Select one of the following options:
- I do not accept the agreement if you want to reject the terms of the End User License Agreement.
- I accept the agreement if you want to accept the terms of the End User License Agreement.
- Press Enter.
If you rejected the terms of the End User License Agreement, initial configuration of Kaspersky Secure Mail Gateway is aborted. The Initial Configuration Wizard prompts you to power down the virtual machine (see figure below):

Powering down the virtual machine if the End User License Agreement has been rejected
The Initial Configuration Wizard of the Kaspersky Secure Mail Gateway virtual machine proceeds to the next step if you accept the terms of the End User License Agreement.
Step 3. Selecting the mode of operation of Kaspersky Secure Mail Gateway
At this step you have to select the mode of operation of Kaspersky Secure Mail Gateway within the IT infrastructure of your organization.
Kaspersky Secure Mail Gateway can run in normal mode or in certified mode.
In normal mode, Kaspersky Secure Mail Gateway is allowed to access the Internet and connect to the following servers outside the IT infrastructure of your organization:
In certified mode, Kaspersky Secure Mail Gateway is not allowed to access the Internet and connect to servers outside the IT infrastructure of your organization. Besides, when Kaspersky Secure Mail Gateway operates in certified mode, the administrator is not allowed to view the event Log from the Kaspersky Secure Mail Gateway administrator's menu.
In certified mode, the settings of Kaspersky Secure Mail Gateway components that require Internet access take the following values by default:
- KSN usage is disabled.
- SPF, DKIM, and DMARC message authentication is disabled. Connection to DNS servers is prohibited.
- The Enforced Anti-Spam Updates service is disabled in the settings of the Anti-Spam component.
- Kaspersky Secure Mail Gateway receives database updates from Kaspersky Security Center or a local source of Kaspersky Secure Mail Gateway database updates.
To select the operation mode of Kaspersky Secure Mail Gateway:
- Select one of the following options for switching Kaspersky Secure Mail Gateway to certified mode of operation (see figure below):
- No, if you do not want to switch Kaspersky Secure Mail Gateway to certified mode of operation and want Kaspersky Secure Mail Gateway to run in normal mode.
- Yes, if you want to switch Kaspersky Secure Mail Gateway to certified mode of operation.
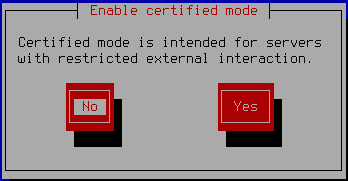
Switching Kaspersky Secure Mail Gateway to certified mode of operation
- Press Enter.
The Initial Configuration Wizard of the Kaspersky Secure Mail Gateway virtual machine proceeds to the next step.
Step 4. Configuring participation in Kaspersky Security Network
If you have selected the regular mode of operation of Kaspersky Secure Mail Gateway, the initial configuration wizard of Kaspersky Secure Mail Gateway prompts you to accept or reject the terms of participation in Kaspersky Security Network (KSN).
Kaspersky Security Network (KSN) is an infrastructure of cloud services providing access to Kaspersky Lab's online knowledge base with information about the reputation of files, web resources, and software. Data from Kaspersky Security Network ensures faster response by Kaspersky Secure Mail Gateway to new threats that have not been added to the antivirus databases yet, improves the performance of some protection components, and reduces the risk of false alarms.
Thanks to users who participate in Kaspersky Security Network, Kaspersky Lab is able to promptly gather information about types and sources of threats, develop solutions for neutralizing them, and minimize the number of false positives. In addition, participation in Kaspersky Security Network provides you with access to information about the reputation of various applications and websites.
If you participate in Kaspersky Security Network, Kaspersky Secure Mail Gateway performance statistics are submitted to Kaspersky Lab. These statistics are sent automatically.
No personal data is collected, processed, or stored.
Participation in Kaspersky Security Network is voluntary. The decision on whether or not to participate in Kaspersky Security Network is made during initial configuration of Kaspersky Secure Mail Gateway. However, you can change your decision later at any time.
The text of the Kaspersky Security Network Statement is displayed on the screen of the virtual machine console (see figure below). Use the arrow buttons to navigate the text. The text of the Kaspersky Security Network Statement is displayed in the language selected at Step 1.
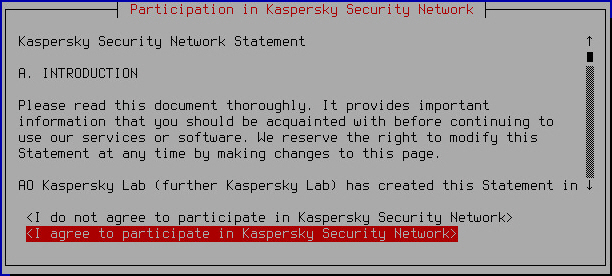
Viewing the Kaspersky Security Network Statement
To accept or decline participation in Kaspersky Security Network:
- Select one of the following options:
- I do not agree to participate in Kaspersky Security Network if you want to decline participation in Kaspersky Security Network.
- I agree to participate in Kaspersky Security Network if you want to accept participation in Kaspersky Security Network.
- Press Enter.
The Initial Configuration Wizard of the Kaspersky Secure Mail Gateway virtual machine proceeds to the next step.
Step 5. Selecting the input language for Kaspersky Secure Mail Gateway
To configure the input language to be used when managing Kaspersky Secure Mail Gateway:
- Select the input language in the list (see figure below).
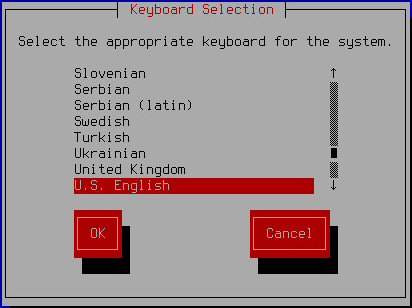
Selecting the input language
- Click OK.
The virtual machine Initial Configuration Wizard proceeds to the next step.
Step 6. Setting the time zone
To set a time zone for Kaspersky Secure Mail Gateway:
- Select a country from the list displayed on the screen of the VMware vSphere Client console (see figure below).
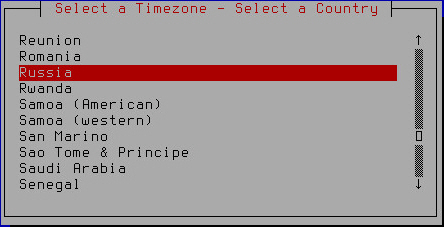
Selecting a country when setting the time zone
- Press Enter.
A list of time zones available for the selected country is displayed (see figure below).
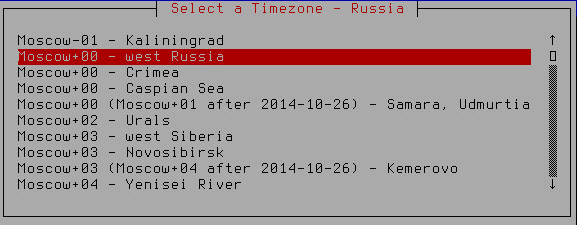
Selecting the time zone
- Select a time zone.
- Press Enter.
A time zone selection confirmation window opens (see figure below).

Confirming time zone selection
- If the time zone has been selected correctly, click Yes.
The Initial Configuration Wizard of Kaspersky Secure Mail Gateway proceeds to the next step.
Step 7. Assigning the host name (myhostname)
To specify the name of the Kaspersky Secure Mail Gateway host to be used by DNS servers (myhostname):
- In the hostname field, enter the full domain name of the Kaspersky Secure Mail Gateway server (see figure below).
Specify the server name in FQDN format (for example: host.domain.com or host.domain.subdomain.com).
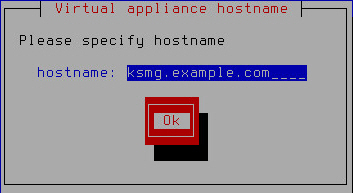
Assigning the host name
- Click OK.
After you have assigned the Kaspersky Secure Mail Gateway host name, the virtual machine attempts to acquire the network settings automatically using the DHCP server and download Kaspersky Secure Mail Gateway databases.
The Initial Configuration Wizard of Kaspersky Secure Mail Gateway proceeds to the next step.
Step 8. Configuring the network interface
At this step, configure the settings of the Kaspersky Secure Mail Gateway network interface: enable or disable the network interface, assign the IP address and network mask.
Enabling and disabling the network interface
At least one network interface has to be enabled to make configuration of Kaspersky Secure Mail Gateway possible. You may have to disable a network interface if you are using several network interfaces and want to disable one of them temporarily.
To disable a network interface:
- Select the Enabled setting (see figure below).
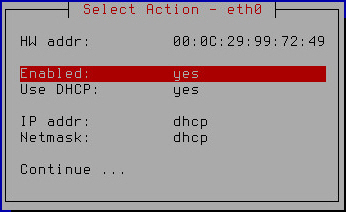
Enabling and disabling the network interface
- Press Enter.
The value of the Enabled setting changes to no.
- Proceed to assign the IP address and network mask (Assigning the IP address and network mask using the DHCP server, Assigning a static IP address and network mask) to finish configuring the network interface.
To enable a network interface:
- Make sure that value of the Enabled setting is set to yes.
The network interface is enabled by default.
- Proceed to assign the IP address and network mask (Assigning the IP address and network mask using the DHCP server, Assigning a static IP address and network mask) to finish configuring the network interface.
Assigning the IP address and network mask using the DHCP server
To assign the IP address and network mask using the DHCP server:
- Make sure that the value of the Use DHCP setting is set to yes (see figure below).
You may need to use the DHCP server for assigning the IP address and network mask if you are configuring Kaspersky Secure Mail Gateway in test mode.
The use of the DHCP server for assigning the IP address and network mask is enabled by default.
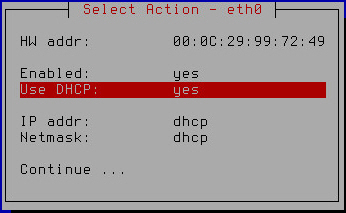
Assigning the IP address and network mask using the DHCP server
- Select Continue.
- Press Enter.
The Initial Configuration Wizard of the Kaspersky Secure Mail Gateway virtual machine proceeds to the next step.
Assigning a static IP address and network mask
To assign a static IP address and network mask:
- Select the Use DHCP setting (see figure below).
Assigning a static IP address and network mask is recommended if you are configuring Kaspersky Secure Mail Gateway in production mode.
Assigning a static IP address and network mask
- Press Enter.
A window opens prompting you to confirm assignment of static settings for the network interface (see figure below).
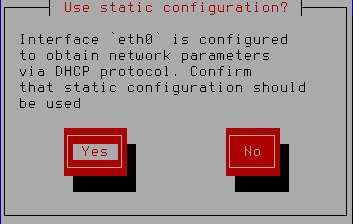
Confirming assignment of static settings for the network interface
- Click Yes.
A window for entering the static IP address and network mask opens (see figure below).
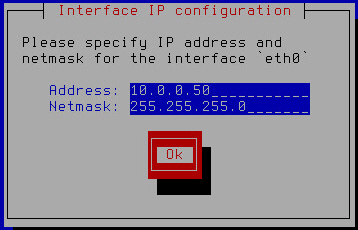
Specifying a static IP address and network mask
- In the Address field, type the IP address that you want to assign for Kaspersky Secure Mail Gateway.
- In the Netmask field, type the mask of the network on which you are using Kaspersky Secure Mail Gateway.
- Click OK.
The Initial Configuration Wizard of Kaspersky Secure Mail Gateway returns to the network interface configuration window (see figure below).
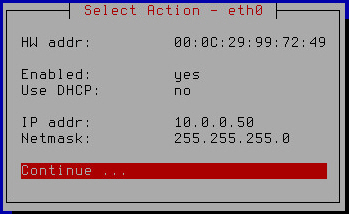
Finishing configuration of the network interface
- Verify that the network settings are correct.
- Select Continue.
- Press Enter.
The Initial Configuration Wizard of the Kaspersky Secure Mail Gateway virtual machine proceeds to the next step.
Step 9. Configuring network routes
At this step, assign the gateway address for configuring the network route. You can also add, delete, or modify additional static network routes at this step.
Assigning a gateway address using the DHCP server
To assign the gateway address using the DHCP server:
- Make sure that the value of the Gateway setting is set to dhcp (see figure below).
You may need to use the DHCP server for assigning the gateway address if you are configuring Kaspersky Secure Mail Gateway in test mode.
The use of the DHCP server for assigning the gateway address is enabled by default.
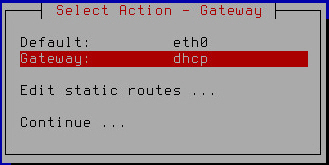
Assigning a gateway address using the DHCP server
- Select Continue.
- Press Enter.
The Initial Configuration Wizard of the Kaspersky Secure Mail Gateway virtual machine proceeds to the next step.
Assigning a static gateway address
To assign a static gateway address:
- Select the Gateway setting (see figure below).
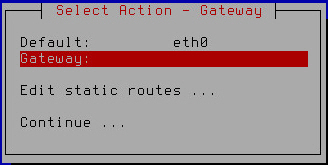
Assigning a static gateway address
- Press Enter.
- If at the previous step of initial configuration of Kaspersky Secure Mail Gateway you chose to use the DHCP server for configuring the network interface, click Yes in the window prompting you to confirm assignment of the static gateway address (see figure below).
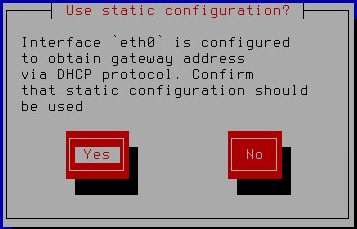
Confirming assignment of a static gateway address
A window for entering the static gateway address opens (see figure below).
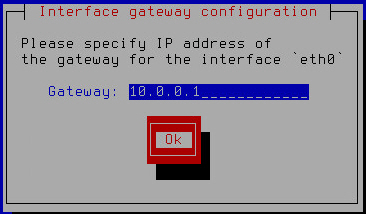
Specifying a static gateway address
- Type the gateway address in the Gateway field.
- Click OK.
The Initial Configuration Wizard of the Kaspersky Secure Mail Gateway virtual machine returns to the network routes configuration window (see figure below).
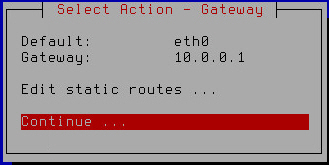
Finishing the configuration of network routes
- Make sure that the network route settings have been configured correctly.
To modify, delete, or add additional static routes, proceed to configuring additional static network routes.
- Select Continue.
- Press Enter.
The Initial Configuration Wizard of the Kaspersky Secure Mail Gateway virtual machine proceeds to the next step.
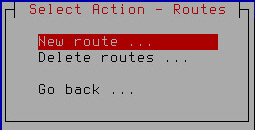
Adding an additional static route
To add an additional static network route:
- Select the Edit static routes setting (see figure below).
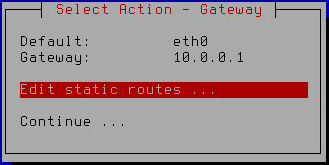
Configuring additional static network routes
- Press Enter.
A window for select additional static route configuration options opens (see figure below).
Adding a new static route
- Select New route.
- Press Enter.
A window for entering the static route settings opens (see figure below).
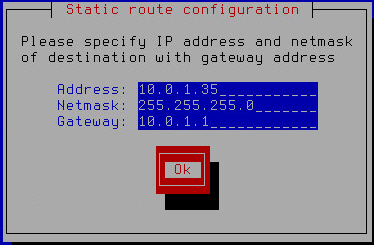
Specifying static route settings
- In the Address field, enter the IP address of the static route.
- In the Netmask field, enter the mask of the static route network.
- Type the gateway address in the Gateway field.
- Click OK.
A window opens, letting you select the network interface for which you want to configure the static route (see figure below).

Selecting the network interface of the static route
- Select a network interface.
- Press Enter.
A window with a list of additional static routes opens (see figure below).
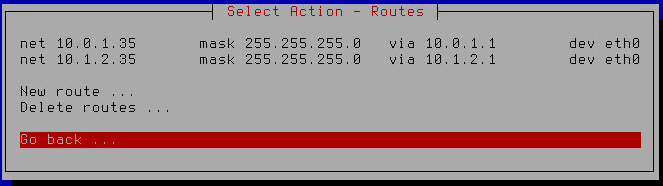
List of additional static network routes
- Select Go back.
- Press Enter.
The Initial Configuration Wizard of the Kaspersky Secure Mail Gateway virtual machine returns to the network routes configuration window (see figure below).
Finishing the configuration of network routes
- Make sure that the network route settings have been configured correctly.
- Select Continue.
- Press Enter.
The Initial Configuration Wizard of the Kaspersky Secure Mail Gateway virtual machine proceeds to the next step.
Modifying an additional static route
To modify an additional static route:
- Select the Edit static routes setting (see figure below).
Configuring additional static network routes
- Press Enter.
A window with a list of additional static routes opens (see figure below).
List of additional static network routes to modify
- Select an additional static network route that you want to modify.
- Press Enter.
- A window for entering the static route settings opens (see figure below).
Specifying static route settings
- Make changes in the Address field to modify the IP address of the static route.
- Make changes in the Netmask field to modify the mask of the static route network.
- Make changes in the Gateway field to modify the gateway address.
- Click OK.
A window opens, letting you select the network interface for which you want to configure the static route (see figure below).
Selecting the network interface of the static route
- Select a network interface.
- Press Enter.
A window with a list of additional static routes opens (see figure below).
List of additional static network routes
- Select Go back.
- Press Enter.
The Initial Configuration Wizard of the Kaspersky Secure Mail Gateway virtual machine returns to the network routes configuration window (see figure below).
Finishing the configuration of network routes
- Make sure that the network route settings have been configured correctly.
- Select Continue.
- Press Enter.
The Initial Configuration Wizard of the Kaspersky Secure Mail Gateway virtual machine proceeds to the next step.
Deleting an additional static route
To delete an additional static route:
- Select the Edit static routes setting (see figure below).
Configuring additional static network routes
- Press Enter.
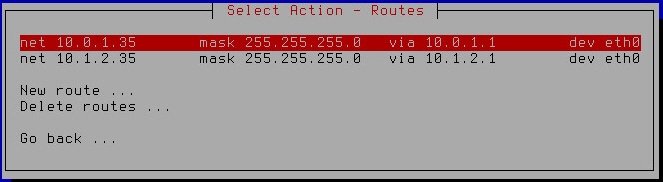
A window with a list of additional static routes opens (see figure below).
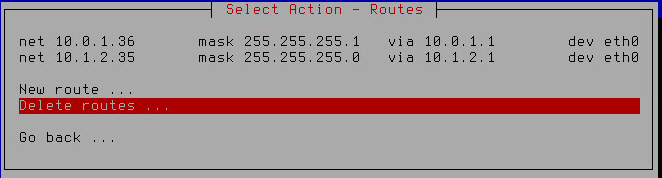
Removing additional static network routes
- Select Delete routes.
- Press Enter.
- A window for selecting the static route to delete opens (see figure below).
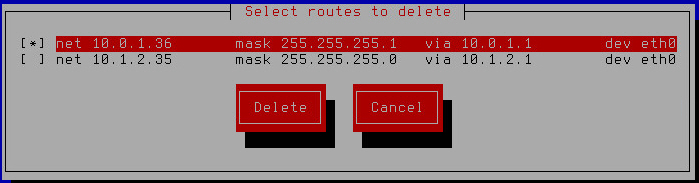
Selecting a static route to delete
- Select the route that you want to delete.
- Click the Delete button.
The Initial Configuration Wizard of the Kaspersky Secure Mail Gateway virtual machine returns to the window with a list of additional static routes that remain after deletion or, if you have deleted all additional routes, displays a window where you can select the action to take on the routes (see figure below).
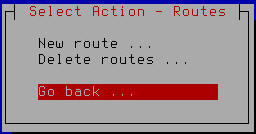
Selecting the action to perform after all static routes have been removed
- Select Go back.
- Press Enter.
The Initial Configuration Wizard of the Kaspersky Secure Mail Gateway virtual machine returns to the network routes configuration window (see figure below).
Finishing the configuration of network routes
- Make sure that the network route settings have been configured correctly.
- Select Continue.
- Press Enter.
The Initial Configuration Wizard of the Kaspersky Secure Mail Gateway virtual machine proceeds to the next step.
Step 10. Configuring DNS settings
At this step, configure the DNS settings of the Kaspersky Secure Mail Gateway virtual machine.
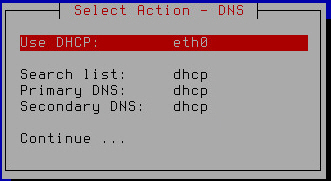
Assigning DNS addresses using the DHCP server
To assign the DNS address using the DHCP server:
- Select the name of your network interface (for example: eth0) in the list of settings for using the DHCP server for assigning DNS addresses (see figure below) .
You may need to use the DHCP server for assigning DNS addressed if you are configuring Kaspersky Secure Mail Gateway in test mode.

Enabling the use of the DHCP server for assigning DNS addresses
- Press Enter.
A window for configuring DNS settings with the use of the DHCP server opens (see figure below).
Finishing configuration of DNS settings with the use of the DHCP server
- Make sure that the values of the Search list, Primary DNS, Secondary DNS settings are set to dhcp.
- Select Continue.
- Press Enter.
A window with the settings of the Kaspersky Secure Mail Gateway network opens (see figure below).
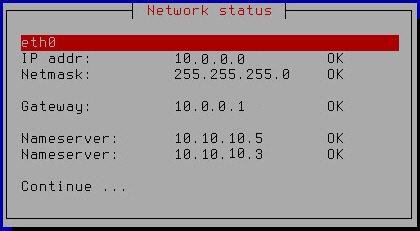
Kaspersky Secure Mail Gateway network settings
- Select Continue.
- Press Enter.
The Initial Configuration Wizard of the Kaspersky Secure Mail Gateway virtual machine restarts the virtual machine with the new values of settings and proceeds to the next step.
Assigning static DNS addresses
To assign static DNS addresses:
- Select no in the list of settings for using the DHCP server for assigning DNS addresses (see figure below) .
Assigning static DNS addresses is recommended if you are configuring Kaspersky Secure Mail Gateway in production mode.

Disabling the use of the DHCP server for assigning DNS addresses
- Press Enter.
A window for entering static DNS addresses opens (see figure below).
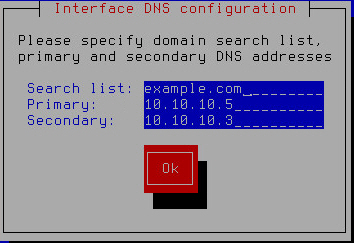
Specifying static DNS addresses
- In the Search list field, type the DNS suffix that you want to use with Kaspersky Secure Mail Gateway.
- In the Primary field, type the IP address of the primary DNS server in IPv4 format.
- In the Secondary field, type the IP address of the secondary DNS server in IPv4 format.
- Click OK.
A window for configuring static DNS settings opens (see figure below).

Finishing configuration of static DNS settings
- Verify that the DNS settings are correct.
- Select Continue.
- Press Enter.
A window with the settings of the Kaspersky Secure Mail Gateway network opens (see figure below).
Kaspersky Secure Mail Gateway network settings
- Select Continue.
- Press Enter.
The Initial Configuration Wizard of the Kaspersky Secure Mail Gateway virtual machine restarts the virtual machine with the new values of settings and proceeds to the next step.
Step 11. Setting the web interface administrator password
To set an administrator's password for accessing the web interface (Administrator account):
- Type any characters in the Test input field to check the keyboard layout.
- In the Password field, type the administrator's password for accessing the web interface of Kaspersky Secure Mail Gateway (see figure below).

Setting the administrator's password for the web interface of Kaspersky Secure Mail Gateway
The password must contain:
- At least eight characters
- Only characters in ASCII encoding
- At least one upper-case character
- At least one lower-case character
- At least one numeral
- Type the password again in the Confirm password field.
- Click OK.
The Initial Configuration Wizard of Kaspersky Secure Mail Gateway proceeds to the next step.
Step 12. Setting the administrator password for using the console
The administrator of Kaspersky Secure Mail Gateway has the rights to manage the virtual machine. The administrator can power down or restart the virtual machine or edit its network settings in the WMware console. The admin account with a separate administrator password is used for administering Kaspersky Secure Mail Gateway.
To set the administrator's password for managing Kaspersky Secure Mail Gateway in the VMware console (under the admin account):
- Type any characters in the Test input field to check the keyboard layout.
- In the Password field, type the administrator's password for managing the settings of Kaspersky Secure Mail Gateway (see figure below).
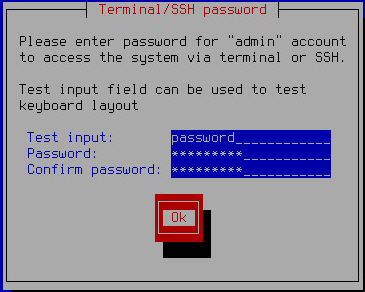
Setting the administrator password for using the VMware console
The password must contain:
- At least eight characters
- Only characters in ASCII encoding
- At least one upper-case character
- At least one lower-case character
- At least one numeral
- Type the password again in the Confirm password field.
- Click OK.
The Initial Configuration Wizard of the Kaspersky Secure Mail Gateway virtual machine proceeds to the next step.
Step 13. Specifying email addresses of the mail server administrator
To specify email addresses of the Kaspersky Secure Mail Gateway mail server administrator:
- In the admins' emails field, enter the email addresses of the Kaspersky Secure Mail Gateway administrator (see figure below). You can specify several addresses, separating them with commas.
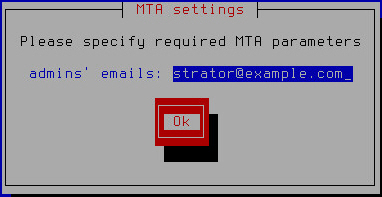
Specifying email addresses of the administrator
- Click OK.
The Initial Configuration Wizard of the Kaspersky Secure Mail Gateway virtual machine proceeds to the next step.
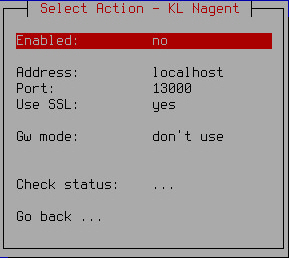
Step 14. Configuring the connection of Kaspersky Secure Mail Gateway to Kaspersky Security Center
At this step, configure the connection of Kaspersky Secure Mail Gateway to Kaspersky Security Center using the wizard for configuring the connection of Kaspersky Secure Mail Gateway to Kaspersky Security Center (see figure below).
Wizard for configuring the connection of Kaspersky Secure Mail Gateway to Kaspersky Security Center
Kaspersky Security Center is designed for centrally managing and monitoring Kaspersky Secure Mail Gateway by performing the primary administrative tasks.
Kaspersky Security Center acts as the Administration Server.
Kaspersky Secure Mail Gateway includes Network Agent (nagent).
Kaspersky Security Center lets the administrator perform the following Kaspersky Secure Mail Gateway management tasks:
- Add the active and additional keys
- Start the Kaspersky Secure Mail Gateway database update task
- Display information about the status of protection of Kaspersky Secure Mail Gateway
- Start and stop Kaspersky Secure Mail Gateway
Enabling Network Agent
Configuring the connection of Kaspersky Secure Mail Gateway to Kaspersky Security Center requires enabling Network Agent.
Network Agent is disabled by default.
To enable Network Agent, do the following in the window of the wizard for configuring the connection of Kaspersky Secure Mail Gateway to Kaspersky Security Center:
- Select the Enabled setting.
- Make sure that value of the Enabled setting is set to yes.
- If the value of the Enabled setting is set to no, press Enter.
Continue performing steps in the window of the wizard for configuring the connection of Kaspersky Secure Mail Gateway to Kaspersky Security Center.
Entering the Administration Server address
To enter the address of the Kaspersky Security Center Administration Server, do the following in the window of the wizard for configuring the connection of Kaspersky Secure Mail Gateway to Kaspersky Security Center:
- Select the Address setting.
- Press Enter.
A window for entering the Administration Server address opens (see figure below).
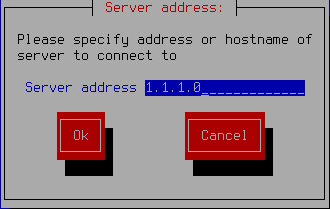
Entering the Administration Server address
- Specify the DNS name or IP address of the Administration Server of Kaspersky Security Center.
- Click OK.
Continue performing the steps of configuring the connection of Kaspersky Secure Mail Gateway to Kaspersky Security Center.
Specifying the number of the port for connecting to the Administration Server
To specify the number of the port for connecting to the Kaspersky Security Center Administration Server, do the following in the window of the wizard for configuring the connection of Kaspersky Secure Mail Gateway to Kaspersky Security Center:
- Select the Port setting.
- Press Enter.
A window opens where you can enter the number of the port for connecting to the Administration Server (see figure below).
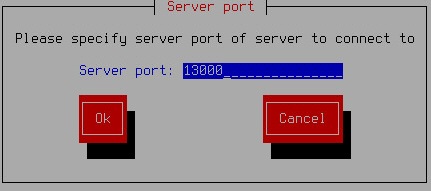
Specifying the port for connecting to the Administration Server
- Specify the number of the port for connecting to the Administration Server or use the default port number (13000).
- Click OK.
Continue performing steps in the window of the wizard for configuring the connection of Kaspersky Secure Mail Gateway to Kaspersky Security Center.
Using the SSL connection for data transfer
You can enable the SSL connection for transferring data to the Administration Server of Kaspersky Security Center.
By default, the SSL connection for transferring data to the Administration Server of Kaspersky Security Center is enabled.
To enable SSL connection, do the following in the window of the wizard for configuring the connection of Kaspersky Secure Mail Gateway to Kaspersky Security Center:
- Select the Use SSL setting.
- Make sure that value of the Use SSL setting is set to yes.
- If the value of the Use SSL setting is set to no, press Enter.
Continue performing steps in the window of the wizard for configuring the connection of Kaspersky Secure Mail Gateway to Kaspersky Security Center.
Using a gateway for connecting to the Administration Server
You can choose one of the options for using the gateway when connecting Kaspersky Secure Mail Gateway to the Administration Server of Kaspersky Security Center:
- Disable the use of the gateway
- Enable the use of the gateway
- Enable the use of Network Agent as a gateway
By default, the use of a gateway is disabled when connecting to the Administration Server, and the connection to Kaspersky Security Center is established directly.
To disable the use of the gateway for connecting Kaspersky Secure Mail Gateway to the Administration Server, do the following in the window of the wizard for configuring the connection of Kaspersky Secure Mail Gateway to Kaspersky Security Center:
- Select the Gw mode setting.
- Make sure that the value of the Gw mode setting is set to don't use.
- If the Gw mode setting has any other value, keep pressing the Enter key until the value of the Gw mode setting changes to don't use.
To enable the use of the gateway for connecting Kaspersky Secure Mail Gateway to the Administration Server, do the following in the window of the wizard for configuring the connection of Kaspersky Secure Mail Gateway to Kaspersky Security Center:
- Select the Gw mode setting.
- Keep pressing the Enter key until the value of the Gw mode setting changes to use gateway.
- Select the Gateway setting.
- Press Enter.
A window for entering the gateway address opens (see figure below).

Entering the address of a gateway for connecting to the Administration Server
- Enter the DNS name or IP address of the gateway that you want to use for connecting to the Administration Server of Kaspersky Security Center.
- Click OK.
To enable the use of Network Agent as a gateway for connecting Kaspersky Secure Mail Gateway to the Administration Server, do the following in the window of the wizard for configuring the connection of Kaspersky Secure Mail Gateway to Kaspersky Security Center:
- Select the Gw mode setting.
- Keep pressing the Enter key until the value of the Gw mode setting changes to act as gateway.
Proceed to check the connection of Kaspersky Secure Mail Gateway to Kaspersky Security Center in the window of the wizard for configuring the connection of Kaspersky Secure Mail Gateway to Kaspersky Security Center.
Step 15. Checking the connection of Kaspersky Secure Mail Gateway to Kaspersky Security Center
To check the connection of Kaspersky Secure Mail Gateway to Kaspersky Security Center, do the following in the window of the wizard for configuring the connection of Kaspersky Secure Mail Gateway to Kaspersky Security Center:
- Select the Check Status setting.
- Press Enter.
- If you have modified the settings of Kaspersky Secure Mail Gateway connection to Kaspersky Security Center when configuring the connection of Kaspersky Secure Mail Gateway to Kaspersky Security Center, click Yes in the window prompting you to confirm changes (see figure below).
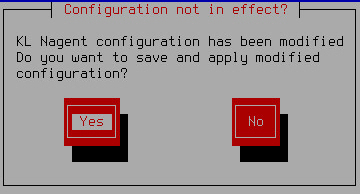
Confirming changes to Kaspersky Security Center connection settings
The window prompting you to confirm saving changes to Kaspersky Security Center connection settings closes.
The Check Status setting takes the value corresponding to the status of Kaspersky Secure Mail Gateway connection to Kaspersky Security Center.
For example, if the connection of Kaspersky Secure Mail Gateway to Kaspersky Security Center has been established successfully, the value of the Check Status setting changes to OK.
- Select Continue.
- Press Enter.
The Initial Configuration Wizard of the Kaspersky Secure Mail Gateway virtual machine proceeds to the next step.
Step 16. Displaying the settings of the connection to the web interface
If the network connection has been configured successfully, initial configuration of Kaspersky Secure Mail Gateway finishes at this step, and a window with the web interface connection settings opens (see figure below).
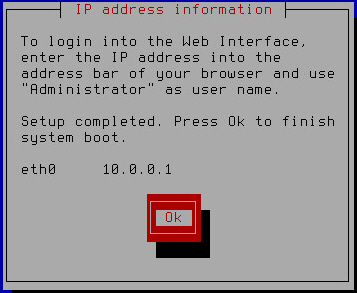
Finishing initial configuration of Kaspersky Secure Mail Gateway
Remember or write down the IP address specified in the IP address information window and click OK.
Initial configuration of Kaspersky Secure Mail Gateway has finished.
If your network does not use a DHCP server, Kaspersky Secure Mail Gateway is unable to retrieve the Kaspersky Secure Mail Gateway web interface connection settings automatically, and the IP address of the connection to the web interface is not displayed in the IP address information window. In this case, you can configure the settings of the connection to the Kaspersky Secure Mail Gateway web interface manually using the administrator's menu of Kaspersky Secure Mail Gateway.