Contents
- Adjustment of distribution points and connection gateways
- Standard configuration of distribution points: Single office
- Standard configuration of distribution points: Multiple small remote offices
- Assigning distribution points automatically
- Assigning distribution points manually
- Modifying the list of distribution points for an administration group
- Forced synchronization
- Enabling a push server
Adjustment of distribution points and connection gateways
A structure of administration groups in Kaspersky Security Center performs the following functions:
- Sets the scope of policies
There is an alternate way of applying relevant settings on devices, by using policy profiles. In this case, you set the scope of policies with tags, device locations in Active Directory organizational units, or membership in Active Directory security groups.
- Sets the scope of group tasks
There is an approach to defining the scope of group tasks that is not based on a hierarchy of administration groups: use of tasks for device selections and tasks for specific devices.
- Sets access rights to devices, virtual Administration Servers, and secondary Administration Servers
- Assigns distribution points
When building the structure of administration groups, you must take into account the topology of the organization's network for the optimum assignment of distribution points. The optimum distribution of distribution points allows you to save traffic on the organization's network.
Depending on the organizational schema and network topology, the following standard configurations can be applied to the structure of administration groups:
- Single office
- Multiple small remote offices
Devices functioning as distribution points must be protected, including physical protection, against any unauthorized access.
Standard configuration of distribution points: Single office
In a standard "single-office" configuration, all devices are on the organization's network so they can "see" each other. The organization's network may consist of a few separate parts (networks or network segments) linked by narrow channels.
The following methods of building the structure of administration groups are possible:
- Building the structure of administration groups taking into account the network topology. The structure of administration groups may not reflect the network topology with absolute precision. A match between the separate parts of the network and certain administration groups would be enough. You can use automatic assignment of distribution points or assign them manually.
- Building the structure of administration groups, without taking the network topology into account. In this case, you must disable automatic assignment of distribution points, and then assign one or several devices to act as distribution points for a root administration group in each of the separate parts of the network, for example, for the Managed devices group. All distribution points will be at the same level and will feature the same scope spanning all devices on the organization's network. In this case, each Network Agent in version 10 Service Pack 1 or later will connect to the distribution point that has the shortest route. The route to a distribution point can be traced with the tracert utility.
Standard configuration of distribution points: Multiple small remote offices
This standard configuration provides for a number of small remote offices, which may communicate with the head office over the internet. Each remote office is located behind the NAT, that is, connection from one remote office to another is not possible because offices are isolated from one another.
The configuration must be reflected in the structure of administration groups: a separate administration group must be created for each remote office (groups Office 1 and Office 2 in the figure below).
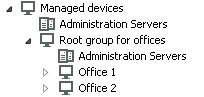
Remote offices are included in the administration group structure
One or multiple distribution points must be assigned to each administration group that correspond to an office. Distribution points must be devices at the remote office that have a sufficient amount of free disk space. Devices deployed in the Office 1 group, for example, will access distribution points assigned to the Office 1 administration group.
If some users move between offices physically, with their laptops, you must select two or more devices (in addition to the existing distribution points) in each remote office and assign them to act as distribution points for a top-level administration group (Root group for offices in the figure above).
Example: A laptop is deployed in the Office 1 administration group and then is moved physically to the office that corresponds to the Office 2 administration group. After the laptop is moved, Network Agent attempts to access the distribution points assigned to the Office 1 group, but those distribution points are unavailable. Then, Network Agent starts attempting to access the distribution points that have been assigned to the Root group for offices. Because remote offices are isolated from one another, attempts to access distribution points assigned to the Root group for offices administration group will only be successful when Network Agent attempts to access distribution points in the Office 2 group. That is, the laptop will remain in the administration group that corresponds to the initial office, but the laptop will use the distribution point of the office where it is physically located at the moment.
Assigning distribution points automatically
We recommend that you assign distribution points automatically. In this case, Kaspersky Security Center will select on its own which devices must be assigned distribution points.
To assign distribution points automatically:
- In the main menu, click the settings icon (
 ) next to the name of the required Administration Server.
The Administration Server properties window opens.
- On the General tab, select the Distribution points section.
- Select the Automatically assign distribution points option.
If automatic assignment of devices as distribution points is enabled, you cannot configure distribution points manually or edit the list of distribution points.
- Click the Save button.
Administration Server assigns and configures distribution points automatically.
Assigning distribution points manually
Kaspersky Security Center allows you to manually assign devices to act as distribution points.
We recommend that you assign distribution points automatically. In this case, Kaspersky Security Center will select on its own which devices must be assigned distribution points. However, if you have to opt out of assigning distribution points automatically for any reason (for example, if you want to use exclusively assigned servers), you can assign distribution points manually after you calculate their number and configuration.
Devices functioning as distribution points must be protected, including physical protection, against any unauthorized access.
To manually assign a device to act as distribution point:
- In the main menu, click the settings icon () next to the name of the required Administration Server.
The Administration Server properties window opens.
- On the General tab, select the Distribution points section.
- Select the Manually assign distribution points option.
- Click the Assign button.
- Select the device that you want to make a distribution point.
When selecting a device, keep in mind the operation features of distribution points and the requirements set for the device that acts as distribution point.
- Select the administration group that you want to include in the scope of the selected distribution point.
- Click the OK button.
The distribution point that you have added will be displayed in the list of distribution points, in the Distribution points section.
- Select the newly added distribution point in the list to open its properties window.
- Configure the distribution point in the properties window:
- The General section contains the setting of interaction between the distribution point and client devices:
- In the Scope section, specify the scope to which the distribution point will distribute updates (administration groups and / or network location).
Only devices running a Windows operating system can determine their network location. Network location cannot be determined for devices running other operating systems.
- In the Source of updates section, you can select a source of updates for the distribution point:
- In the KSN Proxy section, you can configure the application to use the distribution point to forward KSN requests from the managed devices:
- Configure the polling of Windows domains, Active Directory, and IP ranges by the distribution point:
- In the Advanced section, specify the folder that the distribution point must use to store distributed data:
- Click the OK button.
The selected devices act as distribution points.
Modifying the list of distribution points for an administration group
You can view the list of distribution points assigned to a specific administration group and modify the list by adding or removing distribution points.
To view and modify the list of distribution points assigned to an administration group:
- In the main menu, go to DEVICES → MANAGED DEVICES.
- In the Current path field above the list of managed devices, click the path link.
- In the left-side pane that opens, select an administration group for which you want to view the assigned distribution points.
This enables the DISTRIBUTION POINTS menu item.
- In the main menu, go to DEVICES → DISTRIBUTION POINTS.
- To add new distribution points for the administration group, click the Assign button above the list of managed devices and select devices from the pane that opens.
- To remove the assigned distribution points, select devices from the list and click the Unassign button.
Depending on your modifications, the new distribution points are added to the list or existing distribution points are removed from the list.
Forced synchronization
Although Kaspersky Security Center automatically synchronizes the status, settings, tasks, and policies for managed devices, in some cases you might want to run the synchronization for a specified device forcibly. You can run forced synchronization for the following devices:
- Devices that have Network Agent installed
- Devices running KasperskyOS
Before running forced synchronization for a KasperskyOS device, ensure that the device is included in a distribution point scope and that a push server is enabled on the distribution point.
- iOS devices
- Android devices
Before running forced synchronization for an Android device, you must configure Google Firebase Cloud Messaging.
Synchronizing a single device
To force synchronization between the Administration Server and a managed device:
- In the main menu, go to DEVICES → MANAGED DEVICES.
- Click the name of the device that you want to synchronize with the Administration Server.
A property window opens with the General section selected.
- Click the Force synchronization button.
The application synchronizes the selected device with the Administration Server.
Synchronizing multiple devices
To force synchronization between the Administration Server and multiple managed devices:
- Open the device list of an administration group or a device selection:
- In the main menu, go to DEVICES → MANAGED DEVICES, click the path link in the Current path field above the list of managed devices, then select the administration group that contains devices to synchronize.
- Run a device selection to view the device list.
- Select the check boxes next to the devices that you want to synchronize with the Administration Server.
- Above the list of managed devices, click the ellipsis button (
 ), and then click the Force synchronization button.
The application synchronizes the selected devices with the Administration Server.
- In the device list, check that the time of last connection to the Administration Server has changed, for the selected devices, to the current time. If the time has not changed, update the page content by clicking the Refresh button.
The selected devices are synchronized with the Administration Server.
Viewing the time of a policy delivery
After changing a policy for a Kaspersky application on the Administration Server, the administrator can check whether the changed policy has been delivered to a specific managed device. A policy can be delivered during a regular synchronization or a forced synchronization.
To view the date and time that an application policy was delivered to a managed device:
- In the main menu, go to DEVICES → MANAGED DEVICES.
- Click the name of the device that you want to synchronize with the Administration Server.
A property window opens with the General section selected.
- Select the Applications tab.
- Select the application for which you want to view the policy synchronization date.
The application policy window opens with the General section selected and the policy delivery date and time displayed.
Enabling a push server
In Kaspersky Security Center, a distribution point can work as a push server for the devices managed through the mobile protocol and for the devices managed by Network Agent. For example, a push server must be enabled if you want to be able to force synchronization of KasperskyOS devices with Administration Server. A push server has the same scope of managed devices as the distribution point on which the push server is enabled. If you have several distribution points assigned for the same administration group, you can enable push server on each of the distribution points. In this case, Administration Server balances the load between the distribution points.
You might want to use distribution points as push servers to make sure that there is continuous connectivity between a managed device and the Administration Server. Continuous connectivity is needed for some operations, such as running and stopping local tasks, receiving statistics for a managed application, or creating a tunnel. If you use a distribution point as a push server, you do not have to use the Do not disconnect from the Administration Server option on managed devices or send packets to the UDP port of the Network Agent.
A push server supports the load of up to 50,000 simultaneous connections.
To enable push server on a distribution point:
- Click the settings icon () next to the name of the required Administration Server.
The Administration Server properties window opens.
- On the General tab, select the Distribution points section.
- Click the name of the distribution point on which you want to enable the push server.
The distribution point properties window opens.
- On the General section, enable the Run push server option.
- In the Push server port field, type the port number. You can specify number of any unoccupied port.
- In the Address for remote hosts field, specify the IP address or the name of the distribution point device.
- Click the OK button.
The push server is enabled on the selected distribution point.