Contents
- Adjustment of distribution points and connection gateways
- Standard configuration of distribution points: Single office
- Standard configuration of distribution points: Multiple small remote offices
- Assigning a managed device to act as a distribution point
- Connecting a new network segment by using Linux devices
- Connecting a Linux device as a gateway in the demilitarized zone
- Connecting a Linux device to the Administration Server via a connection gateway
- Adding a connection gateway in the DMZ as a distribution point
- Assigning distribution points automatically
- About local installation of Network Agent on a device selected as distribution point
- About using a distribution point as connection gateway
- Adding IP ranges to the scanned ranges list of a distribution point
- Using a distribution point as a push server
Adjustment of distribution points and connection gateways
A structure of administration groups in Kaspersky Security Center performs the following functions:
- Sets the scope of policies
There is an alternate way of applying relevant settings on devices, by using policy profiles. In this case, you set the scope of policies with tags, device locations in Active Directory organizational units, or membership in Active Directory security groups.
- Sets the scope of group tasks
There is an approach to defining the scope of group tasks that is not based on a hierarchy of administration groups: use of tasks for device selections and tasks for specific devices.
- Sets access rights to devices, virtual Administration Servers, and secondary Administration Servers
- Assigns distribution points
When building the structure of administration groups, you must take into account the topology of the organization's network for the optimum assignment of distribution points. The optimum distribution of distribution points allows you to save traffic on the organization's network.
Depending on the organizational schema and network topology, the following standard configurations can be applied to the structure of administration groups:
- Single office
- Multiple small remote offices
Devices functioning as distribution points must be protected, including physical protection, against any unauthorized access.
Standard configuration of distribution points: Single office
In a standard "single-office" configuration, all devices are on the organization's network so they can "see" each other. The organization's network may consist of a few separate parts (networks or network segments) linked by narrow channels.
The following methods of building the structure of administration groups are possible:
- Building the structure of administration groups taking into account the network topology. The structure of administration groups may not reflect the network topology with absolute precision. A match between the separate parts of the network and certain administration groups would be enough. You can use automatic assignment of distribution points or assign them manually.
- Building the structure of administration groups, without taking the network topology into account. In this case, you must disable automatic assignment of distribution points, and then assign one or several devices to act as distribution points for a root administration group in each of the separate parts of the network, for example, for the Managed devices group. All distribution points will be at the same level and will feature the same scope spanning all devices on the organization's network. In this case, each Network Agent in version 10 Service Pack 1 or later will connect to the distribution point that has the shortest route. The route to a distribution point can be traced with the tracert utility.
Standard configuration of distribution points: Multiple small remote offices
This standard configuration provides for a number of small remote offices, which may communicate with the head office over the internet. Each remote office is located behind the NAT, that is, connection from one remote office to another is not possible because offices are isolated from one another.
The configuration must be reflected in the structure of administration groups: a separate administration group must be created for each remote office (groups Office 1 and Office 2 in the figure below).
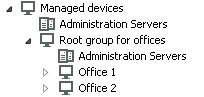
Remote offices are included in the administration group structure
One or multiple distribution points must be assigned to each administration group that correspond to an office. Distribution points must be devices at the remote office that have a sufficient amount of free disk space. Devices deployed in the Office 1 group, for example, will access distribution points assigned to the Office 1 administration group.
If some users move between offices physically, with their laptops, you must select two or more devices (in addition to the existing distribution points) in each remote office and assign them to act as distribution points for a top-level administration group (Root group for offices in the figure above).
Example: A laptop is deployed in the Office 1 administration group and then is moved physically to the office that corresponds to the Office 2 administration group. After the laptop is moved, Network Agent attempts to access the distribution points assigned to the Office 1 group, but those distribution points are unavailable. Then, Network Agent starts attempting to access the distribution points that have been assigned to the Root group for offices. Because remote offices are isolated from one another, attempts to access distribution points assigned to the Root group for offices administration group will only be successful when Network Agent attempts to access distribution points in the Office 2 group. That is, the laptop will remain in the administration group that corresponds to the initial office, but the laptop will use the distribution point of the office where it is physically located at the moment.
Assigning a managed device to act as a distribution point
You can manually assign a device to act as a distribution point for an administration group and configure it as a connection gateway in Administration Console.
To assign a device as distribution point of an administration group:
- In the console tree, select the Administration Server node.
- In the context menu of Administration Server, select Properties.
- In the Administration Server properties window, select the Distribution points section.
- In the right part of the window, select the Manually assign distribution points option.
- Click the Add button.
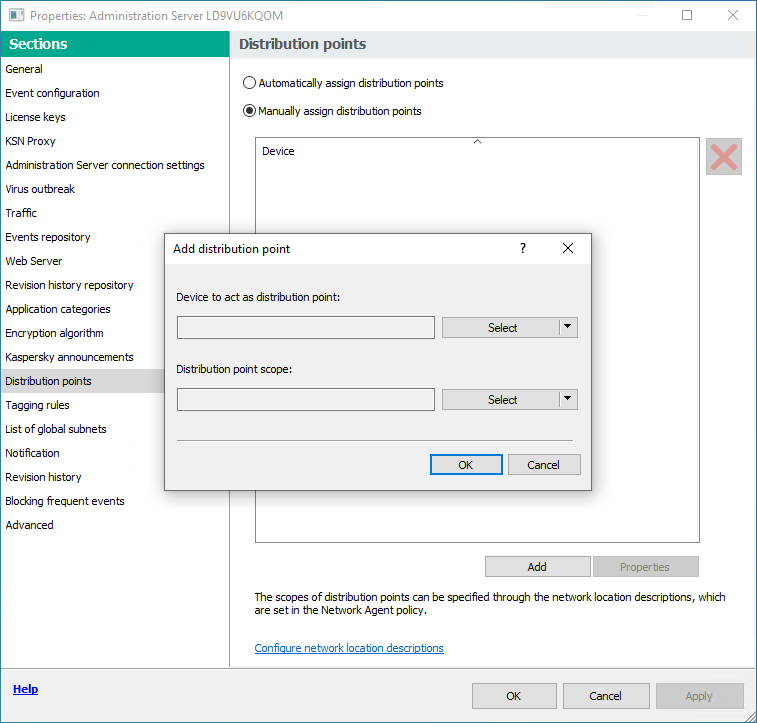
Assign a distribution point manually
This opens the Add distribution point window.
- In the Add distribution point window, perform the following actions:
- Under Device to act as distribution point, click the down arrow (
 ) on the Select split button and select the Add device from group option.
 - In the Select devices window that opens, select the device to act as a distribution point.
- Under Distribution point scope, click the down arrow () on the Select split button.
- Indicate the specific devices to which the distribution point will distribute updates. You can specify an administration group or a network location description.
- Click OK to close the Add distribution point window.
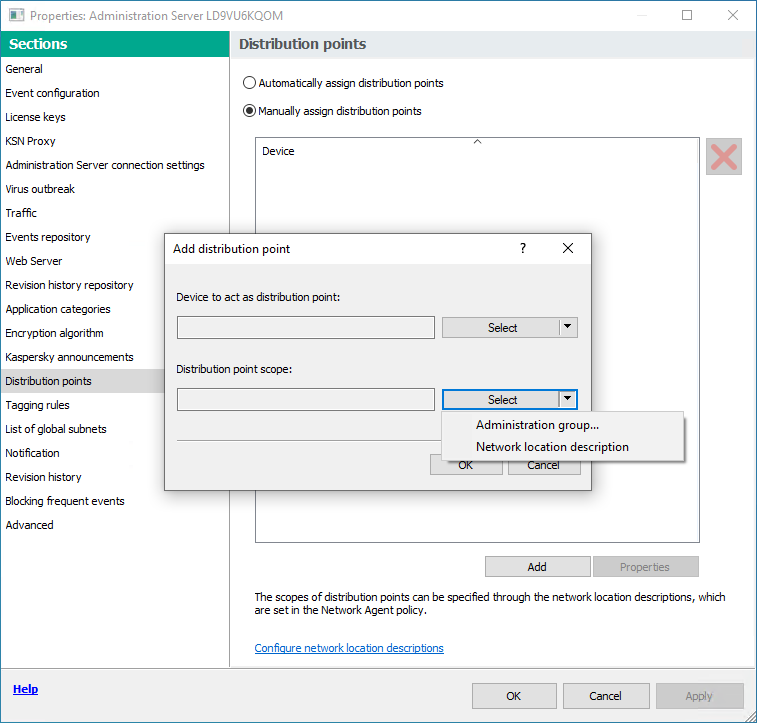
Selecting distribution point scope
- Under Device to act as distribution point, click the down arrow (
The distribution point that you have added will be displayed in the list of distribution points, in the Distribution points section.
The first device with Network Agent installed that connects to the virtual Administration Server will be automatically assigned to act as distribution point and configured as connection gateway.
Connecting a new network segment by using Linux devices
You can connect a new network segment on a Linux device. You need at least two different devices. One device, you can configure as connection gateway in the DMZ; and the other device, you can configure as a distribution point.
Follow the procedure described in this section only after you have completed the main installation scenario.
To connect a new network segment on a Linux device:
- Connect a Linux device as a gateway in the DMZ.
- Connect a Linux device to the Administration Server via a connection gateway.
Connecting a new network segment on a Linux device is configured.
Connecting a Linux device as a gateway in the demilitarized zone
To connect a Linux device as a gateway in the demilitarized zone (DMZ):
- Download and install Network Agent on the Linux device.
- Run the post-install script and follow the Wizard in order to setup the local environment configuration. In the command prompt, run the following command:
$ sudo /opt/kaspersky/klnagent64/lib/bin/setup/postinstall.pl - On the step asking for the Network Agent mode, choose the Use as connection gateway option.
- In the Administration Server properties window that opens, select the Distribution points section.
- In the Distribution points window that opens, in the right part of the window:
- Select the Manually assign distribution points option.
- Click the Add button.
This opens the Add distribution point window.
- In the Add distribution point window, perform the following actions:
- Under Device to act as distribution point, click the down arrow () on the Select split button, and then select the Add connection gateway in DMZ by address option.
- Under Distribution point scope, click the down arrow () on the Select split button.
- Indicate the specific devices to which the distribution point will distribute updates. You can specify an administration group.
- Click OK to close the Add distribution point window.
- Under Device to act as distribution point, click the down arrow (
- The distribution point that you have added will be displayed in the list of distribution points, in the Distribution points section.
- Run the klnagchk utility in order to check whether a connection to Kaspersky Security Center has been successfully configured. In the command prompt, run:
$ sudo /opt/kaspersky/klnagent64/bin/klnagchk - In the main menu, go to Kaspersky Security Center and discover the device.
- In the window that opens, click the <Device name>.
- In the drop-down list, select the Move to Group link.
- In the Select group window that opens, click the Distribution points link.
- Click OK.
- Restart the Network Agent service on the Linux client by executing the following command in the command prompt:
$ sudo /opt/kaspersky/klnagent64/bin/klnagchk -restart
Connecting a Linux device as a gateway in the DMZ is completed.
Connecting a Linux device to the Administration Server via a connection gateway
To connect a Linux device to the Administration Server via a connection gateway, perform the following actions on this device:
- Download and install Network Agent on the Linux device.
- Run the Network Agent post-install script by executing the following command in the command prompt:
$ sudo /opt/kaspersky/klnagent64/lib/bin/setup/postinstall.pl - On the step asking for the Network Agent mode, choose the Connect to server using connection gateway option and enter the address of connection gateway.
- Check the connection with Kaspersky Security Center and the connection gateway, by using the following command in the command prompt:
$ sudo /opt/kaspersky/klnagent64/bin/klnagchkThe address of connection gateway is displayed in the output.
Connecting a Linux device to the Administration Server via a connection gateway is completed. You can use this device to update distribution, for remote installation of applications, and to retrieve information about networked devices.
Page topAdding a connection gateway in the DMZ as a distribution point
A connection gateway waits for connections from Administration Server, rather than establishes connections to Administration Server. It means that right after a connection gateway is installed on a device in the DMZ, Administration Server does not list the device among managed devices. Therefore, you need a special procedure to ensure that Administration Server initiates a connection to the connection gateway.
To add a device with a connection gateway as a distribution point:
- In the console tree, select the Administration Server node.
- In the context menu of Administration Server, select Properties.
- In the Administration Server properties window, select the Distribution points section.
- In the right part of the window, select the Manually assign distribution points option.
- Click the Add button.
This opens the Add distribution point window.
- In the Add distribution point window, perform the following actions:
- Under Device to act as distribution point, click the down arrow () on the Select split button, and then select the Add connection gateway in DMZ by address option.
- In the Enter connection gateway address window that opens, enter the IP address of the connection gateway (or enter the name if the connection gateway is accessible by name).
- Under Distribution point scope, click the down arrow () on the Select split button.
- Indicate the specific devices to which the distribution point will distribute updates. You can specify an administration group or a network location description.
We recommend that you have a separate group for external managed devices.
- Under Device to act as distribution point, click the down arrow (
After you perform these actions, the list of distribution points contains a new entry named Temporary entry for connection gateway.
Administration Server almost immediately attempts to connect to the connection gateway at the address that you specified. If it succeeds, the entry name changes to the name of the connection gateway device. This process takes up to five minutes.
While the temporary entry for the connection gateway is being converted to a named entry, the connection gateway also appears in the Unassigned devices group.
Assigning distribution points automatically
We recommend that you assign distribution points automatically. Kaspersky Security Center will then select on its own which devices must be assigned distribution points.
To assign distribution points automatically:
- Open the main application window.
- In the console tree, select the node with the name of the Administration Server for which you want to assign distribution points automatically.
- In the context menu of the Administration Server, click Properties.
- In the Administration Server properties window, in the Sections pane select Distribution points.
- In the right part of the window, select the Automatically assign distribution points option.
If automatic assignment of devices as distribution points is enabled, you cannot configure distribution points manually or edit the list of distribution points.
- Click OK.
Administration Server assigns and configures distribution points automatically.
About local installation of Network Agent on a device selected as distribution point
To allow the device selected as the distribution point to directly communicate with the virtual Administration Server in order to act as connection gateway, the Network Agent must be installed locally on this device.
The procedure of local installation of Network Agent on the device defined as distribution point is the same as local installation of Network Agent on any network device.
The following conditions must be met for a device selected as a distribution point:
- During local installation of Network Agent, specify the address of a virtual Administration Server that manages the device in the Server Address field in the Administration Server window of the Setup Wizard. You can use either the device IP address or device name in the Windows network.
The following format is used for the virtual Administration Server address: <Full address of the physical Administration Server to which the virtual Server is subordinate>/<Name of virtual Administration Server>.
- So that it can act as connection gateway, open all ports of the device that are necessary for communication with the Administration Server.
After Network Agent with specified settings is installed on a device, Kaspersky Security Center performs the following actions automatically:
- Includes this device in the Managed devices group of the virtual Administration Server.
- Assigns this device as the distribution point of the Managed devices group of the virtual Administration Server.
It is necessary and sufficient to install Network Agent locally on the device that is assigned as the distribution point for the Managed devices group on the organization's network. You can install Network Agent remotely on devices that act as distribution points in the nested administration groups. To do this, use the distribution point of the Managed devices group as connection gateway.
About using a distribution point as connection gateway
If the Administration Server is outside the demilitarized zone (DMZ), Network Agents from this zone cannot connect to the Administration Server.
When connecting the Administration Server with Network Agents, you can use a distribution point as the connection gateway. The distribution point opens a port to Administration Server for the connection to be created. When the Administration Server is started, it connects to that distribution point and maintains this connection during the entire session.
Upon receiving a signal from the Administration Server, the distribution point sends a UDP signal to the Network Agents in order to allow connection to the Administration Server. When the Network Agents receive that signal, they connect to the distribution point, which exchanges information between them and the Administration Server.
We recommend that you use a specially assigned device as the connection gateway and cover a maximum of 10,000 client devices (including mobile devices) with this connection gateway.
Adding IP ranges to the scanned ranges list of a distribution point
You can add IP ranges to the list of scanned ranges of a distribution point.
To add an IP range to the list of scanned ranges:
- In the console tree, select the Administration Server node.
- In the context menu of the node, select Properties.
- In the Administration Server properties window that opens, select the Distribution points section.
- In the list, select the necessary distribution point and click Properties.
- In the distribution point properties window that opens, in the left Sections pane, select Device discovery → IP ranges.
- Select the Enable range polling check box.
- Click the Add button.
The Add button is active only if you select the Enable range polling check box.
The IP range window opens.
- In the IP range window, enter the name of the new IP range (the default name is New range).
- Click the Add button.
- Do one of the following:
- Specify the IP range using the start and end IP addresses.
- Specify the IP range using the address and subnet mask.
- Click Browse and add a subnet from the global list of subnets.
- Click OK.
- Click OK to add the new range with the specified name.
The new range will appear in the list of scanned ranges.
Page topUsing a distribution point as a push server
In Kaspersky Security Center, a distribution point can work as a push server for the devices managed through the mobile protocol and for the devices managed by Network Agent. For example, a push server must be enabled if you want to be able to force synchronization of KasperskyOS devices with Administration Server. A push server has the same scope of managed devices as the distribution point on which the push server is enabled. If you have several distribution points assigned for the same administration group, you can enable push server on each of the distribution points. In this case, Administration Server balances the load between the distribution points.
A push server supports the load of up to 50,000 simultaneous connections.
You might want to use distribution points as push servers to make sure that there is continuous connectivity between a managed device and the Administration Server. Continuous connectivity is needed for some operations, such as running and stopping local tasks, receiving statistics for a managed application, or creating a tunnel. If you use a distribution point as a push server, you do not have to use the Do not disconnect from the Administration Server option on managed devices or send packets to the UDP port of the Network Agent.
To use a distribution point as a push server:
- In the console tree, select the Administration Server node.
- In the context menu of the node, select Properties.
- In the Administration Server properties window that opens, select the Distribution points section.
- In the list, select the necessary distribution point, and then click Properties.
- In the distribution point properties window that opens, in the General section of the left Sections pane, select the Use this distribution point as a push server option.
- Specify the push server port number, that is, the port on the distribution point that client devices will use for connection.
By default, port 13295 is used.
- Click the OK button to exit the distribution point properties window.
- Open the Network Agent policy settings window.
- In the Connectivity section, go to the Network subsection.
- In the Network subsection, select the Use distribution point to force connection to the Administration Server option.
- Click the OK button to exit the window.
The distribution point starts acting as a push server. It can now send push notifications to client devices.
If you manage devices with KasperskyOS installed, or plan to do so, you must use a distribution point as a push server. You can also use a distribution point as a push server if you want to send push notifications to client devices.