Contents
Managing administration groups
This section provides information about how to manage administration groups.
You can perform the following actions on administration groups:
- Add any number of nested groups at any level of hierarchy to administration groups.
- Add devices to administration groups.
- Change the hierarchy of administration groups by moving individual devices and entire groups to other groups.
- Remove nested groups and devices from administration groups.
- Add secondary and virtual Administration Servers to administration groups.
- Move devices from the administration groups of an Administration Server to those of another Server.
- Define which Kaspersky applications will be automatically installed on devices included in a group.
You can perform these actions only if you have the Modify permission in the Management of administration groups area for the administration groups you want to manage (or for the Administration Server to which these groups belong).
Creating administration groups
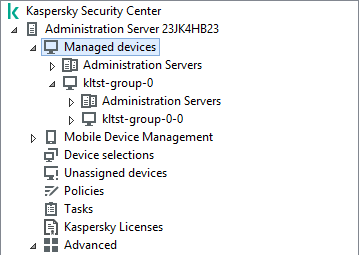
The hierarchy of administration groups is created in the main application window of Kaspersky Security Center in the Managed devices folder. Administration groups are displayed as folders in the console tree (see the figure below).
Immediately after Kaspersky Security Center installation, the Managed devices folder contains only an empty Administration Servers folder.
The user interface settings determine whether the Administration Servers folder appears in the console tree. To display this folder, on the menu bar select View → Configure interface and in the Configure interface window that opens select the Display secondary Administration Servers check box.
When creating a hierarchy of administration groups, you can add devices and virtual machines to the Managed devices folder, and add nested groups. You can add secondary and virtual Administration Servers to the Administration Servers folder.
Just like the Managed devices folder, each created group initially only contains an empty Administration Servers folder intended to work with secondary and virtual Administration Servers of this group. Information about policies and tasks for this group, and information about devices included into this group, is displayed on the tabs with corresponding names in the workspace of this group.
Viewing administration groups hierarchy
To create an administration group:
- In the console tree, expand the Managed devices folder.
- If you want to create a subgroup in an existing administration group, in the Managed devices folder select a subfolder corresponding to the group that is to include the new administration group.
If you create a new top-level administration group, you can skip this step.
- Start the administration group creation in one of the following ways:
- By using the New → Group command in the context menu.
- By clicking the New group button located in the workspace of the main application window, on the Devices tab.
- In the Group name window that opens, enter a name for the group and click OK.
A new administration group folder with the specified name appears in the console tree.
The application allows creating a hierarchy of administration groups based on the structure of Active Directory or the domain network's structure. Also, you can create a structure of groups from a text file.
To create a structure of administration groups:
- In the console tree, select the Managed devices folder.
- In the context menu of the Managed devices folder, select All Tasks → New group structure.
The New Administration Group Structure Wizard starts. Follow the instructions of the Wizard.
Page topMoving administration groups
You can move nested administration groups within the groups hierarchy.
An administration group is moved together with all nested groups, secondary Administration Servers, devices, group policies, and tasks. The system will apply to the group all the settings that correspond to its new position in the hierarchy of administration groups.
The name of the group must be unique within one level of the hierarchy. If a group with the same name already exists in the folder into which you move the administration group, you should change the name of the latter. If you have not changed the name of the moved group, an index in (<next sequence number>) format is automatically added to its name when it is moved, for example: (1), (2).
You cannot rename the Managed devices group because it is a built-in element of Administration Console.
To move a group to another folder in the console tree:
- Select a group to move in the console tree.
- Do one of the following:
- Move the group by using the context menu:
- Select Cut from the context menu of the group.
- Select Paste from the context menu of the administration group to which you want to move the selected group.
- Move the group using the main application menu:
- In the main menu, select Action → Cut.
- Select the administration group to which you have to move the selected group in the console tree.
- In the main menu, select Action → Paste.
- Move the group to another in the console tree using the mouse.
- Move the group by using the context menu:
Deleting administration groups
You can delete an administration group if it contains no secondary Administration Servers, nested groups, or client devices, and if no group tasks or policies have been created for it.
Before deleting an administration group, you must delete all secondary Administration Servers, nested groups, and client devices from that group.
To delete a group:
- Select an administration group in the console tree.
- Do one of the following:
- Select Delete from the context menu of the group.
- In the main application menu, select Action → Delete.
- Press the DELETE key.
Automatic creation of a structure of administration groups
Kaspersky Security Center allows you to create a structure of administration groups using the Groups Hierarchy Creation Wizard.
The Wizard creates a structure of administration groups based on the following data:
- Structures of Windows domains and workgroups
- Structures of Active Directory groups
- Contents of a text file created by the administrator manually
When the text file is generated, the following requirements must be met:
- The name of each new group must begin with a new line; the delimiter must begin with a line break. Blank lines are ignored.
Example:
Office 1
Office 2
Office 3
Three groups of the first hierarchy level will be created in the target group.
- The name of the nested group must be entered with a slash mark (/).
Example:
Office 1/Division 1/Department 1/Group 1
Four subgroups nested inside each other will be created in the target group.
- To create several nested groups of the same hierarchy level, you must specify the "full path to the group".
Example:
Office 1/Division 1/Department 1
Office 1/Division 2/Department 1
Office 1/Division 3/Department 1
Office 1/Division 4/Department 1
One group of the first hierarchy level Office 1 will be created in the destination group; this group will include four nested groups of the same hierarchy level: "Division 1", "Division 2", "Division 3", and "Division 4". Each of these groups will include the "Department 1" group.
Creating the hierarchy of administration groups through the Wizard does not affect the network integrity: instead of existing groups being replaced, new groups are added. A client device cannot be included in an administration group a second time because the device is removed from the Unassigned devices group when it is moved to the administration group.
If, during creation of the administration group structure, a device was not included in the Unassigned devices group for some reason (it was shut down or disconnected from the network), the device will not be automatically moved to the administration group. You can add devices to administration groups manually after the Wizard completes.
To launch the automatic creation of a structure of administration groups:
- Select the Managed devices folder in the console tree.
- In the context menu of the Managed devices folder, select All Tasks → New group structure.
The New Administration Group Structure Wizard starts. Follow the instructions of the Wizard.
Page topAutomatic installation of applications on devices in an administration group
You can specify which installation packages must be used for automatic remote installation of Kaspersky applications to client devices that have recently been added to a group.
To configure automatic installation of applications on new devices in an administration group:
- In the console tree, select the required administration group.
- Open the properties window of this administration group.
- In the Sections pane, select Automatic installation, and in the workspace select the installation packages of the applications to be installed on new devices.
- Click OK.
Group tasks are created. These tasks are run on the client devices immediately after they are added to the administration group.
If some installation packages of one application are selected for automatic installation, the installation task is created for the most recent application version only.