Contents
- Managing Administration Servers
- Creating a hierarchy of Administration Servers: adding a secondary Administration Server
- Connecting to an Administration Server and switching between Administration Servers
- Access rights to Administration Server and its objects
- Conditions of connection to an Administration Server over the internet
- Encrypted connection to an Administration Server
- Disconnecting from an Administration Server
- Adding an Administration Server to the console tree
- Removing an Administration Server from the console tree
- Adding a virtual Administration Server to the console tree
- Changing an Administration Server service account. Utility tool klsrvswch
- Changing DBMS credentials
- Resolving issues with Administration Server nodes
- Viewing and modifying the settings of an Administration Server
- Adjusting the general settings of Administration Server
- Administration Console interface settings
- Event processing and storage on the Administration Server
- Viewing log of connections to the Administration Server
- Control of virus outbreaks
- Limiting traffic
- Configuring Web Server
- Reissuing the Web Server certificate
- Working with internal users
- Backup and restoration of Administration Server settings
- Backup copying and restoration of Administration Server data
- Moving Administration Server and a database server to another device
- Avoiding conflicts between multiple Administration Servers
- Two-step verification
- Scenario: configuring two-step verification for all users
- About two-step verification
- Enabling two-step verification for your own account
- Enabling two-step verification for all users
- Disabling two-step verification for a user account
- Disabling two-step verification for all users
- Excluding accounts from two-step verification
- Editing the name of a security code issuer
Managing Administration Servers
This section provides information about working with Administration Servers and configuring them.
Creating a hierarchy of Administration Servers: adding a secondary Administration Server
You can add an Administration Server as a secondary Administration Server, thus establishing a "primary/secondary" hierarchy. Adding a secondary Administration Server is possible regardless of whether the Administration Server that you intend to use as secondary is available for connection through Administration Console.
When combining two Administration Servers into a hierarchy, make sure that port 13291 is accessible on both Administration Servers. Port 13291 is required to receive connections from Administration Console to the Administration Server.
Connecting an Administration Server as secondary in reference to the primary Administration Server
You can add an Administration Server as secondary by connecting it to the primary Administration Server via port 13000. You will need a device that has Administration Console installed from which TCP ports 13291 can be accessed on both Administration Servers: supposed primary Administration Server and supposed secondary Administration Server.
To add as secondary an Administration Server that is available for connection through Administration Console:
- Make sure that port 13000 of the supposed primary Administration Server is available for receipt of connections from secondary Administration Servers.
- Use Administration Console to connect to the supposed primary Administration Server.
- Select the administration group to which you intend to add the secondary Administration Server.
- In the workspace of the Administration Servers node of the selected group, click the Add secondary Administration Server link.
The Add Secondary Administration Server Wizard starts.
- At the first step of the Wizard (entering the address of the Administration Server being added to the group), enter the network name of the supposed secondary Administration Server.
- Follow the instructions of the Wizard.
The "primary/secondary" hierarchy is built. The primary Administration Server will receive connection from the secondary Administration Server.
If you do not have a device that has Administration Console installed from which TCP ports 13291 can be accessed on both Administration Servers (if, for example, the supposed secondary Administration Server is located at a remote office and the system administrator of that office cannot open internet access to port 13291 for security reasons), you will still be able to add a secondary Administration Server.
To add as secondary an Administration Server that is not available for connection through Administration Console:
- Make sure that port 13000 of the supposed primary Administration Server is available for connection from secondary Administration Servers.
- Write the certificate file of the supposed primary Administration Server to an external device, such as a flash drive, or send it to the system administrator of the remote office where the Administration Server is located.
The certificate file of the Administration Server is on the same Administration Server, at %ALLUSERSPROFILE%\Application Data\KasperskyLab\adminkit\1093\cert\klserver.cer.
- Write the certificate file of the supposed secondary Administration Server to an external device, such as a flash drive. If the supposed secondary Administration Server is located at a remote office, contact the system administrator of that office to prompt him or her to send you the certificate.
The certificate file of the Administration Server is on the same Administration Server, at %ALLUSERSPROFILE%\Application Data\KasperskyLab\adminkit\1093\cert\klserver.cer.
- Use Administration Console to connect to the supposed primary Administration Server.
- Select the administration group to which you intend to add the secondary Administration Server.
- In the workspace of the Administration Servers node, click the Add secondary Administration Server link.
The Add Secondary Administration Server Wizard starts.
- At the first step of the Wizard (entering the address), leave the Secondary Administration Server address (optional) field blank.
- In the Secondary Administration Server certificate file window, click the Browse button and select the certificate file of the secondary Administration Server that you saved.
- When the Wizard is complete, use a different instance of Administration Console to connect to the supposed secondary Administration Server. If this Administration Server is located at a remote office, contact the system administrator of that office to prompt him or her to connect to the supposed secondary Administration Server and perform further due steps.
- In the context menu of the Administration Server node, select Properties.
- In the Administration Server properties, proceed to the Advanced section and then to the Hierarchy of Administration Servers subsection.
- Select the This Administration Server is secondary in the hierarchy check box.
The entry fields become available for data input and editing.
- In the Primary Administration Server address field, enter the network name of the supposed primary Administration Server.
- Select the previously saved file with the certificate of the supposed primary Administration Server by clicking the Browse button.
- Click OK.
The "primary/secondary" hierarchy is built. You can connect to the secondary Administration Server through Administration Console. The primary Administration Server will receive connection from the secondary Administration Server.
Connecting the primary Administration Server to a secondary Administration Server
You can add a new Administration Server as secondary so that the primary Administration Server connects to the secondary Administration Server via port 13000. This is advisable if, for example, you place a secondary Administration Server in DMZ.
You will need a device that has Administration Console installed from which TCP ports 13291 can be accessed on both Administration Servers: supposed primary Administration Server and supposed secondary Administration Server.
To add a new Administration Server as secondary and connect the primary Administration Server via port 13000:
- Make sure that port 13000 of the supposed secondary Administration Server is available for receipt of connections from the primary Administration Server.
- Use Administration Console to connect to the supposed primary Administration Server.
- Select the administration group to which you intend to add the secondary Administration Server.
- In the workspace of the Administration Servers node of the relevant administration group, click the Add secondary Administration Server link.
The Add Secondary Administration Server Wizard starts.
- At the first step of the Wizard (entering the address of the Administration Server to be added to the group), enter the network name of the supposed secondary Administration Server and select the Connect primary Administration Server to secondary Administration Server in DMZ check box.
- If you connect to the supposed secondary Administration Server by using a proxy server, at the first step of the Wizard select the Use proxy server check box and specify the connection settings.
- Follow the instructions of the Wizard.
The hierarchy of Administration Servers is created. The secondary Administration Server will receive connection from the primary Administration Server.
Connecting to an Administration Server and switching between Administration Servers
After Kaspersky Security Center is started, it attempts to connect to an Administration Server. If several Administration Servers are available on the network, the application requests the server to which it was connected during the previous session of Kaspersky Security Center.
When the application is started for the first time after installation, it attempts to connect to the Administration Server that was specified during Kaspersky Security Center installation.
After connection to an Administration Server is established, the folders tree of that Server is displayed in the console tree.
If several Administration Servers have been added to the console tree, you can switch between them.
Administration Console is required for work with each Administration Server. Before the first connection to a new Administration Server, make sure that port 13291, which receives connections from Administration Console, is open, as well as all the remaining ports required for communication between Administration Server and other Kaspersky Security Center components.
To switch to another Administration Server:
- In the console tree, select the node with the name of the required Administration Server.
- In the context menu of the node, select Connect to Administration Server.
- In the Connection settings window that opens, in the Administration Server address field specify the name of the Administration Server to which you want to connect. You can specify an IP address or the name of a device on a Windows network as the name of the Administration Server. You can click the Advanced button to configure the connection to the Administration Server (see figure below).
To connect to the Administration Server through a different port than the default port, enter a value in the Administration Server address field in <Administration Server name>:<Port> format.
Users who do not have Read rights will be denied access to Administration Server.
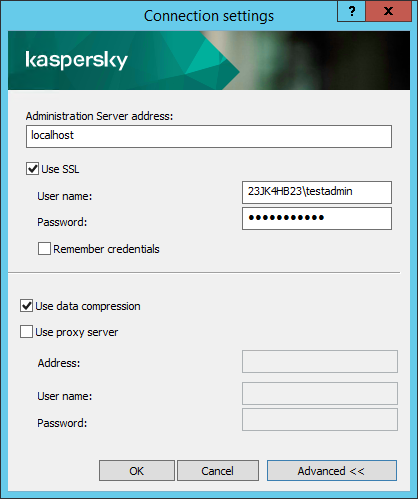
Connecting to Administration Server
- Click OK to complete the switch between Servers.
After the Administration Server is connected, the folders tree of the corresponding node in the console tree is updated.
Access rights to Administration Server and its objects
The KLAdmins and KLOperators groups are created automatically during Kaspersky Security Center installation. These groups are granted permissions to connect to the Administration Server and to process Administration Server objects.
Depending on the type of account that is used for installation of Kaspersky Security Center, the KLAdmins and KLOperators groups are created as follows:
- If the application is installed under a user account included in a domain, the groups are created on the Administration Server and in the domain that includes the Administration Server.
- If the application is installed under a system account, the groups are created on the Administration Server only.
You can view the KLAdmins and KLOperators groups and modify the access privileges of the users that belong to the KLAdmins and KLOperators groups by using the standard administrative tools of the operating system.
The KLAdmins group is granted all access rights; the KLOperators group is granted only Read and Execute rights. The rights granted to the KLAdmins group are locked.
Users that belong to the KLAdmins group are called Kaspersky Security Center administrators, while users from the KLOperators group are called Kaspersky Security Center operators.
In addition to users included in the KLAdmins group, administrator rights for Kaspersky Security Center are also provided to the local administrators of devices on which Administration Server is installed.
You can exclude local administrators from the list of users who have Kaspersky Security Center administrator rights.
All operations started by the administrators of Kaspersky Security Center are performed using the rights of the Administration Server account.
An individual KLAdmins group can be created for each Administration Server from the network; the group will have the necessary rights for that Administration Server only.
If devices belonging to the same domain are included in the administration groups of different Administration Servers, the domain administrator is the Kaspersky Security Center administrator for all the groups. The KLAdmins group is the same for those administration groups; it is created during installation of the first Administration Server. All operations initiated by a Kaspersky Security Center administrator are performed using the account rights of the Administration Server for which these operations have been started.
After the application is installed, an administrator of Kaspersky Security Center can do the following:
- Modify the rights granted to the KLOperators groups.
- Grant rights—to access Kaspersky Security Center functionality—to other user groups and individual users who are registered on the administrator's workstation.
- Assign user access rights within each administration group.
The Kaspersky Security Center administrator can assign access rights to each administration group or to other objects of Administration Server in the Security section in the properties window of the selected object.
You can track user activity by using the records of events in the Administration Server operation. Event records are displayed in the Administration Server node on the Events tab. These events have the importance level Info events and the event types begin with "Audit".
Conditions of connection to an Administration Server over the internet
If an Administration Server is remotely located outside a corporate network, client devices can connect to it over the internet.
For devices to connect to an Administration Server over the internet, the following conditions must be met:
- The remote Administration Server must have an external IP address and the incoming port 13000 must remain open (for connection of Network Agents). We recommend that you also open UDP port 13000 (for receiving notifications of device shut down).
- Network Agents must be installed on the devices.
- When installing Network Agent on devices, you must specify the external IP address of the remote Administration Server. If an installation package is used for installation, specify the external IP address manually in the properties of the installation package, in the Settings section.
- To use the remote Administration Server to manage applications and tasks for a device, in the properties window of the device, in the General section select the Do not disconnect from the Administration Server check box. After the check box is selected, wait until the Administration Server is synchronized with the remote device. The number of client devices maintaining a continuous connection with an Administration Server cannot exceed 300.
To speed up the performance of tasks initiated by a remote Administration Server, you can open port 15000 on a device. In this case, to run a task, the Administration Server sends a special packet to Network Agent over port 15000 without waiting until completion of synchronization with the device.
Encrypted connection to an Administration Server
Data exchange between client devices and Administration Server, as well as Administration Console connection to Administration Server, can be performed using the TLS (Transport Layer Security) protocol. The TLS protocol can identify the interacting parties, encrypt the data that is transferred, and protect data against modification during transfer. The TLS protocol uses public keys to authenticate the interacting parties and encrypt data.
Authenticating Administration Server when a device is connected
When a client device connects to Administration Server for the first time, Network Agent on the device downloads a copy of the Administration Server certificate and stores it locally.
If you install Network Agent on a device locally, you can select the Administration Server certificate manually.
The downloaded copy of the certificate is used to verify Administration Server rights and permissions during subsequent connections.
During future sessions, Network Agent requests the Administration Server certificate at each connection of the device to Administration Server and compares it with the local copy. If the copies do not match, the device is not allowed access to Administration Server.
Page topAdministration Server authentication during Administration Console connection
At the first connection to Administration Server, Administration Console requests the Administration Server certificate and saves it locally on the administrator's workstation. After that, each time when Administration Console tries to connect to this Administration Server, the Administration Server is identified based on the certificate copy.
If the Administration Server certificate does not match the copy stored on the administrator's workstation, Administration Console prompts you to confirm connection to the Administration Server with the specified name and download a new certificate. After the connection is established, Administration Console saves a copy of the new Administration Server certificate, which will be used to identify the Administration Server in the future.
Page topAbout Administration Server certificate
Two operations are performed based on the Administration Server certificate: Administration Server authentication during connection by Administration Console and data exchange with devices. The certificate is also used for authentication when the primary Administration Servers are connected to secondary Administration Servers.
Certificate issued by Kaspersky
The Administration Server certificate is created automatically during installation of the Administration Server component and it is stored in the %ALLUSERSPROFILE%\Application Data\KasperskyLab\adminkit\1093\cert folder.
The Administration Server certificate is valid for five years, if the certificate was issued before September 1, 2020. Otherwise, the certificate validity term is limited to 397 days. A new certificate is generated by the Administration Server as the reserve certificate 90 days before the expiration date of the current certificate. Subsequently, the new certificate automatically replaces the current certificate one day before the expiration date. All Network Agents on the client devices are automatically reconfigured to authenticate the Administration Server with the new certificate.
Custom certificates
If necessary, you can assign a custom certificate for the Administration Server. For example, this may be necessary for better integration with the existing PKI of your enterprise or for custom configuration of the certificate fields.
The maximum validity period for any of the Administration Server certificates must be 397 days or less.
When replacing the certificate, all Network Agents that were previously connected to Administration Server through SSL, will lose their connection and will return "Administration Server authentication error." To eliminate this error, you will have to restore the connection after the certificate replacement.
If the Administration Server certificate is lost, you must reinstall the Administration Server component, and then restore the data in order to recover it.
Page topDisconnecting from an Administration Server
To disconnect from an Administration Server:
- In the console tree select the node corresponding to the Administration Server that you want to disconnect.
- In the context menu of the node select Disconnect from Administration Server.
Adding an Administration Server to the console tree
To add an Administration Server to the console tree:
- In the Kaspersky Security Center main window, in the console tree select the Kaspersky Security Center 13.1 node.
- In the context menu of the node, select New → Administration Server.
A node named Administration Server - <Device name> (Not connected) is created in the console tree from which you will be able to connect to any of the Administration Servers installed on the network.
Page topRemoving an Administration Server from the console tree
To remove an Administration Server from the console tree:
- In the console tree select the node corresponding to the Administration Server that you want to remove.
- In the context menu of the node select Remove.
Adding a virtual Administration Server to the console tree
To add a virtual Administration Server to the console tree:
- In the console tree, select the node with the name of the Administration Server for which you need to create a virtual Administration Server.
- In the Administration Server node, select the Administration Servers folder.
- In the workspace of the Administration Servers folder, click the Add virtual Administration Server link.
The New Virtual Administration Server Wizard starts.
- In the Name of virtual Administration Server window, specify the name of the virtual Administration Server to be created.
The name of a virtual Administration Server cannot be more than 255 characters long and cannot include any special characters (such as "*<>?\:|).
- In the Enter address for device connection to virtual Administration Server window, specify the device connection address
The connection address of a virtual Administration Server is the network address through which devices will connect to that Server. The connection address has two parts: the network address of a physical Administration Server and the name of a virtual Administration Server, separated with a slash. The name of the virtual Administration Server will be substituted automatically. The specified address will be used on the virtual Administration Server as the default address in Network Agent installation packages.
- In the Create the virtual Administration Server administrator account window, assign a user from the list to act as virtual Server administrator, or add a new administrator account by clicking the Create button.
You can specify multiple accounts.
A node named Administration Server <Name of virtual Administration Server> is created in the console tree.
Page topChanging an Administration Server service account. Utility tool klsrvswch
If you have to change the Administration Server service account that was set during installation of Kaspersky Security Center, you can use a utility named klsrvswch that is designed for changing the Administration Server account.
When Kaspersky Security Center is installed, the utility is automatically copied to the application installation folder.
The number of launches of the utility is essentially unlimited.
The klsrvswch utility allows you to change the account type. For example, if you use a local account, you can change it to a domain account or to a managed service account (and vice versa). The klsrvswch utility does not allow you to change the account type to group managed service account (gMSA).
Windows Vista and later Windows versions do not allow the use of a LocalSystem account for the Administration Server. In these Windows versions, the LocalSystem account option is inactive.
To change an Administration Server service account to a domain account:
- Launch the klsrvswch utility from the installation folder of Kaspersky Security Center.
This action also launches the Wizard for modification of Administration Server service account. Follow the instructions of the Wizard.
- In the Administration Server service account window, select LocalSystem account.
After the Wizard finishes, the Administration Server account is changed. The Administration Server service will start under the LocalSystem Account and use its credentials.
Correct operation of Kaspersky Security Center requires that the account used to start the Administration Server service has administrator rights to the resource where the Administration Server database is hosted.
To change an Administration Server service account to a user account or a managed service account:
- Launch the klsrvswch utility from the installation folder of Kaspersky Security Center.
This action also launches the Wizard for modification of Administration Server service account. Follow the instructions of the Wizard.
- In the Administration Server service account window, select Custom account.
- Click the Find now button.
The Select User window opens.
- In the Select User window, click the Object Types button.
- In the object types list, select Users (if you want a user account) or Service Accounts (if you want a managed service account) and click OK.
- In the object name field, enter the name of the account, or a part of the name, and click Check Names.
- In the list of the matching names, select the necessary name, and then click OK.
- If you selected Service Accounts, in the Account password window, leave the Password and Confirm password fields blank. If you selected Users, enter a new password for the user and confirm it.
The Administration Server service account will be changed to the account that you selected.
When Microsoft SQL Server is used in a mode that presupposes authenticating user accounts with Windows tools, access to the database must be granted. The user account must have the status of owner of the Kaspersky Security Center database. The dbo schema is used by default.
Changing DBMS credentials
Sometimes, you may need to change DBMS credentials, for example, in order to perform a credential rotation for security purposes.
To change DBMS credentials in a Windows environment by using klsrvswch.exe:
- Launch the klsrvswch utility that is located in the installation folder of Kaspersky Security Center.
- Click the Next button of the Wizard until you reach the Change DBMS access credentials step.
- At the Change DBMS access credentials step of the Wizard, perform the following:
- Select the Apply new credentials option.
- Specify a new account name in the Account field.
- Specify a new password for an account in the Password field.
- Specify the new password in the Confirm password field.
You should specify credentials of an account that exists in the DBMS.
- Click the Next button.
After the Wizard finishes, the DBMS credentials are changed.
Page topResolving issues with Administration Server nodes
The console tree in the left pane of Administration Console contains nodes of Administration Servers. You can add as many Administration Servers as you need to the console tree.
The list of Administration Server nodes in the console tree is stored in a shadow copy of a .msc file by means of Microsoft Management Console. The shadow copy of this file is located in the %USERPROFILE%\AppData\Roaming\Microsoft\MMC\ folder on the device where the Administration Console is installed. For each Administration Server node, the file contains the following information:
- Administration Server address
- Port number
- Whether TLS is in use
This parameter depends on the port number used to connect Administration Console to the Administration Server.
- User name
- Administration Server certificate
Troubleshooting
When Administration Console connects to the Administration Server, the certificate stored locally is compared to the Administration Server certificate. If the certificates do not match, Administration Console generates an error. For example, a certificate mismatch may occur when you replace the Administration Server certificate. In this case, recreate the Administration Server node in the console.
To recreate an Administration Server node:
- Close the Kaspersky Security Center Administration Console window.
- Delete the Kaspersky Security Center 13.1 file at %USERPROFILE%\AppData\Roaming\Microsoft\MMC\.
- Run Kaspersky Security Center Administration Console.
You will be prompted to connect to the Administration Server and accept its existing certificate.
- Do one of the following:
- Accept the existing certificate by clicking the Yes button.
- To specify your certificate, click the No button, and then browse to the certificate file to be used to authenticate the Administration Server.
The certificate issue is resolved. You can use Administration Console to connect to the Administration Server.
Page topViewing and modifying the settings of an Administration Server
You can adjust the settings of an Administration Server in the properties window of this Server.
To open the Properties: Administration Server window,
Select Properties in the context menu of the Administration Server node in the console tree.
Adjusting the general settings of Administration Server
You can adjust the general settings of Administration Server in the General, Administration Server connection settings, Events repository, and Security sections of the Administration Server properties window.
The Security section is not displayed in the Administration Server properties window if the display has been disabled in the Administration Console interface.
To enable the display of the Security section in Administration Console:
- In the console tree, select the Administration Server that you want.
- In the View menu of the main application window, select Configure interface.
- In the Configure interface window that opens, select the Display security settings sections check box and click OK.
- In the window with the application message, click OK.
The Security section will be displayed in the Administration Server properties window.
Page topAdministration Console interface settings
You can adjust the interface settings of Administration Console to display or hide the user interface controls related to the following features:
- Vulnerability and Patch Management
- Data encryption and protection
- Endpoint control settings
- Mobile Device Management
- Secondary Administration Servers
- Security Settings sections
To configure the Administration Console interface settings:
- In the console tree, select the Administration Server that you want.
- In the View menu of the main application window, select Configure interface.
- In the Configure interface window that opens, select the check boxes next to the features that you want displayed and click OK.
- In the window with the application message, click OK.
The selected features will be displayed in the Administration Console interface.
Page topEvent processing and storage on the Administration Server
Information about events during the operation of the application and managed devices is saved in the Administration Server database. Each event is attributed to a certain type and level of severity (Critical event, Functional failure, Warning, or Info). Depending on the conditions under which an event occurred, the application can assign different levels of severity to events of the same type.
You can view types and levels of severity assigned to events in the Event configuration section of the Administration Server properties window. In the Event configuration section, you can also configure processing of every event by the Administration Server:
- Registration of events on the Administration Server and in event logs of the operating system on a device and on the Administration Server.
- Method used for notifying the administrator of an event (for example, an SMS or email message).
In the Events repository section of the Administration Server properties window, you can edit the settings of events storage in the Administration Server database by limiting the number of event records and record storage term. When you specify the maximum number of events, the application calculates an approximate amount of storage space required for the specified number. You can use this approximate calculation to evaluate whether you have enough free space on the disk to avoid database overflow. The default capacity of the Administration Server database is 400,000 events. The maximum recommended capacity of the database is 45 million events.
If the number of events in the database reaches the maximum value specified by the administrator, the application deletes the oldest events and rewrites them with new ones. When the Administration Server deletes old events, it cannot save new events to the database. During this period of time, information about events that were rejected is written to the Kaspersky Event Log. The new events are queued and then saved to the database after the deletion operation is complete.
You can change the settings of any task to save events related to the task progress, or save only task execution results. In doing so, you will reduce the number of events in the database, increase the speed of execution of scenarios associated with analysis of the event table in the database, and lower the risk that critical events will be overwritten by a large number of events.
Page topViewing log of connections to the Administration Server
The history of connections and attempts to connect to the Administration Server during its operation can be saved to a log file. The information in the file allows you to track not only connections on your network infrastructure, but unauthorized attempts to access the Administration Server as well.
To log the events of connection to the Administration Server:
- In the console tree, select the Administration Server for which you want to enable connection event logging.
- In the context menu of the Administration Server, select Properties.
- In the properties window that opens, in the Administration Server connection settings section, select the Connection ports subsection.
- Enable the Log Administration Server connection events option.
- Click the OK button to close the Administration Server properties window.
All further events of inbound connections to the Administration Server, authentication results, and SSL errors will be saved to the file %ProgramData%\KasperskyLab\adminkit\logs\sc.syslog.
Control of virus outbreaks
Kaspersky Security Center allows you to quickly respond to emerging threats of virus outbreaks. Risks of virus outbreaks are assessed by monitoring virus activity on devices.
You can configure assessment rules for threats of virus outbreaks and actions to take in case one emerges; to do this, use the Virus outbreak section of the properties window of Administration Server.
You can specify the notification procedure for the Virus outbreak event in the Event configuration section of the Administration Server properties window, in the Virus outbreak event properties window.
The Virus outbreak event is generated upon detection of Malicious object detected events during the operation of security applications. Therefore, you must save information about all Malicious object detected events on Administration Server in order to recognize virus outbreaks.
You can specify the settings for saving information about any Malicious object detected event in the policies of the security applications.
When Malicious object detected events are counted, only information from the devices of the primary Administration Server is taken into account. The information from secondary Administration Servers is not taken into account. For each secondary Server, the Virus outbreak event is configured individually.
Limiting traffic
To reduce traffic volumes within a network, the application provides the option to limit the speed of data transfer to an Administration Server from specified IP ranges and IP subnets.
You can create and configure traffic-limiting rules in the Traffic section of the Administration Server properties window.
To create a traffic-limiting rule:
- In the console tree, select the node with the name of the Administration Server for which you want to create a traffic-limiting rule.
- In the context menu of the Administration Server, select Properties.
- In the Administration Server properties window, select the Traffic section.
- Click the Add button.
- In the New rule window, specify the following settings:
In the IP range to limit traffic section, select the method that will be used to define the subnet or range for which the data transfer rate will be limited, and then enter the values of the settings for the selected method. Select one of the following methods:
- Specify the range by using address and network mask
- Specify the range by using start and end addresses
In the Traffic limit section, you can adjust the following restrictive settings for the data transfer rate:
Primarily, traffic limiting rules affect the transfer of files. These rules do not apply to the traffic generated by synchronization between Administration Server and Network Agent, or between primary and secondary Administration Servers.
Page topConfiguring Web Server
Web Server is designed for publishing stand-alone installation packages, iOS MDM profiles, and files from a shared folder.
You can define the settings for Web Server connection to the Administration Server and set the Web Server certificate in the Web Server section of the Administration Server properties window.
Page topReissuing the Web Server certificate
The Web Server certificate used in Kaspersky Security Center is required for publishing Network Agent installation packages that you subsequently download to managed devices, as well as for publishing iOS MDM profiles, iOS apps, and Kaspersky Endpoint Security for Mobile installation packages. Depending on the current application configuration, various certificates can function as the Web Server certificate (for more detail, see About Kaspersky Security Center certificates).
You may need to reissue the Web Server certificate to meet the specific security requirements of your organization or to maintain continuous connection of your managed devices before starting to upgrade the application. Kaspersky Security Center provides two ways of reissuing the Web Server certificate; the choice between the two methods depends on whether you have mobile devices connected and managed through the mobile protocol (i.e., by using the mobile certificate).
If you have never specified your own custom certificate as the Web Server certificate in the Web Server section of the Administration Server properties window, the mobile certificate acts as the Web Server certificate. In this case, the Web Server certificate reissuance is performed through the reissuance of the mobile protocol itself.
To reissue the Web Server certificate when you have no mobile devices managed through the mobile protocol:
- In the console tree, right-click the name of the relevant Administration Server and in the context menu select Properties.
- In the Administration Server properties window that opens, in the left pane select the Administration Server connection settings section.
- In the list of subsections, select the Certificates subsection.
- If you plan to continue using the certificate issued by Kaspersky Security Center, do the following:
- On the right pane, in the Administration Server authentication by mobile devices group of settings, select the Certificate issued through Administration Server option and click the Reissue button.
- In the Reissue certificate window that opens, in the Connection address and Activation term group of settings select the relevant options and click OK.
- In the confirmation window, click Yes.
Alternatively, if you plan to use your own custom certificate, do the following:
- Check whether your custom certificate meets the requirements of Kaspersky Security Center and the requirements for trusted certificates by Apple. If necessary, modify the certificate.
- Select the Other certificate option and click the Browse button.
- In the Certificate window that opens, in the Certificate type field select the type of your certificate and then specify the certificate location and settings:
- If you have selected PKCS #12 container, click the Browse button next to the Certificate file field and specify the certificate file on your hard drive. If the certificate file is password-protected, enter the password in the Password (if any) field.
- If you have selected X.509 certificate, click the Browse button next to the Private key (.prk, .pem) field and specify the private key on your hard drive. If the private key is password-protected, enter the password in the Password (if any) field. Then click the Browse button next to the Public key (.cer) field and specify the private key on your hard drive.
- In the Certificate window, click OK.
- In the confirmation window, click Yes.
The mobile certificate is reissued to be used as the Web Server certificate.
To reissue the Web Server certificate when you have any mobile devices managed through the mobile protocol:
- Generate your custom certificate and prepare it for the usage in Kaspersky Security Center. Check whether your custom certificate meets the requirements of Kaspersky Security Center and the requirements for trusted certificates by Apple. If necessary, modify the certificate.
You can use the kliossrvcertgen.exe utility for certificate generation.
- In the console tree, right-click the name of the relevant Administration Server and in the context menu select Properties.
- In the Administration Server properties window that opens, in the left pane select the Web Server section.
- In the Over HTTPS menu, select the Specify another certificate option.
- In the Over HTTPS menu, click the Change button.
- In the Certificate window that opens, in the Certificate type field select the type of your certificate:
- If you have selected PKCS #12 container, click the Browse button next to the Certificate file field and specify the certificate file on your hard drive. If the certificate file is password-protected, enter the password in the Password (if any) field.
- If you have selected X.509 certificate, click the Browse button next to the Private key (.prk, .pem) field and specify the private key on your hard drive. If the private key is password-protected, enter the password in the Password (if any) field. Then click the Browse button next to the Public key (.cer) field and specify the private key on your hard drive.
- In the Certificate window, click OK.
- If necessary, in the Administration Server properties window, in the Web Server HTTPS port field change the number of the HTTPS port for Web Server. Click OK.
The Web Server certificate is reissued.
Working with internal users
The accounts of internal users are used to work with virtual Administration Servers. Kaspersky Security Center grants the rights of real users to internal users of the application.
The accounts of internal users are created and used only within Kaspersky Security Center. No data on internal users is transferred to the operating system. Kaspersky Security Center authenticates internal users.
You can configure accounts of internal users in the User accounts folder of the console tree.
Page topBackup and restoration of Administration Server settings
Backup of the settings of Administration Server and its database is performed through the backup task and klbackup utility. A backup copy includes all the main settings and objects pertaining to the Administration Server, such as certificates, primary keys for encryption of drives on managed devices, keys for various licenses, structure of administration groups with all of its contents, tasks, policies, etc. With a backup copy you can recover the operation of an Administration Server as soon as possible, spending from a dozen minutes to a couple of hours on this.
If no backup copy is available, a failure may lead to an irrevocable loss of certificates and all Administration Server settings. This will necessitate reconfiguring Kaspersky Security Center from scratch, and performing initial deployment of Network Agent on the organization's network again. All primary keys for encryption of drives on managed devices will also be lost, risking irrevocable loss of encrypted data on devices with Kaspersky Endpoint Security. Therefore, do not neglect regular backups of Administration Server using the standard backup task.
The Quick Start Wizard creates the backup task for Administration Server settings and sets it to run daily, at 4:00 AM. Backup copies are saved by default in the folder %ALLUSERSPROFILE%\Application Data\KasperskySC.
If an instance of Microsoft SQL Server installed on another device is used as the DBMS, you must modify the backup task by specifying a UNC path, which is available for write by both the Administration Server service and the SQL Server service, as the folder to store backup copies. This requirement, which is not obvious, derives from a special feature of backup in the Microsoft SQL Server DBMS.
If a local instance of Microsoft SQL Server is used as the DBMS, we also recommend to save backup copies on a dedicated medium in order to secure them against damage together with Administration Server.
Because a backup copy contains important data, the backup task and klbackup utility provide for password protection of backup copies. By default, the backup task is created with a blank password. You must set a password in the properties of the backup task. Neglecting this requirement causes a situation where all keys of Administration Server certificates, keys for licenses, and primary keys for encryption of drives on managed devices remain unencrypted.
In addition to the regular backup, you must also create a backup copy prior to every significant change, including installation of Administration Server upgrades and patches.
If you use Microsoft SQL Server as the DBMS, you can minimize the size of backup copies. To do this, enable the Compress backup option in the SQL Server settings.
Restoration from a backup copy is performed with the utility klbackup on an operable instance of Administration Server that has just been installed and has the same version (or later) for which the backup copy was created.
The instance of Administration Server on which the restoration is to be performed, must use a DBMS of the same type (for example, the same SQL Server or MariaDB) and the same or later version. The version of Administration Server can be the same (with an identical or later patch), or later.
This section describes standard scenarios for restoring settings and objects of Administration Server.
Using a file system snapshot to reduce the backup duration
In Kaspersky Security Center 13.1, the idle time of Administration Server during backup has been reduced as compared to earlier versions. Moreover, the Use file system snapshot for data backup feature has been added to the task settings. This feature provides additional idle reduction by using the klbackup utility, which creates a shadow copy of the disk during backup (this takes a few seconds) and simultaneously copies the database (this takes a few minutes at longest). When klbackup creates a shadow copy of the disk and a copy of the database, the utility makes the Administration Server connectible again.
You can use the file system snapshotting feature only if these two conditions are met:
- The Administration Server shared folder and the %ALLUSERSPROFILE%\KasperskyLab folder are located on the same logical disk and are local in reference to the Administration Server.
- The %ALLUSERSPROFILE%\KasperskyLab folder does not contain any symbolic links that have been created manually.
Do not use the feature if either of these conditions cannot be met. In this case, the application would return an error message in response to any attempt to create a file system snapshot.
To use the feature, you must have an account that has been granted the permission to create snapshots of the logical disk storing the %ALLUSERSPROFILE% folder. Note that the Administration Server service account has no such permission.
To use the file system snapshotting feature in order to reduce the backup duration:
- In the Tasks section, select the backup task.
- In the context menu, select Properties.
- In the task properties window that opens, select the Settings section.
- Select the Use file system snapshot for data backup check box.
- In the User name and Password fields, enter the name and password of an account that has the permission to create snapshots of the logical disk storing the %ALLUSERSPROFILE% folder.
- Click Apply.
At any further startup of the backup task, the klbackup utility will create file system snapshots thus reducing the Administration Server idle time during the task run.
Page topA device with Administration Server is inoperable
If a device with Administration Server is inoperable due to a failure, you are recommended to perform the following actions:
- The new Administration Server must be assigned the same address: NetBIOS name, FQDN, or static IP (depending on which of them was set when Network Agents were deployed).
- Install Administration Server, using a DBMS of the same type, of the same (or later) version. You can install the same version of Server with the same (or later) patch, or a later version. After installation, do not perform the initial setup through the Wizard.
- In the Start menu, run the klbackup utility and perform restoration.
The settings of Administration Server or the database are corrupted
If Administration Server is inoperable due to corrupted settings or database (e.g., after a power surge), you are recommended to use the following restoration scenario:
- Scan the file system on the damaged device.
- Uninstall the inoperable version of Administration Server.
- Reinstall Administration Server, using a DBMS of the same type and of the same (or later) version. You can install the same version of Server with the same (or later) patch, or a later version. After installation, do not perform the initial setup through the Wizard.
- In the Start menu, run the utility klbackup and perform restoration.
It is prohibited to restore Administration Server in any way other than through the klbackup utility.
Any attempts to restore Administration Server through third-party software will inevitably lead to desynchronization of data on nodes of the distributed application Kaspersky Security Center and, consequently, to improper functioning of the application.
Page topBackup copying and restoration of Administration Server data
Data backup allows you to move Administration Server from one device to another without data loss. Through backup, you can restore data when moving the Administration Server database to another device, or when upgrading to a newer version of Kaspersky Security Center.
Note that the installed management plug-ins are not backed up. After you restore Administration Server data from a backup copy, you need to download and reinstall plug-ins for managed applications.
You can create a backup copy of Administration Server data in one of the following ways:
- By creating and running a data backup task through Administration Console.
- By running the klbackup utility on the device that has Administration Server installed. This utility is included in the Kaspersky Security Center distribution kit. After the installation of Administration Server, the utility is located in the root of the destination folder specified at the application installation.
The following data is saved in the backup copy of Administration Server:
- Database of Administration Server (policies, tasks, application settings, events saved on the Administration Server).
- Configuration details of the structure of administration groups and client devices.
- Repository of distribution packages of applications for remote installation.
- Administration Server certificate.
Recovery of Administration Server data is only possible using the klbackup utility.
Creating a data backup task
Backup tasks are Administration Server tasks; they are created through the Quick Start Wizard. If a backup task created by the Quick Start Wizard has been deleted, you can create one manually.
To create an Administration Server data backup task:
- In the console tree, select the Tasks folder.
- Start creation of the task in one of the following ways:
- By selecting New → Task in the context menu of the Tasks folder in the console tree.
- By clicking the Create a task button in the workspace.
The Add Task Wizard starts. Follow the instructions of the Wizard. In the Select the task type window of the Wizard select the task type named Backup of Administration Server data.
The Backup of Administration Server data task can only be created in a single copy. If the Administration Server data backup task has already been created for the Administration Server, it is not displayed in the task type selection window of the Backup Task Creation Wizard.
Page topData backup and recovery utility (klbackup)
You can copy Administration Server data for backup and future recovery using the klbackup utility, which is part of the Kaspersky Security Center distribution kit.
The klbackup utility can run in either of the two following modes:
Data backup and recovery in interactive mode
To create a backup copy of Administration Server data in interactive mode:
- Run the klbackup utility located in the Kaspersky Security Center installation folder.
The Backup and Restore Wizard starts.
- In the first window of the Wizard, select Perform backup of Administration Server data.
If you select the Restore or back up Administration Server certificate only option, only a backup copy of the Administration Server certificate will be saved.
Click Next.
- In the next window of the Wizard, specify a password and a destination folder for backup, and then click the Next button to start backup.
- If you are working with a database in a cloud environment such as Amazon Web Services (AWS) or Microsoft Azure, in the Sign In to Online Storage window, fill in the following fields:
To recover Administration Server data in interactive mode:
- Run the klbackup utility located in the Kaspersky Security Center installation folder. Start the utility under the same account that you used to install Administration Server.
The Backup and Restore Wizard starts.
- In the first window of the Wizard, select Restore Administration Server data.
If you select the Restore or back up Administration Server certificate only option, the Administration Server certificate will only be recovered.
Click Next.
- In the Restore settings window of the Wizard:
- Specify the folder that contains a backup copy of Administration Server data.
If you are working in a cloud environment such as AWS or Azure, specify the address of the storage. Also, make sure that the file is named backup.zip.
- Specify the password that was entered during data backup.
When restoring data, you must specify the same password that was entered during backup. If the path to a shared folder changed after backup, check the operation of tasks that use restored data (restore tasks and remote installation tasks). If necessary, edit the settings of these tasks. While data is being restored from a backup file, no one must access the shared folder of Administration Server. The account under which the klbackup utility is started must have full access to the shared folder.
- Specify the folder that contains a backup copy of Administration Server data.
- Click the Next button to restore data.
Data backup and recovery in non-interactive mode
To create a backup copy or recover Administration Server data in non-interactive mode,
Run klbackup with the required set of keys from the command line of the device that has Administration Server installed.
Utility command line syntax:
klbackup -path BACKUP_PATH [-logfile LOGFILE] [-use_ts]|[-restore] [-password PASSWORD] [-online]
If no password is specified in the command line of the klbackup utility, the utility prompts you to enter the password interactively.
Descriptions of the keys:
-path BACKUP_PATH—Save information in the BACKUP_PATH folder, or use data from the BACKUP_PATH folder for recovery (mandatory parameter).-logfile LOGFILE—Save a report about Administration Server data backup and recovery.The database server account and the klbackup utility should be granted permissions for changing data in the folder BACKUP_PATH.
-use_ts—When saving data, copy information to the BACKUP_PATH folder, to the subfolder with a name containing the current system date and operation time inklbackupYYYY-MM-DD # HH-MM-SSformat. If no key is specified, information is saved in the root of the folder BACKUP_PATH.During attempts to save information in a folder that already stores a backup copy, an error message appears. No information will be updated.
Availability of the
-use_tskey allows an Administration Server data archive to be maintained. For example, if the-pathkey indicates the folderC:\KLBackups, the folderklbackup2022/6/19 # 11-30-18then stores information about the status of the Administration Server as of June 19, 2022, at 11:30:18 AM.-restore—Recover Administration Server data. Data recovery is performed based on information contained in the BACKUP_PATH folder. If no key is available, data is backed up in the BACKUP_PATH folder.-password PASSWORD—Save or recover the Administration Server certificate; to encrypt and decrypt the certificate, use the password specified by the PASSWORD parameter.A forgotten password cannot be recovered. There are no password requirements. The password length is unlimited and zero length (no password) is also possible.
When restoring data, you must specify the same password that was entered during backup. If the path to a shared folder changed after backup, check the operation of tasks that use restored data (restore tasks and remote installation tasks). If necessary, edit the settings of these tasks. While data is being restored from a backup file, no one must access the shared folder of Administration Server. The account under which the klbackup utility is started must have full access to the shared folder. We recommend that you run the utility on a newly installed Administration Server.
-online—Back up Administration Server data by creating a volume snapshot to minimize the offline time of the Administration Server. When you use the utility to recover data, this option is ignored.
Moving Administration Server and a database server to another device
If you need to use Administration Server on a new device, you can move it in one of the following ways:
- Move Administration Server and the database server to a new device.
- Keep the database server on the previous device and move only Administration Server to a new device.
To move Administration Server and the database server to a new device:
- On the previous device, create a backup of Administration Server data.
To do this, you can run the data backup task through Administration Console or run the klbackup utility.
If you use SQL Server as a DBMS for Administration Server on the previous device, Kaspersky Security Center creates a data backup compatible only with SQL Server. This means that you cannot restore the data from the backup into MySQL or MariaDB on a new device.
- Select a new device on which to install the Administration Server. Make sure that the hardware and software on the selected device meet the requirements for Administration Server, Administration Console, and Network Agent. Also, check that ports used on Administration Server are available.
- On the new device, install the database management system (DBMS) that the Administration Server will use.
When you select a DBMS, consider the number of devices covered by the Administration Server.
- Run the custom installation of the Administration Server on the new device.
- Install Administration Server components into the same folder where the Administration Server is installed on the previous device. Click the Browse button to specify the file path.
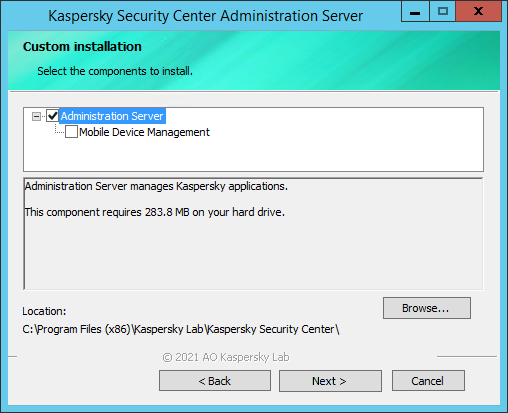
The Custom installation window
- Configure the database server connection settings.
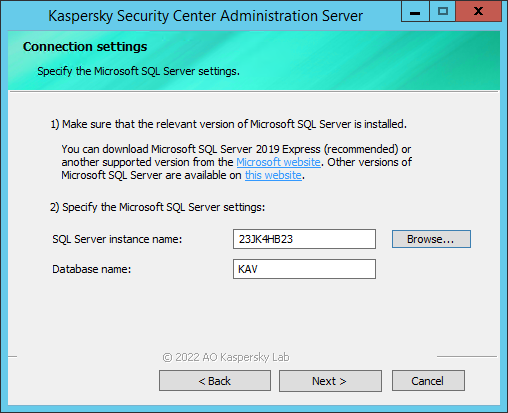
Example of the Connection settings window for Microsoft SQL Server
Depending on where you need to locate the database server, do one of the following:
- After the installation is complete, recover Administration Server data on the new device by using the klbackup utility.
If you use SQL Server as a DBMS on the previous and new devices, note that the version of SQL Server installed on the new device must be the same or later than the version of SQL Server installed on the previous device. Otherwise, you cannot recover Administration Server data on the new device.
- Open Administration Console and connect to the Administration Server.
- Verify that all the client devices are connected to the Administration Server.
- Uninstall the Administration Server and the database server from the previous device.
You can also use Kaspersky Security Center 13.1 Web Console to move Administration Server and a database server to another device.
Avoiding conflicts between multiple Administration Servers
If you have more than one Administration Server on your network, they can see the same client devices. This may result, for example, in remote installation of the same application to one and the same device from more than one Server and other conflicts. To avoid such a situation, Kaspersky Security Center 13.1 allows you to prevent an application from being installed on a device managed by another Administration Server.
You can also use the Managed by a different Administration Server property as a criterion for the following purposes:
Kaspersky Security Center 13.1 uses heuristics to determine whether a client device is managed by the Administration Server you are working with or by a different Administration Server.
Page topTwo-step verification
This section describes how you can use two-step verification to reduce the risk of unauthorized access to Administration Console or Kaspersky Security Center 13.1 Web Console.
Scenario: configuring two-step verification for all users
This scenario describes how to enable two-step verification for all users and how to exclude user accounts from two-step verification. If you did not enable two-step verification for your account before you enable it for other users, the application opens the window for enabling two-step verification for your account, first. This scenario also describes how to enable two-step verification for your own account.
If you enabled two-step verification for your account, you may proceed to the stage of enabling of two-step verification for all users.
Prerequisites
Before you start:
- Make sure that your user account has the Modify object ACLs right of the General features: User permissions functional area for modifying security settings for other users' accounts.
- Make sure that the other users of Administration Server install an authenticator application on their devices.
Stages
Enabling two-step verification for all users proceeds in stages:
- Installing an authenticator application on a device
You can install Google Authenticator, Microsoft Authenticator, or any other authenticator application that supports the Time-based One-time Password algorithm.
- Synchronizing the authenticator application time with the time of the device on which Administration Server is installed
Ensure that the time set in the authenticator application is synchronized with the time of Administration Server.
- Enabling two-step verification for your account and receiving the secret key for your account
How-to instructions:
- For MMC-based Administration Console: Enabling two-step verification for your own account
- For Kaspersky Security Center 13.1 Web Console: Enabling two-step verification for your own account
After you enable two-step verification for your account, you can enable two-step verification for all users.
- Enabling two-step verification for all users
Users with two-step verification enabled must use it to log in to Administration Server.
How-to instructions:
- For MMC-based Administration Console: Enabling two-step verification for all users
- For Kaspersky Security Center 13.1 Web Console: Enabling two-step verification for all users
- Editing the name of a security code issuer
If you have several Administration Servers with similar names, you may have to change the security code issuer names for better recognition of different Administration Servers.
How-to instructions:
- For MMC-based Administration Console: Editing the name of a security code issuer
- For Kaspersky Security Center 13.1 Web Console: Editing the name of a security code issuer
- Excluding user accounts for which you do not need to enable two-step verification
If required, you can exclude users from two-step verification. Users with excluded accounts do not have to use two-step verification to log in to Administration Server.
How-to instructions:
- For MMC-based Administration Console: Excluding accounts from two-step verification
- For Kaspersky Security Center 13.1 Web Console: Excluding accounts from two-step verification
Results
Upon completion of this scenario:
- Two-step verification is enabled for your account.
- Two-step verification is enabled for all user accounts of the Administration Server, except for user accounts that were excluded.
About two-step verification
Kaspersky Security Center provides two-step verification for users of Administration Console or Kaspersky Security Center 13.1 Web Console. When two-step verification is enabled for your own account, every time you log in to Administration Console or Kaspersky Security Center 13.1 Web Console, you enter your user name, password, and an additional single-use security code. If you use domain authentication for your account, you only have to enter an additional single-use security code. To receive a single-use security code, you must have an authenticator application on your computer or your mobile device.
A security code has an identifier referred to as issuer name. The security code issuer name is used as an identifier of the Administration Server in the authenticator application. You can change the name of the security code issuer name. The security code issuer name has a default value that is the same as the name of the Administration Server. The issuer name is used as an identifier of the Administration Server in the authenticator application. If you change the security code issuer name, you must issue a new secret key and pass it to the authenticator application. A security code is single-use and valid for up to 90 seconds (the exact time may vary).
Any user for whom two-step verification is enabled can reissue his or her own secret key. When a user authenticates with the reissued secret key and uses it for logging in, Administration Server saves the new secret key for the user account. If the user enters the new secret key incorrectly, Administration Server does not save the new secret key and leaves the current secret key valid for the further authentication.
Any authentication software that supports the Time-based One-time Password algorithm (TOTP) can be used as an authenticator application, for example, Google Authenticator. In order to generate the security code, you must synchronize the time set in the authenticator application with the time set for Administration Server.
An authenticator application generates the security code as follows:
- Administration Server generates a special secret key and QR code.
- You pass the generated secret key or QR code to the authenticator application.
- The authenticator application generates a single-use security code that you pass to the authentication window of Administration Server.
We highly recommend that you install an authenticator application on more than one device. Save the secret key (or QR code) and keep it in a safe place. This will help you to restore access to Administration Console or Kaspersky Security Center 13.1 Web Console in case you lose access to your mobile device.
To secure the usage of Kaspersky Security Center, you can enable two-step verification for your own account and enable two-step verification for all users.
You can exclude accounts from two-step verification. This can be necessary for service accounts that cannot receive a security code for authentication.
Two-step verification works according to the following rules:
- Only a user account that has the Modify object ACLs right in the General features: User permissions functional area can enable two-step verification for all users.
- Only a user that enabled two-step verification for his or her own account can enable the option of two-step verification for all users.
- Only a user that enabled two-step verification for his or her own account can exclude other user accounts from the list of two-step verification enabled for all users.
- A user can enable two-step verification only for his or her own account.
- A user account that has the Modify object ACLs right in the General features: User permissions functional area and is logged in to Administration Console or Kaspersky Security Center 13.1 Web Console by using two-step verification can disable two-step verification: for any other user only if two-step verification for all users is disabled, for a user excluded from the list of two-step verification that is enabled for all users.
- Any user that logged in to Administration Console or Kaspersky Security Center 13.1 Web Console by using two-step verification can reissue his or her own secret key.
- You can enable the two-step verification for all users option for the Administration Server you are currently working with. If you enable this option on the Administration Server, you also enable this option for the user accounts of its virtual Administration Servers and do not enable two-step verification for the user accounts of the secondary Administration Servers.
If two-step verification is enabled for a user account on Kaspersky Security Center Administration Server version 13 or later, the user will not be able to log in to the Kaspersky Security Center 13.1 Web Console versions 12, 12.1 or 12.2.
Enabling two-step verification for your own account
Before you enable two-step verification for your account, ensure that an authenticator application is installed on your mobile device. Ensure that the time set in the authenticator application is synchronized with the time of Administration Server.
To enable two-step verification for your account:
- In the Kaspersky Security Center console tree, open the context menu of the Administration Server folder, and then select Properties.
- In the Administration Server properties window, go to the Sections pane and select Advanced, and then Two-step verification.
- In the Two-step verification section, click the Set up button.
In the two-step verification properties window that opens, the secret key is displayed.
- Enter the secret key in the authenticator application to receive one-time security code. You can specify the secret key into the authenticator application manually or scan the QR code by your mobile device.
- Specify the security code generated by the authenticator application, and then click the OK button to exit the two-step verification properties window.
- Click the Apply button.
- Click the OK button.
Two-step verification is enabled for your own account.
Enabling two-step verification for all users
You can enable two-step verification for all users of Administration Server if your account has the Modify object ACLs right in the General features: User permissions functional area and if you are authenticated by using two-step verification. If you did not enable two-step verification for your account before enabling it for all users, the application opens the window for enabling two-step verification for your own account.
To enable two-step verification for all users:
- In the Kaspersky Security Center console tree, open the context menu of the Administration Server folder, and then select Properties.
- In the Administration Server properties window, in the Sections pane, select Advanced, and then Two-step verification.
- Click the Set as required button to enable two-step verification for all users.
- In the Two-step verification section, click the Apply button, and then click the OK button.
Two-step verification is enabled for all users. From now on, all users of Administration Server, including the users that were added after enabling this option, have to configure two-step verification for their accounts, except for the users whose accounts are excluded from two-step verification.
Disabling two-step verification for a user account
To disable two-step verification for your own account:
- In the Kaspersky Security Center console tree, open the context menu of the Administration Server folder, and then select Properties.
- In the Administration Server properties window, in the Sections pane, select Advanced, and then Two-step verification.
- In the Two-step verification section, click the Disable button.
- Click the Apply button.
- Click the OK button.
Two-step verification is disabled for your account.
You can disable two-step verification of other users' accounts. This provides protection in case, for example, a user loses or breaks a mobile device.
You can disable two-step verification of another user's account only if you have the Modify object ACLs right in the General features: User permissions functional area. Following the steps below, you can disable two-step verification for your own account as well.
To disable two-step verification for any user account:
- In the console tree, open the User accounts folder.
The User accounts folder is a subfolder of the Advanced folder by default.
- In the workspace, double-click the user account for which you want to disable two-step verification.
- In the Properties: <user name> window that opens, select the Two-step verification section.
- In the Two-step verification section, select the following options:
- If you want to disable two-step verification for a user account, click the Disable button.
- If you want to exclude this user account from two-step verification, select the User can pass authentication by using user name and password only option.
- Click the Apply button.
- Click the OK button.
Two-step verification for a user account is disabled.
Disabling two-step verification for all users
You can disable two-step verification for all users of the Administration Server if you have Modify object ACLs right in the General features: User permissions functional area and if you are authenticated by using two-step verification.
To disable two-step verification for all users:
- In the Kaspersky Security Center console tree, open the context menu of the Administration Server folder, and then select Properties.
- In the Administration Server properties window, in the Sections pane, select Advanced, and then Two-step verification.
- Click the Set as optional button to disable two-step verification for all the users.
- Click the Apply button in the Two-step verification section.
- Click the OK button in the Two-step verification section.
Two-step verification is disabled for all users.
Excluding accounts from two-step verification
You can exclude an account from two-step verification if your account has the Modify object ACLs right in the General features: User permissions functional area.
If a user account is excluded from two-step verification, that user can log in to Administration Console or Kaspersky Security Center 13.1 Web Console without using two-step verification.
Excluding accounts from two-step verification can be necessary for service accounts that cannot pass the security code during authentication.
To exclude a user account from two-step verification:
- If you want to exclude an Active Directory account, perform Active Directory polling to refresh the list of Administration Server users.
- In the console tree, open the User accounts folder.
The User accounts folder is a subfolder of the Advanced folder by default.
- In the workspace, double-click the user account that you want to exclude from two-step verification
- In the Properties: <user name> window that opens, select the Two-step verification section.
- In the opened section, select the User can pass authentication by using user name and password only option.
- In the Two-step verification section, click the Apply button, and then click the OK button.
This user account is excluded from two-step verification. You can check the excluded accounts in the list of user accounts.
Editing the name of a security code issuer
You can have several identifiers (they are called issuers) for different Administration Servers. You can change the name of a security code issuer in case, for example, the Administration Server already uses a similar name of security code issuer for another Administration Server. By default, the name of a security code issuer is the same as the name of the Administration Server.
After you change the security code issuer name you have to reissue a new secret key and pass it to the authenticator application.
To specify a new name of a security code issuer:
- In the Kaspersky Security Center console tree, open the context menu of the Administration Server folder, and then select Properties.
- In the Administration Server properties window, in the Sections pane, select Advanced, and then Two-step verification.
- Specify a new security code issuer name in the Security code issuer field.
- Click the Apply button in the Two-step verification section.
- Click the OK button in the Two-step verification section.
A new security code issuer name is specified for the Administration Server.