Contents
- Updating Kaspersky databases and applications
- Scenario: Regular updating Kaspersky databases and applications
- About updating Kaspersky databases, software modules, and applications
- Creating the Download updates to the Administration Server repository task
- Verifying downloaded updates
- Creating the task for downloading updates to the repositories of distribution points
- Enabling and disabling automatic updating and patching for Kaspersky Security Center components
- Automatic installation of updates for Kaspersky Endpoint Security for Windows
- Approving and declining software updates
- Updating Administration Server
- Enabling and disabling the offline model of update download
- Updating Kaspersky databases and software modules on offline devices
- Adjustment of distribution points and connection gateways
- Standard configuration of distribution points: Single office
- Standard configuration of distribution points: Multiple small remote offices
- Assigning distribution points automatically
- Assigning distribution points manually
- Modifying the list of distribution points for an administration group
- Forced synchronization
- Enabling a push server
Updating Kaspersky databases and applications
This section describes steps you must take to regularly update the following:
- Kaspersky databases and software modules
- Installed Kaspersky applications, including Kaspersky Security Center components and security applications
Scenario: Regular updating Kaspersky databases and applications
This section provides a scenario for regular updating of Kaspersky databases, software modules, and applications. After you complete the Configuring network protection scenario, you must maintain the reliability of the protection system to make sure that the Administration Servers and managed devices are kept protected against various threats, including viruses, network attacks, and phishing attacks.
Network protection is kept up-to-date by regular updates of the following:
- Kaspersky databases and software modules
- Installed Kaspersky applications, including Kaspersky Security Center components and security applications
When you complete this scenario, you can be sure of the following:
- Your network is protected by the most recent Kaspersky software, including Kaspersky Security Center components and security applications.
- The anti-virus databases and other Kaspersky databases critical for the network safety are always up-to-date.
Prerequisites
The managed devices must have a connection to the Administration Server. If they do not have a connection, consider updating Kaspersky databases, software modules, and applications manually or directly from the Kaspersky update servers.
Administration Server must have a connection to the internet.
Before you start, make sure that you have done the following:
- Deployed the Kaspersky security applications to the managed devices according to the scenario of deploying Kaspersky applications through Kaspersky Security Center 13.1 Web Console.
- Created and configured all required policies, policy profiles, and tasks according to the scenario of configuring network protection.
- Assigned an appropriate amount of distribution points in accordance with the number of managed devices and the network topology.
Updating Kaspersky databases and applications proceeds in stages:
- Choosing an update scheme
There are several schemes that you can use to install updates to Kaspersky Security Center components and security applications. Choose the scheme or several schemes that meet the requirements of your network best.
- Creating the task for downloading updates to the repository of the Administration Server
This task is created automatically by Kaspersky Security Center Quick Start Wizard. If you did not run the Wizard, create the task now.
This task is required to download updates from Kaspersky update servers to the repository of the Administration Server, as well as to update Kaspersky databases and software modules for Kaspersky Security Center. After the updates are downloaded, they can be propagated to the managed devices.
If your network has assigned distribution points, the updates are automatically downloaded from the Administration Server repository to the repositories of the distribution points. In this case the managed devices included in the scope of a distribution point download the updates from the repository of the distribution point instead of the Administration Server repository.
How-to instructions:
- Administration Console: Creating the task for downloading updates to the repository of the Administration Server
or
- Kaspersky Security Center 13.1 Web Console: Creating the task for downloading updates to the repository of the Administration Server
- Creating the task for downloading updates to the repositories of distribution points (optional)
By default, the updates are downloaded to the distribution points from the Administration server. You can configure Kaspersky Security Center to download the updates to the distribution points directly from Kaspersky update servers. Download to the repositories of distribution points is preferable if the traffic between the Administration Server and the distribution points is more expensive than the traffic between the distribution points and Kaspersky update servers, or if your Administration Server does not have internet access.
When your network has assigned distribution points and the Download updates to the repositories of distribution points task is created, the distribution points download updates from Kaspersky update servers, and not from the Administration Server repository.
How-to instructions:
- Administration Console: Creating the task for downloading updates to the repositories of distribution points
or
- Kaspersky Security Center 13.1 Web Console: Creating the task for downloading updates to the repositories of distribution points
- Configuring distribution points
When your network has assigned distribution points, make sure that the Deploy updates option is enabled in the properties of all required distribution points. When this option is disabled for a distribution point, the devices included in the scope of the distribution point download updates from the repository of the Administration Server.
If you want the managed devices to receive updates only from the distribution points, enable the Distribute files through distribution points only option in the Network Agent policy.
- Optimizing the update process by using the offline model of update download or diff files (optional)
You can optimize the update process by using the offline model of update download (enabled by default) or by using diff files. For each network segment, you have to choose which of these two features to enable, because they cannot work simultaneously.
When the offline model of update download is enabled, Network Agent downloads the required updates to the managed device once the updates are downloaded to the Administration Server repository, before the security application requests the updates. This enhances the reliability of the update process. To use this feature, enable the Download updates and anti-virus databases from the Administration Server in advance option in the Network Agent policy.
If you do not use the offline model of update download, you can optimize traffic between the Administration Server and the managed devices by using diff files. When this feature is enabled, the Administration Server or a distribution point downloads diff files instead of entire files of Kaspersky databases or software modules. A diff file describes the differences between two versions of a file of a database or software module. Therefore, a diff file occupies less space than an entire file. This results in decrease in the traffic between the Administration Server or distribution points and the managed devices. To use this feature, enable the Download diff files option in the properties of the Download updates to the Administration Server repository task and/or the Download updates to the repositories of distribution points task.
How-to instructions:
- Administration Console: Enabling and disabling the offline model of update download
or
- Kaspersky Security Center 13.1 Web Console: Enabling and disabling the offline model of update download
- Verifying downloaded updates (optional)
Before installing the downloaded updates, you can verify the updates through the Update verification task. This task sequentially runs the device update tasks and virus scan tasks configured through settings for the specified collection of test devices. Upon obtaining the task results, the Administration Server starts or blocks the update propagation to the remaining devices.
The Update verification task can be performed as part of the Download updates to the repository of the Administration Server task. In the properties of the Download updates to the repository of the Administration Server task, enable the Verify updates before distributing option in the Administration Console or the Run update verification option in Kaspersky Security Center 13.1 Web Console.
How-to instructions:
- Administration Console: Verifying downloaded updates
or
- Kaspersky Security Center 13.1 Web Console: Verifying downloaded updates
- Approving and declining software updates
By default, the downloaded software updates have the Undefined status. You can change the status to Approved or Declined. The approved updates are always installed. If an update requires reviewing and accepting the terms of the End User License Agreement, then you first need to accept the terms. After that the update can be propagated to the managed devices. The undefined updates can only be installed on Network Agent and other Kaspersky Security Center components in accordance with the Network Agent policy settings. The updates for which you set Declined status will not be installed on devices. If a declined update for a security application was previously installed, Kaspersky Security Center will try to uninstall the update from all devices. Updates for Kaspersky Security Center components cannot be uninstalled.
How-to instructions:
- Administration Console: Approving and declining software updates
or
- Kaspersky Security Center 13.1 Web Console: Approving and declining software updates
- Configuring automatic installation of updates and patches for Kaspersky Security Center components
Starting from version 10 Service Pack 2, the downloaded updates and patches for Network Agent and other Kaspersky Security Center components are installed automatically. If you have left the Automatically install applicable updates and patches for components that have the Undefined status option enabled in the Network Agent properties, then all updates will be installed automatically after they are downloaded to the repository (or several repositories). If this option is disabled, Kaspersky patches that have been downloaded and tagged with the Undefined status will be installed only after you change their status to Approved.
For Network Agent versions earlier than 10 Service Pack 2, make sure that the Update Network Agent modules option is enabled in the properties of the Download updates to the repository of the Administration Server task or the Download updates to the repositories of distribution points task.
How-to instructions:
- Administration Console: Enabling and disabling automatic updating and patching for Kaspersky Security Center components
or
- Kaspersky Security Center 13.1 Web Console: Enabling and disabling automatic updating and patching for Kaspersky Security Center components
- Installation of updates for the Administration Server
Software updates for the Administration Server do not depend on the update statuses. They are not installed automatically and must be preliminarily approved by the administrator on the Monitoring tab in the Administration Console (Administration Server <server name> → Monitoring) or on the NOTIFICATIONS section in Kaspersky Security Center 13.1 Web Console (MONITORING & REPORTING → NOTIFICATIONS). After that, the administrator must explicitly run installation of the updates.
- Configuring automatic installation of updates for the security applications
Create the Update tasks for the managed applications to provide timely updates to the applications, software modules and Kaspersky databases, including anti-virus databases. To ensure timely updates, we recommend that you select the When new updates are downloaded to the repository option when configuring the task schedule.
By default, updates for Kaspersky Endpoint Security for Windows and Kaspersky Endpoint Security for Linux are installed only after you change the update status to Approved. You can change the update settings in the Update task.
If an update requires reviewing and accepting the terms of the End User License Agreement, then you first need to accept the terms. After that the update can be propagated to the managed devices.
How-to instructions:
- Administration Console: Automatic installation of Kaspersky Endpoint Security updates on devices
or
- Kaspersky Security Center 13.1 Web Console: Automatic installation of Kaspersky Endpoint Security updates on devices
Results
Upon completion of the scenario, Kaspersky Security Center is configured to update Kaspersky databases and installed Kaspersky applications after the updates are downloaded to the repository of the Administration Server or to the repositories of distribution points. You can then proceed to monitoring the network status.
About updating Kaspersky databases, software modules, and applications
To be sure that the protection of your Administration Servers and managed devices is up-to-date, you must provide timely updates of the following:
- Kaspersky databases and software modules
- Installed Kaspersky applications, including Kaspersky Security Center components and security applications
Depending on the configuration of your network, you can use the following schemes of downloading and distributing the required updates to the managed devices:
- By using a single task: Download updates to the Administration Server repository
- By using two tasks:
- The Download updates to the Administration Server repository task
- The Download updates to the repositories of distribution points task
- Manually through a local folder, a shared folder, or an FTP server
- Directly from Kaspersky update servers to Kaspersky Endpoint Security on the managed devices
Using the Download updates to the Administration Server repository task
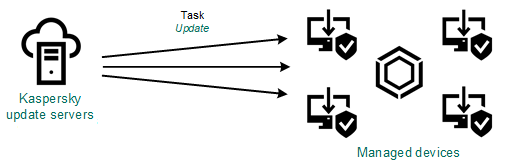
In this scheme, Kaspersky Security Center downloads updates through the Download updates to the Administration Server repository task. In small networks that contain less than 300 managed devices in a single network segment or less than 10 managed devices in each network segment, the updates are distributed to the managed devices directly from the Administration Server repository (see figure below).
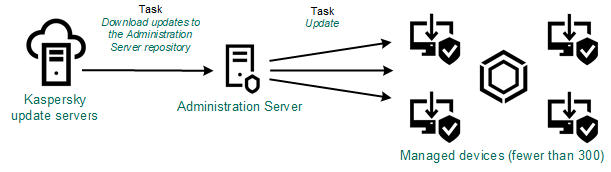
Updating by using the Download updates to the Administration Server repository task without distribution points
By default, the Administration Server communicates with Kaspersky update servers and downloads updates by using the HTTPS protocol. You can configure the Administration Server to use the HTTP protocol instead of HTTPS.
If your network contains more than 300 managed devices in a single network segment or if your network consists of several network segments with more than 9 managed devices in each network segment, we recommend that you use distribution points to propagate the updates to the managed devices (see figure below). Distribution points reduce the load on the Administration Server and optimize traffic between the Administration Server and the managed devices. You can calculate the number and configuration of distribution points required for your network.
In this scheme, the updates are automatically downloaded from the Administration Server repository to the repositories of the distribution points. The managed devices included in the scope of a distribution point download the updates from the repository of the distribution point instead of the Administration Server repository.
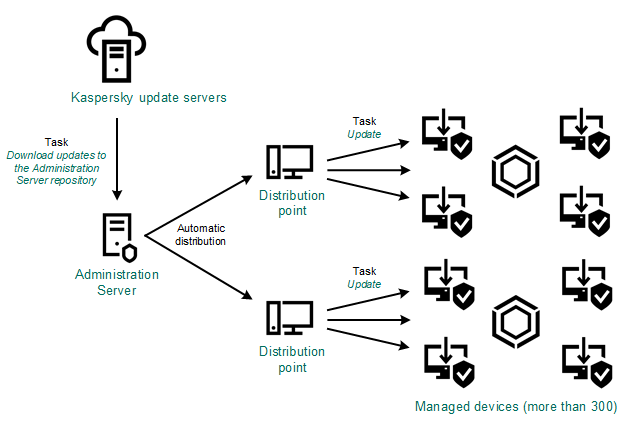
Updating by using the Download updates to the Administration Server repository task with distribution points
When the Download updates to the Administration Server repository task is complete, the following updates are downloaded to the Administration Server repository:
- Kaspersky databases and software modules for Kaspersky Security Center
These updates are installed automatically.
- Kaspersky databases and software modules for the security applications on the managed devices
These updates are installed through the Update task for Kaspersky Endpoint Security for Windows.
- Updates for the Administration Server
These updates are not installed automatically. The administrator must explicitly approve and run installation of the updates.
Local administrator rights are required for installing patches on the Administration Server.
- Updates for the components of Kaspersky Security Center
By default, these updates are installed automatically. You can change the settings in the Network Agent policy.
- Updates for the security applications
By default, Kaspersky Endpoint Security for Windows installs only those updates that you approve. (You can approve updates via the Administration Console or via Kaspersky Security Center 13.1 Web Console). The updates are installed through the Update task and can be configured in the properties of this task.
The Download updates to the repository of the Administration Server task is not available on virtual Administration Servers. The repository of the virtual Administration Server displays updates downloaded to the primary Administration Server.
You can configure the updates to be verified for operability and errors on a set of test devices. If the verification is successful, the updates are distributed to other managed devices.
Each Kaspersky application requests required updates from Administration Server. Administration Server aggregates these requests and downloads only those updates that are requested by any application. This ensures that the same updates are not downloaded multiple times and that unnecessary updates are not downloaded at all. When running the Download updates to the Administration Server repository task, Administration Server sends the following information to Kaspersky update servers automatically in order to ensure the downloading of relevant versions of Kaspersky databases and software modules:
- Application ID and version
- Application installation ID
- Active key ID
- Download updates to the repository of the Administration Server task run ID
None of the transmitted information contains personal or other confidential data. AO Kaspersky Lab protects information in accordance with requirements established by law.
Using two tasks: the Download updates to the Administration Server repository task and the Download updates to the repositories of distribution points task
You can download updates to the repositories of distribution points directly from the Kaspersky update servers instead of the Administration Server repository, and then distribute the updates to the managed devices (see figure below). Download to the repositories of distribution points is preferable if the traffic between the Administration Server and the distribution points is more expensive than the traffic between the distribution points and Kaspersky update servers, or if your Administration Server does not have internet access.
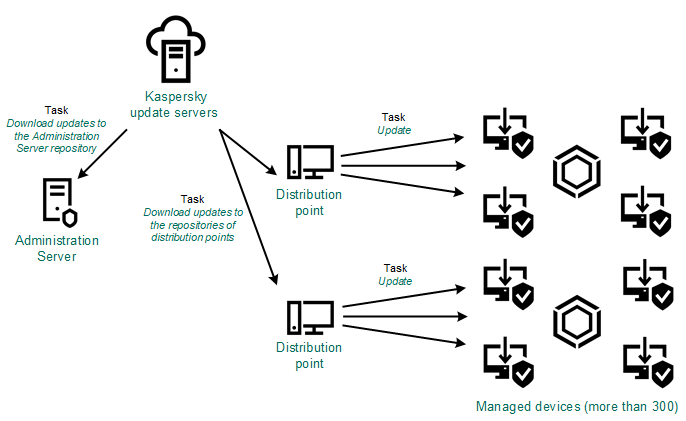
Updating by using the Download updates to the Administration Server repository task and the Download updates to the repositories of distribution points task
By default, the Administration Server and distribution points communicate with Kaspersky update servers and download updates by using the HTTPS protocol. You can configure the Administration Server and/or distribution points to use the HTTP protocol instead of HTTPS.
To implement this scheme, create the Download updates to the repositories of distribution points task in addition to the Download updates to the Administration Server repository task. After that the distribution points will download updates from Kaspersky update servers, and not from the Administration Server repository.
Distribution point devices running macOS cannot download updates from Kaspersky update servers.
If one or more devices running macOS are within the scope of the Download updates to the repositories of distribution points task, the task completes with the Failed status, even if it has successfully completed on all Windows devices.
The Download updates to the Administration Server repository task is also required for this scheme, because this task is used to download Kaspersky databases and software modules for Kaspersky Security Center.
Manually through a local folder, a shared folder, or an FTP server
If the client devices do not have a connection to the Administration Server, you can use a local folder or a shared resource as a source for updating Kaspersky databases, software modules, and applications. In this scheme, you need to copy required updates from the Administration Server repository to a removable drive, then copy the updates to the local folder or the shared resource specified as an update source in the settings of Kaspersky Endpoint Security (see figure below).
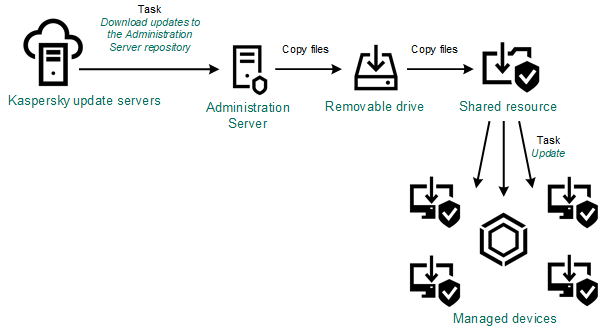
Updating through a local folder, a shared folder, or an FTP server
For more information about sources of updates in Kaspersky Endpoint Security, see the following Helps:
Directly from Kaspersky update servers to Kaspersky Endpoint Security on the managed devices
On the managed devices, you can configure Kaspersky Endpoint Security to receive updates directly from Kaspersky update servers (see figure below).
Updating security applications directly from Kaspersky update servers
In this scheme, the security application does not use the repositories provided by Kaspersky Security Center. To receive updates directly from Kaspersky update servers, specify Kaspersky update servers as an update source in the interface of the security application. For more information about these settings, see the following Helps:
Creating the Download updates to the Administration Server repository task
The Download updates to the Administration Server repository task of the Administration Server is created automatically by the Kaspersky Security Center Quick Start Wizard. You can create only one Download updates to the Administration Server repository task. Therefore, you can create a Download updates to the Administration Server repository task only if this task was removed from the Administration Server tasks list.
This task is required to download updates from Kaspersky update servers to the repository of the Administration Server. The list of updates includes:
- Updates to databases and software modules for Administration Server
- Updates to databases and software modules for Kaspersky security applications
- Updates to Kaspersky Security Center components
- Updates to Kaspersky security applications
After the updates are downloaded, they can be propagated to the managed devices.
Before distributing updates to the managed devices, you can run the Update verification task. This allows you to make sure that Administration Server will install the downloaded updates properly and a security level will not decrease because of the updates. To verify them before distributing, configure the Run update verification option in the Download updates to the Administration Server repository task settings.
To create the Download updates to the Administration Server repository task:
- In the main menu, go to DEVICES → TASKS.
- Click Add.
The Add Task Wizard starts. Follow the steps of the Wizard.
- For the Kaspersky Security Center application, select the Download updates to the Administration Server repository task type.
- Specify the name for the task that you are creating. A task name cannot be more than 100 characters long and cannot include any special characters ("*<>?\:|).
- If you want to modify the default task settings, enable the Open task details when creation is complete option on the Finish task creation page. If you do not enable this option, the task is created with the default settings. You can modify the default settings later, at any time.
- Click the Create button.
The task is created and displayed in the list of tasks.
- Click the name of the created task to open the task properties window.
- In the task properties window, on the Application settings tab, specify the following settings:
- Sources of updates
- Content of updates:
- Other settings:
- Run update verification:
- In the task properties window, on the Schedule tab, create a schedule for task start. If necessary, specify the following settings:
- Click the Save button.
The task is created and configured.
When Administration Server performs the Download updates to the Administration Server repository task, updates to databases and software modules are downloaded from the updates source and stored in the shared folder of Administration Server. If you create this task for an administration group, it will only be applied to Network Agents included in the specified administration group.
Updates are distributed to client devices and secondary Administration Servers from the shared folder of Administration Server.
Verifying downloaded updates
Before installing updates to the managed devices, you can first check the updates for operability and errors through the Update verification task. The Update verification task is performed automatically as part of the Download updates to the Administration Server repository task. The Administration Server downloads updates from the source, saves them in the temporary repository, and runs the Update verification task. If the task completes successfully, the updates are copied from the temporary repository to the Administration Server shared folder. They are distributed to all client devices for which the Administration Server is the source of updates.
If, as a result of the Update verification task, updates located in the temporary repository are incorrect or if the Update verification task completes with an error, such updates are not copied to the shared folder. The Administration Server retains the previous set of updates. Also, the tasks that have the When new updates are downloaded to the repository schedule type are not started then. These operations are performed at the next start of the Download updates to the Administration Server repository task if scanning of the new updates completes successfully.
A set of updates is considered invalid if any of the following conditions is met on at least one test device:
- An update task error occurred.
- The real-time protection status of the security application changed after the updates were applied.
- An infected object was detected during running of the on-demand scan task.
- A runtime error of a Kaspersky application occurred.
If none of the listed conditions is true for any test device, the set of updates is considered valid, and the Update verification task is considered to have completed successfully.
Before you start to create the Update verification task, perform the prerequisites:
- Create an administration group with several test devices. You will need this group to verify the updates.
We recommend using devices with the most reliable protection and the most popular application configuration across the network. This approach increases the quality and probability of virus detection during scans, and minimizes the risk of false positives. If viruses are detected on test devices, the Update verification task is considered unsuccessful.
- Create two tasks for Kaspersky Endpoint Security for Windows: Update and Virus Scan. You will need them to create the Update verification task. This task sequentially runs the Update and Virus Scan tasks on test devices to check that all updates are valid.
When creating the Update and Virus Scan tasks, specify the administration group with the test devices.
To make Kaspersky Security Center verify downloaded updates before distributing them to client devices:
- In the main menu, go to DEVICES → TASKS.
- Click the Download updates to the Administration Server repository task.
- In the task properties window that opens, in the Application settings tab, click the Configure button next to Run update verification.
- In the Update verification window that opens, enable the Run update verification option.
- If the Update verification task exists, click the Edit link. In the window that opens, select the Update verification task in the administration group with test devices.
- If you did not create the Update verification task earlier, do the following:
- Click the New task button.
- In the Add Task Wizard that opens, specify the task name if you want to change the preset name.
- Select the administration group with test devices, which you created earlier.
- First, select the Update task of Kaspersky Endpoint Security for Windows, and then select the Virus Scan task.
After that, the following options appear. We recommend leaving them enabled:
- Specify an account from which the Update verification task will be run. You can use your account and leave the Default account option enabled. Alternatively, you can specify that the task should be run under another account that has the necessary access rights. To do this, select the Specify account option, and then enter the credentials of that account.
- Click Save to close the properties window of the Download updates to the Administration Server repository task.
The automatic update verification is enabled. Now, you can run the Download updates to the Administration Server repository task, and it will start from update verification.
Creating the task for downloading updates to the repositories of distribution points
The Downloading updates to the repositories of distribution points task works only on distribution point devices running Windows. Distribution point devices running Linux or macOS cannot download updates from Kaspersky update servers.If at least one device running Linux or macOS is within the task scope, the task will have the Failed status. Even if the task is completed successfully on all Windows devices, it will return an error on the remaining devices.
You can create the Download updates to the repositories of distribution points task for an administration group. This task will run for distribution points included in the specified administration group.
You can use this task, for example, if traffic between the Administration Server and the distribution point(s) is more expensive than traffic between the distribution point(s) and Kaspersky update servers, or if your Administration Server does not have internet access.
This task is required to download updates from Kaspersky update servers to the repositories of distribution points. The list of updates includes:
- Updates to databases and software modules for Kaspersky security applications
- Updates to Kaspersky Security Center components
- Updates to Kaspersky security applications
After the updates are downloaded, they can be propagated to the managed devices.
To create the Download updates to the repositories of distribution points task, for a selected administration group:
- In the main menu, go to DEVICES → TASKS.
- Click the Add button.
The Add Task Wizard starts. Follow the steps of the Wizard.
- For the Kaspersky Security Center application, in the Task type field select Download updates to the repositories of distribution points.
- Specify the name for the task that you are creating. A task name cannot be more than 100 characters long and cannot include any special characters ("*<>?\:|).
- Select an option button to specify the administration group, the device selection, or the devices to which the task applies.
- At the Finish task creation step, if you want to modify the default task settings, enable the Open task details when creation is complete option. If you do not enable this option, the task is created with the default settings. You can modify the default settings later, at any time.
- Click the Create button.
The task is created and displayed in the list of tasks.
- Click the name of the created task to open the task properties window.
- On the Application settings tab of the task properties window, specify the following settings:
- Create a schedule for task start. If necessary, specify the following settings:
- Click the Save button.
The task is created and configured.
In addition to the settings that you specify during task creation, you can change other properties of a created task.
When the Download updates to the repositories of distribution points task is performed, updates for databases and software modules are downloaded from the update source and stored in the shared folder. Downloaded updates will only be used by distribution points that are included in the specified administration group and that have no update download task explicitly set for them.
The previous versions of the application (Kaspersky Security Center 10 Service Pack 2 and earlier) allowed you to create the update download task for distribution points as a local task only. Starting from Kaspersky Security Center 10 Service Pack 3, this restriction has been lifted, which has resulted in decreased traffic rates.
Enabling and disabling automatic updating and patching for Kaspersky Security Center components
Updates and patches for the Administration Server can be installed only manually, after obtaining explicit approval from the administrator.
Automatic installation of updates and patches for Kaspersky Security Center components is enabled by default during Network Agent installation on the device. You can disable it during Network Agent installation, or disable it later by using a policy.
To disable automatic updating and patching for Kaspersky Security Center components during local installation of Network Agent on a device:
- Start local installation of Network Agent on the device.
- At the Advanced settings step, clear the Automatically install applicable updates and patches for components that have Undefined status check box.
- Follow the instructions of the Wizard.
Network Agent with disabled automatic updating and patching for Kaspersky Security Center components will be installed on the device. You can enable automatic updating and patching later by using a policy.
To disable automatic updating and patching for Kaspersky Security Center components during Network Agent installation on the device through an installation package:
- In the main menu, go to OPERATIONS → REPOSITORIES → INSTALLATION PACKAGES.
- Click the Kaspersky Security Center Network Agent <version number> package.
- In the properties window, open the Settings tab.
- Turn off the Automatically install applicable updates and patches for components that have the Undefined status toggle button.
Network Agent with disabled automatic updating and patching for Kaspersky Security Center components will be installed from this package. You can enable automatic updating and patching later by using a policy.
If this check box was selected (or cleared) during Network Agent installation on the device, you can subsequently enable (or disable) automatic updating by using the Network Agent policy.
To enable or disable automatic updating and patching for Kaspersky Security Center components by using the Network Agent policy:
- In the main menu, go to DEVICES → POLICIES & PROFILES.
- Click the Network Agent policy.
- In the policy properties window, open the Application settings tab.
- In the Manage patches and updates section, turn on or off the Automatically install applicable updates and patches for components that have the Undefined status toggle button to enable or disable, respectively, automatic updating and patching.
- Set the lock (
 ) for this toggle button.
The policy will be applied to the selected devices, and automatic updating and patching for Kaspersky Security Center components will be enabled (or disabled) on these devices.
Automatic installation of updates for Kaspersky Endpoint Security for Windows
You can configure automatic updates of databases and software modules of Kaspersky Endpoint Security for Windows on client devices.
To configure download and automatic installation of updates of Kaspersky Endpoint Security for Windows on devices:
- In the main menu, go to DEVICES → TASKS.
- Click the Add button.
The Add Task Wizard starts. Follow the steps of the Wizard.
- For the Kaspersky Endpoint Security for Windows application, select Update as the task subtype.
- Specify the name for the task that you are creating. A task name cannot be more than 100 characters long and cannot include any special characters ("*<>?\:|).
- Choose the task scope.
- Specify the administration group, the device selection, or the devices to which the task applies.
- At the Finish task creation step, if you want to modify the default task settings, enable the Open task details when creation is complete option. If you do not enable this option, the task is created with the default settings. You can modify the default settings later, at any time.
- Click the Create button.
The task is created and displayed in the list of tasks.
- Click the name of the created task to open the task properties window.
- On the Application settings tab of the task properties window, define the update task settings in local or mobile mode:
- Local mode: Connection is established between the device and the Administration Server.
- Mobile mode: No connection is established between Kaspersky Security Center and the device (for example, when the device is not connected to the internet).
- Enable the update sources that you want to use to update databases and application modules for Kaspersky Endpoint Security for Windows. If required, change positions of the sources in the list by using the Move up and Move down buttons. If several update sources are enabled, Kaspersky Endpoint Security for Windows tries to connect to them one after another, starting from the top of the list, and performs the update task by retrieving the update package from the first available source.
- Enable the Install approved application module updates option to download and install software module updates together with the application databases.
If the option is enabled, Kaspersky Endpoint Security for Windows notifies the user about available software module updates and includes software module updates in the update package when running the update task. Kaspersky Endpoint Security for Windows installs only those updates for which you have set the Approved status; they will be installed locally through the application interface or through Kaspersky Security Center.
You can also enable the Automatically install critical application module updates option. If any updates are available for software modules, Kaspersky Endpoint Security for Windows automatically installs those that have Critical status; the remaining updates will be installed after you approve them.
If updating the software module requires reviewing and accepting the terms of the License Agreement and Privacy Policy, the application installs updates after the terms of the License Agreement and Privacy Policy have been accepted by the user.
- Select the Copy updates to folder check box in order for the application to save downloaded updates to a folder, and then specify the folder path.
- Schedule the task. To ensure timely updates, we recommend that you select the When new updates are downloaded to the repository option.
- Click Save.
When the Update task is running, the application sends requests to Kaspersky update servers.
Some updates require installation of the latest versions of management plug-ins.
Approving and declining software updates
The settings of an update installation task may require approval of updates that are to be installed. You can approve updates that must be installed and decline updates that must not be installed.
For example, you may want to first check the installation of updates in a test environment and make sure that they do not interfere with the operation of devices, and only then allow the installation of these updates on client devices.
To approve or decline one or several updates:
- In the main menu, go to OPERATIONS → KASPERSKY APPLICATIONS, and in the drop-down list select SEAMLESS UPDATES.
A list of available updates appears.
Updates of managed applications may require a specific minimum version of Kaspersky Security Center to be installed. If this version is later than your current version, these updates are displayed but cannot be approved. Also, no installation packages can be created from such updates until you upgrade Kaspersky Security Center. You are prompted to upgrade your Kaspersky Security Center instance to the required minimum version.
- Select the updates that you want to approve or decline.
- Click Approve to approve the selected updates or Decline to decline the selected updates.
The default value is Undefined.
The updates to which you assign Approved status are placed in a queue for installation.
The updates to which you assign Declined status are uninstalled (if possible) from all devices on which they were previously installed. Also, they will not be installed on other devices in future.
Some updates for Kaspersky applications cannot be uninstalled. If you set Declined status for them, Kaspersky Security Center will not uninstall these updates from the devices on which they were previously installed. However, these updates will never be installed on other devices in future.
If you set Declined status for third-party software updates, these updates will not be installed on devices for which they were planned but have not yet been installed. Updates will remain on devices on which they were already installed. If you have to delete the updates, you can manually delete them locally.
Updating Administration Server
You can install Administration Server updates by using Update Administration Server Wizard.
To install an Administration Server update:
- In the main menu, go to OPERATIONS → KASPERSKY APPLICATIONS → SEAMLESS UPDATES.
- Run the Update Administration Server Wizard in one of the following ways:
- Click the name of an Administration Server update in the list of updates, and in the window that opens, click the Run Update Administration Server Wizard link.
- Click the Run Update Administration Server Wizard link in the notification field at the top of the window.
- In the Update Administration Server Wizard window, select one of the following to specify when to install an update:
- Install now. Select this option if you want to install the update now.
- Postpone installation. Select this option if you want to install the update later. In this case, a notification about this update will be displayed.
- Ignore update. Select this option if you do not want to install an update and do not want to receive notifications about this update.
- Select the Create backup copy of Administration Server before update installation option if you want to create a backup of Administration Server before installing the update.
- Click the OK button to finish the Wizard.
In the backup process is interrupted, the update installation process is also interrupted.
Enabling and disabling the offline model of update download
We recommend that you avoid disabling the offline model of update download. Disabling it may cause failures in update delivery to devices. In certain cases, a Kaspersky Technical Support specialist may recommend that you disable the Download updates and anti-virus databases from Administration Server in advance option. Then, you will have to make sure that the task for receiving updates for Kaspersky applications has been set up.
To enable or disable the offline model of update download for an administration group:
- In the main menu, go to DEVICES → POLICIES & PROFILES.
- Click Groups.
- In the administration group structure, select the administration group for which you need to enable the offline model of update download.
- Click the Network Agent policy.
The properties window of the Network Agent policy opens.
By default, settings of child policies are inherited from parent policies and cannot be modified. If the policy that you want to modify is inherited, you first need to create a new policy for Network Agent in the required administration group. In the newly created policy, you can modify the settings that are not locked in the parent policy.
- In the Application settings tab, select the Manage patches and updates section.
- Enable or disable the Download updates and anti-virus databases from Administration Server in advance (recommended) option to enable or disable, respectively, the offline model of update download.
By default, the offline model of update download is enabled.
The offline model of update download will be enabled or disabled.
Updating Kaspersky databases and software modules on offline devices
Updating Kaspersky databases and software modules on managed devices is an important task for maintaining protection of the devices against viruses and other threats. Administrators usually configure regular updates through usage of the Administration Server repository or repositories of distribution points.
When you need to update databases and software modules on a device (or a group of devices) that is not connected to the Administration Server (primary or secondary), a distribution point or the internet, you have to use alternative sources of updates, such as an FTP server or a local folder. In this case you have to deliver the files of the required updates by using a mass storage device, such as a flash drive or an external hard drive.
You can copy the required updates from:
- The Administration Server.
To be sure the Administration Server repository contains the updates required for the security application installed on an offline device, at least one of the managed online devices must have the same security application installed. This application must be configured to receive the updates from the Administration Server repository through the Download updates to the Administration Server repository task.
- Any device that has the same security application installed and configured to receive the updates from the Administration Server repository, a distribution point repository, or directly from the Kaspersky update servers.
Below is an example of configuring updates of databases and software modules by copying them from the Administration Server repository.
To update Kaspersky databases and software modules on offline devices:
- Connect the removable drive to the device where the Administration Server is installed.
- Copy the updates files to the removable drive.
By default, the updates are located at: \\<server name>\KLSHARE\Updates.
Alternatively, you can configure Kaspersky Security Center to regularly copy the updates to the folder that you select. For this purpose, use the Copy downloaded updates to additional folders option in the properties of the Download updates to the Administration Server repository task. If you specify a folder located on a flash drive or an external hard drive as a destination folder for this option, this mass storage device will always contain the latest version of the updates.
- On offline devices, configure the security application (for example, Kaspersky Endpoint Security for Windows) to receive updates from a local folder or a shared resource, such as an FTP server or a shared folder.
- Copy the updates files from the removable drive to the local folder or the shared resource that you want to use as an update source.
- On the offline device that requires update installation, start the update task of Kaspersky Endpoint Security for Windows.
After the update task is complete, the Kaspersky databases and software modules are up-to-date on the device.
Adjustment of distribution points and connection gateways
A structure of administration groups in Kaspersky Security Center performs the following functions:
- Sets the scope of policies
There is an alternate way of applying relevant settings on devices, by using policy profiles. In this case, you set the scope of policies with tags, device locations in Active Directory organizational units, or membership in Active Directory security groups.
- Sets the scope of group tasks
There is an approach to defining the scope of group tasks that is not based on a hierarchy of administration groups: use of tasks for device selections and tasks for specific devices.
- Sets access rights to devices, virtual Administration Servers, and secondary Administration Servers
- Assigns distribution points
When building the structure of administration groups, you must take into account the topology of the organization's network for the optimum assignment of distribution points. The optimum distribution of distribution points allows you to save traffic on the organization's network.
Depending on the organizational schema and network topology, the following standard configurations can be applied to the structure of administration groups:
- Single office
- Multiple small remote offices
Devices functioning as distribution points must be protected, including physical protection, against any unauthorized access.
Standard configuration of distribution points: Single office
In a standard "single-office" configuration, all devices are on the organization's network so they can "see" each other. The organization's network may consist of a few separate parts (networks or network segments) linked by narrow channels.
The following methods of building the structure of administration groups are possible:
- Building the structure of administration groups taking into account the network topology. The structure of administration groups may not reflect the network topology with absolute precision. A match between the separate parts of the network and certain administration groups would be enough. You can use automatic assignment of distribution points or assign them manually.
- Building the structure of administration groups, without taking the network topology into account. In this case, you must disable automatic assignment of distribution points, and then assign one or several devices to act as distribution points for a root administration group in each of the separate parts of the network, for example, for the Managed devices group. All distribution points will be at the same level and will feature the same scope spanning all devices on the organization's network. In this case, each Network Agent in version 10 Service Pack 1 or later will connect to the distribution point that has the shortest route. The route to a distribution point can be traced with the tracert utility.
Standard configuration of distribution points: Multiple small remote offices
This standard configuration provides for a number of small remote offices, which may communicate with the head office over the internet. Each remote office is located behind the NAT, that is, connection from one remote office to another is not possible because offices are isolated from one another.
The configuration must be reflected in the structure of administration groups: a separate administration group must be created for each remote office (groups Office 1 and Office 2 in the figure below).
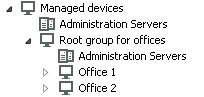
Remote offices are included in the administration group structure
One or multiple distribution points must be assigned to each administration group that correspond to an office. Distribution points must be devices at the remote office that have a sufficient amount of free disk space. Devices deployed in the Office 1 group, for example, will access distribution points assigned to the Office 1 administration group.
If some users move between offices physically, with their laptops, you must select two or more devices (in addition to the existing distribution points) in each remote office and assign them to act as distribution points for a top-level administration group (Root group for offices in the figure above).
Example: A laptop is deployed in the Office 1 administration group and then is moved physically to the office that corresponds to the Office 2 administration group. After the laptop is moved, Network Agent attempts to access the distribution points assigned to the Office 1 group, but those distribution points are unavailable. Then, Network Agent starts attempting to access the distribution points that have been assigned to the Root group for offices. Because remote offices are isolated from one another, attempts to access distribution points assigned to the Root group for offices administration group will only be successful when Network Agent attempts to access distribution points in the Office 2 group. That is, the laptop will remain in the administration group that corresponds to the initial office, but the laptop will use the distribution point of the office where it is physically located at the moment.
Assigning distribution points automatically
We recommend that you assign distribution points automatically. In this case, Kaspersky Security Center will select on its own which devices must be assigned distribution points.
To assign distribution points automatically:
- In the main menu, click the settings icon (
 ) next to the name of the required Administration Server.
The Administration Server properties window opens.
- On the General tab, select the Distribution points section.
- Select the Automatically assign distribution points option.
If automatic assignment of devices as distribution points is enabled, you cannot configure distribution points manually or edit the list of distribution points.
- Click the Save button.
Administration Server assigns and configures distribution points automatically.
Assigning distribution points manually
Kaspersky Security Center allows you to manually assign devices to act as distribution points.
We recommend that you assign distribution points automatically. In this case, Kaspersky Security Center will select on its own which devices must be assigned distribution points. However, if you have to opt out of assigning distribution points automatically for any reason (for example, if you want to use exclusively assigned servers), you can assign distribution points manually after you calculate their number and configuration.
Devices functioning as distribution points must be protected, including physical protection, against any unauthorized access.
To manually assign a device to act as distribution point:
- In the main menu, click the settings icon () next to the name of the required Administration Server.
The Administration Server properties window opens.
- On the General tab, select the Distribution points section.
- Select the Manually assign distribution points option.
- Click the Assign button.
- Select the device that you want to make a distribution point.
When selecting a device, keep in mind the operation features of distribution points and the requirements set for the device that acts as distribution point.
- Select the administration group that you want to include in the scope of the selected distribution point.
- Click the OK button.
The distribution point that you have added will be displayed in the list of distribution points, in the Distribution points section.
- Select the newly added distribution point in the list to open its properties window.
- Configure the distribution point in the properties window:
- The General section contains the setting of interaction between the distribution point and client devices:
- In the Scope section, specify the scope to which the distribution point will distribute updates (administration groups and / or network location).
Only devices running a Windows operating system can determine their network location. Network location cannot be determined for devices running other operating systems.
- In the Source of updates section, you can select a source of updates for the distribution point:
- In the KSN Proxy section, you can configure the application to use the distribution point to forward KSN requests from the managed devices:
- Configure the polling of Windows domains, Active Directory, and IP ranges by the distribution point:
- In the Advanced section, specify the folder that the distribution point must use to store distributed data:
- Click the OK button.
The selected devices act as distribution points.
Modifying the list of distribution points for an administration group
You can view the list of distribution points assigned to a specific administration group and modify the list by adding or removing distribution points.
To view and modify the list of distribution points assigned to an administration group:
- In the main menu, go to DEVICES → MANAGED DEVICES.
- In the Current path field above the list of managed devices, click the path link.
- In the left-side pane that opens, select an administration group for which you want to view the assigned distribution points.
This enables the DISTRIBUTION POINTS menu item.
- In the main menu, go to DEVICES → DISTRIBUTION POINTS.
- To add new distribution points for the administration group, click the Assign button above the list of managed devices and select devices from the pane that opens.
- To remove the assigned distribution points, select devices from the list and click the Unassign button.
Depending on your modifications, the new distribution points are added to the list or existing distribution points are removed from the list.
Forced synchronization
Although Kaspersky Security Center automatically synchronizes the status, settings, tasks, and policies for managed devices, in some cases you might want to run the synchronization for a specified device forcibly. You can run forced synchronization for the following devices:
- Devices that have Network Agent installed
- Devices running KasperskyOS
Before running forced synchronization for a KasperskyOS device, ensure that the device is included in a distribution point scope and that a push server is enabled on the distribution point.
- iOS devices
- Android devices
Before running forced synchronization for an Android device, you must configure Google Firebase Cloud Messaging.
Synchronizing a single device
To force synchronization between the Administration Server and a managed device:
- In the main menu, go to DEVICES → MANAGED DEVICES.
- Click the name of the device that you want to synchronize with the Administration Server.
A property window opens with the General section selected.
- Click the Force synchronization button.
The application synchronizes the selected device with the Administration Server.
Synchronizing multiple devices
To force synchronization between the Administration Server and multiple managed devices:
- Open the device list of an administration group or a device selection:
- In the main menu, go to DEVICES → MANAGED DEVICES, click the path link in the Current path field above the list of managed devices, then select the administration group that contains devices to synchronize.
- Run a device selection to view the device list.
- Select the check boxes next to the devices that you want to synchronize with the Administration Server.
- Above the list of managed devices, click the ellipsis button (
 ), and then click the Force synchronization button.
The application synchronizes the selected devices with the Administration Server.
- In the device list, check that the time of last connection to the Administration Server has changed, for the selected devices, to the current time. If the time has not changed, update the page content by clicking the Refresh button.
The selected devices are synchronized with the Administration Server.
Viewing the time of a policy delivery
After changing a policy for a Kaspersky application on the Administration Server, the administrator can check whether the changed policy has been delivered to a specific managed device. A policy can be delivered during a regular synchronization or a forced synchronization.
To view the date and time that an application policy was delivered to a managed device:
- In the main menu, go to DEVICES → MANAGED DEVICES.
- Click the name of the device that you want to synchronize with the Administration Server.
A property window opens with the General section selected.
- Select the Applications tab.
- Select the application for which you want to view the policy synchronization date.
The application policy window opens with the General section selected and the policy delivery date and time displayed.
Enabling a push server
In Kaspersky Security Center, a distribution point can work as a push server for the devices managed through the mobile protocol and for the devices managed by Network Agent. For example, a push server must be enabled if you want to be able to force synchronization of KasperskyOS devices with Administration Server. A push server has the same scope of managed devices as the distribution point on which the push server is enabled. If you have several distribution points assigned for the same administration group, you can enable push server on each of the distribution points. In this case, Administration Server balances the load between the distribution points.
You might want to use distribution points as push servers to make sure that there is continuous connectivity between a managed device and the Administration Server. Continuous connectivity is needed for some operations, such as running and stopping local tasks, receiving statistics for a managed application, or creating a tunnel. If you use a distribution point as a push server, you do not have to use the Do not disconnect from the Administration Server option on managed devices or send packets to the UDP port of the Network Agent.
A push server supports the load of up to 50,000 simultaneous connections.
To enable push server on a distribution point:
- Click the settings icon () next to the name of the required Administration Server.
The Administration Server properties window opens.
- On the General tab, select the Distribution points section.
- Click the name of the distribution point on which you want to enable the push server.
The distribution point properties window opens.
- On the General section, enable the Run push server option.
- In the Push server port field, type the port number. You can specify number of any unoccupied port.
- In the Address for remote hosts field, specify the IP address or the name of the distribution point device.
- Click the OK button.
The push server is enabled on the selected distribution point.