Contents
- Managing client devices
- Settings of a managed device
- Creating administration groups
- Adding devices to an administration group manually
- Moving devices to an administration group manually
- Creating device moving rules
- Copying device moving rules
- Viewing and configuring the actions when devices show inactivity
- About device statuses
- Configuring the switching of device statuses
- Remotely connecting to the desktop of a client device
- Connecting to devices through Windows Desktop Sharing
- Device selections
- Device tags
- About device tags
- Creating a device tag
- Renaming a device tag
- Deleting a device tag
- Viewing devices to which a tag is assigned
- Viewing tags assigned to a device
- Tagging a device manually
- Removing an assigned tag from a device
- Viewing rules for tagging devices automatically
- Editing a rule for tagging devices automatically
- Creating a rule for tagging devices automatically
- Running rules for auto-tagging devices
- Deleting a rule for tagging devices automatically
- Managing device tags by using the klscflag utility
Managing client devices
This section describes how to manage devices in the administration groups.
Settings of a managed device
To view the settings of a managed device:
- Select DEVICES → MANAGED DEVICES.
The list of managed devices is displayed.
- In the list of managed devices, click the link with the name of the required device.
The properties window of the selected device is displayed.
The following tabs are displayed in the upper part of the properties window representing the main groups of the settings:
Creating administration groups
Immediately after Kaspersky Security Center installation, the hierarchy of administration groups contains only one administration group, called Managed devices. When creating a hierarchy of administration groups, you can add devices, including virtual machines, to the Managed devices group, and add nested groups (see the figure below).
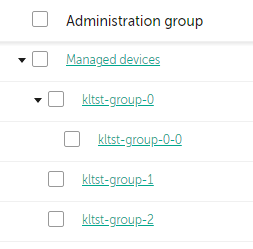
Viewing administration groups hierarchy
To create an administration group:
- In the main menu, go to DEVICES → HIERARCHY OF GROUPS.
- In the administration group structure, select the administration group that is to include the new administration group.
- Click the Add button.
- In the Name of the new administration group window that opens, enter a name for the group, and then click the Add button.
A new administration group with the specified name appears in the hierarchy of administration groups.
The application allows creating a hierarchy of administration groups based on the structure of Active Directory or the domain network's structure. Also, you can create a structure of groups from a text file.
To create a structure of administration groups:
- In the main menu, go to DEVICES → HIERARCHY OF GROUPS.
- Click the Import button.
The New Administration Group Structure Wizard starts. Follow the instructions of the Wizard.
Page topAdding devices to an administration group manually
You can move devices to administration groups automatically by creating device moving rules or manually by moving devices from one administration group to another or by adding devices to a selected administration group. This section describes how to manually add devices to an administration group.
To add manually one or more devices to a selected administration group:
- In the main menu, go to DEVICES → MANAGED DEVICES.
- Click the Current path:
<current path>link above the list. - In the window that opens, select the administration group to which you want to add the devices.
- Click the Add devices button.
The Move Devices Wizard starts.
- Make a list of the devices that you want to add to the administration group.
You can add only devices for which information has already been added to the Administration Server database either upon connection of the device or after device discovery.
Select how you want to add devices to the list:
- Click the Add devices button, and then specify the devices in one of the following ways:
- Select devices from the list of devices detected by the Administration Server.
- Specify a device IP address or an IP range.
- Specify the NetBIOS name or DNS name of a device.
The device name field must not contain space characters or the following prohibited characters: \ / * ; : ` ~ ! @ # $ ^ & ( ) = + [ ] { } | , < > %
- Click the Import devices from file button to import a list of devices from a .txt file. Each device address or name must be specified on a separate line.
The file must not contain space characters or the following prohibited characters: \ / * ; : ` ~ ! @ # $ ^ & ( ) = + [ ] { } | , < > %
- Click the Add devices button, and then specify the devices in one of the following ways:
- View the list of devices to be added to the administration group. You can edit the list by adding or removing devices.
- After making sure that the list is correct, click the Next button.
The Wizard processes the device list and displays the result. The successfully processed devices are added to the administration group and are displayed in the list of devices under names generated by Administration Server.
Moving devices to an administration group manually
You can move devices from one administration group to another, or from the group of unassigned devices to an administration group.
To move one or several devices to a selected administration group:
- Open the administration group from which you want to move the devices. To do this, perform one of the following:
- To open an administration group, go to DEVICES → MANAGED DEVICES, click the path link in the Current path field, and select an administration group in the left-side pane that opens.
- To open the UNASSIGNED DEVICES group, go to DISCOVERY & DEPLOYMENT → UNASSIGNED DEVICES.
- Select the check boxes next to the devices that you want to move to a different group.
- Click the Move to group button.
- In the hierarchy of administration groups, select the check box next to the administration group to which you want to move the selected devices.
- Click the Move button.
The selected devices are moved to the selected administration group.
Page topCreating device moving rules
You can set up device moving rules, that is, rules that automatically allocate devices to administration groups.
To create a moving rule:
- In the main menu, go to the DEVICES → MOVING RULES tab.
- Click Add.
- In the window that opens, specify the following information on the General tab:
- On the Rule conditions tab, specify at least one criterion by which the devices are moved to an administration group.
- Click Save.
The moving rule is created. It is displayed in the list of moving rules.
The higher the position is on the list, the higher the priority of the rule. To increase or decrease the priority of a moving rule, move the rule up or down in the list, respectively, using the mouse.
If the device attributes meet the conditions of multiple rules, the device is moved to the target group of the rule with the highest priority (that is, has the highest rank in the list of rules).
Copying device moving rules
You can copy moving rules, for example, if you want to have several identical rules for different target administration groups.
To copy an existing a moving rule:
- In the main menu, go to the DEVICES → MOVING RULES tab.
You can also select DISCOVERY & DEPLOYMENT → DEPLOYMENT & ASSIGNMENT, and then select MOVING RULES on the menu.
The list of moving rules is displayed.
- Select the check box next to the rule you want to copy.
- Click Copy.
- In the window that opens, change the following information on the General tab—or make no changes if you only want to copy the rule without changing its settings:
- On the Rule conditions tab, specify at least one criterion for the devices that you want to be moved automatically.
- Click Save.
The new moving rule is created. It is displayed in the list of moving rules.
Viewing and configuring the actions when devices show inactivity
If client devices within a group are inactive, you can get notifications about it. You can also automatically delete such devices.
To view or configure the actions when the devices in the group show inactivity:
- In the main menu, go to DEVICES → HIERARCHY OF GROUPS.
- Click the name of the required administration group.
The administration group properties window opens.
- In the properties window, go to the Settings tab.
- In the Inheritance section, enable or disable the following options:
- In the Device activity section, enable or disable the following options:
- Click Save.
Your changes are saved and applied.
Page topAbout device statuses
Kaspersky Security Center assigns a status to each managed device. The particular status depends on whether the conditions defined by the user are met. In some cases, when assigning a status to a device, Kaspersky Security Center takes into consideration the device's visibility flag on the network (see the table below). If Kaspersky Security Center does not find a device on the network within two hours, the visibility flag of the device is set to Not Visible.
The statuses are the following:
- Critical or Critical / Visible
- Warning or Warning / Visible
- OK or OK / Visible
The table below lists the default conditions that must be met to assign the Critical or Warning status to a device, with all possible values.
Conditions for assigning a status to a device
Condition |
Condition description |
Available values |
|---|---|---|
Security application is not installed |
Network Agent is installed on the device, but a security application is not installed. |
|
Too many viruses detected |
Some viruses have been found on the device by a task for virus detection, for example, the Virus scan task, and the number of viruses found exceeds the specified value. |
More than 0. |
Real-time protection level differs from the level set by the Administrator |
The device is visible on the network, but the real-time protection level differs from the level set (in the condition) by the administrator for the device status. |
|
Virus scan has not been performed in a long time |
The device is visible on the network and a security application is installed on the device, but neither the Malware scan task nor a local scan task has been run within the specified time interval. The condition is applicable only to devices that were added to the Administration Server database 7 days ago or earlier. |
More than 1 day. |
Databases are outdated |
The device is visible on the network and a security application is installed on the device, but the anti-virus databases have not been updated on this device within the specified time interval. The condition is applicable only to devices that were added to the Administration Server database 1 day ago or earlier. |
More than 1 day. |
Not connected in a long time |
Network Agent is installed on the device, but the device has not connected to an Administration Server within the specified time interval, because the device was turned off. |
More than 1 day. |
Active threats are detected |
The number of unprocessed objects in the ACTIVE THREATS folder exceeds the specified value. |
More than 0 items. |
Restart is required |
The device is visible on the network, but an application requires the device restart longer than the specified time interval and for one of the selected reasons. |
More than 0 minutes. |
Incompatible applications are installed |
The device is visible on the network, but software inventory performed through Network Agent has detected incompatible applications installed on the device. |
|
Software vulnerabilities have been detected |
The device is visible on the network and Network Agent is installed on the device, but the Find vulnerabilities and required updates task has detected vulnerabilities with the specified severity level in applications installed on the device. |
|
License expired |
The device is visible on the network, but the license has expired. |
|
License expires soon |
The device is visible on the network, but the license will expire on the device in less than the specified number of days. |
More than 0 days. |
Check for Windows Update updates has not been performed in a long time |
The device is visible on the network, but the Perform Windows Update synchronization task has not been run within the specified time interval. |
More than 1 day. |
Invalid encryption status |
Network Agent is installed on the device, but the device encryption result is equal to the specified value. |
|
Mobile device settings do not comply with the policy |
The mobile device settings are other than the settings that were specified in the Kaspersky Endpoint Security for Android policy during the check of compliance rules. |
|
Unprocessed incidents detected |
Some unprocessed incidents have been found on the device. Incidents can be created either automatically, through managed Kaspersky applications installed on the client device, or manually by the administrator. |
|
Device status defined by application |
The status of the device is defined by the managed application. |
|
Device is out of disk space |
Free disk space on the device is less than the specified value or the device could not be synchronized with the Administration Server. The Critical or Warning status is changed to the OK status when the device is successfully synchronized with the Administration Server and free space on the device is greater than or equal to the specified value. |
More than 0 MB. |
Device has become unmanaged |
During device discovery, the device was recognized as visible on the network, but more than three attempts to synchronize with the Administration Server failed. |
|
Protection is disabled |
The device is visible on the network, but the security application on the device has been disabled for longer than the specified time interval. |
More than 0 minutes. |
Security application is not running |
The device is visible on the network and a security application is installed on the device but is not running. |
|
Kaspersky Security Center allows you to set up automatic switching of the status of a device in an administration group when specified conditions are met. When specified conditions are met, the client device is assigned one of the following statuses: Critical or Warning. When specified conditions are not met, the client device is assigned the OK status.
Different statuses may correspond to different values of one condition. For example, by default, if the Databases are outdated condition has the More than 3 days value, the client device is assigned the Warning status; if the value is More than 7 days, the Critical status is assigned.
If you upgrade the Kaspersky Security Center from the previous version, the values of the Databases are outdated condition for assigning the status to Critical or Warning do not change.
When Kaspersky Security Center assigns a status to a device, for some conditions (see the Condition description column) the visibility flag is taken into consideration. For example, if a managed device was assigned the Critical status because the Databases are outdated condition was met, and later the visibility flag was set for the device, then the device is assigned the OK status.
Configuring the switching of device statuses
You can change conditions to assign the Critical or Warning status to a device.
To enable changing the device status to Critical:
- Open the properties window in one of the following ways:
- In the Policies folder, in the context menu of an Administration Server policy, select Properties.
- Select Properties in the context menu of an administration group.
- In the Properties window that opens, in the Sections pane, select Device status.
- In the right pane, in the Set to Critical if these are specified section, select the check box next to a condition in the list.
You can change only settings that are not locked in the parent policy.
- Set the required value for the selected condition.
You can set values for some, but not all, conditions.
- Click OK.
When specified conditions are met, the managed device is assigned the Critical status.
To enable changing the device status to Warning:
- Open the properties window in one of the following ways:
- In the Policies folder, in the context menu of the Administration Server policy, select Properties.
- Select Properties in the context menu of the administration group.
- In the Properties window that opens, in the Sections pane select Device status.
- In the right pane, in the Set to Warning if these are specified section, select the check box next to a condition in the list.
You can change only settings that are not locked in the parent policy.
- Set the required value for the selected condition.
You can set values for some, but not all, conditions.
- Click OK.
When specified conditions are met, the managed device is assigned the Warning status.
Remotely connecting to the desktop of a client device
The administrator can obtain remote access to the desktop of a client device through a Network Agent installed on the device. Remote connection to a device through the Network Agent is possible even if the TCP and UDP ports of the client device are closed.
Upon establishing the connection with the device, the administrator gains full access to information stored on this device and can manage applications installed on it.
Remote connection must be allowed in the operating system settings of the target managed device. For example, in Windows 10, this option is called Allow Remote Assistance connections to this computer (you can find this option at Control Panel → System and Security → System → Remote settings). If you have a license for the Vulnerability and Patch Management feature, you can enable this option forcibly when you establish connection to a managed device. If you do not have the license, enable this option locally on the target managed device. If this option is disabled, remote connection is not possible.
To establish remote connection to a device, you must have two utilities:
- Kaspersky utility named klsctunnel. This utility must be stored on the administrator's workstation. You use this utility for tunneling the connection between a client device and the Administration Server.
Kaspersky Security Center allows tunneling TCP connections from Administration Console via the Administration Server and then via Network Agent to a specified port on a managed device. Tunneling is designed for connecting a client application on a device with Administration Console installed to a TCP port on a managed device—if no direct connection is possible between Administration Console and the target device.
Connection tunneling between a remote client device and Administration Server is required if the port used for connection to Administration Server is not available on the device. The port on the device may be unavailable in the following cases:
- The remote device is connected to a local network that uses the NAT mechanism.
- The remote device is part of the local network of Administration Server, but its port is closed by a firewall.
- Standard Microsoft Windows component named Remote Desktop Connection. Connection to a remote desktop is established through the standard Windows utility mstsc.exe in accordance with the utility's settings.
Connection to the current remote desktop session of the user is established without the user's knowledge. Once the administrator connects to the session, the device user is disconnected from the session without an advance notification.
To connect to the desktop of a client device:
- In MMC-based Administration Console, in the context menu of the Administration Server, select Properties.
- In the Administration Server properties window that opens, go to Administration Server connection settings → Connection ports.
- Make sure that the Open RDP port for Kaspersky Security Center 13.1 Web Console option is enabled.
- In Kaspersky Security Center 13.1 Web Console, go to DEVICES → MANAGED DEVICES.
- In the Current path field above the list of managed devices, click the path link.
- In the left-side pane that opens, select the administration group that contains the device to which you want to obtain access.
- Select the check box next to the name of the device to which you want to obtain access.
- Click the Connect to Remote Desktop button.
The Remote Desktop (Windows only) window opens.
- Enable the Allow remote desktop connection on managed device option. In this case, the connection will be established even if remote connections are currently prohibited in the operating system settings on the managed device.
This option is only available if you have a license for the Vulnerability and Patch Management feature.
- Click the Download button to download the klsctunnel utility.
- Click the Copy to clipboard button to copy the text from the text field. This text is a Binary Large Object (BLOB) that contains settings required to establish connection between the Administration Server and the managed device.
A BLOB is valid for 3 minutes. If it has expired, reopen the Remote Desktop (Windows only) window to generate a new BLOB.
- Run the klsctunnel utility.
The utility window opens.
- Paste the copied text into the text field.
- If you use a proxy server, select the Use proxy server check box, and then specify the proxy server connection settings.
- Click the Open port button.
The Remote Desktop Connection login window opens.
- Specify the credentials of the account under which you are currently logged in to Kaspersky Security Center 13.1 Web Console.
- Click the Connect button.
When connection to the device is established, the desktop is available in the Remote Desktop Connection window of Microsoft Windows.
Page topConnecting to devices through Windows Desktop Sharing
The administrator can obtain remote access to the desktop of a client device through a Network Agent installed on the device. Remote connection to a device through the Network Agent is possible even if the TCP and UDP ports of the client device are closed.
The administrator can connect to an existing session on a client device without disconnecting the user in this session. In this case, the administrator and the session user on the device share access to the desktop.
To establish remote connection to a device, you must have two utilities:
- Kaspersky utility named klsctunnel. This utility must be stored on the administrator's workstation. You use this utility for tunneling the connection between a client device and the Administration Server.
Kaspersky Security Center allows tunneling TCP connections from Administration Console via the Administration Server and then via Network Agent to a specified port on a managed device. Tunneling is designed for connecting a client application on a device with Administration Console installed to a TCP port on a managed device—if no direct connection is possible between Administration Console and the target device.
Connection tunneling between a remote client device and Administration Server is required if the port used for connection to Administration Server is not available on the device. The port on the device may be unavailable in the following cases:
- The remote device is connected to a local network that uses the NAT mechanism.
- The remote device is part of the local network of Administration Server, but its port is closed by a firewall.
- Windows Desktop Sharing. When connecting to an existing session of the remote desktop, the session user on the device receives a connection request from the administrator. No information about remote activity on the device and its results will be saved in reports created by Kaspersky Security Center.
The administrator can configure an audit of user activity on a remote client device. During the audit, the application saves information about files on the client device that have been opened and/or modified by the administrator.
To connect to the desktop of a client device through Windows Desktop Sharing, the following conditions must be met:
- Microsoft Windows Vista or a later Windows operating system is installed on the client device.
- Microsoft Windows Vista or later is installed on the administrator's workstation. The type of operating system of the device hosting Administration Server imposes no restrictions on connection through Windows Desktop Sharing.
To check whether the Windows Desktop Sharing feature is included in your Windows edition, make sure that there is CLSID\{32BE5ED2-5C86-480F-A914-0FF8885A1B3F} key in the Windows Registry.
- Microsoft Windows Vista or later is installed on the client device.
- Kaspersky Security Center uses a license for Vulnerability and patch management.
To connect to the desktop of a client device through Windows Desktop Sharing:
- In MMC-based Administration Console, in the context menu of the Administration Server, select Properties.
- In the Administration Server properties window that opens, go to Administration Server connection settings → Connection ports.
- Make sure that the Open RDP port for Kaspersky Security Center 13.1 Web Console option is enabled.
- In Kaspersky Security Center 13.1 Web Console, go to DEVICES → MANAGED DEVICES.
- In the Current path field above the list of managed devices, click the path link.
- In the left-side pane that opens, select the administration group that contains the device to which you want to obtain access.
- Select the check box next to the name of the device to which you want to obtain access.
- Click the Windows Desktop Sharing button.
The Windows Desktop Sharing Wizard opens.
- Click the Download button to download the klsctunnel utility, and wait for the download process to complete.
If you already have the klsctunnel utility, skip this step.
- Click the Next button.
- Select the session on the device to which you want to connect, and then click the Next button.
- On the target device, in the dialog box that opens, the user must allow a desktop sharing session. Otherwise, the session is not possible.
After the device user confirms the desktop sharing session, the next page of the Wizard opens.
- Click the Copy to clipboard button to copy the text from the text field. This text is a Binary Large OBject (BLOB) that contains settings required to establish connection between the Administration Server and the managed device.
A BLOB is valid for 3 minutes. If it has expired, generate a new BLOB.
- Run the klsctunnel utility.
The utility window opens.
- Paste the copied text into the text field.
- If you use a proxy server, select the Use proxy server check box, and then specify the proxy server connection settings.
- Click the Open port button.
Desktop sharing starts in a new window. If you want to interact with the device, click the menu icon ( ) in the upper-left corner of the window, and then select Interactive mode.
Device selections
Device selections are a tool for filtering devices according to specific conditions. You can use device selections to manage several devices: for example, to view a report about only these devices or to move all of these devices to another group.
Kaspersky Security Center provides a broad range of predefined selections (for example, Devices with Critical status, Protection is disabled, Active threats are detected). Predefined selections cannot be deleted. You can also create and configure additional user-defined selections.
In user-defined selections, you can set the search scope and select all devices, managed devices, or unassigned devices. Search parameters are specified in the conditions. In the device selection you can create several conditions with different search parameters. For example, you can create two conditions and specify different IP ranges in each of them. If several conditions are specified, a selection displays the devices that meet any of the conditions. By contrast, search parameters within a condition are superimposed. If both an IP range and the name of an installed application are specified in a condition, only those devices will be displayed where both the application is installed and the IP address belongs to the specified range.
To view the device selection:
- In the main menu, go to DEVICES → DEVICE SELECTIONS or DISCOVERY & DEPLOYMENT → DEVICE SELECTIONS section.
- In the selection list, click the name of the relevant selection.
The device selection result is displayed.
Creating a device selection
To create a device selection:
- In the main menu, go to DEVICES → DEVICE SELECTIONS.
A page with a list of device selections is displayed.
- Click the Add button.
The Device selection settings window opens.
- Enter the name of the new selection.
- Specify the type of the devices that you want to include in the device selection.
- Click the Add button.
- In the window that opens, specify conditions that must be met for including devices in this selection, and then click the OK button.
- Click the Save button.
The device selection is created and added to the list of device selections.
Page topConfiguring a device selection
To configure a device selection:
- In the main menu, go to DEVICES → DEVICE SELECTIONS.
A page with a list of device selections is displayed.
- Click the relevant user-defined device selection.
The Device selection settings window opens.
- On the General tab, specify conditions that must be met for including devices in this selection.
- Click the Save button.
The settings are applied and saved.
Below are descriptions of the conditions for assigning devices to a selection. Conditions are combined by using the OR logical operator: the selection will contain devices that comply with at least one of the listed conditions.
General
In the General section, you can change the name of the selection condition and specify whether that condition must be inverted:
Network
In the Network section, you can specify the criteria that will be used to include devices in the selection according to their network data:
Tags
In the Tags section, you can configure criteria for including devices into a selection based on key words (tags) that were previously added to the descriptions of managed devices:
Active Directory
In the Active Directory section, you can configure criteria for including devices into a selection based on their Active Directory data:
- Device is in an Active Directory organizational unit
- Include child organizational units
- This device is a member of an Active Directory group
Network activity
In the Network activity section, you can specify the criteria that will be used to include devices in the selection according to their network activity:
- This device is a distribution point
- Do not disconnect from the Administration Server
- Connection profile switched
- Last connected to Administration Server
- New devices detected by network poll
- Device is visible
Application
In the Application section, you can configure criteria for including devices in a selection based on the selected managed application:
- Application name
- Application version
- Critical update name
- Modules last updated
- Device is managed through Kaspersky Security Center 13.1
- Security application is installed
Operating system
In the Operating system section, you can specify the criteria that will be used to include devices in the selection according to their operating system type.
- Operating system version
- Operating system bit size
- Operating system service pack version
- Operating system build
- Operating system release ID
Device status
In the Device status section, you can configure criteria for including devices into a selection based on the description of the devices status from a managed application:
Protection components
In the Protection components section, you can set up the criteria for including devices in a selection based on their protection status:
Applications registry
In the Applications registry section, you can set up the criteria to search for devices according to applications installed on them:
- Application name
- Application version
- Vendor
- Application status
- Find by update
- Incompatible security application name
- Application tag
- Apply to devices without the specified tags
Hardware registry
In the Hardware registry section, you can configure criteria for including devices into a selection based on their installed hardware:
- Device
- Vendor
- Device name
- Description
- Device vendor
- Serial number
- Inventory number
- User
- Location
- CPU frequency, in MHz
- Virtual CPU cores
- Hard drive volume, in GB
- RAM size, in MB
Virtual machines
In the Virtual machines section, you can set up the criteria to include devices in the selection according to whether these are virtual machines or part of virtual desktop infrastructure (VDI):
Vulnerabilities and updates
In the Vulnerabilities and updates section, you can specify the criteria that will be used to include devices in the selection according to their Windows Update source:
WUA is switched to Administration Server
Users
In the Users section, you can set up the criteria to include devices in the selection according to the accounts of users who have logged in to the operating system.
Status-affecting problems in managed applications
In the Status-affecting problems in managed applications section, you can specify the criteria that will be used to include devices in the selection according to the list of possible problems detected by a managed application. If at least one problem that you select exists on a device, the device will be included in the selection. When you select a problem listed for several applications, you have the option to select this problem in all of the lists automatically.
Statuses of components in managed applications
In the Statuses of components in managed applications section, you can configure criteria for including devices in a selection according to the statuses of components in managed applications:
- Data Leakage Prevention status
- Collaboration servers protection status
- Anti-virus protection status of mail servers
- Endpoint Sensor status
Encryption
Cloud segments
In the Cloud segments section, you can configure criteria for including devices in a selection according to their respective cloud segments:
Application components
This section contains the list of components of those applications that have corresponding management plug-ins installed in Administration Console.
In the Application components section, you can specify criteria for including devices in a selection according to the statuses and version numbers of the components that refer to the application that you select:
Page topDevice tags
This section describes device tags, and provides instructions for creating and modifying them as well as for tagging devices manually or automatically.
About device tags
Kaspersky Security Center allows you to tag devices. A tag is the label of a device and it can be used for grouping, describing, or finding devices. Tags assigned to devices can be used for creating selections, for finding devices, and for distributing devices among administration groups.
You can tag devices manually or automatically. You may use manual tagging when you want to tag an individual device. Auto-tagging is performed by Kaspersky Security Center in accordance with the specified tagging rules.
Devices are tagged automatically when specified rules are met. An individual rule corresponds to each tag. Rules are applied to the network properties of the device, operating system, applications installed on the device, and other device properties. For example, if you have a hybrid infrastructure of physical machines, Amazon EC2 instances, and Microsoft Azure virtual machines, you can set up a rule that will assign the [Azure] tag to all Microsoft Azure virtual machines. Then, you can use this tag when creating a device selection; and this will help you sort all Microsoft Azure virtual machines and assign them a task.
A tag is automatically removed from a device in the following cases:
- When the device stops meeting conditions of the rule that assigns the tag.
- When the rule that assigns the tag is disabled or deleted.
The list of tags and the list of rules on each Administration Server are independent of all other Administration Servers, including a primary Administration Server or subordinate virtual Administration Servers. A rule is applied only to devices from the same Administration Server on which the rule is created.
Creating a device tag
To create a device tag:
- In the main menu, go to DEVICES → TAGS → DEVICE TAGS.
- Click Add.
A new tag window opens.
- In the Tag field, enter the tag name.
- Click Save to save the changes.
The new tag appears in the list of device tags.
Renaming a device tag
To rename a device tag:
- In the main menu, go to DEVICES → TAGS → DEVICE TAGS.
- Click the name of the tag that you want to rename.
A tag properties window opens.
- In the Tag field, change the tag name.
- Click Save to save the changes.
The updated tag appears in the list of device tags.
Deleting a device tag
To delete a device tag:
- In the main menu, go to DEVICES → TAGS → DEVICE TAGS.
- In the list, select the device tag that you want to delete.
- Click the Delete button.
- In the window that opens, click Yes.
The device tag is deleted. The deleted tag is automatically removed from all of the devices to which it was assigned.
The tag that you have deleted is not removed automatically from auto-tagging rules. After the tag is deleted, it will be assigned to a new device only when the device first meets the conditions of a rule that assigns the tag.
The deleted tag is not removed automatically from the device if this tag is assigned to the device by an application or Network Agent. To remove the tag from your device, use the klscflag utility.
Viewing devices to which a tag is assigned
To view devices to which a tag is assigned:
- In the main menu, go to DEVICES → TAGS → DEVICE TAGS.
- Click the View devices link next to the tag for which you want to view assigned devices.
If you do not see the View devices link next to a tag, the tag is not assigned to any devices.
The list of devices that appears shows only those devices to which the tag is assigned.
To return to the list of device tags, click the Back button of your browser.
Viewing tags assigned to a device
To view tags assigned to a device:
- In the main menu, go to DEVICES → MANAGED DEVICES.
- Click the name of the device whose tags you want to view.
- In the device properties window that opens, select the Tags tab.
The list of tags assigned to the selected device is displayed.
You can assign another tag to the device or remove an already assigned tag. You can also see all device tags that exist on the Administration Server.
Tagging a device manually
To assign a tag to a device manually:
- View tags assigned to the device to which you want to assign another tag.
- Click Add.
- In the window that opens, do one of the following:
- To create and assign a new tag, select Create new tag, and then specify the name of the new tag.
- To select an existing tag, select Assign existing tag, and then select the necessary tag in the drop-down list.
- Click OK to apply the changes.
- Click Save to save the changes.
The selected tag is assigned to the device.
Removing an assigned tag from a device
To remove a tag from a device:
- In the main menu, go to DEVICES → MANAGED DEVICES.
- Click the name of the device whose tags you want to view.
- In the device properties window that opens, select the Tags tab.
- Select the check box next to the tag that you want to remove.
- At the top of the list, click the Unassign tag button.
- In the window that opens, click Yes.
The tag is removed from the device.
The unassigned device tag is not deleted. If you want, you can delete it manually.
You cannot manually remove tags assigned to the device by applications or Network Agent. To remove these tags, use the klscflag utility.
Viewing rules for tagging devices automatically
To view rules for tagging devices automatically,
Do any of the following:
- In the main menu, go to DEVICES → TAGS → AUTO-TAGGING RULES.
- In the main menu, go to DEVICES → TAGS, and then click the Set up auto-tagging rules link.
- View tags assigned to a device and then click the Settings button.
The list of rules for auto-tagging devices appears.
Editing a rule for tagging devices automatically
To edit a rule for tagging devices automatically:
- View rules for tagging devices automatically.
- Click the name of the rule that you want to edit.
A rule settings window opens.
- Edit the general properties of the rule:
- In the Rule name field, change the rule name.
The name cannot be more than 256 characters long.
- Do any of the following:
- Enable the rule by switching the toggle button to Rule enabled.
- Disable the rule by switching the toggle button to Rule disabled.
- In the Rule name field, change the rule name.
- Do any of the following:
- If you want to add a new condition, click the Add button, and specify the settings of the new condition in the window that opens.
- If you want to edit an existing condition, click the name of the condition that you want to edit, and then edit the condition settings.
- If you want to delete a condition, select the check box next to the name of the condition that you want to delete, and then click Delete.
- Click OK in the conditions settings window.
- Click Save to save the changes.
The edited rule is shown in the list.
Creating a rule for tagging devices automatically
To create a rule for tagging devices automatically:
- View rules for tagging devices automatically.
- Click Add.
A new rule settings window opens.
- Configure the general properties of the rule:
- In the Rule name field, enter the rule name.
The name cannot be more than 256 characters long.
- Do one of the following:
- Enable the rule by switching the toggle button to Rule enabled.
- Disable the rule by switching the toggle button to Rule disabled.
- In the Tag field, enter the new device tag name or select one of the existing device tags from the list.
The name cannot be more than 256 characters long.
- In the Rule name field, enter the rule name.
- In the conditions section, click the Add button to add a new condition.
A new condition settings window open.
- Enter the condition name.
The name cannot be more than 256 characters long. The name must be unique within a rule.
- Set up the triggering of the rule according to the following conditions. You can select multiple conditions.
- Network—Network properties of the device, such as the device name on the Windows network, or device inclusion in a domain or an IP subnet.
If case sensitive collation is set for the database that you use for Kaspersky Security Center, keep case when you specify a device DNS name. Otherwise, the auto-tagging rule will not work.
- Applications—Presence of Network Agent on the device, operating system type, version, and architecture.
- Virtual machines—Device belongs to a specific type of virtual machine.
- Active Directory—Presence of the device in an Active Directory organizational unit and membership of the device in an Active Directory group.
- Applications registry—Presence of applications of different vendors on the device.
- Network—Network properties of the device, such as the device name on the Windows network, or device inclusion in a domain or an IP subnet.
- Click OK to save the changes.
If necessary, you can set multiple conditions for a single rule. In this case, the tag will be assigned to a device if it meets at least one condition.
- Click Save to save the changes.
The newly created rule is enforced on devices managed by the selected Administration Server. If the settings of a device meet the rule conditions, the device is assigned the tag.
Later, the rule is applied in the following cases:
- Automatically and periodically, depending on the server workload
- After you edit the rule
- When you run the rule manually
- After the Administration Server detects a change in the settings of a device that meets the rule conditions or the settings of a group that contains such device
You can create multiple tagging rules. A single device can be assigned multiple tags if you have created multiple tagging rules and if the respective conditions of these rules are met simultaneously. You can view the list of all assigned tags in the device properties.
Running rules for auto-tagging devices
When a rule is run, the tag specified in properties of this rule is assigned to devices that meet conditions specified in properties of the same rule. You can run only active rules.
To run rules for auto-tagging devices:
- View rules for tagging devices automatically.
- Select check boxes next to active rules that you want to run.
- Click the Run rule button.
The selected rules are run.
Deleting a rule for tagging devices automatically
To delete a rule for tagging devices automatically:
- View rules for tagging devices automatically.
- Select the check box next to the rule that you want to delete.
- Click Delete.
- In the window that opens, click Delete again.
The selected rule is deleted. The tag that was specified in properties of this rule is unassigned from all of the devices that it was assigned to.
The unassigned device tag is not deleted. If you want, you can delete it manually.
Managing device tags by using the klscflag utility
This section provides information on how to assign or remove device tags by using the klscflag utility.
Assigning a device tag
Note that you must run the klscflag utility on the client device to which you want to assign a tag.
To assign a tag to your device by using the klscflag utility:
- Enter the following command, using administrator rights:
klscflag -ssvset -pv 1103/1.0.0.0 -s KLNAG_SECTION_TAGS_INFO -n KLCONN_HOST_TAGS -sv "[\"
TAG NAME\"]" -svt ARRAY_T -ss "|ss_type = \"SS_PRODINFO\";"where
TAG NAMEis the name of the tag you want to assign to your device, for example:klscflag -ssvset -pv 1103/1.0.0.0 -s KLNAG_SECTION_TAGS_INFO -n KLCONN_HOST_TAGS -sv "[\"ENTERPRISE\"]" -svt ARRAY_T -ss "|ss_type = \"SS_PRODINFO\";" - Restart the Network Agent service.
The specified tag is assigned to your device. To make sure that the tag is assigned successfully, view tags assigned to the device.
Alternatively, you can assign device tags manually.
Page topRemoving a device tag
If a tag has been assigned to your device by an application or Network Agent, you cannot remove this tag manually. In this case, use the klscflag utility to remove the assigned tag from the device.
Note that you must run the klscflag utility on the client device from which you want to remove a tag.
To remove a tag from the device by using the klscflag utility:
- Enter the following command, using administrator rights:
klscflag -ssvset -pv 1103/1.0.0.0 -s KLNAG_SECTION_TAGS_INFO -n KLCONN_HOST_TAGS -sv "[]" -svt ARRAY_T -ss "|ss_type = \"SS_PRODINFO\";" - Restart the Network Agent service.
The tag is removed from the device.