Contents
- Installation
- Installing a database management system
- Configuring the MariaDB x64 server for working with Kaspersky Security Center 13.1
- Configuring the MySQL x64 server for working with Kaspersky Security Center 13.1
- Installing Kaspersky Security Center 13.1 Web Console
- Installation of Kaspersky Security Center 13.1 Web Console on Linux platforms
- Installing Kaspersky Security Center 13.1 Web Console connected to Administration Server installed on Microsoft failover cluster nodes
- Upgrading Kaspersky Security Center Web Console
- Specifying certificates for trusted Administration Servers in Kaspersky Security Center 13.1 Web Console
- Replacing certificate for Kaspersky Security Center 13.1 Web Console
- Reissuing the certificate for Kaspersky Security Center Web Console
- Converting a PFX certificate to the PEM format
Installation
This section describes installation of Kaspersky Security Center and Kaspersky Security Center 13.1 Web Console.
Installing a database management system
Install the database management system (DBMS) that will be used by Kaspersky Security Center. For this purpose, choose a supported DBMS. You can select, for example, Microsoft SQL Server, MySQL, or MariaDB.
For information about how to install the selected DBMS, refer to its documentation.
If you install MariaDB or MySQL, use the recommended settings to ensure the DBMS functions properly.
Configuring the MariaDB x64 server for working with Kaspersky Security Center 13.1
Kaspersky Security Center 13.1 supports MariaDB DBMS. For more information about supported versions of MariaDB, see section Hardware and software requirements.
If you use the MariaDB server for Kaspersky Security Center, enable support of InnoDB and MEMORY storage and of UTF-8 and UCS-2 encodings.
Recommended settings for the my.ini file
To configure the my.ini file:
- Open the my.ini file in a text editor.
- Add the following lines into the
[mysqld]section of the my.ini file:sort_buffer_size=10M
join_buffer_size=100M
join_buffer_space_limit=300M
join_cache_level=8
tmp_table_size=512M
max_heap_table_size=512M
key_buffer_size=200M
innodb_buffer_pool_size=
<value>innodb_thread_concurrency=20
innodb_flush_log_at_trx_commit=0
innodb_lock_wait_timeout=300
max_allowed_packet=32M
max_connections=151
max_prepared_stmt_count=12800
table_open_cache=60000
table_open_cache_instances=4
table_definition_cache=60000
The value of the
innodb_buffer_pool_sizemust be no less than 80 percent of the expected KAV database size. Note that the specified memory is allocated at server startup. If the database size is smaller than the specified buffer size, only the required memory is allocated. If you use MariaDB 10.4.3 or older, the actual size of allocated memory is approximately 10 percent greater than the specified buffer size.It is recommended to use the parameter value
innodb_flush_log_at_trx_commit=0, because the values "1" or "2" negatively affect the operating speed of MariaDB.
By default, the optimizer add-ons join_cache_incremental, join_cache_hashed, and join_cache_bka are enabled. If these add-ons are not enabled, you must enable them.
To check whether optimizer add-ons are enabled:
- In the MariaDB client console, execute the command:
SELECT @@optimizer_switch; - Check that its output contains the following lines:
join_cache_incremental=onjoin_cache_hashed=onjoin_cache_bka=onIf these lines are present and have the value
on, then the optimizer add-ons are enabled.If these lines are missing or have the value
off, do the following:- Open the my.ini file in a text editor.
- Add the following lines into the
[mysqld]section of the my.ini file:optimizer_switch='join_cache_incremental=on'optimizer_switch='join_cache_hashed=on'optimizer_switch='join_cache_bka=on'
The add-ons join_cache_incremental, join_cache_hash, and join_cache_bka are enabled.
Configuring the MySQL x64 server for working with Kaspersky Security Center 13.1
If you use the MySQL server for Kaspersky Security Center, enable support of InnoDB and MEMORY storage and of UTF-8 and UCS-2 encodings.
Recommended settings for the my.ini file
To configure the my.ini file:
- Open the my.ini file in a text editor.
- Enter the following lines into the my.ini file:
sort_buffer_size = 10Mjoin_buffer_size = 20Mtmp_table_size = 200Mmax_heap_table_size = 200Mkey_buffer_size = 200Minnodb_buffer_pool_size = the real value must be no less than 80% of the expected KAV database sizeinnodb_thread_concurrency = 20innodb_flush_log_at_trx_commit = 0 (in most cases, the server uses small transactions)innodb_lock_wait_timeout = 300max_allowed_packet = 32Mmax_connections = 151max_prepared_stmt_count = 12800table_open_cache = 60000table_open_cache_instances = 4table_definition_cache = 60000The value of the
innodb_buffer_pool_sizemust be no less than 80 percent of the expected KAV database size.It is recommended to use the parameter value
innodb_flush_log_at_trx_commit = 0, because the values "1" or "2" negatively affect the operating speed of MySQL.
Installing Kaspersky Security Center 13.1 Web Console
This section describes how to install Kaspersky Security Center 13.1 Web Console Server (also referred to as Kaspersky Security Center 13.1 Web Console) separately. Before installation, you must install a database management system and the Kaspersky Security Center Administration Server. You can install Kaspersky Security Center 13.1 Web Console either on the same device where Kaspersky Security Center is installed, or on a different one.
To install Kaspersky Security Center 13.1 Web Console:
- Under an account with administrative privileges, run the KSCWebConsoleInstaller.<version number>.<build number>.exe executable file.
This starts the Setup Wizard.
- Select a language for the Setup Wizard.
- In the welcome window, click Next.
- In the License Agreement window, read and accept the terms of the End User License Agreement. The installation continues after you accept the EULA, otherwise, the Next button is unavailable.
- In the Destination folder window, select a folder where Kaspersky Security Center 13.1 Web Console will be installed (by default, %ProgramFiles%\Kaspersky Lab\Kaspersky Security Center Web Console). If such a folder does not exist, it is created automatically during the installation.
You can change the destination folder by using the Browse button.
- In the Kaspersky Security Center 13.1 Web Console connection settings window, specify the following information:
- The address of Kaspersky Security Center 13.1 Web Console (by default, 127.0.0.1).
- The port that Kaspersky Security Center 13.1 Web Console will use for incoming connections, that is, the port that gives access to Kaspersky Security Center 13.1 Web Console from a browser (by default, 8080).
We recommend that you leave the address and the port number as they are.
If you want, you can click Test to make sure if the selected port is available.
If you want to enable logging of Kaspersky Security Center 13.1 Web Console activities, select the appropriate option. If you do not select this option, Kaspersky Security Center 13.1 Web Console log files will not be created.
- In the Account settings window, specify the account names and passwords.
We recommend that you use default accounts.
- In the Client certificate window, select one of the following:
- Generate new certificate. This option is recommended if you do not have a browser certificate.
- Choose existing. You can select this option if you already have a browser certificate; in this case, specify the path to it.
If you choose to generate a new certificate, when you open Kaspersky Security Center 13.1 Web Console, the browser may inform you that the connection to Kaspersky Security Center 13.1 Web Console is not private and the Kaspersky Security Center 13.1 Web Console certificate is invalid. This warning appears because the Kaspersky Security Center 13.1 Web Console certificate is self-signed and automatically generated by Kaspersky Security Center. To remove this warning, you can do one of the following:
- Create a certificate that is trusted in your infrastructure and that meets the requirements for custom certificates. Next, select the Choose existing option in the Client certificate window, and then specify the path to your custom certificate.
- Keep the Generate new certificate option, and then add the Kaspersky Security Center 13.1 Web Console certificate to the list of trusted browser certificates after you install Kaspersky Security Center 13.1 Web Console. We recommend that you use this option only if you cannot create a custom certificate.
Certificates in the PFX format are not supported by Kaspersky Security Center 13.1 Web Console. To use such a certificate, you must first convert it to the supported PEM format by using an OpenSSL-based cross-platform utility, such as OpenSSL for Windows.
- In the Trusted Administration Servers window, make sure that your Administration Server is on the list and click Next to proceed to the last window of the installer.
If you need to add a new Administration Server to the list, click the Add button. In the opened window, specify the properties of a new trusted Administration Server:
- Administration Server name
The Administration Server name that will be displayed in the login window of Kaspersky Security Center 13.1 Web Console.
- Administration Server address
The IP address of the device where you install Administration Server.
- Administration Server port
The OpenAPI port that Kaspersky Security Center 13.1 Web Console uses to connect to Administration Server (default value is 13299).
- Administration Server certificate
The certificate file is stored on the device where Administration Server is installed. The default path to the Administration Server certificate:
- For Windows—%ALLUSERSPROFILE%\Application Data\KasperskyLab\adminkit\1093\cert
- For Linux—/var/opt/kaspersky/klnagent_srv/1093/cert/
If you install Kaspersky Security Center 13.1 Web Console on the same device where Administration Server is installed, use one of the paths given above. Otherwise, copy the certificate file from device where Administration Server is installed to the device where you install Kaspersky Security Center 13.1 Web Console, and then specify the local path to the certificate.
- Administration Server name
- In the last window of the installer, click Install to begin the installation.
After the installation successfully completes, a shortcut appears on your desktop, and you can log in to Kaspersky Security Center 13.1 Web Console.
The Administration Server Quick Start Wizard starts if you did not run it in the Microsoft Management Console based Administration Console.
Troubleshooting
If Kaspersky Security Center 13.1 Web Console is not displayed in your browser at the URL you typed, try the following:
- Check that you specified the correct host name or IP address of the device on which Kaspersky Security Center 13.1 Web Console is installed.
- Check that the device that you want to operate has access to the device on which Kaspersky Security Center 13.1 Web Console is installed.
- Check that firewall settings on the device on which Kaspersky Security Center 13.1 Web Console is installed allow incoming connections through port 8080 and for application node.exe.
- In Windows, open Services. Check that the Kaspersky Security Center 13.1 Web Console service is running.
- Check that you can access Kaspersky Security Center by using Administration Console.
- In Windows, open Event Viewer, and then select Applications and Services Logs → Kaspersky Event Log. Make sure that the log does not contain errors.
Installation of Kaspersky Security Center 13.1 Web Console on Linux platforms
This section explains how to install Kaspersky Security Center 13.1 Web Console Server (also referred to as Kaspersky Security Center 13.1 Web Console) on devices running the Linux operating system (see the list of supported Linux distributions).
Installing Kaspersky Security Center 13.1 Web Console on Linux platforms
This section describes how to install Kaspersky Security Center 13.1 Web Console Server (also referred to as Kaspersky Security Center 13.1 Web Console) on devices running the Linux operating system. Before installation, you must install a database management system and the Kaspersky Security Center Administration Server.
Use the installation file—ksc-web-console-[version_number].deb or ksc-web-console-[version_number].x86_64.rpm—that corresponds to the Linux distribution installed on your device. You receive the installation file by downloading it from the Kaspersky website.
To install Kaspersky Security Center 13.1 Web Console:
- Make sure that the device on which you want to install Kaspersky Security Center 13.1 Web Console is running one of the supported Linux distributions.
- Read the End User License Agreement (EULA). If the Kaspersky Security Center distribution kit does not include a TXT file with the text of EULA, you can download the file from the Kaspersky website. If you do not accept the terms of the License Agreement, do not install the application.
- Create a response file that contains parameters for connecting Kaspersky Security Center 13.1 Web Console to the Administration Server. Name this file ksc-web-console-setup.json and place it in the following directory: /etc/ksc-web-console-setup.json.
Example of a response file containing the minimal set of parameters and the default address and port:
{
"address": "127.0.0.1",
"port": 8080,
"trusted": "127.0.0.1|13299|/var/opt/kaspersky/klnagent_srv/1093/cert/klserver.cer|KSC Server",
"acceptEula": true
}
When you install Kaspersky Security Center 13.1 Web Console on the Linux ALT operating system, you must specify a port number other than 8080, because port 8080 is used by the operating system.
Kaspersky Security Center 13.1 Web Console cannot be updated by using the same .rpm installation file. If you want to change settings in a response file and use this file to reinstall the application, you must first remove the application, and then install it again with the new response file.
- Under an account with root privileges, use the command line to run the setup file with the .deb or .rpm extension, depending on your Linux distribution.
- To install or upgrade Kaspersky Security Center 13.1 Web Console from a .deb file, run the following command:
$ sudo dpkg -i ksc-web-console-[
version_number].deb - To install Kaspersky Security Center 13.1 Web Console from an .rpm file, run the following command:
$ sudo rpm -ivh --nodeps ksc-web-console-[
version_number].x86_64.rpm - To upgrade from a previous version of Kaspersky Security Center Web Console, run one of the following commands:
- For devices running RPM-based operating system:
$ sudo rpm -Uvh --nodeps --force ksc-web-console-[
version_number].x86_64.rpm - For devices running Debian-based operating system:
$ sudo dpkg -i ksc-web-console-[
version_number].x86_64.deb
- For devices running RPM-based operating system:
This starts unpacking of the setup file. Please wait until the installation is complete. Kaspersky Security Center 13.1 Web Console is installed to the following directory: /var/opt/kaspersky/ksc-web-console.
- To install or upgrade Kaspersky Security Center 13.1 Web Console from a .deb file, run the following command:
When the installation is complete, you can use your browser to open and log in to Kaspersky Security Center 13.1 Web Console.
Page topKaspersky Security Center 13.1 Web Console installation parameters
For installing Kaspersky Security Center 13.1 Web Console Server on devices running Linux, you must create a response file in the JSON format, which contains parameters for connecting Kaspersky Security Center 13.1 Web Console to the Administration Server.
Example of a response file containing the minimal set of parameters and the default address and port:
{
"address": "127.0.0.1",
"port": 8080,
"defaultLangId": 1049,
"enableLog": false,
"trusted": "127.0.0.1|13299|/var/opt/kaspersky/klnagent_srv/1093/cert/klserver.cer|KSC Server",
"acceptEula": true,
"certPath": "/var/opt/kaspersky/klnagent_srv/1093/cert/klserver.cer",
"webConsoleAccount": "Group1:User1",
"managementServiceAccount": "Group1:User2",
"serviceWebConsoleAccount": "Group1:User3",
"pluginAccount": "Group1:User4",
"messageQueueAccount": "Group1:User5"
}
When you install Kaspersky Security Center 13.1 Web Console on the Linux ALT operating system, you must specify a port number other than 8080, because port 8080 is used by the operating system.
The table below describes the parameters that can be specified in a response file.
Parameters for installing Kaspersky Security Center 13.1 Web Console on devices running Linux
Parameter |
Description |
Available values |
|---|---|---|
|
Address of Kaspersky Security Center 13.1 Web Console Server (required). |
String value. |
|
Number of port that Kaspersky Security Center 13.1 Web Console Server uses to connect to the Administration Server (required). |
Numerical value. |
|
Language of user interface (by default, |
Numerical code of the language:
If no value is specified, then English language is used. |
|
Whether or not to enable Kaspersky Security Center 13.1 Web Console activity logging. |
Boolean value:
|
|
List of trusted Administration Servers allowed to connect to Kaspersky Security Center 13.1 Web Console (required). Each Administration Server must be defined with the following parameters:
The parameters are separated with vertical bars. If several Administration Servers are specified, separate them with two vertical bars (pipes). |
String value in the following format:
Example:
|
|
Whether or not you want to accept the terms of the End User License Agreement (EULA). The file containing the terms of the EULA is downloaded together with the installation file (required). |
Boolean value:
|
|
If you want to generate a new certificate, use this parameter to specify the domain name for which a new certificate is to be generated. |
String value. |
|
If you want to use an existing certificate, use this parameter to specify the path to the certificate file. |
String value. Specify the path |
|
If you want to use an existing certificate, use this parameter to specify path to the key file. |
String value. |
|
Name of the account under which the KSCWebConsole service is run. |
String value in the following format: Example: If no value is specified, the Kaspersky Security Center 13.1 Web Console installer creates a new account with the default name |
|
Name of the privileged account under which the KSCWebConsoleManagement service is run. |
String value in the following format: Example: If no value is specified, the Kaspersky Security Center 13.1 Web Console installer creates a new account with the default name |
|
Name of the account under which the KSCSvcWebConsole service is run. |
String value in the following format: Example: If no value is specified, the Kaspersky Security Center 13.1 Web Console installer creates a new account with the default name |
|
Name of the account under which the KSCWebConsolePlugin service is run. |
String value in the following format: Example: If no value is specified, the Kaspersky Security Center 13.1 Web Console installer creates a new account with the default name |
|
Name of the account under which the KSCWebConsoleMessageQueue service is run. |
String value in the following format: Example: If no value is specified, the Kaspersky Security Center 13.1 Web Console installer creates a new account with the default name |
If you specify the webConsoleAccount, managementServiceAccount, serviceWebConsoleAccount, pluginAccount, or messageQueueAccount parameters, make sure that the custom user accounts belong to the same security group. If these parameters are not specified, the Kaspersky Security Center 13.1 Web Console installer creates a default security group, and then creates user accounts with default names in this group.
Installing Kaspersky Security Center 13.1 Web Console connected to Administration Server installed on Microsoft failover cluster nodes
This section describes how to install Kaspersky Security Center 13.1 Web Console Server (hereinafter also referred to as Kaspersky Security Center 13.1 Web Console), that connects to Administration Server installed on Microsoft failover cluster nodes. Prior to installing Kaspersky Security Center 13.1 Web Console, install a database management system and Kaspersky Security Center Administration Server on Microsoft failover cluster nodes.
We do not recommend installing Kaspersky Security Center 13.1 Web Console on a cluster node. In case of node failure, you will lose access to Administration Server.
To install Kaspersky Security Center 13.1 Web Console that connects to Administration Server installed on Microsoft failover cluster nodes:
- Perform the steps of the Kaspersky Security Center 13.1 Web Console installation, starting from step 1 to step 8.
- At step 9, in the Trusted Administration Servers window, click the Add button to add a Microsoft failover cluster as a trusted Administration Server.
In the opened window, specify the following properties:
- Administration Server name
The cluster name that will be displayed in the login window of Kaspersky Security Center 13.1 Web Console.
- Administration Server address
The cluster address that you obtained when creating the Microsoft failover cluster.
- Administration Server port
The OpenAPI port that Kaspersky Security Center 13.1 Web Console uses to connect to Administration Server (default value is 13299).
- Administration Server certificate
The Administration Server certificate is located in the shared data storage of the Microsoft failover cluster. The default path to the certificate file: <shared data folder>\1093\cert\klserver.cer. Copy the certificate file from the shared data storage to the device where you install Kaspersky Security Center 13.1 Web Console. Specify the local path to the Administration Server certificate.
- Administration Server name
- Continue with the standard installation of Kaspersky Security Center 13.1 Web Console.
After the installation is complete, a shortcut appears on your desktop and you can log in to Kaspersky Security Center 13.1 Web Console.
Page topUpgrading Kaspersky Security Center Web Console
If you want to use a newer version of Kaspersky Security Center Web Console without removing your currently installed instance, you can use the standard upgrade procedure provided in the Kaspersky Security Center Web Console installer.
To upgrade Kaspersky Security Center Web Console:
- Under an account with administrator rights, run the KSCWebConsoleInstaller.<build number>.exe executable file, where <build number> stands for a Kaspersky Security Center Web Console build whose number is later than that of your currently installed instance.
- In the Setup Wizard window that opens, select a language, and then click OK.
- In the welcome window, select the Upgrade option, and then click Next.
- In the License Agreement window, read and accept the terms of the End User License Agreement. The installation continues after you accept the EULA; otherwise, the Next button is unavailable.
- Progress through the steps of the Setup Wizard until you finish the installation. When progressing, you can also modify the Kaspersky Security Center Web Console settings that you specified during the previous installation. When you reach the Ready for Kaspersky Security Center 13.1 Web Console modification step, click the Upgrade button. Wait until the new settings are applied and on the next step of the Setup Wizard, click Finish. You can also click the Start Kaspersky Security Center 13.1 Web Console in your browser link to start the upgraded instance of Kaspersky Security Center Web Console immediately.
Modifying the Kaspersky Security Center Web Console settings during the upgrade is only available in Kaspersky Security Center Web Console version 12.2 or later.
Your Kaspersky Security Center Web Console instance is upgraded.
Specifying certificates for trusted Administration Servers in Kaspersky Security Center 13.1 Web Console
The existing Administration Server certificate is automatically replaced with a new one before the certificate expiration date. You can also replace the existing Administration Server certificate with a custom one. Every time the certificate is changed, the new certificate must be specified in the settings of Kaspersky Security Center 13.1 Web Console. Otherwise, Kaspersky Security Center 13.1 Web Console will not be able to connect to the Administration Server.
If Kaspersky Security Center 13.1 Web Console and the Administration Server are installed on the same device, Kaspersky Security Center 13.1 Web Console receives the new certificate automatically. If Kaspersky Security Center 13.1 Web Console is installed on a different device, you must specify the local path to the new Administration Server certificate.
To specify a new certificate for the Administration Server:
- On the device where the Administration Server is installed, copy the certificate file, for example, to a mass storage device.
By default, the certificate file is stored in the following folder:
- For Windows—%ALLUSERSPROFILE%\Application Data\KasperskyLab\adminkit\1093\cert
- For Linux—/var/opt/kaspersky/klnagent_srv/1093/cert/
- On the device where Kaspersky Security Center 13.1 Web Console is installed, place the certificate file in a local folder.
- Run the KSCWebConsoleInstaller.<build number>.exe executable file under an account with administrative privileges.
This starts the Setup Wizard.
- On the first page of the Wizard, select the Upgrade option.
Follow the instructions of the Wizard.
- On the Trusted Administration Servers page of the Wizard, select the required Administration Server and click the Edit button.
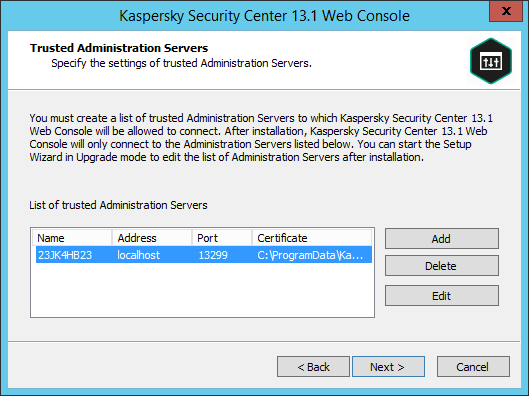
Specifying trusted Administration Servers
- In the Edit Administration Server window that opens, click the Browse button, specify the path to the new certificate file, and then click the Update button to apply changes.
- On the Ready for Kaspersky Security Center 13.1 Web Console installation page of the Wizard, click the Upgrade button to start the upgrade.
- After the application reconfiguration successfully completes, click the Finish button.
- Log in to Kaspersky Security Center 13.1 Web Console.
Kaspersky Security Center 13.1 Web Console works with the specified certificate.
Replacing certificate for Kaspersky Security Center 13.1 Web Console
By default, when you install Kaspersky Security Center 13.1 Web Console Server, a browser certificate for the application is generated automatically. You can replace the automatically generated certificate with a custom one.
To replace the certificate for Kaspersky Security Center 13.1 Web Console Server with a custom one:
- On the device where Kaspersky Security Center 13.1 Web Console Server is installed, run the ksc-web-console-<version number>.<build number>.exe executable file under an account with administrative privileges.
This starts the Setup Wizard.
- On the first page of the Wizard, select the Upgrade option.
- On the Modification type page, select the Edit connection settings option.
- On the Client certificate page, select the Choose existing certificate option and specify the path to the custom certificate.
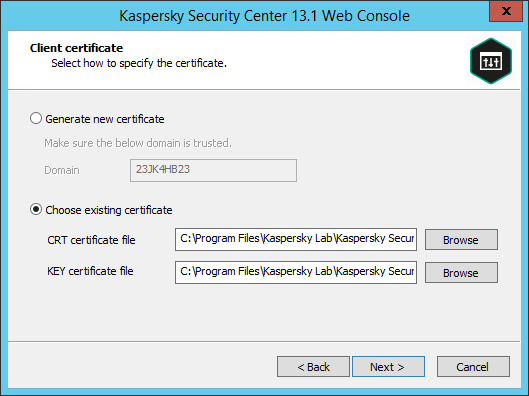
Specifying client certificate
- On the last page of the Wizard, click Modify to apply the new settings.
- After the application reconfiguration successfully completes, click the Finish button.
Kaspersky Security Center 13.1 Web Console works with the specified certificate.
Page topReissuing the certificate for Kaspersky Security Center Web Console
Most browsers impose a limit on the validity term of a certificate. To fall within this limit, the validity term of the Kaspersky Security Center Web Console certificate is limited to 397 days. You can replace an existing certificate received from a certification authority (CA) by issuing a new self-signed certificate manually. Alternatively, you can reissue your expired Kaspersky Security Center Web Console certificate.
If you already use a self-signed certificate, you can also reissue it by upgrading Kaspersky Security Center Web Console through the standard procedure in the installer (Upgrade option).
When you open the Web Console, the browser may inform you that the connection to the Web Console is not private and the Web Console certificate is invalid. This warning appears because the Web Console certificate is self-signed and automatically generated by Kaspersky Security Center. To remove or prevent this warning, you can do one of the following:
- Specify a custom certificate when you reissue it (recommended option). Create a certificate that is trusted in your infrastructure and that meets the requirements for custom certificates.
- Add the Web Console certificate to the list of trusted browser certificates after you reissue the certificate. We recommend that you use this option only if you cannot create a custom certificate.
To issue a new certificate when you install Kaspersky Security Center Web Console for the first time:
- Run the routine installation of Kaspersky Security Center Web Console.
- When you reach the Client certificate step of the Setup Wizard, select the Generate new certificate option, and then click the Next button.
- Progress through the remaining steps of the Setup Wizard until you finish the installation.
A new certificate for Kaspersky Security Center Web Console is issued with a validity term of 397 days.
To reissue the expired Kaspersky Security Center Web Console certificate:
- Under an account with administrator rights, run the KSCWebConsoleInstaller.<build number>.exe executable file.
- In the Setup Wizard window that opens, select a language, and then click OK.
- In the welcome window, select the Reissue certificate option, and then click Next.
- On the next step, wait until the reconfiguration of Kaspersky Security Center Web Console is complete, and then click Finish.
The Kaspersky Security Center Web Console certificate is reissued for another validity term of 397 days.
If you use Identity and Access Manager, you must also reissue all the TLS certificates for the ports that Identity and Access Manager uses. Kaspersky Security Center Web Console displays a notification when a certificate expires. You must follow the notification instructions.
Converting a PFX certificate to the PEM format
To use a PFX certificate in Kaspersky Security Center 13.1 Web Console, you must first convert it to the PEM format by using any convenient OpenSSL-based cross-platform utility.
To convert a PFX certificate to the PEM format in the Windows operating system:
- In an OpenSSL-based cross-platform utility, execute the following commands:
openssl pkcs12 -in <filename.pfx> -clcerts -nokeys -out server.crtopenssl pkcs12 -in <filename.pfx> -nocerts -nodes -out key.pemAs a result, you get a public key as a .crt file and a private key as a passphrase-protected .pem file.
- Make sure that the .crt and .pem files are generated to the same folder where the .pfx file is stored.
- If the .crt or .pem file contains the "Bag Attributes", delete these attributes by using any convenient text editor, and then save the file.
- Restart the Windows service.
- Kaspersky Security Center 13.1 Web Console does not support passphrase-protected certificates. Therefore, run the following command in an OpenSSL-based cross-platform utility to remove a passphrase from the .pem file:
openssl rsa -in key.pem -out key-without-passphrase.pemDo not use the same name for the input and output .pem files.
As a result, the new .pem file is unencrypted. You do not have to enter a passphrase to use it.
The .crt and .pem files are ready to use, so you can specify them in the Kaspersky Security Center 13.1 Web Console installer.
To convert a PFX certificate to the PEM format in the Linux operating system:
- In an OpenSSL-based cross-platform utility, execute the following commands:
openssl pkcs12 -in <filename.pfx> -clcerts -nokeys | sed -ne '/-BEGIN CERTIFICATE-/,/-END CERTIFICATE-/p' > server.crtopenssl pkcs12 -in <filename.pfx> -nocerts -nodes | sed -ne '/-BEGIN PRIVATE KEY-/,/-END PRIVATE KEY-/p' > key.pem - Make sure that the certificate file and the private key are generated to the same directory where the .pfx file is stored.
- Kaspersky Security Center 13.1 Web Console does not support passphrase-protected certificates. Therefore, run the following command in an OpenSSL-based cross-platform utility to remove a passphrase from the .pem file:
openssl rsa -in key.pem -out key-without-passphrase.pemDo not use the same name for the input and output .pem files.
As a result, the new .pem file is unencrypted. You do not have to enter a passphrase to use it.
The .crt and .pem files are ready to use, so you can specify them in the Kaspersky Security Center 13.1 Web Console installer.
Page top