Contents
- Best Practices for Service Providers
- Planning Kaspersky Security Center deployment
- Deployment and initial setup
- Recommendations on Administration Server installation
- Configuring protection on a client organization's network
- Manual setup of Kaspersky Endpoint Security policy
- Manual setup of the group update task for Kaspersky Endpoint Security
- Manual setup of the group task for scanning a device with Kaspersky Endpoint Security
- Scheduling the Find vulnerabilities and required updates task
- Manual setup of the group task for updates installation and vulnerabilities fix
- Building a structure of administration groups and assigning distribution points
- Hierarchy of policies, using policy profiles
- Tasks
- Device moving rules
- Software categorization
- About multi-tenant applications
- Backup and restoration of Administration Server settings
- Deploying Network Agent and the security application
- Initial deployment
- Configuring installers
- Installation packages
- MSI properties and transform files
- Deployment with third-party tools for remote installation of applications
- General information about the remote installation tasks in Kaspersky Security Center
- Deployment using group policies of Microsoft Windows
- Forced deployment through the remote installation task of Kaspersky Security Center
- Running stand-alone packages created by Kaspersky Security Center
- Options for manual installation of applications
- Remote installation of applications on devices with Network Agent installed
- Managing device restarts in the remote installation task
- Suitability of databases updating in an installation package of an anti-virus application
- Removing incompatible third-party security applications
- Using tools for remote installation of applications in Kaspersky Security Center for running relevant executable files on managed devices
- Monitoring the deployment
- Configuring installers
- Virtual infrastructure
- Support of file system rollback for devices with Network Agent
- Initial deployment
- About connection profiles for out-of-office users
- Deploying the Mobile Device Management feature
- Other routine work
Best Practices for Service Providers
This section provides information about how to configure and use Kaspersky Security Center.
This section contains recommendations on how to deploy, configure, and use the application, as well as describes ways of resolving typical issues in the application operation.
Planning Kaspersky Security Center deployment
When planning the deployment of Kaspersky Security Center components on an organization's network, you must take into account the size and scope of the project; specifically, the following factors:
- Total number of devices
- Number of MSP clients
One Administration Server can support a maximum of 100,000 devices. If the total number of devices on an organization's network exceeds 100,000, multiple Administration Servers must be deployed on the service provider side and combined into a hierarchy for convenient centralized management.
Up to 500 virtual servers can be created on a single Administration Server, so an individual Administration Server is required for each 500 MSP clients.
At the stage of deployment planning, the assignment of the special certificate X.509 to the Administration Server must be considered. Assignment of the X.509 certificate to the Administration Server may be useful in the following cases (partial list):
- Inspecting secure socket layer (SSL) traffic by means of an SSL termination proxy
- Specifying required values in certificate fields
- Providing the required encryption strength of a certificate
Providing internet access to the Administration Server
To allow devices on the client network to access the Administration Server over the internet, you have to make available the following Administration Server ports:
- 13000 TCP—Administration Server TLS port for connecting Network Agents deployed on the client network
- 8061 TCP—HTTPS port for publishing stand-alone packages using Administration Console tools
- 8060 TCP—HTTP port for publishing stand-alone packages using Administration Console tools
- 13292 TCP—TLS port required only if there are mobile devices that need to be managed
If you need to provide clients with basic options of network administration through Kaspersky Security Center 13.1 Web Console, you also have to open the following Kaspersky Security Center 13.1 Web Console ports:
- 8081 TCP—HTTPS port
- 8080 TCP—HTTP port
Kaspersky Security Center standard configuration
One or several Administration Servers are deployed on the MSPs' servers. The number of Administration Servers can be selected either based on available hardware, or on the total number of MSP clients served or total number of managed devices.
One Administration Server can support up to 100,000 devices. You must consider the possibility of increasing the number of managed devices in the near future: it may be useful to connect a slightly smaller number of devices to a single Administration Server.
Up to 500 virtual servers can be created on a single Administration Server, so an individual Administration Server is required for each 500 MSP clients.
If multiple Servers are used, it is recommended that you combine them into a hierarchy. Using a hierarchy of Administration Servers allows you to avoid dubbed policies and tasks, handle the whole set of managed devices, as if they are managed by a single Administration Server: i.e., search for devices, build selections of devices, and create reports.
On each virtual server that corresponds to an MSP client, you must assign one or several distribution point(s). If MSP clients and the Administration Server are linked through the internet, it may be useful to create a Download updates to the repositories of distribution points task for the distribution points, so that they will download updates directly from Kaspersky servers, not from the Administration Server.
If some devices in the MSP client network have no direct internet access, you have to switch the distribution points to the connection gateway mode. In this case, Network Agents on devices on the MSP client network will be connected, for further synchronization, to the Administration Server—but through the gateway, not directly.
As the Administration Server, most probably, will not be able to poll the on the MSP client network, it may be useful to turn this function over to a distribution point.
The Administration Server will not be able to send notifications to port 15000 UDP to managed devices located behind the NAT on the MSP client network. To resolve this issue, it may be useful to enable the mode of continuous connection to the Administration Server in the properties of devices acting as distribution points and running in connection gateway mode (Do not disconnect from the Administration Server check box). The continuous connection mode is available if the total number of distribution points does not exceed 300.
Page topAbout distribution points
Device with Network Agent installed can be used as distribution point. In this mode, Network Agent can perform the following functions:
- Distribute updates (these can be retrieved either from the Administration Server or from Kaspersky servers). In the latter case, the Download updates to the repositories of distribution points task must be created for the device serving as the distribution point.
- Install software (including initial deployment of Network Agents) on other devices.
- Poll the network to detect new devices and update information about existing ones. A distribution point can apply the same device discovery methods as the Administration Server.
Deployment of distribution points on an organization's network pursues the following objectives:
- Reduce the load on the Administration Server if it functions as the update source.
- Optimize internet traffic since, in this case, each device on the MSP client network does not have to access Kaspersky servers or the Administration Server for updates.
- Provide the Administration Server access to devices behind the NAT (relative to the Administration Server) of the MSP client network, which allows the Administration Server to perform the following actions:
- Send notifications to devices over UDP.
- Poll the network.
- Perform initial deployment.
A distribution point is assigned for an administration group. In this case, the distribution point's scope includes all devices within the administration group and all of its subgroups. However, the device acting as the distribution point does not have to be included in the administration group to which it has been assigned.
You can make a distribution point function as a connection gateway. In this case, devices in the scope of this distribution point will be connected to the Administration Server through the gateway, not directly. You can use this mode in scenarios that do not allow the establishment of a direct connection between devices with Network Agent and an Administration Server.
Devices functioning as distribution points must be protected, including physical protection, against any unauthorized access.
Hierarchy of Administration Servers
An MSP may run multiple Administration Servers. It can be inconvenient to administer several separate Administration Servers, so a hierarchy can be applied. A "primary/secondary" configuration for two Administration Servers provides the following options:
- A secondary Administration Server inherits policies and tasks from the primary Administration Server, thus preventing duplication of settings.
- Selections of devices on the primary Administration Server can include devices from secondary Administration Servers.
- Reports on the primary Administration Server can contain data (including detailed information) from secondary Administration Servers.
Virtual Administration Servers
On the basis of a physical Administration Server, multiple virtual Administration Servers can be created, which will be similar to secondary Administration Servers. Compared to the discretionary access model, which is based on access control lists (ACLs), the virtual Administration Server model is more functional and provides a larger degree of isolation. In addition to a dedicated structure of administration groups for assigned devices with policies and tasks, each virtual Administration Server features its own group of unassigned devices, own sets of reports, selected devices and events, installation packages, moving rules, etc. For maximum mutual isolation of MSP clients, we recommend that you choose virtual Administration Servers as the functionality to be used. In addition, creating a virtual Administration Server for each MSP client allows you to provide clients basic options of network administration through Kaspersky Security Center 13.1 Web Console.
Virtual Administration Servers are very similar to secondary Administration Servers, but with the following distinctions:
- A virtual Administration Server lacks most global settings and its own TCP ports.
- A virtual Administration Server has no secondary Administration Servers.
- A virtual Administration Server has no other virtual Administration Servers.
- A physical Administration Server views devices, groups, events, and objects on managed devices (items in Quarantine, applications registry, etc.) of all its virtual Administration Servers.
- A virtual Administration Server can only scan the network with distribution points connected.
Managing mobile devices with Kaspersky Endpoint Security for Android
Mobile devices with installed Kaspersky Endpoint Security for Android (hereinafter referred to as KES devices) are managed by means of the Administration Server. Kaspersky Security Center 10 Service Pack 1, as well as later versions, supports the following features for managing KES devices:
- Handling mobile devices as client devices:
- Membership in administration groups
- Monitoring, such as viewing statuses, events, and reports
- Modifying local settings and assigning policies for Kaspersky Endpoint Security for Android
- Sending commands in centralized mode
- Installing mobile apps packages remotely
Administration Server manages KES devices through TLS, TCP port 13292.
Deployment and initial setup
Kaspersky Security Center is a distributed application. Kaspersky Security Center includes the following applications:
- Administration Server—The core component, designed for managing devices of an organization and storing data in a DBMS.
- Administration Console—The basic tool for the administrator. Administration Console is shipped together with Administration Server, but it can also be installed individually on one or several devices run by the administrator.
- Kaspersky Security Center 13.1 Web Console—A web interface for Administration Server designed for basic operations. You can install this component on any device that meets the hardware and software requirements.
- Network Agent—Designed for managing the security application installed on a device, as well as getting information about that device. Network Agents are installed on devices of an organization.
Deployment of Kaspersky Security Center on an organization's network is performed as follows:
- Installation of Administration Server
- Installation of Kaspersky Security Center 13.1 Web Console
- Installation of Administration Console on the administrator's device
- Installation of Network Agent and the security application on devices of the enterprise
Recommendations on Administration Server installation
This section contains recommendations on how to install Administration Server. This section also provides scenarios for using a shared folder on the Administration Server device in order to deploy Network Agent on client devices.
Creating accounts for the Administration Server services on a failover cluster
By default, the installer automatically creates non-privileged accounts for services of Administration Server. This behavior is the most convenient for Administration Server installation on an ordinary device.
However, installation of Administration Server on a failover cluster requires a different scenario:
- Create non-privileged domain accounts for services of Administration Server and make them members of a global domain security group named KLAdmins.
- In the Administration Server Installer, specify the domain accounts that have been created for the services.
Selecting a DBMS
When installing Administration Server, you can select the DBMS that Administration Server will use. When selecting the database management system (DBMS) to be used by an Administration Server, you must take into account the number of devices covered by the Administration Server.
The following table lists the valid DBMS options, as well as the restrictions on their use.
Restrictions on DBMS
DBMS |
Restrictions |
|---|---|
SQL Server Express Edition 2012 or later |
Not recommended if you intend to run a single Administration Server for more than 10,000 devices or to use Application Control. |
Local SQL Server edition, other than Express, 2012 or later |
No limitations. |
Remote SQL Server edition, other than Express, 2012 or later |
Only valid if both devices are in the same Windows domain; if the domains differ, a two-way trust relationship must be established between them. |
Local or remote MySQL 5.5, 5.6, or 5.7 (MySQL versions 5.5.1, 5.5.2, 5.5.3, 5.5.4, and 5.5.5 are no longer supported) |
Not recommended if you intend to run a single Administration Server for more than 10,000 devices or to use Application Control. |
Local or remote MariaDB Server 10.3, MariaDB 10.3 (build 10.3.22 or later) |
Not recommended if you intend to run a single Administration Server for more than 20,000 devices or to use Application Control. |
If you are using SQL Server 2019 as a DBMS and you do not have cumulative patch CU12 or later, you have to perform the following after installing Kaspersky Security Center:
- Connect to SQL Server using SQL Management Studio.
- Run the following commands (if you chose a different name for the database, use that name instead of KAV):
USE KAVGOALTER DATABASE SCOPED CONFIGURATION SET TSQL_SCALAR_UDF_INLINING = OFFGO - Restart the SQL Server 2019 service.
Otherwise, using SQL Server 2019 may result in errors, such as "There is insufficient system memory in resource pool 'internal' to run this query."
Concurrent use of the SQL Server Express Edition DBMS by Administration Server and another application is strictly forbidden.
Specifying the address of the Administration Server
When installing Administration Server, you must specify the external address of the Administration Server. This address will be used as the default address when creating installation packages of Network Agent. After that, you will be able to change the address of the Administration Server host by using Administration Console tools; the address will not change automatically in Network Agent installation packages that have been already created.
Configuring protection on a client organization's network
After Administration Server installation is complete, Administration Console launches and prompts you to perform the initial setup through the relevant wizard. When the Quick Start Wizard is running, the following policies and tasks are created in the root administration group:
- Policy of Kaspersky Endpoint Security
- Group task for updating Kaspersky Endpoint Security
- Group task for scanning a device with Kaspersky Endpoint Security
- Policy of Network Agent
- Vulnerability scan task (task of Network Agent)
- Updates installation and vulnerabilities fix task (task of Network Agent)
Policies and tasks are created with the default settings, which may turn out to be sub-optimal or even inadmissible for the organization. Therefore, you must check the properties of objects that have been created and modify them manually, if necessary.
This section contains information about manual configuration of policies, tasks, and other settings of Administration Server, and information about the distribution point, building an administration group structure and hierarchy of tasks, and other settings.
Manual setup of Kaspersky Endpoint Security policy
This section provides recommendations on how to configure the Kaspersky Endpoint Security policy, which is created by the Quick Start Wizard. You can perform the setup in the policy properties window.
When editing a setting, please keep in mind that you must click the lock icon above the relevant setting in order to allow using its value on a workstation.
Configuring the policy in the Advanced Threat Protection section
For a full description of the settings in this section, please refer to the Kaspersky Endpoint Security for Windows documentation.
In the Advanced Threat Protection section, you can configure the use of Kaspersky Security Network for Kaspersky Endpoint Security for Windows. You can also configure Kaspersky Endpoint Security for Windows modules, such as Behavior Detection, Exploit Prevention, Host Intrusion Prevention, and Remediation Engine.
In the Kaspersky Security Network subsection, we recommend that you enable the Use KSN Proxy option. Using this option helps to redistribute and optimize traffic on the network. If the Use KSN Proxy option is disabled, you can enable direct use of KSN servers.
Configuring the policy in the Essential Threat Protection section
For a full description of the settings in this section, please refer to the Kaspersky Endpoint Security for Windows documentation.
In the Essential Threat Protection section of the policy properties window, we recommend that you specify additional settings in the Firewall and File Threat Protection subsections.
The Firewall subsection contains settings that allow you to control the network activity of applications on the client devices. A client device uses a network to which one of the following statuses is assigned: public, local, or trusted. Depending on the network status, Kaspersky Endpoint Security can allow or deny network activity on a device. When you add a new network to your organization, you must assign an appropriate network status to it. For example, if the client device is a laptop, we recommend that this device use the public or trusted network, because the laptop is not always connected to the local network. In the Firewall subsection, you can check whether you correctly assigned statuses to the networks used in your organization.
To check the list of networks:
- In the policy properties, go to Essential Threat Protection → Firewall.
- In the Available networks section, click the Settings button.
- In the Firewall window that opens, go to the Networks tab to view the list of networks.
In the File Threat Protection subsection, you can disable the scanning of network drives. Scanning network drives can place a significant load on network drives. It is more convenient to perform indirect scanning, on file servers.
To disable scanning of network drives:
- In the policy properties, go to Essential Threat Protection → File Threat Protection.
- In the Security level section, click the Settings button.
- In the File Threat Protection window that opens, on the General tab clear the All network drives check box.
Configuring the policy in the General Settings section
For a full description of the settings in this section, please refer to the Kaspersky Endpoint Security for Windows documentation.
In the General Settings section of the policy properties window, we recommend that you specify additional settings in the Reports and Storage and Interface subsections.
In the Reports and Storage subsection, go to the Data transfer to Administration Server section. The About started application check box specifies whether the Administration Server database saves information about all versions of all software modules on the networked devices. If this check box is selected, the saved information may require a significant amount of disk space in the Kaspersky Security Center database (dozens of gigabytes). Clear the About started applications check box if it is selected in the top-level policy.
If Administration Console manages the Anti-Virus protection on the organization's network in centralized mode, disable the display of the Kaspersky Endpoint Security for Windows user interface on workstations. To do this, in the Interface subsection, go to the Interaction with user section, and then select Do not display option.
To enable password protection on workstations, in the Interface subsection, go to the Password protection section, click the Settings button, and then select the Enable password protection check box.
Configuring the policy in the Event configuration section
In the Event configuration section, you should disable the saving of any events on Administration Server, except for the following ones:
- On the Critical event tab:
- Application autorun is disabled
- Access denied
- Application startup prohibited
- Disinfection not possible
- License Agreement violated
- Could not load encryption module
- Cannot start two tasks at the same time
- Active threat detected. Start Advanced Disinfection
- Network attack detected
- Not all components were updated
- Activation error
- Error enabling portable mode
- Error in interaction with Kaspersky Security Center
- Error disabling portable mode
- Error changing application components
- Error applying file encryption / decryption rules
- Policy cannot be applied
- Process terminated
- Network activity blocked
- On the Functional failure tab: Invalid task settings. Settings not applied
- On the Warning tab:
- Self-Defense is disabled
- Incorrect reserve key
- User has opted out of the encryption policy
- On the Info tab: Application startup prohibited in test mode
Manual setup of the group update task for Kaspersky Endpoint Security
Information from this subsection is only applicable to Kaspersky Security Center 10 Maintenance Release 1 and later versions.
If the Administration Server acts as the update source, the optimal and recommended schedule option for Kaspersky Endpoint Security 10 and later versions is When new updates are downloaded to the repository with the Use automatically randomized delay for task starts check box selected.
For a group update task in Kaspersky Endpoint Security version 8 you must explicitly specify the launch delay (1 hour or longer) and select the Use automatically randomized delay for task starts check box.
If a local task for downloading updates from Kaspersky servers to the repository is created on each distribution point, periodic scheduling will be optimal and recommended for the Kaspersky Endpoint Security group update task. In this case, the randomization interval value should be set on 1 hour.
Page topManual setup of the group task for scanning a device with Kaspersky Endpoint Security
The Quick Start Wizard creates a group task for scanning a device. By default, the task is assigned a Run on Fridays at 7:00 PM schedule with automatic randomization, and the Run missed tasks check box is cleared.
This means that if devices in an organization are shut down on Fridays, for example, at 6:30 PM, the device scan task will never run. You must set up the most convenient schedule for this task based on the workplace rules adopted in the organization.
Scheduling the Find vulnerabilities and required updates task
The Quick Start Wizard creates the Find vulnerabilities and required updates task for Network Agent. By default, the task is assigned a Run on Tuesdays at 7:00 PM schedule with automatic randomization, and the Run missed tasks check box is selected.
If the organization's workplace rules provide for shutting down all devices at this time, the Find vulnerabilities and required updates task will run after the devices are turned on again, that is, on Wednesday morning. Such activity may be undesirable because a vulnerability scan may increase the load on CPUs and disk subsystems. You must set up the most convenient schedule for the task based on the workplace rules adopted in the organization.
Manual setup of the group task for updates installation and vulnerabilities fix
The Quick Start Wizard creates a group task for updates installation and vulnerabilities fix for Network Agent. By default, the task is set up to run every day at 01:00 AM, with automatic randomization, and the Run missed tasks option is not enabled.
If the organization's workplace rules provide for shutting down devices overnight, the update installation will never run. You must set up the most convenient schedule for the vulnerability scan task based on the workplace rules adopted in the organization. It is also important to keep in mind that installation of updates may require restarting the device.
Building a structure of administration groups and assigning distribution points
A structure of administration groups in Kaspersky Security Center performs the following functions:
- Sets the scope of policies.
There is an alternate way of applying relevant settings on devices, by using policy profiles. In this case, the scope of policies is set with tags, device locations in Active Directory organizational units, membership in Active Directory security groups, etc.
- Sets the scope of group tasks.
There is an approach to defining the scope of group tasks that is not based on a hierarchy of administration groups: use of tasks for device selections and tasks for specific devices.
- Sets access rights to devices, virtual Administration Servers, and secondary Administration Servers.
- Assigns distribution points.
When building the structure of administration groups, you must take into account the topology of the organization's network for the optimum assignment of distribution points. The optimum distribution of distribution points allows you to save traffic on the organization's network.
Depending on the organizational schema and network topology adopted by the MSP client, the following standard configurations can be applied to the structure of administration groups:
- Single office
- Multiple small detached offices
Standard MSP client configuration: Single office
In a standard "single-office" configuration, all devices are on the organization's network so they can "see" each other. The organization's network may consist of a few separate parts (networks or network segments) linked by narrow channels.
The following methods of building the structure of administration groups are possible:
- Building the structure of administration groups taking into account the network topology. The structure of administration groups may not reflect the network topology with absolute precision. A match between the separate parts of the network and certain administration groups would be enough. You can use automatic assignment of distribution points or assign them manually.
- Building the structure of administration groups, without taking the network topology into account. In this case, you must disable automatic assignment of distribution points and then assign one or several devices to act as distribution points for a root administration group in each of the separate parts of the network, for example, for the Managed devices group. All distribution points will be at the same level and will feature the same scope spanning all devices on the organization's network. In this case, each of Network Agents will connect to the distribution point that has the shortest route. The route to a distribution point can be traced with the tracert utility.
Standard MSP client configuration: Multiple small remote offices
This standard configuration provides for a number of small remote offices, which may be communicated with the head office via the internet. Each remote office is located behind the NAT, that is, connection from one remote office to another is not possible because offices are isolated from one another.
The configuration must be reflected in the structure of administration groups: a separate administration group must be created for each remote office (groups Office 1 and Office 2 in the figure below).
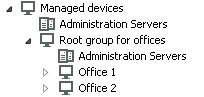
Remote offices are included in the administration group structure
One or multiple distribution points must be assigned to each administration group corresponding to an office. Distribution points must be devices at the remote office that have a sufficient amount of free disk space. Devices deployed in the Office 1 group, for example, will access distribution points assigned to the Office 1 administration group.
If some users move between offices physically, with their laptops, you must select two or more devices (in addition to the existing distribution points) in each remote office and assign them to act as distribution points for a top-level administration group (Root group for offices in the figure above).
Example: A laptop is deployed in the Office 1 administration group and then is moved physically to the office that corresponds to the Office 2 administration group. After the laptop is moved, Network Agent attempts to access the distribution points assigned to the Office 1 group, but those distribution points are unavailable. Then, Network Agent starts attempting to access the distribution points that have been assigned to the Root group for offices. Because remote offices are isolated from one another, attempts to access distribution points assigned to the Root group for offices administration group will only be successful when Network Agent attempts to access distribution points in the Office 2 group. That is, the laptop will remain in the administration group that corresponds to the initial office, but the laptop will use the distribution point of the office where it is physically located at the moment.
Hierarchy of policies, using policy profiles
This section provides information about how to apply policies to devices in administration groups. This section also provides information about policy profiles supported in Kaspersky Security Center, starting from version 10 Service Pack 1.
Hierarchy of policies
In Kaspersky Security Center, you use policies for defining a single collection of settings to multiple devices. For example, the policy scope of application P defined for administration group G includes managed devices with application P installed that have been deployed in group G and all of its subgroups, except for subgroups where the Inherit from parent group check box is cleared in the properties.
A policy differs from any local setting by lock icons ( ) next to its settings. If a setting (or a group of settings) is locked in the policy properties, you must, first, use this setting (or group of settings) when creating effective settings and, second, you must write the settings or group of settings to the downstream policy.
Creation of the effective settings on a device can be described as follows: the values of all settings that have not been locked are taken from the policy, then they are overwritten with the values of local settings, and then the resulting collection is overwritten with the values of locked settings taken from the policy.
Policies of the same application affect each other through the hierarchy of administration groups: Locked settings from the upstream policy overwrite the same settings from the downstream policy.
There is a special policy for out-of-office users. This policy takes effect on a device when the device switches into out-of-office mode. Out-of-office policies do not affect other policies through the hierarchy of administration groups.
The out-of-office policy will not be supported in further versions of Kaspersky Security Center. Policy profiles will be used instead of out-of-office policies.
Page topPolicy profiles
Applying policies to devices only through the hierarchy of administration groups may be inconvenient in many circumstances. It may be necessary to create several instances of a single policy that differ in one or two settings for different administration groups, and synchronize the contents of those policies in the future.
To help you avoid such problems, Kaspersky Security Center, starting from version 10 Service Pack 1, supports policy profiles. A policy profile is a named subset of policy settings. This subset is distributed on target devices together with the policy, supplementing it under a specific condition called the profile activation condition. Profiles only contain settings that differ from the "basic" policy, which is active on the client device (computer or mobile device). Activation of a profile modifies the policy settings that were active on the device before the profile was activated. Those settings take values that have been specified in the profile.
The following restrictions are currently imposed on policy profiles:
- A policy can include a maximum 100 profiles.
- A policy profile cannot contain other profiles.
- A policy profile cannot contain notification settings.
Contents of a profile
A policy profile contains the following constituent parts:
- Name Profiles with identical names affect each other through the hierarchy of administration groups with common rules.
- Subset of policy settings. Unlike the policy, which contains all the settings, a profile only contains settings that are actually required (locked settings).
- Activation condition is a logical expression with the device properties. A profile is active (supplements the policy) only when the profile activation condition becomes true. In all other cases, the profile is inactive and ignored. The following device properties can be included in that logical expression:
- Status of out-of-office mode.
- Properties of network environment—Name of the active rule for Network Agent connection.
- Presence or absence of specified tags on the device.
- Device location in Active Directory unit: explicit (the device is right in the specified OU), or implicit (the device is in an OU, which is within the specified OU at any nesting level).
- Device's membership in an Active Directory security group (explicit or implicit).
- Device owner's membership in an Active Directory security group (explicit or implicit).
- Profile disabling check box. Disabled profiles are always ignored and their respective activation conditions are not verified.
- Profile priority. The activation conditions of different profiles are independent, so several profiles can be activated simultaneously. If active profiles contain non-overlapping collections of settings, no problems will arise. However, if two active profiles contain different values of the same setting, an ambiguity will occur. This ambiguity is to be avoided through profile priorities: The value of the ambiguous variable will be taken from the profile that has the higher priority (the one that is rated higher in the list of profiles).
Behavior of profiles when policies affect each other through the hierarchy
Profiles with the same name are merged according to the policy merge rules. Profiles of an upstream policy have a higher priority than profiles of a downstream policy. If editing settings is prohibited in the upstream policy (it is locked), the downstream policy uses the profile activation conditions from the upstream one. If editing settings is allowed in the upstream policy, the profile activation conditions from the downstream policy are used.
Since a policy profile may contain the Device is offline property in its activation condition, profiles completely replace the feature of policies for out-of-office users, which will no longer be supported.
A policy for out-of-office users may contain profiles, but its profiles can only be activated after the device switches into out-of-office mode.
Page topTasks
Kaspersky Security Center manages Kaspersky security applications installed on devices by creating and running tasks. Tasks are required for installing, launching, and stopping applications, scanning files, updating databases and software modules, and performing other actions on applications.
Tasks for a specific application can be created only if the management plug-in for that application is installed.
Tasks can be performed on the Administration Server and on devices.
The following tasks are performed on the Administration Server:
- Automatic distribution of reports
- Downloading of updates to the repository of the Administration Server
- Backup of Administration Server data
- Maintenance of the database
- Windows Update synchronization
- Creation of an installation package based on the operating system (OS) image of a reference device
The following types of tasks are performed on devices:
- Local tasks—Tasks that are performed on a specific device
Local tasks can be modified either by the administrator, by using Administration Console tools, or by the user of a remote device (for example, through the security application interface). If a local task has been modified simultaneously by the administrator and the user of a managed device, the changes made by the administrator will take effect because they have a higher priority.
- Group tasks—Tasks that are performed on all devices of a specific group
Unless otherwise specified in the task properties, a group task also affects all subgroups of the selected group. A group task also affects (optionally) devices that have been connected to secondary and virtual Administration Servers deployed in the group or any of its subgroups.
- Global tasks—Tasks that are performed on a set of devices, regardless of whether they are included in any group
For each application, you can create any number of group tasks, global tasks, or local tasks.
You can make changes to the settings of tasks, view the progress of tasks, and copy, export, import, and delete tasks.
A task is started on a device only if the application for which the task was created is running.
Results of tasks are saved in the Microsoft Windows event log and the Kaspersky Security Center event log, both centrally on the Administration Server and locally on each device.
Do not include private data in task settings. For example, avoid specifying the domain administrator password.
Device moving rules
We recommend that you automate the allocation of devices to administration groups on the virtual server that corresponds to an MSP client, using device moving rules. A device moving rule consists of three main parts: a name, an execution condition (logical expression with the device attributes), and a target administration group. A rule moves a device to the target administration group if the device attributes meet the rule execution condition.
All device moving rules have priorities. The Administration Server checks the device attributes as to whether they meet the execution condition of each rule, in ascending order of priority. If the device attributes meet the execution condition of a rule, the device is moved to the target group, so the rule processing is complete for this device. If the device attributes meet the conditions of multiple rules, the device is moved to the target group of the rule with the highest priority (that is, has the highest rank in the list of rules).
Device moving rules can be created implicitly. For example, in the properties of an installation package or a remote installation task, you can specify the administration group to which the device must be moved after Network Agent is installed on it. Also, device moving rules can be created explicitly by the administrator of Kaspersky Security Center, in the list of moving rules. The list is located in Administration Console, in the properties of the Unassigned devices group.
By default, a device moving rule is intended for one-time initial allocation of devices to administration groups. The rule moves devices from the Unassigned devices group only once. If a device once was moved by this rule, the rule will never move it again, even if you return the device to the Unassigned devices group manually. This is the recommended way of applying moving rules.
You can move devices that have already been allocated to some of the administration groups. To do this, in the properties of a rule, clear the Move only devices that do not belong to an administration group check box.
Applying moving rules to devices that have already been allocated to some of the administration groups, significantly increases the load on the Administration Server.
You can create a moving rule that would affect a single device repeatedly.
We strongly recommend that you avoid moving a single device from one group to another repeatedly (for example, in order to apply a special policy to that device, run a special group task, or update the device through a specific distribution point).
Such scenarios are not supported, because they increase the load on Administration Server and network traffic to an extreme degree. These scenarios also conflict with the operating principles of Kaspersky Security Center (particularly in the area of access rights, events, and reports). Another solution must be found, for example, through the use of policy profiles, tasks for device selections, assignment of Network Agents according to the standard scenario, and so on.
Page topSoftware categorization
The main tool for monitoring the running of applications are Kaspersky categories (hereinafter also referred to as KL categories). KL categories help Kaspersky Security Center administrators to simplify the support of software categorization and minimize traffic going to managed devices.
User categories must only be created for applications that cannot be classified in any of the existing KL categories (for example, for custom-made software). User categories are created on the basis of an application installation package (MSI) or a folder with installation packages.
If a large collection of software is available, which has not been categorized through KL categories, it may be useful to create an automatically updated category. The checksums of executable files will be automatically added to this category on every modification of the folder containing distribution packages.
Do not create automatically updated categories of software for the folders My Documents, %windir%, %ProgramFiles%, and %ProgramFiles(x86)%. The pool of files in these folders is subject to frequent changes, which leads to an increased load on Administration Server and increased network traffic. You must create a dedicated folder with the collection of software and periodically add new items to it.
Page topAbout multi-tenant applications
Kaspersky Security Center enables administrators of service providers and tenant administrators to use Kaspersky applications with multitenancy support. After a multi-tenant Kaspersky application is installed in the infrastructure of a service provider, tenants can start using the application.
To separate tasks and policies related to different tenants, you must create a dedicated virtual Administration Server in Kaspersky Security Center for each tenant. All tasks and policies for multi-tenant applications running for a tenant must be created for the Managed devices administration group of the virtual Administration Server corresponding to that tenant. The tasks created for the administration groups related to the primary Administration Server do not affect the devices of tenants.
Unlike service provider administrators, a tenant administrator can create and view tasks and application policies only for the devices of the corresponding tenant. The sets of tasks and policy settings available to service provider administrators and tenant administrators are different. Some of the tasks and policy settings are not available to tenant administrators.
Within a hierarchical structure of a tenant, the policies created for multi-tenant applications are inherited to lower-level administration groups as well as to upper-level administration groups: the policy is propagated to all client devices that belong to the tenant.
Backup and restoration of Administration Server settings
Backup of the settings of Administration Server and its database is performed through the backup task and klbackup utility. A backup copy includes all the main settings and objects pertaining to the Administration Server, such as certificates, primary keys for encryption of drives on managed devices, keys for various licenses, structure of administration groups with all of its contents, tasks, policies, etc. With a backup copy you can recover the operation of an Administration Server as soon as possible, spending from a dozen minutes to a couple of hours on this.
If no backup copy is available, a failure may lead to an irrevocable loss of certificates and all Administration Server settings. This will necessitate reconfiguring Kaspersky Security Center from scratch, and performing initial deployment of Network Agent on the organization's network again. All primary keys for encryption of drives on managed devices will also be lost, risking irrevocable loss of encrypted data on devices with Kaspersky Endpoint Security. Therefore, do not neglect regular backups of Administration Server using the standard backup task.
The Quick Start Wizard creates the backup task for Administration Server settings and sets it to run daily, at 4:00 AM. Backup copies are saved by default in the folder %ALLUSERSPROFILE%\Application Data\KasperskySC.
If an instance of Microsoft SQL Server installed on another device is used as the DBMS, you must modify the backup task by specifying a UNC path, which is available for write by both the Administration Server service and the SQL Server service, as the folder to store backup copies. This requirement, which is not obvious, derives from a special feature of backup in the Microsoft SQL Server DBMS.
If a local instance of Microsoft SQL Server is used as the DBMS, we also recommend to save backup copies on a dedicated medium in order to secure them against damage together with Administration Server.
Because a backup copy contains important data, the backup task and klbackup utility provide for password protection of backup copies. By default, the backup task is created with a blank password. You must set a password in the properties of the backup task. Neglecting this requirement causes a situation where all keys of Administration Server certificates, keys for licenses, and primary keys for encryption of drives on managed devices remain unencrypted.
In addition to the regular backup, you must also create a backup copy prior to every significant change, including installation of Administration Server upgrades and patches.
If you use Microsoft SQL Server as the DBMS, you can minimize the size of backup copies. To do this, enable the Compress backup option in the SQL Server settings.
Restoration from a backup copy is performed with the utility klbackup on an operable instance of Administration Server that has just been installed and has the same version (or later) for which the backup copy was created.
The instance of Administration Server on which the restoration is to be performed, must use a DBMS of the same type (for example, the same SQL Server or MariaDB) and the same or later version. The version of Administration Server can be the same (with an identical or later patch), or later.
This section describes standard scenarios for restoring settings and objects of Administration Server.
A device with Administration Server is inoperable
If a device with Administration Server is inoperable due to a failure, you are recommended to perform the following actions:
- The new Administration Server must be assigned the same address: NetBIOS name, FQDN, or static IP (depending on which of them was set when Network Agents were deployed).
- Install Administration Server, using a DBMS of the same type, of the same (or later) version. You can install the same version of Server with the same (or later) patch, or a later version. After installation, do not perform the initial setup through the Wizard.
- In the Start menu, run the klbackup utility and perform restoration.
The settings of Administration Server or the database are corrupted
If Administration Server is inoperable due to corrupted settings or database (e.g., after a power surge), you are recommended to use the following restoration scenario:
- Scan the file system on the damaged device.
- Uninstall the inoperable version of Administration Server.
- Reinstall Administration Server, using a DBMS of the same type and of the same (or later) version. You can install the same version of Server with the same (or later) patch, or a later version. After installation, do not perform the initial setup through the Wizard.
- In the Start menu, run the utility klbackup and perform restoration.
It is prohibited to restore Administration Server in any way other than through the klbackup utility.
Any attempts to restore Administration Server through third-party software will inevitably lead to desynchronization of data on nodes of the distributed application Kaspersky Security Center and, consequently, to improper functioning of the application.
Page topDeploying Network Agent and the security application
To manage devices in an organization, you have to install Network Agent on each of them. Deployment of distributed Kaspersky Security Center on corporate devices normally begins with installation of Network Agent on them.
In Microsoft Windows XP, Network Agent might not perform the following operations correctly: downloading updates directly from Kaspersky servers (as a distribution point); functioning as a KSN proxy server (as a distribution point); and detecting third-party vulnerabilities (if Vulnerability and Patch Management is used).
Initial deployment
If a Network Agent has already been installed on a device, remote installation of applications on that device is performed through this Network Agent. The distribution package of an application to be installed is transferred over communication channels between Network Agents and Administration Server, along with the installation settings defined by the administrator. To transfer the distribution package, you can use relay distribution nodes, that is, distribution points, multicast delivery, etc. For more details on how to install applications on managed devices with Network Agent already installed, see below in this section.
You can perform initial installation of Network Agent on devices running Windows, using one of the following methods:
- With third-party tools for remote installation of applications.
- With Windows group policies: using standard Windows management tools for group policies.
- In forced mode, using special options in the remote installation task of Kaspersky Security Center.
- By sending device users links to stand-alone packages generated by Kaspersky Security Center. Stand-alone packages are executable modules that contain the distribution packages of selected applications with their settings defined.
- Manually, by running application installers on devices.
On platforms other than Microsoft Windows, you have to perform initial installation of Network Agent on managed devices either through the existing third-party tools, or manually, by sending users an archive with a pre-configured distribution package. You can upgrade Network Agent to a new version or install other Kaspersky applications on non-Windows platforms, using Network Agents (already installed on devices) to perform remote installation tasks. In this case, installation is identical to that on devices running Microsoft Windows.
When selecting a method and a strategy for deployment of applications on a managed network, you must consider a number of factors (partial list):
- Configuration of the corporate network
- Total number of devices
- Presence of Windows domains on the managed network, possibility to modify Active Directory group policies in those domains
- Awareness of the user account(s) with local administrator rights on devices on which initial deployment of Kaspersky applications has been planned (i.e., availability of a domain user account with local administrator rights, or presence of unified local user accounts with administrator rights on those devices)
- Connection type and bandwidth of network channels between the Administration Server and MSP client networks, as well as the bandwidth of channels inside those networks
- Security settings applied on remote devices at the start of deployment (such as use of UAC and Simple File Sharing mode)
Configuring installers
Before starting deployment of Kaspersky applications on a network, you must specify the installation settings, that is, those defined during the application installation. When installing Network Agent, you should specify, at a minimum, an address for connection to the Administration Server and the proxy settings; some advanced settings may also be required. Depending on the installation method that you have selected, you can define settings in different ways. In the simplest case (manual interactive installation on a selected device), all relevant settings can be defined through the user interface of the Installer, so, in some cases, initial deployment can even be performed by sending users a link to the Network Agent distribution package together with the settings (Administration Server address, etc.) that the user must enter in the Installer interface.
This method is not recommended for use since it is inconvenient for users, entailing a high risk of errors when defining settings manually; it is also non-usable with non-interactive silent installation of applications on device groups. In general, the administrator must specify values for settings in centralized mode; those values can subsequently be used for creation of stand-alone packages. Stand-alone packages are self-extracting archives that contain distribution packages with settings defined by the administrator. Stand-alone packages can be located on resources that allow both downloading by end users (for example, on Kaspersky Security Center Web Server) and non-interactive installation on selected networked devices.
Page topInstallation packages
The first and main method of defining the installation settings of applications is all-purpose and thus suitable for all installation methods, both with Kaspersky Security Center tools, and with most third-party tools. This method consists of creating installation packages of applications in Kaspersky Security Center.
Installation packages are generated using the following methods:
- Automatically, from specified distribution packages, on the basis of included descriptors (files with the kud extension that contain rules for installation and results analysis, and other information)
- From the executable files of installers or from installers in Microsoft Windows Installer (MSI) format, for standard or supported applications
Generated installation packages are organized hierarchically as folders with subfolders and files. In addition to the original distribution package, an installation package contains editable settings (including the installer's settings and rules for processing such cases as necessity of restarting the operating system in order to complete installation), as well as minor auxiliary modules.
Values of installation settings that are specific for a selected application to be supported can be specified in the Administration Console user interface when creating an installation package (more settings can be found in the properties of an installation package that has already been created). When performing remote installation of applications through Kaspersky Security Center tools, installation packages are delivered to target devices so that running the installer of an application makes all administrator-defined settings available for it. When using third-party tools for installation of Kaspersky applications, you only have to ensure the availability of the entire installation package on the target device, that is, the availability of the distribution package and its settings. Installation packages are created and stored by Kaspersky Security Center in a dedicated subfolder of the shared data folder.
Do not specify any details of privileged accounts in the parameters of installation packages.
For instructions about using this configuration method for Kaspersky applications before deployment through third-party tools, see section "Deployment using group policies of Microsoft Windows."
Immediately after Kaspersky Security Center installation, a few installation packages are automatically generated; they are ready for installation and include Network Agent packages and security application packages for Microsoft Windows.
In some cases, using installation packages for deployment of applications on an MSP client network implies the need to create installation packages on virtual Servers that correspond to MSP clients. Creating installation packages on virtual Servers allows you to use different installation settings for different MSP clients. In the first instance, this is useful when handling Network Agent installation packages since Network Agents deployed on the networks of different MSP clients use different addresses to connect to the Administration Server. Actually, the connection address determines the Server to which Network Agent connects.
In addition to the possibility to create new installation packages immediately on a virtual Administration Server, the main operation mode for installation packages on virtual Administration Servers is the "distribution" of installation packages from the primary Administration Server to virtual ones. You can distribute selected (or all) installation packages to selected virtual Administration Servers (including all Servers within a selected administration group) using the corresponding Administration Server task. Also, you can select the list of installation packages of the primary Administration Server when creating a new virtual Administration Server. The packages that you have selected will be immediately distributed to a newly created virtual Administration Server.
When distributing an installation package, its contents are not copied entirely. The file repository on a virtual Administration Server, which corresponds to the installation package being distributed, only stores files of settings that are specific for that virtual Server. The main part of the installation package (including the distribution package of the application being installed) remains unchanged; it is stored only in the primary Administration Server repository. This allows you to increase the system performance dramatically and reduce the required disk volume. When handling installation packages distributed to virtual Administration Servers (i.e., when running remote installation tasks or creating stand-alone installation packages), the data from the original installation package of the primary Administration Server is "merged" with the settings files, which correspond to the distributed package on the virtual Administration Server.
Although the license key for an application can be set in the installation package properties, it is advisable to avoid this license distribution method because it is easy to accidentally obtain read access to files in the folder. You should use automatically distributed license keys or installation tasks for license keys.
Page topMSI properties and transform files
Another way of configuring installation on Windows platform is to define MSI properties and transform files. This method can be used when performing installation through third-party tools intended for installers in Microsoft Installer format, as well as when performing installation through Windows group policies using standard Microsoft tools or other third-party tools designed for handling Windows group policies.
Page topDeployment with third-party tools for remote installation of applications
When any tools for remote installation of applications (such as Microsoft System Center) are available in an organization, it is convenient to perform initial deployment by using those tools.
The following actions must be performed:
- Select the method for configuring installation that best suits the deployment tool to be used.
- Define the mechanism for synchronization between the modification of the settings of installation packages (through the Administration Console interface) and the operation of selected third-party tools used for deployment of applications from installation package data.
General information about the remote installation tasks in Kaspersky Security Center
Kaspersky Security Center provides a broad range of methods for remote installation of applications, which are implemented as remote installation tasks. You can create a remote installation task both for a specified administration group and for specific devices or a selection of devices (such tasks are displayed in Administration Console, in the Tasks folder). When creating a task, you can select installation packages (those of Network Agent and / or another application) to be installed within this task, as well as specify certain settings that define the method of remote installation.
Tasks for administration groups affect both devices included in a specified group and all devices in all subgroups within that administration group. A task covers devices of secondary Administration Servers included in a group or any of its subgroups if the corresponding setting is enabled in the task.
Tasks for specific devices refresh the list of client devices at each run in accordance with the selection contents at the moment the task starts. If a selection includes devices that have been connected to secondary Administration Servers, the task will run on those devices, too.
To ensure a successful operation of a remote installation task on devices connected to secondary Administration Servers, you must use the distribution task to distribute installation packages used by your task to corresponding secondary Administration Servers in advance.
Page topDeployment using group policies of Microsoft Windows
It is recommended that you perform the initial deployment of Network Agents through Microsoft Windows group policies if the following conditions are met:
- This device is member of an Active Directory domain.
- Access to the domain controller is granted with the administrator rights, which allow you to create and modify Active Directory group policies.
- Configured installation packages can be moved to the network hosting target managed devices (to a shared folder that is available for reading by all target devices).
- The deployment scheme allows you to wait for the next routine restart of target devices before starting deployment of Network Agents on them (or you can force a Windows group policy to be applied to those devices).
This deployment scheme consists of the following:
- The application distribution package in Microsoft Installer format (MSI package) is located in a shared folder (a folder where the LocalSystem accounts of target devices have read permissions).
- In the Active Directory group policy, an installation object is created for the distribution package.
- The installation scope is set by specifying the organizational unit (OU) and / or the security group, which includes the target devices.
- The next time a target device logs in to the domain (before device users log in to the system), all installed applications are checked for the presence of the required application. If the application is not found, the distribution package is downloaded from the resource specified in the policy and is then installed.
An advantage of this deployment scheme is that assigned applications are installed on target devices while the operating system is loading, that is, even before the user logs in to the system. Even if a user with sufficient rights removes the application, it will be reinstalled at the next launch of the operating system. This deployment scheme's shortcoming is that changes made by the administrator to the group policy will not take effect until the devices are restarted (if no additional tools are involved).
You can use group policies to install both Network Agent and other applications if their respective installers are in Windows Installer format.
Besides, when you select this deployment method, you have to assess the load on the file resource from which files will be copied to target devices after you apply the Windows group policy. You also have to choose the method of delivering the configured installation package to that resource, as well as the method of synchronizing the relevant changes in its settings.
Handling Microsoft Windows policies through the remote installation task of Kaspersky Security Center
This deployment method is only available if access to the controller of the domain, which contains the target devices, is possible from the Administration Server device, while the shared folder of the Administration Server (the one storing installation packages) is accessible for reading from target devices. Owing to the above reasons, this deployment method is not viewed as applicable to MSP.
Unassisted installation of applications through policies of Microsoft Windows
The administrator can create objects required for installation in a Windows group policy on his or her own behalf. In this case, you have to upload the packages to a stand-alone file server and provide a link to them.
The following installation scenarios are possible:
- The administrator creates an installation package and sets up its properties in Administration Console. Then the administrator copies the entire EXEC subfolder of this package from the shared folder of Kaspersky Security Center to a folder on a dedicated file resource of the organization. The group policy object provides a link to the MSI file of this package stored in a subfolder on the dedicated file resource of the organization.
- The administrator downloads the application distribution package (including that of Network Agent) from the internet and uploads it to the dedicated file resource of the organization. The group policy object provides a link to the MSI file of this package stored in a subfolder on the dedicated file resource of the organization. The installation settings are defined by configuring the MSI properties or by configuring MST transform files.
Forced deployment through the remote installation task of Kaspersky Security Center
To perform initial deployment of Network Agents or other applications, you can force installation of selected installation packages by using the remote installation task of Kaspersky Security Center—provided that each device has a user account(s) with local administrator rights and at least one device with Network Agent installed acts as a distribution point in each subnet.
In this case, you can specify target devices either explicitly (with a list), or by selecting the Kaspersky Security Center administration group to which they belong, or by creating a selection of devices based upon a specific criterion. The installation start time is defined by the task schedule. If the Run missed tasks setting is enabled in the task properties, the task can be run either immediately after target devices are turned on, or when they are moved to the target administration group.
Forced installation consists of delivery of installation packages to distribution points, subsequent copying of files to the admin$ resource on each of the target devices, and remote registration of supporting services on those devices. Delivery of installation packages to distribution points is performed through a Kaspersky Security Center feature that ensures network interaction. The following conditions must be met in this case:
- Target devices are accessible from the distribution point side.
- Name resolution for target devices function properly on the network.
- The administrative shares (admin$) remain enabled on target devices.
- The Server system service is running on target devices (by default, it is running).
- The following ports are open on target devices to allow remote access through Windows tools: TCP 139, TCP 445, UDP 137, and UDP 138.
- On target devices running Microsoft Windows XP, Simple File Sharing mode is disabled.
- On target devices, the access sharing and security model are set as Classic – local users authenticate as themselves, it can be in no way Guest only – local users authenticate as Guest.
- Target devices are members of the domain, or uniform accounts with administrator rights are created on target devices in advance.
Devices in workgroups can be adjusted in accordance with the above requirements by using the riprep.exe utility, which is described on Kaspersky Technical Support website.
During installation on new devices that have not yet been allocated to any of the Kaspersky Security Center administration groups, you can open the remote installation task properties and specify the administration group to which devices will be moved after Network Agent installation.
When creating a group task, keep in mind that each group task affects all devices in all nested groups within a selected group. Therefore, you must avoid duplicating installation tasks in subgroups.
Automatic installation is a simplified way to create tasks for forced installation of applications. To do this, open the administration group properties, open the list of installation packages and select the ones that must be installed on devices in this group. As a result, the selected installation packages will be automatically installed on all devices in this group and all of its subgroups. The time interval over which the packages will be installed depends on the network throughput and the total number of networked devices.
To allow forced installation, you should make sure that distribution points are present in each of the isolated subnets hosting target devices.
Note that this installation method places a significant load on devices acting as distribution points. Therefore, it is recommended that you select powerful devices with high-performance storage units as distribution points. Moreover, the free disk space in the partition with the %ALLUSERSPROFILE%\Application Data\KasperskyLab\adminkit folder must exceed, by many times, the total size of the distribution packages of installed applications.
Page topRunning stand-alone packages created by Kaspersky Security Center
The above-described methods of initial deployment of Network Agent and other applications cannot always be implemented because it is not possible to meet all of the applicable conditions. In such cases, you can create a common executable file called a stand-alone installation package through Kaspersky Security Center, using installation packages with the relevant installation settings that have been prepared by the administrator. A stand-alone installation package can be published either on an internal Web Server (included in Kaspersky Security Center) if this is deemed reasonable (outside access to that Web Server has been configured for target device users), or on an exclusively deployed Web Server included in Kaspersky Security Center 13.1 Web Console. You can also copy stand-alone packages to another Web Server.
You can use Kaspersky Security Center to send selected users an email message containing a link to the stand-alone package file on the currently used Web Server, prompting them to run the file (either in interactive mode, or with the "-s" key for silent installation). You can attach the stand-alone installation package to an email message and then send it to the users of devices that have no access to the Web Server. The administrator can also copy the stand-alone package to an external device, deliver it to a relevant device, and then run it later.
You can create a stand-alone package from a Network Agent package, a package of another application (for example, the security application), or both. If the stand-alone package has been created from Network Agent and another application, installation starts with Network Agent.
When creating a stand-alone package with Network Agent, you can specify the administration group to which new devices (those that have not been allocated to any of the administration groups) will be automatically moved when Network Agent installation completes on them.
Stand-alone packages can run in interactive mode (by default), displaying the result for installation of applications they contain, or they can run in silent mode (when run with the key "-s"). Silent mode can be used for installation from scripts, for example, from scripts configured to run after an operating system image is deployed. The result of installation in silent mode is determined by the return code of the process.
Page topOptions for manual installation of applications
Administrators or experienced users can install applications manually in interactive mode. They can use either original distribution packages or installation packages generated from them and stored in the shared folder of Kaspersky Security Center. By default, installers run in interactive mode and prompt users for all required values. However, when running the process setup.exe from the root of an installation package with the key "-s", the installer will be running in silent mode and with the settings that have been defined when configuring the installation package.
When running setup.exe from the root of an installation package, the package will first be copied to a temporary local folder, and then the application installer will be run from the local folder.
Page topRemote installation of applications on devices with Network Agent installed
If an operable Network Agent connected to the primary Administration Server (or to any of its secondary Servers) is installed on a device, you can upgrade Network Agent on this device, as well as install, upgrade, or remove any supported applications through Network Agent.
You can enable this option by selecting the Using Network Agent check box in the properties of the remote installation task.
If this check box is selected, installation packages with installation settings defined by the administrator will be transferred to target devices over communication channels between Network Agent and the Administration Server.
To optimize the load on the Administration Server and minimize traffic between the Administration Server and the devices, it is useful to assign distribution points on every remote network or in every broadcasting domain (see sections About distribution points and Building a structure of administration groups and assigning distribution points). In this case, installation packages and the installer settings are distributed from the Administration Server to target devices through distribution points.
Moreover, you can use distribution points for broadcasting (multicast) delivery of installation packages, which allows reducing network traffic significantly when deploying applications.
When transferring installation packages to target devices over communication channels between Network Agents and the Administration Server, all installation packages that have been prepared for transfer will also be cached in the %ALLUSERSPROFILE%\Application Data\KasperskyLab\adminkit\1093\.working\FTServer folder. When using multiple large installation packages of various types and involving a large number of distribution points, the size of this folder may increase dramatically.
Files cannot be deleted from the FTServer folder manually. When original installation packages are deleted, the corresponding data will be automatically deleted from the FTServer folder.
All data received on the distribution points side are saved to the %ALLUSERSPROFILE%\Application Data\KasperskyLab\adminkit\1103\$FTClTmp folder.
Files cannot be deleted from the $FTClTmp folder manually. As tasks using data from this folder complete, the contents of this folder will be deleted automatically.
Because installation packages are distributed over communication channels between Administration Server and Network Agents from an intermediate repository in a format optimized for network transfers, no changes are allowed in installation packages stored in the original folder of each installation package. Those changes will not be automatically registered by Administration Server. If you need to modify the files of installation packages manually (although you are recommended to avoid this scenario), you must edit any of the settings of an installation package in Administration Console. Editing the settings of an installation package in Administration Console causes Administration Server to update the package image in the cache that has been prepared for transfer to target devices.
Page topManaging device restarts in the remote installation task
Devices often need a restart to complete the remote installation of applications (particularly on Windows).
If you use the remote installation task of Kaspersky Security Center, in the Add Task Wizard or in the properties window of the task that has been created (Operating system restart section), you can select the action to perform when a restart is required:
- Do not restart the device. In this case, no automatic restart will be performed. To complete the installation, you must restart the device (for example, manually or through the device management task). Information about the required restart will be saved in the task results and in the device status. This option is suitable for installation tasks on servers and other devices where continuous operation is critical.
- Restart the device. In this case, the device is always restarted automatically if a restart is required for completion of the installation. This option is useful for installation tasks on devices that provide for regular pauses in their operation (shutdown or restart).
- Prompt user for action. In this case, the restart reminder is displayed on the screen of the client device, prompting the user to restart it manually. Some advanced settings can be defined for this option: text of the message for the user, the message display frequency, and the time interval after which a restart will be forced (without the user's confirmation). The Prompt user for action is the most suitable for workstations where users need a possibility of selecting the most convenient time for a restart.
Suitability of databases updating in an installation package of an anti-virus application
Before starting the protection deployment, you must keep in mind the possibility of updating anti-virus databases (including modules of automatic patches) shipped together with the distribution package of the security application. It is useful to update the databases in the installation package of the application before starting the deployment (for example, by using the corresponding command in the context menu of a selected installation package). This will reduce the number of restarts required for completion of protection deployment on target devices. If your remote installation involves installation packages that have been relayed to virtual Servers from the primary Administration Server, you only have to update databases in the original package on the primary Server. In this case, you do not have to update databases in relayed packages on virtual Servers.
Page topRemoving incompatible third-party security applications
Installation of Kaspersky security applications through Kaspersky Security Center may require removal of third-party software incompatible with the application being installed. There are two main ways of removing the third-party applications.
Automatic removal of incompatible applications by using the installer
When you run the installer, it shows a list of applications that are incompatible with a Kaspersky application:
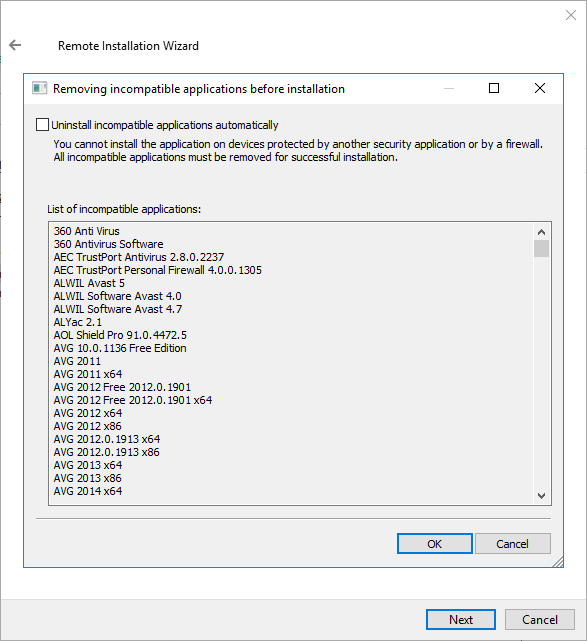
The list of incompatible applications that is displayed in the Remote Installation Wizard
Kaspersky Security Center detects incompatible software. Accordingly, you can select the Uninstall incompatible applications automatically check box to continue installation. If you clear this check box and do not uninstall the incompatible software, the error occurs and the Kaspersky application is not installed.
Automatic removal of incompatible applications is supported by various types of installation.
Removing incompatible applications through a dedicated task
To remove incompatible applications, use the Uninstall application remotely task. This task should be run on devices before the security application installation task. For example, in the installation task you can select On completing another task as the schedule type where the other task is Uninstall application remotely.
This method of uninstallation is useful when the security application installer cannot properly remove an incompatible application.
Page topUsing tools for remote installation of applications in Kaspersky Security Center for running relevant executable files on managed devices
Using the New Package Wizard, you can select any executable file and define the settings of the command line for it. For this you can add to the installation package either the selected file itself or the entire folder in which this file is stored. Then you must create the remote installation task and select the installation package that has been created.
While the task is running, the specified executable file with the defined settings of the command prompt will be run on target devices.
If you use installers in Microsoft Windows Installer (MSI) format, Kaspersky Security Center analyzes the installation results by means of standard tools.
If the Vulnerability and Patch Management license is available, Kaspersky Security Center (when creating an installation package for any supported application in the corporate environment) also uses rules for installation and analysis of installation results that are in its updatable database.
Otherwise, the default task for executable files waits for the completion of the running process, and of all its child processes. After completion of all of the running processes, the task will be completed successfully regardless of the return code of the initial process. To change such behavior of this task, before creating the task, you have to manually modify the .kpd files that were generated by Kaspersky Security Center in the folder of the newly created installation package and its subfolders.
For the task not to wait for the completion of the running process, set the value of the Wait setting to 0 in the [SetupProcessResult] section:
Example: [SetupProcessResult] Wait=0 |
For the task to wait only for the completion of the running process on Windows, not for the completion of all child processes, set the value of the WaitJob setting to 0 in the [SetupProcessResult], section, for example:
Example: [SetupProcessResult] WaitJob=0 |
For the task to complete successfully or return an error depending on the return code of the running process, list successful return codes in the [SetupProcessResult_SuccessCodes], section, for example:
Example: [SetupProcessResult_SuccessCodes] 0= 3010= |
In this case, any code other than those listed will result in an error returned.
To display a string with a comment on the successful completion of the task or an error in the task results, enter brief descriptions of errors corresponding to return codes of the process in the [SetupProcessResult_SuccessCodes] and [SetupProcessResult_ErrorCodes] sections, for example:
Example: [SetupProcessResult_SuccessCodes] 0= Installation completed successfully 3010=A restart is required to complete the installation [SetupProcessResult_ErrorCodes] 1602=Installation canceled by the user 1603=Fatal error during installation |
To use Kaspersky Security Center tools for managing the device restart (if a restart is required to complete an operation), list the return codes of the process that indicate that a restart must be performed, in the [SetupProcessResult_NeedReboot] section:
Example: [SetupProcessResult_NeedReboot] 3010= |
Monitoring the deployment
To monitor the Kaspersky Security Center deployment and make sure that a security application and Network Agent are installed on managed devices, you have to check the traffic light in the Deployment section. This traffic light is located in the workspace of the Administration Server node in the main window of Administration Console. The traffic light reflects the current deployment status. The number of devices with Network Agent and security applications installed is displayed next to the traffic light. When any installation tasks are running, you can monitor their progress here. If any installation errors occur, the number of errors is displayed here. You can view the details of any error by clicking the link.
You can also use the deployment schema in the workspace of the Managed devices folder on the Groups tab. The chart reflects the deployment process, showing the number of devices without Network Agent, with Network Agent, or with Network Agent and a security application.
For more details on the progress of the deployment (or the operation of a specific installation task) open the results window of the relevant remote installation task: Right-click the task and select Results in the context menu. The window displays two lists: the upper one contains the task statuses on devices, while the lower one contains task events on the device that is currently selected in the upper list.
Information about deployment errors are added to the Kaspersky Event Log on Administration Server. Information about errors is also available in the corresponding selection of events in the Reports and notifications folder, the Events subfolder.
Page topConfiguring installers
This section provides information about the files of Kaspersky Security Center installers and the installation settings, as well as recommendations on how to install Administration Server and Network Agent in silent mode.
General information
Installers of Kaspersky Security Center 13.1 components (Administration Server, Network Agent, and Administration Console) are built on Windows Installer technology. An MSI package is the core of an installer. This format of packaging allows using all of the advantages provided by Windows Installer: scalability, availability of a patching system, transformation system, centralized installation through third-party solutions, and transparent registration with the operating system.
Installation in silent mode (with a response file)
The installers of Administration Server and Network Agent have the feature of working with the response file (ss_install.xml), where the parameters for installation in silent mode without user participation are integrated. The ss_install.xml file is located in the same folder as the MSI package; it is used automatically during installation in silent mode. You can enable the silent installation mode with the command line key "/s".
An overview of an example run follows:
setup.exe /s |
Before you start the installer in silent mode, read the End User License Agreement (EULA). If the Kaspersky Security Center distribution kit does not include a TXT file with the text of the EULA, you can download the file from the Kaspersky website.
The ss_install.xml file is an instance of the internal format of parameters of the Kaspersky Security Center installer. Distribution packages contain the ss_install.xml file with the default parameters.
Please do not modify ss_install.xml manually. This file can be modified through the tools of Kaspersky Security Center when editing the parameters of installation packages in Administration Console.
To modify the response file for Administration Server installation:
- Open the Kaspersky Security Center distribution package. If you use a full package EXE file, then unpack it.
- Form the Server folder, open the command line, and then run the following command:
setup.exe /r ss_install.xml
The Kaspersky Security Center installer starts.
- Follow the Wizard's steps to configure the Kaspersky Security Center installation.
When you complete the Wizard, the response file is automatically modified according to the new settings that you specified.
Installation of Network Agent in silent mode (without a response file)
You can install Network Agent with a single .msi package, specifying the values of MSI properties in the standard way. This scenario allows Network Agent to be installed by using group policies. To avoid conflicts between parameters defined through MSI properties and parameters defined in the response file, you can disable the response file by setting the property DONT_USE_ANSWER_FILE=1. An example of a run of the Network Agent installer with an .msi package is as follows.
Installation of Network Agent in non-interactive mode requires acceptance of the terms of the End User License Agreement. Use the EULA=1 parameter only if you have fully read, understand and accept the terms of the End User License Agreement.
Example:
|
You can also define the installation parameters for an .msi package by preparing the response file in advance (one with an .mst extension). This command appears as follows:
Example:
|
You can specify several response files in a single command.
Partial installation configuration through setup.exe
When running installation of applications through setup.exe, you can add the values of any properties of MSI to the MSI package.
This command appears as follows:
Example: /v"PROPERTY_NAME1=PROPERTY_VALUE1 PROPERTYNAME2=PROPERTYVALUE2" |
Administration Server installation parameters
The table below describes the MSI properties that you can configure when installing Administration Server. All of the parameters are optional, except for EULA and PRIVACYPOLICY.
Parameters of Administration Server installation in non-interactive mode
MSI property |
Description |
Available values |
|---|---|---|
EULA |
Acceptance of the terms of the License Agreement (required) |
|
PRIVACYPOLICY |
Acceptance of the terms of the Privacy Policy (required) |
|
INSTALLATIONMODETYPE |
Type of Administration Server installation |
|
INSTALLDIR |
Application installation folder |
String value. |
ADDLOCAL |
List of components to install (separated by commas) |
CSAdminKitServer, NAgent, CSAdminKitConsole, NSAC, MobileSupport, KSNProxy, SNMPAgent, GdiPlusRedist, Microsoft_VC90_CRT_x86, Microsoft_VC100_CRT_x86. Minimum list of components sufficient for proper Administration Server installation:
|
NETRANGETYPE |
Network size |
|
SRV_ACCOUNT_TYPE |
Way of specifying the user for the operation of the Administration Server service |
|
SERVERACCOUNTNAME |
User name for the service |
String value. |
SERVERACCOUNTPWD |
User password for the service |
String value. |
DBTYPE |
Database type |
|
MYSQLSERVERNAME |
Full name of MySQL or MariaDB server |
String value. |
MYSQLSERVERPORT |
Number of port for connection to MySQL or MariaDB server |
Numerical value. |
MYSQLDBNAME |
Name of MySQL or MariaDB server database |
String value. |
MYSQLACCOUNTNAME |
User name for connection to MySQL or MariaDB server database |
String value. |
MYSQLACCOUNTPWD |
User password for connection to MySQL or MariaDB server database |
String value. |
MSSQLCONNECTIONTYPE |
Type of use of MSSQL database |
|
MSSQLSERVERNAME |
Full name of SQL Server instance |
String value. |
MSSQLDBNAME |
Name of SQL Server database |
String value. |
MSSQLAUTHTYPE |
Method of authentication for connection to SQL Server |
|
MSSQLACCOUNTNAME |
User name for connection to SQL Server in SQLServer mode |
String value. |
MSSQLACCOUNTPWD |
User password for connection to SQL Server in SQLServer mode |
String value. |
CREATE_SHARE_TYPE |
Method of specifying the shared folder |
|
EXISTSHAREFOLDERNAME |
Full path to an existing shared folder |
String value. |
SERVERPORT |
Port number to connect to Administration Server |
Numerical value. |
SERVERSSLPORT |
Number of port for establishing SSL connection to Administration Server |
Numerical value. |
SERVERADDRESS |
Administration Server address |
String value. |
SERVERCERT2048BITS |
Size of the key for the Administration Server certificate (bits) |
|
MOBILESERVERADDRESS |
Address of the Administration Server for connection of mobile devices; ignored if the MobileSupport component has not been selected |
String value. |
Network Agent installation parameters
The table below describes the MSI properties that you can configure when installing Network Agent. All of the parameters are optional, except for EULA and SERVERADDRESS.
Parameters of Network Agent installation in non-interactive mode
MSI property |
Description |
Available values |
|---|---|---|
EULA |
Acceptance of the terms of the License Agreement |
|
DONT_USE_ANSWER_FILE |
Read installation settings from response file |
|
INSTALLDIR |
Path to the Network Agent installation folder |
String value. |
SERVERADDRESS |
Administration Server address (required) |
String value. |
SERVERPORT |
Number of port for connection to Administration Server |
Numerical value. |
SERVERSSLPORT |
Number of the port for encrypted connection to Administration Server by using SSL protocol |
Numerical value. |
USESSL |
Whether to use SSL connection |
|
OPENUDPPORT |
Whether to open a UDP port |
|
UDPPORT |
UDP port number |
Numerical value. |
USEPROXY |
Whether to use a proxy server |
|
PROXYLOCATION (PROXYADDRESS:PROXYPORT)
|
Proxy address and number of port for connection to proxy server |
String value. |
PROXYLOGIN |
Account for connection to proxy server |
String value. |
PROXYPASSWORD |
Password of account for connection to proxy server (Do not specify any details of privileged accounts in the parameters of installation packages.) |
String value. |
GATEWAYMODE |
Connection gateway use mode |
|
GATEWAYADDRESS |
Connection gateway address |
String value. |
CERTSELECTION |
Method of receiving a certificate |
|
CERTFILE |
Path to the certificate file |
String value. |
VMVDI |
Enable dynamic mode for Virtual Desktop Infrastructure (VDI) |
|
LAUNCHPROGRAM |
Whether to start the Network Agent service after installation |
|
NAGENTTAGS |
Tag for Network Agent (has priority over the tag given in the response file) |
String value. |
Virtual infrastructure
Kaspersky Security Center supports the use of virtual machines. You can install Network Agent and the security application on each virtual machine, and you can protect virtual machines at the hypervisor level. In the first case, you can use either a standard security application or Kaspersky Security for Virtualization Light Agent to protect your virtual machines. In the second case, you can use Kaspersky Security for Virtualization Agentless.
Kaspersky Security Center supports rollbacks of virtual machines to their previous state.
Tips on reducing the load on virtual machines
When installing Network Agent on a virtual machine, you are advised to consider disabling some Kaspersky Security Center features that seem to be of little use for virtual machines.
When installing Network Agent on a virtual machine or on a template intended for generation of virtual machines, we recommend the following actions:
- If you are running a remote installation, in the properties window of the Network Agent installation package, in the Advanced section, select the Optimize settings for VDI option.
- If you are running an interactive installation through a Wizard, in the Wizard window, select the Optimize the Network Agent settings for the virtual infrastructure option.
Selecting those options alters the settings of Network Agent so that the following features remain disabled by default (before a policy is applied):
- Retrieving information about software installed
- Retrieving information about hardware
- Retrieving information about vulnerabilities detected
- Retrieving information about updates required
Usually, those features are not necessary on virtual machines because they use uniform software and virtual hardware.
Disabling the features is invertible. If any of the disabled features is required, you can enable it through the policy of Network Agent, or through the local settings of Network Agent. The local settings of Network Agent are available through the context menu of the relevant device in Administration Console.
Support of dynamic virtual machines
Kaspersky Security Center supports dynamic virtual machines. If a virtual infrastructure has been deployed on the organization's network, dynamic (temporary) virtual machines can be used in certain cases. The dynamic VMs are created under unique names based on a template that has been prepared by the administrator. The user works on a VM for a while and then, after being turned off, this virtual machine will be removed from the virtual infrastructure. If Kaspersky Security Center has been deployed on the organization's network, a virtual machine with installed Network Agent will be added to the Administration Server database. After you turn off a virtual machine, the corresponding entry must also be removed from the database of Administration Server.
To make functional the feature of automatic removal of entries on virtual machines, when installing Network Agent on a template for dynamic virtual machines, select the Enable dynamic mode for VDI option:
- For remote installation—In the properties window of the installation package of Network Agent (Advanced section)
- For interactive installation—In the Network Agent Installation Wizard
Avoid selecting the Enable dynamic mode for VDI option when installing Network Agent on physical devices.
If you want events from dynamic virtual machines to be stored on the Administration Server for a while after you remove those virtual machines, then, in the Administration Server properties window, in the Events repository section, select the Store events after devices are deleted option and specify the maximum storage term for events (in days).
Support of virtual machines copying
Copying a virtual machine with installed Network Agent or creating one from a template with installed Network Agent is identical to the deployment of Network Agents by capturing and copying a hard drive image. So, in general case, when copying virtual machines, you need to perform the same actions as when deploying Network Agent by copying a disk image.
However, the two cases described below showcase Network Agent, which detects the copying automatically. Owing to the above reasons, you do not have to perform the sophisticated operations described under "Deployment by capturing and copying the hard drive of a device":
- The Enable dynamic mode for VDI option was selected when Network Agent was installed—After each restart of the operating system, this virtual machine will be recognized as a new device, regardless of whether it has been copied or not.
- One of the following hypervisors is in use: VMware, HyperV, or Xen: Network Agent detects the copying of the virtual machine by the changed IDs of the virtual hardware.
Analysis of changes in virtual hardware is not absolutely reliable. Before applying this method widely, you must test it on a small pool of virtual machines for the version of the hypervisor currently used in your organization.
Support of file system rollback for devices with Network Agent
Kaspersky Security Center is a distributed application. Rolling back the file system to a previous state on a device with Network Agent installed will lead to data desynchronization and improper functioning of Kaspersky Security Center.
The file system (or a part of it) can be rolled back in the following cases:
- When copying an image of the hard drive.
- When restoring a state of the virtual machine by means of the virtual infrastructure.
- When restoring data from a backup copy or a recovery point.
Scenarios under which third-party software on devices with Network Agent installed affects the %ALLUSERSPROFILE%\Application Data\KasperskyLab\adminkit\ folder are only critical scenarios for Kaspersky Security Center. Therefore, you must always exclude this folder from the recovery procedure, if possible.
Because the workplace rules of some organizations provide for rollbacks of the file system on devices, support for the file system rollback on devices with Network Agent installed has been added to Kaspersky Security Center, starting with version 10 Maintenance Release 1 (Administration Server and Network Agents must be of version 10 Maintenance Release 1 or later). When detected, those devices are automatically reconnected to the Administration Server with full data cleansing and full synchronization.
By default, support of file system rollback detection is enabled in Kaspersky Security Center 13.1.
As much as possible, avoid rolling back the %ALLUSERSPROFILE%\Application Data\KasperskyLab\adminkit\ folder on devices with Network Agent installed, because full resynchronization of data requires a large amount of resources.
A rollback of the system state is absolutely not allowed on a device with Administration Server installed. Nor is a rollback of the database used by Administration Server.
You can restore a state of Administration Server from a backup copy only with the standard klbackup utility.
Page topAbout connection profiles for out-of-office users
Out-of-office users of laptops (hereinafter also referred to as "devices") may need to change the method of connecting to an Administration Server or switch between Administration Servers depending on the current location of the device on the enterprise network.
Connection profiles are supported only for devices running Windows.
Using different addresses of a single Administration Server
The following procedure is only applied to Kaspersky Security Center 10 Service Pack 1 and later.
Devices with Network Agent installed can connect to the Administration Server either from the organization's intranet or from the internet. This situation may require Network Agent to use different addresses for connection to Administration Server: the external Administration Server address for the Internet connection and the internal Administration Server address for the internal network connection.
To do this, you must add a profile (for connection to Administration Server from the Internet) to the Network Agent policy. Add the profile in the policy properties (Connectivity section, Connection profiles subsection). In the profile creation window, you must disable the Use to receive updates only option and select the Synchronize connection settings with the Administration Server settings specified in this profile option. If you use a connection gateway to access Administration Server (for example, in a Kaspersky Security Center configuration as that described in Internet access: Network Agent as connection gateway in DMZ), you must specify the address of the connection gateway in the corresponding field of the connection profile.
Switching between Administration Servers depending on the current network
The following procedure is only applied to Kaspersky Security Center 10 Service Pack 2 Maintenance Release 1 and any later versions.
If the organization has multiple offices with different Administration Servers and some of the devices with Network Agent installed move between them, you need Network Agent to connect to the Administration Server of the local network in the office where the device is currently located.
In this case, you must create a profile for connection to Administration Server in the properties of the policy of Network Agent for each of the offices, except for the home office where the original home Administration Server is located. You must specify the addresses of Administration Servers in connection profiles and enable or disable the Use to receive updates only option:
- Select the option if you need Network Agent to be synchronized with the home Administration Server, while using the local Server for downloading updates only.
- Disable this option if it is necessary for Network Agent to be managed completely by the local Administration Server.
After that, you must set up the conditions of switching to the newly created profiles: at least one condition for each of the offices, except for the home office. Every condition's purpose consists in detection of items that are specific for an office's network environment. If a condition is true, the corresponding profile gets activated. If none of the conditions is true, Network Agent switches to the home Administration Server.
Deploying the Mobile Device Management feature
This section provides information about initial deployment of the Mobile Device Management feature.
Connecting KES devices to the Administration Server
Depending on the method used for connection of devices to the Administration Server, two deployment schemes are possible for Kaspersky Device Management for iOS for KES devices:
- Scheme of deployment with direct connection of devices to the Administration Server
- Scheme of deployment involving Forefront Threat Management Gateway (TMG)
Direct connection of devices to the Administration Server
KES devices can connect directly to port 13292 of the Administration Server.
Depending on the method used for authentication, two options are possible for connection of KES devices to the Administration Server:
- Connecting devices with a user certificate
- Connecting devices without a user certificate
Connecting a device with a user certificate
When connecting a device with a user certificate, that device is associated with the user account to which the corresponding certificate has been assigned through Administration Server tools.
In this case, two-way SSL authentication (mutual authentication) will be used. Both the Administration Server and the device will be authenticated with certificates.
Connecting a device without a user certificate
When connecting a device without a user certificate, that device is associated with none of the user's accounts on the Administration Server. However, when the device receives any certificate, the device will be associated with the user to which the corresponding certificate has been assigned through Administration Server tools.
When connecting that device to the Administration Server, one-way SSL authentication will be applied, which means that only the Administration Server is authenticated with the certificate. After the device retrieves the user certificate, the type of authentication will change to two-way SSL authentication (2-way SSL authentication, mutual authentication).
Page topScheme for connecting KES devices to the Server involving Kerberos constrained delegation (KCD)
The scheme for connecting KES devices to the Administration Server involving Kerberos constrained delegation (KCD) provides for the following:
- Integration with Microsoft Forefront TMG.
- Use of Kerberos Constrained Delegation (hereinafter referred to as KCD) for authentication of mobile devices.
- Integration with Public Key Infrastructure (hereinafter referred to as PKI) for applying user certificates.
When using this connection scheme, please note the following:
- The type of connection of KES devices to TMG must be "two-way SSL authentication", that is, a device must connect to TMG through its proprietary user certificate. To do this, you need to integrate the user certificate into the installation package of Kaspersky Endpoint Security for Android, which has been installed on the device. This KES package must be created by the Administration Server specifically for this device (user).
- You must specify the special (customized) certificate instead of the default server certificate for the mobile protocol:
- In the Administration Server properties window, in the Settings section, select the Open port for mobile devices check box and select Add certificate in the drop-down list.
- In the window that opens, specify the same certificate that was set on TMG when the point of access to the mobile protocol was published on the Administration Server.
- User certificates for KES devices must be issued by the Certificate Authority (CA) of the domain. Keep in mind that if the domain includes multiple root CAs, user certificates must be issued by the CA, which has been set in the publication on TMG.
You can make sure the user certificate is in compliance with the above-described requirement, using one of the following methods:
- Specify the special user certificate in the New Installation Package Wizard and in the Certificate Installation Wizard.
- Integrate the Administration Server with the domain's PKI and define the corresponding setting in the rules for issuance of certificates:
- In the console tree, expand the Mobile Device Management folder and select the Certificates subfolder.
- In the workspace of the Certificates folder, click the Configure certificate issuance rules button to open the Certificate issuance rules window.
- In the Integration with PKI section, configure integration with the Public Key Infrastructure.
- In the Issuance of mobile certificates section, specify the source of certificates.
Below is an example of setup of Kerberos Constrained Delegation (KCD) with the following assumptions:
- Point of access to the mobile protocol on the Administration Server is set up on port 13292.
- The name of the device with TMG is tmg.mydom.local.
- The name of the device with Administration Server is ksc.mydom.local.
- Name of the external publishing of the point of access to the mobile protocol is kes4mob.mydom.global.
Domain account for Administration Server
You must create a domain account (for example, KSCMobileSrvcUsr) under which the Administration Server service will run. You can specify an account for the Administration Server service when installing the Administration Server or through the klsrvswch utility. The klsrvswch utility is located in the installation folder of Administration Server.
A domain account must be specified by the following reasons:
- The feature for management of KES devices is an integral part of Administration Server.
- To ensure a proper functioning of Kerberos Constrained Delegation (KCD), the receive side (i.e., the Administration Server) must run under a domain account.
Service Principal Name for http/kes4mob.mydom.local
In the domain, under the KSCMobileSrvcUsr account, add an SPN for publishing the mobile protocol service on port 13292 of the device with Administration Server. For the kes4mob.mydom.local device with Administration Server, this will appear as follows:
setspn -a http/kes4mob.mydom.local:13292 mydom\KSCMobileSrvcUsr
Configuring the domain properties of the device with TMG (tmg.mydom.local)
To delegate traffic, you must trust the device with TMG (tmg.mydom.local) to the service defined by the SPN (http/kes4mob.mydom.local:13292).
To trust the device with TMG to the service defined by the SPN (http/kes4mob.mydom.local:13292), the administrator must perform the following actions:
- In the Microsoft Management Console snap-in named "Active Directory Users and Computers", select the device with TMG installed (tmg.mydom.local).
- In the device properties, on the Delegation tab, set the Trust this computer for delegation to specified service only toggle to Use any authentication protocol.
- In the Services to which this account can present delegated credentials list, add the SPN http/kes4mob.mydom.local:13292.
Special (customized) certificate for the publishing (kes4mob.mydom.global)
To publish the mobile protocol of Administration Server, you must issue a special (customized) certificate for the FQDN kes4mob.mydom.global and specify it instead of the default server certificate in the settings of the mobile protocol of Administration Server in Administration Console. To do this, in the properties window of the Administration Server, in the Settings section select the Open port for mobile devices check box and then select Add certificate in the drop-down list.
Please note that the server certificate container (file with the p12 or pfx extension) must also contain a chain of root certificates (public keys).
Configuring publication on TMG
On TMG, for traffic that goes from the mobile device side to port 13292 of kes4mob.mydom.global, you have to configure KCD on the SPN (http/kes4mob.mydom.local:13292), using the server certificate issued for the FQND kes4mob.mydom.global. Please note that publishing and the published access point (port 13292 of the Administration Server) must share the same server certificate.
Using Google Firebase Cloud Messaging
To ensure timely responses of KES devices on Android to the administrator's commands, you must enable the use of Google Firebase Cloud Messaging (hereinafter referred to as FCM) in the Administration Server properties.
To enable the use of FCM:
- In Administration Console, select the Mobile Device Management node, and the Mobile devices folder.
- In the context menu of the Mobile devices folder, select Properties.
- In the folder properties, select the Google Firebase Cloud Messaging settings section.
- In the Sender ID and Server key fields, specify the FCM settings: SENDER_ID and API Key.
FCM service runs in the following address ranges:
- From the KES device's side, access is required to ports 443 (HTTPS), 5228 (HTTPS), 5229 (HTTPS), and 5230 (HTTPS) of the following addresses:
- google.com
- fcm.googleapis.com
- android.apis.google.com
- All of the IP addresses listed in Google's ASN of 15169
- From the Administration Server side, access is required to port 443 (HTTPS) of the following addresses:
- fcm.googleapis.com
- All of the IP addresses listed in Google's ASN of 15169
If the proxy server settings (Advanced / Configuring Internet access) have been specified in the Administration Server properties in Administration Console, they will be used for interaction with FCM.
Configuring FCM: retrieving SENDER_ID and API Key
To configure FCM, the administrator must perform the following actions:
- Register on Google portal.
- Go to Developers portal.
- Create a new project by clicking the Create Project button, specify the project's name, and specify the ID.
- Wait for the project to be created.
On the first page of the project, in the upper part of the page, the Project Number field shows the relevant SENDER_ID.
- Go to the APIs & auth / APIs section and enable Google Firebase Cloud Messaging for Android.
- Go to the APIs & auth / Credentials section and click the Create New Key button.
- Click the Server key button.
- Impose restrictions (if any), click the Create button.
- Retrieve the API Key from the properties of the newly created key (Server key field).
Integration with Public Key Infrastructure
Integration with Public Key Infrastructure (hereinafter referred to as PKI) is primarily intended for simplifying the issuance of domain user certificates by Administration Server.
The administrator can assign a domain certificate for a user in Administration Console. This can be done using one of the following methods:
- Assign the user a special (customized) certificate from a file in the New Device Connection Wizard or in the Certificate Installation Wizard.
- Perform integration with PKI and assign PKI to act as the source of certificates for a specific type of certificates or for all types of certificates.
The settings of integration with PKI are available in the workspace of the Mobile Device Management / Certificates folder by clicking the Integrate with public key infrastructure link.
General principle of integration with PKI for issuance of domain user certificates
In Administration Console, click the Integrate with public key infrastructure link in the workspace of the Mobile Device Management / Certificates folder to specify a domain account that will be used by Administration Server to issue domain user certificates through the domain's CA (hereinafter referred to as the account under which integration with PKI is performed).
Please note the following:
- The settings of integration with PKI provide you the possibility to specify the default template for all types of certificates. Note that the rules for issuance of certificates (available in the workspace of the Mobile Device Management / Certificates folder by clicking the Configure certificate issuance rules button) allow you to specify an individual template for every type of certificates.
- A special Enrollment Agent (EA) certificate must be installed on the device with Administration Server, in the certificates repository of the account under which integration with PKI is performed. The Enrollment Agent (EA) certificate is issued by the administrator of the domain's CA (Certificate Authority).
The account under which integration with PKI is performed must meet the following criteria:
- It is a domain user.
- It is a local administrator of the device with Administration Server from which integration with PKI is initiated.
- It has the right to Log On As Service.
- The device with Administration Server installed must be run at least once under this account to create a permanent user profile.
Kaspersky Security Center Web Server
Kaspersky Security Center Web Server (hereinafter referred to as Web Server) is a component of Kaspersky Security Center. Web Server is designed for publishing stand-alone installation packages, stand-alone installation packages for mobile devices, and files from the shared folder.
Installation packages that have been created are published on Web Server automatically and then removed after the first download. The administrator can send the new link to the user in any convenient way, such as by email.
By clicking the link, the user can download the required information to a mobile device.
Web Server settings
If fine-tuning of Web Server is required, its properties allow you to change ports for HTTP (8060) and HTTPS (8061). In addition to changing ports, you can replace the server certificate for HTTPS and change the FQDN of Web Server for HTTP.
Page topOther routine work
This section provides recommendations on routine work with Kaspersky Security Center.
Monitoring traffic lights and logged events in Administration Console
Administration Console allows you to quickly assess the current status of Kaspersky Security Center and managed devices by checking traffic lights. The traffic lights are shown in the workspace of the Administration Server node, on the Monitoring tab. The tab provides six information panels with traffic lights and logged events. A traffic light is a colored vertical bar on the left side of a panel. Each panel with a traffic light corresponds to a specific functional scope of Kaspersky Security Center (see the table below).
Scopes covered by traffic lights in Administration Console
Panel name |
Traffic light scope |
|---|---|
Deployment |
Installing Network Agent and security applications on devices on an organization's network |
Management scheme |
Structure of administration groups. Network scanning. Device moving rules |
Protection settings |
Security application functionality: protection status, virus scanning |
Update |
Updates and patches |
Monitoring |
Protection status |
Administration Server |
Administration Server features and properties |
Each traffic light can be any of these five colors (see the table below). The color of a traffic light depends on the current status of Kaspersky Security Center and on events that were logged.
Color codes of traffic lights
Status |
Traffic light color |
Traffic light color meaning |
|---|---|---|
Informational |
Green |
Administrator's intervention is not required. |
Warning |
Yellow |
Administrator's intervention is required. |
Critical |
Red |
Serious problems have been encountered. Administrator's intervention is required to solve them. |
Informational |
Light blue |
Events have been logged that are unrelated to potential or actual threats to the security of managed devices. |
Informational |
Gray |
The details of events are not available or have not yet been retrieved. |
The administrator's goal is to keep traffic lights on all of the information panels on the Monitoring tab green.
The information panels also show logged events that affect traffic lights and the status of Kaspersky Security Center (see the table below).
Name, description, and traffic light colors of logged events
Traffic light color |
Event type display name |
Event type |
Description |
|---|---|---|---|
Red |
License expired on %1 device(s) |
IDS_AK_STATUS_LIC_EXPAIRED |
Events of this type occur when the commercial license has expired. Once a day Kaspersky Security Center checks whether the license has expired on the devices. When the commercial license expires, Kaspersky Security Center provides only basic functionality. To continue using Kaspersky Security Center, renew your commercial license. |
Red |
Security application is not running on: %1 device(s) |
IDS_AK_STATUS_AV_NOT_RUNNING |
Events of this type occur when the security application installed on the device is not running. Make sure that Kaspersky Endpoint Security is running on the device. |
Red |
Protection is disabled on: %1 device(s) |
IDS_AK_STATUS_RTP_NOT_RUNNING |
Events of this type occur when the security application on the device has been disabled for longer than the specified time interval. Check the current status of real-time protection on the device and make sure that all the protection components that you need are enabled. |
Red |
A software vulnerability has been detected on devices |
IDS_AK_STATUS_VULNERABILITIES_FOUND |
Events of this type occur when the Find vulnerabilities and required updates task has detected vulnerabilities with the severity level specified in applications installed on the device. Check the list of available updates in the Software updates subfolder included in the Application management folder. This folder contains a list of updates for Microsoft applications and other software vendors products retrieved by Administration Server, which can be distributed to devices. After viewing information about available updates, install them on the device. |
Red |
Critical events have been registered on the Administration Server |
IDS_AK_STATUS_EVENTS_OCCURED |
Events of this type occur when Administration Server critical events are detected. Check the list of events stored on the Administration Server, and then fix the critical events one by one. |
Red |
Errors have been logged in events on the Administration Server |
IDS_AK_STATUS_ERROR_EVENTS_OCCURED |
Events of this type occur when unexpected errors are logged on the Administration Server side. Check the list of events stored on the Administration Server, and then fix the errors one by one. |
Red |
Lost connection to %1 device(s) |
IDS_AK_STATUS_ADM_LOST_CONTROL1 |
Events of this type occur when the connection between the Administration Server and the device is lost. View the list of disconnected devices and try to reconnect them. |
Red |
%1 device (s) have not connected to the Administration Server in a long time |
IDS_AK_STATUS_ADM_NOT_CONNECTED1 |
Events of this type occur when the device has not connected to the Administration Server within the specified time interval, because the device was turned off. Make sure that the device is turned on and that Network Agent is running. |
Red |
%1 device(s) have a status other than OK |
IDS_AK_STATUS_HOST_NOT_OK |
Events of this type occur when the OK status of the device connected to the Administration Server changes to Critical or Warning. You can troubleshoot the problem by using the Kaspersky Security Center remote diagnostics utility. |
Red |
Databases are outdated on: %1 device(s) |
IDS_AK_STATUS_UPD_HOSTS_NOT_UPDATED |
Events of this type occur when the anti-virus databases have not been updated on the device within the specified time interval. Follow the instructions to update Kaspersky databases. |
Red |
Device(s) where check for Windows Update updates has not been performed in a long time: %1 |
IDS_AK_STATUS_WUA_DATA_OBSOLETE |
Events of this type occur when the Perform Windows Update synchronization task has not been run within the specified time interval. Follow the instructions to synchronize updates from Windows Update with Administration Server. |
Red |
%n plug-in(s) for Kaspersky Security Center 13.1 must be installed |
IDS_AK_STATUS_PLUGINS_REQUIRED |
Events of this type occur when you need to install additional plug-ins for Kaspersky applications. Download and install the required management plug-ins for the Kaspersky application from the Kaspersky Technical Support webpage. |
Remote access to managed devices
This section provides information about remote access to managed devices.
Access to local tasks and statistics, "Do not disconnect from the Administration Server" check box
By default, Kaspersky Security Center does not feature continuous connectivity between managed devices and the Administration Server. Network Agents on managed devices periodically establish connections and synchronize with the Administration Server. The interval between those synchronization sessions (by default, it is 15 minutes) is defined in a policy of Network Agent. If an early synchronization is required (for example, to force the application of a policy), the Administration Server sends Network Agent a signed network packet to port UDP 15000. If no connection through UDP is possible between the Administration Server and a managed device for any reason, synchronization will run at the next regular connection of Network Agent to the Administration Server within the synchronization interval.
Some operations cannot be performed without an early connection between Network Agent and the Administration Server, such as running and stopping local tasks, receiving statistics for a managed application (security application or Network Agent), creating a tunnel, etc. To resolve this issue, in the properties of the managed device (General section), select the Do not disconnect from the Administration Server check box. If the managed device accesses the Administration Server through a distribution point running in gateway mode, not directly, this check box must be selected in the properties of the device, which acts as the distribution point and functions as the gateway. The maximum total number of devices with the Do not disconnect from the Administration Server check box selected is 300.
Page topAbout checking the time of connection between a device and the Administration Server
Upon shutting down a device, Network Agent notifies the Administration Server of this event. In Administration Console that device is displayed as shut down. However, Network Agent cannot notify Administration Server of all such events. The Administration Server, therefore, periodically analyzes the Connected to Administration Server attribute (the value of this attribute is displayed in Administration Console, in the device properties, in the General section) for each device and compares it against the synchronization interval from the current settings of Network Agent. If a device has not responded over more than three successive synchronization intervals, that device is marked as shut down.
Page topAbout forced synchronization
Although Kaspersky Security Center automatically synchronizes the status, settings, tasks, and policies for managed devices, in some cases the administrator needs to know exactly whether synchronization has already been performed for a specified device at the present moment.
In the context menu of managed devices in Administration Console, the All tasks menu item contains the Force synchronization command. When Kaspersky Security Center 13.1 executes this command, the Administration Server attempts to connect to the device. If this attempt is successful, forced synchronization will be performed. Otherwise, synchronization will be forced only after the next scheduled connection between Network Agent and the Administration Server.
About tunneling
Kaspersky Security Center allows tunneling TCP connections from Administration Console via the Administration Server and then via Network Agent to a specified port on a managed device. Tunneling is designed for connecting a client application on a device with Administration Console installed to a TCP port on a managed device—if no direct connection is possible between Administration Console and the target device.
For example, tunneling is used for connections to a remote desktop, both for connecting to an existing session, and for creating a new remote session.
Tunneling can also be enabled by using external tools. For example, the administrator can run the putty utility, the VNC client, and other tools in this way.
Page top