Contents
- Appendices
- Advanced features
- Kaspersky Security Center operation automation. klakaut utility
- Custom tools
- Network Agent disk cloning mode
- Preparing a reference device with Network Agent installed for creating an image of operating system
- Configuring receipt of messages from File Integrity Monitor
- Administration Server maintenance
- User notification method window
- General section
- Device selection window
- Define the name of the new object window
- Application categories section
- Features of using the management interface
- Reference information
- Searching and exporting data
- Settings of tasks
- Global list of subnets
- Usage of Network Agent for Windows, for macOS and for Linux: comparison
- Advanced features
Appendices
This section provides reference information and additional facts regarding the use of Kaspersky Security Center.
Advanced features
This section describes a range of additional options of Kaspersky Security Center designed for expanding the functionality of centralized management of applications on devices.
Kaspersky Security Center operation automation. klakaut utility
You can automate the Kaspersky Security Center operation using the klakaut utility. The klakaut utility and a Help system for it are located in the Kaspersky Security Center installation folder.
Page topCustom tools
Kaspersky Security Center allows you to create a list of custom tools (hereinafter also referred to simply as tools), that is, applications activated for a client device in Administration Console, through the Custom tools group of the context menu. Each tool in the list will be associated with a separate menu command, which Administration Console uses to start the application corresponding to that tool.
The applications starts on the administrator's workstation. The application can accept the attributes of a remote client device as command-line arguments (NetBIOS name, DNS name, or IP address). Connection to the remote device can be established through tunneling.
By default, the list of custom tools contains the following service programs for each client device:
- Remote diagnostics is a utility for remote diagnostics of Kaspersky Security Center.
- Remote Desktop is a standard Microsoft Windows component named Remote Desktop Connection.
- Computer Management is a standard Microsoft Windows component.
To add or remove custom tools, or to edit their settings,
In the context menu of the client device, select Custom tools → Configure custom tools.
The Custom tools window opens. In this window, you can add custom tools or edit their settings by using the Add and Modify buttons. To remove a custom tool, click the remove button with the red cross icon ( ).
).
Network Agent disk cloning mode
Cloning the hard drive of a reference device is a popular method of software installation on new devices. If Network Agent is running in standard mode on the hard drive of the reference device, the following problem arises:
After the reference disk image with Network Agent is deployed on new devices, they are displayed in Administration Console under a single icon. This problem arises because the cloning procedure causes new devices to keep identical internal data, which allows the Administration Server to associate a device with an icon in Administration Console.
The special Network Agent disk cloning mode allows you to avoid problems with an incorrect display of new devices in Administration Console after cloning. Use this mode when you deploy software (with Network Agent) on new devices by cloning the disk.
In disk cloning mode, Network Agent keeps running but does not connect to the Administration Server. When exiting the cloning mode, Network Agent deletes the internal data, which causes Administration Server to associate multiple devices with a single icon in Administration Console. Upon completing the cloning of the reference device image, new devices are displayed in Administration Console properly (under individual icons).
Network Agent disk cloning mode use scenario
- The administrator installs Network Agent on the reference device.
- The administrator checks the Network Agent connection to the Administration Server using the klnagchk utility.
- The administrator enables the Network Agent disk cloning mode.
- The administrator installs software and patches on the device, and restarts it as many times as needed.
- The administrator clones the hard drive of the reference device on any number of devices.
- Each cloned copy must meet the following conditions:
- The device name must be changed.
- The device must be restarted.
- The disk cloning mode must be disabled.
Enabling and disabling the disk cloning mode using the klmover utility
To enable or disable the Network Agent disk cloning mode:
- Run the klmover utility on the device with Network Agent installed that you have to clone.
The klmover utility is located in the Network Agent installation folder.
- To enable the disk cloning mode, enter the following command at the Windows command prompt:
klmover -cloningmode 1.Network Agent switches to disk cloning mode.
- To request the current status of the disk cloning mode, enter the following command at the command prompt:
klmover -cloningmode.The utility window shows whether the disk cloning mode is enabled or disabled.
- To disable the disk cloning mode, enter the following command in the utility command line:
klmover -cloningmode 0.
Preparing a reference device with Network Agent installed for creating an image of operating system
You may want to create an operating system image of a reference device with Network Agent installed and then to deploy the image on the networked devices. In this case, you create an operating system image of a reference device on which the Network Agent has not yet been started. If you start the Network Agent on a reference device before creating an operating system image, Administration Server's identification of devices deployed from an operating system image of the reference device will be problematic.
To prepare the reference device for creating an image of the operating system:
- Make sure that the Windows operating system is installed on the reference device and install the other software that you need on that device.
- On the reference device, in the Windows Network Connections settings, disconnect the reference device from the network where Kaspersky Security Center is installed.
- On the reference device, start the local installation of Network Agent by using the setup.exe file.
The Kaspersky Security Center Network Agent Setup Wizard starts. Follow the instructions of the Wizard.
- On the Administration Server page of the Wizard, specify the Administration Server IP address.
If you do not know the exact address of the Administration Server, enter localhost. You can change the IP address later by using the klmover utility with the
-addresskey. - On the Start application page of the Wizard, disable the Start application during installation option.
- When the Network Agent installation is complete, do not restart the device before creating an operating system image.
If you restart the device, you will have to repeat the whole process of preparing a reference device for creation of an operating system image.
- On the reference device, in the command line, start the sysprep utility and execute the following command:
sysprep.exe /generalize /oobe /shutdown.
The reference device is ready for creating an operating system image.
Configuring receipt of messages from File Integrity Monitor
Managed applications such as Kaspersky Security for Windows Server or Kaspersky Security for Virtualization Light Agent send messages from File Integrity Monitor to Kaspersky Security Center. Kaspersky Security Center also allows you to monitor any changes to critically important components of systems (such as web servers and ATMs) and promptly respond to breaches of the integrity of such systems. For these purposes, you can receive messages from the File Integrity Monitor component. The File Integrity Monitor component lets you monitor not only the file system of a device, but also its registry hives, firewall status, and the status of connected hardware.
You must configure Kaspersky Security Center to receive messages from the File Integrity Monitor component without using Kaspersky Security for Windows Server or Kaspersky Security for Virtualization Light Agent.
To configure receipt of messages from File Integrity Monitor:
- Open the system registry of the device on which Administration Server is installed (for example, locally, using the regedit command in the Start → Run menu).
- Go to the following hive:
- For 32-bit systems:
HKEY_LOCAL_MACHINE\SOFTWARE\KasperskyLab\Components\34\1093\1.0.0.0\ServerFlags
- For 64-bit systems:
HKEY_LOCAL_MACHINE\SOFTWARE\Wow6432Node\KasperskyLab\Components\34\1093\1.0.0.0\ServerFlags
- For 32-bit systems:
- Create keys:
- Create the key KLSRV_EVP_FIM_PERIOD_SEC to specify the time period for counting the number of processed events. Specify the following settings:
- Specify KLSRV_EVP_FIM_PERIOD_SEC as the key name.
- Specify DWORD as the key type.
- Specify a range of values for the time interval from 43 200 to 172 800 seconds. By default, the time interval is 86 400 seconds.
- Create the key KLSRV_EVP_FIM_LIMIT to limit the number of received events for the specified time interval. Specify the following settings:
- Specify KLSRV_EVP_FIM_LIMIT as the key name.
- Specify DWORD as the key type.
- Specify a range of values for received events from 2 000 to 50 000. The default number of events is 20 000.
- Create the key KLSRV_EVP_FIM_PERIOD_ACCURACY_SEC to count events with accuracy up to a specific time interval. Specify the following settings:
- Specify KLSRV_EVP_FIM_PERIOD_ACCURACY_SEC as the key name.
- Specify DWORD as the key type.
- Specify a range of values from 120 to 600 seconds. The default time interval is 300 seconds.
- Create the key KLSRV_EVP_FIM_OVERFLOW_LATENCY_SEC so that, after the specified amount of time, the application can check whether the number of events processed over the time interval is turning out to be less than the specified limit. This check is performed upon reaching the limit for receiving events. If this condition is met, the application resumes saving events to the database. Specify the following settings:
- Specify KLSRV_EVP_FIM_OVERFLOW_LATENCY_SEC as the key name.
- Specify DWORD as the key type.
- Specify a range of values from 600 to 3 600 seconds. The default time interval is 1 800 seconds.
If the keys are not created, the default values are used.
- Create the key KLSRV_EVP_FIM_PERIOD_SEC to specify the time period for counting the number of processed events. Specify the following settings:
- Restart the Administration Server service.
The limits on receiving events from the File Integrity Monitor component will be configured. You can view the results of the File Integrity Monitor component in the reports named Top 10 rules of File Integrity Monitor / System Integrity Monitoring that were triggered on devices most frequently and Top 10 devices with File Integrity Monitor / System Integrity Monitoring rules most frequently triggered.
Page topAdministration Server maintenance
The Administration Server maintenance allows you to reduce the database volume, and improve the performance and operation reliability of the application. We recommend that you maintain the Administration Server at least every week.
The Administration Server maintenance is performed using the dedicated task. The application performs the following actions when maintaining the Administration Server:
- Checks the database for errors.
- Re-organizes database indexes.
- Updates the database statistics.
- Shrinks the database (if necessary).
The Administration Server maintenance task supports MariaDB versions 10.3 and later. If you use MariaDB versions 10.2 or earlier, administrators have to maintain this DBMS on their own.
To create the Administration Server maintenance task:
- In the console tree, select the node of the Administration Server for which you want to create the Administration Server maintenance task.
- Select the Tasks folder.
- By clicking the New task button in the workspace of the Tasks folder.
The Add Task Wizard starts.
- In the Select the task type window of the Wizard, select Administration Server maintenance as the task type and click Next.
- If you have to shrink the Administration Server database during maintenance, in the Settings window of the Wizard, select the Shrink database check box.
- Follow the rest of the Wizard instructions.
The newly created task is displayed in the list of tasks in the workspace of the Tasks folder. Only one Administration Server maintenance task can be running for a single Administration Server. If an Administration Server maintenance task has already been created for an Administration Server, no new Administration Server maintenance task can be created.
Page topUser notification method window
In the User notification method window, you can configure the user notification about certificate installation on the mobile device:
- Show link in Wizard. If you select this option, a link to the installation package will be shown at the final step of the New Device Connection Wizard.
- Send link to user. If you select this option, you can specify the settings for notifying the user about connection of a device.
In the By email group of settings, you can configure user notification about installation of a new certificate on his or her mobile device using email messages. This notification method is only available if the SMTP Server is enabled.
In the By SMS group of settings, you can configure the user notification about installation of a certificate on his or her mobile device by using SMS. This notification method is only available if SMS notification is enabled.
Click the Edit message link in the By email and By SMS groups of settings to view and edit the notification message, if necessary.
General section
In this section, you can adjust the general profile settings for Exchange ActiveSync mobile devices:
Page topDevice selection window
Choose a selection from the Device selection list. The list contains the default selections and the selections created by the user.
You can view the details of device selections in the workspace of the Device selections section.
Page topDefine the name of the new object window
In the window, specify the name of the newly created object. A name cannot be more than 100 characters long and cannot include any special characters ("*<>?\:|).
Page topApplication categories section
In this section, you can configure the distribution of information about application categories on client devices.
Full data transmission (for Network Agents Service Pack 2 and earlier)
Transmission of modified data only (for Network Agents Service Pack 2 and later)
Features of using the management interface
This section describes actions that you can perform in the main window of Kaspersky Security Center.
Console tree
The console tree (see the figure below) is designed to display the hierarchy of Administration Servers on the corporate network, the structure of their administration groups, and other objects of the application, such as the Repositories or Application management folders. The name space of Kaspersky Security Center can contain several nodes including the names of servers corresponding to the installed Administration Servers included in the hierarchy.
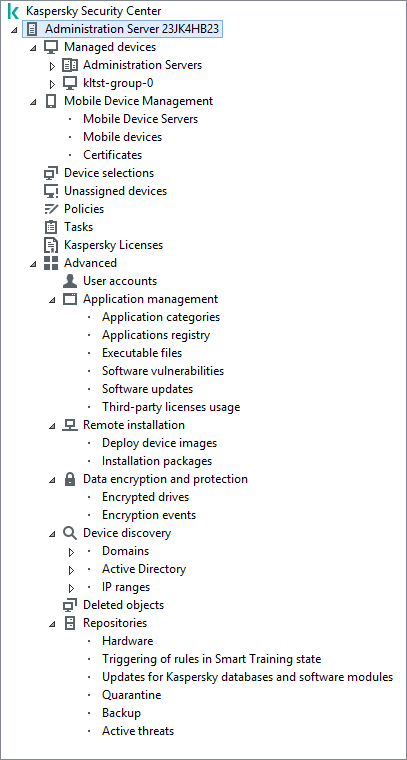
Console tree
Administration Server node
The Administration Server – <Device name> node is a container that shows the structural organization of the selected Administration Server.
The workspace of the Administration Server node contains summary information about the current status of the application and devices managed through the Administration Server. Information in the workspace is distributed between various tabs:
- Monitoring. Displays information about the application operation and the current status of client devices in real-time mode. Important messages for the administrator (such as messages on vulnerabilities, errors, or viruses detected) are highlighted in a specific color. You can use links on the Monitoring tab to perform the standard administrator tasks (for example, install and configure the security application on client devices), as well as to go to other folders in the console tree.
- Statistics. Contains a set of charts grouped by topics (protection status, Anti-Virus statistics, updates, etc.). These charts visualize current information about the application operation and the status of client devices.
- Reports. Contains templates for reports generated by the application. On this tab, you can create reports using preset templates, as well as create custom report templates.
- Events window. Contains records on events that have been registered during the application operation. Those records are distributed between topics for ease of reading and filtering. On this tab, you can view selections of events that have been generated automatically, as well as create custom selections.
Folders in the Administration Server node
The Administration Server – <Device name> node includes the following folders:
- Managed devices. This folder is intended for storage, display, configuration, and modification of the structure of administration groups, group policies, and group tasks.
- Mobile Device Management. This folder is intended for managing mobile devices. The Mobile Device Management folder contains the following subfolders:
- Mobile Device Servers. Intended for managing iOS MDM Servers and Microsoft Exchange Mobile Devices Servers.
- Mobile Devices. It is intended for managing mobile devices, KES, Exchange ActiveSync, and iOS MDM.
- Certificates. It is intended for managing certificates of mobile devices.
- Device selections. This folder is intended for quick selection of devices that meet specified criteria (a device selection) among all managed devices. For example, you can quickly select devices on which no security application is installed, and proceed to these devices (view the list). You can perform specific actions on these selected devices, for example, assign them some tasks. You can use preset selections or create your own custom selections.
- Unassigned devices. This folder contains a list of devices that have not been included in any of the administration groups. You can perform some actions on unassigned devices, for example, move them into administration groups or install applications on them.
- Policies. This folder is intended for viewing and creating policies.
- Tasks. This folder is intended for viewing and creating tasks.
- Kaspersky Licenses. Contains a list of license keys available for Kaspersky applications. In the workspace of this folder, you can add new license keys to the license key repository, deploy license keys to managed devices, and view the license key usage report.
- Advanced. This folder contains a set of subfolders that correspond to various groups of application features.
Advanced folder. Moving folders in the console tree
The Advanced folder includes the following subfolders:
- User accounts. Contains a list of network user accounts.
- Application management. Intended for managing applications installed on devices on the network. The Application management folder contains the following subfolders:
- Application categories. Intended for managing custom application categories.
- Applications registry. Contains a list of applications on devices with Network Agent installed.
- Executable files. Contains the list of executable files stored on client devices with Network Agent installed.
- Software vulnerabilities. Contains a list of vulnerabilities in applications on devices with Network Agent installed.
- Software updates. Contains a list of application updates received by Administration Server that can be distributed on devices.
- Third-party licenses usage. Contains a list of licensed applications groups. You can use licensed applications groups to monitor the usage of licenses for third-party software (non-Kaspersky applications) and possible violations of licensing restrictions.
- Remote installation. This folder is intended for managing remote installation of operating systems and applications. The Remote installation folder contains the following subfolders:
- Deploy device images. Intended for deploying images of operating systems on devices.
- Installation packages. Contains a list of installation packages that can be used for remote installation of applications on devices.
- Data encryption and protection. This folder is intended for managing the process of data encryption on hard drives and removable drives.
- Network poll. This folder displays the network in which Administration Server is installed. Administration Server receives information about the structure of the network and its devices, through regular polls of the Windows network, IP subnets, and Active Directory on the corporate network. Poll results are displayed in the workspaces of the corresponding folders: Domains, IP ranges, and Active Directory.
- Repositories. This folder is intended for operations with objects used to monitor the status of devices and perform maintenance. The Repositories folder contains the following subfolders:
- Adaptive anomaly detection. Contains a list of detects performed by the Kaspersky Endpoint Security rules working in the SMART Training mode on client devices.
- Kaspersky software updates and patches. Contains a list of updates received by Administration Server that can be distributed to devices.
- Hardware. Contains a list of hardware connected to the organization's network.
- Quarantine. Contains a list of objects moved to Quarantine by anti-virus applications on devices.
- Backup. Contains a list of backup copies of files that were deleted or modified during disinfection on devices.
- Unprocessed files. Contains a list of files assigned for later scanning by anti-virus applications.
You can change the set of subfolders included in the Advanced folder. Frequently used subfolders can be moved up one level from the Advanced folder. Subfolders that are used rarely can be moved to the Advanced folder.
To move a subfolder out of the Advanced folder:
- In the console tree, select the subfolder that you want to move out of the Advanced folder.
- In the context menu of the subfolder, select View → Move from Advanced folder.
You can also move a subfolder out of the Advanced folder in the workspace of the Advanced folder by clicking the Move from Advanced folder link in the section with the name of that subfolder.
To move a subfolder to the Advanced folder:
- In the console tree, select the subfolder that you need to move to the Advanced folder.
- In the context menu of the subfolder, select View → Move to Advanced folder.
How to update data in the workspace
In Kaspersky Security Center, the workspace data (such as device statuses, statistics, and reports) are never updated automatically.
To update data in the workspace:
- Press the F5 key.
- In the context menu of the object in the console tree, select Refresh.
- Click the refresh icon (
 ) in the workspace.
How to navigate the console tree
To navigate the console tree, you can use the following toolbar buttons:
 —One step back.
 —One step forward.
 —One level up.
You can also use a navigation chain located in the upper-right corner of the workspace. The navigation chain contains the full path to the folder of the console tree in which you are currently located. All elements of the chain, except for the last one, are links to the objects in the console tree.
Page topHow to open the object properties window in the workspace
You can change the properties of the most Administration Console objects in the object properties window.
To open the properties window of an object located in the workspace:
- From the context menu of the object, select Properties.
- Select an object and press ALT+ENTER.
How to select a group of objects in the workspace
You can select a group of objects in the workspace. You can select a group of objects, for example, to create a set of devices for which you may create tasks later.
To select an objects range:
- Select the first object in the range and press Shift.
- Hold down the Shift key and select the last object in the range.
The range will be selected.
To group separate objects:
- Select the first object in the group and press Ctrl.
- Hold down the Ctrl key and select other objects that you want to include in the group.
The objects will be grouped.
Page topHow to change the set of columns in the workspace
Administration Console allows you to change a set of columns displayed in the workspace.
To change a set of columns displayed in the workspace:
- In the console tree, click the object for which you wish to change the set of columns.
- In the workspace of the folder, open the window intended for configuration of the set of columns by clicking the Add/Remove columns link.
- In the Add/Remove columns window, specify the set of columns to be displayed.
Reference information
Tables of this section provide summary information about the context menu of Administration Console objects, as well as about the statuses of console tree objects and workspace objects.
Context menu commands
This section lists Administration Console objects and corresponding context menu items (see table below).
Items of the context menu of Administration Console objects
Object |
Menu item |
Menu item purpose |
|---|---|---|
General items of context menu |
Search |
Opens the devices search window. |
Refresh |
Refreshes the display of the selected object. |
|
Export list |
Exports the current list to a file. |
|
Properties |
Opens the properties window of the selected object. |
|
View → Add/Remove columns |
Adds or removes columns to/from the table of objects in the workspace. |
|
View → Large icons |
Shows objects in the workspace as large icons. |
|
View → Small icons |
Shows objects in the workspace as small icons. |
|
View → List |
Shows objects in the workspace as a list. |
|
View → Table |
Shows objects in the workspace as a table. |
|
View → Configure |
Configures the display of Administration Console elements. |
|
Kaspersky Security Center |
New → Administration Server |
Adds an Administration Server to the console tree. |
<Administration Server name> |
Connect to Administration Server |
Connects to the Administration Server. |
Disconnect from Administration Server |
Disconnects from the Administration Server. |
|
Managed devices |
Install application |
Starts the Application Remote Installation Wizard. |
View → Configure interface |
Configures the display of interface elements. |
|
Remove |
Removes the Administration Server from the console tree. |
|
Install application |
Starts the Remote Installation Wizard for the administration group. |
|
Reset Virus Counter |
Resets the virus counters for devices included in the administration group. |
|
View report on threats |
Creates a report on threats and virus activity on devices included in the administration group. |
|
New → Group |
Creates an administration group. |
|
All Tasks → New group structure |
Creates a structure of administration groups based on the structure of domains or Active Directory. |
|
All Tasks → Show Message |
Starts the New Message for User Wizard intended for the users of devices included in the administration group. |
|
Managed devices → Administration Servers |
New → Secondary Administration Server |
Starts the Add Secondary Administration Server Wizard. |
New → Virtual Administration Server |
Starts the New Virtual Administration Server Wizard. |
|
Mobile Device Management → Mobile devices |
New → Mobile device |
Connects a new mobile device of the user. |
Mobile Device Management → Certificates |
New → Certificate |
Creates a certificate. |
Create → Mobile device |
Connects a new mobile device of the user. |
|
Device selections |
New → New selection |
Creates a device selection. |
All Tasks → Import |
Imports a selection from a file. |
|
Kaspersky Licenses |
Add activation code or key file |
Adds a license key to the Administration Server repository. |
Activate Application |
Starts the Application Activation Task Creation Wizard. |
|
Report on usage of license keys |
Creates and shows a report on license keys on client devices. |
|
Application management → Application categories |
New → Category |
Creates an application category. |
Application management → Applications registry |
Filter |
Sets up a filter for the list of applications. |
Monitored Applications |
Configures the publishing of events related to installation of applications. |
|
Remove applications that are not installed |
Clears the list of all details of applications that are no longer installed on networked devices. |
|
Application management → Software updates |
Accept License Agreements for updates |
Accepts the License Agreements of software updates. |
Application management → Third-party licenses usage |
New → Licensed applications group |
Creates a licensed applications group. |
Remote installation → Installation packages |
Show current application versions |
Shows the list of up-to-date versions of Kaspersky applications available on web servers. |
New → Installation package |
Creates an installation package. |
|
All Tasks → Update databases |
Updates application databases in installation packages. |
|
All Tasks → Show the general list of stand-alone packages |
Shows the list of stand-alone packages created for installation packages. |
|
Device discovery → Domains |
All Tasks → Device Activity |
Sets up the Administration Server's response to inactivity of networked devices. |
Device discovery → IP ranges |
New → IP range |
Creates an IP range. |
Repositories → Updates for Kaspersky databases and software modules |
Download updates |
Opens the properties window of the Download updates to the repository task of the Administration Server. |
Updates Download Settings |
Configures the Download updates to the repository task of the Administration Server. |
|
Report on usage of anti-virus databases |
Creates and shows a report on versions of databases. |
|
All Tasks → Clear updates repository |
Clears the repository of updates on the Administration Server. |
|
Repositories → Hardware |
New → Device |
Creates a new device. |
List of managed devices. Description of columns
The following table displays the names and respective descriptions of columns in the list of managed devices.
Descriptions of columns in the list of managed devices
Column name |
Value |
|---|---|
Name |
NetBIOS name of the client device. The descriptions of the icons of device names are given in the appendix. |
Operating system type |
Type of operating system installed on the client device. |
Windows domain |
Name of the Windows domain in which the client device is located. |
Network Agent is installed |
Result of Network Agent installation on the client device (Yes, No, Unknown). |
Network Agent is running |
The result of Network Agent operation (Yes, No, Unknown). |
Real-time protection |
Security application is installed (Yes, No, Unknown). |
Last connected to Administration Server |
Time period that has elapsed since the client device was connected to the Administration Server. |
Protection last updated |
The time period that has elapsed since the last update of managed devices. |
Status |
Current status of the client device (OK, Critical, or Warning). |
Status description |
Reasons for change of the client device status to Critical or Warning. The device status changes to Warning or Critical for the following reasons:
Managed Kaspersky applications on client devices can add status descriptions to the list. Kaspersky Security Center can receive the description of a client device status from managed Kaspersky applications installed on that device. If the status that has been assigned to the device by a managed application is other than that assigned by Kaspersky Security Center, Administration Console displays the status that is the most critical to the device security. For example, if a managed application has assigned the Critical status to the device while Kaspersky Security Center has assigned it the Warning status, Administration Console displays the Critical status for that device with the corresponding description provided by the managed application. |
Information last updated |
Time period that has elapsed since the client device was last synchronized successfully with the Administration Server (that is, since the last network scan). |
DNS name |
DNS domain name of the client device. |
DNS domain |
The main DNS suffix. |
IP address |
IP address of the client device. It is recommended to use the IPv4 address. |
Last visible |
Time period during which the client device has remained visible on the network. |
Last full scan |
Date and time of the last scan of the client device performed by the security application upon the user's request. |
Total number of threats detected |
Number of threats found. |
Real-time protection status |
Real-time protection status (Starting, Running, Running (maximum protection), Running (maximum speed), Running (recommended settings), Running (custom settings), Stopped, Paused, Failed). |
Connection IP address |
The IP address that is used for connection to Kaspersky Security Center Administration Server. |
Network Agent version |
Version of Network Agent. |
Application version |
Version of the security application installed on the client device. |
Anti-virus databases last updated |
The version of the anti-virus databases. |
System last started |
Date and time when the client device was last turned on. |
Restart is required |
Restart of the client device is required. |
Distribution point |
Name of the device that acts as distribution point for this client device. |
Description |
Description of the client device received after a network scan. |
Encryption status |
Data encryption status of the client device. |
WUA status |
Status of Windows Update Agent on the client device. Yes corresponds to client devices that receive updates through Windows Update from the Administration Server. No corresponds to client devices that receive updates through Windows Update from other sources. |
Operating system bit size |
Bit size of the operating system installed on the client device. |
Spam protection status |
Status of Spam protection component (Running, Starting, Stopped, Paused, Failed, No data from device) |
Data Leakage Prevention status |
Status of Data Leakage Prevention component (Running, Starting, Stopped, Paused, Failed, No data from device) |
Collaboration servers protection status |
Status of Content Filtering component (Running, Starting, Stopped, Paused, Failed, No data from device) |
Anti-virus protection status of mail servers |
Status of Mail Server anti-virus protection component (Running, Starting, Stopped, Paused, Failed, No data from device) |
Endpoint Sensor status |
Status of Endpoint Sensor component (Running, Starting, Stopped, Paused, Failed, No data from device) |
Created
|
Time when the <Device Name> icon was created. This attribute is used to compare various events with each other.
|
Name of virtual or secondary Administration Server
|
Name of virtual or secondary Administration Server. This column is only available in lists that contain devices from different Administration Servers. |
Parent group
|
Name of the administration group where the < Device Name> icon is located. This column is only available in lists that contain devices from different Administration Servers. |
Managed by a different Administration Server
|
The parameter can take one of these values:
|
Operating system build
|
The build number of the operating system. You can specify whether the selected operating system must have an equal, earlier, or later build number. You can also configure searching for all build numbers except the specified one.
|
Operating system release ID
|
The release identifier (ID) of the operating system. You can specify whether the selected operating system must have an equal, earlier, or later release ID. You can also configure searching for all release ID numbers except the specified one.
|
Statuses of devices, tasks, and policies
The table below contains a list of icons displayed in the console tree and in the Administration Console workspace, next to the names of devices, tasks, and policies. Those icons define the statuses of objects.
Statuses of devices, tasks, and policies
Icon |
Status |
|
Device with an operating system for workstations detected in the system but not yet included in any of the administration groups. |
|
Device with an operating system for workstations included in an administration group, with the OK status. |
|
Device with an operating system for workstations included in an administration group, with the Warning status. |
|
Device with an operating system for workstations included in an administration group, with the Critical status. |
|
Device with an operating system for workstations included in an administration group, which has lost connection with the Administration Server. |
|
Device with an operating system for servers detected in the system but not yet included in any of the administration groups. |
|
Device with an operating system for servers included in an administration group, with the OK status. |
|
Device with an operating system for servers included in an administration group, with the Warning status. |
|
Device with an operating system for servers included in an administration group, with the Critical status. |
|
Device with an operating system for servers included in an administration group, which has lost connection with the Administration Server. |
|
Mobile device detected on the network and included in none of the administration groups. |
|
Mobile device included in an administration group, with the OK status. |
|
Mobile device included in an administration group, with the Warning status. |
|
Mobile device included in an administration group, with the Critical status. |
|
Mobile device included in an administration group, having lost its connection with the Administration Server. |
|
UEFI protection device detected on the network but not included in any administration group. UEFI protection device is on the network. |
|
UEFI protection device detected on the network but not included in any administration group. UEFI protection device is not on the network. |
|
UEFI protection device included in an administration group, with OK status. UEFI protection device is on the network. |
|
UEFI protection device included in an administration group, with OK status. UEFI protection device is not on the network. |
|
UEFI protection device included in an administration group, with Warning status. UEFI protection device is on the network. |
|
UEFI protection device included in an administration group, with Warning status. UEFI protection device is not on the network. |
|
UEFI protection device included in an administration group, with Critical status. UEFI protection device is on the network. |
|
UEFI protection device included in an administration group, with Critical status. UEFI protection device is not on the network. |
|
Active policy. |
|
Inactive policy. |
|
Active policy inherited from a group that was created on the primary Administration Server. |
|
Active policy inherited from a top-level group. |
|
Task (group task, Administration Server task, or task for specific devices) with the Scheduled or Completed successfully status. |
|
Task (group task, Administration Server task, or task for specific devices) with the Running status. |
|
Task (group task, Administration Server task, or task for specific devices) with the Failed status. |
|
Task inherited from a group that was created on the primary Administration Server. |
|
Task inherited from a top-level group. |


File status icons in Administration Console
For ease of file management in Kaspersky Security Center Administration Console, icons are displayed next to the names of files (see table below). Icons indicate statuses assigned to files by managed Kaspersky applications on client devices. Icons are shown in the workspaces of the Quarantine, Backup, and Active threats folders.
Statuses are assigned to objects by Kaspersky Endpoint Security installed on the client device on which the object is located.
Correspondence between icons and file statuses
Icon |
Status |
|
File with the Infected status. |
|
File with the Warning or Probably infected status. |
|
File with the Added by user status. |
|
File with the False positive status. |
|
File with the Disinfected status. |
|
File with the Deleted status. |
|
File in the Quarantine folder with the Not infected, Password-protected or Must be sent to Kaspersky status. If there is no status description next to an icon, this means that the managed Kaspersky application on the client device has reported an unknown status to Kaspersky Security Center. |
|
File in the Backup folder with the Not infected, Password-protected or Must be sent to Kaspersky status. If there is no status description next to an icon, this means that the managed Kaspersky application on the client device has reported an unknown status to Kaspersky Security Center. |
|
File in the Active threats folder with Not infected, Password-protected or Must be sent to Kaspersky status. If there is no status description next to an icon, this means that the managed Kaspersky application on the client device has reported an unknown status to Kaspersky Security Center. |


Searching and exporting data
This section contains information about data search methods and about exporting data.
Finding devices
Kaspersky Security Center allows you to find devices on the basis of specified criteria. Search results can be saved to a text file.
The search feature allows you to find the following devices:
- Client devices in administration groups of an Administration Server and its secondary Servers.
- Unassigned devices managed by an Administration Server and its secondary Servers.
To find client devices included in an administration group:
- In the console tree, select an administration group folder.
- Select Search from the context menu of the administration group folder.
- On the tabs of the Search window, specify the criteria for the search of devices, and click the Find now button.
Devices that meet the specified search criteria are now displayed in a table in the lower part of the Search window.
To find unassigned devices:
- In the console tree, select the Unassigned devices folder.
- Select Search from the context menu of the Unassigned devices folder.
- On the tabs of the Search window, specify the criteria for the search of devices, and click the Find now button.
Devices that meet the specified search criteria are now displayed in a table in the lower part of the Search window.
To find devices regardless of whether they are included in an administration group:
- In the console tree, select the Administration Server node.
- In the context menu of the node, select Search.
- On the tabs of the Search window, specify the criteria for the search of devices, and click the Find now button.
Devices that meet the specified search criteria are now displayed in a table in the lower part of the Search window.
In the Search window you can also search for administration groups and secondary Administration Servers using a drop-down list in the top right corner of the window. Search functionality for administration groups and secondary Administration Servers is not available if you opened the Search window from the Unassigned devices folder.
To find devices, you can use regular expressions in the fields of the Search window.
Full text search in the Search window is available:
- On the Network tab, in the Description field
- On the Hardware tab, in the Device, Vendor, and Description fields
Device search settings
Below are descriptions of the settings used for searching managed devices. Search results are displayed in the lower part of the window.
Network
On the Network tab, you can specify the criteria that will be used to search for devices according to their network data:
- Device name or IP address
- Windows domain
- Administration group
- Description
- IP range
- Managed by a different Administration Server
Tags
On the Tags tab, you can configure a device search based on key words (tags) that were previously added to the descriptions of managed devices:
Active Directory
On the Active Directory tab, you can specify that devices should be searched for in the Active Directory organizational unit (OU) or group. You can also include devices from all child OUs of the specified Active Directory OU in the selection. To select devices, define the following settings:
- Device is in an Active Directory organizational unit
- Include child organizational units
- This device is a member of an Active Directory group
Network activity
On the Network activity tab, you can specify the criteria that will be used to search for devices according to their network activity:
- This device is a distribution point
- Do not disconnect from the Administration Server
- Connection profile switched
- Last connected to Administration Server
- New devices detected by network poll
- Device is visible
Application
On the Application tab, you can specify the criteria that will be used to search for devices according to the selected managed application:
- Application name
- Application version
- Critical update name
- Modules last updated
- Device is managed through Kaspersky Security Center 13.1
- Security application is installed
Operating system
On the Operating system tab, you can set up the following criteria to find devices by their operating system (OS) type:
- Operating system version
- Operating system bit size
- Operating system service pack version
- Operating system build
- Operating system release ID
Device status
On the Device status tab, you can specify criteria for searching devices based on the device status from the managed application:
- Device status
- Real-time protection status
- Device status description
- Device status defined by application
Protection components
On the Protection components tab, you can set up the criteria to search for client devices by their protection status.
Applications registry
On the Applications registry tab, you can configure the search for devices according to applications installed on them:
- Application name
- Application version
- Vendor
- Application status
- Find by update
- Incompatible security application name
- Application tag
Hierarchy of Administration Servers
On the Hierarchy of Administration Servers tab, check the Include data from secondary Administration Servers (down to level) box if you want the information stored on secondary Administration Servers to be considered while searching for devices, and in the entry field, you can specify the nesting level of secondary Administration Server from which information is considered while searching for devices. By default, this check box is cleared.
Virtual machines
On the Virtual machines tab, you can configure the search for devices according to whether these are virtual machines or part of virtual desktop infrastructure (VDI):
Hardware
On the Hardware tab, you can configure search for client devices according to their hardware:
- Device
- Vendor
- Description
- Inventory number
- CPU frequency, in MHz
- Virtual CPU cores
- Hard drive volume, in GB
- RAM size, in MB
Vulnerabilities and updates
On the Vulnerabilities and updates tab, you can set up the criterion to search for devices according to their Windows Update source:
Users
On the Users tab, you can set up the criteria to search for devices according to the accounts of users who have logged in to the operating system.
Status-affecting problems in managed applications
On the Status-affecting problems in managed applications tab, you can set up search for devices according to descriptions of their statuses provided by the managed application:
Statuses of components in managed applications
On the Statuses of components in managed applications tab, you can set up the criteria to search for devices according to the statuses of components in managed applications:
- Data Leakage Prevention status
- Collaboration servers protection status
- Anti-virus protection status of mail servers
- Endpoint Sensor status
Encryption
Cloud segments
On the Cloud segments tab, you can configure a search based on whether a device belongs to specific cloud segments:
Application components
This section contains the list of components of those applications that have corresponding management plug-ins installed in Administration Console.
In the Application components section, you can specify criteria for including devices in a selection according to the statuses and version numbers of the components that refer to the application that you select:
Using masks in string variables
Using masks for string variables is allowed. When creating masks, you can use the following regular expressions:
- Wildcard character (*)—Any string of 0 or more characters.
- Question mark (?)—Any single character.
- [<range>]—Any single character from a specified range or set.
For example: [0–9]—Any digit. [abcdef]—Any of the characters a, b, c, d, e, or f.
Using regular expressions in the search field
You can use the following regular expressions in the search field to search for specific words and characters:
- *. Replaces any sequence of characters. To search for such words as Server, Servers, or Server room, enter the
Server*expression in the search field. - ?. Replaces any single character. To search for such words as Word or Ward, enter the
W?rdexpression in the search field.Text in the search field cannot begin with a question mark (?).
- [<range>]. Replaces any single character from a specified range or set. To search for any numeral, enter the
[0-9]expression in the search field. To search for one of the characters—a, b, c, d, e, or f—enter the[abcdef]expression in the search field.
Use the following regular expressions in the search field to run a full-text search:
- Space. The result is all devices whose descriptions contain any of the listed words. For example, to search for a phrase that contains the word "Secondary" or "Virtual" (or both these words), enter the
Secondary Virtualexpression in the search field. - Plus sign (+), AND, or &&. When a plus sign precedes a word, all search results will contain this word. For example, to search for a phrase that contains both the word "Secondary" and the word "Virtual", you can enter any of the following expressions in the search field:
+Secondary+Virtual,Secondary AND Virtual,Secondary && Virtual. - OR or ||. When placed between two words, it indicates that one word or the other can be found in the text. To search for a phrase that contains either the word "Secondary" or the word "Virtual", you can enter any of the following expressions in the search field:
Secondary OR Virtual,Secondary || Virtual. - Minus sign (-). When a minus sign precedes a word, no search results will contain this word. To search for a phrase that must contain such word as Secondary and must not contain such word as Virtual, you must enter the
+Secondary-Virtualexpression in the search field. "<some text>". Text enclosed in quotation marks must be present in the text. To search for a phrase that contains such word combination as Secondary Server, you must enter the"Secondary Server"expression in the search field.
Full-text search is available in the following filtering blocks:
- In the event list filtering block, by the Event and Description columns.
- In the user account filtering block, by the Name column.
- In the applications registry filtering block, by the Name column, if the Show in list section has no grouping selected as the filtering criterion.
Exporting lists from dialog boxes
In dialog boxes of the application you can export lists of objects to text files.
Export of a list of objects is possible for dialog box sections that contain the Export to file button.
Page topGeneral task settings
This section contains the settings that you can view and configure for most of your tasks. The list of settings available depends on the task you are configuring.
Settings specified during task creation
You can specify the following settings when creating a task. Some of these settings can also be modified in the properties of the created task.
- Operating system restart settings:
- Task scheduling settings:
- Devices to which the task will be assigned:
- Account settings:
Settings specified after task creation
You can specify the following settings only after a task is created.
- Advanced scheduling settings:
- Notification settings:
- Security settings
- Task scope settings
Depending on how the task scope is determined, the following settings are present:
- Revision history
Download updates to the Administration Server repository task settings
Settings specified during task creation
You can specify the following settings when creating a task. Some of these settings can also be modified in the properties of the created task.
- Sources of updates
- Other settings:
Force update of secondary Administration Servers
Copy downloaded updates to additional folders
Do not force updating of devices and secondary Administration Servers unless copying is complete
Update Network Agent modules (for Network Agent versions earlier than 10 Service Pack 2)
Settings specified after task creation
You can specify the following settings only after a task is created.
- Settings section, Content of updates block:
- Update verification section:
Download updates to the repositories of distribution points task settings
Settings specified during task creation
You can specify the following settings when creating a task. Some of these settings can also be modified in the properties of the created task.
- Sources of updates
- Other settings → Folder for storing updates
Settings specified after task creation
You can specify the following setting in the Settings section, in the Content of updates block only after a task is created.
Find vulnerabilities and required updates task settings
Settings specified during task creation
You can specify the following settings when creating a task. Some of these settings can also be modified in the properties of the created task.
- Search for vulnerabilities and updates listed by Microsoft
- Search for third-party vulnerabilities and updates listed by Kaspersky
- Enable advanced diagnostics
Install required updates and fix vulnerabilities task settings
Settings specified during task creation
You can specify the following settings when creating a task. Some of these settings can also be modified in the properties of the created task.
- Specify rules for installing updates
- Start installation at device restart or shutdown
- Install required general system components
- Allow installation of new application versions during updates
- Download updates to the device without installing them
- Enable advanced diagnostics
Settings specified after task creation
You can specify the following settings only after a task is created.
- Updates to install
In the Updates to install section, you can view the list of updates that the task installs. Only updates that match the applied task settings are shown.
- Test installation of updates:
- Do not scan. Select this option if you do not want to perform a test installation of updates.
- Run scan on selected devices. Select this option if you want to test updates installation on selected devices. Click the Add button and select devices on which you need to perform test installation of updates.
- Run scan on devices in the specified group. Select this option if you want to test updates installation on a group of devices. In the Specify a test group field, specify a group of devices on which you want to perform a test installation.
- Run scan on specified percentage of devices. Select this option if you want to test updates installation on some portion of devices. In the Percentage of test devices out of all target devices field, specify the percentage of devices on which you want to perform a test installation of updates.
Global list of subnets
This section provides information about the global list of subnets that you can use in the rules.
To store the information about subnets of your network, you can set up a global list of subnets for each Administration Server you use. This list helps you match pairs {IP address, mask} and physical units such as branch offices. You can use subnets from this list in the networking rules and settings.
Adding subnets to the global list of subnets
You can add subnets with their descriptions to the global list of subnets.
To add a subnet to the global list of subnets:
- In the console tree, select the node of the Administration Server that you require.
- In the context menu of the Administration Server, select Properties.
- In the Properties window that opens, in the Sections pane select List of global subnets.
- Click the Add button.
The New subnet window opens.
- Fill in the following fields:
- Click OK.
The subnet appears in the list of subnets.
Page topViewing and modifying subnet properties in the global list of subnets
You can view and modify the properties of subnets in the global list of subnets.
To view or modify properties of a subnet in the global list of subnets:
- In the console tree, select the node of the Administration Server that you require.
- In the context menu of the Administration Server, select Properties.
- In the Properties window that opens, in the left Sections pane, select List of global subnets.
- In the list, select the subnet that you want.
- Click the Properties button.
The New subnet window opens.
- If necessary, change the settings of the subnet.
- Click OK.
If you have made changes, they will be stored.
Page topUsage of Network Agent for Windows, for macOS and for Linux: comparison
The Network Agent usage varies depending on the operating system of the device. The Network Agent policy and installation package settings also differ depending on the operating system. The table below compares Network Agent features and usage scenarios available for Windows, macOS, and Linux operating systems.
Network Agent feature comparison
Network Agent feature |
Windows |
macOS |
Linux |
|---|---|---|---|
Installation |
|||
|
|
|
|
|
|
|
|
|
|
|
|
|
|
|
|
Installing with third-party tools for remote installation of applications |
|
|
|
Installing manually, by running application installers on devices |
|
|
|
|
|
|
|
|
|
|
|
Manually connecting a client device to the Administration Server. klmover utility |
|
|
|
Automatic installing of updates and patches for Kaspersky Security Center components |
|
|
|
|
|
|
|
|
|
|
|
Distribution point |
|||
|
|
|
|
|
|
|
|
|
|
|
|
|
|
|
|
Push installation of applications on Windows devices |
|
Restricted: after the operating system type is defined on the networked devices through polling, Administration Server does not attempt to perform push installation on Windows devices by using non-Windows distribution points |
Restricted: after the operating system type is defined on the networked devices through polling, Administration Server does not attempt to perform push installation on Windows devices by using non-Windows distribution points |
|
(If one or more devices running Linux or macOS are within the scope of the Download updates to the repositories of distribution points task, the task completes with the Failed status, even if it has successfully completed on all Windows devices.) |
(If one or more devices running Linux or macOS are within the scope of the Download updates to the repositories of distribution points task, the task completes with the Failed status, even if it has successfully completed on all Windows devices.) |
|
|
|
|
|
|
|
|
|
Handling other applications |
|||
|
|
|
|
|
|
|
|
Configuring operating system updates in a Network Agent policy |
|
|
|
|
|
|
|
|
|
|
|
|
|
|
|
|
|
|
|
Installation of applications via stand-alone packages created by Kaspersky Security Center |
|
|
|
|
|
|
|
Virtual machines |
|||
|
|
|
|
Optimization settings for virtual desktop infrastructure (VDI) |
|
|
|
|
|
|
|
Other |
|||
Auditing actions on a remote client device by using Windows Desktop Sharing |
|
|
|
|
|
|
|
|
|
|
|
|
|
|
|
|
|
|
|
|
|
|
|
|
|
|
|
Checking the connection between a client device and the Administration Server. klnagchk utility |
|
|
|
|
|
|
|
Downloading a stand-alone installation package through the Migration Wizard |
|
|
|
Zeroconf polling |
|
|
|
